The cursed gold has been disturbed and terrible beasts are wandering the Lost Lands! Join Susan as she attempts to right the chaos and find her way back home. Our Lost Lands – The Golden Curse Walkthrough will help guide you on your journey. Our guide features all Figurine, Morphing Object, and Collection Item locations!
Contents
General Tips & Tricks
Whether you’re just getting started or simply need a refresher, this section covers all the basic tips and tricks you need to get started.
- There are three difficulties available when starting the game:
- Easy- Features a tutorial, locations with possible actions shown on the map, sparkles in active areas, sparkles over hidden object scenes, shown objectives, collectible and morphing object locations shown on the map, a fast hint recharge, and a fast skip recharge.
- Normal- Features all the same features as Easy mode, however hints and skips take twice as long to recharge.
- Hard- All of the above features are disabled. Hints take 1 minute to recharge and skips take 2 minutes to charge.
- You may also customize your refill rate for hints and skips regardless of difficulty chosen.
- The Journal keeps track of all important clues and pieces of story you uncover as you play through the game.
- The Map can be used to navigate your way through the game. The following legend applies:
- Circle- Unlocked location
- Circle with Footprints- Current location
- Green Circle- Activate location/Location with available actions
- Rose Icon- Location with Morphing Object
- Coin Icon- Location with Collection Item
- Numerous Extras are available in the Platinum Edition of the game. They include wallpapers, concept art, videos, music, mini-games, puzzles, achievements, a bonus game, and even a quiz.
- Hints are located in the bottom right corner of the screen. Use these when you’re unsure where to go or what to do next. During puzzles or mini-games, the Hint button is replaced with a Skip button.
- Morphing Objects are hidden throughout the game. Each Morphing Object is listed in the guide below and circled blue in the screenshots.
- Figurines are another type of collectible hidden throughout the game. These special items are circled in yellow in the guide below.
- Inventory Items or Collectibles are outlined in bold, with Locations listed in italics. Use this to help yourself navigate our guide faster!
Lost Lands – The Golden Curse Walkthrough
A deadly curse has been unleashed upon anyone greedy enough to touch the cursed gold! You play as Susan- a young woman who finds herself displaced in a land of Druids and fantastical creatures. Can you find your way back home?
Chapter 1: Druid Valley
A portal has been opened, and you’ll find yourself landing in a thicket of leaves. All of your belongings have been lost. It’s time to find out where you are!
Forest
- Clear away the brush and click on the Journal to obtain Collection Item 1/14.
- Take a closer look at the bridge on the right. Collect the Manuscript 1/28 (Druid Village), then collect the Hammer Head lying beneath.
- The Hammer Handle is lying at the base of the stone steps. Combine the Hammer Handle with the Hammer Head in your inventory to acquire the Hammer.
- Examine the portal toward the upper left. Collect the Map Fragment and the Xylophone Hammer 1/3 propped up at the base to add them to your inventory.
- Examine the right side of the stone staircase. Attempt to pick up your camera- but oh no! It’s fallen down to a location we can’t reach!
- Take a closer look at the banner hanging from the settlement wall up ahead. Click on the banner to remove it, then use the Hammer to remove the Nails and Planks. Within the wall alcove, click on the Knife and the Pick-axe Handle to add them to your inventory, too.
- Examine the bridge on the right again. Use the Planks, the Nails, and the Hammer to restore the bridge.
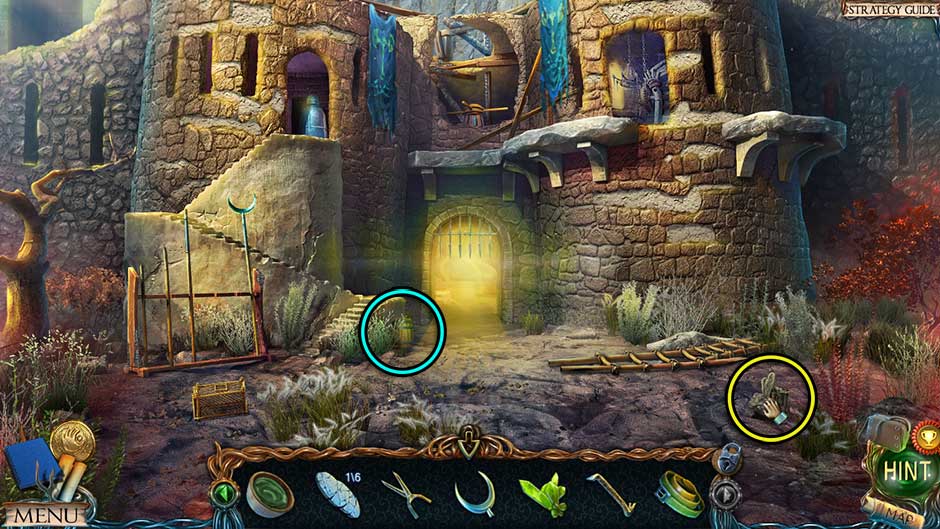
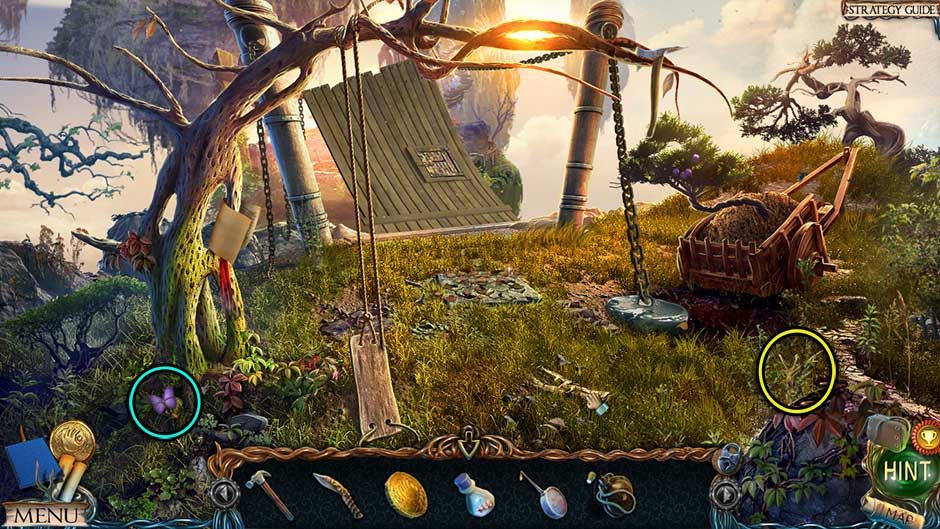
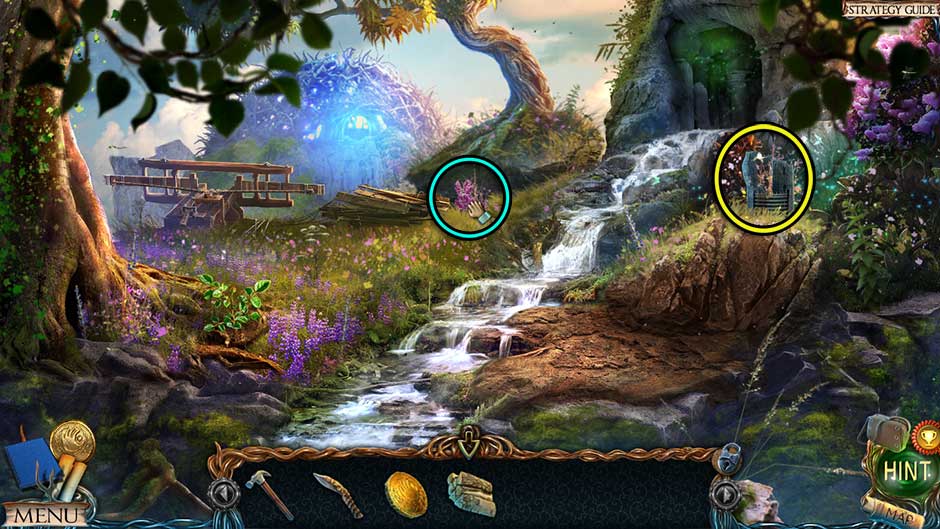
- Morphing Object 1/35 is located to the right of the closest stone step, on the way to the bridge.
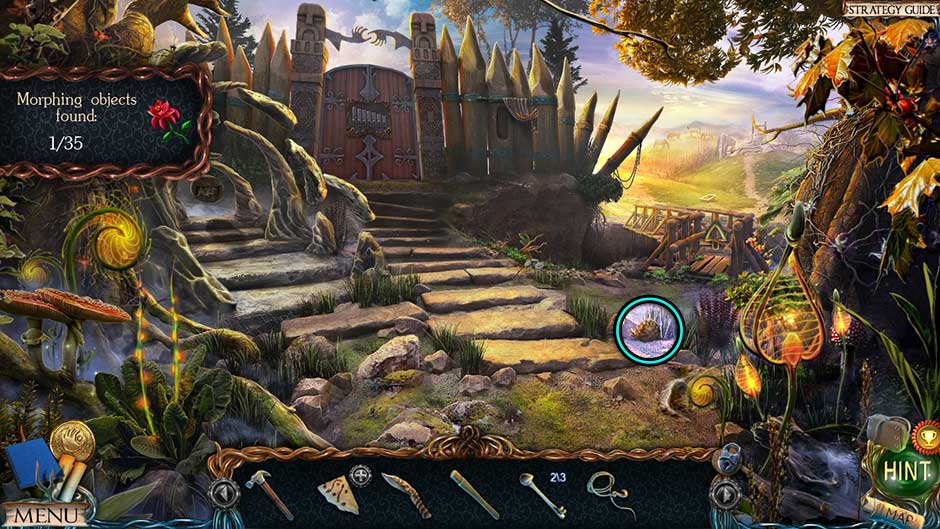
Lost Lands – The Golden Curse Forest Collectible Location
- Proceed right to the next location.
Hills
- Speak with the girl calling for help- she’s stuck in the well, and will need your help to escape.
- Examine the water trough. Collect the Manuscript 2/28 (Floating Islands), then the Xylophone Hammer 2/3 lying beneath.
- Take a closer look at the horse directly behind the trough in the distance. Use the Knife to cut the Rope with Hook free and add it to your inventory. Attach the Rope with Hook to the back of the horse’s saddle.
- Examine the well in the distance. Click on the rope with hook to attach it to the chain.
- Take a closer look at the horse again. Click on the horse to encourage it to move, pulling the girl up from the well.
- Speak with the girl. She introduces herself as Fiora. She will give you the Sheet Music.
- Examine the well again. Click on the drawing of Blossom to learn more about Fiora’s favorite doll, then collect the Xylophone Hammer 3/3 and the Half a Pair of Clippers on the edge of the well to add them to your inventory.
- Morphing Object 2/35 is located next to the boulder on the right.
- Figurine 1/24 is located to the right of the leftmost boulder.
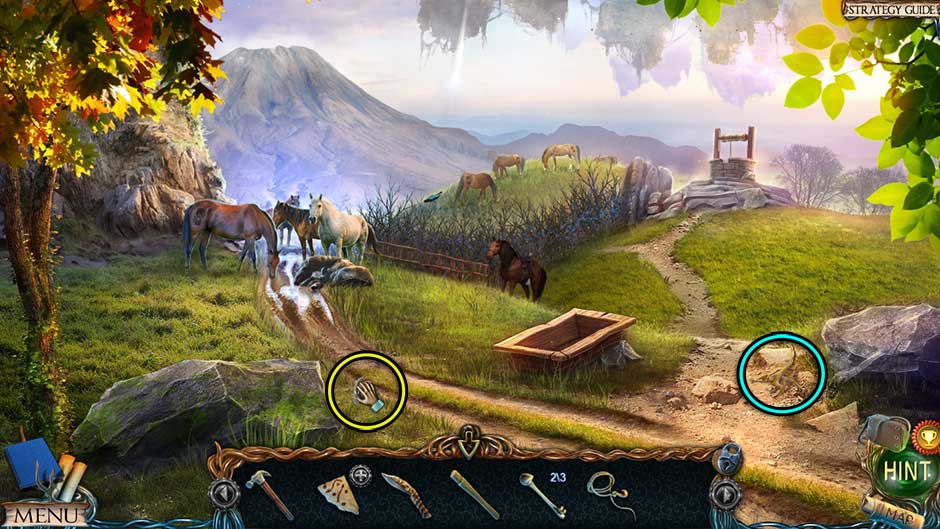
Lost Lands – The Golden Curse Hills Collectibles Locations
- Go back to the Forest.
Forest
- Take a closer look at the gate again. Use the Sheet Music and the Xylophone Hammer 3/3 on the closeup to trigger a puzzle.
- Play the melody by tapping the hammers in the correct order. The order is 7, 4, 2, 5, 1, 3, 6, 4. The solution, which is numbered according to which hammer you should click in successive order, is shown below.

Lost Lands – The Golden Curse Xylophone Puzzle Solution
- Proceed through the gate into the next area.
Druid Village
- Speak with the Elder to learn more about what’s going on.
- Figurine 2/24 is located in front of the stump on the left.
- Morphing Object 3/35 is located at the top of the highest window of the house on the left.
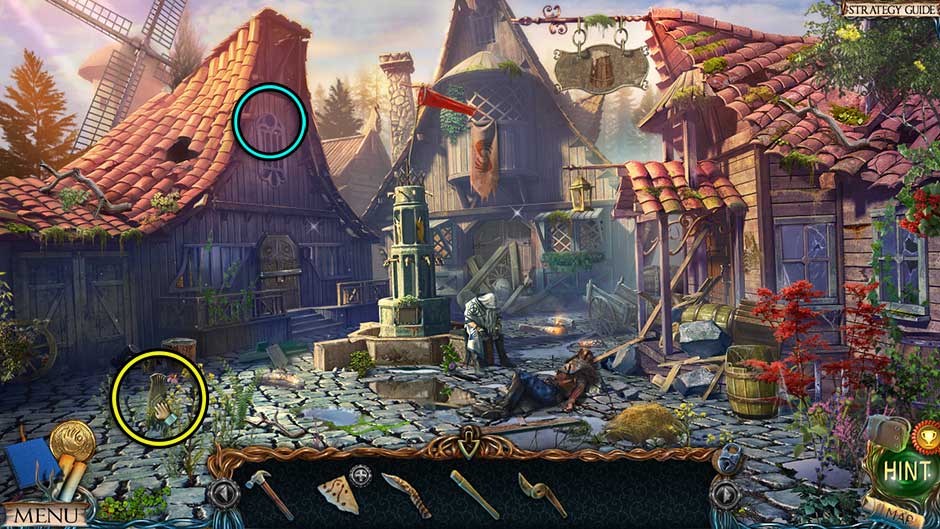
Lost Lands – The Golden Curse Druids Village Collectibles Locations
- Examine the fountain straight ahead. Click on the Map Fragment (2) to add it to your inventory.
- Take a closer look at the house on the right. Click on the tip of the Bloody Spear to add it to your inventory.
- Examine the stump on the left and collect the Half a Pair of Clippers (2) sitting on top. Place the nearby log on top of the stump before exiting the closeup.
- Take a closer look at the building straight ahead. Click to clear the debris, then collect the Manuscript 3/28 (Marron) and the Brackets.
- Examine the alcove at the base of the fountain. Use the Brackets here to trigger a puzzle.
- Move the brackets and drop the balls so that they land in each pipe at least once. The solutions are shown below. Upon completing the puzzle, water will flow from the fountain again.
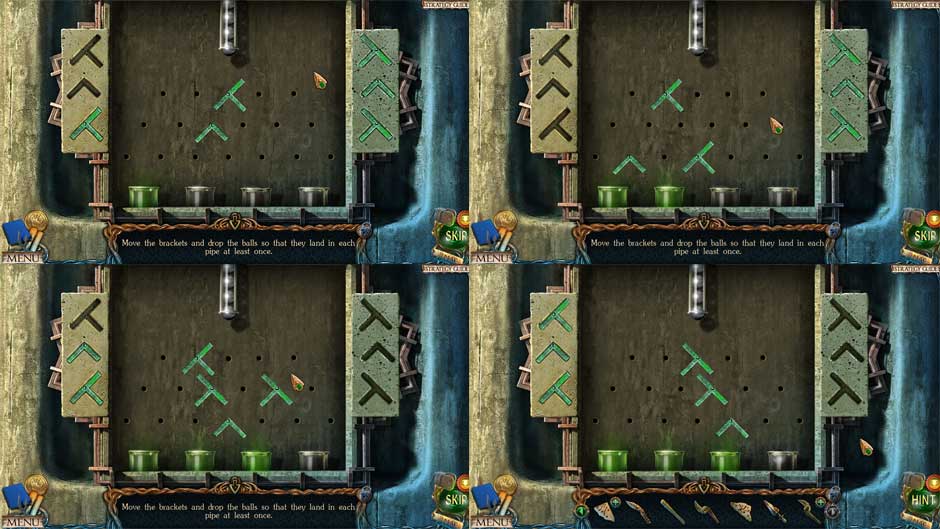
Lost Lands – The Golden Curse Fountain Bracket Puzzle Solution
- Combine the Half a Pair of Clippers x2 in your inventory with each other to acquire the Clippers.
- Return to the Hills.
Hills
- Take a closer look at the well again. Use the Clippers to cut the chain holding the Bucket and add it to your inventory.
- Go back to the Druid Village.
Druid Village
- Examine the fountain for a closer view. Use the Bucket on the water to obtain the Bucket of Water.
- Return to the Hills again.
Hills
- Take a closer look at the watering trough and pour the Bucket of Water The horses will move away from the path, allowing you to proceed forward to the next area.
Plains of the Dead
- Figurine 3/24 is located just beneath the tent on the left.
- Morphing Object 4/35 is propped up against the rocks in the background, just above the chariot wreckage.
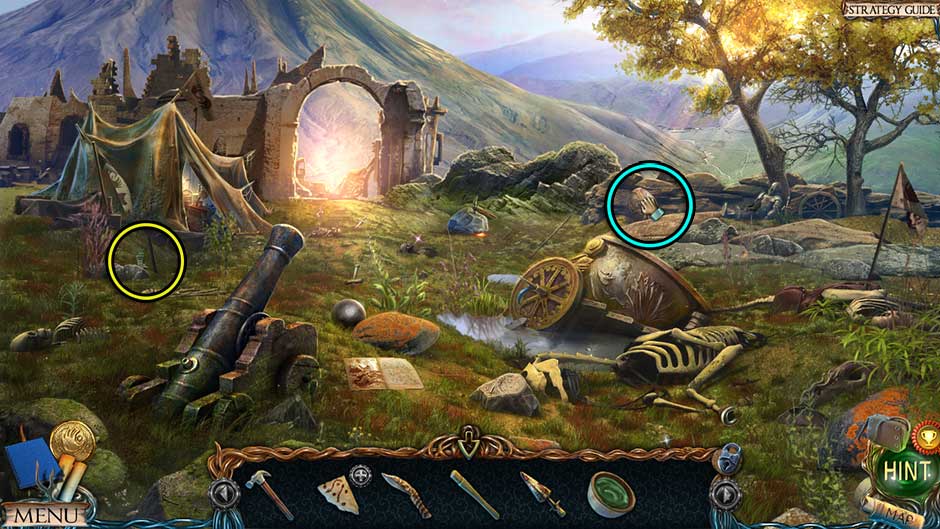
Lost Lands – The Golden Curse Plains of the Dead Collectibles Locations
- Click on the tent on the left to enter a hidden object area. Upon completing the area, the Ointment will be added to your inventory.
- Collect the Manuscript 4/28 (Plains of the Dead) and the Cannonball lying on the ground to the right of the cannon.
- Examine the wheel of the broken chariot. Click on the Stone Feathers 1/6 to add them to your inventory.
- Take a closer look at the stone with the pickax stuck in it straight ahead. Click on the handle, which will break off. Click on the Broken Pick-axe to add it to your inventory.
- In your inventory, select the Broken Pick-axe, then use the Hammer to drive out the broken handle remnants. Combine the head with the Pick-axe Handle, using the Hammer again to complete it. The newly completed Pick-axe will be added to your inventory.
- Proceed forward through the archway ahead.
Ancient Graveyard
- Figurine 4/24 is to the left and behind the base of the first statue on the left.
- Morphing Object 5/35 is located behind the first statue on the left.
- Pick up the Manuscript 5/28 (Mount Bashar) lying on the ground directly in front of you.
- Take a closer look at the dead flowers in front of the first statue on the left. Remove the dead rose bush. Pick up the Garden Shears to add them to your inventory.
- Click on the stone slab on the right to clear away the dirt blocking the inscription. Read the writing.
- Proceed forward through the Ancient Graveyard and to the next location.
Volcanic Cavern
- Figurine 5/24 is located just above the upper left corner of the stone archway.
- Morphing Object 6/35 is located next to Figurine 5 of 24, to the immediate left of the upper left corner of the stone archway.
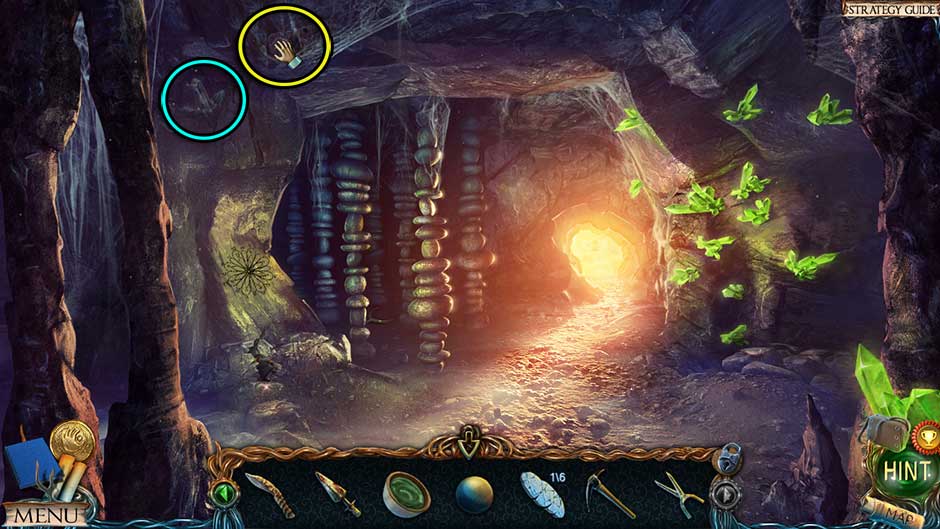
Lost Lands – The Golden Curse Volcanic Cavern Collectibles Locations
- Take a closer look at the columns of rocks ahead. Click on the Spear Head lying on the floor to add it to your inventory.
- Examine the crystals on the wall on the right. Use the Pick-axe to acquire the Volcanic Crystal.
- Pick up the Crowbar lying on the ground on the right.
- Proceed forward to the next area.
Volcanic Crater
- Morphing Object 7/35 is located next to the path on the right.
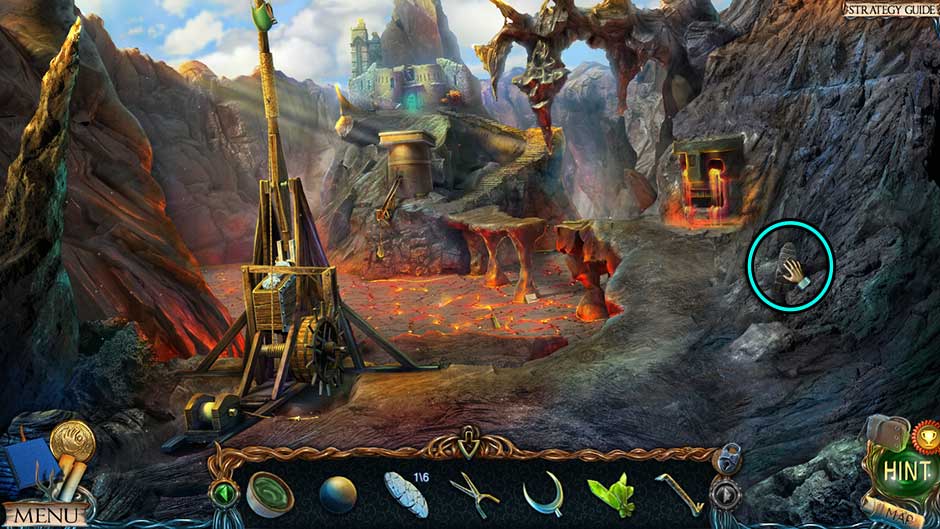
Lost Lands – The Golden Curse Volcanic Crater Collectible Location
- Examine the pathway straight ahead. Click on the Lever lying on the ground to add it to your inventory.
- Take a closer look at the trebuchet on the left. Use the Lever on the apparatus. Once out of the closeup, click on the wheel on the right side of the trebuchet to crank it back.
- Examine the trebuchet once again for a closer look. Take the Belt and place the Cannonball into the sling. Click on the lever to activate it.
- Take a closer look at the tower straight ahead in the distance. Click on the base to trigger a puzzle.
- Restore the damaged pattern. The solution is shown below.
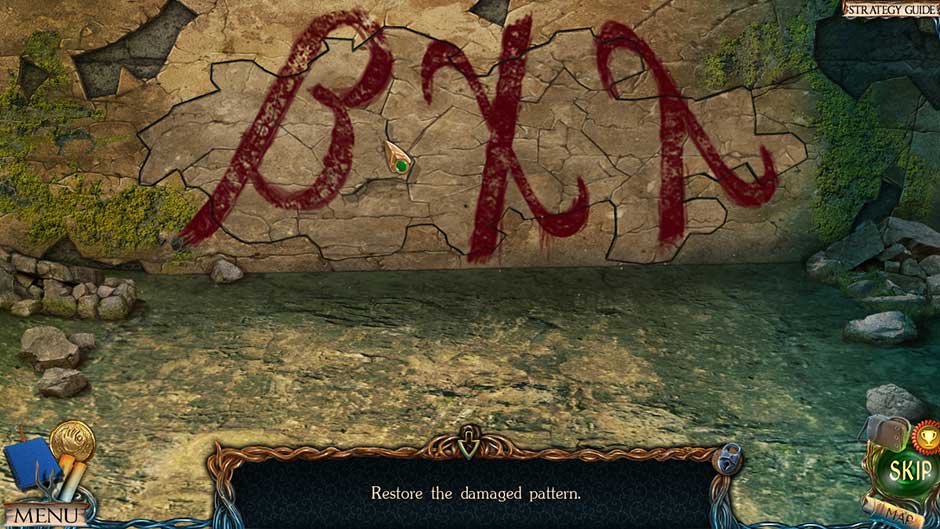
Lost Lands – The Golden Curse Damaged Wall Puzzle Solution
- Proceed up the path and to the next area.
Arena Entrance
- Figurine 6/24 is located in the bottom right corner of the screen.
- Morphing Object 8/35 is located to the immediate right of the bottom of the staircase on the left.
Lost Lands – The Golden Curse Arena Entrance Collectibles Locations
- Click on the Cage Trap on the lower left to add it to your inventory.
- Examine the doorway at the top of the left tower. Collect the Bandage and the Clamp lying on the floor at the foot of the iron maiden.
- Back outside, take a closer look at the weapons rack on the left. Collect the Two-pronged Spear 1/2, then place the Spear Head on the spear remaining on the rack and click to collect the Two-pronged Spear 2/2.
- Examine the broken ladder lying on the ground on the right. Use the Belt on the ladder and collect the Stone Feathers 2/6.
- Return to the Volcanic Cavern.
Volcanic Cavern
- Take a closer look at the foot of the rock columns on the left. Place the Cage Trap here, then exit for now.
- Return to the Hills.
Hills
- Examine the bramble thicket between the path to the graveyard and the well. Use the Garden Shears to clip the branch, then click on the branch to remove the Blackthorn Berries and add them to your inventory, along with the Blackthorn Twig.
- Go to the Plains of the Dead.
Plains of the Dead
- Examine the base of the trees on the upper right. Use the Blackthorn Twig to shoo away the raven, then click on the Mechanical Eye in the helmet to add it to your inventory.
- Return to the Druid Village.
Druid Village
- Examine the door of the house on the left. Use the Crowbar to pry off the bar, then place the Volcanic Crystal in the slot in the door. Enter the house.
Relic Repository
- Figurine 7/24 is located at the bottom left corner of the stairs.
- Morphing Object 9/35 is hanging on the wall above the tapestry on the right.
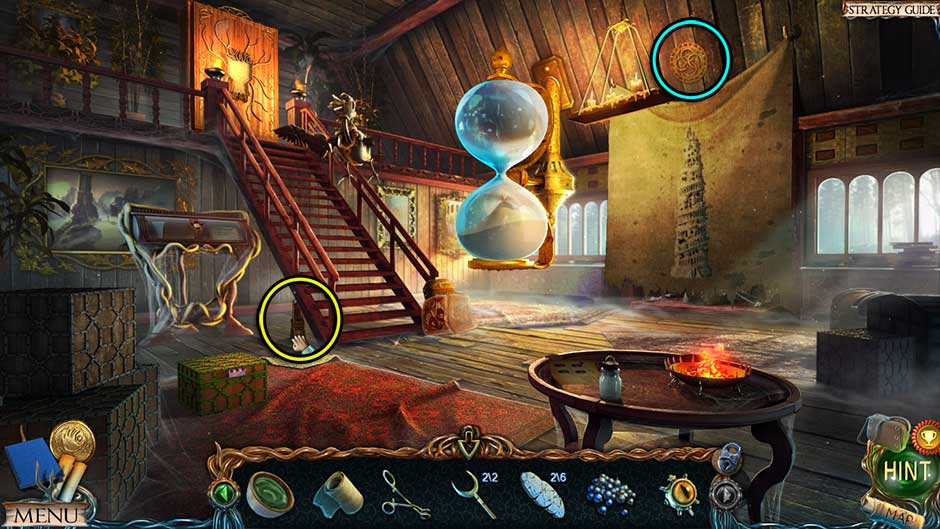
Lost Lands – The Golden Curse Relic Repository Collectibles Locations
- Take a closer look at the table at the bottom of the screen. Read the recipe for the Bloody Antidote, then click on the Flask to add it to your inventory. Place the Ointment on the table and the Blackthorn Berries within it.
- Back in the main area, take a closer look at the foot of the stairs. Collect the Manuscript 6/28 (Relic Repository) and the Mouse.
- Click on the large hourglass twice to rotate it. Tip: You will return here later.
- Click on the tapestry hanging on the right to remove it. Note the unveiled alcove: you will return here later.
- Head back to the Volcanic Cavern.
Volcanic Cavern
- Examine the Cage Trap you left at the base of the stone columns. Place the Flask on the rocks and the Mouse inside the trap. Use the Clamp to remove the snake from within the trap. Collect the resulting Viper Venom put into the former Flask to add it to your inventory.
- Return to the Relic Repository.
Relic Repository
- Take a closer look at the small table again and pour the Viper Venom into the Ointment mixture. Place the Bloody Spear into the dish, then click on the resulting Potion to add it to your inventory.
- Exit outside to the Druid Village.
Druid Village
- Take a closer look at the injured Druid lying on the ground toward the right. Use the Potion on the arm wounds and the Bandage to complete the first aid. Collect the Belt around the upper arm and the Key from the man’s hand once it opens.
- Enter the Relic Repository once again.
Relic Repository
- Examine the case at the base of the stairs. Use the Key to open it and collect the Stone Feathers 3/6
- Return to the Arena Entrance.
Arena Entrance
- Take a closer look at the broken ladder lying on the ground again. Use the Belt to finish repairing the Ladder, adding it to your inventory.
- Use the Ladder to access the doorway in the tower on the right. Your Figurine collection is displayed here.
- Now take a closer look at the area above the portcullis. Collect the Manuscript 7/28 (Arena) sitting on top of the wheel. Once collected, zoom in on the wheel again and click to rotate it.
- Examine the archway straight ahead. Place the Two-pronged Spear 2/2 beneath the portcullis to hold it open.
- Proceed through the archway and into the next area.
Arena
- Morphing Object 10/35 is located between the arches at the top of the Arena to the left of the Minotaur statue on the right.
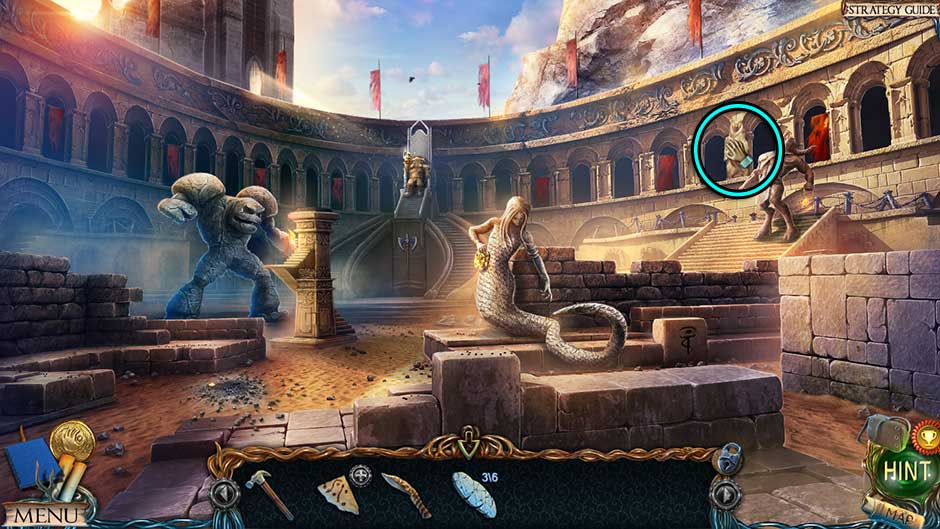
Lost Lands – The Golden Curse Arena Collectible Location
- Examine the burn mark on the ground on the left. Click on the Chewing Gum to obtain Collection Item 2/14. Select it in your inventory and click on the wrappers to remove the gum, then click on it once again to obtain the newly-chewed Chewing Gum.
- Examine the stone pedestal toward the left and click on the cover to remove it. Tip: You will come back here later.
- Take a closer look at the top of this same stone pedestal. Collect the Manuscript 8/28 (Gorasar Conn) and the Battery (Collection Item 3/14).
- Back in the main area, examine the stone with the rune marking toward the lower right. Click on the stone to remove it, then collect the Map Fragment (3) There is also a book you may read.
- Select the Map Fragment (1) in your inventory and combine it with Map Fragment (2) and Map Fragment (3). Click on each to arrange them into their correct position, then add the Chewing Gum. The completed Map will be added to your inventory.
- Return to the Volcanic Cavern.
Volcanic Cavern
- Examine the stone columns toward the left and use the Map in this location, then watch the cutscene that follows.
Leproch’s House
- Collect the Full Jerry Can from the bed on the right, then take a closer look at the generator on the left. Click to remove the red cap, then use the Full Jerry Can to refuel the device. Click on the red cap again to close it, then select the pull string (bottom left corner) three times to restore power to the area.
- Figurine 8/24 is located on the upper left corner of the shelf straight ahead.
- Morphing Object 11/35 is located on the small table to the left of the generator.
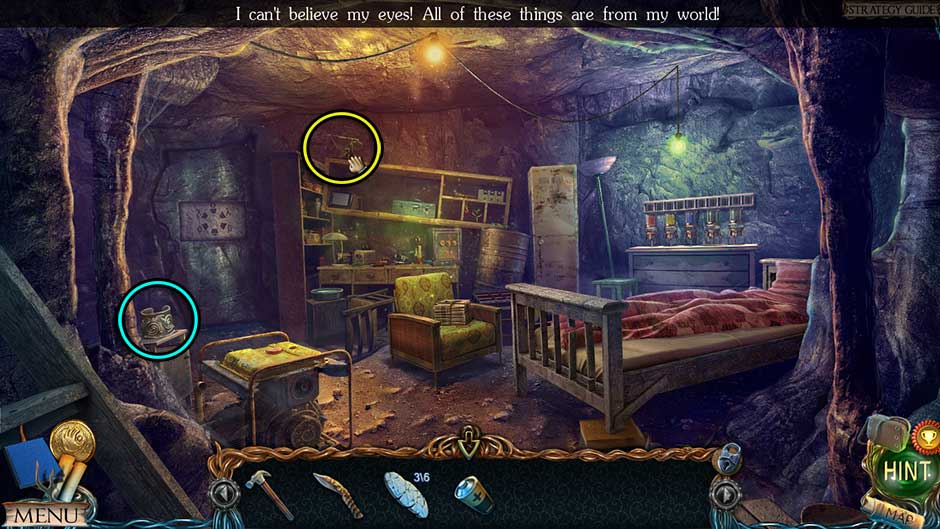
Lost Lands – The Golden Curse Leprochs House Collectibles Locations
- Click on the hidden object scene straight ahead. Upon completing it, the Stone Feathers 4/6 will be added to your inventory. Tip!: The combination is 279.
- Take a closer look at the stack of papers sitting on the chair straight ahead. Use the Knife to cut the string, then read the top paper. Upon setting it down, you will be able to pick up the Key sitting on top of the stack.
- Take a closer look at the bed. Click on the covers to remove them, then collect the Stone Figurine under the mattress.
- Now take a closer look at the painting bench behind the bed. Examine the compartment on the top left part of the table’s surface. Use the Key to open it, then collect the Puzzle Pieces
- Examine the stone wall to the left of the bookshelves to trigger a puzzle. Mark the right symbols with the sliding triangles. You’ve seen them before. The solution is shown below.

Lost Lands – The Golden Curse Stone Door Puzzle Solution Part 1
- Now the second part of the puzzle begins. Use the Puzzle Pieces on the design in the wall to trigger it. Place the puzzle pieces in the central area to make a woven pattern. The solution is shown below.
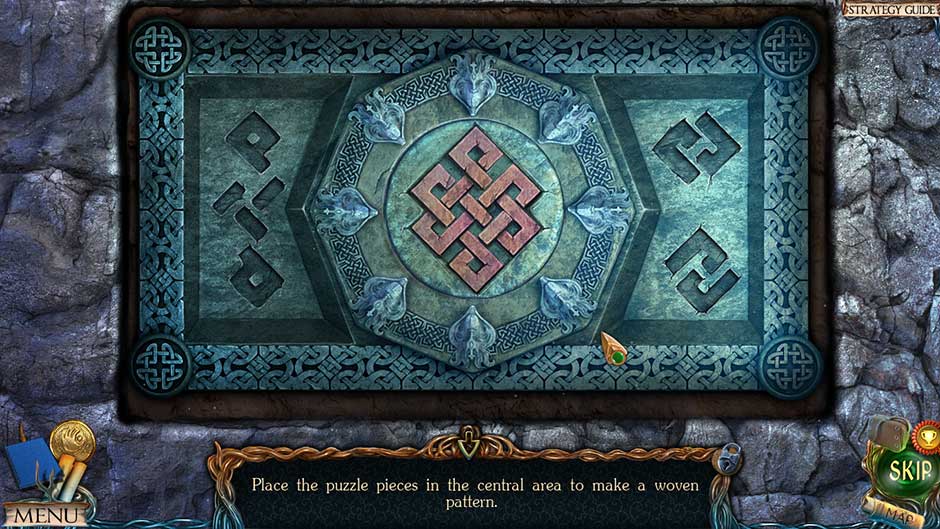
Lost Lands – The Golden Curse Stone Door Puzzle Solution Part 2
- Enter through the passage revealed to reach the next area.
Leproch’s Tomb
- Examine the flashlight sitting on the rock. Click to remove the back of it, as well as the battery within. Place the new Battery from your inventory into the flashlight, then replace the cap and click the on/off switch.
- Figurine 9/24 is sitting on the floor at the bottom right corner of the sarcophagus.
- Morphing Object 12/35 is on the rock to the left of the flashlight.
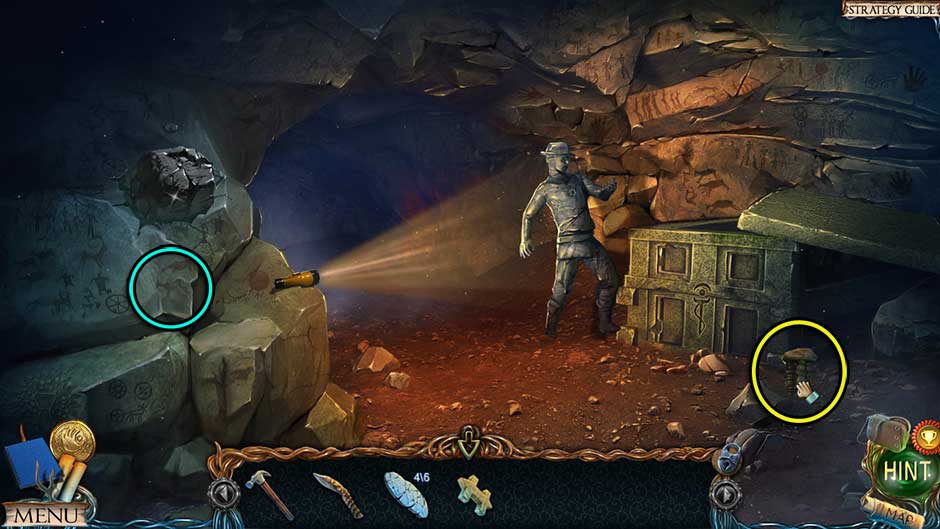
Lost Lands – The Golden Curse Leprochs Tomb Collectibles Locations
- Take a closer look inside the sarcophagus. Click on the Manuscript 9/28 (Leproch Conn), followed by the Medallion Part beneath it.
- Examine the stone explorer. Take the Medallion Part (2) from around his neck.
- Combine the Medallion Parts x2 in your inventory to obtain the completed Medallion.
- Return to the Druid Village.
Druid Village
- Speak with the Elder. You will be rewarded with the Stone Feathers 5/6.
- Enter the Relic Repository.
Relic Repository
- Examine the large suspended hourglass. Place the Medallion into the center of the hourglass to trigger a puzzle.
- Rearrange the rays of light so that they all shine toward the inside of the hexagon. Click on the sections of the puzzle in the order shown in the screenshot below to complete it.

Lost Lands – The Golden Curse Hourglass Lightbeam Puzzle Solution
- Upon completing the puzzle, collect the Stone Feathers 6/6
- Return to the Ancient Graveyard.
Ancient Graveyard
- Examine the winged statue on the right. Place the Stone Feathers 6/6 into the wings.
- Take a closer look at the newly opened mausoleum Place the Stone Figurine at the base of the bricks into the slot on the left, and the Stone Figurine from your inventory into the slot on the right. Collect the Mask within to add it to your inventory.
- Return to the Relic Repository.
Relic Repository
- Examine the alcove at the top of the stairs. Place the Mask into the groove. This will reveal a hidden object area.
- Complete the hidden object area to acquire a set of gloves which will allow you to touch the cursed gold!
- Return to the Arena.
Arena
- Examine the burnt mark on the ground on the left and collect the Cursed Harpy Coin.
- Return to the Druid Village.
Druid Village
- Enter the building straight ahead.
Elders’ House
- Upon entering the house, speak with the Elder.
- Morphing Object 13/35 is located at the top of the left wooden pillar.

Lost Lands – The Golden Curse Elders House Collectible Location
- Examine the table at the base of the pillar on the left. Collect the Nail Polish Remover (Collection Item 4/14).
- Take a closer look at the throne ahead and collect the Oilcan propped up on the right.
- Examine the book on the pedestal on the right side of the room. Click on the Manuscript 10/28 (A Century in the History of Lost Lands) and the Candle.
- Tip: Before leaving, click on the rug on the floor to lift it. There’s a secret spot which requires a lever key you will come back to later.
- Go to the Relic Repository.
Relic Repository
- Examine the table at the bottom of the screen and use the Candle on the coals to light it, acquiring the Burning Candle.
- Examine the alcove in the right wall, behind the tapestry. Place the Burning Candle in the dish, then collect the Powder Flask within the large sculpture. Click on the candle to push it into the sculpture, revealing the Human Figurine at the very top.
- Return to the Forest.
Forest
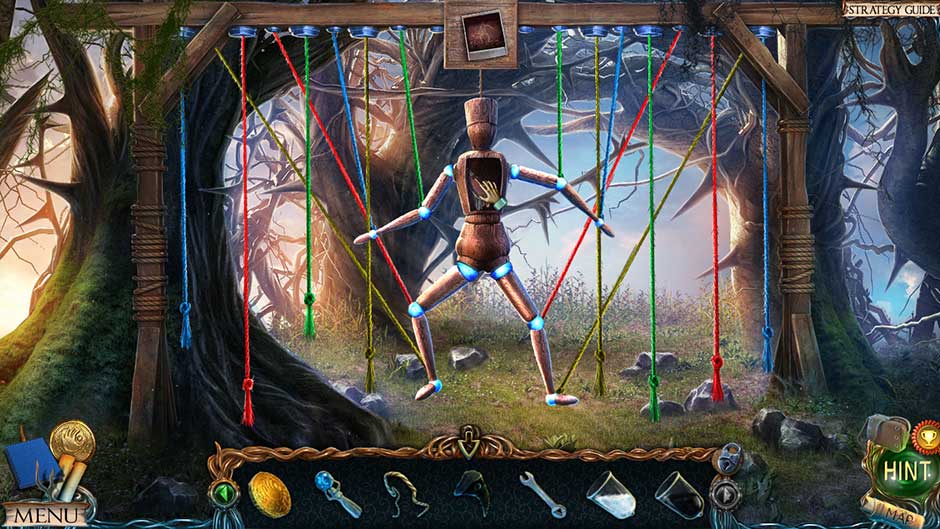
- Take a closer look at the portal on the left. Click on the floating disc and place the Human Figurine into the groove to trigger a puzzle.
- Move the blocks so the one showing the little man lands on top. The solution is shown below.
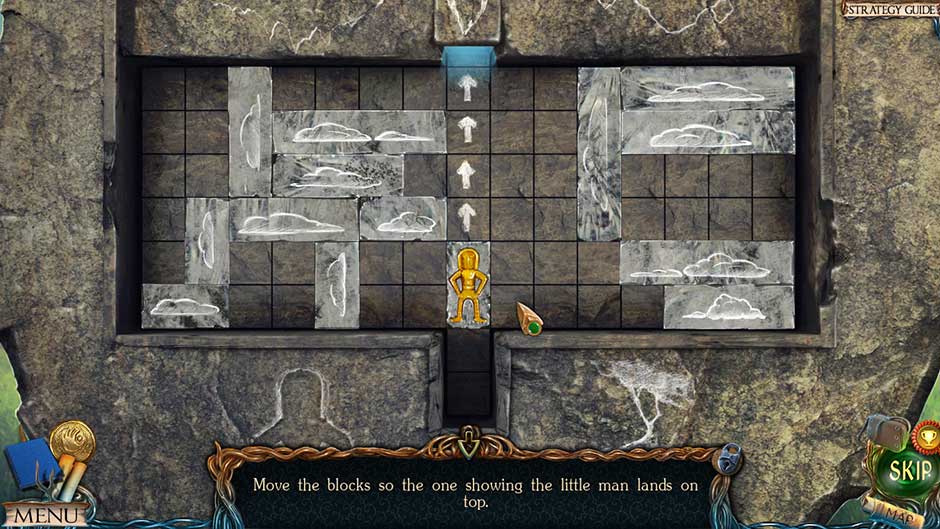
Lost Lands – The Golden Curse Portal Puzzle Solution
Chapter 2: The Floating Islands
The portal to the Floating Islands has been opened! But the dangerous Harpy still lurks about. Can you progress without falling victim to this bird of prey?
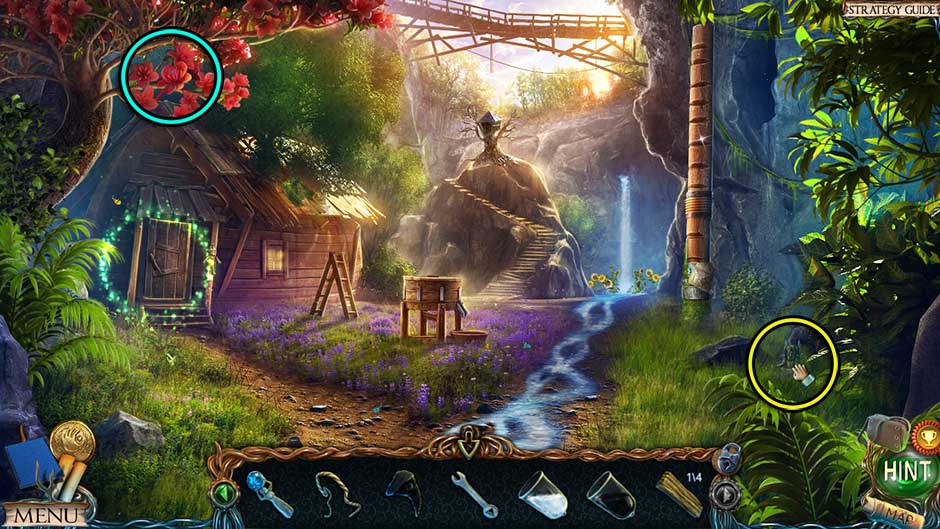
Lower Island
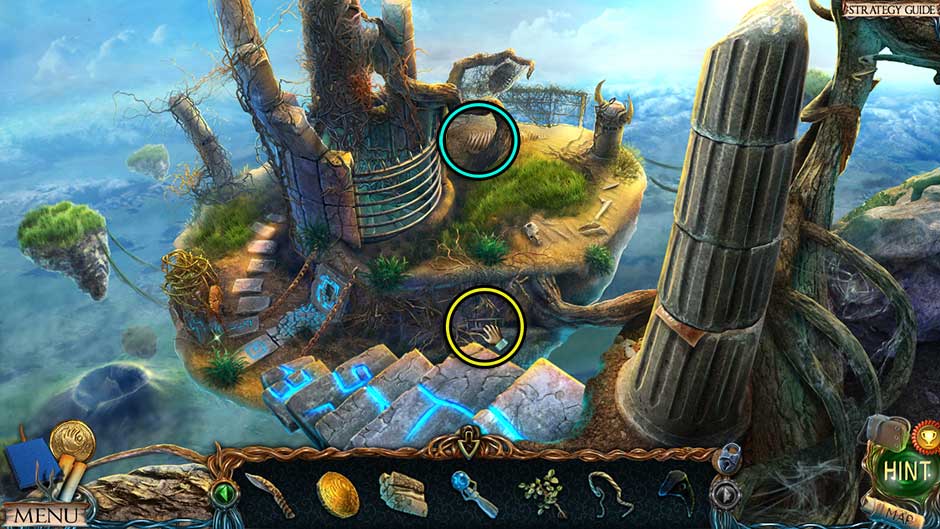
- Morphing Object 14/35 is located at the base of the tree on the left.
- Figurine 10/24 is located just above the rock in the lower right corner.
Lost Lands – The Golden Curse Lower Island Collectibles Locations
- Click on the Figurine lying in the grass to add it to your inventory.
- Take a closer look at the tree on the left and collect the Manuscript 11/28 (The Great Metronome).
- Take a closer look at the door propped up straight ahead. Use the Oilcan on the latch, then click to open it.
- Tip: Examine the stone slab in the ground straight ahead and click on the leaves to clear them. You’ll be coming back here often later.
- Examine the rope swing. Click on the rope to re-secure it, then click on the swing to swing it high, knocking loose an item.
- Examine the area in front of the wooden cart on the right. Click on the Axe to add it to your inventory.
- Make your way back to the Druid Village.
Druid Village
- Examine the chopping block on the left. Chop the wood with the Axe, placing it back on the block once split. Do this until you’ve collected the Firewood and added it to your inventory.
- Take a closer look at the upper portion of the fountain. Place the Figurine in the alcove, then break off the Windsock at the top to add it to your inventory.
- Select the Windsock in your inventory and click on the end to tie it off, obtaining the Net.
- Head back to the Lower Island.
Lower Island
- Take a closer look through the door you opened straight ahead. Use the Net to acquire the Stamp hanging from the vines.
- Head back to the Plains of the Dead.
Plains of the Dead
- Examine the cannon on the left. Use the Powder Flask on the hole in the top.
- Make your way back to the Volcanic Crater.
Volcanic Crater
- Examine the statue from which lava flows on the right. Place the Stamp in the groove at the top to reveal a secret alcove. Collect the Manuscript 12/28 (Solidus) and the Core of Flames
- Return to the Lower Island.
Lower Island
- Examine the front of the wooden cart on the right. Place the Core of Flames into the hole in the ground, then click on the cart hatch to bury it.
- Proceed across the door-turned-bridge to the next floating island.
Crossroads
- Morphing Object 15/35 is hanging at the base of the wood post on the left.
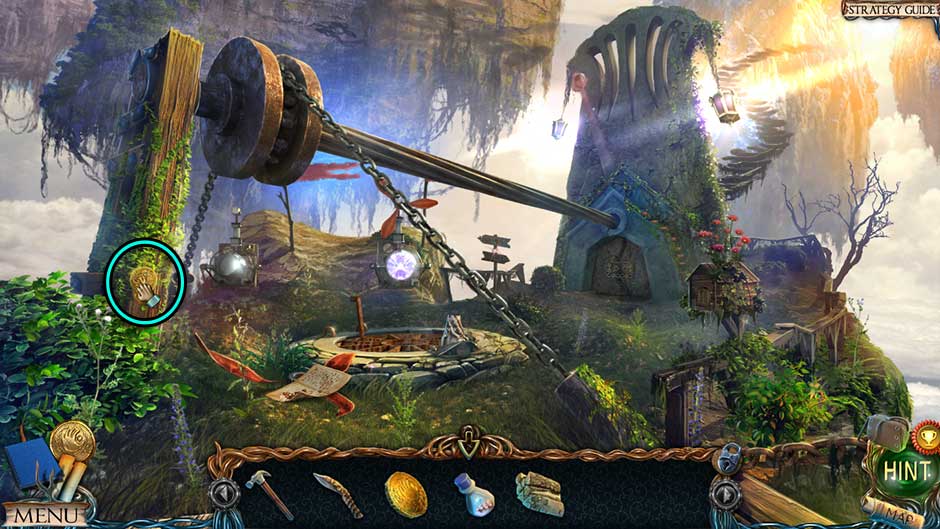
Lost Lands – The Golden Curse Crossroads Collectible Location
- Collect the Manuscript 13/28 lying on the grass, as well as the Broken Blades.
- Examine the signpost straight ahead in the far distance. Click on the “Metronome” Tile sitting on top of the Anvil Peak sign to add it to your inventory, then collect the Tweezers (Collection Item 5/14) on the lower right.
- Take a closer look at the house-like mailbox on the right. Click on the small door to open it, reading the letter inside, then click on the Rope to add it to your inventory.
- Select the Rope from your inventory and combine it with the Nail Polish Remover. You will obtain the Alcohol-soaked Rope.
- Go back to the Lower Island.
Lower Island
- Place the “Metronome” Tile into the groove in the stone slab in the ground.
- Make your way back to the Relic Repository.
Relic Repository
- Examine the chest on the floor in the lower left corner. Use the Tweezers to remove the pin, then collect the Firecracker inside to add it to your inventory.
- Head to the Plains of the Dead.
Plains of the Dead
- Take a closer look at the cannon again and use the Alcohol-soaked Rope on the hole where you placed the powder earlier.
- Next, examine the front of the cannon and place the Firecracker
- Examine the round stone sitting in the grass straight ahead. Click on the rope to place it in the flaming crevice, igniting the fuse.
- Once the cannon has fired, return to the Crossroads.
Crossroads
- Examine the mailbox on the right again. Collect the Device Part inside to add it to your inventory.
- Take a closer look at the door of the large metronome. Place the Device Part in the center of the door to trigger a puzzle.
- Turn the circles to move the figurines. Place them in their correct spots as in the image. The solution is shown below.
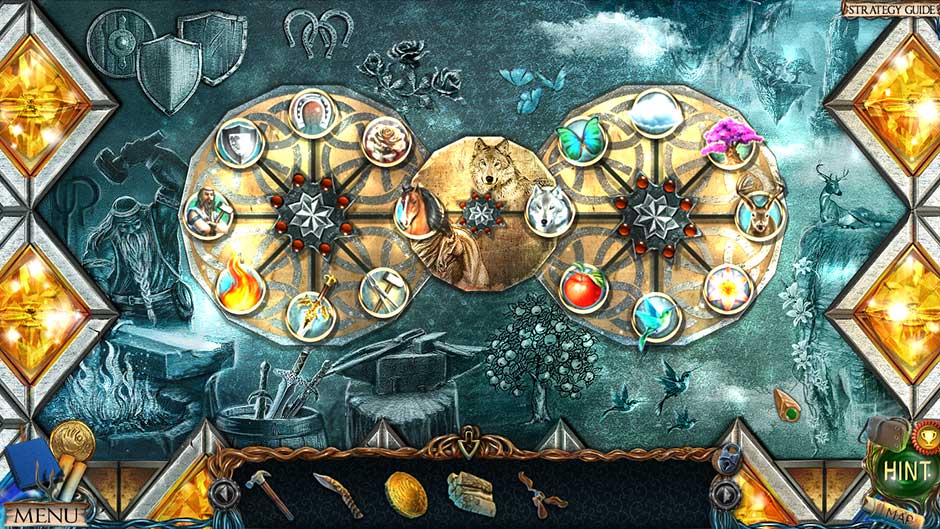
Lost Lands – The Golden Curse Metronome Door Puzzle Solution
- Enter through the doorway to the next area.
Anvil Peak
- Speak with the smith, Braeloff.
- Figurine 11/24 is on the snowy slope above the bellows.
- Morphing Object 16/35 is in the snow at the bottom of the screen, directly in front of you.
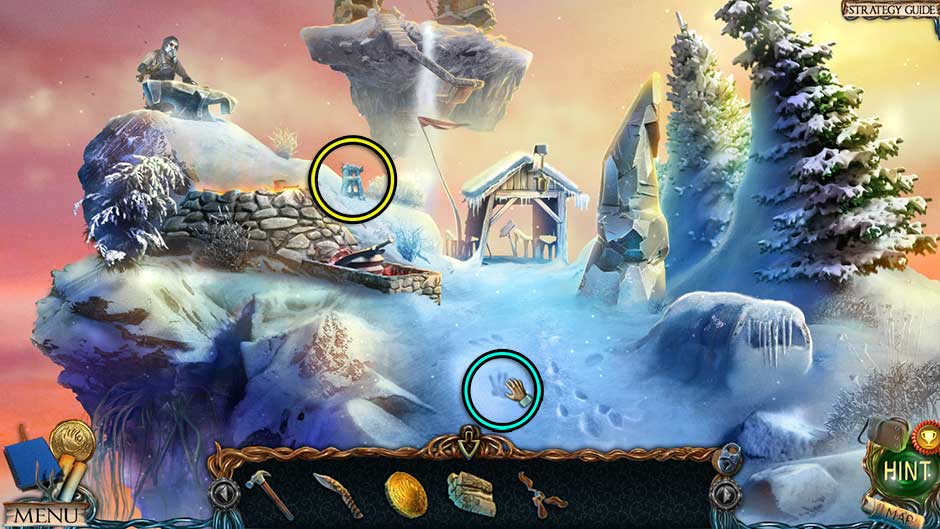
Lost Lands – The Golden Curse Anvil Peak Collectibles Locations
- Give the Broken Blades to Braeloff. He’ll fix them, for a trade.
- Examine the small shed straight ahead. Click on the Pole Hook propped up on the left to add it to your inventory.
- Back in the main area, examine the bellows on the left. Click on the Manuscript 14/28 (The Water of Life) to collect it.
- Take a closer look at the snowy mound on the right, clicking on it to shift away some of the snow. Tip: Note this location for later, as you’ll be coming back.
- For now, return to Leproch’s Tomb.
Leproch’s Tomb
- Use the Pole Hook on the large cluster of Coal on the upper left to collect it.
- Return to Anvil Peak.
Anvil Peak
- Give the Coal to Braeloff. In exchange, he’ll give you the fixed Blades.
- Head back to the Crossroads.
Crossroads
- Examine the device in the distance, to the right of the leftmost wooden beam. Use the Blades on the device, allowing you access to the next area.
- Proceed forward to the next location.
Hanging Gardens
- Figurine 12/24 is located to the right of the stream, toward the upper right hand corner.
- Morphing Object 17/35 is to the immediate right of the pile of wood straight ahead, beneath the tree.
Lost Lands – The Golden Curse Hanging Garden Collectibles Locations
- Click on the cave, the origin of the stream, to enter a hidden object area. Upon completing it, the Mother Figurine will be added to your inventory.
- Take a closer look at the green plant at the base of the tree on the far left. Click on the Young Rose Bush to add it to your inventory.
- Examine the large wooden ballista. Click on the lever to ready it, then place each of the arrow shafts into the mechanism. Click on the string to release it, creating a bridge to the next floating island.
- Proceed across the bridge to the next location.
Island of Exile
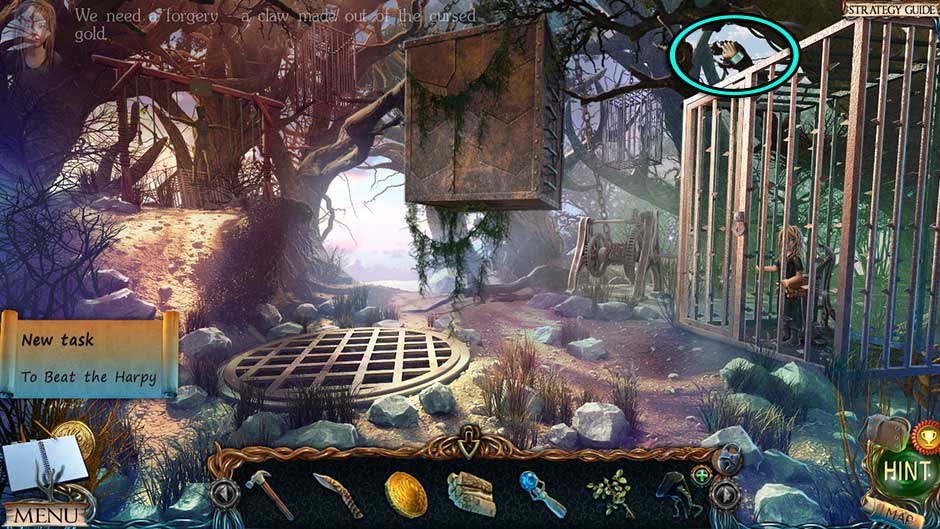
- Speak with Fiora, who’s locked in the cage on the right. She will give you the Harpy Claw.
- Morphing Object 18/35 is above the cage on the right.
Lost Lands – The Golden Curse Island of Exile Collectible Location
- Examine the mechanism next to the cage. Click on the Manuscript 15/28 (The Harpy), then take a closer look at the Harpy Claw in your inventory. Click on the Shoelace to remove it from the Harpy Claw.
- Head forward to the next area.
Harpy’s Nest
- Figurine 13/24 is just above the second step down, on the side of the floating island.
- Morphing Object 19/35 is beneath the gnarled tree straight ahead.
Lost Lands – The Golden Curse Harpys Nest Collectibles Locations
- Examine the gnarled tree straight ahead. Click on the Fish Hook beneath the mirror to add it to your inventory.
- Take a closer look at the brambles on the left side of the island. Use the Harpy Claw on the scratch marks, then collect the Lemon from the receded brambles.
- Click on the topmost sections of the stone pillar on the right until each section has been removed, revealing the Manuscript 16/28 (The Cube) and the “Tower” Tile.
- Select the Lemon in your inventory and use the Knife to cut it. You will obtain Half a Lemon.
- Go back to the Island of Exile.
Island of Exile
- Take a closer look at the underside of the suspended box. Use Half a Lemon to acquire the Gear.
- Examine the mechanism next to the cage again and use the Gear on it. Click to lower the cube to the ground.
- Tip: Head back to the Lower Island.
Lower Island
- Examine the stone slab in the ground again and place the “Tower” Tile in its correct location.
- Go to Anvil Peak.
Anvil Peak
- Speak with Braeloff.
- Return to the Druid Village.
Druid Village
- Open the door to the house on the right and proceed inside.
Tavern
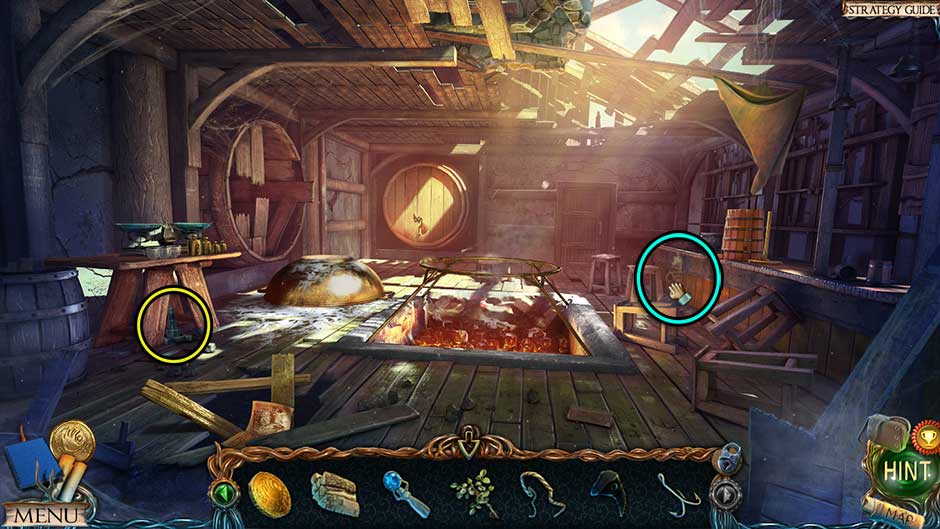
- Figurine 14/24 is beneath the weighing bench on the left.
- Morphing Object 20/35 is against the counter, just above the fallen stools.
Lost Lands – The Golden Curse Tavern Collectibles Locations
- Take a closer look at the hole in the floor toward the lower left. Click on the Manuscript 17/28 (The Druids’ Curse), then clear away the boards and collect the Scraper.
- Examine the fallen basic toward the left end of the room. Click on the Wet Bowl to add it to your inventory. Before leaving, open the crate and collect the Wrench inside, as well as clicking to remove the boards in the barrel on the left, collecting the Fan.
- Take a closer look at the large barrel at the far end of the room. Click on the Fishing Rod to add it to your inventory.
- Select the Fishing Rod in your inventory and click on the reel. Use the Fish Hook on it to re-obtain the completed Fishing Rod.
- Examine the coal pit in the middle of the room. Place the Firewood in the pit and use the Fan to stoke it. Place the Wet Bowl on the stand to dry it, then once dry, click to remove it again.
- Return to the Forest for now.
Forest
- It’s finally time to take care of that camera that fell earlier. Take a closer look at the cliff edge ahead. Use the Fishing Rod to obtain the photograph and the Camera (Collection Item 6/14).
- Head back to the Ancient Graveyard.
Ancient Graveyard
- Examine the base of the first statue on the left. Place the Young Rose Bush into the hole in the ground, then exit for now.
- Examine the second statue on the left. Use the Scraper to remove the excess paint, resulting in the Dye Set being added to your inventory.
- Head back to Leproch’s House.
Leproch’s House
- Examine the paint bench toward the right side of the house, behind the bed. Use the Dye Set on the flasks at the top of the screen. Next, use the Wrench to loosen the two large flasks on the right. Click on the Flask for Black Paint and Flask for White Paint to add them to your inventory.
- Head back to the Lower Island.
Lower Island
- Take a closer look at the front of the wooden cart on the right. Use the Flask for White Paint on the chalk to obtain the Flask of Chalk Dust. Before exiting the closeup, don’t forget to collect the unveiled Lever.
- Go to the Elders’ House.
Elders’ House
- Examine the floor beneath the green rug. Use the Lever on the slots, then click to open the wooden hatch. Collect the Metal Brush
- Go to the Tavern.
Tavern
- Examine the large bowl sitting on the floor. Place the Flask for Black Paint in front of it, then use the Metal Brush on the bowl to obtain the Flask of Soot.
- Before exiting the closeup, use the Camera to take a photo of the dancing man etched into the side of the bowl. The Photo of Little Man will be added to your inventory.
- Return to the Island of Exile.
Island of Exile
- Take a closer look at the large hanging puppet in the upper left corner. Place the Photo of Little Man above the mannequin to trigger a puzzle.
- Place the marionette as shown in the photo. The solution is shown below.
Lost Lands – The Golden Curse Marionette Puzzle Solution
- Upon completing the puzzle, collect the Metal Wing from the marionette’s chest.
- Return to the Relic Repository.
Relic Repository
- Examine the mechanical bird hanging above the staircase. Use the Metal Wing on the bird, then click on the key and chain to wind it up. You will acquire the Key.
- Take a closer look at the glass display case to the left of the stairs. Use the Key on the slot to open it, then click on the Stone Slab inside to add it to your inventory.
- Go to the Hills again.
Hills
- Examine the well on the right. Place the Stone Slab into the slot on the side of the well, triggering a cutscene.
- Head down to the next location.
Chapter 3: Exploring Underground
With the Floating Islands explored, now it’s time to delve underground. What challenges await you in the dark?
Cave
- Figurine 15/24 is to the left of the statue on the right.
- Morphing Object 21/35 is on the rock wall straight ahead.
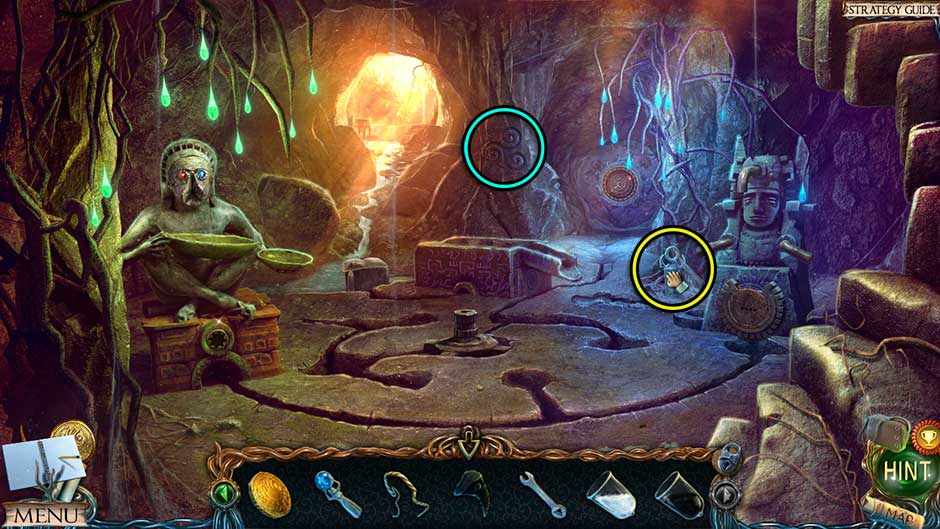
Lost Lands – The Golden Curse Cave Collectibles Locations
- Examine the book sitting on the stone in front of the cave exit on the left. Click on the Manuscript 18/28 (Naga).
- Take a closer look at the stone basin straight ahead. Click on the Step 1/4 to add it to your inventory.
- Exit into the light to reach the next area.
Underground Oasis
- Figurine 16/24 is in front of the two rocks on the right.
- Morphing Object 22/35 is in the tree on the upper left.
Lost Lands – The Golden Curse Underground Oasis Collectibles Locations
- Take a closer look at the door on the left. Click on the Doll to add it to your inventory.
- Select the Doll in your inventory. Pull the Pedal-Key from the front pocket to add it to your inventory, in addition to Fiora’s Doll being added back.
- Examine the waterfall ahead. Use the Knife to cut the Sunflowers and add them to your inventory.
- Take a closer look at the base of the large column on the right. Click on the Manuscript 19/28 (The Tree of Life) to collect it.
- Before leaving the closeup, use the Wrench to loosen the column, causing it to fall and reveal a hidden object area.
- Enter the hidden object area at the top of the column. Upon completing it, the Blessed Water will be added to your inventory.
- Examine the door on the left again. Use the Pedal-Key to open the door, then proceed inside to the next area.
Fisherman’s Hut
- Speak with Sandra, the owner of the home. She will give you the Magic Hammer.
- Morphing Object 23/35 is located on the left, between the tree and the fallen beam.
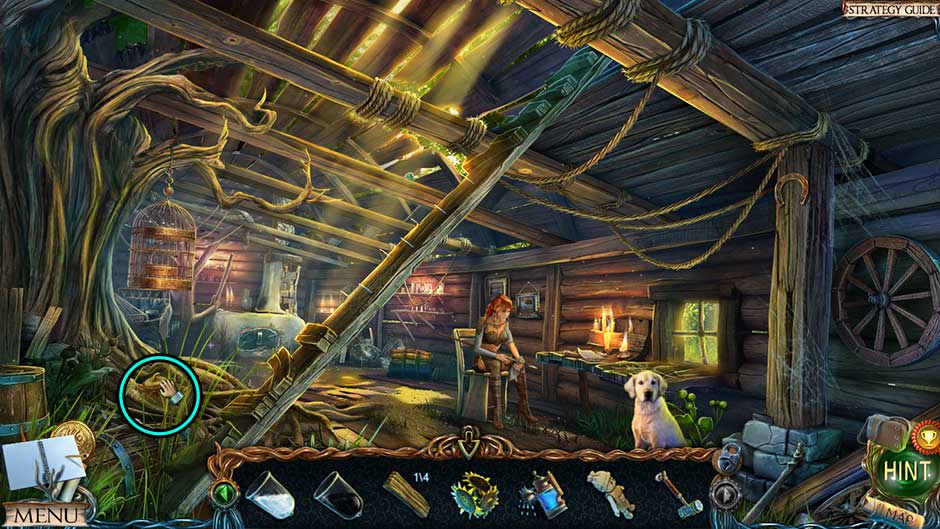
Lost Lands – The Golden Curse Fishermans Hut Collectible Location
- Take a closer look at the hearth at the back of the hut and collect the Flask for Sunflower Oil.
- Examine the table on the right. Collect the Manuscript 20/28 (Sandra’s Memoirs) and the Step 2/4 beneath it.
- Exit the hut and proceed to the Tree of Life.
Tree of Life
- Morphing Object 24/35 is located at the center base of the tree.
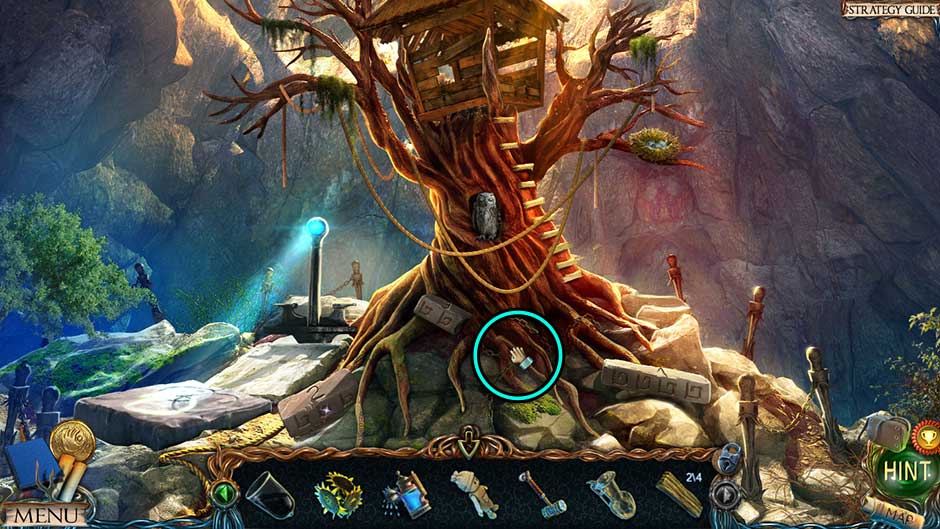
Lost Lands – The Golden Curse Tree of Life Collectible Location
- Pick up the large stone blocks labeled 1, 2, and 3 and place them to the right of the tree.
- Examine the inside of the tree house Collect the Silk Headscarf (Collectible Item 7/14) and the Step 3/4 to add them to your inventory. Use the Silk Headscarf to clear the cobwebs.
- Back in the main view, click on the tree house to knock it down.
- Examine the glowing pole on the left. Place the Mother Figurine on the left side.
- Examine the inside of the fallen tree house Click on the owl inside twice to trigger a puzzle.
- Find identical feathers on the left and right wings. The solution is shown below.
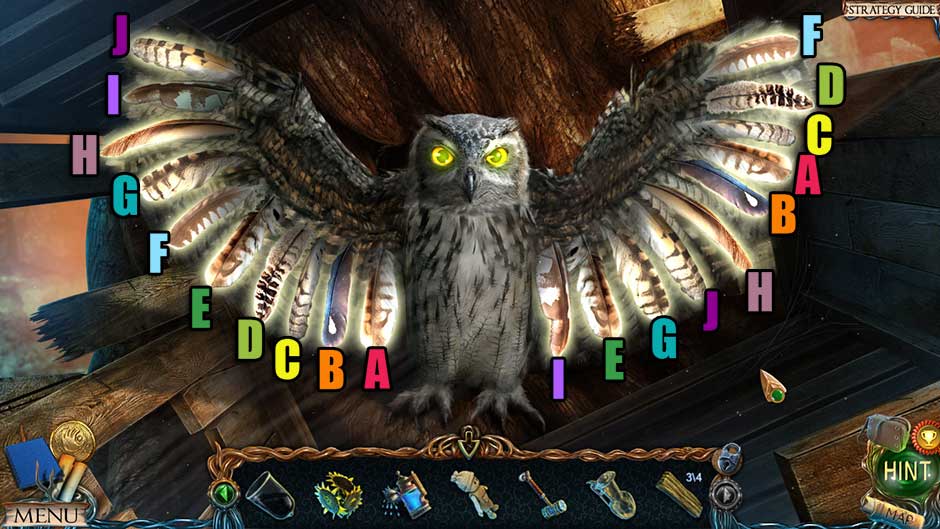
Lost Lands – The Golden Curse Feather Matching Puzzle Solution
- Upon completing the puzzle, examine the inside of the tree house again. The owl has vacated the hollow. Tip: You will be returning here later.
- For now, make your way back to the Ancient Graveyard.
Ancient Graveyard
- Examine the foot of the statue on the left. Use the Blessed Water on the rosebush, then click on the resulting rose that blooms. The statue will bow. Zoom in once more and collect the Rose Petals.
- Take a closer look at the bowed statue and collect the Button within his hat.
- Return to Leproch’s House.
Leproch’s House
- Examine the painting bench beyond the bed. Place the Flask of Soot and the Flask of Chalk Dust back onto their stands.
- Make your way back to the Tavern.
Tavern
- Examine the bar on the right. Place the Flask for Sunflower Oil beneath the spigot. Use the Sunflowers on the churn and the press to squeeze them out. The resulting Sunflower Oil will be added to your inventory.
- Head to Anvil Peak.
Anvil Peak
- Take a closer look at the anvil on the upper left. Collect the Shovel and read the note with instructions left behind.
- Examine the bellows. Click on them a few times to stoke the coals, then take a closer look at the coals. Place the Cursed Harpy Coin into the form to melt it down.
- Make your way to the Hanging Gardens.
Hanging Gardens
- Examine the dirt to the right of the stream. Use the Shovel to unearth the “Ballista” Tile and add it to your inventory. Collect the remaining pile of Clay as well.
- Select the Clay in your inventory. Click on it to roll it into a ball, then use the Harpy Claw to create the Clay Form.
- Go to the Island of Exile.
Island of Exile
- Give Fiora’s Doll to Fiora, who’s still locked in the cage. You will get the Blacksmith’s Pincers.
- Return to the Lower Island.
Lower Island
- Examine the stone slab in the ground and place the “Ballista” Tile in its respective slot.
- Proceed to Anvil Peak.
Anvil Peak
- Examine the coals on the left. Place the Clay Form on the edge of the coals. Click on the wire to the immediate left of it to create a handle. Click on the form to place it on the coals, then click on the melted gold to pour it into the form. Use the Blacksmith’s Pincers to retrieve the Nipper with a Cast.
- Back in the main area, examine the small snowbank on the right. Use the Nipper with a Cast to melt the ice. Once melted, collect the Pliers, and use the Hammer to break the cast, resulting in the Golden Claw Casting.
- Select the Golden Claw Casting in your inventory and use the Pliers to remove the wire. The Golden Claw Casting will be added back to your inventory.
- Examine the chest. Place the Button into the slot to trigger a puzzle.
- Play the melody by pressing the buttons in the correct order. The solution is as follows: 5, 3, 7, 2, 4, 6, 1.
- When the chest opens, collect the “Anvil” Tile and the Snow Shoes.
- Examine the anvil on the upper left. Place the Golden Claw Casting on the anvil, then use the Magic Hammer on it. Click to obtain the Golden Claw. Select it once again in your inventory and use the Shoelace on it. You will receive the Golden Harpy Claw.
- Go back to the Lower Island.
Lower Island
- Examine the stone slab in the ground and place the “Anvil” Tile in its respective location.
- Go to the Leproch’s House.
Leproch’s House
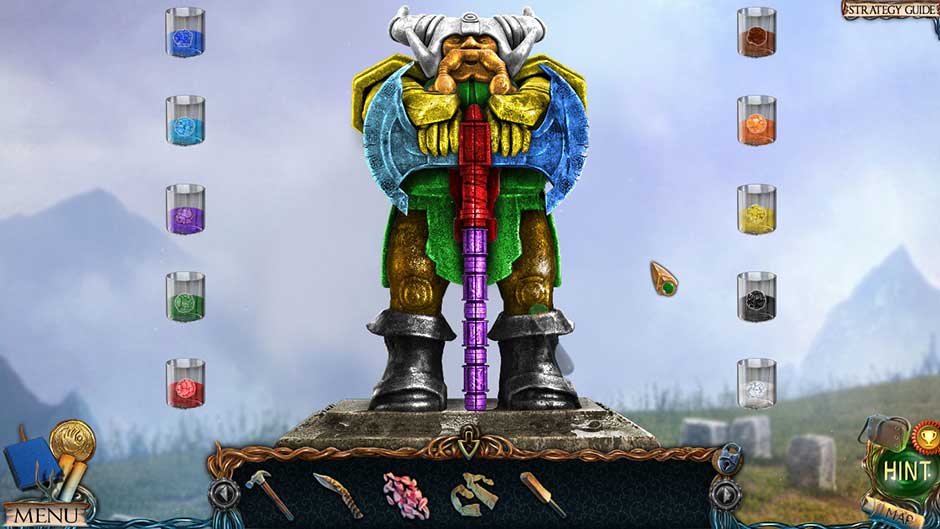
- Examine the painting bench and pour the Sunflower Oil into the black and white paint jars. This will trigger a puzzle.
- Make the paints you need by mixing the ones you have. The solution is as follows:
- Blue: Blue + Blue
- Purple: Blue + Red
- Light Blue: Blue + White
- Green: Blue + Yellow
- Red: Red + Red
- Orange: Red + Yellow
- Dark Red: Red + Black
- Yellow: Yellow + Yellow
- Black: Black + Black
- White: White + White
- Upon completing the puzzle, you will receive the Paint Set.
- Before exiting the closeup, use the Golden Harpy Claw on the black paint to obtain the Fake Harpy Claw.
- Make your way back to the Volcanic Crater.
Volcanic Crater
- Examine the lava. Use the Snow Shoes to cross it. After the cutscene, take a closer look at the lava again. Collect the Package of Nylons (Collectible Item 8/14) and the Step 4/4.
- Select the Package of Nylons from your inventory and unwrap them to obtain the Nylon Stockings.
- Head back to the Ancient Graveyard.
Ancient Graveyard
- Examine the dwarven statue on the far left. Use the Paint Set You will require one more component before you can trigger the puzzle.
- For now, go back to the Fisherman’s Hut.
Fisherman’s Hut
- Use the Step 4/4 on the fallen beam. A hidden object area will appear up in the rafters. Complete it to obtain the Mechanical Eye (2).
- Go to the Arena Entrance.
Arena Entrance
- Examine the doorway on the upper left. Take a closer look at the iron maiden, then place the Mechanical Eye x2 into the eye slots.
- Head back to the Island of Exile.
Island of Exile
- Use the Fake Harpy Claw on the Harpy taunting Fiora, then watch the cutscene that follows.
- Speak with Fiora, then take a closer look inside the cage. Collect the Paper Clip (Collectible Item 9/14) at the base of the pump.
- Select the Paper Clip in your inventory and click on it until you acquire the Unbent Paper Clip.
- Return to Leproch’s House.
Leproch’s House
- Examine the locker on the other end of the room. Use the Unbent Paper Clip to pick the lock. Collect the Fire Hose and the Flint Stone
- Go back to the Island of Exile.
Island of Exile
- Take a closer look at the pump again. Use the Fire Hose here, then click to unroll it. Back in the view of the main area, click on it again to throw it up over the box.
- Examine the box itself and click on the end of the hose to place it into the hole in the top.
- Look at the pump again and click on the handle to use it. Examine the top of the box once more. Click on the Brush (Collection Item 10/14) floating near the hole in the top to add it to your inventory.
- Return to the Ancient Graveyard.
Ancient Graveyard
- Take a closer look at the dwarf statue again and use the Brush to trigger a puzzle.
- Paint all parts of the statue the right color. The solution is shown below.
Lost Lands – The Golden Curse Statue Painting Puzzle Solution
- Once finished, the statue will spread its arms. Collect the TNT from the cavity in the statue’s chest.
- Return to the Island of Exile.
Island of Exile
- Examine the large box again. Use the TNT on it.
- Take a look at the green fuse lying on the ground. Use the Flint Stone and the Knife to light it.
- Run back to the Hanging Gardens, quickly!
Hanging Gardens
- After the explosion, proceed forward back to the Island of Exile.
Island of Exile
- Examine the remains of the large box. Collect Maaron’s Staff inside to add it to your inventory.
- Return to the Elders’ House.
Elders’ House
- Give Maaron’s Staff to Maaron. You will receive the Dragon Figurine.
- Make your way back to the Cave.
Cave
- Examine the circular plate in the wall ahead. Use the Dragon Figurine here to trigger a puzzle.
- Rotate the discs so that all the beams are lit. The solution is shown below.
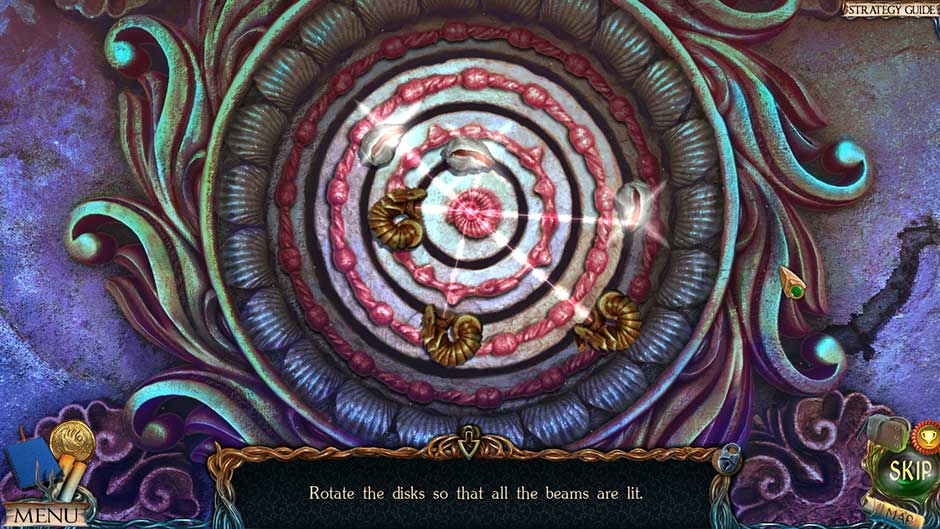
Lost Lands – The Golden Curse Dragon Disk Puzzle Solution
- Once finished, enter through the new doorway to the next area.
Underground Lake
- Figurine 17/24 is at the bow of the schooner toward the upper right corner of the screen.
- Morphing Object 25/35 is at the center on top of the stone ruins on the upper left.

Lost Lands – The Golden Curse Underground Lake Collectibles Locations
- Click on the wreckage immediately in front of you to enter a hidden object area. Upon completing it, the Cauldron will be added to your inventory.
- Enter the Schooner Wreckage toward the upper right corner.
Schooner Wreckage
- Figurine 18/24 is beneath the gangplank at the bottom of the screen.
- Morphing Object 26/35 is in the water to the left of the ship’s bow.
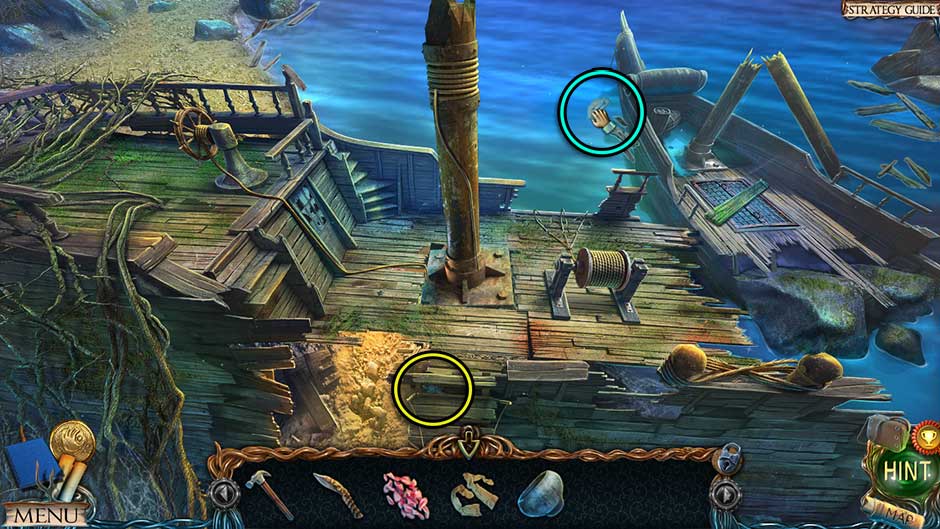
Lost Lands – The Golden Curse Schooner Wreckage Collectibles Locations
- Examine the ropes in the lower right corner. Use the Knife to cut them and note the signs revealed.
- Take a closer look at the bottom of the mast. Click on the rope to secure it, then take a closer look at the wheel on the left. Click on it to tighten the rope, bringing down the mast.
- Collect the Steering Wheel on the left, then examine the base of the mast again. Note the puzzle tube here for later.
- Take a closer look at the broken door in the wreckage. Click to collect the Door, as well as Manuscript 21/28 (Chain-mail Fish) beneath it.
- Back in the main view of the area, use the Door to bridge the gap to the wreckage on the right. Zoom in for a closer look. Click on the Long Log to add it to your inventory, and the grating to open it.
- Examine the winch on the deck. Use the Steering Wheel on the side.
- Backtrack to the Underground Oasis.
Underground Oasis
- Take a closer look at the waterfall in the distance. Use the Cauldron here to obtain the Cauldron of Water.
- Enter the Fisherman’s Hut.
Fisherman’s Hut
- Examine the stove at the back of the hut. Place the Cauldron of Water on top of it.
- Return to the Arena.
Arena
- Examine the ruins straight ahead and collect the Gold Mask. Look at the steps on the right to collect the Cursed Minotaur Amulet and the soot pile to the left of the stone pillar on the left to collect Solidus’s Cursed Knuckles.
- Exit to the Arena Entrance.
Arena Entrance
- Zoom in on the doorway on the upper left and take a closer look at the iron maiden. Place the Gold Mask over the face to open the compartment. Collect the Stacking Toy and Tile-key inside to add them to your inventory.
- Go to the Cave.
Cave
- Examine the base of the statue on the right. Use Solidus’s Cursed Knuckles on the holes in the stone, then click to turn it, restoring the flow of water from here.
- Enter the Underground Lake.
Underground Lake
- Take a closer look at the small stone column on the left. Use the Tile-key to open the side compartment. Collect the Glue Formula
- Place the Stacking Toy in the compartment to trigger a cutscene in which Naga will steal the artifact.
- Return to the Fisherman’s Hut.
Fisherman’s Hut
- Speak with Sandra. She will give you the Scissors (Collectible Item 11/14).
- Zoom in on the stove at the back of the room again. Place the Glue Formula page back into the book and note the ingredients.
- Head for the Hills.
Hills
- Zoom in on each of the three nearest horses and use the Scissors on each to acquire the Horse’s Mane 3/3.
- Go back to the Fisherman’s Hut.
Fisherman’s Hut
- Give the Horse’s Mane 3/3 to Sandra. Now there’s just one more ingredient left to find.
- Go to the Hanging Gardens.
Hanging Gardens
- Use the Long Log to bridge the gap to the tree straight ahead, then take a closer look. Use the Knife to acquire the Corkwood Bark.
- Tip: Note the design etched into the tree. It will come in handy later.
- Make your way back to the Fisherman’s Hut.
Fisherman’s Hut
- Give the Corkwood Bark to Sandra. She will give you the Axis Pin.
- Go outside.
Underground Oasis
- Examine the small mill straight ahead. Click to remove the Broken Millstone Disk, then collect the Wooden Boards Place the Gold Mask into the mill, then exit for now.
- Take a closer look at the ladder to the left of the mill. Use the Axis Pin to secure the top.
- Zoom in on the top of the ladder once propped up against the house. Remove the fronds and collect the Flask.
- Select the Wooden Boards in your inventory, followed by the Nylon Stockings. Use the Knife to cut them, then click to create the Homemade Lever.
- Select the Flask in your inventory. Click to unfold the paper on the side. Read it, then add the Flask for Elixir back to your inventory.
- Return to the Schooner Wreckage.
Schooner Wreckage
- Examine the open grate on the right. Use the Flask for Elixir here to acquire the Flask of Lake Water.
- Go to the Cave.
Cave
- Place the Flask of Lake Water on the stand to the right of the leftmost statue. You will obtain the Potion Flask.
- Go to the Plains of the Dead.
Plains of the Dead
- Take a closer look at the chariot wreckage. Use the Homemade Lever to remove the Hook’s Blade from the wheel and add it to your inventory.
- Select the Hook’s Blade in your inventory and use the Hammer to acquire the Hook.
- Go to the Arena Entrance.
Arena Entrance
- Examine the weapons rack on the left. Place the Hook on top of the remaining pole to obtain the Pole Hook.
- Go down to the Volcanic Crater.
Volcanic Crater
- Examine the equipment in the distance straight ahead. Use the Pole Hook to retrieve the Glove and the Piece of a Globe hanging above you and add it to your inventory.
- Go to the Elders’ House.
Elders’ House
- Examine the glowing alcove in the right pillar. Place the Potion Flask here to acquire the Elixir of Waterbreathing.
- Head to Anvil Peak.
Anvil Peak
- Give the Broken Millstone Disk to Braeloff. He will give you the Chisel.
- Go back to the Plains of the Dead.
Plains of the Dead
- Take a closer look at the horse skeleton on the lower right. Use the Chisel and Hammer to remove the Horseshoe and add it to your inventory.
- Go to the Schooner Wreckage.
Schooner Wreckage
- Examine the open grate on the right again. Use the Elixir of Waterbreathing here to enter the water to the next location.
Sunken Hull
- Figurine 19/24 is on the upper left, near the floating barrel.
- Morphing Object 27/35 is on the far right, next to the globe.
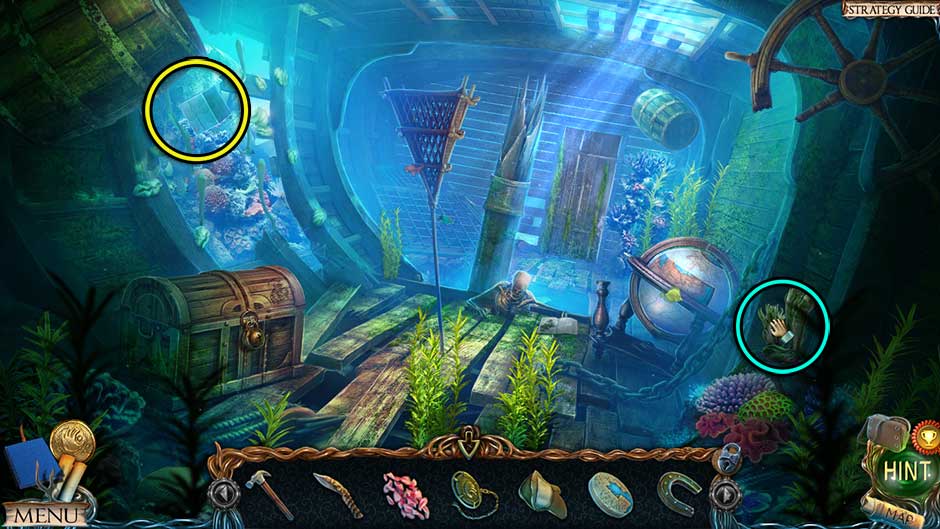
Lost Lands – The Golden Curse Sunken Hull Collectibles Locations
- Zoom in on the globe on the right. Click on the top to open it, then place the Piece of a Globe Click on the top to close it once again and select the globe to trigger a puzzle.
- Rotate the disks to restore the map. The solution is shown below.

Lost Lands – The Golden Curse Globe Disk Rotation Puzzle Solution
- Take a closer look at the inside of the globe once the puzzle is complete. Click on the Energy Ball to add it to your inventory.
- Look at the skeleton straight ahead. Collect the Manuscript 22/28 (Paralyzing Cones) and the Pirate Hook
- Examine the chest on the left. Use the Pirate Hook to open the lock, then collect the Bottle with a Letter that floats out and to the top of your screen.
- Look at the triangular net straight ahead. Click to open it, then collect the Fish
- Go back to the Fisherman’s Hut.
Fisherman’s Hut
- Upon entering the hut, Sandra will give you the Fishing Net.
- Examine the table on the right. Place the Fish on the table, then use the Knife to remove the Fish Scales and add them to your inventory.
- Take a look at the stove at the back of the room again. Place the Fish Scales into the cauldron, then click on the ladle to mix it all. Use the Fishing Net on the cauldron full of glue to obtain the Glue-covered Net.
- Head to Anvil Peak.
Anvil Peak
- Examine the stone obelisk ahead and a little to the right. Use the Horseshoe here to obtain the Magnetized Horseshoe.
- Select the Magnetized Horseshoe in your inventory and combine it with the Glove to acquire the Enchanted Horseshoe with Glove.
- Head to the Volcanic Crater.
Volcanic Crater
- Zoom in on the lava. Use the Enchanted Horseshoe with Glove to catch the Chain-mail Fish.
- Head back to Anvil Peak.
Anvil Peak
- Give the Chain-mail Fish to Braeloff to acquire the Fixed Millstone Disk.
- Go to the Underground Oasis.
Underground Oasis
- Take a closer look at the small mill straight ahead. Place the Fixed Millstone Disk into the mill and click it to grind the gold. Use the Glue-covered Net on the resulting gold dust to acquire the Cursed Net.
- Now it’s time to take care of Naga once and for all. Return to the Underground Lake.
Underground Lake
- Use the Cursed Net on Naga, who is located ahead and to the left of the wreckage.
- After the cutscene, enter the Schooner Wreckage.
Schooner Wreckage
- Click on the hooks attached to the rope and crank on the deck to throw them out into the water. Click on the crank again to reel Naga in.
- Zoom in on the cursed net and click to remove the hooks. Use the Knife to cut the net and the Hammer to break the artifact out of Naga’s hand. Click to reacquire the Stacking Toy.
- Go back to the Underground Lake.
Underground Lake
- Examine the small stone column on the left again. Place the Stacking Toy into the compartment to trigger a puzzle.
- Move the disks one by one from the central rod to a rod on the side. You can’t place a bigger on on top of a smaller one. The goal is to move all the disks onto the rod on the right. The solution is shown below.
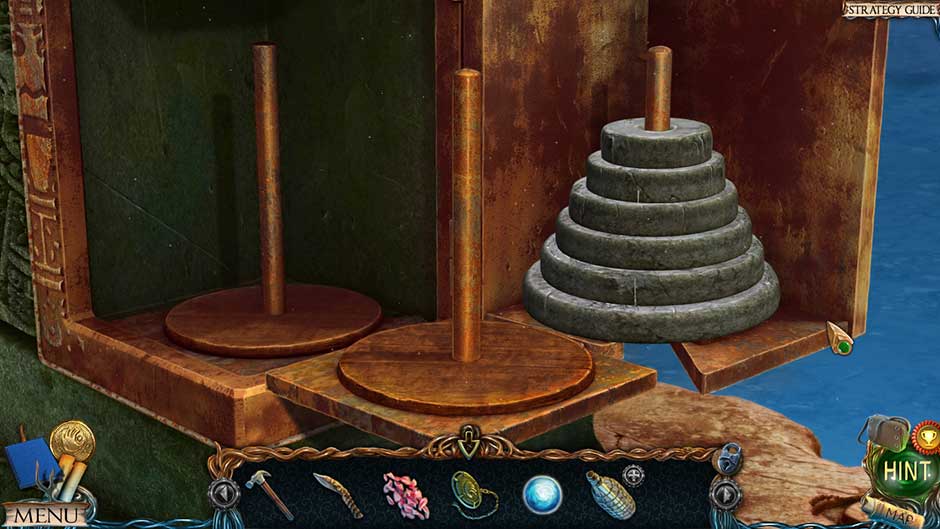
Lost Lands – The Golden Curse Stacking Toy Puzzle Solution
- Examine the boat that appears toward the left. Collect the Key Part Click to align the oar and click again to remove the chains from the horns at the front of the boat.
- Proceed forward to the next area.
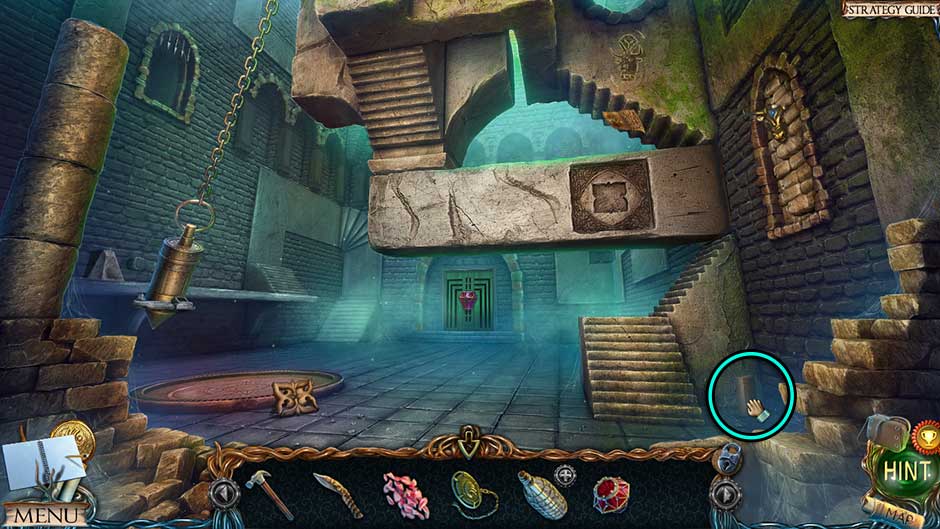
Castle of Madness
- Figurine 20/24 is beneath the drainage pipe on the right.
- Morphing Object 28/35 is in the upper left corner beneath the large arch.
Lost Lands – The Golden Curse Castle of Madness Collectibles Locations
- Click on the Wood Saw lying on the ground to add it to your inventory.
- Examine the swirling basin to the left of the steps. Click on the Stone Tile to add it to your inventory, then place the Energy Ball into the stand.
- Examine the swirling basin to the right of the steps. Collect Manuscript 23/28 (The Castle of Madness).
- Return to the Lower Island.
Lower Island
- Take a closer look at the tree on the left. Use the Wood Saw to cut it, then click on the wood piece to obtain the “Wood-network” Tile.
- Examine the stone slab on the ground and place the “Wood-network” Tile in its respective location.
- Head to the Harpy’s Nest.
Harpy’s Nest
- Examine the glowing blue alcove at the base of the steps. Insert the Stone Tile into the slot. Collect the Key Part (2) inside, and click the lever on the left.
- Enter the hidden object area that appears in the center of the Harpy’s Nest. Upon completing it, the Energy Ball will be added to your inventory.
- Select the Key Part (1) in your inventory and combine it with the other Key Part (2) to obtain the Key.
- Go to the Arena Entrance.
Arena Entrance
- Examine the doorway on the upper left and take a closer look at the iron maiden. Use the Key to open it and collect Atlas’s Arm
- Select Atlas’s Arm in your inventory and click to collect the Key. Atlas’s Arm will be re-added to your inventory as well.
- Head back to the Schooner Wreckage.
Schooner Wreckage
- Examine the box beneath the fallen mast. Use the Key to open the box, then collect Atlas’s Arm (2)
- Select Atlas’s Arm in your inventory. Click to collect the Diamond Key from its hand. Atlas’s Arm will be re-added to your inventory.
- Go to the Castle of Madness.
Castle of Madness
- Take a closer look at the swirling basin on the right. Place the Energy Ball into the basin, then examine the stone steps to trigger a puzzle.
- Move the steps to connect the first to the last. Move a step by clicking on it. The solution is shown below.
Lost Lands – The Golden Curse Castle of Madness Steps Puzzle Solution
- Zoom in on the door straight ahead. Place each of Atlas’s Arms x2 onto the statues to open the door.
- Enter the Castle of Madness.
Chapter 4: The Castle of Madness
With Naga and the Harpy defeated, now only two villains remain. Can you outwit the Minotaur as you enter the Castle of Madness?
Labyrinth
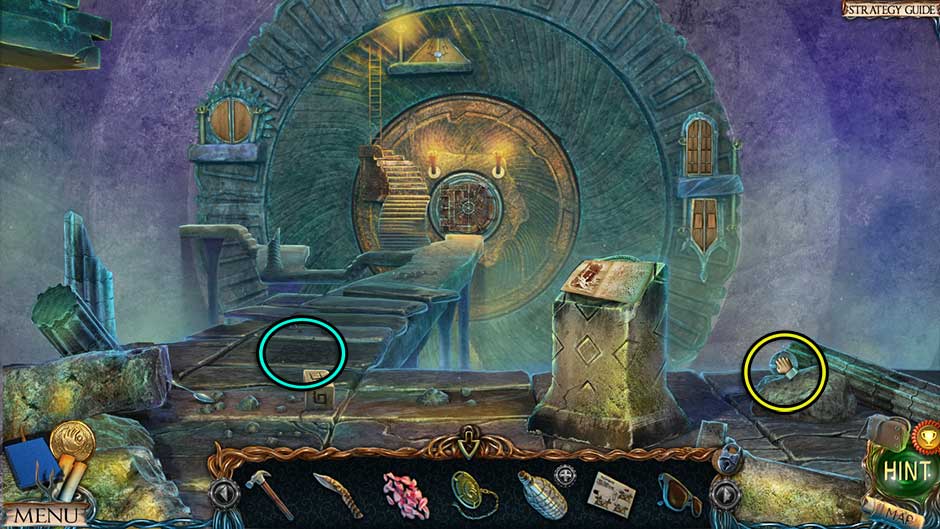
- Morphing Object 29/35 is located in the lower right corner next to the steps.
Lost Lands – The Golden Curse Labyrinth Collectible Location
- Click on the Piece of Pattern on the floor toward the left.
- Examine the ornate alcove above the steps on the right. Place the Piece of Pattern into the slot, then take a closer look at the pedestal above. Click on the Lipstick (Collection Item 12/14) to add it to your inventory. Place the Diamond Key into the slot.
- Back in the view of the main area, click on the Manuscript 24/28 (The Order of Madmen) on the steps on the upper right to collect it.
- Examine the large pendulum on the left. Click on the stone jutting out from the wall to activate a switch, revealing steps to the alcove on the upper left. Before exiting the close-up, collect the Everlasting Match from the top of the pyramid on the left.
- Open the panel in the pendulum. Open the second compartment inside and collect the Ink Formula.
- Proceed through the door at the far end of the room into the next location.
Room of Riddles
- Morphing Object 30/35 is above the archway straight ahead.
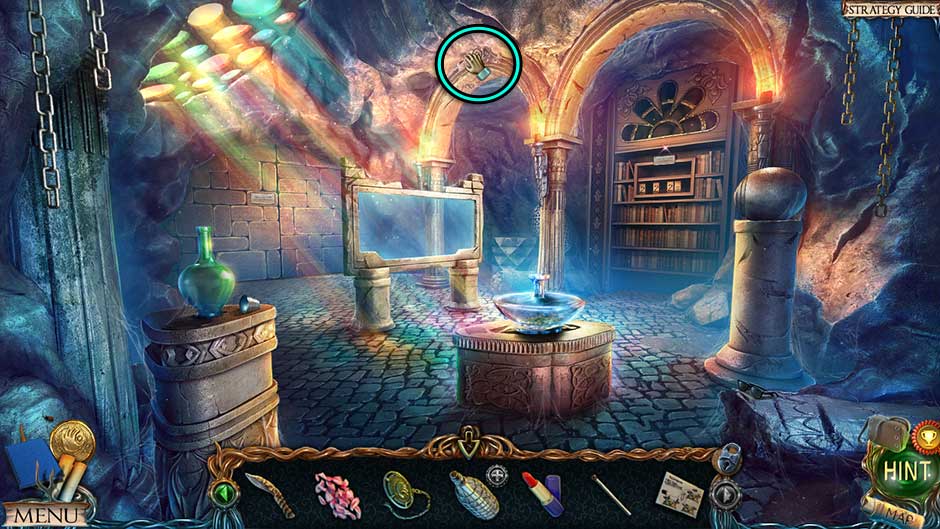
Lost Lands – The Golden Curse Room of Riddles Collectible Location
- Pick up the Sunglasses (Collection Item 13/14) sitting on the rock on the lower right.
- Examine the pedestal on the left. Click on the Lens to add it to your inventory and place the Everlasting Match inside the vase.
- Examine the pedestal on the right to trigger a puzzle.
- Enter the correct code. You saw a hint earlier. The solution is shown below.
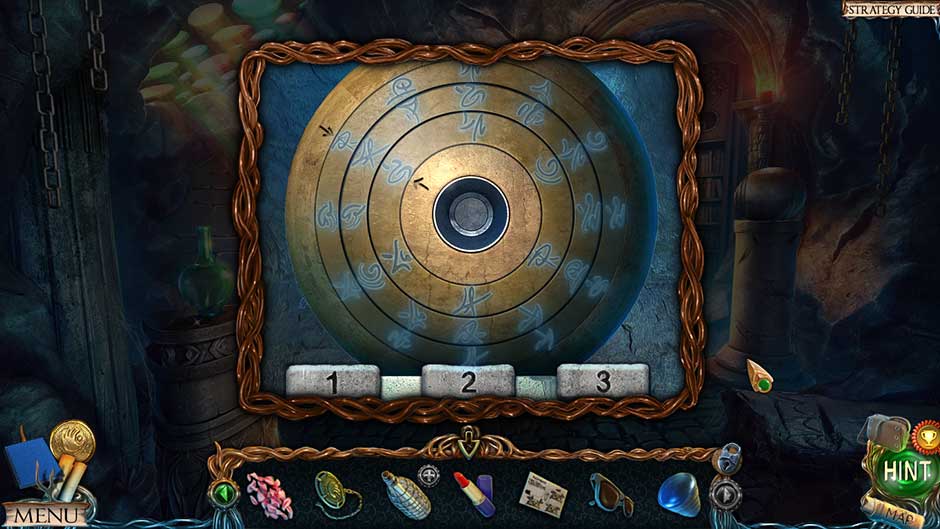
Lost Lands – The Golden Curse Room of Riddles Rotation Puzzle Solution
- Upon completing the puzzle, place the Lens into the center slot.
- Examine the glass surface straight ahead. Use the Lipstick on it to trigger another puzzle.
- Connect the dots in the correct order. The solution is shown below.
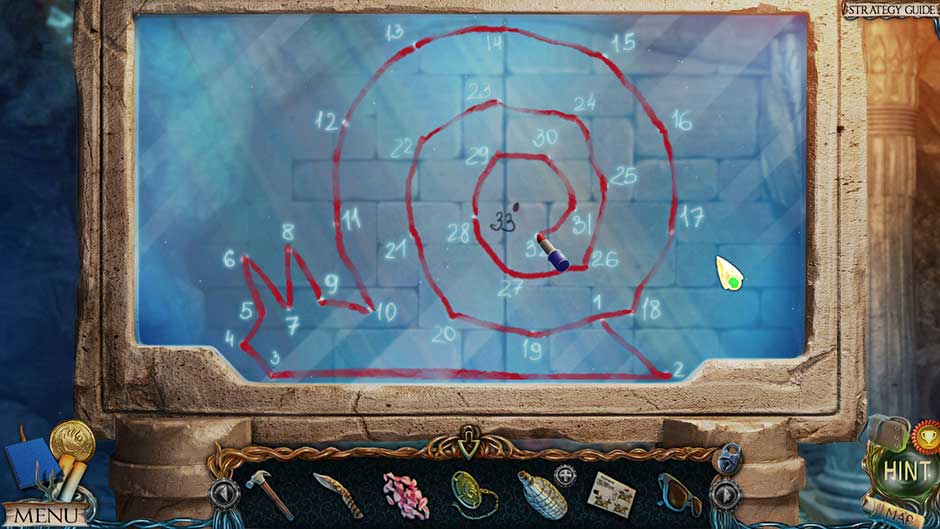
Lost Lands – The Golden Curse Connect the Dots Puzzle Solution
- Once the puzzle is finished, examine the wall behind it. Click on the brick where the snail’s shell swirl ends to open a passage to a new room.
Room of Insanity
- Figurine 21/24 is behind the rubble in the lower right corner.
- Morphing Object 31/35 is at the beginning of the stone steps leading across, just behind the stone block.
Lost Lands – The Golden Curse Room of Insanity Collectibles Locations
- Click on the Stone Block and the Spoon lying on the floor to add them to your inventory.
- Examine the pedestal. Click on Manuscript 25/28 (Ruined Temple) to collect it.
- Make your way back to the Tree of Life.
Tree of Life
- Place the Stone Block on top of the pile on the right, then take a closer look at the top of it. Click on the Egg inside the nest to add it to your inventory.
- Return to the Castle of Madness.
Castle of Madness
- Examine the hot spring on the lower right. Place the Egg in the water to cook it, then use the Spoon to fish out the Boiled Egg.
- Select the Boiled Egg in your inventory and click on it to remove the shell. The shell-less Boiled Egg will be added to your inventory again.
- Go to the Room of Riddles.
Room of Riddles
- Examine the pedestal on the left. Place the Boiled Egg into the glass vase and collect the Crystal Pyramid.
- Enter the Room of Insanity.
Room of Insanity
- Examine the pyramid at the top of the large wheel structure at the other end of the room. Place the Crystal Pyramid at the top, then place the Cursed Minotaur Amulet into the slot on the lower right. Collect the Hand Wheel Key that appears.
- Take a closer look at the vault door on the other end of the room. Use the Hand Wheel Key on the peg on the right, then click to open the door and proceed inside.
The Safe
- Speak with Yudzhit, the Goldsmith. He will give you the Diamonds and Grains.
- Morphing Object 32/35 is located on top of the head of the large statue on the left.
Lost Lands – The Golden Curse The Safe Collectible Location
- Pick up the Bottle of Cologne (Collection Item 14/14) at the base of the steps.
- Take a look at the chest at the base of the steps. Pick up the Piece of the Statue lying on top of it.
- Examine the second tier of steps straight ahead. Read the sign to trigger a puzzle.
- Move the steps according to their value, from cheapest to most expensive. Click on the steps in the number sequence shown below to solve the puzzle.

Lost Lands – The Golden Curse Step Sequence Puzzle Solution
- Upon completing the puzzle, click on the hidden object area that appears. Upon completing it, the Empty Cartridge will be added to your inventory.
- Select the Empty Cartridge in your inventory and open it. Exit the close-up for now.
- Examine the bellows on the steps. Click on the bellows to remove them.
- Zoom in on the top of the large horn statue. Collect the Manuscript 26/28 (The Minotaur).
- Go back to the Cave.
Cave
- Zoom in on the statue on the left. Place the Piece of the Statue into the statue’s face.
- Return to the Fisherman’s Hut.
Fisherman’s Hut
- Examine the bird cage hanging on the left. Place the Diamonds and Grains into the slot. Click on the drawer to allow the bird to feed. Once finished, collect the remaining Diamonds to add them to your inventory.
- Go to the Tavern.
Tavern
- Examine the table on the left. Place the Ink Formula here, along with the Bottle of Cologne.
- Go to Anvil Peak.
Anvil Peak
- Speak with Braeloff. He will give you the Metal Saw.
- Give the Sunglasses to Braeloff, then go to the Island of Exile.
Island of Exile
- Take a closer look at the large circular metal grate in the ground. Use the Metal Saw to cut it open. Collect the “Cube” Tile and Key around the skeleton’s neck to add them to your inventory.
- Go to the Lower Island.
Lower Island
- Examine the stone slab in the ground and place the “Cube” Tile into its respective location.
- Head back to the Underground Lake.
Underground Lake
- Examine the inside of the boat toward the left. Use the Key on the small compartment at the far bottom end of the boat. Collect the Corkscrew and the Leather Roll inside to add them to your inventory.
- Select the Bottle with a Letter in your inventory and use the Corkscrew to remove the cork. You will acquire the Empty Bottle and the Note.
- Return to The Safe.
The Safe
- Give the Diamonds to the Goldsmith.
- Return to the Tavern.
Tavern
- Examine the barrel at the far end of the room. Place the Empty Bottle beneath the spigot and turn the handle to collect the Bottle of Wine.
- Examine the weight table on the left and place the Bottle of Wine
- Head to Anvil Peak.
Anvil Peak
- Give the Leather Roll to Braeloff. He will give you the Sliding Bolt Key.
- Take a closer look at the bellows. Use the Sliding Bolt Key to remove the lock, then collect the Bellows.
- Go to the Hanging Gardens.
Hanging Gardens
- Take a closer look at the tree straight ahead. Pin the Note to the right side of the tree to reveal the secret pattern.
- Head to the Schooner Wreckage.
Schooner Wreckage
- Take a closer look at the red tube beneath the fallen mast to trigger a puzzle.
- Enter the correct code. You saw a hint earlier. The solution is shown below.
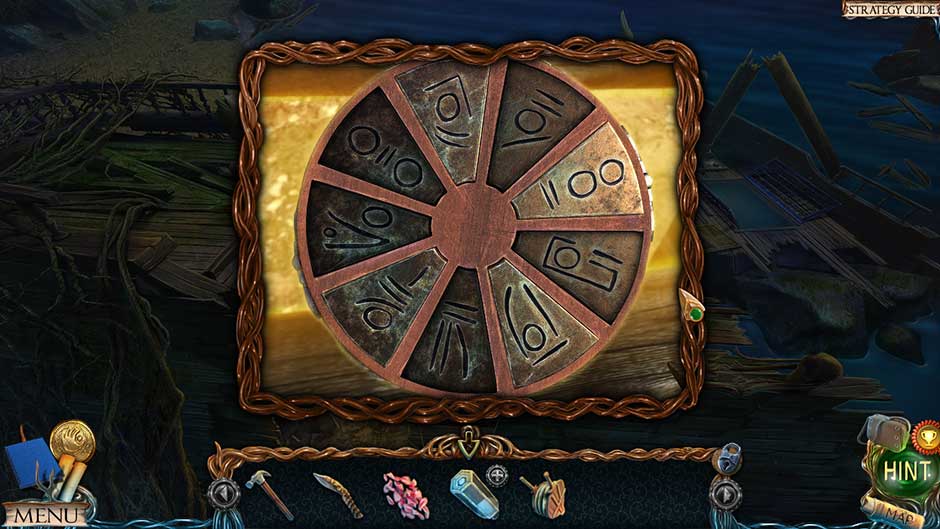
Lost Lands – The Golden Curse Schooner Tube Code Puzzle Solution
- Upon completing the puzzle, open the tube and collect the Tracing Paper
- Return to The Safe.
The Safe
- Take a closer look at the bottom of the large horn sculpture on the right. Place the Bellows
- Go to Leproch’s House.
Leproch’s House
- Examine the painting bench on the far end of the room. Pick up the Flask of Black Paint.
- Head back to the Tavern.
Tavern
- Examine the weighing table on the left. Place the Flask of Black Paint on the table to trigger a puzzle.
- Follow the recipe and measure out the required quantity of ingredients. The solution is as follows:
- Black Oil Paint: 8-unit weight on the left scale, black paint cup and 5-unit weight on the right scale
- Strong Red Wine: 5-unit weight on the left scale, red wine cup and 1-unit weight on the right scale
- Solvent: 1-unit weight (x2) on the left scale, pink solvent cup on the right scale
- Upon completing the puzzle, the Ink Ingredients will be added to your inventory.
- Select the Empty Cartridge in your inventory and open it. Combine with the Ink Ingredients to obtain the Cartridge.
- Make your way back to the Labyrinth.
Labyrinth
- Examine the pendulum on the left. Place the Cartridge inside and collect the resulting Key. Place the Key into the slot in front of the pendulum to release it.
- As the pendulum swings, place the Tracing Paper on the floor. Once finished, collect the Tracing Paper once again.
- Go to the Volcanic Cavern.
Volcanic Cavern
- Examine the design on the left wall of the cavern. Place the Tracing Paper over it. The pattern will be noted in your Journal.
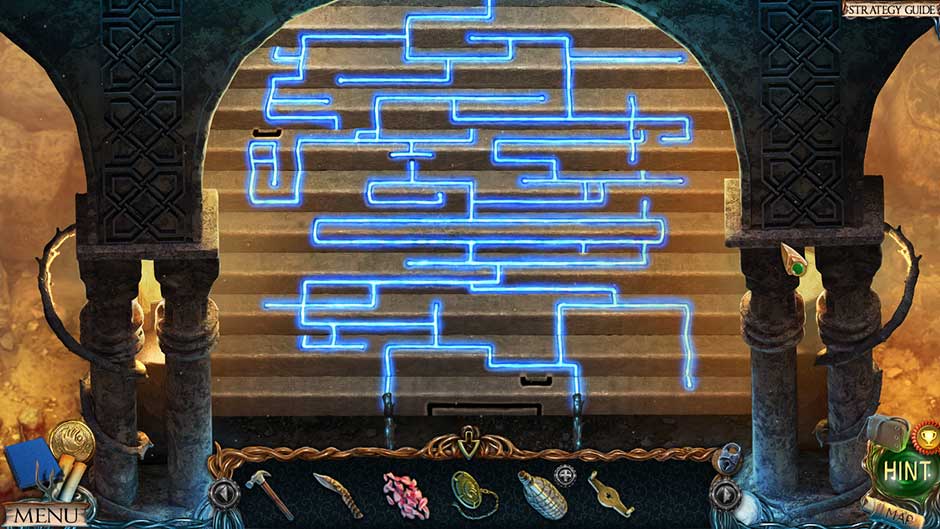
- Examine the box straight ahead. Click on the lock to trigger a puzzle.
- Press the buttons in the correct order. You saw the code earlier. The code is: 3, 6, 9, 12, 15, 18, 21, 24.
- Upon completing the puzzle, click on the Air Element inside the chest to add it to your inventory.
- Go to the Room of Insanity.
Room of Insanity
- Examine the control pedestal nearby. Click on the rings to rotate the room so you can access the left doorway.
- Take a closer look at the round doorway on the left. Place the Air Element on the shelf to open it, then zoom inside and collect the Vacuum Container.
- Head back to the Lower Island.
Lower Island
- Take a closer look at the bonsai-like tree next to the wooden cart on the right. Use the Vacuum Container to collect the Cones of Paralysis and add them to your inventory.
- Head to the Sunken Hull.
Sunken Hull
- Take a closer look at the cluster of coral on the left. Use the Cones of Paralysis in the closeup, then use the Knife to pry open the clam and collect the Pearl
- Return to The Safe.
The Safe
- Give the Pearl to the Goldsmith. You will be rewarded with the Whistle.
- Examine the bellows at the base of the large horn. Place the Whistle between the bellows and base of the horn, then click on it to make the call. You will obtain the Lever. Examine the bellows and do this once more to trigger a cutscene.
- Exit to the Labyrinth.
Labyrinth
- Take a closer look at the alcove high in the wall on the left. Use the Lever on the slot on the right.
- Back in the main area, click on the Bull-head Key sitting at the base of the steps on the right to add it to your inventory.
- Examine the pedestal with the diamond key above you. Place the Bull-head Key on top, then click it.
- Enter the Minotaur’s Lair.
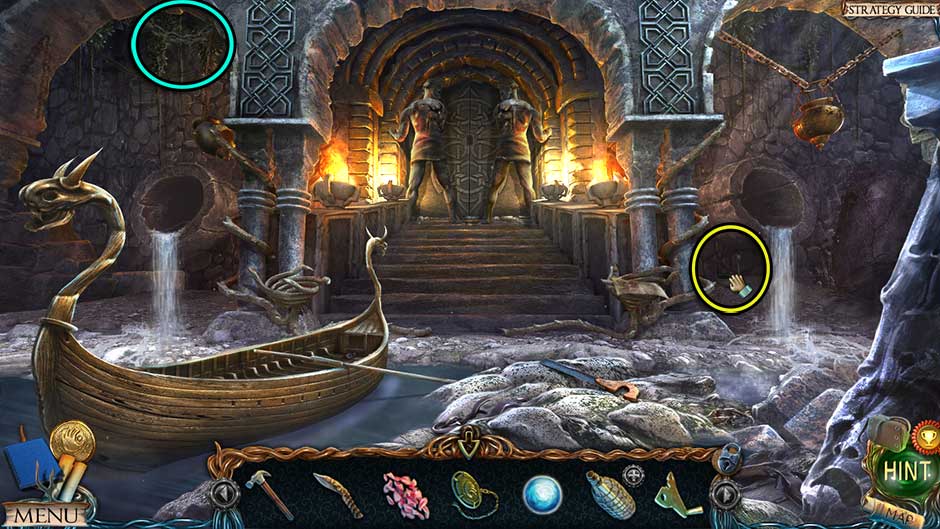
Minotaur’s Lair
- Figurine 22/24 is in front of the fountain in the wall on the left.
- Morphing Object 33/35 is on the right wall above the corpse.
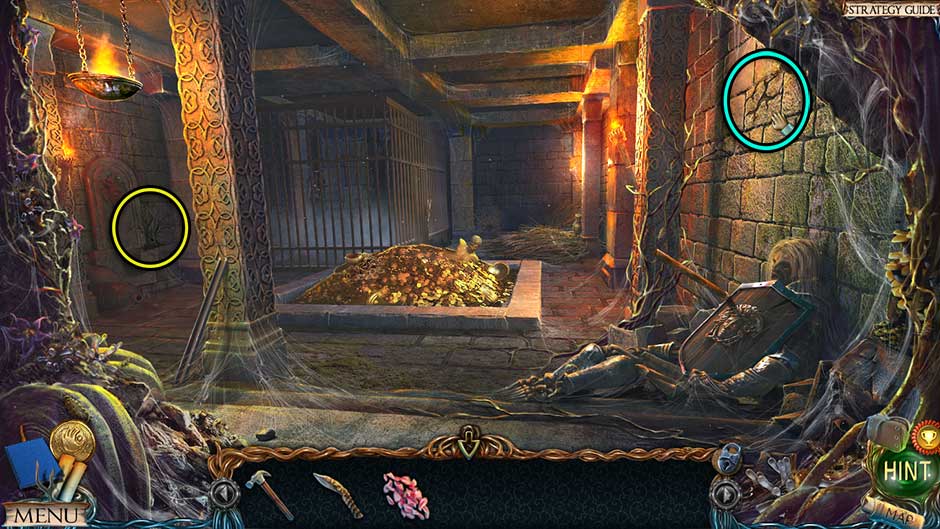
Lost Lands – The Golden Curse Minotaurs Lair Collectibles Locations
- Pick up Rail 1/2 propped up against the pillar on the left.
- Take a closer look at the bed of hay straight ahead. Collect the Jug of Water.
- Examine the cage in the back left corner. Collect Manuscript 27/28 (The Last of the Madmen).
- Zoom in on the corpse on the right. Click to move the shield aside, then click on the Trident to add it to your inventory.
- Examine the hay bedding at the far end of the room again. Use the Trident to sift the hay aside, revealing a box. Click to open it and collect the Tiles
- Head back to the Room of Riddles.
Room of Riddles
- Take a closer look at the bookshelf on the right. Use the Tiles on the closeup to trigger a puzzle.
- Move the tiles to get the correct equation. The solution is as follows: 2 ÷ 2 + 2 = 3.
- Enter through the new doorway and into the next area.
Great Library
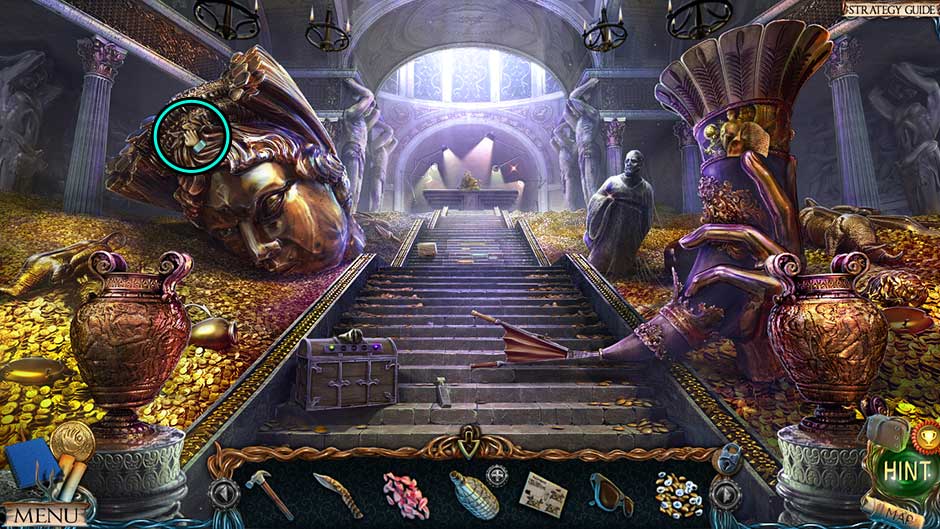
- Figurine 23/24 is in the opening of the curtains on the left.
- Morphing Object 34/35 is amid the scrolls beneath the large dome.
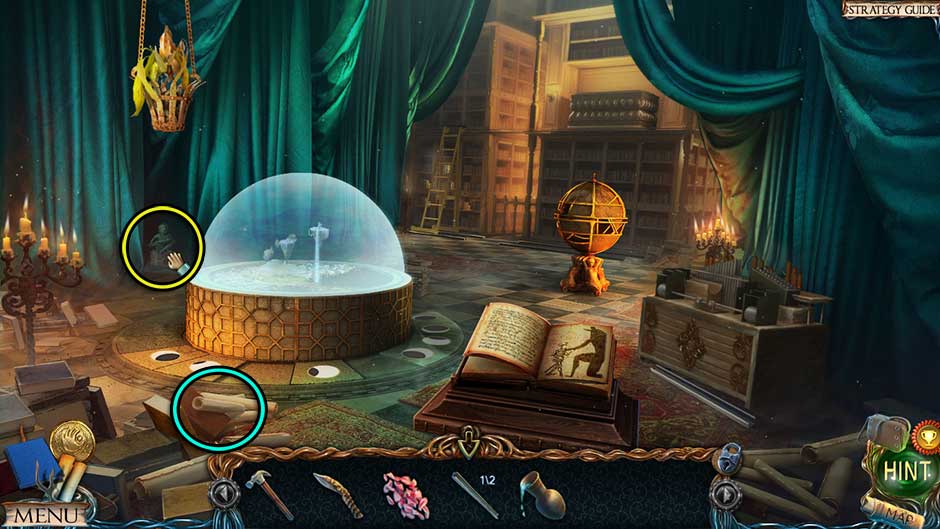
Lost Lands – The Golden Curse Great Library Collectibles Locations
- Collect the Rail 2/2 lying on the ground in front of the box on the right.
- Take a closer look at the floor straight ahead. Place the Rails x2 onto the tracks to complete them, then click on the ladder at the far end of the room to slide it into position.
- Click on the Hanging Bucket on the upper left to knock it down, then click on it again to add it to your inventory.
- Zoom in on the book in front of you. Click to turn the page, then click on the Casket Button inside to add it to your inventory.
- Exit to the Room of Riddles.
Room of Riddles
- Take a closer look at the center pedestal. Use the Jug of Water on the jar and collect the Rope Ladder which appears.
- Backtrack to the Tree of Life.
Tree of Life
- Zoom in on the tree house straight ahead. Use the Casket Button on the box in the hollow and collect the Disk Knife
- Return to the Sunken Hull.
Sunken Hull
- Examine the door at the far end of the area. Use the Disk Knife to cut the algae, revealing a hidden object area. Upon completing the hidden object area, the Bench Piece will be added to your inventory.
- Return to the Underground Lake.
Underground Lake
- Examine the large turtle shell on the left. Use the Bench Piece to flip the shell. Collect the Metalworking Scissors beneath and note the pattern on the underside of the shell.
- Go to the Minotaur’s Lair.
Minotaur’s Lair
- Look at the corpse on the right again. Use the Metalworking Scissors to cut open the breastplate. Collect the Piece of the Pattern within to add it to your inventory.
- Return to the Great Library.
Great Library
- Examine the area above the ladder at the far end of the room. Insert the Piece of the Pattern into the top of the sarcophagus, then click to open it. Collect the Manuscript 28/28 (Geo-table), the Keeper’s Manuscript, and the Empty Beaker
- Enter The Safe again.
The Safe
- Give the Keeper’s Manuscript to the Goldsmith.
- Return to the Minotaur’s Lair.
Minotaur’s Lair
- Take a closer look at the pile of gold in the center of the room. Sprinkle the Rose Petals on top of the gold. Click on the petal which dies to sift it and gold aside, then click to collect the Cursed Bull Ring.
- Examine the ruins of the Minotaur on the floor once the cutscene has passed. Use the Hammer to break off the finger and collect the Signet Ring.
- Examine the break in the column on the left. Click on the lever chain to pull it.
- Return to the Cave.
Cave
- Take a closer look at the base of the statue on the left. Insert the Signet Ring and click.
- Examine the face of the statue on the left. Collect the Sapphire and the Ruby from the basin of water to add them to your inventory.
- Look at the small pedestal which rises in the center of the room. Click to open it and collect the Emerald
- Head to Anvil Peak.
Anvil Peak
- Examine the small wood shed straight ahead. Click on the edge for a closer view. Use the Hanging Bucket to reach the Half-eclipse Tile and add it to your inventory.
- Return to the Great Library.
Great Library
- Place the Half-eclipse Tile into the floor around the dome. Tip: You will be returning here soon with one more.
- For now, head back to The Safe.
The Safe
- Take a closer look at the chest at the base of the steps. Insert the Ruby, the Sapphire, and the Emerald into the slots and collect the Jade Skull
- Make your way back to the Ancient Graveyard.
Ancient Graveyard
- Take a closer look at the circle of jade skulls straight ahead. Place the Jade Skull on top of the pedestal on the left to trigger a puzzle.
- Arrange the skulls so that they are all looking toward the center. The solution is shown below.
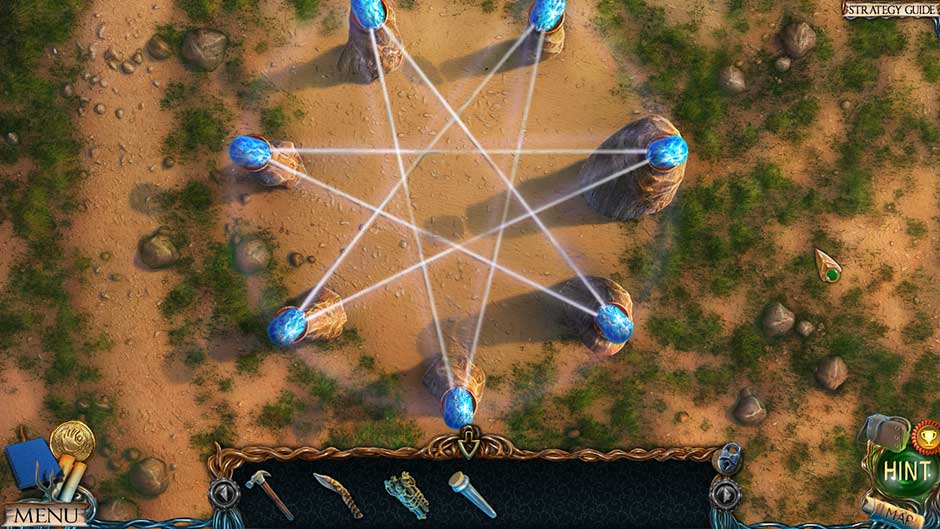
Lost Lands – The Golden Curse Jade Skulls Puzzle Solution
- Upon completing the puzzle, click on the Water Element that appears in the center of the ring to add it to your inventory.
- Return to the Room of Insanity.
Room of Insanity
- Click on the pedestal and rotate the rooms so that you can access the room on the left with the orange-lit door.
- Take a closer look at the door on the left side of the ring. Place the Water Element on the shelf to open the door, then take a closer look inside. Collect the Books from the shelf on the scorpion’s tail.
- Return to the Great Library.
Great Library
- Examine the bookshelves straight ahead. Place the Books on the shelf to trigger a puzzle.
- Press the buttons with the numbers that are skipped on the shelf. The solution is as follows: 4, 12, 17.
- Upon completing the puzzle, a hidden object area will appear. Complete the area to receive the Spell Book.
- Return to the Elders’ House.
Chapter 5: Elixir of Animation
The Minotaur is defeated, but can you face the remaining evil on your own, or will you require the help of someone else?
Elders’ House
- Collect the Broom propped up against the right pillar.
- Give the Spell Book to the Elder. You will receive the Lever and the Elixir of Animation Formula.
- Take a closer look at the statue on the right. Use the Empty Beaker on the statue’s tears to acquire the Nymph’s Tears.
- Examine the shelf on the left. Place the Elixir of Animation Formula Pour the Nymph’s Tears into the jar.
- Make your way to the Hills.
Hills
- Examine the remains of the Harpy on the left. Use the Hammer to break the Chest of Gold 1/9 (Claw) free of the Harpy’s grasp and add it to your inventory.
- Go to the Cave.
Cave
- Take a closer look at the statue on the right. Collect the Chest of Gold 2/9 (Knuckles) from the base.
- Head to the Underground Lake.
Underground Lake
- Use the Broom to sweep away the sand in the lower right corner, revealing a clutch of eggs. Click to break open each of the eggs. Collect the Switch and the Dragon-egg Shells to add them to your inventory.
- Enter the Schooner Wreckage.
Schooner Wreckage
- Examine the remains of Naga on the deck. Collect the Chest of Gold 3/9 (Net) to add it to your inventory.
- Return to the Minotaur’s Lair.
Minotaur’s Lair
- Take a closer look at the remains of the Minotaur on the floor. Click on the Chest of Gold 4/9 (Nose Ring) to add it to your inventory.
- Return to the Elders’ House.
Elders’ House
- Take a closer look at the table on the left. Place the Dragon-egg Shells into the mortar and use the pestle to crush it. Pour the powder into the jar.
- Make your way to the Crossroads.
Crossroads
- Take a closer look at the metal grating straight ahead. Place the Lever on top of the stand and click on the grate to open it.
- Examine the inside of the grate, which peers straight down. Use the Rope Ladder on the inside of the tunnel down.
- Take a closer look at the center hole again. This time you will get a closeup of below. Collect the Full-eclipse Tile from the ivy, then click to clear the rest away. Open the hidden panel and use the Switch on the instrument inside. Click on it to toggle it from the + to the – setting.
- Backtrack to Leproch’s Tomb.
Leproch’s Tomb
- Take a closer look at the two children with the gold scepter between them. Use the Hammer to carefully remove it, adding the Cursed Scepter to your inventory.
- Examine the adult explorer. Click on the Cursed Key to add it to your inventory.
- Examine the small boy behind the explorer. Use the Knife to remove the hardened dirt beneath the tip of the sword, then click to add the Cursed Sword to your inventory.
- Return to the Crossroads.
Crossroads
- Examine the face of the metronome on the right, then proceed up the steps to the small booth. Use the Cursed Key to open the door, acquiring the Chest of Gold 5/9 (Key). Click to open the door and collect the (normal) Key
- Return to the Elders’ House.
Elders’ House
- Take a closer look at the throne straight ahead. Place the Cursed Scepter into the slot on the left and collect the resulting Glass Punchcard which appears. Re-collect the Chest of Gold 6/9 (Scepter).
- Go to the Great Library.
Great Library
- Place the Full-eclipse Tile at the base of the large dome. Take a closer look at the dome to trigger a puzzle.
- Move the tiles into the correct order. The solution is shown below.
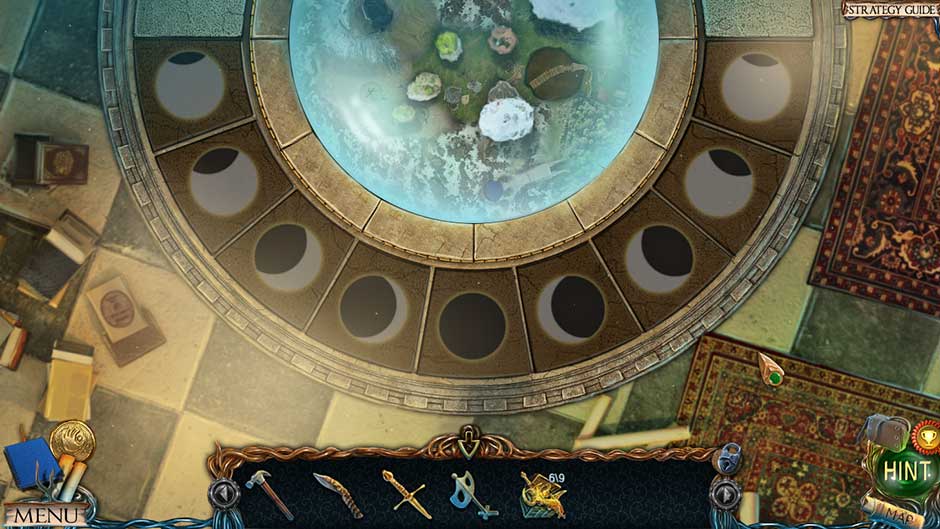
Lost Lands – The Golden Curse Eclipse Tile Puzzle Solution
- Upon completing the puzzle, the cover of the dome will be removed. Take a closer look at the model within and click on the rightmost island to move it into a new position.
- Make your way to the Ruined Temple via Anvil Peak.
Ruined Temple
- Figurine 24/24 is in the snowbank on the right above the grate from which the water flows.
- Morphing Object 35/35 is on the left side of the leftmost ruined structure.
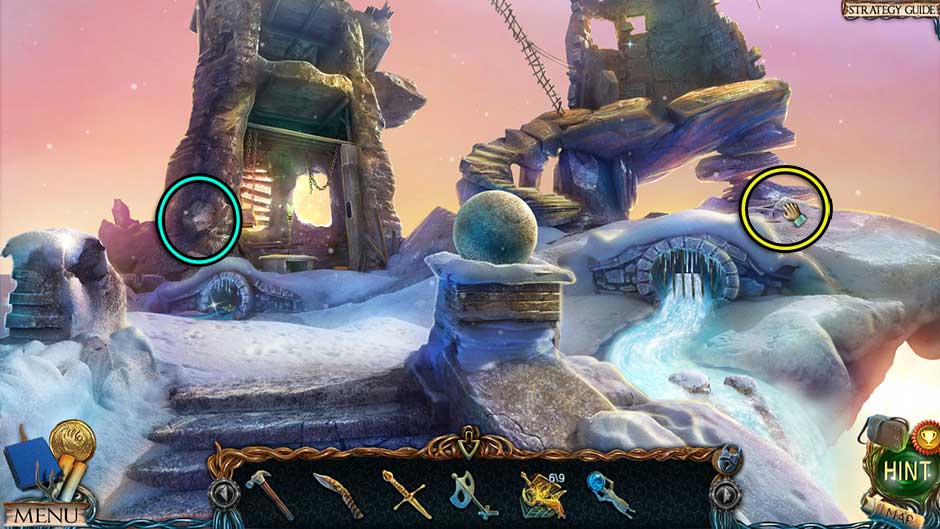
Lost Lands – The Golden Curse Ruined Temple Collectibles Locations
- Click on the Father Figurine at the bottom of the screen to add it to your inventory.
- Click on the hidden object area within the ruined building on the left. Upon completing the area, the Crown Piece will be added to your inventory.
- Take a closer look at the water drain on the left. Click on the Crown Part inside to add it to your inventory.
- Select the Crown Piece in your inventory and combine it with the Crown Part to acquire the Crown.
- Examine the spherical stone in front of you. Click on the Dice beneath to add them to your inventory.
- Take a closer look at the structure on the upper right. Click on the stone for a closer look, then use the Key on the +-shaped slot.
- Examine the top of the leftmost ruined structure for a closer view. Click to clear away the rubble, then click on the Handle to add it to your inventory.
- Proceed to the Tree of Life.
Tree of Life
- Take a closer look at the glowing pole on the left. Place the Father Figurine on the right stand.
- Examine the stone slab on the lower left. Click on it, and it will rise up. Examine it once again to collect the Tree of Life Fruit from the branch above.
- Go to the Elders’ House.
Elders’ House
- Zoom in on the table on the left again. Place the Tree of Life Fruit on the table, then use the Knife to cut it. Click on the fruit to squeeze it into the container. Bottle it up and select the Elixir of Animation to add it to your inventory.
- Go to Leproch’s Tomb.
Leproch’s Tomb
- Examine the inside of the large stone sarcophagus. Use the Elixir of Animation on the corpse of Leproch within. You will obtain the Key.
- Examine the inside of the sarcophagus again. Use the Key on the slot near the gold and click to obtain the Chest of Gold 7/9 (Coins).
- Go to the Great Library.
Great Library
- Examine the large musical chest on the right. Use the Handle on it and collect the Spring that appears at its base.
- Take a closer look at the base of the gold globe. Use the Spring on the base, then take a closer look at the globe itself. Click on it to open it up, revealing the Fire Element. Click on it to add it to your inventory.
- Enter the Room of Insanity.
Room of Insanity
- Take a closer look at the stone pedestal and rotate the wheels so that you can access the arched door on the right. Place the Fire Element on the shelf on the door to open it, then take a closer look inside. Collect the Plank on the stand to add it to your inventory.
- Enter The Safe.
The Safe
- Examine the stone statue of the man to the right of the stairs. Place the Crown on his head and collect the Stone Tablet which appears.
- Select the Stone Tablet from your inventory and use the Hammer to smash it. Click to clear away the pieces until you’ve collected the Wooden Punchcard hidden within.
- Go to the Minotaur’s Lair.
Minotaur’s Lair
- Zoom in on the cell at the back of the room. Use the Glass Punchcard and the Wooden Punchcard on the lock to open it, then take a closer look inside, where there’s a hidden object area. Complete it successfully to receive the Spreading Tool.
- Return to The Safe.
The Safe
- Take a closer look at the large statue head on the left. Use the Spreading Tool to open the eyelid, then click on the eye to roll it until the Lens Click on it to add it to your inventory.
- Backtrack to the Harpy’s Nest.
Harpy’s Nest
- Examine the pedestal on the right side of the island. Place the Lens on the pedestal and click to angle it.
- Take a closer look at the glowing marking which appears on the ground nearby. Use the Cursed Sword on the positioning crosshairs to raise the ground.
- Zoom in on the newly raised portion of ground. Click on the handle sticking out to clear away the dirt, pulling out a box. Click to open it and add the Dice, clicking again to trigger a mini-game
- Roll the dice to win the game. You need to land on the 31 space exactly to finish it. Tip: The game is entirely randomized. You will need to simply roll over and over until you land on the 31 space.
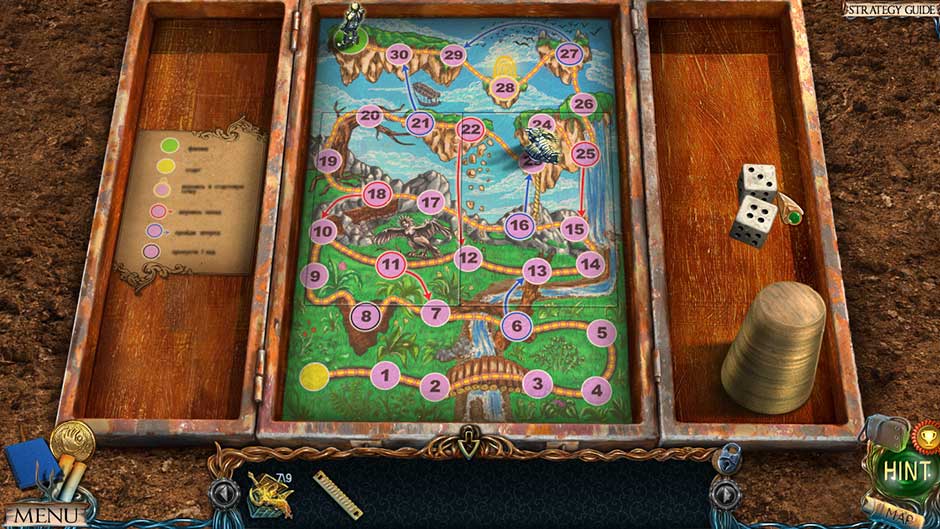
Lost Lands – The Golden Curse Dice Game
- Upon completing the puzzle, the game board will open, revealing a secret compartment. Click on the Ratchet Strap inside to add it to your inventory.
- Examine the sword in the ground again. Click on the Chest of Gold 8/9 (Sword) to add it to your inventory.
- Proceed to the Ruined Temple.
Ruined Temple
- Take a closer look at the water grate on the right. Use the Ratchet Strap on the bars, then click to tighten them. Take a closer look inside and use the Plank to trigger a puzzle.
- Move the strips so that their symbols match. You’ve seen the correct pairs before. The solution is shown below.

Lost Lands – The Golden Curse Plank Puzzle Solution
- Upon completing the puzzle, click on the “Sanctuary” Tile to add it to your inventory.
- Head to the Lower Island.
Lower Island
- Examine the stone slab in the ground. Place the “Sanctuary” Tile into the remaining slot and collect the Chest of Gold 9/9 (Horn) that appears.
- Go to the Arena.
Arena
- Examine the top of the stone pedestal on the left. Place the Chest of Gold 9/9 at the top. You will receive the Tile.
- Take a closer look at the base of the stone pedestal. Place the into the board, then click on it to trigger a puzzle.
- Find the pairs. The solutions are shown below.
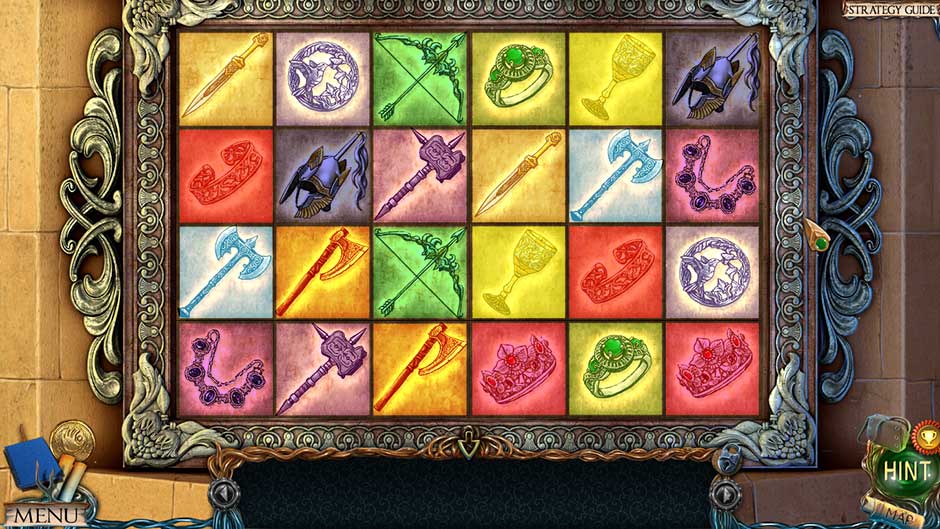
Lost Lands – The Golden Curse Tile Pairs Puzzle Solution
- Upon completing the puzzle, click on the Key to add it to your inventory.
- Examine the pole axe in the distance straight ahead. Use the Key to unlock the the guard, then click on the Pole Axe to add it to your inventory.
- Examine the dwarf king at the top of the steps ahead. Use the Pole Axe to free the Golden Cup from his grasp.
- Take a closer look at the treasure chest on top of the stone pedestal again. Place the Golden Cup
With the last champion defeated, the main adventure comes to a close. However, numerous extras and a bonus chapter await! Do you have what it takes to help Susan find her way home? What about her friends?
Congratulations! You’ve completed our Lost Lands – The Golden Curse Walkthrough! For more great tips and tricks, visit our blog!
Delicious – Emily’s Hopes and Fears Walkthrough
Big City Adventure – Shanghai Walkthrough
Building the Great Wall of China 2 Walkthrough
The Lost Lands – The Golden Curse Walkthrough is meant as a guide and does not contain cheats, hacks, or serials.