Rewrite history, and solve a mystery! Posing as a journalist to enter the Titanic, you attempt to track down Robert Ashley and dispel the enigma that is his life. Unfortunately, in the process you become trapped inside the wreckage of the Titanic. In order to escape this watery jail, you must travel through time to rewrite tragedies and unlock the reason fate chose you. This Hidden Mysteries – Return to the Titanic Walkthrough will provide you with the tips and tricks you need to get through the challenges you will face as you work through the mystery of the Titanic.
Contents
General Tips & Tricks
- This game is divided into chapters. Many tasks within the chapter can be done out of order, but some are required before the story can advance.
- Sparkling items indicate the start of an hidden object section. Click on them to begin.
- Many sections of the story are randomized; the solutions will vary from game to game.
- The hint button is useful if you get stuck on a task in game. Hints are unlimited, but have a recharge timer before a new one is given.
- The notes tab contains information about your current objectives
- The blueprints page functions as your map.
- Locations marked as flashback take place in the past. Locations marked underwater are set in the present
Hidden Mysteries – Return to the Titanic Walkthrough
Chapter 1
- Begin the game by accepting the anonymous tip from the steward.
- Talk to Janeck Sarasvat.
- Enter the First Class Passageway area.
- Collect the Newspaper in the bottom right portion of the scene.
- Travel to the First Class Passageway
- Talk to Diana.
- Grab the Light Bulb from the lower shelf on the table with the vase on it.
- Go back to through the First Class Passageway to the Grand Staircase.
- Go up to the Upper Lobby.
- Talk to Montague.
- Grab the Note from the table.
- Go through the glass door to the Forward Deck.
- Talk to the Captain.
- Return to the Grand Staircase.
- Go back to the First Class Passageway,
- Enter the closed door on your right to get to Your Room.
- Use the Light Bulb on the Lamp.
- Zoom in on the desk, and open your drawer.
- Grab the Note and the Press Pass.
- Zoom in on the Suitcase. The code is 4 8 1.

Hidden Mysteries – Return to Titanic – Suitcase Code
- Click on the sparkles to start a Hidden Object Scene.
- Collect all the items listed at the bottom of the scene, and get the Straight Razor.
- Leave Your Room, and return to the Grand Staircase.
- Go down the stairs to the Lower Lobby.
- Click on the Fireplace, and pick the Wooden Planks and the Claw Hammer.
- Speak with Joseph.
- Click on the Paintings, and use the Straight Razor to get the Painting.
- Return to the entrance to the First Class Passageway.
- Use the Claw Hammer on the Nails on the left wall to remove them.
- Travel back to the Upper Lobby.
- Finish the minigame to expose a nail.
-
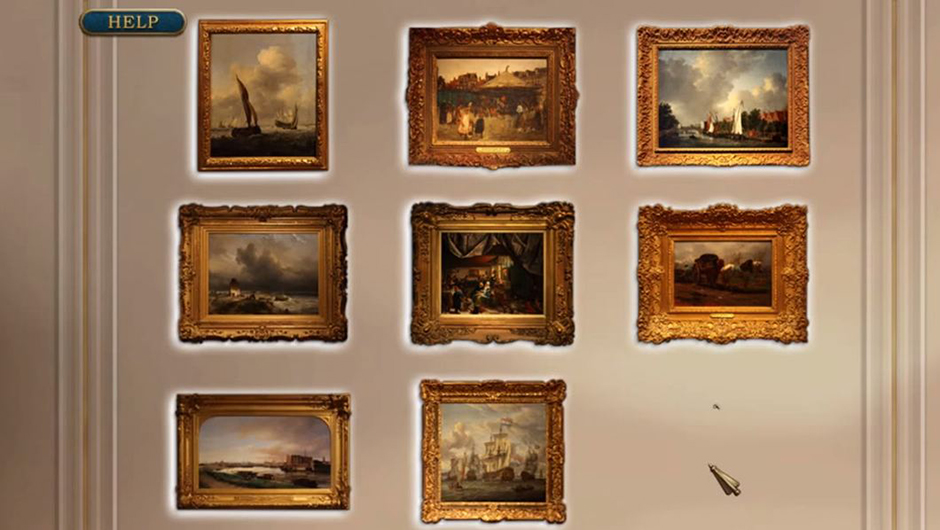
Hidden Mysteries – Return to Titanic – Paintings Solution
- Use the Claw Hammer to remove it.
- Go to the Forward Deck.
- Click on the Water Tank; collect the nail using the Claw Hammer.
- Click on the ladder.
- Attach the Wood Planks. Secure each plank using the Nails and the Claw Hammer.
- Climb up and talk to Robert Ashley to complete Chapter 1.
Chapter 2
- Once the Handgun hits the ocean floor, collect it.
- Grab the Anchor on the left of the scene.
- Click on the bag, and collect the Passport.
- Go into the Elevator Shaft.
- Toss the Anchor on the opening to enter the Grand Staircase.
- Speak with the Overseer (the smoke). He will seal off most passages.
- Enter the First Class Passageway.
- Take the Lead Pipe and the Thick Rag.
- Continue forward, and collect the Scissors.
- You are now able to enter the Engine Room; enter it.
- Flip over the wheel barrel with the Lead Pipe.
- Take the Doorknob.
- Return to the second First Class Passageway.
- Use the Doorknob on the door.
- Talk to Diana’s Ghost.
- Enter the portal.
- Enter the Stateroom in the Flashback.
- Take the Gloves.
- Enter the Engine Room in the Flashback.
- Click on the mine cart.
- Use the Gloves to move the hot coals, and collect the Brick.
- Leave the Engine Room.
- Use the Brick to smash the bottle; take the
- Return to the Stateroom, and use the Key to enter the closet.
- Click on the sparkles to start an Hidden Object Scene.
- Complete the scene, and collect the Golf Club.
- Go back to the Engine Room.
- Use the Golf Club on the handles of the cabinet near the right of the scene.
- Go back through the portal to the wreckage.
- Enter the Underwater Engine Room.
- Remove the Golf Club
- Click on the sparkles to start the second Hidden Object Scene of the chapter.
- Complete the scene to get the
- Go through the portal.
- Use the screwdriver on the door handle in the Flashback FIrst Class Passageway.
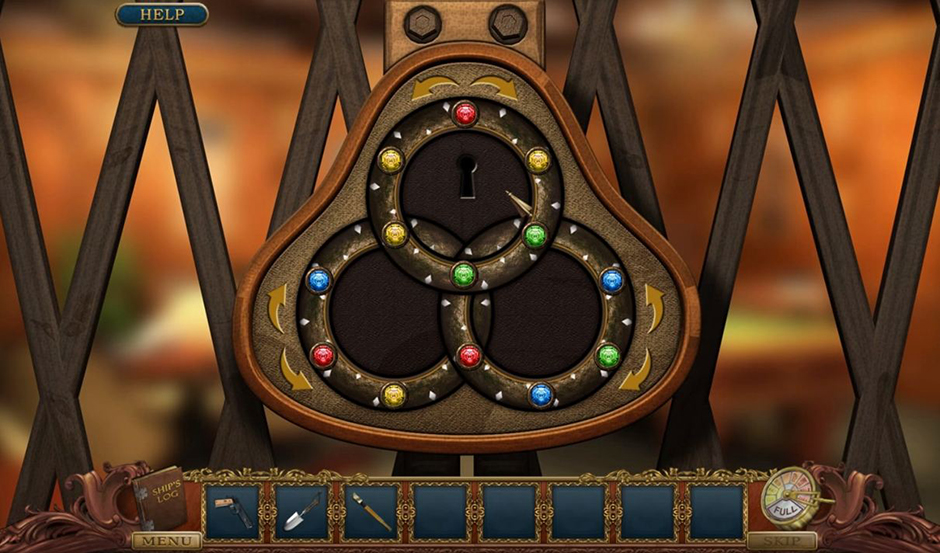
- This starts a randomized puzzle.
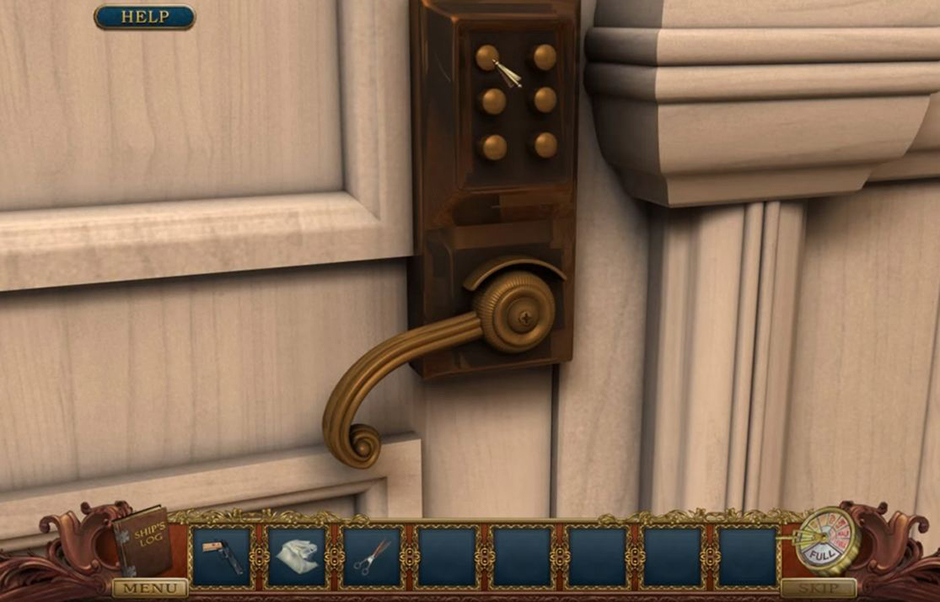
Hidden Mysteries – Return to Titanic – Door Handle
- Solve the puzzle to enter Diana’s stateroom.
- Talk to the ghost of Diana’s brother.
- Return to the wreckage, and talk to Diana’s ghost.
- Go to the Underwater Grand Staircase, and talk with the Overseer.
Chapter 3
- Go up the staircase to the Reading Room.
- Click on the fireplace, and take the Fireplace Shovel.
- Leave the ship, and go to the Stern Hull.
- Use the Fireplace Shovel to dig up the sand.
- Take the Pipe Wrench.
- Go inside the wrecked ship, and enter the Washroom.
- Use the Pipe Wrench to remove the
- Go back to the Reading Room.
- Click on the floor near the cracked bowl; take the J Shaped Pipe and the Pocket Watch.
- Click on the table, and use the Pocket Watch on the board.
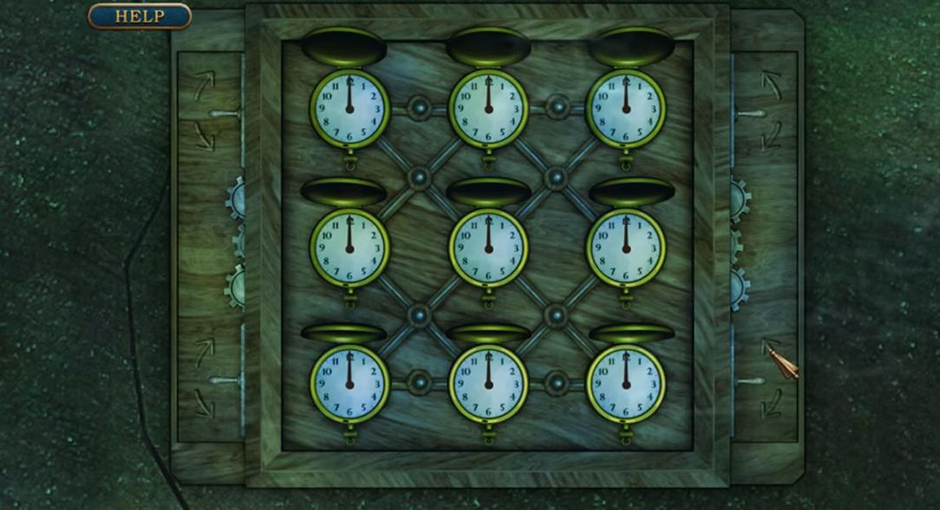
Hidden Mysteries – Return to Titanic – Pocket Watch
- Completing the puzzle reveals Janeck; this chapter’s goal.
- Go through the portal
- Speak to Flashback Janeck.
- Enter the Flashback Washroom.
- Grab the
- Go back through the portal to the Underwater Washroom.
- Use the Plunger to unclog the toilet.
- Take the Gold Disk.
- Go back through the portal to the Flashback Reading Room.
- Click on the box. Use the Scissors to cut the rope.
- Take the book, and put the book on the shelf on the right of the scene.
- Zoom in on the lock that was revealed.
- Put the Gold Disk into the open space.
- This starts a randomized puzzle minigame. The goal is to match the icons on the medallions with the icons on the spaces. Each medallion will slide, meaning it needs a clear path to its destination in order to be moved.
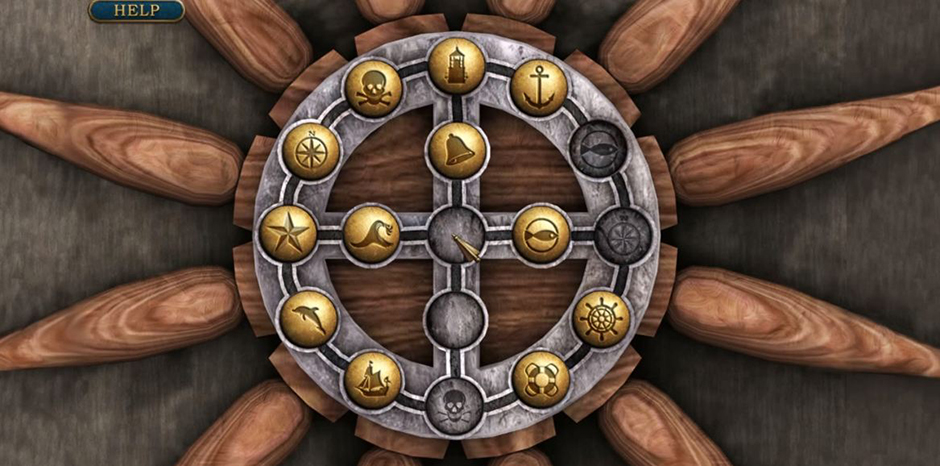
Hidden Mysteries – Return to Titanic – Medallions
- Complete the puzzle to open the Secret Passageway. Take this.
- Knock over the trashcan to find the Small Key.
- Take the door to the Flashback Infirmary.
- Take the Flashlight from the cabinet.
- Find the Bed Pan under the sheets.
- Use the Small Key to unlock the closet.
- Click on the sparkles to start a Hidden Object Scene.
- Complete the scene to earn an Oxygen Tank.
- Go back to the Flashback Washroom.
- Put the Oxygen Tank in the porthole.
- Go back through the portal to the Underwater Washroom.
- The Oxygen Tank blew out a large hole in the ship’s hull. Exit the ship.
- Click on the sparkles to start a Hidden Object Scene.
- Complete the scene to get the Fire Station Mallet.
- Return to the Flashback Secret Passage.
- Use the Fire Station Mallet to break the glass.
- Take the Fire Axe.
- Go Back to the Flashback Washroom.
- Chop beam, at the top and bottom, to get the Wood Beam.
- Go to the Underwater Washroom, and exit the ship.
- Place the Wood Beam over the rift in the scene.
- Go to the Coral Reef.
- Click on the hole. Use the Flashlight, and take the Paint Scraper.
- Leave the Coral Reef.
- Use the Paint Scraper to take the Mussels from the side of the ship.
- Collect the Mussels in the Bed Pan.
- Go back to the Coral Reef.
- Feed the octopus the Mussels
- Click on the canister. Take the SOS Message.
- Go to the Underwater Reading Room and speak with Jack’s Ghost.
- Return to the Grand Staircase.
Chapter 4
- Exit via the Port Hull
- Click on the crank. Take the Crowbar.
- Return to the Underwater Washroom, and exit the ship.
- Click on the Crane, and use the Crowbar to remove the
- Received the David Crank.
- Click on the sparkles to start a Hidden Object Scene.
- Complete the scene to get the Metal Shears.
- Return to the Port Hull.
- Click on the Crank. Use the Davit Crank to spin the handle.
- Click on the sparkles to start a Hidden Object Scene.
- Complete the scene to get the Diavit Hook.
- Attach the Diavit Hook onto the chain, and attach the chain to the ship.
- Spin the handle on the crank again.
- Enter the Dining Room.
- Pull on the
- Click on the rubble, and take the Champagne.
- Enter the Bar.
- Take the Menu.
- Place the Champagne on the shelf to start a randomized puzzle.
- Solve the puzzle, and talk to Montague’s ghost.
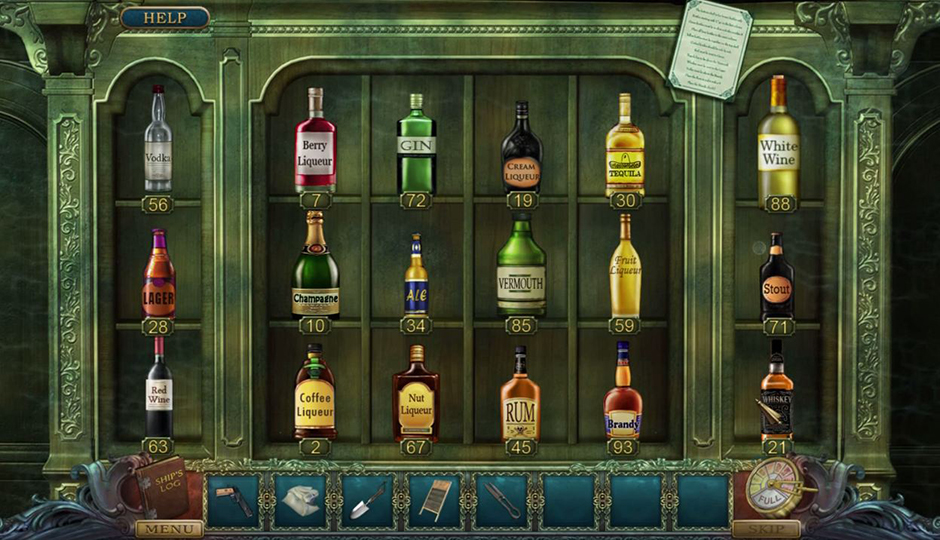
Hidden Mysteries – Return to Titanic – Champagne
- Enter the Flashback Dining Room.
- Click on the sparkles to start a Hidden Object Scene.
- Complete the scene to get the
- Click on the coat; take the Luggage Key.
- Click on the table. Use the Thick Rag to remove the lid.
- Take the Carving Knife.
- Go to the Flashback Gallery.
- Take the Baking Soda from the Cabinet.
- Go to the Flashback Boat Deck.
- Speak with Montague.
- Remove the cover from the lifeboat, and take the Boat Hook.
- Click on the chest. Take all five Darts.
- Prop open the Ice Chest Door with the
- Take the Ice Axe.
- Place the Darts on the dartboard to start a randomized puzzle.
- Solve the puzzle, and click on the compartment behind the dart board.
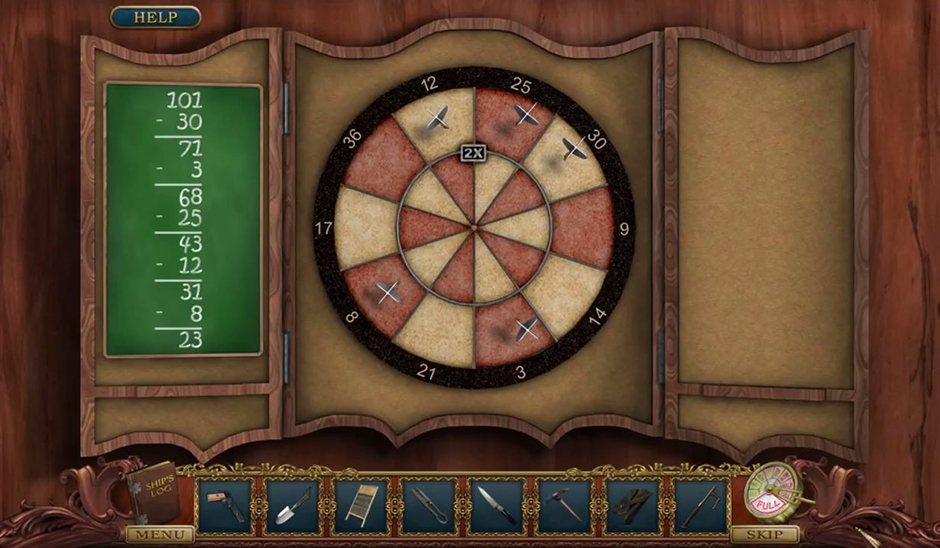
Hidden Mysteries – Return to Titanic – Dartboard
- Take the Hair Gel and Comb.
- Use the Boat Hook to move the Chandelier.
- Go back through the portal.
- Enter Montague’s Stateroom through the new hole.
- Take the note,
- Click on the Table Drawer, and take the Scrub Brush.
- Click on the wardrobe door, and take the Tie.
- Use the Metal Shears to cut open the Locker door.
- Take the Gate Key.
- Go back to the Underwater Port Hull.
- Open the luggage with the Luggage Key, and take the Suit.
- Go to the Underwater Bar.
- Click on the Use the Baking Soda and then the Scrub Brush to clean the valve.
- Spin the Valve.
- Go into the Underwater Dining Room.
- Click on the ice. Use the Ice Axe four times.
- Take the Shoes.
- Return to the Underwater Lower Lobby.
- Click on the Fireplace, move the wood, and take the
- Take the Trowel.
- Unlock the Gate with the Gate Key.
- Speak with the ghost.
- Enter the Underwater Music Room.
- Click on the hole, and take the seven Piano Keys.
- Proceed into the Underwater Luggage Room.
- Use the Carving Knife to cut the Netting.
- Click on the sparkles to start a Hidden Object Scene.
- Complete the scene to get the Tie Down Straps.
- Return to the Flashback Boat Deck.
- Use the Netting on the racquets to get Racquet Net.
- Exit the ship via the Underwater Washroom.
- Go to the Coral Reef.
- Use the Racquet Net to catch the Tuna.
- Go to Underwater Montague’s Stateroom.
- Zoom in on the Luggage to start a puzzle.
- Fit all the luggage into the suitcase to get Robert’s Suitcase.
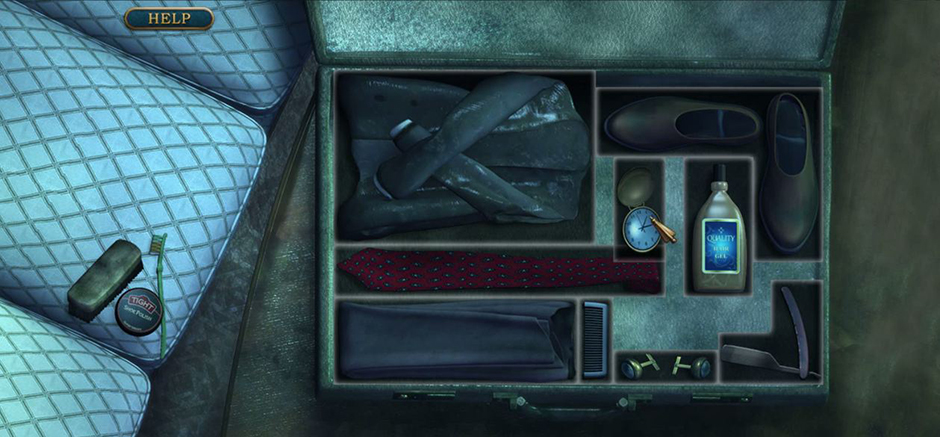
Hidden Mysteries – Return to Titanic – Luggage
- Return to the Flashback Bar.
- Give Robert’s Suitcase to the seated man.
- Go to the Flashback Gallery.
- Place the Tuna on the cutting board, and chop it with the Carving Knife.
- Take Buxley.
- Go to the Flashback Deck.
- Give Buxley to Montague.
- Go back to the Underwater Bar and speak to Montague’s Ghost.
Chapter 5
- Go back to the Flashback Lower Lobby.
- Click on the table, and click on the top tap of the book.
- Take the Number 2.
- Go to the Flashback Music Room.
- Click on the Piano.
- open the Bench lid, and take the Mosaic Tiles.
- Take the Shrimp.
- Open the desk drawer, and take the Matches.
- Enter the Flashback Cargo Hold.
- Open the chest, and take the Egyptian Staff.
- Use the Tie Down Straps on the Luggage on the shelf.
- Take the Mosaic Tiles.
- Leave the Flashback Cargo Hold, and enter the Flashback Linen Room.
- Place the Washboard inside the laundry bucket.
- Click on the sparkles to start a Hidden Object Scene.
- Complete the scene to get the Sheet Music.
- Enter the Turkish Baths via the stairs.
- Take the Bath Salts from the cabinet.
- Remove the towels from the hamper, and take the number 8.
- Light the fire with the Matches.
- Go to the Linen Room.
- Use the Bath Salts on the laundry bucket, and take the Blue Gem.
- Go to the Flashback Music Room.
- Use the Piano Keys and Sheet Music on the Piano to get the Yellow Gem.
- Go to the Underwater Music Room.
- Feed the crab the Shrimp, and get the Heart Shaped Key.
- Enter the Underwater Cargo Hold.
- Click on the luggage to start a randomized puzzle.
- Solve the puzzle by organizing the luggage to resemble stairs.

Hidden Mysteries – Return to Titanic – Organizing Luggage
- Go up the luggage to the Underwater Turkish Baths.
- Take the Mosaic Piece.
- Use the Egyptian Staff on the window to get the Empty Bucket.
- Go to the Underwater Music Room.
- Place the Mosaic Tiles on the board to start a randomized puzzles.
- Complete the pattern in the puzzle to receive the Red Gem.
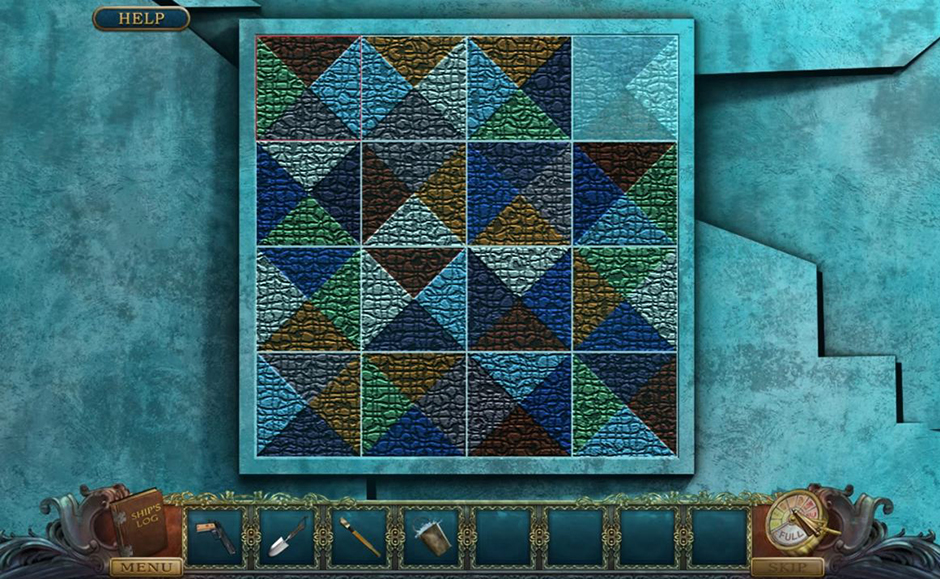
Hidden Mysteries – Return to Titanic – Mosaic Tiles
- Go to the Flashback Music Room.
- Open the box on the desk with the Heart Shaped Key.
- Take the Number 5.
- Go to the Flashback Luggage Room.
- Click on the Briefcase, use the Number 8, the Number 2, and the Number 5 in that order.
- Move the Number 5 and Number 8 up to open the briefcase; take the Glass Cutter.
- Go to the Linen Room.
- Turn the sink on, and fill the bucket to get Bucket of Water.
- Go to the Flashback Turkish Baths.
- Use the Bucket of Water on the coals to get the Green Gem.
- Go to the Flashback Lower Lobby.
- Place the Red Gem, Yellow Gem, Green Gem, and Blue Gem into the lock on the game to start a randomized puzzle.
- Solve the puzzle, and go to the Underwater Port Hull.
-
Hidden Mysteries – Return to Titanic – Gems
- Click on the sparkles to start a Hidden Object Scene.
- Complete the scene to get the Push Button.
- Go to the Underwater Dining Room.
- Cut the ice on the floor with the Glass Cutter, and take
- Go to the Flashback Linen Room.
- Use the Hacksaw to take the Curved Pipe.
- Go to the Underwater Turkish Baths.
- Install the Curved Pipe, and take the Gate Release Lever.
- Go to the Flashback Turkish Baths.
- Use the Gate Release Lever to open the gate.
- Return to the Underwater Lower Lobby and talk to Joseph’s ghost.
- Go back to the Underwater Grand Staircase.
Chapter 6
- Go up the stairs to the Underwater Upper Lobby.
- Move the pillow, and take the Drawer Knob.
- Go to the Forward Deck.
- Take the Socket Wrench from the bag.
- Enter the Captain’s Quarters.
- Click on the dresser, move the board, and take the Letter Opener.
- Go to the Underwater Upper Lobby.
- Cut the canvas with the Letter Opener; take the Crew Photo.
- Go to the Captain’s Quarters.
- Place the Crew Photo into the empty photo frame.
- Speak with the Captain’s Ghost.
- Go through the portal, and enter the Flashback Forward Deck.
- Use the Socket Wrench to remove the bolt on the alarm, and take the Alarm Clock Bells.
- Click on the door on the right of the screen.
- Take the Desk Key and the note from the drawer.
- Remove the floorboard on the left of the scene, and grab the Quarter.
- Enter the Flashback Wheelhouse.
- Take the Storage Key.
- Place the Push Button on the time clock.
- Use the Push Button to receive Unpunched Time Card.
- Take the Crowbar from the cupboard.
- Enter Flashback Marconi Room.
- Use the Drawer Knob on the drawer, and take the Mini Screwdriver.
- Return to the Flashback Wheelhouse, and go to the Bow.
- Use the Storage Key on the chest.
- Click on the sparkles to start a Hidden Object Scene.
- Complete the scene to get the Car Jack.
- Go to the Flashback Captain’s Quarters.
- Use the Desk Key on the desk.
- Click on the sparkles to start a Hidden Object Scene.
- Complete the scene to get the Magnifying Lens.
- Return to the Underwater Cargo Hold.
- Click on the sparkles to start a Hidden Object Scene.
- Complete the scene to get the Wood Saw.
- Use the Car Jack to lift the car, and take the Car Tire Rim.
- Go to the Underwater Turkish Baths.
- Use the Crowbar to open the clam, and take the pearl.
- Go to the Underwater Upper Lobby.
- Put the Pearl above the barracuda.
- Pick up the Alarm Clock Bells.
- Go to the Flashback Captain’s Quarters.
- Place both Alarm Clock Bells in the clock.
- Go to the Flashback Bow.
- Use the Car Tire Rim to lower the ladder.
- Go to the top of the Crow’s Nest, and take the Marconi Tube.
- Use the Wood Saw on the mast.
- Go to the Underwater Forward Deck and enter the Underwater Wheelhouse.
- Click on the sparkles to start a Hidden Object Scene.
- Complete the scene to get the Marconi Dial.
- Click on the Skeleton. Use the Mini Screwdriver to remove the screw, and take the Magnifying Lens.
- Take the first Pool Ball and Forceps from the first aid kit.
- Place the Unpunched Time Card into the time clock to start a randomized puzzle.
- Solve the puzzle, and go to the Underwater Bridge.
-
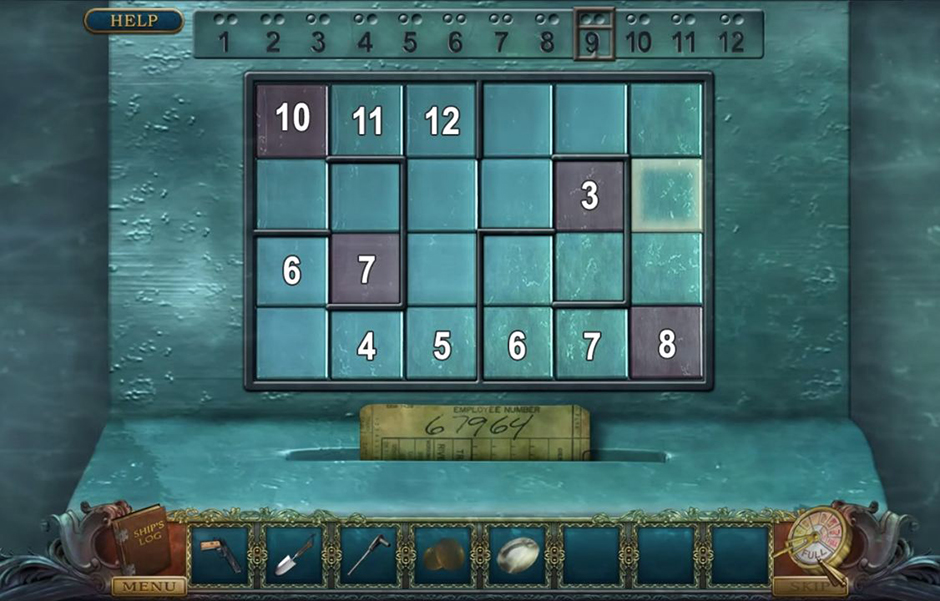
Hidden Mysteries – Return to Titanic – Time Card
- Click on the door, place both Magnifying Lenses, and take the Binoculars.
- Go to the Flashback Marconi Room.
- Underneath the cabinet, use the Forceps to take the Quarters.
- Put the Marconi Tube and Marconi Dial into the Marconi device to start a randomized puzzle.
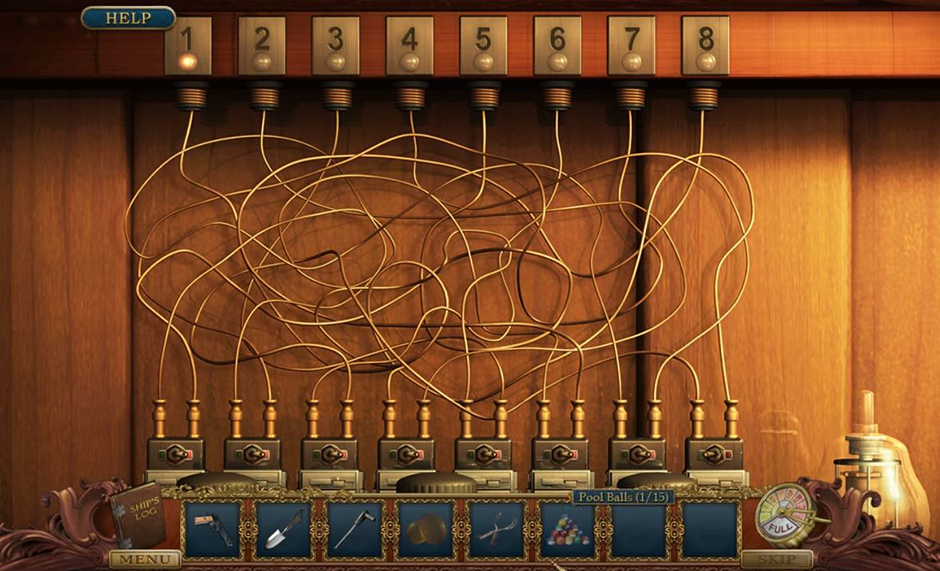
Hidden Mysteries – Return to Titanic – Marconi Device
- Solve the puzzle to receive the Marconi Message.
- Go back one scenario.
- Place the Punched Time Card into the time clock.
- Take the Schedule.
- Hang the Marconi Message on the corkboard.
- Go to the Flashback Bow, and place the binoculars on the Crow’s Nest stool.
- Go to the Underwater Upper Lobby.
- Use both Quarters on the Candy Dispenser to get the Toy Seagull.
- Go to the Underwater Captain’s Quarters.
- Place the Toy Seagull on the ledge on the clock, and take the Clock Gear.
- Go to the Flashback Captain’s Quarters.
- Place the Clock Gear into the clock, and set the alarm hand to 11.
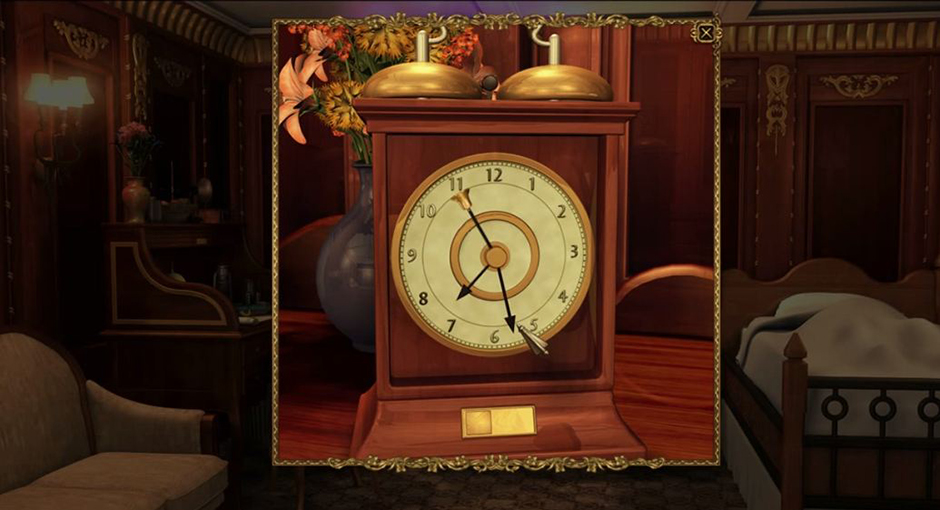
Hidden Mysteries – Return to Titanic – Captain’s Gear
- Return to the Underwater Captain’s Quarters and speak to the Ghost of the Captain.
Chapter 7
- Go to the Underwater Grand Staircase, and talk to the Overseer.
- Go to Your Room via the First Class passageway.
- Rip open the mattress to find the second Pool Ball.
- Take the Empty Blow Torch from the vent on the floor.
- Go through the portal.
- Find the third Pool Ball under the sheet.
- Move the snow globe, and take the fourth Pool Ball.
- Go to the Flashback First Class Passageway.
- Take the fifth Pool Ball.
- Click on the plant, and take the Pruning Shears.
- Dig up the Soil using the Trowel to get the sixth Pool Ball.
- Take the seventh Pool Ball from inside the fireplace.
- Go to the Flashback Smoking Lounge.
- Grab the Wine Bucket and the eight Pool Ball.
- Go to Café Parisian via the Flashback Grand Staircase.
- Click on the sparkles to start a Hidden Object Scene.
- Complete the scene to get the Fuel Hose.
- Move the vase to get the ninth Pool Ball.
- Cut the Vines with the Shears, and take the tenth Pool Ball.
- Go to the Flashback Upper Lobby.
- Move the pillow to pick up the eleventh Pool Ball.
- Take the twelfth Pool Ball from the drawer.
- Go to the Flashback Forward Deck.
- Open the lid to the Fuel Tank to get the thirteenth Pool Ball.
- Use the Hose and the Empty Blow Torch on the Fuel Tank to receive the Blow Torch.
- Click on the doorway, and close to drawer to get the fourteenth Pool Ball.
- Go to the Underwater elevator Shaft.
- Use the Wine Bucket to hold the elevator open, and take the fifteenth Pool Ball.
- Open the panel, and take the
- Go to the Underwater Engine Room.
- Click on the sparkles to start a Hidden Object Scene.
- Complete the scene to get the Sledgehammer.
- Click on the door, and place the Gear.
- Enter the Underwater Maintenance Room.
- Take the Bolt Cutters.
- Use the Blowtorch to open the gate, and take the Harpoon Gun.
- Go through the portal to Flashback Your Room.
- Use the Sledgehammer on the cracked ceiling.
- Go to the Flashback Smoking Lounge.
- Place all Fifteen Pool Balls on the Pool Table to start a puzzle.
- Solve the Puzzle to get the Wax Ball.
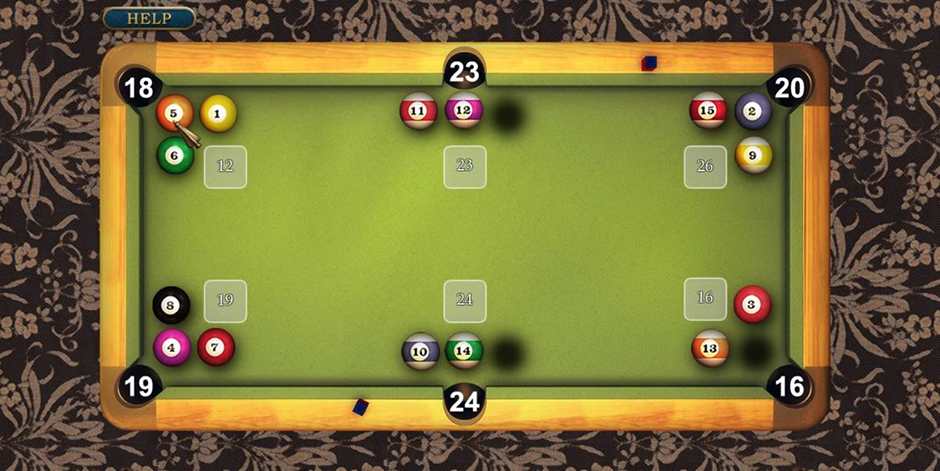
Hidden Mysteries – Return to Titanic – Pool Table
- Use the Bolt Cutters to cut the chain on the Window.
- Click on the sparkles to start a Hidden Object Scene.
- Complete the scene to get the
- Use the Lighter on the wood in the fireplace.
- Put the Wax Ball near the fire, and take the Anchor Trinket.
- Go to the Flashback Upper Lobby.
- Use the Anchor Trinket on the lock in the wardrobe.
- Move the coats to the left to get the Reach Claw.
- Move the coats to the right to get the
- Go to Underwater Your Room.
- Get the Hand Drill from the toolbox.
- Go to the Underwater Engine Room.
- Use the Reach Claw to get the Harpoon Spear from the grate, and complete the Harpoon Gun.
- Go to the Underwater Elevator Shaft.
- Shoot the elevator with the Harpoon Gun.
- Take the Pulley Lever.
- Go to the Underwater Machine Room.
- Put the Pulley Lever on the crank.
- Pull the lever, and click on the chest to start a randomized puzzle.
- Solve the puzzle, open the chest, and take the Hand Drill.
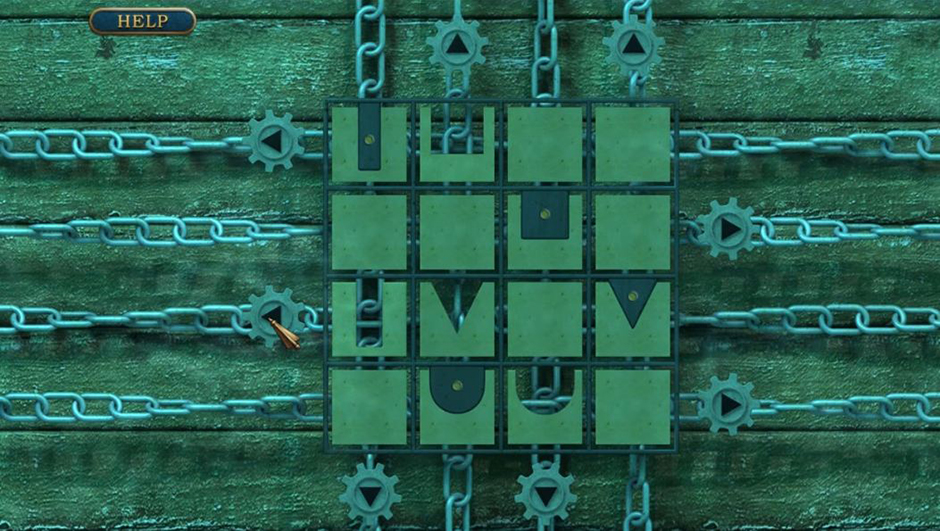
Hidden Mysteries – Return to Titanic – Randomized Puzzle
- Go to Flashback Your Room.
- Move the mirror to find the safe.
- Use the Hand Drill on the safe and the tweezers on the hole to open the safe.
- Take the Note and the Money.
- Go to Flashback Forward Deck.
- Give the Money to Montague.
- Climb up the ladder, and speak to Robert Ashley.
Congratulations! You have officially completed our Hidden Mysteries – Return to the Titanic Walkthrough!
Delicious – Emily’s Hopes and Fears Walkthrough
Big City Adventure – Shanghai Walkthrough
Building the Great Wall of China 2 Walkthrough
The Hidden Mysteries – Return to the Titanic Walkthrough is meant as a guide and does not contain cheats, hacks, or serials.