Echoes of the Past – The Revenge of the Witch is a story about the Kingdom of Orion, which has been taken over by an evil witch. Work your way through the many puzzles and games to defeat the witch and bring peace to the Kingdom once again. A journey such as this can be tricky, so if your are stuck and you need a hint, this walkthrough will help you find your way.
Contents
General Tips & Tricks
If you are stuck and you don’t want to dive into the walkthrough just yet, try the Hint button. It is in the upper right of the screen. Though it does require some time to recharge, you can use it unlimited times. (It will, however, be disabled in “Expert” Mode.)
Don’t be afraid to use the Reset button during a puzzle if you get stuck. Sometimes a fresh start s all you need to get a puzzle right. Also, if a puzzle is taking too long for you, a Skip button will eventually appear. This will allow you to move on. (This is also unavailable “Expert Mode”.)
Your Journal is a very important tool on your journey. Check it for reminders of important details you’ll gather along the way. Your Inventory Bar is where all your collected objects go. Click on it at the top of your screen to bring it down to explore.
Echoes of the Past – The Revenge of the Witch Walkthrough
Chapter 1: The Knight and the Dogs
Welcome to the game! The first item you need to collect is the Magic Staff. You can find it laying on the ground. Through the game you will be collecting Magic Gems that will be stored in it. Now, go ahead and scare off the bird on the left, then collect the Dagger. Move ahead to the next screen.
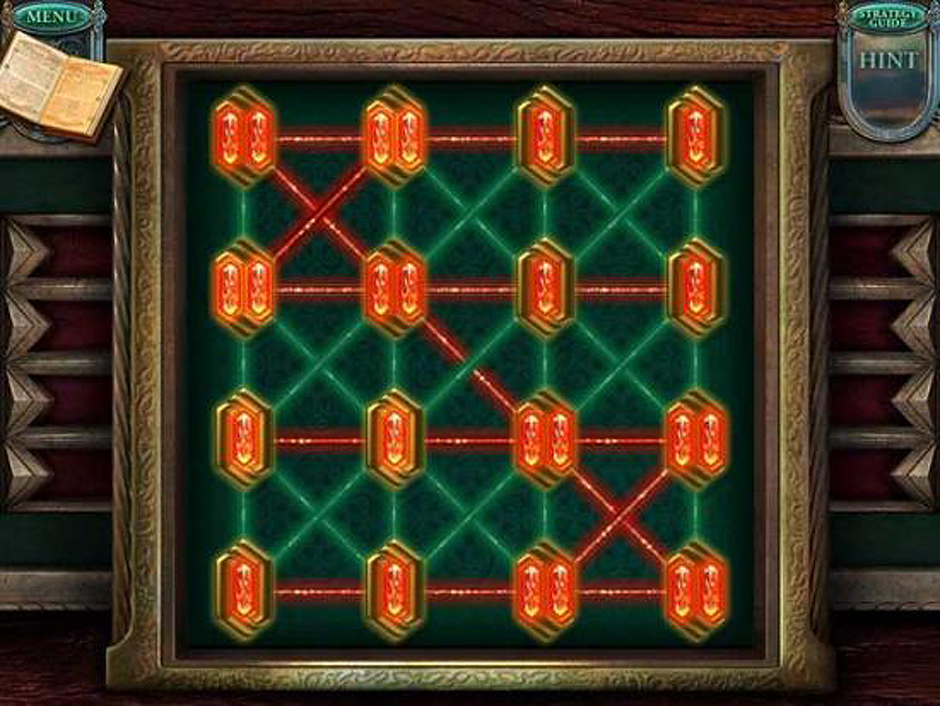
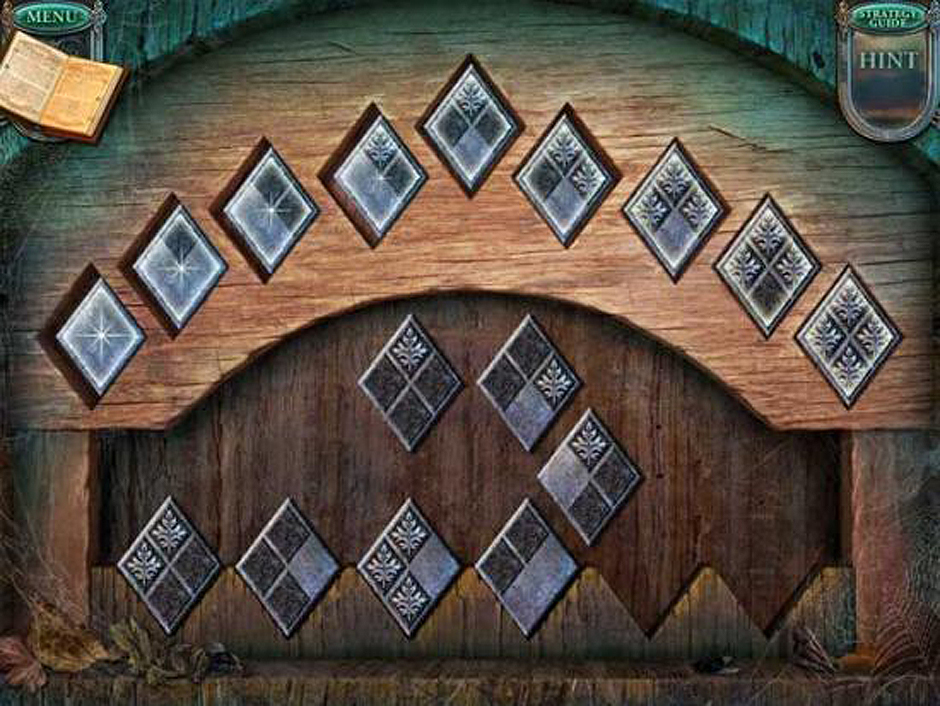
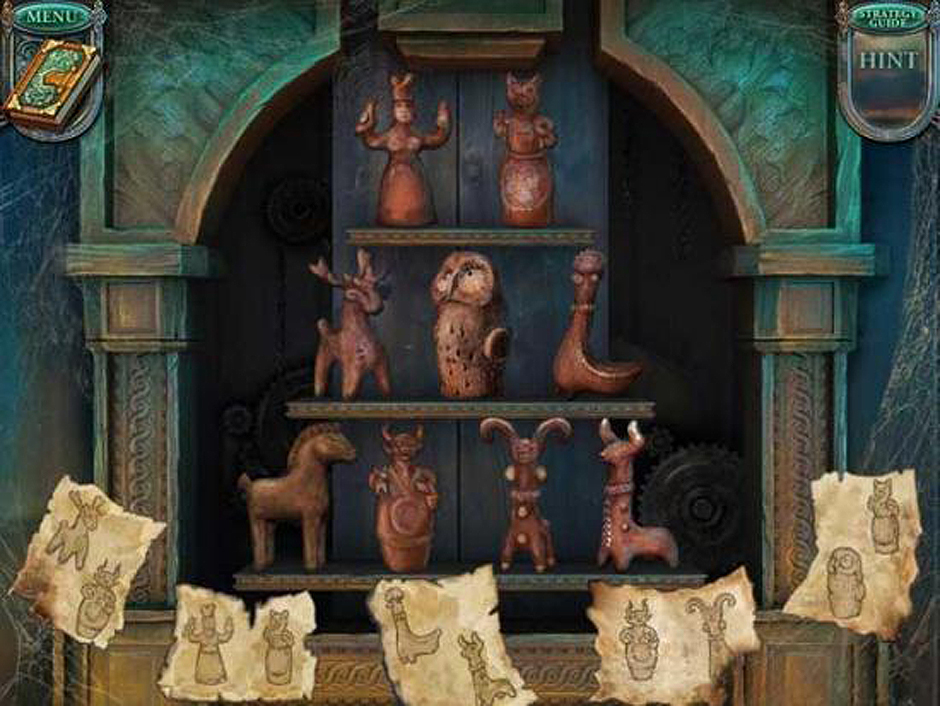
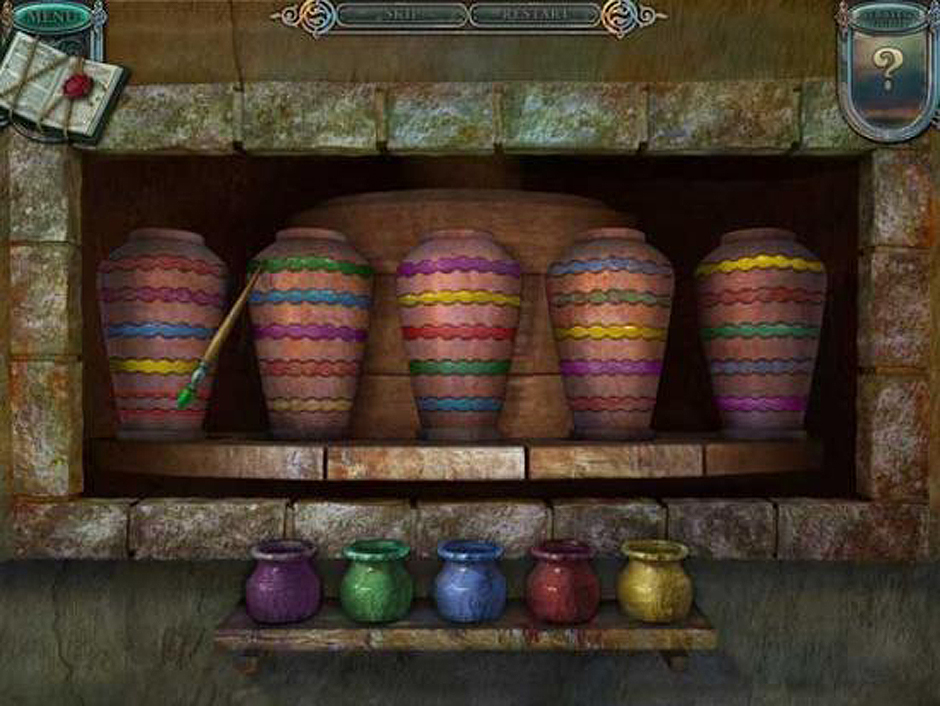
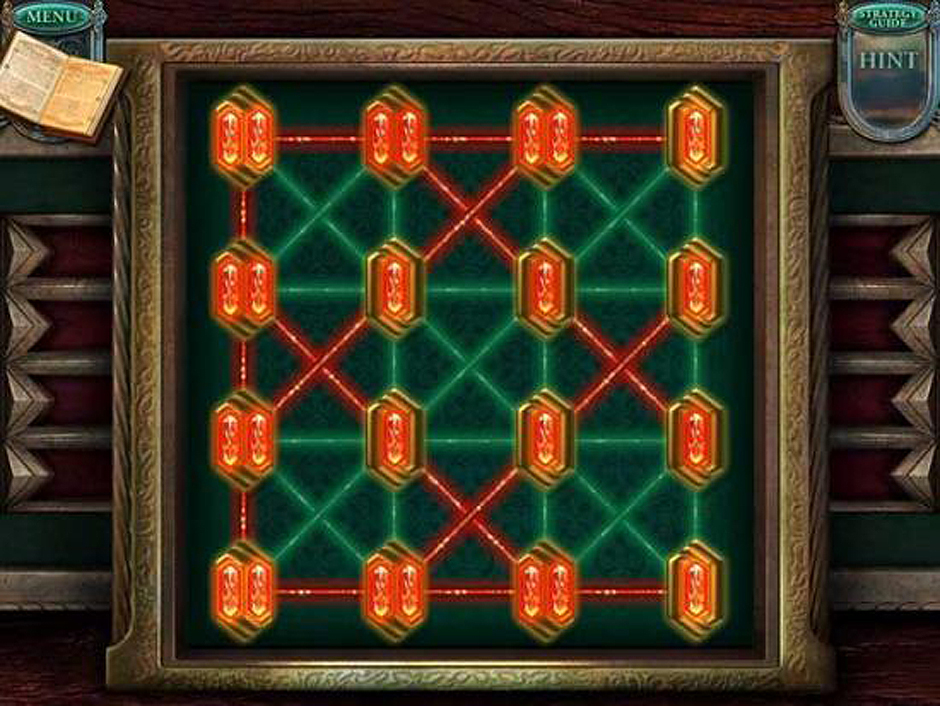
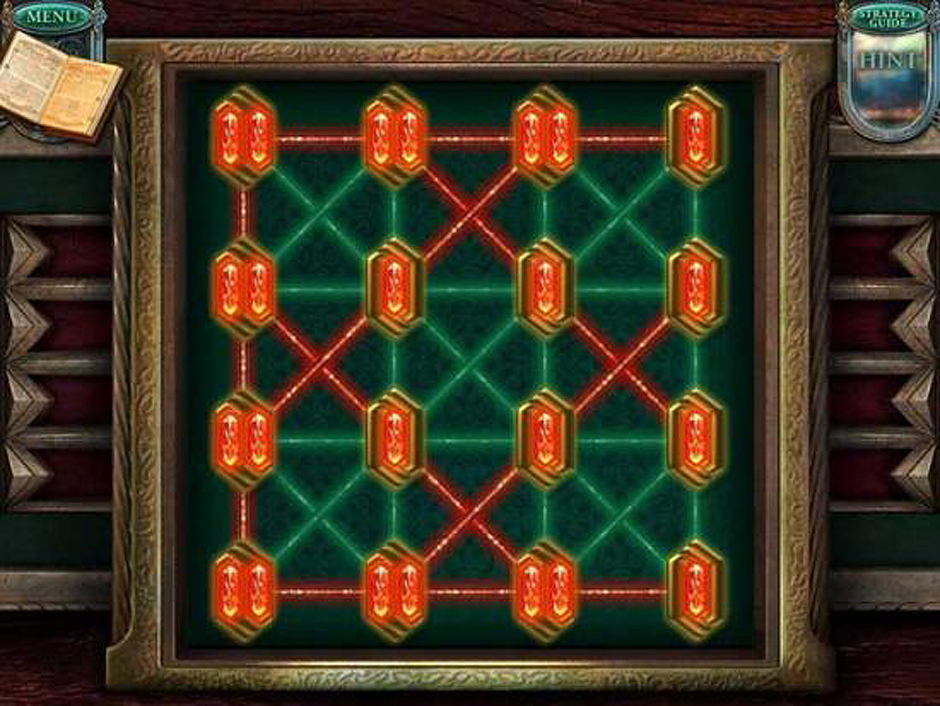
Next, you’ll use the Dagger on the stone block. This will remove the Plate with Sword off so you can collect it. There is a box on the tipped over cart. Use the Plate with Sword on it and trigger a puzzle. This is the solution:
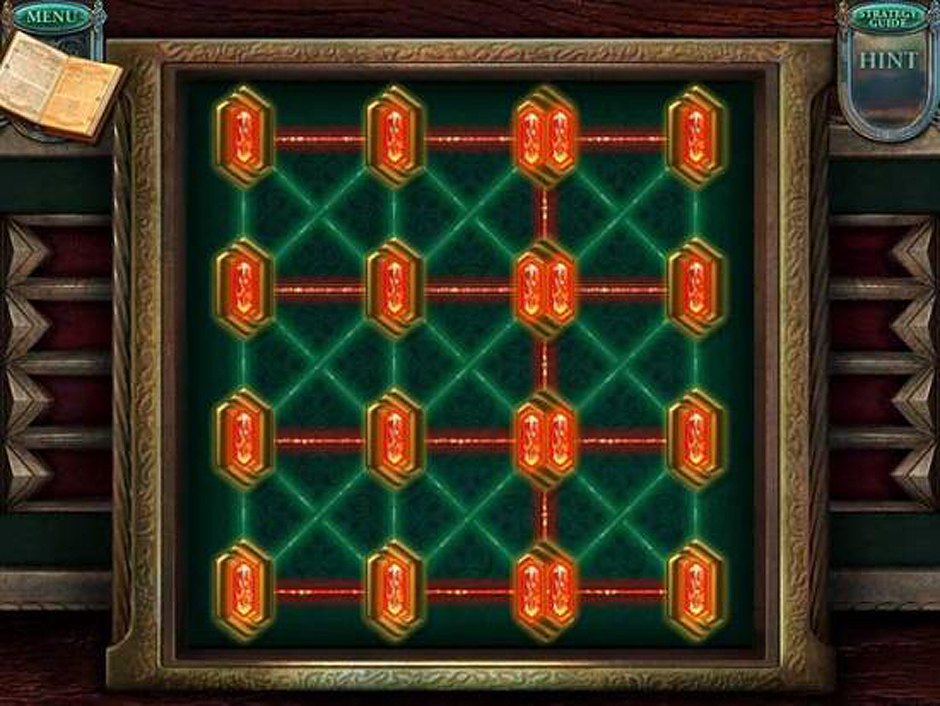
Revenge-Of-The-Witch-Puzzle-Solution-01
Finishing the puzzle will allow to you to collect the Magic Powder and Scroll. Go to the Knight and use the Magic Powder on him. Collect your first Magic Gem before moving on.
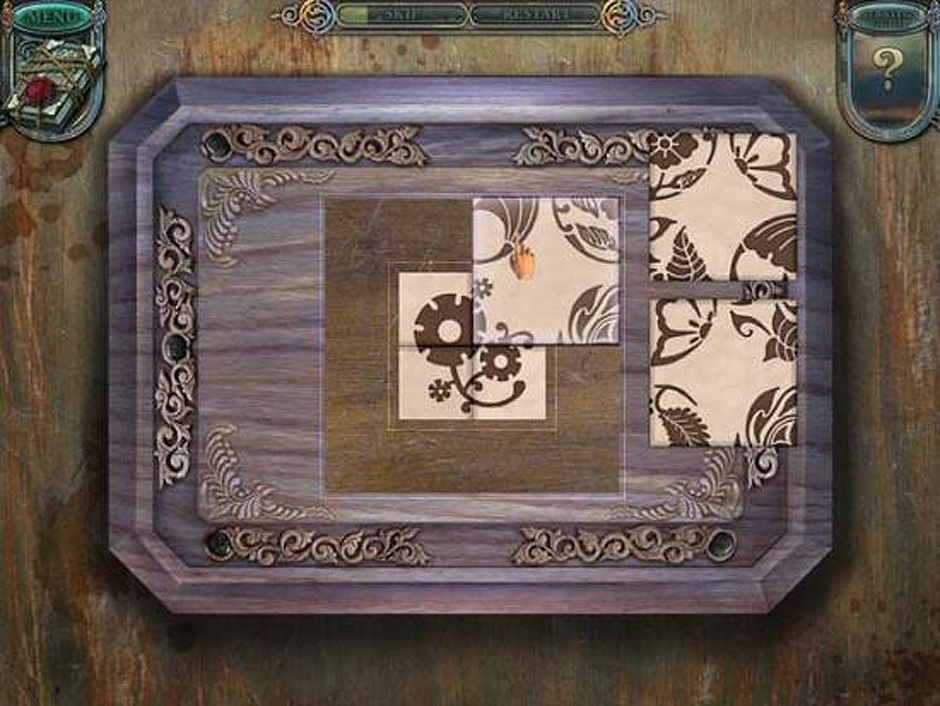
Pick up the Origami Figure and Dry Brush. Now go back to the forest screen. There is a tree with a hole in it. If you look closely, you can use the Dry Brush on the sap in the hole and create the Brush with Glue. Now travel back to the gate and look at the ground for the debris. Zoom in and collect the broken bits. You can use all of these pieces, along with the Brush with Glue to fix the Bas-Relief. Now place it into the locking slot of the gate and start another puzzle. This is the answer:
Revenge-Of-The-Witch-Puzzle-Solution-02
Finish the puzzle and you will be let into the next area. When you are there, head to the left. There is a hidden object puzzle on the desk. Collect all the objects to receive the Cupboard Key. Now you can click on the mess on the floor to find Kindling and another Scroll. Use this key on the cupboard to open the lock and start another puzzle. Place the items where they belong and you will be rewardsed with the Empty Oil Can. Now take a look at the painting with the gentleman in the red hat. Collect the Tiny Skeleton Arm from it. You can now leave back to the last area. Here you can use the Empty Oil Can on the hanging lamp. This will collect oil and create the Full Oil Can. You can now leave this area and head back to the main gate.
The Kindling can be used on the torch. This will create the Burning Kindling. Now go to your left and through the back to get to an aquarium area. Light the chandelier by using the Full Oil Can and then the Burning Kindling. Now you can see! Root through the junk on the floor to find and collect the Crown, then the edge of the table to find a Lens, and lastly there is a Scalpel hidden in the leather case on the rightmost table. Now go back to the apothecary room. The Scalpel can be used on the ropes around the left most box. When it opens you can collect the Tiny Skeleton Leg. Now it is time to head back to the main gate.
Here you place the Crown in the slot right over the shield. This will let you collect the Storeroom Key. Head back to the aquarium room now. There is a locked door on the left where you can use the Storeroom Key and go into the next area.
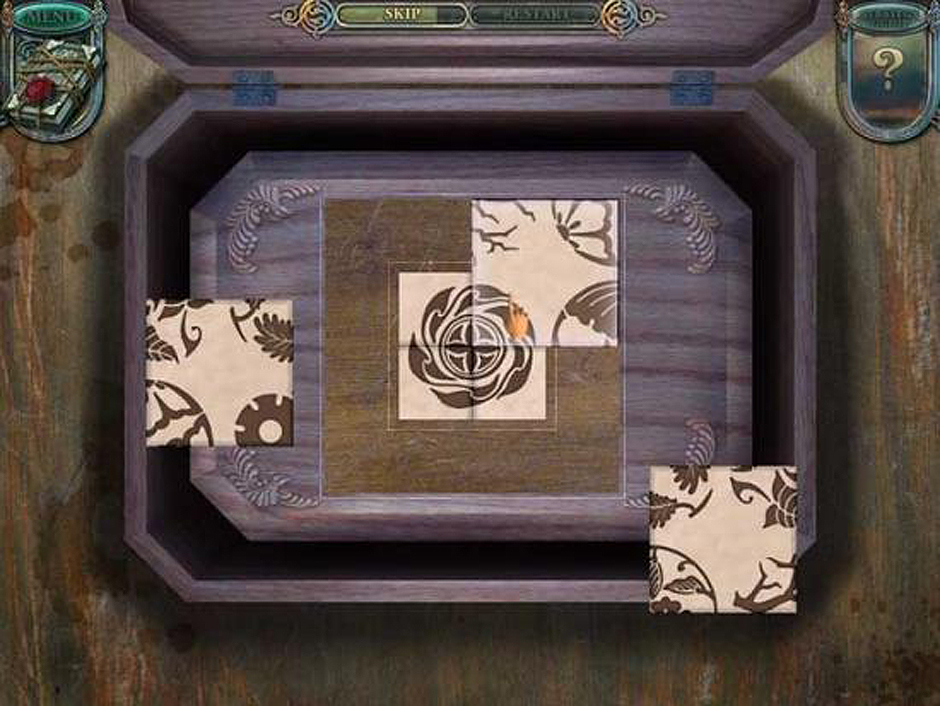
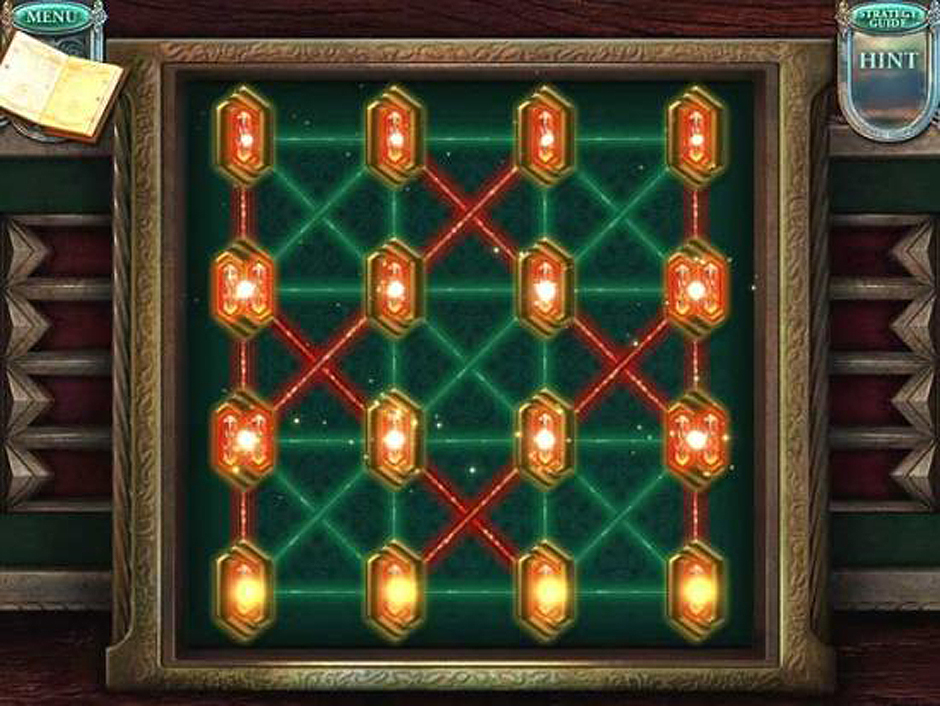
Here in the storeroom you can collect the Hook, Ceramic Decoration, and Elder Leaves. There is a note inside the paper rabbit, too. In the middle of the floor there is a chest where you can use the Tiny Skeleton Arm and Tiny Skeleton Leg. Now go back to the gate. If you take a closer look at the tower with the ladder, you can use the Hook to remove the gold necklace from the skeleton. Now you can collect the Tiny Skull. Return to the chest you placed the bones in before and add the Tiny Skull. You can now collect the Tweezers from inside. Now go back to the aquarium room and use the Tweezers on the aquarium in the lower right corner. You will collect the Aquarium Handle. You can use this on the leftmost aquarium to start a puzzle. Try to get all the creatures to eat the poisonous seaweed by moving them to the right of the tank. You will collect the Plate with Dog Paw when you are finished. Now you’ll go back to the apothecary room. There is a box between the rear archway and the desk that you will want to put the Plate with Dog Paw into. This will start another crystal puzzle. Here is the answer:
Revenge-Of-The-Witch-Puzzle-Solution-03
When you finish, you will collect another Scroll and Magic Powder. Go out to the courtyard. You can use the Magic Power on the dog creatures to return them to their true forms. Talk to the Doctor and collect the Magic Gem.
Chapter 2: The Archway and the Fire
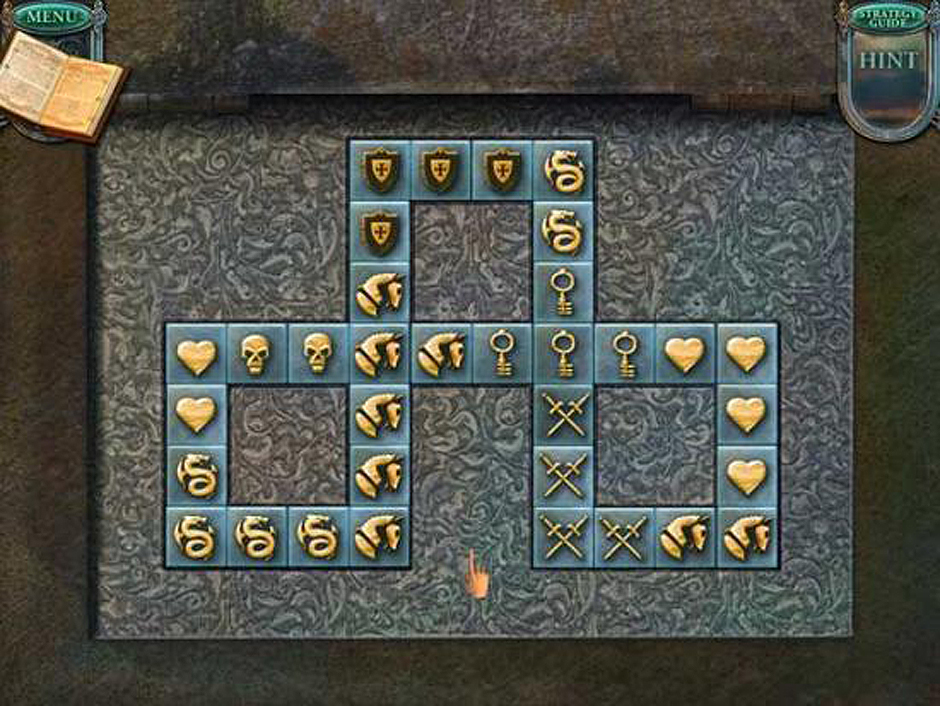
Here in the courtyard you will want to collect the Gunpowder Barrel from the broken carriage and use the Scalpel on the leather strap. This will give you the Leather Harness. Go to the right of the puppies to the stairs. There is Metal Lock Part for you to collect on the left and middle of the staircase. The leftmost stone lion will move if you click on it. Inside is the Shield Part. Now go back and past the puppies to the left this time. There is a Ceramic Decoration (2) in the first caravan. There is a hidden object puzzle over the second caravan. Collect the objects and you will be given the Wooden Quartrefoil. Now pull back and look at the base of the clock tower. First, collect all the boards. Then collect all the nails. You’re done here for now so you can go back to the entrance.
There is a slot in the door to use the Wooden Quartrefoil in. This will start another puzzle. Place the plates into the correct spots by matching them with the ones above. When you are finished with the puzzle, you can go through the now open doors. You can move ahead onto the the next screen after that and collect the Scroll from the left. Inside the seat there is a Plate with Fish Eggs to collect. Now go back the way you came and go left instead. Knock down the painting on the left. There is a code underneath. Now collect the Fountain Part and make your way back to the apothecary room.
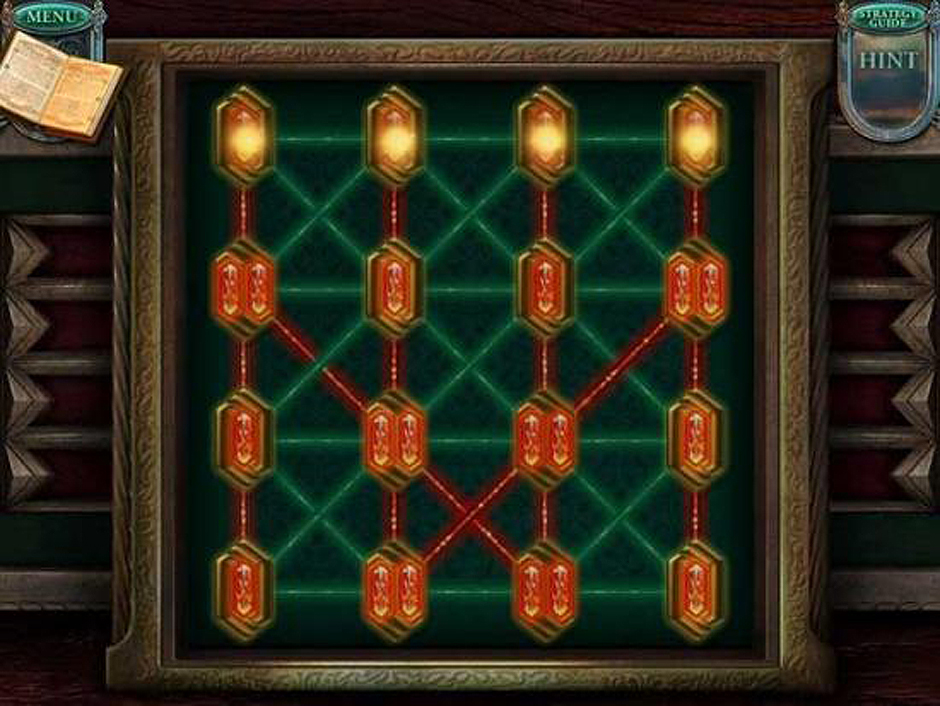
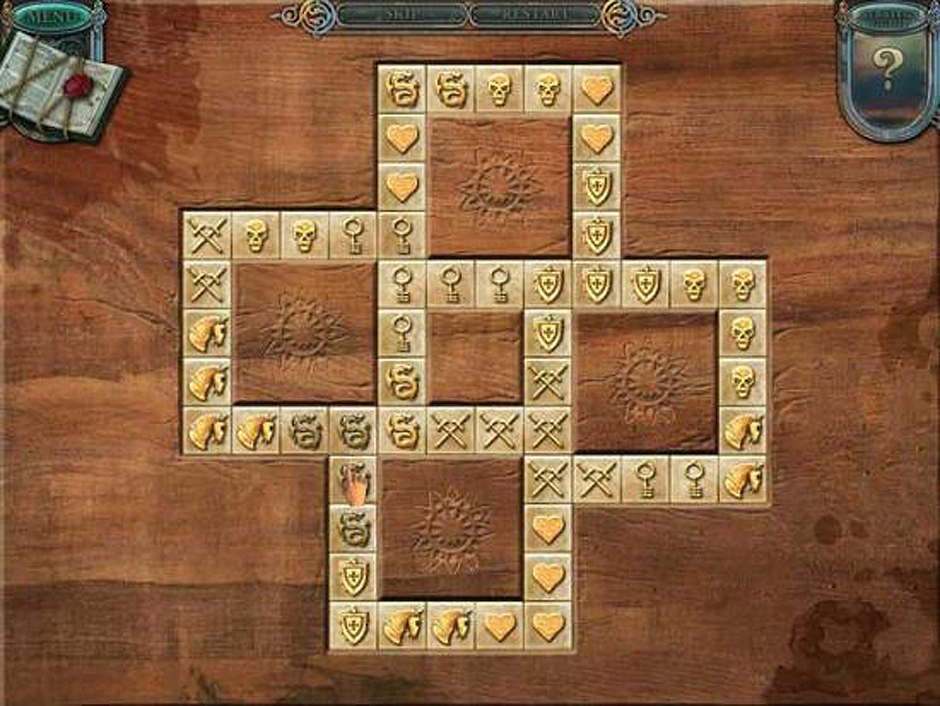
There is a hidden object area over the desk. Collect the items and you will receive the Letter N. Back in the stroreroom, there in a gold case on the right. You can use the Plate with Fish Eggs on it and start a puzzle. Click on the tiles in this order: 1, 4, 7, 3, 9, 6, 3, 7, 4, 8, 5, 9, 6, 3, 2, 4, 7, 5, 8, 7, 4, 1. Once the puzzle is finished, you will be given the Scroll, Hammer, and the Fountain Part (2). Go back to the screen with the clock tower and go to the fountain. Here you can use both Fountain Part (1) and (2). A Metal Snake will appear for you to collect. Hisssss!
Go ahead and look at the Clock Tower again. You can now use the Hammer to fix the ladder using it on the nails. This will let you climb to the face of the clock tower. Now you need to go back to the apothecary room once again. On the left there is a box you can use the Metal Snake on. Collect the Aquarium Handle from inside. It’s time to go back to the aquarium room again! Use this Aquarium Handle on the rightmost tank and trigger a puzzle. Once again, you’ll want to lead the creatures to the seaweed. This time you need to separate the green creatures from the red. You will be given the Ceramic Decoration (3) and the Metal Fish. Go back to the apothecary once again. Inside the cupboard in a hidden object area. Place everything back into the correct spots. You will be given the Figurine Part.
Now you will want to go back to the plaza with the clock tower. Go back to the first caravan and use the Metal Fish on the locked box. Collect the Letter A from here. Go back to the hallway with the moved painting and use all three Ceramic Decorations between the doors. You will be able to collect the Letter D. Now you need to go back to the town hall area, where you can use your Letter N, A, and D on the leftmost box. You will be able to collect the Plate with Crown from it. Now go back again to the entrance and place it into the box on the left of screen. This will start a puzzle. You can find the answer here:
Revenge-Of-The-Witch-Puzzle-Solution-04
Once you finish the puzzle you will receive the Scroll and Magic Powder. Now go back to the plaza with the clock tower when the Magic Powder on the monster. Now you can pass through and collect the third Magic Gem. Collect the origami figure and the Wormwood before moving ahead into the brewery. There is a hidden object area in the back of the room, on the right. Collect the objects. When you finish, the Wood Figure will be given to you. Now take the Crown from the floor. Go back one screen and then move forward.
Collect the Spade from the left of the screen before going back to the town gate. You can use the Crown on the top of the plaque there. You will be able to collect the Picture Scrap. Now go back to the storeroom and use the Spade to dig up the ground where it is lower. You can collect the Metal Decoration. Go back to the town hall and use the Picture Scrap on the missing place in the far right picture frame. This will start a puzzle where you have to restore the painting. Take the Metal Lock Part (2). Now go pack the screen with the well, then go down the dirt path. This will take you to a riverbank.
On the left is a satchel. Inside you’ll find a Reagent. Take it and go back to the Apothecary. At the back of the room, you will find a small cabinet. You can use the Reagent here to start another puzzle. Add liquid until the colors are separated on both sides. Now take the Herbicide and Oil. You can go back to the well now and use the Herbicide on the bushes to make them go away. Pick up the Metal Lock Part (3) and head back to the street. There is a door on the left that you can examine and add all three Metal Lock Parts to. The door will open to a toy shop. Collect the Metal Tongs, Gear, and Carving Knife before taking a look at the workbench. You can fix the Figurine Part by now using the Dry Brush on the glue jar. Now take the Leather Harness and on the wheels on the left side of the room. Now go back to the clocktower area and look at the first caravan. You can use the Carving Knife on the wooden figures and collect Wooden Figurine (2). Go back to the brewery. In the right rear of the room there is a cabinet. You can use the Gear here to open it and take the Mint Leaves.
You can now go back to the apothecary. Over the desk on the right is a hidden object area. Find the objects and collect the Card once you are finished. Now go back to the aquarium. Using the table at the back right, use the Mint Leaves, Wormwood, and Elder Leaves on the mortar and crush them with the pestle. Add your Oil to the mix and collect the Insecticide. Now go all the way to the first screen and use it on the insects inside the tree. Collect the Tiny Sword. Go all the way to the Toy Shop and look at the puppet box. It’s underneath the tall statue. Here you can use the Tiny Sword with the knight and take the Toy Princess.
There is a large box to the left. You can use the Toy Princess here inside the outline. This will start a puzzle. First move the prince, then move the princess. Here is the answer.
Revenge-Of-The-Witch-Puzzle-Solution-05
Now you can collect the Figure Part. Use this on the figurine with the brush and glue to repair it and collect Wooden Figurine (3). Now move back to the brewery. There is a barrel on the right with fur on top. You can use the Card to trigger a new puzzle where you play a game of solitaire. You can now collect the Safe Handle. Go back to the Toy Shop where you can use it on the safe that is against the left wall. This will trigger a puzzle. This is the solution:
Revenge-Of-The-Witch-Puzzle-Solution-06
Now you can collect the Wooden Figurine (4) and go back to the clock tower plaza and climb up to the clock tower face. Use all the Wooden Figurines into the correct slots to get the Plate with Fire Sign. You can now go back to the side street and take a look at the box near the first door on the left and place the Plate with Fire Sign. This will start a puzzle. The answer looks like this:
Revenge-Of-The-Witch-Puzzle-Solution-07
One you’ve finished, you can collect the Scroll and Magic Powder. Go back to the town hall and sprinkle the Magic Powder on the fire. You can now collect the fourth Magic Gem.
Chapter 3: The River and the Skeleton
You’ll want to examine the plaque on the large box. Take the Signet from it before returning to the side hall and look at the door on the left. You can use the Signet to open the door and head into the archives. Collect the Scroll and the Decorative Elements. Find all the pages in the mess on the floor. Now leave and go back to the street. The second door on the left can have the Decorative Elements used on it to start a puzzle. This is the answer:
Revenge-Of-The-Witch-Puzzle-Solution-08
Now you can go into the smithy. Use the bellows to get rid of the dust so you can collect the Wrench and Nail Drawer. There is a grate you can zoom in on and collect the Metal Wedge. Now go back to the Brewery and use the Nail Drawer on the boarded up door. There is a hidden object area here. Place the objects where they need to go and collect the Piece of Cheese. Now go back to the storeroom and use it on the hole in the wall. Collect the Mouse that pops out. Now go back to the apothecary. Here you’ll want to look at the hidden object area over the cupboard. Put all the items back where they belong to collect the Letter R. Now go back out into the courtyard.
Examine the carriage behind the pups. Use the Wrench on the closest barrel to you to get the Metal Hoop. Now examine the well and use the Metal Hoop on the bucket so you can fix and collect the Bucket. Now go to the riverbank and use the Metal Wedge to split the log by hitting it with the Hammer. Collect the Gear and treat the owl in the tree to a snack by giving him the Mouse. Now you can collect the Domino Pieces. Go back to the Brewery where you’ll find a hidden object screen to the right in the back. Find the objects and then you will be able to collect the Broom. If you take a look at the far left table you can use the Domino Pieces to start a puzzle. The answer is this:
Revenge-Of-The-Witch-Puzzle-Solution-09
When you finish you will be able to collect the Metal Decoration (2). Now sweep up the sawdust with the Broom. You can now collect the Rope. Go back to the archives and take another look at the mess on the floor. Tie up the pages with the Rope. Collect the letters for the title of the book and then you will collect the Ancient Book. Place it into the empty slot on the bookshelf. This will open up a secret passage! Go through into… a torture chamber! Collect the origami figure and the Metal Goat. After giving the wheel on the right a spin, examine that skeleton. You can cut the ropes with the Scalpel. Collect the Tower Key, which you can now use to open the rightmost door in the hallway.
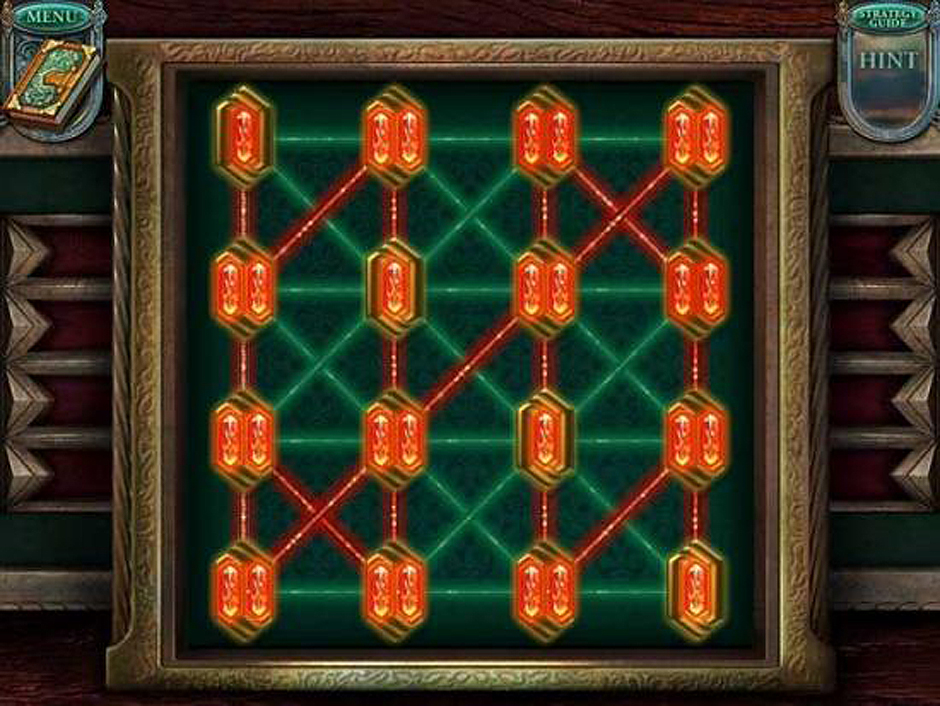
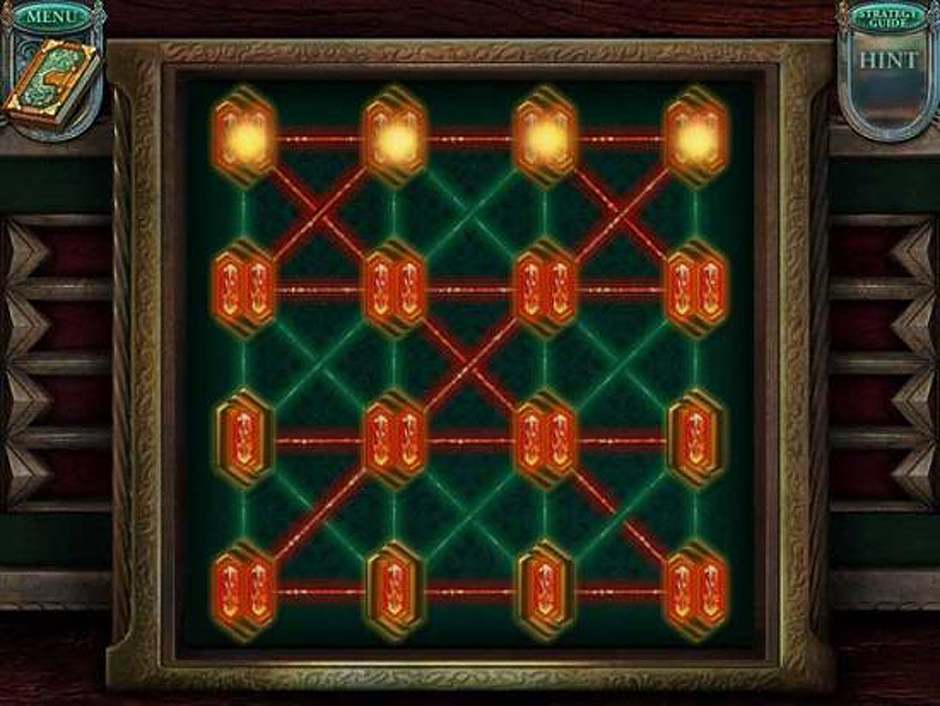
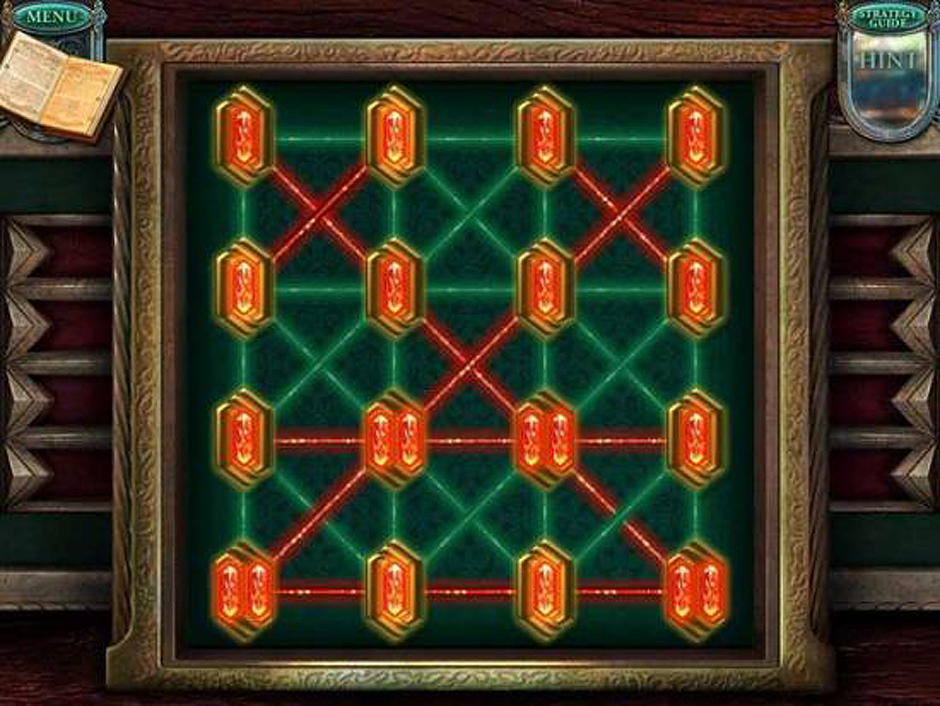
Collect the scroll first then move the lower right plaque. Collect the Stone Ball. Add the Lens to the telescope then look above the bell. You can add the Gear here. Now it’s time to go back to the entrance with the stone lions. Give the Stone Ball to the lion on the right and rotate it. Collect the Plate with Water Sign. Now it’s time to go back to the archives. You can use the plate with the box here to start another crystal puzzle. This is the answer:

Revenge-Of-The-Witch-Puzzle-Solution-10
Now you can collect the Scroll and Magic Powder. Head back out to the riverbank to use it on the princess in the water. She will give you the fifth Magic Gem. Collect the Weed from the ground and fill the Bucket with Water. You can now go forward and onto the Mountain Path. Grab the origami figure, the Gear and the Quill. Now make your way back to the archives. Use the Quill on the inkwell to start another puzzle. Correct the errors and you will be given a code. Collect the Stone Letter. Now go back out into the hall and notice the painting is no longer covering part of the wall. You can use the Stone Letter here and start another puzzle. This is the answer:
Revenge-Of-The-Witch-Puzzle-Solution-11
When you finish the puzzle you will be given the Telescope Handle. Now go up into the tower. You can use the handle on the telescope. Now go all the way back the the plaza with the clock tower. There is a hidden object area over the second caravan. Fin the objects and the Metal Gryphon will be given to you. Time to go back to the mountain path. Explore the door to the carriage and use the Metal Goat and Metal Gryphon here to start another puzzle. This is the solution.
Revenge-Of-The-Witch-Puzzle-Solution-12
You can look inside the carriage now. Take the Olives and the Curtain Handle. Go back to the brewery and put the Olives into the press. You can now collect the Olive Oil. From here, go to the town hall where you can use the Curtain Handle with the small curtain. This will start a puzzle. You will have to fix the painting. Once you’ve finished, you can collect the Metal Medallion. Go to the smithy where the Olive Oil should be used on the rusty hinges. This will let you get the Crowbar. On the left is a tray you can fill with the Bucket of Water. You’ll need to go back out to the riverbank and refill the Bucket. Now go back to the central entrance and loosen the left stone with the Crowbar. You can pick up the Metal Decoration (3) now. Go back to the smithy and use the Metal Decorations inside the slots of the grate on the far wall. Take the Letter S. Return to the Mountain Path and pry the stone under the wheel of the carriage with the Crowbar. This will allow you to go to the cottage. Move the traps away and grab the Pick and break of a piece of Clay.
You need to go back to the torture chamber now. Break the bricked-over section of the wall with the Pick. Take the Gear, Decorative Plates, and Ram Horns from there. Now you can go back to the tower. Use the Gears with the pegs above the bell. Take the Barrel-Organ Handle. Now go back to the Brewery and look over the hidden object area. Once you have put everything back where it belongs, you will be given the Wooden Flower. Go ahead and use the Barrel-Organ Handle on the peg above the barrel in the back to start a puzzle. This is the answer:

Revenge-Of-The-Witch-Puzzle-Solution-13
Collect the Statuette and go back to the well. There is a door to the left to place the Statuette on the shelf. Rearrange the figures as so:
Revenge-Of-The-Witch-Puzzle-Solution-14
You can now move on to the pottery studio and collect the Lever and Statuette Hand. Fill the jar on the left with the Bucket of Water. Take the Cupboard Key and use it on the cupboard in front of you. Take the Plate with Skull. There is a little box on the lower right that you can use the Decorative Plates with. This will start another puzzle. This is the answer:
Revenge-Of-The-Witch-Puzzle-Solution-15
Revenge-Of-The-Witch-Puzzle-Solution-16
Now collect the Stone with Fish Image and go back to the riverbank to once again will your Bucket with Water. Go to the pottery studio and use it on the basin, then add the Clay. Take the Clay from the basin and place it on the wheel so you can spin it into a Jug and collect it. Now go back to the tower where you can use the Plate with Skull on the box sitting on the ledge. This will start a puzzle. This is the answer:
Revenge-Of-The-Witch-Puzzle-Solution-17
When you finish you can collect the Scroll and the Magic Powder. Upon completing the puzzle, click on the Scroll and the Magic Powder to collect them. You can go back to the Torture Chamber and use the Magic Powder on the ghoul and collect the sixth Magic Gem.
Chapter 4: The Spider and the Vines
Now you can use the Lever on the vice to open it and collect the Greenhouse Key. Now go to the side street and use the key on the greenhouse on the right. Go inside and collect the Hacksaw and Paint. Go to the pottery studio again and go to the painting wheel. If you place the Paint and Jug here you will start another puzzle. This is the answer:
Revenge-Of-The-Witch-Puzzle-Solution-18
Collect the Statue Head and go back to the town hall, where you can use the Statue Head, Statue Hand and Metal Medallion to put the statue back together. You can now collect the Part of Tablet. Go back to the torture chamber and use the Hacksaw on the chairs above the skeleton. Collect the Crystal and exit to the archives. You can use the Part of Tablet on the frame on the floor in the back to start a puzzle. This is the answer:
Revenge-Of-The-Witch-Puzzle-Solution-19
Collect the Clay Tablet and go to the tower. You can use it in the lower left on the groove and then pick up the Triangular Key. No go to the smithy and take a look at the box under the window. You can use the Triangular Key to start a puzzle. Play checkers with the magician tile to defeat all the monsters by jumping over them. Now collect the Wooden Flower (2) and go to the greenhouse, where you can use both Wooden Flowers to open the drawer on the left. Collect the Wire Cutters. Now it’s time to go to the cottage. Here you can use those Wire Cutters on the mesh so you can take the Wooden Blocks. Now go back to the greenhouse and use the Wooden Blocks with the square cabinet to start a puzzle. Place all the parts back where they belong and collect the Axe Billet. Travel to the smithy and place it into the oven, before using the Metal Tongs to pull it back out and hitting it into shape with the Hammer. You can then drop it into the tray of water. Collect the Blunt Axe Blade and go to the toy shop where you’ll use the sharpening wheel to create the Sharp Axe Blade. Chop the wooden handle with the Sharp Axe Blade then use the Wooden Wedge on the hole you made, then Hammer it into place. This creates the Axe for you to collect.
Now you go back to the Well. You can chop down the tree here and create a bridge to cross. Do so and collect the Scroll, Small Key, Metal Daisy, and Minerals. You can set the Gunpowder Barrel against the rock and then head back to the plaza with the clock. Go to the hidden object area over the second caravan. Find the items and collect the Metal Sunflower when you finish. You can now go back to the Torture Chamber and use the Small Key on the book. Collect the Metal Tulip. Now you can go back to the greenhouse. In the upper right of the cabinets, use the Metal Daisy, Metal Sunflower, and Metal Tulip to start a puzzle. Click on the buttons in the following order: 3, 1, 3, 5, 5, 1, 4, 2.

Revenge-Of-The-Witch-Puzzle-Solution-20
You can now collect the Plate with Spider and go to the pottery studio again. You can use the Plate with Spider on the box here and start another puzzle. The answer is:
Revenge-Of-The-Witch-Puzzle-Solution-21
Now collect the Scroll and the Magic Powder and move onto the cottage. You can use the Magic Powder on the spider to cause it to vanish. Now collect the seventh Magic Gem. Only three more to go! Go inside the cottage to collect the Screwdriver and Fuse. Now go to the brewery and start the hidden object screen under the right window. Collect all the objects and you will be awarded the Scale. If you take a look at the cabinet on the right wall, you can use the Screwdriver to take the Hook. Now go back to the town hall.
If you look at the right statue, you can use the Scale to fix it. You can collect the Stone with Bird Image now. Go to the well and use the Hook on the rope so you can use the lever and collect the Stone with Hog Image. Go back to the Gully
and place the Fuse on the Gunpowder Barrel that you left there. Light it with the Burning Kindling. Now with a bang, the rocks will be moved and you can go past them to a clearing. You’ll find a hidden object area on the right. Collect all the items and you will get a Decorative Plate. Now pull back and to the Scroll and the Antlers. Now you can go back to the Pottery Studio. If you look inside the open cupboard you’ll see a box on the lower left to use the Decorative Plate on. This will start a new puzzle for you. This is the answer:

Revenge-Of-The-Witch-Puzzle-Solution-22
Revenge-Of-The-Witch-Puzzle-Solution-23
Now collect the Letter E and head back to the town hall. Look at the leftmost box and place the Letter E, Letter R, and Letter S on the plaque. This will let you collect the Stone with Squirrel Image. Go back to the cottage and take a look at the slotted stone marker on the right. The Stone with Fish Image, Stone with Bird Image, Stone with Hog Image, and Stone with Squirrel Image all go here. You’ll be able to collect the Plate with Leaf. Go back inside the cottage and look at the box in the back right. Use your Plate with Leaf in it to start a puzzle. The answer is:
Revenge-Of-The-Witch-Puzzle-Solution-24
Once you finish, collect the Scroll and Magic Powder before returning to the greenhouse. You can use it on the vines to free the girl. Now collect the eighth Magic Gem!
Chapter 5: The Eagle and the Chains
Take a look at the table in the back. Find all the flower pots and all the flower bulbs before going back to the main area. There a doorway you can now go through into the garden. Collect the Scissors. Now go back inside the cottage and use them on the Fleece Blanket that is laying on the bed. Go back to the greenhouse and slip the Fleece under the snake hiding out under the barrel planter. Light it with the Burning Kindling and make him run off. You can now collect the Saw. Go back to the clearing and bring up the hidden object area on the right. Collect all the objects and you will be given the Honey. Use the Saw on the pile of sticks, which will let you find and collect the Metal Rose. Go back to the garden so you can place the Metal Rose in the statue’s hand. Now collect the Quadrangular Key before going to the brewery. There you can look at the hidden object area on the right and put the pieces back into place. You will be rewarded with the Aloe. Now unlock the box on the middle table in the back of the room with the Quadrangular Key. This will start another puzzle. Like a game of checkers, move the magician piece to jump over the monsters. You will collect the Crystal (2) when you finish. Now go to the garden again.
In the back of the garden, there is a small table. Place the Minerals, Weed, and Aloe into the mixing bowl before using the pestle and crushing it up. Now add the Honey to the bowel. Collect the Growth Accelerate. One the main back table, you can use this on the potted plants. Collect the Live Flowers. Now go back to the clearing. Give the Live Flowers to the fairy statue so you can collect the Decorative Plate. Now go back to the pottery studio and go to the open cabinet. Use the Decorative Plate on the box in the upper right side. This will start a puzzle. The answer is:
Revenge-Of-The-Witch-Puzzle-Solution-25
Revenge-Of-The-Witch-Puzzle-Solution-26
Collect the Plate with Eagle and move on back to the garden. You can use the Plate with Eagle on the box behind the left statue and start a puzzle. The answer is:
Revenge-Of-The-Witch-Puzzle-Solution-27
Collect the Scroll and the Magic Powder before going back to the clearing. Here you can use the Magic Powder on the Eagle and collect the ninth Magic Gem! Only one more to go! Collect the Round Key and go inside the building to the lab. The desk to the left contains beakers. Find them all, then find all the magic crystals. Now go back to the inside of the cottage and use the Round Key to unlock the box on the right. This will start a puzzle. Like checkers, move the magician tile and jump over the monsters. You will be given the Shield Part (2). Go back to the archives. You can use both Shield Parts to fix the coat of arms and collect the Scroll and Magic Liquid. Now go back to the clearing and look at the hidden object area that in on the right. Collect all the objects and you will be rewarded with the Buffalo Horns. Go back inside the cottage now and place the Antlers, Ram Horns, and Buffalo Horns onto the correct animals. Now you can take the Rifle. Go back outside and place the Rifle into the stand on the right. Click the windows to hit all the witches. You can now collect the Golden Key. Go back to the lab and use the key on the cage. Take the Crystal (3) from inside.
Now got back to the table that is by the bookcase. The Magic Liquid goes into the beakers. Collect the Crystal (4). Now use these Crystals on the fountain on the right and take the Plate with Phoenix. Go back out to the clearing. The Plate with Phoenix is used on the box under the tree to start a puzzle. This is the answer:
Revenge-Of-The-Witch-Puzzle-Solution-28
When you finish, collect the Scroll and the Magic Powder. Go back to the lab and use the Magic Powder on the chains holding the magician. Collect the tenth and final Magic Gem! Now you can go through the door ahead of you and into the catacomb where a puzzle will start. Click on the balls in the order that they show up. Once you win, place the Magic Staff in it’s place in the back of the room. Congratulations! You’ve beat the game!
You’ve completed our Echoes of the Past – The Revenge of the Witch Walkthrough! For more great tips and tricks, visit our blog!
Delicious – Emily’s Hopes and Fears Walkthrough
Big City Adventure – Shanghai Walkthrough
Building the Great Wall of China 2 Walkthrough
This Echoes of the Past – The Revenge of the Witch Walkthrough is meant as a guide and does not contain cheats, hacks or serials.