There’s nothing like a nice long nap to put things in perspective. However, after Princess Sophia awakens from her century-long siesta, there’s no one in sight! Get the sleep out of your eyes, because it’s up to you to find your family, your friends, and your throne. This Awakening – Moonfell Wood Walkthrough will contain guides to the many levels, tips and hints for solving puzzles, and some additional hints to help you find your way through this mysterious landscape. Rise and shine, the woods say hello!
Contents
General Tips & Tricks
- Mira, your fairy guide, can give you hints and even solve puzzles for you if you get stuck.
- Notes and diagrams that can help you solve puzzles go in your Journal: check it if you get stuck.
- Don’t be ashamed to turn the difficulty down to Casual if you’re having a tough time.
Awakening – Moonfell Wood Walkthrough
Part 1
Start by grabbing the Stick in front of you. Continue to the next screen and examine the bush to the right to uncover a Hidden Object Puzzle. You will receive a Rope: combine this with the oar piece on the stone with the Rope and you will create an Oar. Don’t forget to grab the four Painted Tiles nearby! Inside the nearby boat is four more Painted Tiles, which can be used on the nearby box to solve a puzzle. Refer to the screenshot below for the solution. Opening the box will reveal a Signet Ring and a Magic Card: The Forest. Locate the nine birds hidden on the Magic Card and it will be yours! Finally, use the oar on the boat to continue onto the next area.
Awakening – Moonfell Wood – Part 1 Puzzle
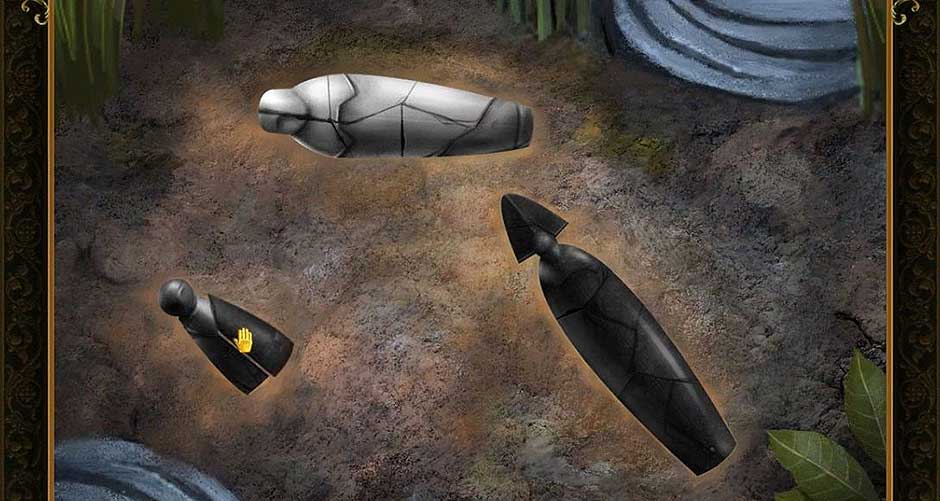
Part 2
Grab the Wooden Stick, then pick up all six Purple Mushrooms on this screen. There are six more Purple Mushrooms inside the fallen log to the left, but you’ll need the Wooden Stick to grab one of them. Continue onward, hanging a left at the waterfall, and you’ll find yourself at the Cliffside pool. On the ground near you is a small stone lantern, with some nearby broken figurines. Rearrange the broken pieces into the shapes shown in the screenshot below to solve the first part of this puzzle. You will receive the Stone Lantern Figurines, which need to be arranged in a particular way according to the inscription on the stone lantern. The order they need to be placed are, from left to right, smallest to largest, in groups separated by color, light to dark.
Awakening – Moonfell Wood – Part 2 Puzzle
Inside the stone lantern is a scroll with another puzzle. Cross out every item except for the purple mushroom and white flower in the middle. Your reward will be a Potion of Moondew, which you should take to the previous screen and use on the bush to your right in order to start another puzzle. You will receive some Mossflowers: Now, select the nearby tree stump and use the stick to goad out the tiny dragon. Then, feed it the Mossflowers and Mushrooms to add the Pocket Dragon to your inventory. Use it to open the lock on the gate to the right of the waterfall, one screen down.

Awakening – Moonfell Wood – Feeding Dragon Guide
Collect all the Acorns in this area: there are eight, with some in the stump to the left and a few in the rock pile to the right. Then, grab the Axe Handle in the next room and backtrack to the path leading up to the waterfall. Combine the Axe Handle with the axe head resting on the stump to construct the Axe, then use the Pocket Dragon to light the candle next to the tree on the left with the hole in it. Giving the squirrel your Acorns will trigger another Hidden Object Puzzle, and your reward will be the Claw Hammer. Head back up to the Cliffside pool and use the Axe to chop down the tree with the wooden boards nailed to it, blocking the waterfall in the process. Don’t forget to pry off the boards with the assistance of the Claw Hammer.
Back to the path previously blocked by the gate, use the Boards and Claw Hammer on the side of the tree to make a ladder. Climbing the ladder to the nest will yield you a Block of Tin and Gem Keystone. Use the Block of Tin on the anvil at the base of the stone centaur and heat it up four times with the Pocket Dragon. This will give you a Tin Rose, which is used to free the petrified centaur and receive the Sunstone. Going back to the waterfall, examine a stone near the right path: there should be a slot for your Gem Keystone, which will trigger a short puzzle. To solve, match the diamond shaped gems, then the square gems, the circle gems, and the heart gems. The final gem you’ll find is the Moonstone, which will allow you to open the door behind the waterfall along with the Sunstone.
In the next room, grab the three Candles and fill the nearby Silver Basin with water. Underneath the Silver Basin is the Magic Card: The Moon, which will be added to your inventory after finding the hidden butterflies. Place the now filled Silver Basin on its original spot to trigger another puzzle. The solution to this one is to press the buttons around the circle until the light pattern matches the one in your Journal. You will receive the Sun Medallion, which belongs in the center of the fresco at the end of the cave. First, place the broken pieces in the same position as the below screenshot. After placing the Sun Medallion in the center, swap the larger outside pieces around until the wings are formed and the door will open.
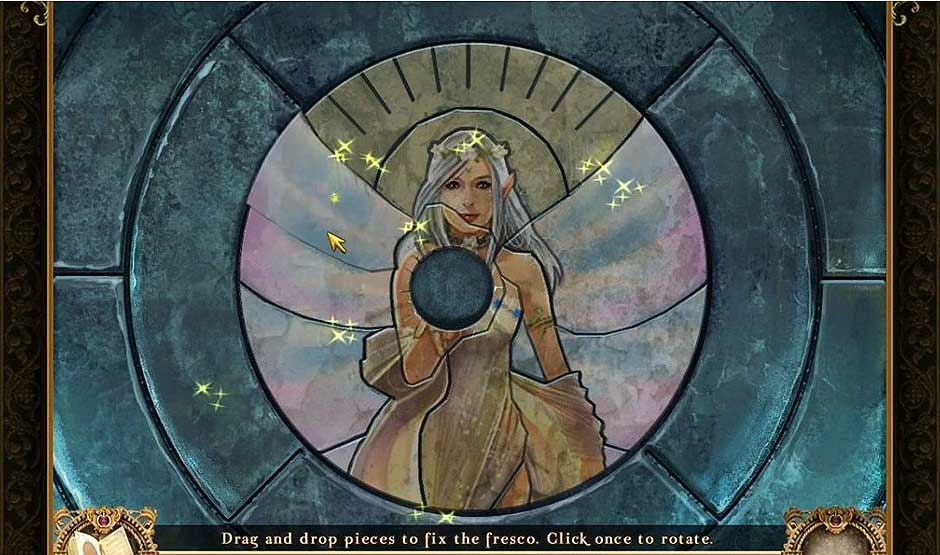
Awakening – Moonfell Wood – Fresco
There are three more Candles to grab in this area. Place them on the Gate of Sun and Moon, then light them with the Pocket Dragon in this order: square, star, diamond, circle, triangle and heart. These shapes will also come in handy as a guide to which candles should be used to color which section of the diagram, similar to paint-by-numbers. When fully colored, the Gate will activate, allowing you to walk through to the next area…
Part 3
Take a step back and grab the Fairy Beads, including the one in the nest. The sunflowers hold the Magic Card: The Fairy Queen, which will be yours after finding the hidden hearts. Heading back to the waterfall, talk to the Fairy Queen and she will ask you to find 21 Fairy Beads. Three of them can be found on the path the right (one’s in the stump), and there are four more on the next screen, including one in the nest.
Back to the path before the waterfall, you’ll see a goblin woodsman who will challenge you to a game of Tripeaks. Don’t worry if you mess up: you can try as many times as you like. Your prize is a Cherry Berry Basket and first pickings of the stuff in his rucksack, which is another Hidden Object Puzzle. Get the Oil Tap from the rucksack, then grab the Wooden Pole.
Heading to the path on the left of the waterfall, there are four more Fairy Beads, one hidden in the stump. the next screen has 3 more, one hidden by a frog. Picking the matching berries in the bush will fill your Cherry Berry Basket, which you can bring back to the goblin in exchange for some paper. Rearrange the paper so it looks like the screenshot below and you will learn how to get Everlasting Oil.

Awakening – Moonfell Wood – Guide Puzzle
Continue on the path right of the waterfall to the lake. Collect the three Fairy Beads and then use the Wooden Pole on the lantern to knock it over, letting you access the Brass Key after repairing the broken glass. The Brass Key can be used to open the nearby box, giving you the Fishing Line and Decorative Brick. combine the Fishing Line with the Wooden Pole to make the Flexible Pole with String. Placing the Decorative Brick with the others on the wall will trigger a matching game. Your rewards for completing it are an Empty Spider Jar, Empty Honey Pot, Empty Oil Flask and a Fishing Lure, which creates the Fishing Rod when combined with the Flexible Pole with String.
Walking down two screens, grab the 3 Fairy Beads and use the Oil Tap on the tree to fill the Empty Oil Flask. Then, go to the Cliffside pool and use the Fishing Rod to catch a Fish. Head back to the fallen lantern and fill it with the Oil Flask, lighting it with the Pocket Dragon. Hanging the lit lantern will give you a Copper Key, which will open the right side of the lockbox containing Glass Marbles and four Runes. In the next area, give the Fish to the cat and you will receive the Magic Card: The Moon. Then, grab the Glass Marbles in the fountain. Place the Glass Marbles in the nearby gate according to the screenshot below and enter the pavilion.
Awakening – Moonfell Wood – Pavilion
In the pavilion, grab the Incense Censer from the statue, and place the four Magic Cards you’ve collected on the center pedestal: the order from left to right is The Forest, The Sun, The Fairy Queen, and The Moon. collect the four Fairy Beads, then rearrange the tiles on the left to form three pictures of a bee, granting you a Wax Knife and some Smoky Incense. Exit the pavilion and go back three screens.
In this area, hang the Incense Censer on the tree, place the Smoky Incense inside, and light it with the Pocket Dragon. This will allow you to collect Beeswax using the Wax Knife and fill your Empty Honey Pot with some honey. Back at the waterfall, give the Fairy Beads to the Fairy Queen and she will give you a Letter to the Witch, which can be placed in the cat’s envelope, closed with Beeswax, and sealed with the Pocket Dragon and Signet Ring.
Placing the Sheet of Paper on the flat stone, rub it with the Burnt Branch to reveal a Rune. Back at the falls, the five Runes can be placed on the puzzle to get an Ornate Key and Stone Tile. The Ornate Key opens the gate. Enter the cave and collect all the spiders on the web to the right, filling your Empty Spider Jar, then burn the webs with the Pocket Dragon.
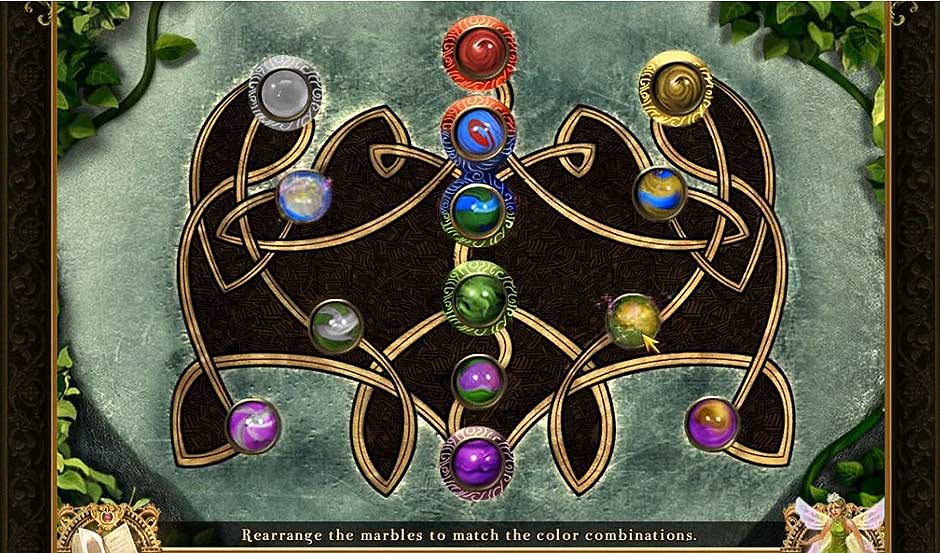
There are three frescos that need to be rearranged, granting three Wooden Discs. Arrange the Wooden Discs in the correct order on the stone portal, then arrange the color gems in kind. You can see the correct order in the screenshot below. Once you pass through the gate, arrange the symbols on the snake in order from 2 to 10, starting from the head. This will allow you to pass through to the next area.
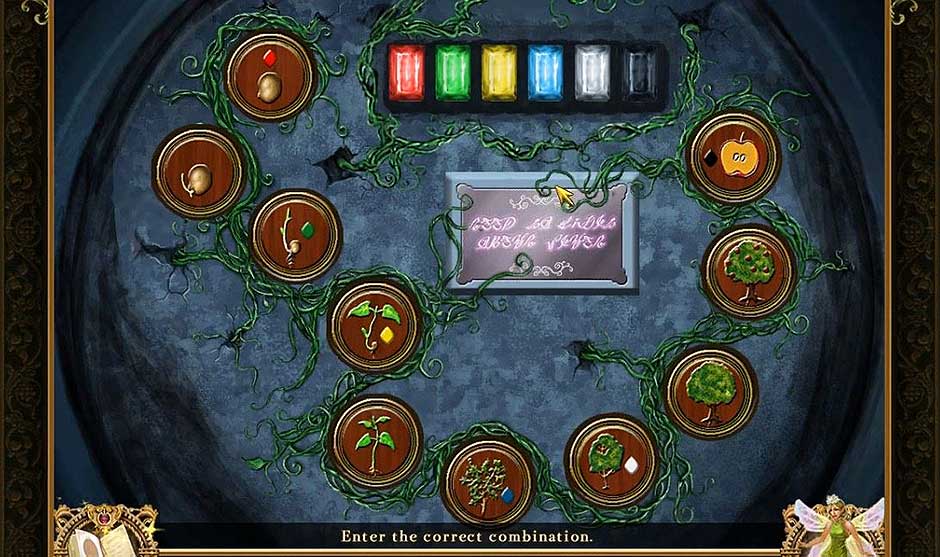
Awakening – Moonfell Wood – Combination
Part 4
Walking down from the vista, play another round of Tripeaks with the goblin. He will give you a Potion of Rapid Growth. Head down the path to the right and rearrange the shapes on the nearby spider web so the like shapes are lined up, with the large ones on the outside and the small ones on the inside. Then, move the bricks so that they form the flower shapes, and your reward will be the Black Orb and Grappling Hook Head.
In the nearby storage box are some parts which can be assembled into Gardening Shears, which can be used to cut the Rope hanging on the tree. Combine the Rope with the Grappling Hook Head, then walk forward. The Gardening Shears can be used by the tree on the left to get the Pickaxe Handle, and then solve the flower puzzle above it to receive a Bouquet of Moonflowers.
Head into the pavilion and solve the matching tile puzzle on the stone slab: you will need the Signet Ring, and your reward is a map and crest for your Journal. Select the ivory chest and use the Bouquet of Moonflowers to open it by placing them in the correct position. In the chest are some scraps of the Magic Card: The Witch, which you should arrange and then collect after solving the puzzle. Solve the puzzle of the strings on the board to the left to get the Hemp Rope.
Exiting the pavilion, walk down one screen and combine the Pickaxe Handle with the head to get the Pickaxe, which is used to break the stone marked with an X. Use the Grappling Hook on the hole, tie the other end to the Hemp Rope and use the Potion of Rapid Growth to recover a chest. Form the crest to open the chest and collect the hidden objects to receive a White Orb and some Statue Fragments.
Head back to the front of the pavilion and use the Statue Fragments to reassemble the right statue. Check the screenshot if you get stuck. Place the White Orb in its hand and take the Moon Medallion, then reassemble the statue on the left and place the Black Orb in its hand, taking the Small Silver Key. In the pavilion, use the Moon Medallion to activate another tile matching puzzle, which will give you some glyphs for your Journal when solved. Place the Magic Card: The Witch on the stone table, getting the Small Gold Key and go back to the statues: using the glyphs in your Journal, solve the two puzzles and use the two keys to activate the bridge leading to the next area…
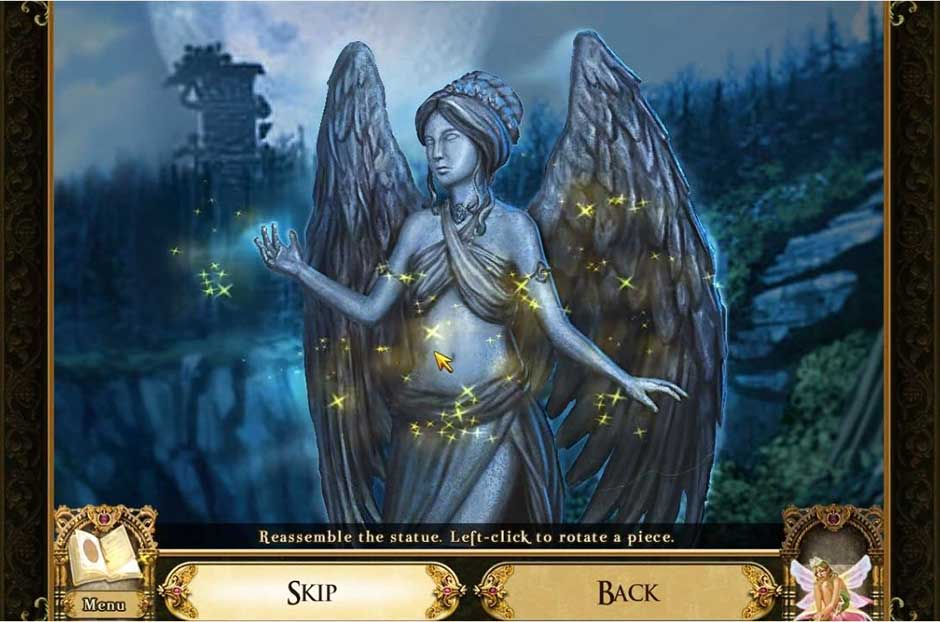
Awakening – Moonfell Wood – Statue Puzzle Solution
Parts 5 and 6
Collect three Pinecones, then play Tripeaks with the goblin. Get two more Pinecones on the next screen and light the lantern with the Pocket Dragon. Match the moths to get a Net Full of Moths, then light the candle by the alcove and solve the match-3 puzzle. Grab the Empty Snail Pot and fill it with the nearby snails, then head to the left for two more Pinecones. Match the moths to open the door, then match the gourds in the next room to get the Giant Gourd. You’ll find the Key Fragments by the pots on the shelf, which can be used to open the door and enter the tower.
Grab the Garden Trowel, then find the hidden objects on the desk to get the Botany Book. Reconstruct the broken pot and head up the stairs, where you can find a Doorknob next to the bitey plant. Place the Botany Book on the shelf and match the books to connect the vines: Check the screenshot if you get stuck. Get the Magic Beans and exit the tower, using the Doorknob to open the shed.
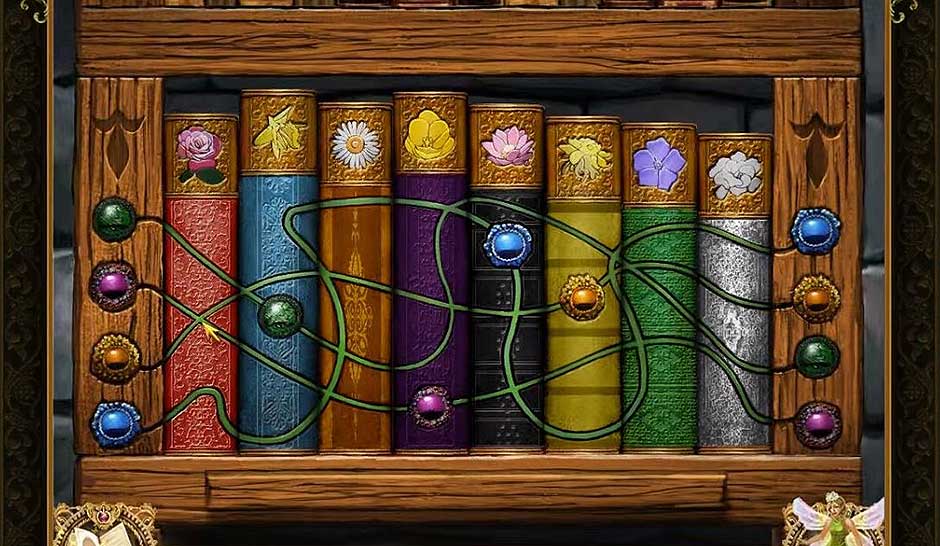
Awakening – Moonfell Wood – Books Solution
Solving the Hidden Object Puzzle will give you the Weedkiller Spray, which can kill the bitey plant in the tower, giving you the Pot of Dirt and the Magic Card: The Griffin. Place the pot on the bench with the others, add the dirt with the Garden Trowel and arrange the flowers according to the books, referring to your Journal. Take the gems and head back up the tower, placing them on the paintings after solving them, getting eight Rotary Dials.
Head back to the pavilion and place the Magic Card: The Griffin on the stone slab to get the Disc of Sun and Moon, which you can take to the middle of the tower to open the door and head up the stairs, where you can grab the Crowbar, Oil Can and Wire Brush. Place the Onyx on the grimoire and rearrange the rings, then complete the diagram to add it to your Journal.
Balance the scales on the back wall by swapping the tiles, and then go to the vent shaft. You can place the five Rotary Dials on the device behind the glass door and rotate the gems to open the chest. Arrange the jars and items into the same position as the screenshot below, and you’ll get the Jar of Eyeballs. Leave and climb up the ladder to obtain the Bird’s Egg and Packet of Seed, and use the Crowbar to pry off the boards.
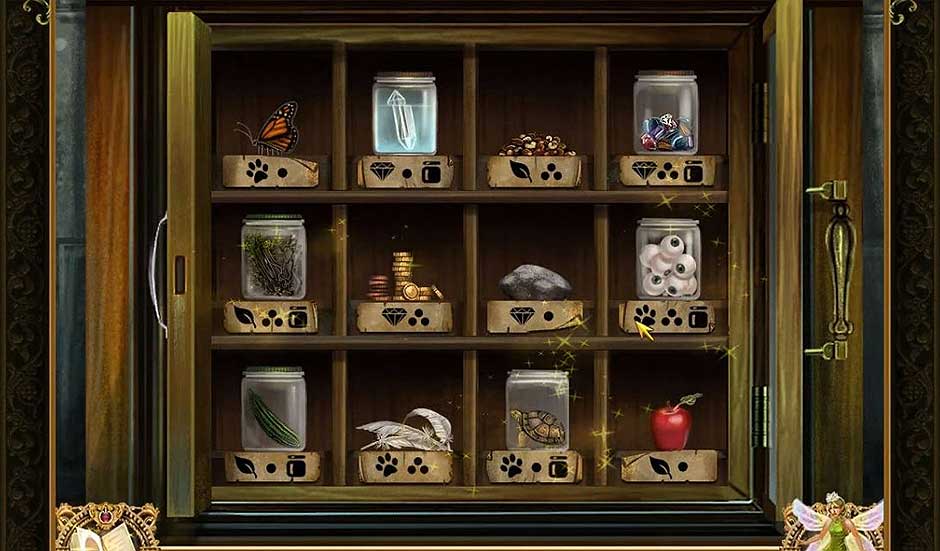
Awakening – Moonfell Wood – Jars Solution
Get the Twilight Gem from the goblin and drop the Giant Gourd over the edge because it’s funny. Go back down the ladder and use the Twilight Gem to open the alchemy chest after solving a puzzle. Take the steel weight and then repair the broken glass pieces of the Alchemical Flask to add it to your inventory. Exit the tower and take the Small Bronze Key out of the smashed Giant Gourd. Use the Birdseed to get rid of the bird and steal its three Bird’s Eggs, then go back in the tower and unlock the nightstand drawer with the Small Bronze Key. Match the keys until one is left to take, then go to the well and place the Steel Weights in the cage, tipping it with the Crowbar.
Using the Oil Can, the Wire Brush, and the Iron Key, grab the Lead Block from the other cage and head up the stairs. At the alchemy set, add the Jar of Spiders, Jar of Snails, and Jar of Eyeballs to the top, as well as the four Bird’s Eggs. Make a fire with the Pinecones and Pocket Dragon, and refer to your Journal to match the pointers to their correct position. Fill the Flask with the Philosopher’s Balm and grab the Crystal Gem as well, then exit the tower and backtrack to the crossroads.
For more great tips and tricks, visit our blog!
The Awakening – Moonfell Wood Walkthrough is meant as a guide and does not contain cheat codes, hacks or serials.