Welcome to the Persian Nights – Sands of Wonders walkthrough! The harsh rule of Grand Vizier Zaved has brought the kingdom of Persian to the edge of ruin. Disease plagues the land, and it’s the calling of one talented young apothecary to purge the kingdom of the illness and evil that shadows it in this stunning hidden object adventure. Our walkthrough will guide you along your journey with all the tips and tricks, puzzle solutions, and hidden object locations you need, including hidden collectibles. Browse the Contents list below to get started!
Contents
General Tips & Tricks
Whether you’re a tried and true hidden object adventurer or just starting on your path, this section will provide you with all the general tips and tricks you need to get started.
- Persian Nights – Sands of Wonders is a hidden object adventure. You will be able to freely traverse scenes and locations while looking for items and objects necessary to solve riddles and puzzles in order to progress.
- When starting the game for the first time, you’ll be allowed to choose from 4 difficulties:
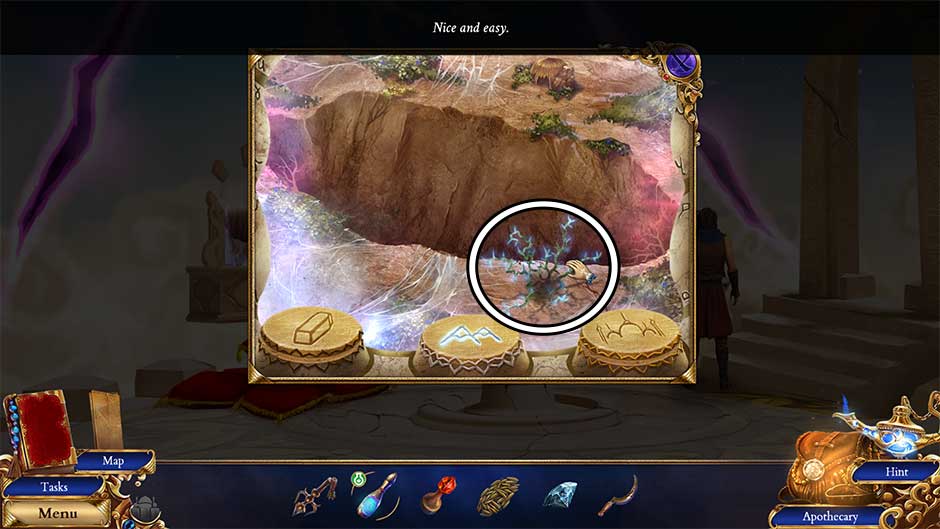
- Casual: Nice and easy – enjoy your adventure.
- Advanced: Tackle the moderate challenge of riddles.
- Expert: Unleash your greatness!
- Custom: It’s entirely up to you!
- To navigate between locations, move your mouse to a location, and if an arrow appears, click to move to that location.
- Your current Tasks can be accessed by clicking on the journal on the lower left. All current tasks and objectives will be listed here.
- The Inventory tab is located at the bottom of your screen. All Key Items you find during the game will be stored here for later use and are marked in bold type in the walkthrough below.
- Items with a + sign next to them indicate they can be further examined or interacted with. Click on the item to have a closer look. Interacting with an item may require using an additional item to complete it.
- The Hint button is located in the lower right corner of the screen. Click on this to receive a hint regarding what to do or where you should go next.
- During hidden object scenes, the hint button will reveal the location of a hidden object you need to find.
- During puzzles, the hint button will be replaced with a Skip button, allowing you to complete the puzzle without solving it.
- Along your journey, you will receive the Map. Click on the map to display all active locations. You can also fast-travel to a location by clicking on it.
- The Apothecary is another feature you’ll find along your journey. Located in the lower right corner, the apothecary will allow you to create special potions and mixtures to further solve puzzles and overcome challenges.
- Hidden throughout the game are Collectible Khur Palace Markings. These are marked and numbered with an ornamental blue circle in the guide below. You can also choose to skip to the Khur Palace Marking Collectible Locations portion of the walkthrough for a list of all locations.
- A small palace icon in the lower left corner of your screen will indicate whether or not a marking can be found in a given area. If the icon is white, there’s a palace marking you’ve yet to find. If the icon is grey, there’s no palace marking to uncover.
- Palace Markings are only visible in main rooms. They will not appear in close-up windows, puzzles, or hidden object scenes.
- There are numerous points in the game where you will no longer be able to backtrack to previous locations. As such, it’s highly recommended you locate palace markings as you enter new locations.
- Access game Extras by selecting the Extras tab in the game’s main menu. From here, you can view cutscenes, replay minigames, view achievements, replay hidden object puzzles, view concept art, listen to the soundtrack, and download bonus wallpapers.
Persian Nights – Sands of Wonders Walkthrough
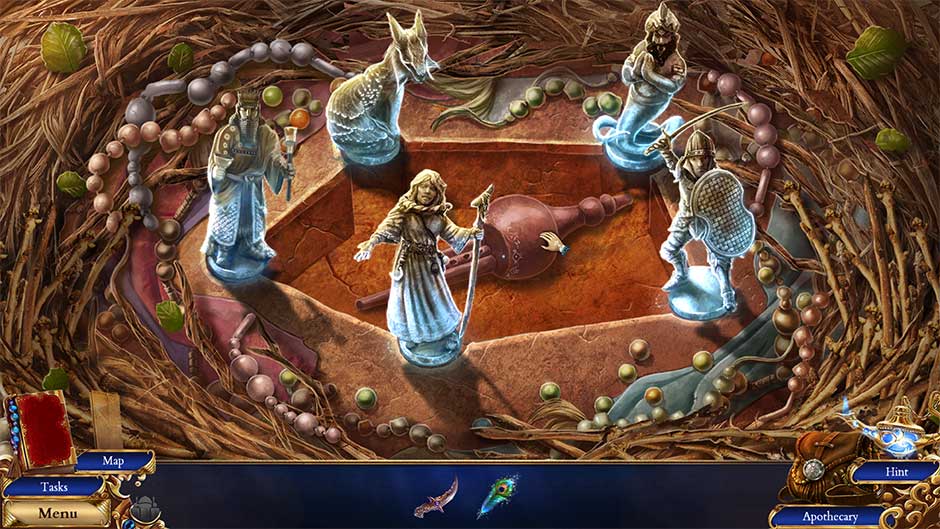
It’s a difficult time for Persia. With the wicked reign of Grand Vizier Zaved bringing misfortune across the land, it will be up to young apothecary Tara to cure the illness that plagues the kingdom. But she won’t be doing this alone! A mysterious young swordsman, a quirky genie, and a cast of fascinating characters will aid her along her quest. An encounter with an old soothsayer gives Tara the first clue on where to start her journey…
Chapter 1 – The Temple
Temple Gate
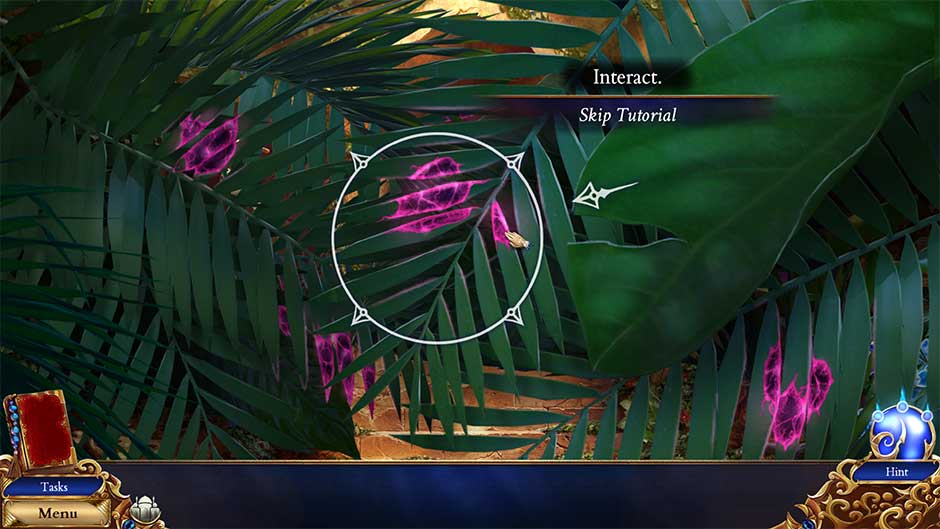
- Click on the leaves covered with the glowing purple corruption to clear the way to the Temple Gate.
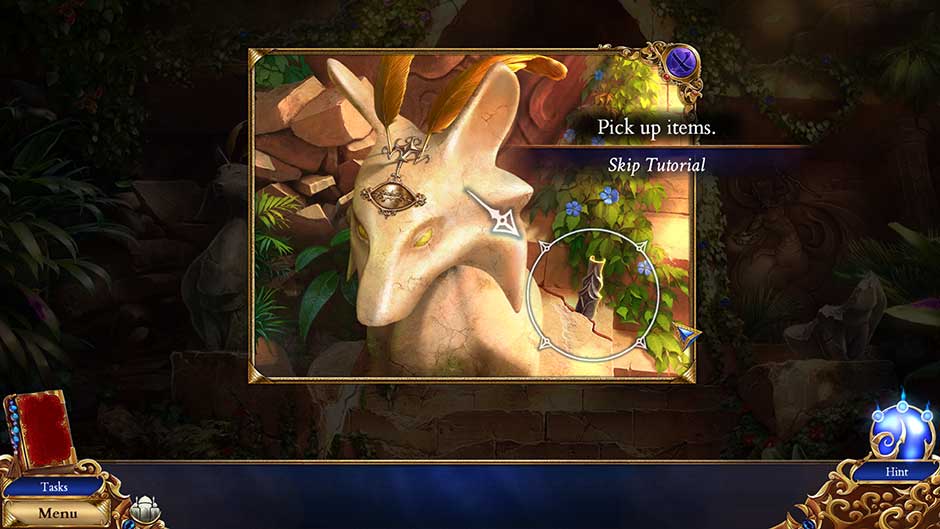
- Examine the statue on the left.
- Click on the Spearhead embedded in the right side of the statue to add it to your inventory.
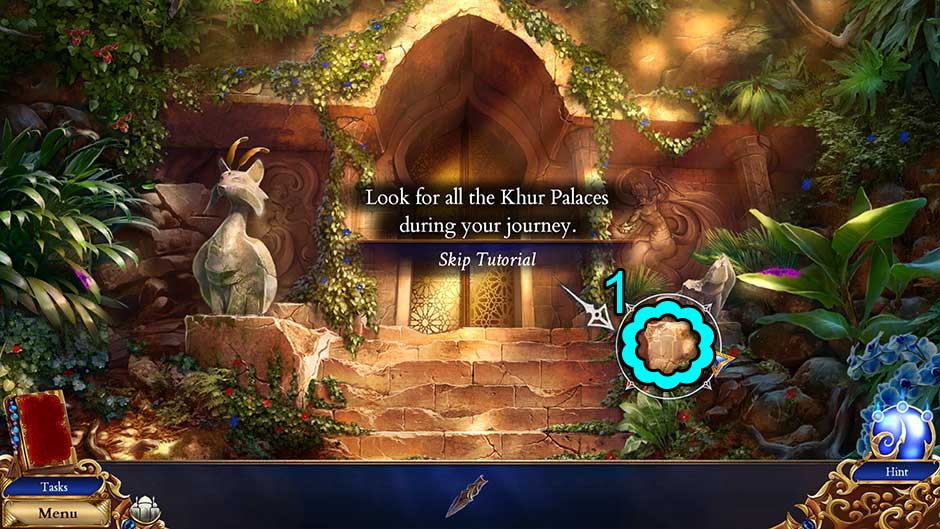
- Back in the main area, click on the Palace Marking 1/32 to unlock the Citizen achievement.
- Take a closer look at the palace wall on the right.
- Click on the leaves to move them aside, revealing the wall.
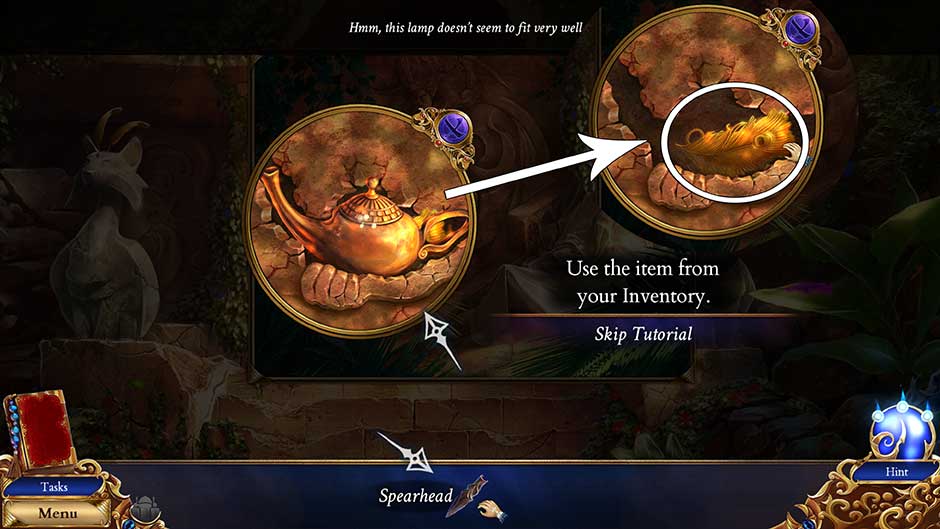
- Take a closer look at the lamp embedded in the wall.
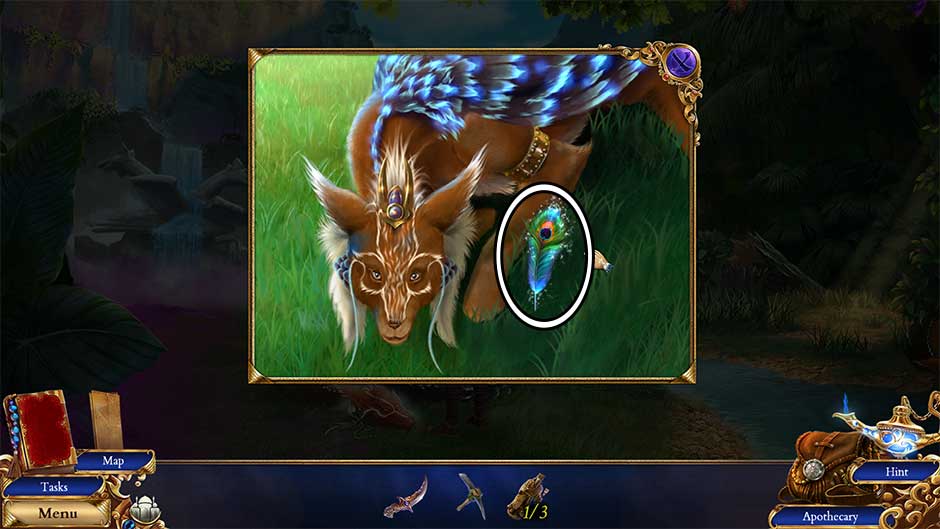
- Use the Spearhead to remove the lamp. Click on the Gold Peacock Feather inside the crevice to add it to your inventory.
- Click on the white sheet at the bottom of the wall to reveal a skeleton. Click on the Old Traveling Sack to add it to your inventory.
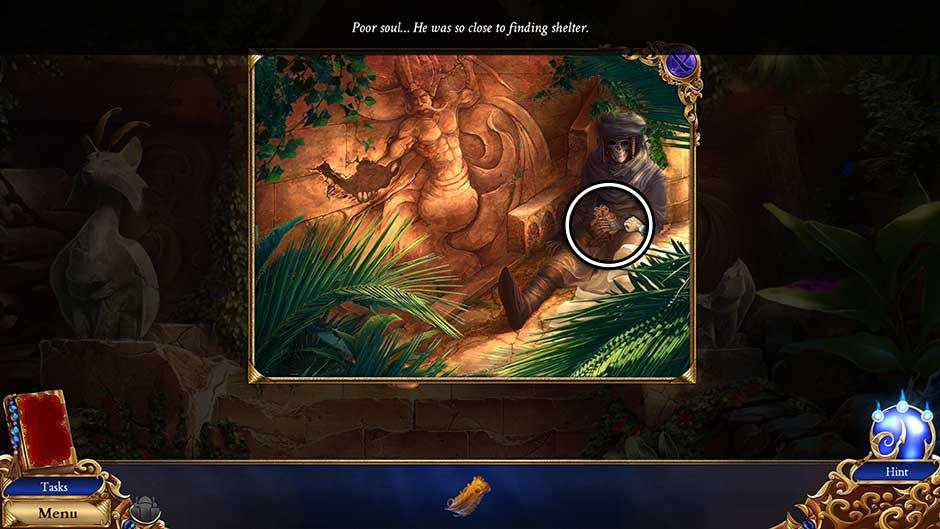
- Select the Old Traveling Sack from your inventory for a closer view.
- Click on the sack to open it.
- Click on the Flint and Steel to add it to your inventory.
- Open the note left inside and add the Peacock Eye to your inventory, too.
- Back in the main area, take a closer look at the statue on the left again.
- Place the Gold Peacock Feather into the statue headpiece.
- Insert the Peacock Eye into the slot that appears in the statue’s forehead.
- Click on the statue head twice to move it.
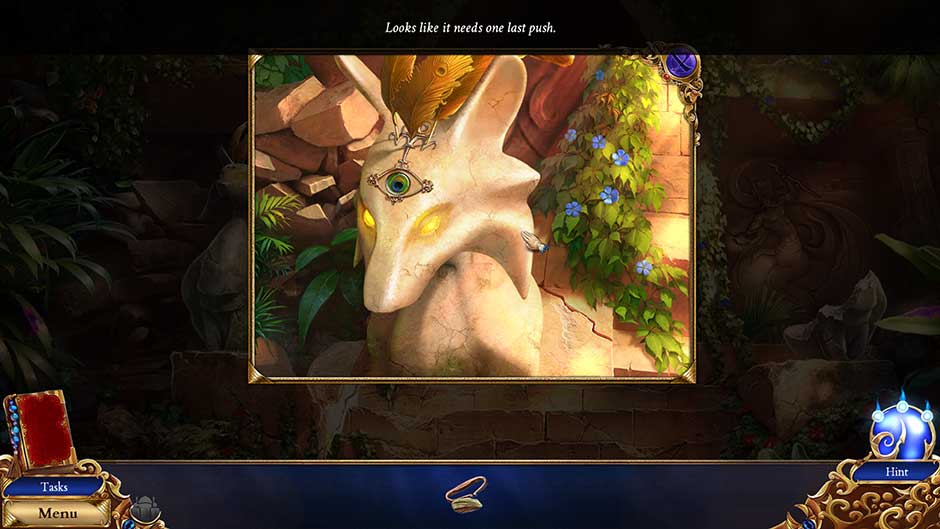
- The doors of the temple will open. Proceed forward into the Temple Atrium.
Temple Atrium
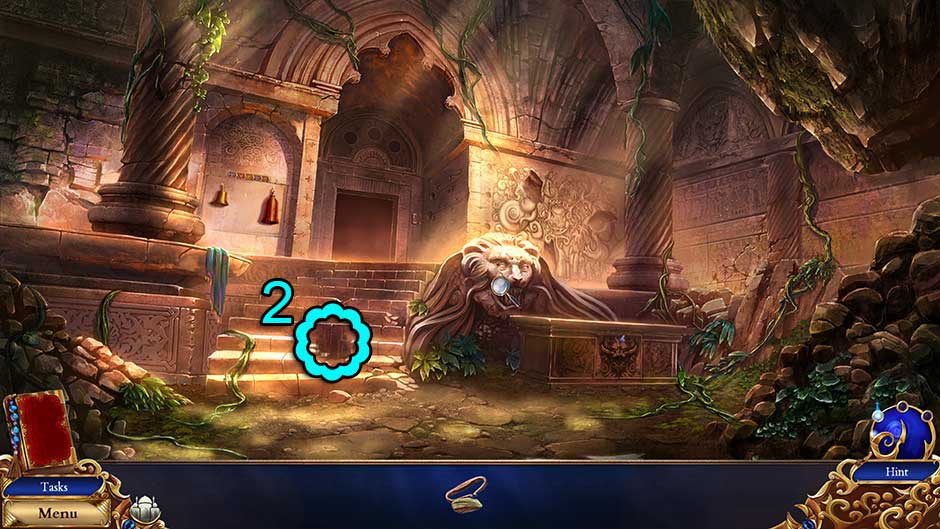
- Click on the Palace Marking 2/32 located on the steps.
- Examine the stone lion’s mouth straight ahead.
- Click on the lower right fang, followed by the left to open the lion’s mouth.
- Click on the Silver Bell to add it to your inventory.
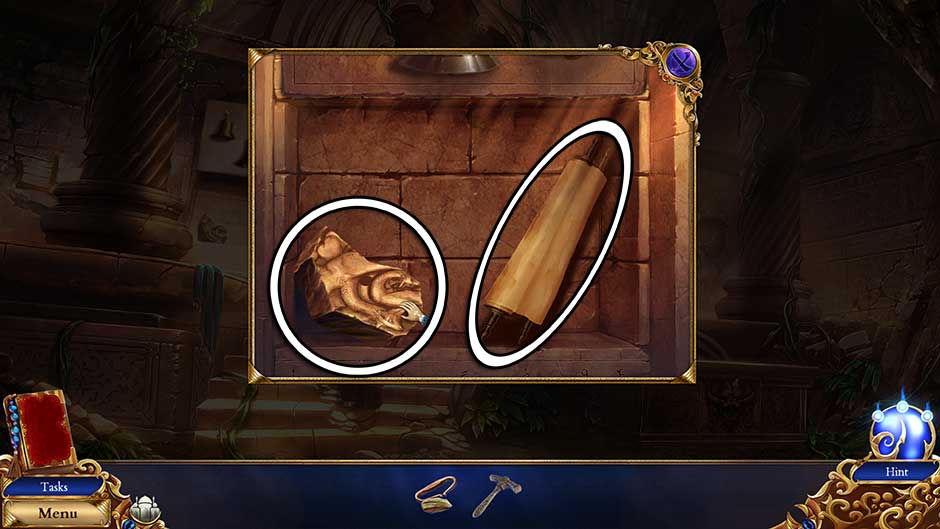
- Take a closer look at the wall above the stone lion.
- Pick up the Ornate Hammer and add it to your inventory.
- Examine the wall to the left of the far doorway.
- Place the Silver Bell on the hook between the two other bells.
- Click on the bells in the following order: Silver, Bronze, Gold, Silver, Gold.
- A secret compartment will open. Click on the Relief Part and the Old Drawing
- Go down, back outside to the Temple Gate.
Temple Gate
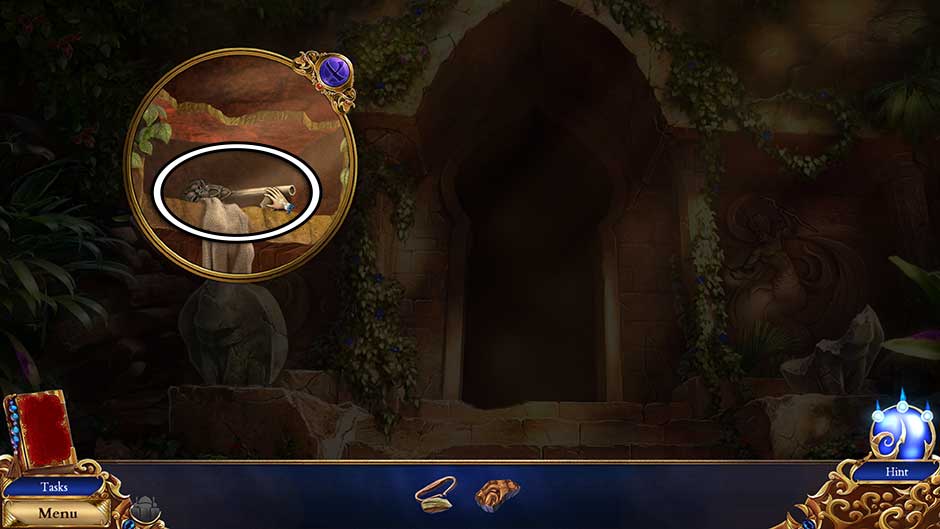
- The Old Drawing will automatically be pulled from your inventory. Take a closer look at the section of stone overhang above the left statue.
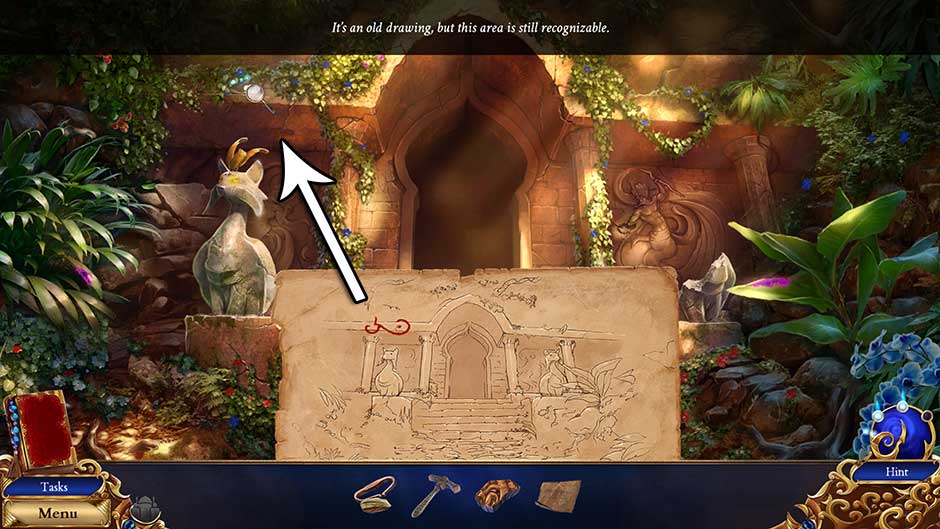
- Click on the ivy to remove it from the stone. Use the Ornate Hammer to crack open the stone brick.
- Click on the cloth inside to unwrap it, then click on the Peculiar Key to add it to your inventory.
- Enter the Temple Atrium again.
Temple Atrium
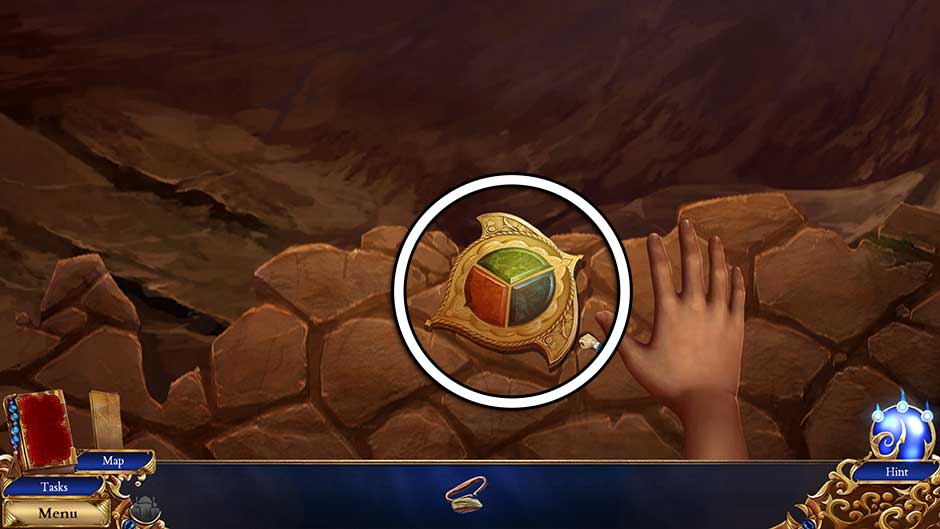
- Examine the stone sarcophagus beneath the stone lion on the right.
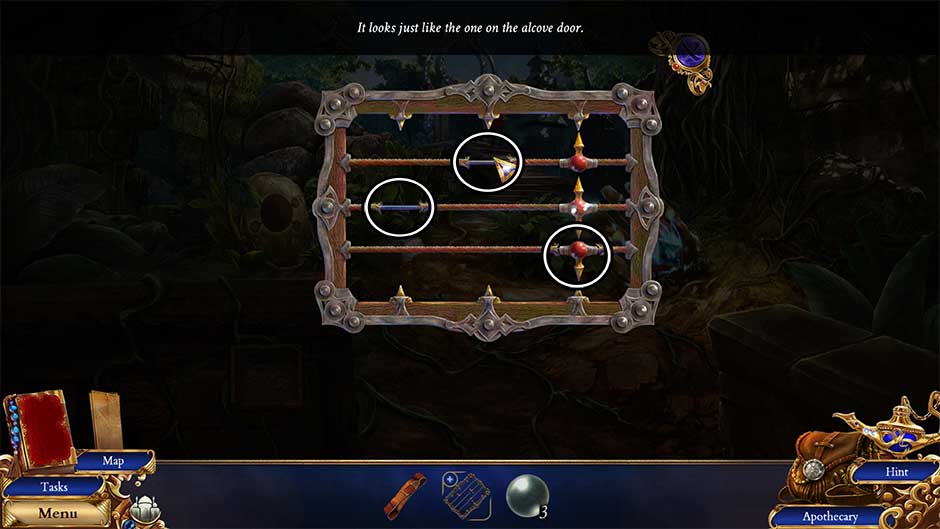
- Use the Peculiar Key on the lock to open the stone panel, triggering a minigame.
- Listen to the story. Find the elements displayed in the sphere. Their locations, and the puzzle solution, is shown below.
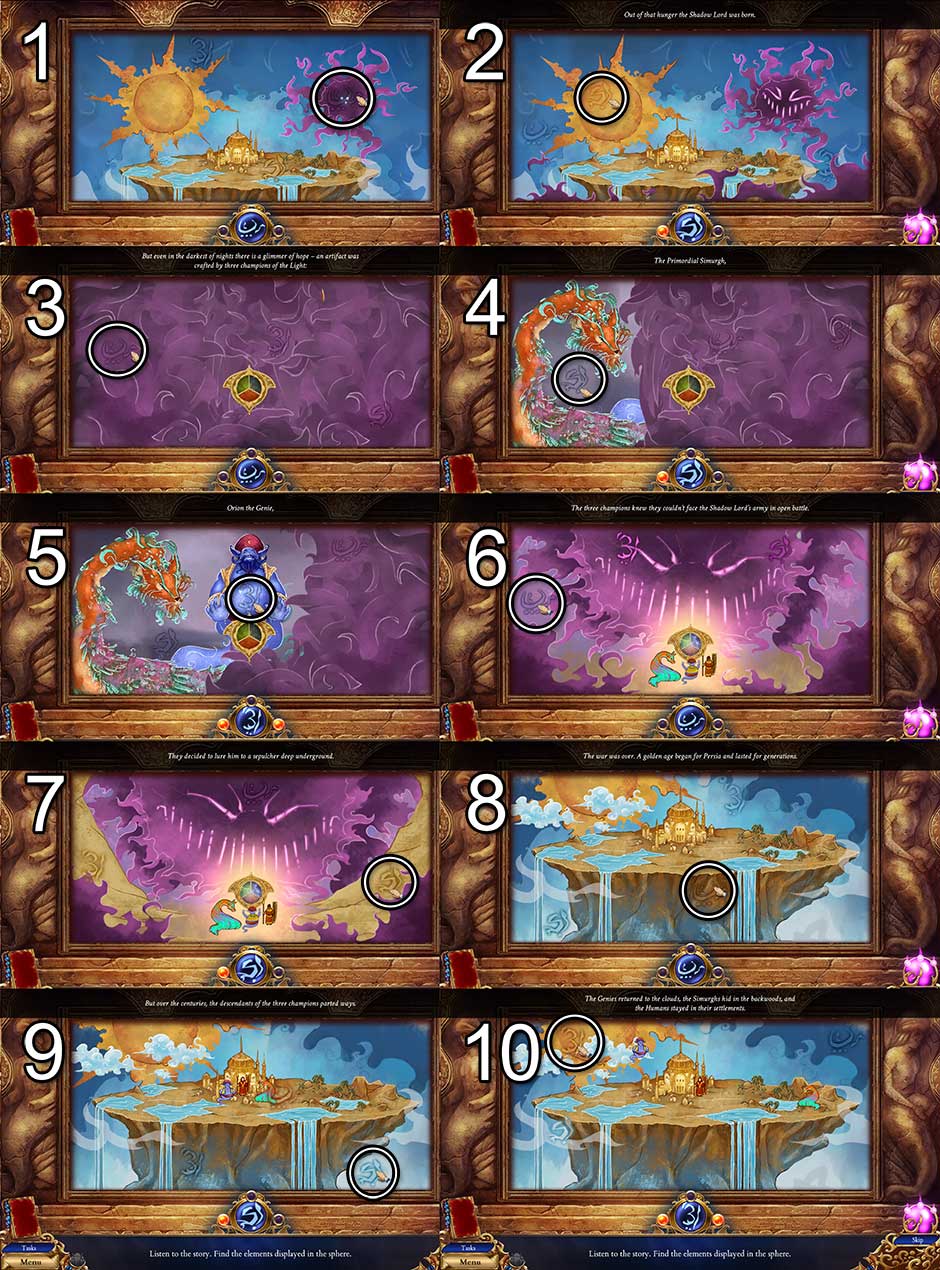
- Upon completing the puzzle, click on the Relief Part (2) to add it to your inventory.
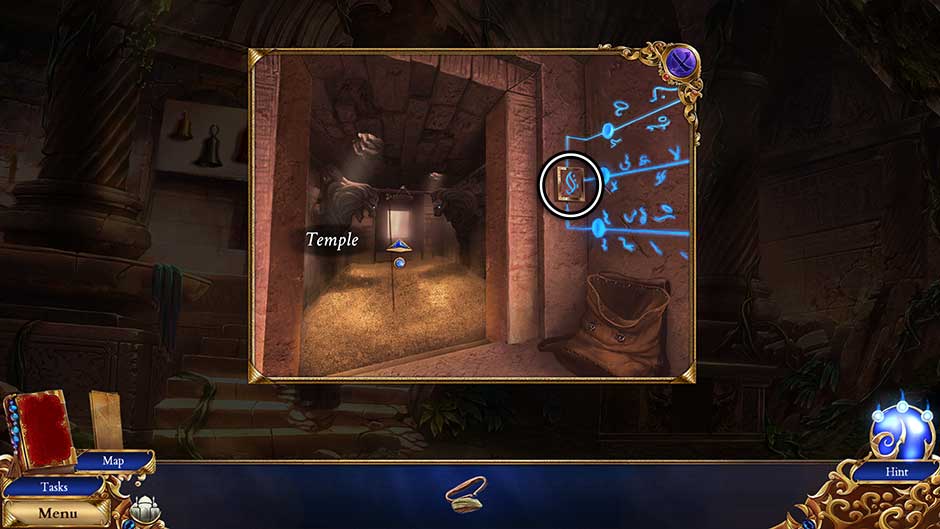
- Zoom in on the doorway up ahead.
- Take a closer look at the bag in the lower right corner.
- Click on the buckle to open the bag, then take a closer look at the Map inside. The Map will be added to the lower left corner of your screen and will allow you to fast-travel between locations.
- Collect the final Relief Part (3) remaining in the bag to add it to your inventory.
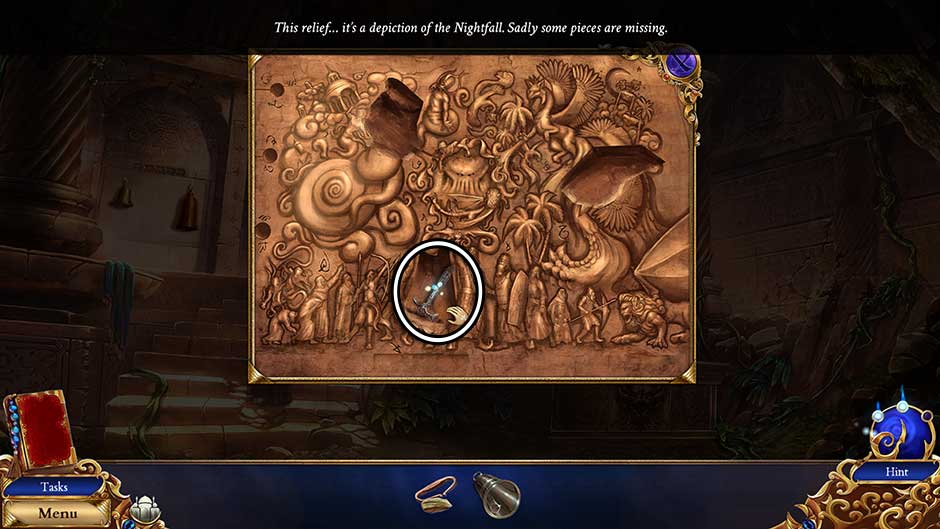
- Back in the main area, examine the wall to the right of the doorway, above the stone lion.
- Insert the Relief Parts (x3) into the slots in the mural. Once all the pieces are inserted, the wall will begin to glow.
- Take a closer look at the doorway ahead again.
- Click on the button to the right of the door to create a safe passage across the traps, then proceed forward into the Temple.
- Take a closer look at the bag in the lower right corner.
Antechamber
- A cutscene will occur. During a pause in the cutscene, pick up the Talisman.
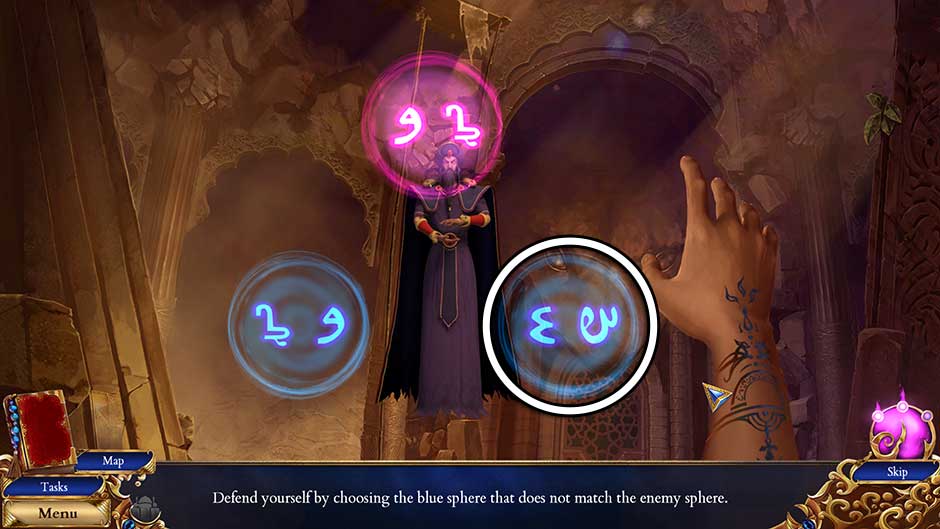
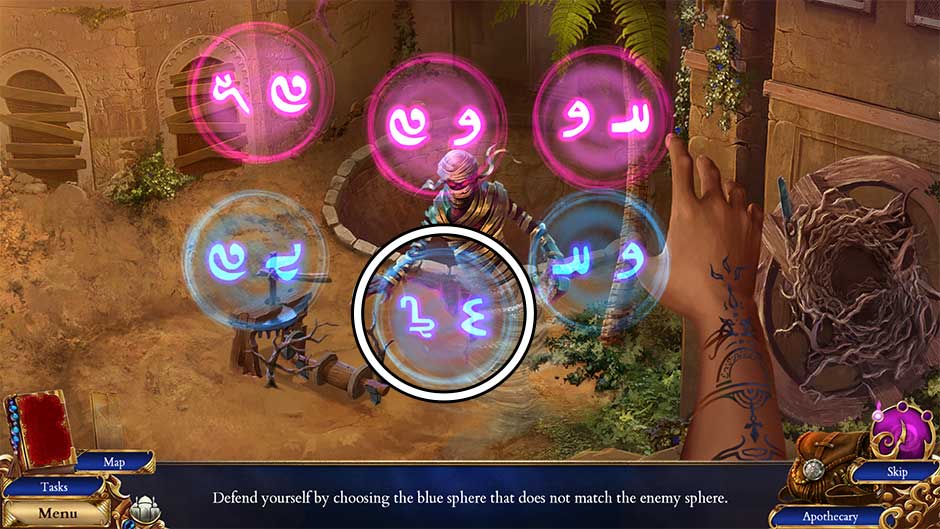
- A fight ensues with Grand Vizier Zaved. Defend yourself by choosing the blue sphere that does not match the enemy sphere. The solution is shown below.
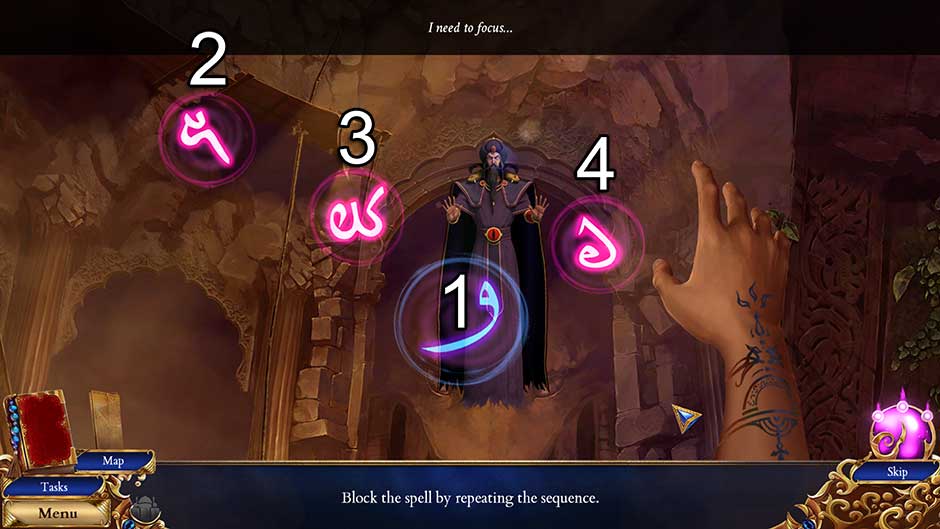
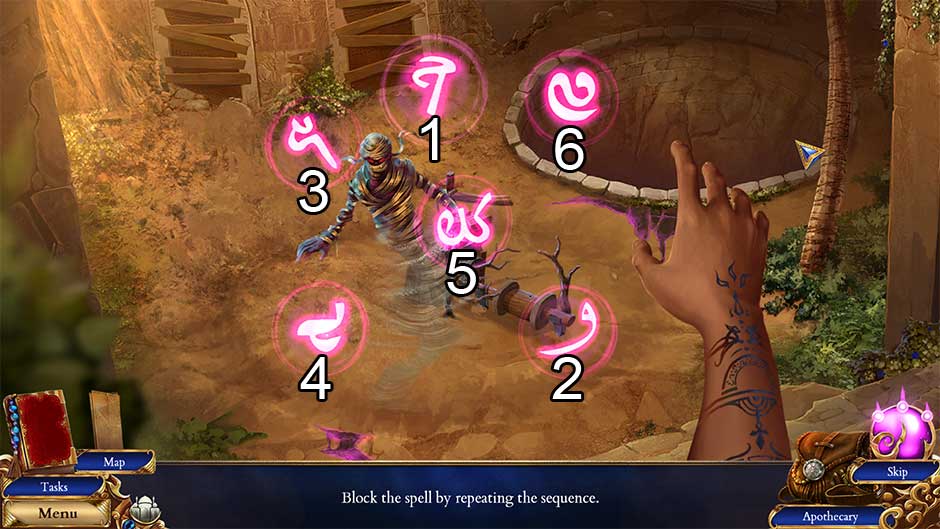
- Block the spell by repeating the sequence. Click on the orbs in the order shown in the screenshot below to repel Zaved’s attack.
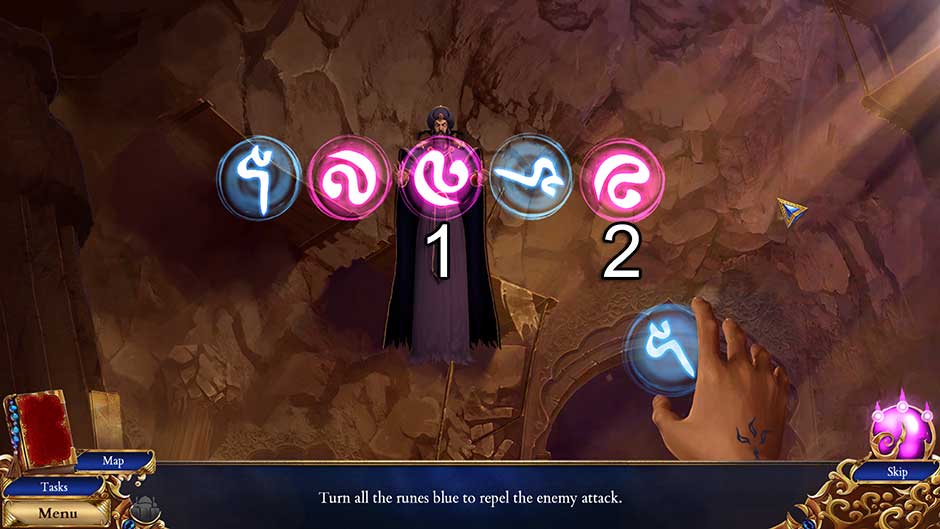
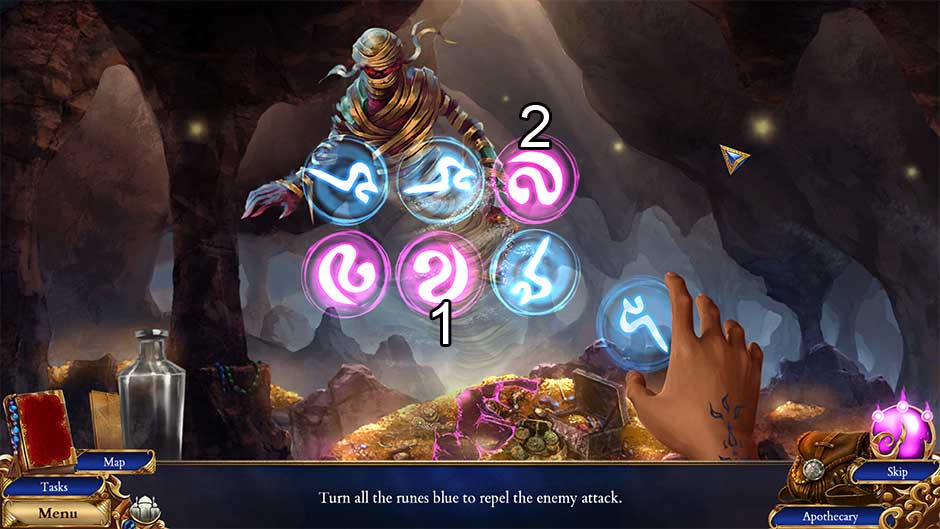
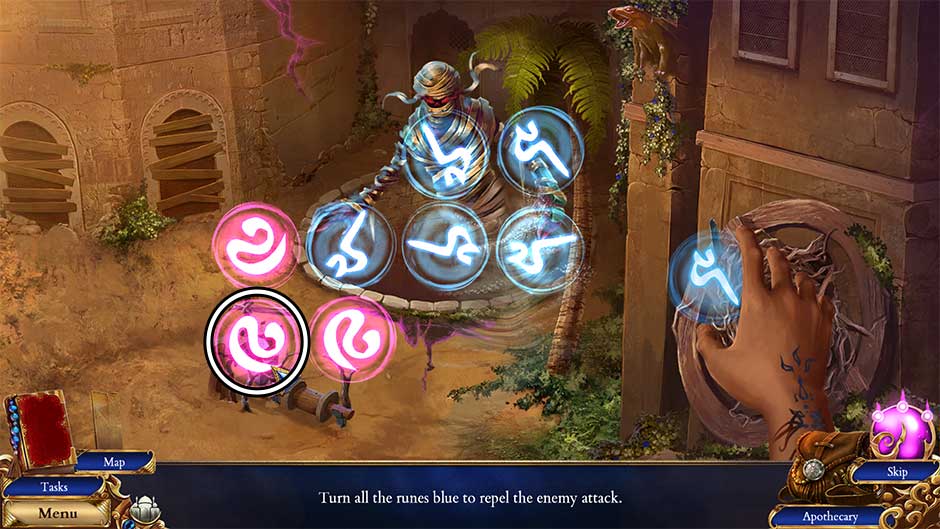
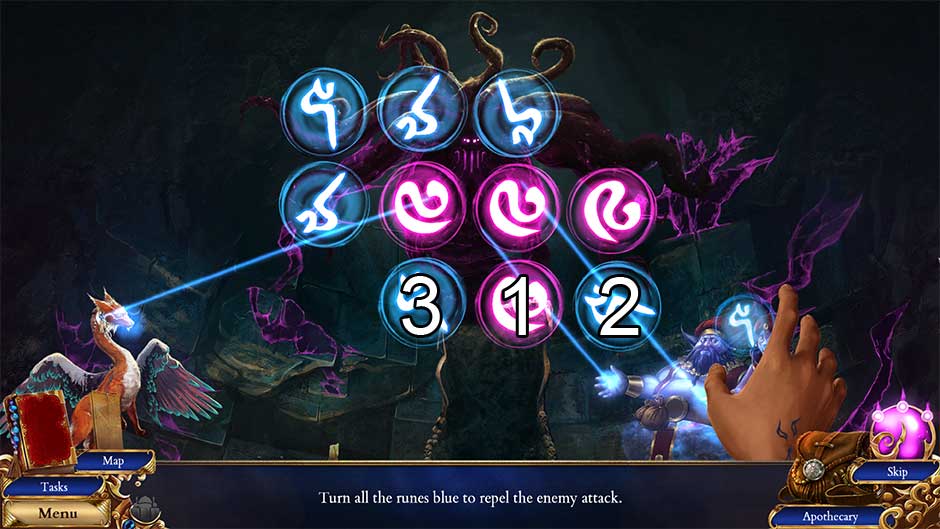
- Turn all the runes blue to repel Zaved’s final attack. Click on the orbs in the order shown in the screenshot below to solve the puzzle.
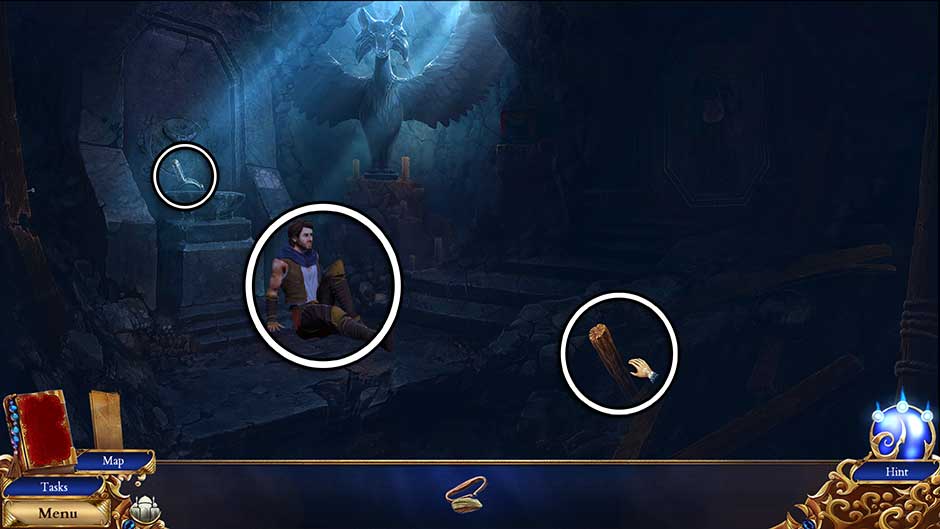
- After a brief cutscene, you’ll be acquainted with Darius – and a dark room! Click on the Stick to add it to your inventory. As soon as you pick it up, Darius will offer the Torn Cloth. Collect this as well. Finally, take a closer look at the basin behind Darius and collect the Flammable Oil.
- Click on the Stick in your inventory to pull up a closer view. Attach the Torn Cloth to the stick, then use the Flammable Oil to douse it. Finally, use the Flint and Steel to light the Torch, adding it to your inventory.
- Take a closer look at the basin where you previously found the Flammable Oil.
- Use the Torch on the basin to illuminate the room.
- Once the room has been lit, you’ll have the option to speak with Darius. Click on him and select anything you want to ask him. Click “Leave” once finished.
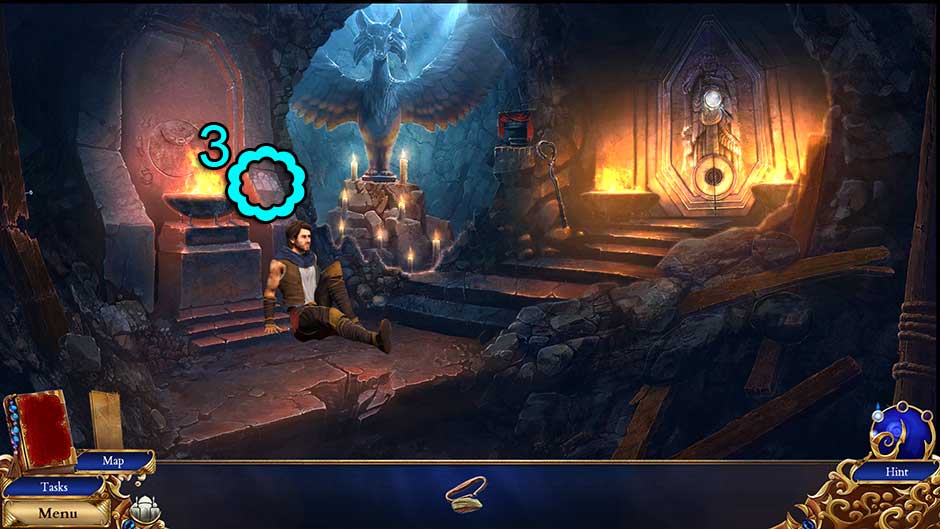
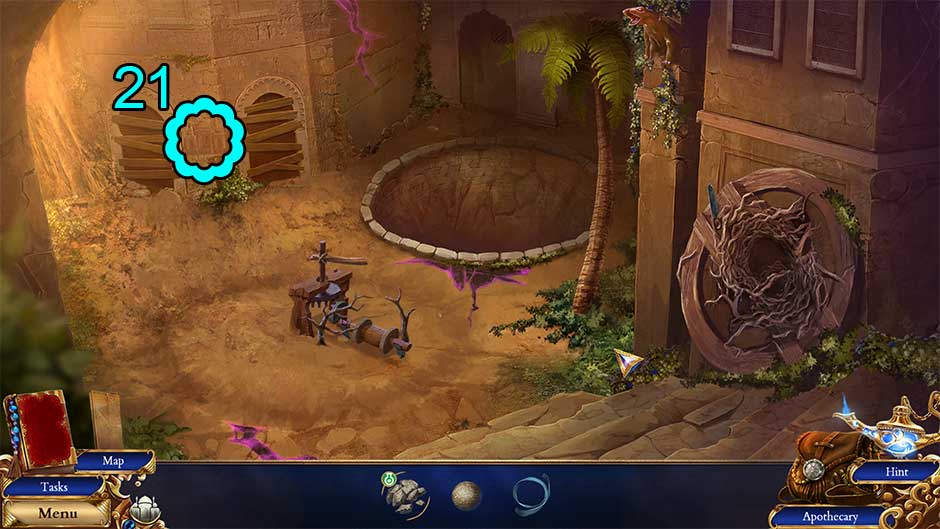
- Click on Palace Marking 3/32 on the stone above Darius.
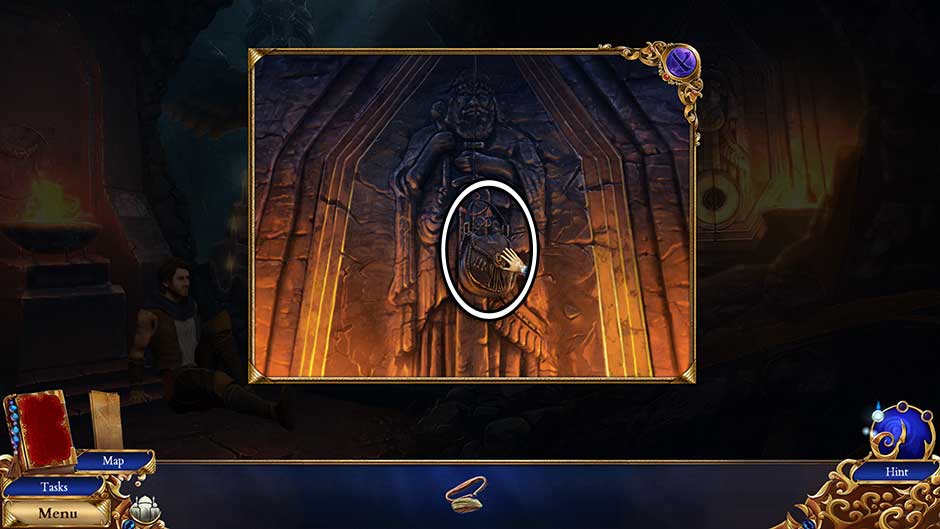
- Take a closer look at the sealed door on the right.
- Click on Tara’s Apothecary Kit and add it to your inventory.
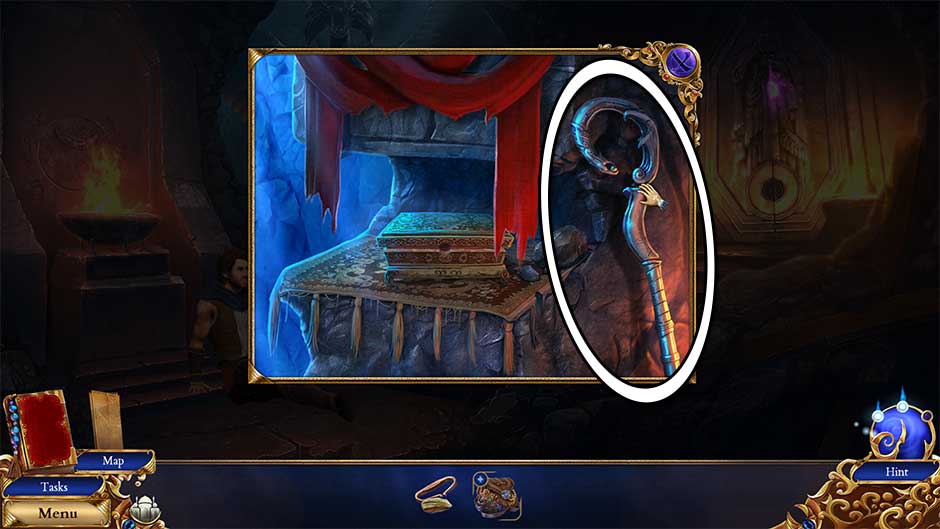
- Examine the small shelf between the statue with candles and the door on the right.
- Click on the Cane to add it to your inventory.
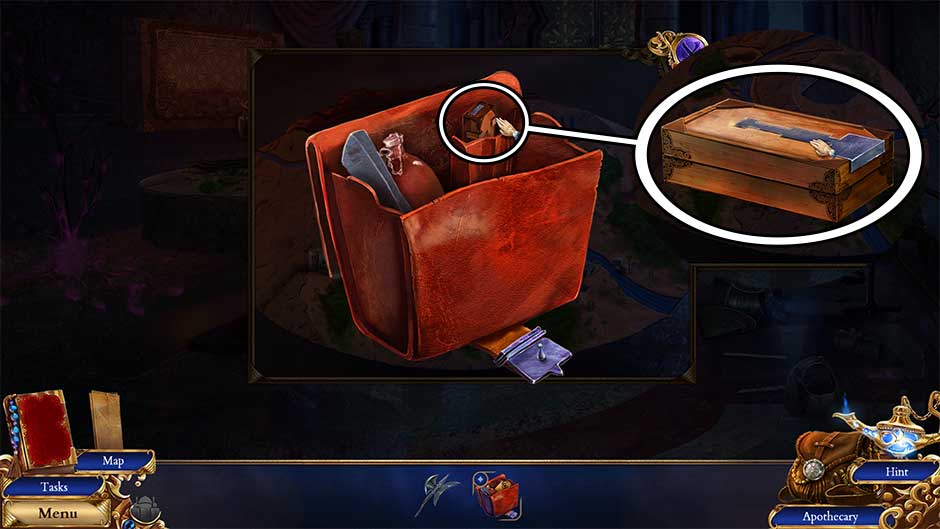
- Click on Tara’s Apothecary Kit to examine it.
- Take a closer look at the wooden lion on the left side of the bag. Click on it to open it and collect the Key
- Use the Key on the lock on the front of the bag to open it.
- Inside the bag, collect the Mortar and Pestle, the vial kit, the Aloe Vial wrapped in cloth, and the apothecary book inside. Open the book to reveal the Restorative Herbs.

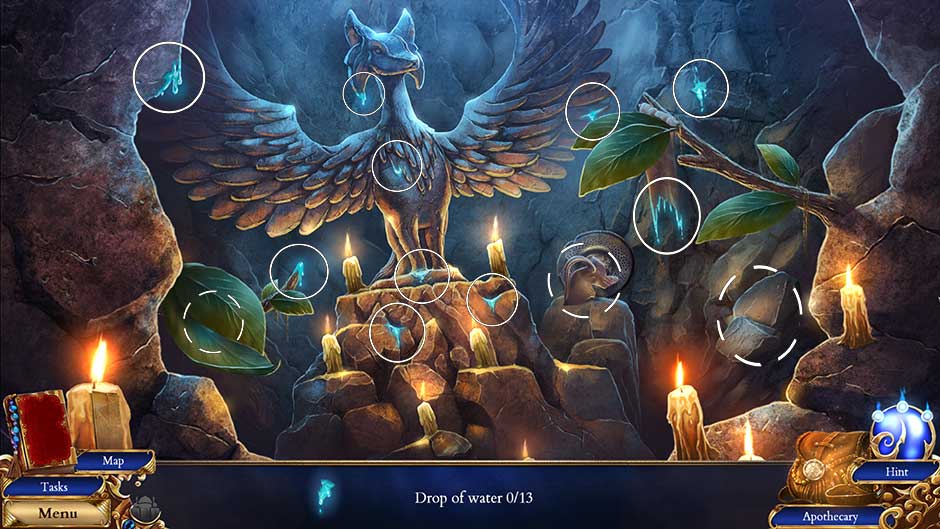
- After speaking with Darius, a hidden object area will appear over the statue next to him.
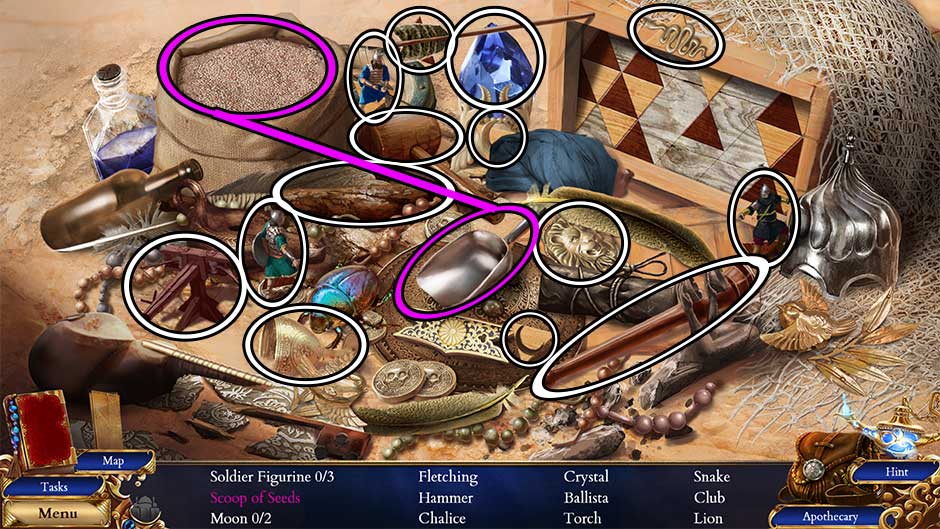
- Find all the objects listed at the bottom of the screen. Their locations are shown below. Upon completing the hidden object area, the Jug of Water will be added to your inventory.
- Click on the Apothecary in the lower right corner to open it.
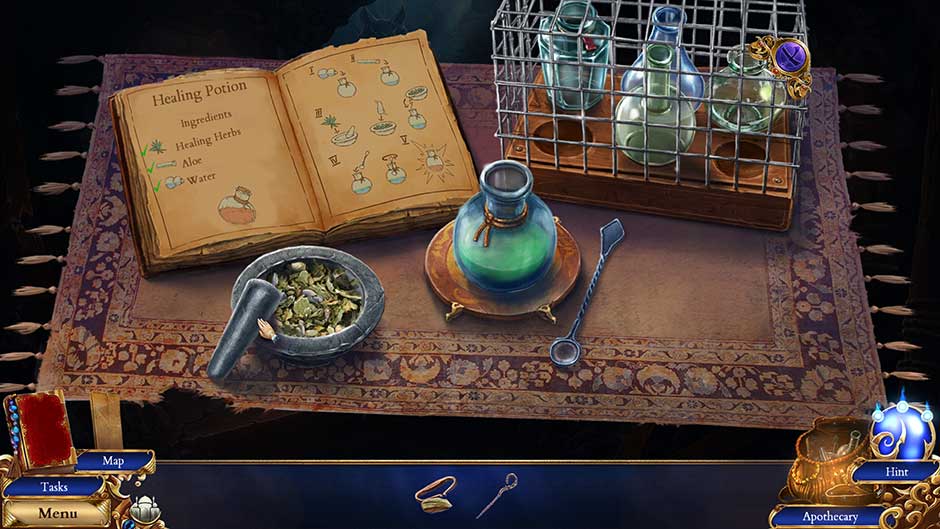
- It’s time to brew a Healing Potion. Complete the following steps to make the potion:
- Pour the Jug of Water into the potion bottle.
- Add the Aloe Vial to the potion bottle.
- Place the Restorative Herbs into the mortar. Click on the pestle to crush the herbs into a fine mixture. Pour the mixture from the mortar into the potion bottle.
- Click on the spoon next to the potion bottle to mix the brew.
- Once the potion has been mixed, click on the Healing Tonic to add it to your inventory.
- It’s time to brew a Healing Potion. Complete the following steps to make the potion:
- Give the Healing Tonic to Darius.
- Take a closer look at the door on the right. Use the Cane to pry it open.
- Enter into the Mysterious Chamber in the next room.
Genie Lamp Chamber
- Click on Palace Marking 4/32 in the blue paneling on the right.
- Examine the console on the right.
- Click on the note to read it. The Knife will be added to your inventory.
- Go back to the Antechamber.
Antechamber
- Examine the small shelf between the statue and the door, with the red cloth.
- Take a closer look at the box on the shelf. Use the Knife to unlock the box, then click on the Ornate Block inside to add it to your inventory.
- Return to the Genie Lamp Chamber.
Genie Lamp Chamber
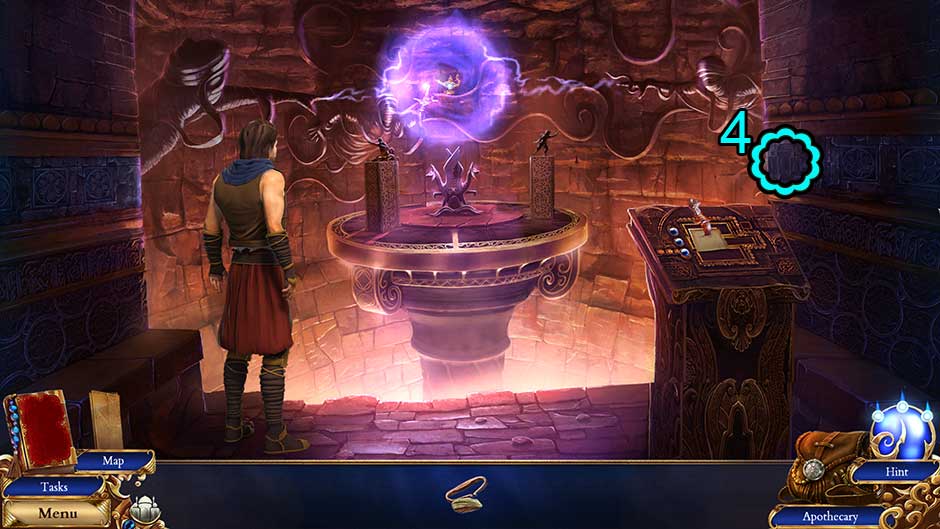
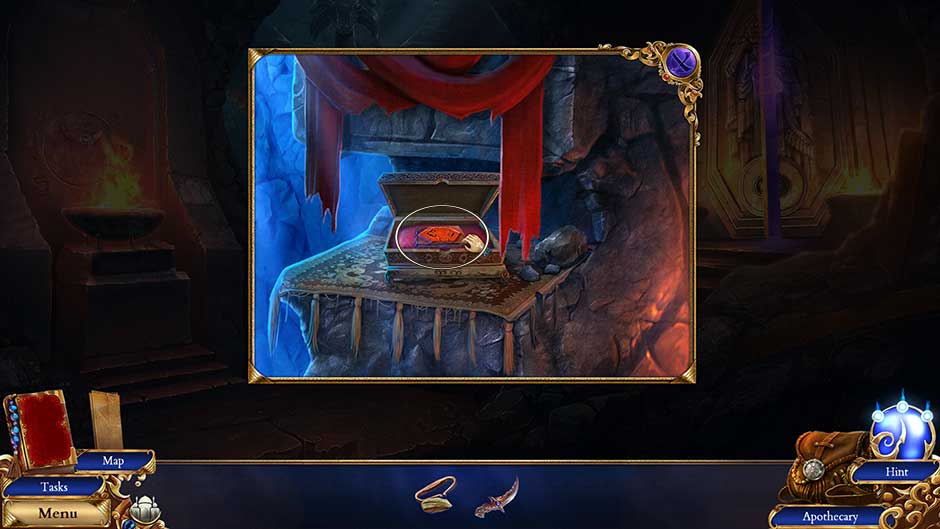
- Take a closer look at the pedestal on the right. Insert the Ornate Block into the left slot to trigger a puzzle.
- Move the blocks to rearrange them. Move the key piece to lock it in place on the right side of the board. The puzzle solutions are shown below.
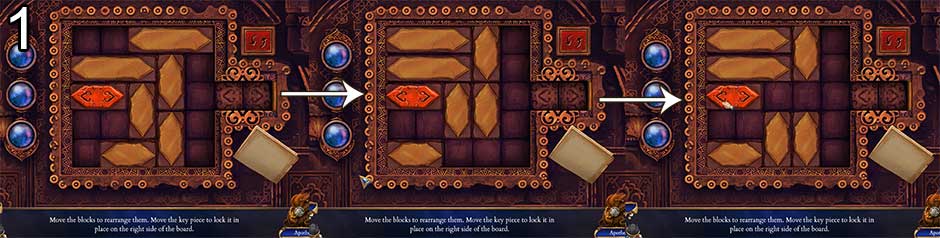

- Once the puzzle has been completed, a pathway to the lamp will appear. Go forward along the path, then climb up to the platform. It’s as simple as clicking where the arrow points.
- Once Darius reaches the platform, take a closer look at the left pedestal.
- Click on the Human Figure to add it to your inventory.
- Take a closer look at the pedestal on the right. Click on the Genie Figure to add it to your inventory.
- Head back to the Antechamber.
Antechamber
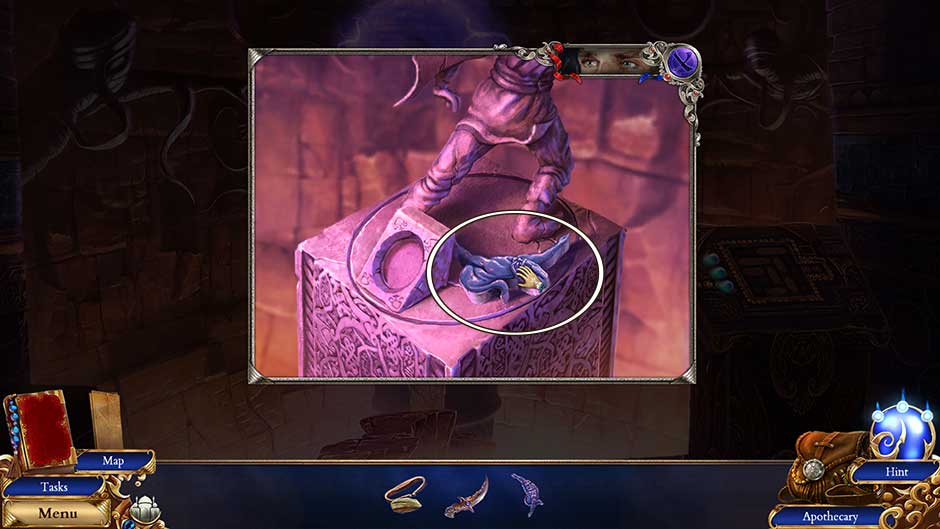
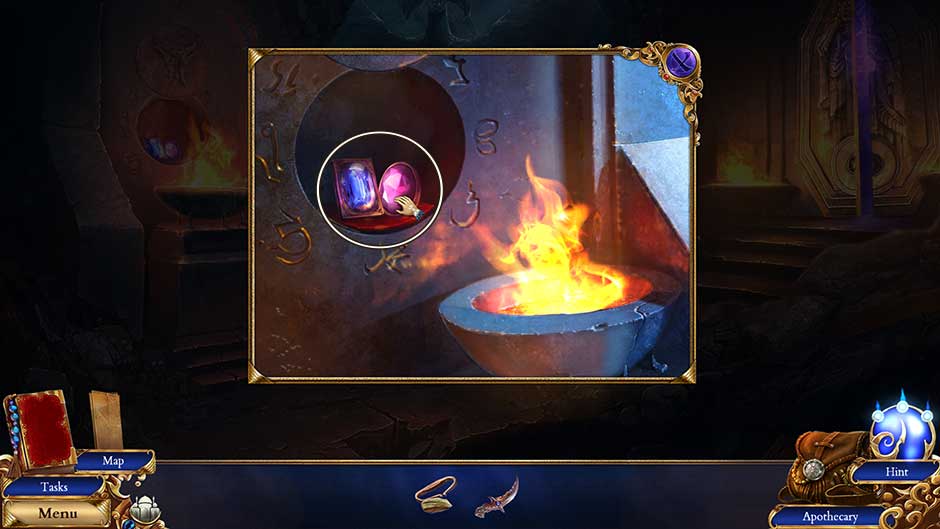
- Take a closer look at the bowl of fire on the left. Place the Human Figure and the Genie Figure into the slots on the slab, revealing a hidden compartment. Collect the Round Gemstone and Square Gemstone
- Go back into the Genie Vault.
Genie Lamp Chamber
- Examine the left pedestal. Place the Square Gemstone into the slot.
- Examine the right pedestal. Place the Round Gemstone into the slot.
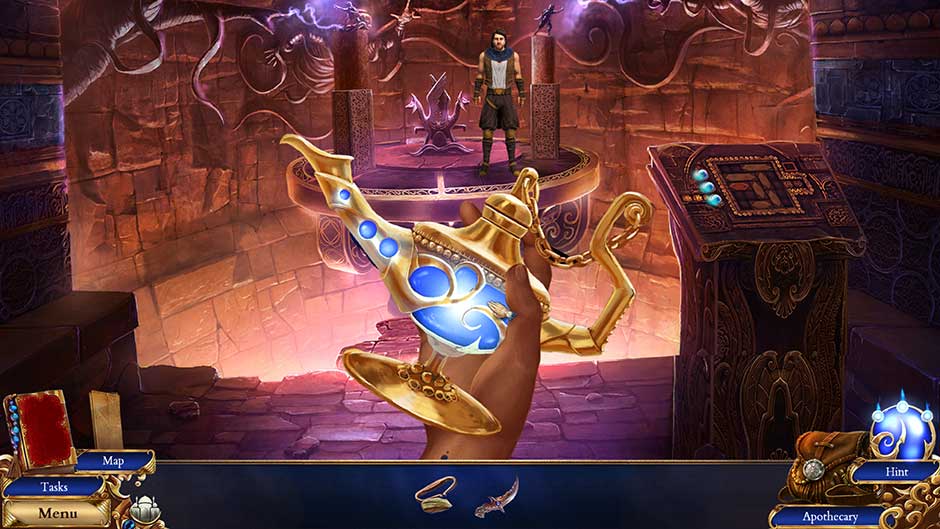
- You will acquire the Genie Lamp! Click on it to examine it further.
Chapter 2 – Seat of the Simurghs
Shelf
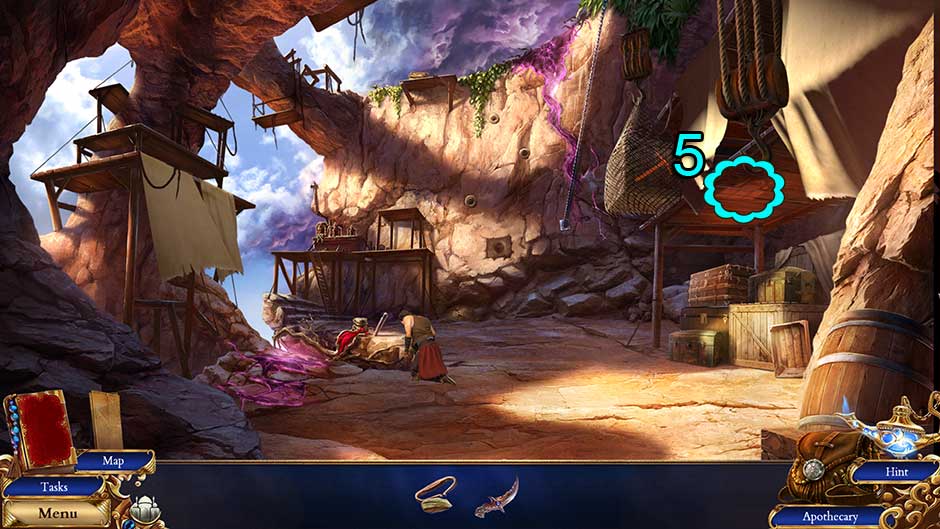
- Click on Palace Marking 5/32 underneath the wooden scaffolding on the right.
- Examine the work table on top of the wooden platform ahead.
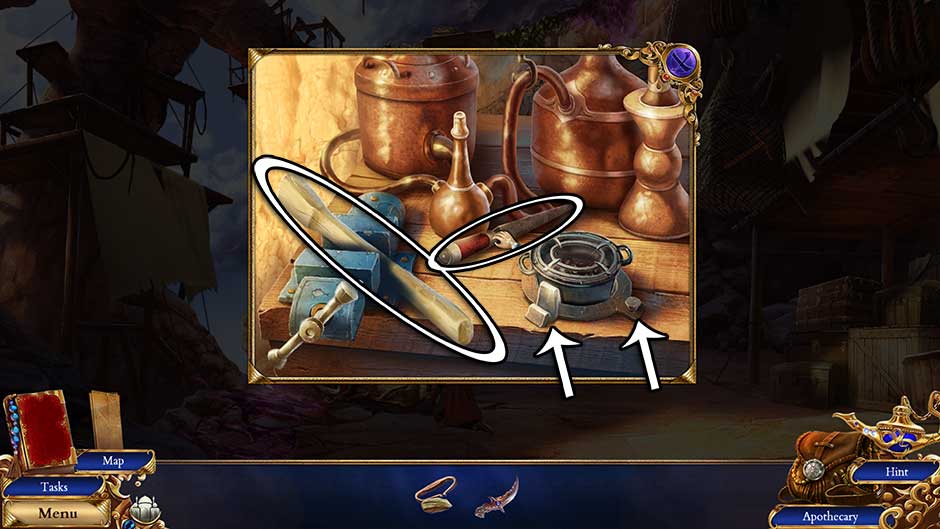
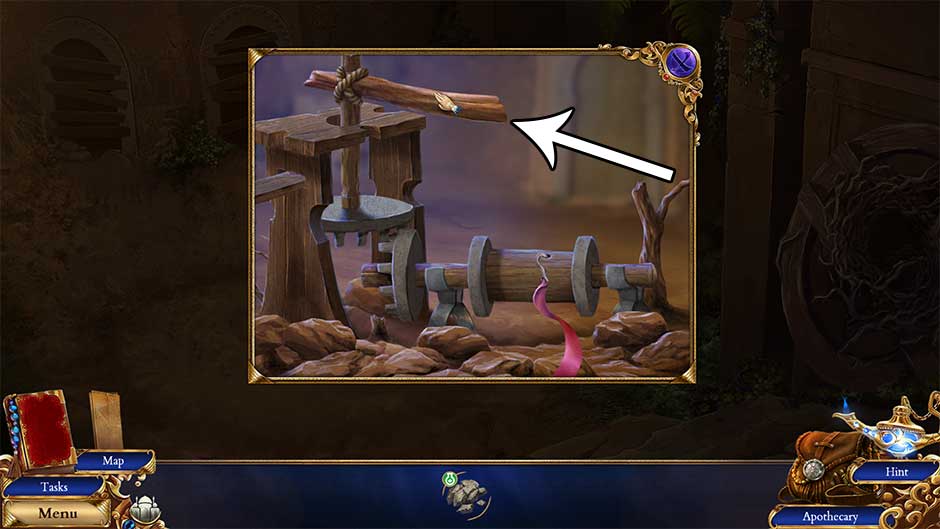
- Click on the vice handle on the left to loosen it, then add the Old File and the Pickaxe Handle to your inventory. Before leaving, click on the latch and the bolt to remove the Burner, which will be added to the Apothecary.
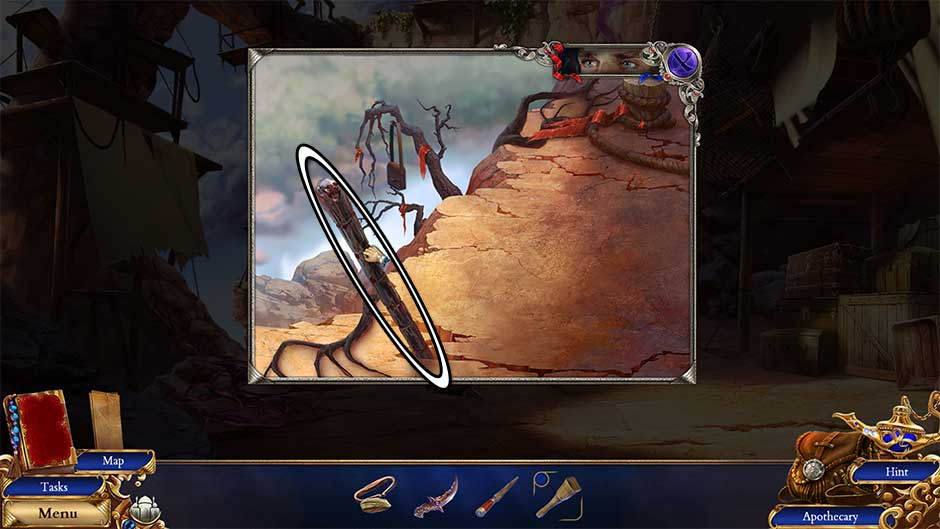
- Take a closer look at the cliff edge in front of Darius. Click on the Rusty Rod to add it to your inventory.
- Examine the stack of boxes on the right.
- Click on the latches on the left and right holding the box shut, then click on the lid to open it. Collect the Unfitting Crank Wheel and note the presence of the locked box.
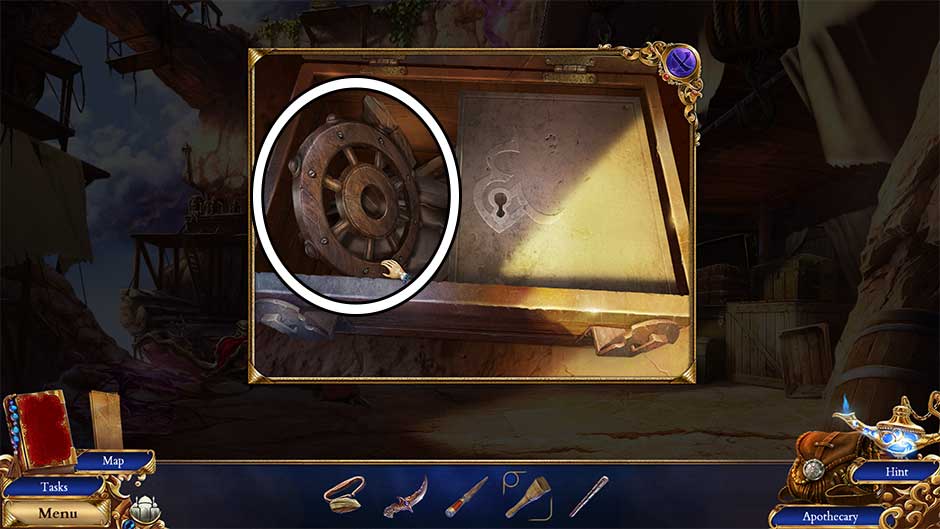
- Select the Unfitting Crank Wheel in your inventory. Use the Old File on the wheel to obtain the Crank Wheel.
- Examine the rock wall straight ahead. Place the Crank Wheel on the peg, then use the Rusty Rod to hold it in place. Interact with the wheel, then climb the handholds up the cliff to the next location.
- Head up the cliff to the Seat of the Simurghs.
Seat of the Simurghs
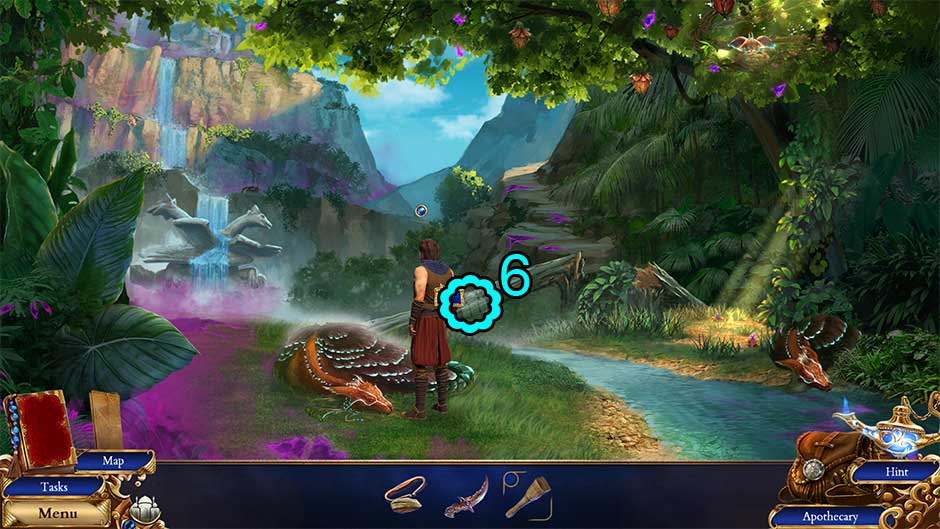
- Click on Palace Marking 6/32 on the fallen log.
- Talk with Darius. Once finished, click the Leave button.
- Take a closer look at the tree in the upper right corner. Use the Knife to cut down the Liana and add it to your inventory.
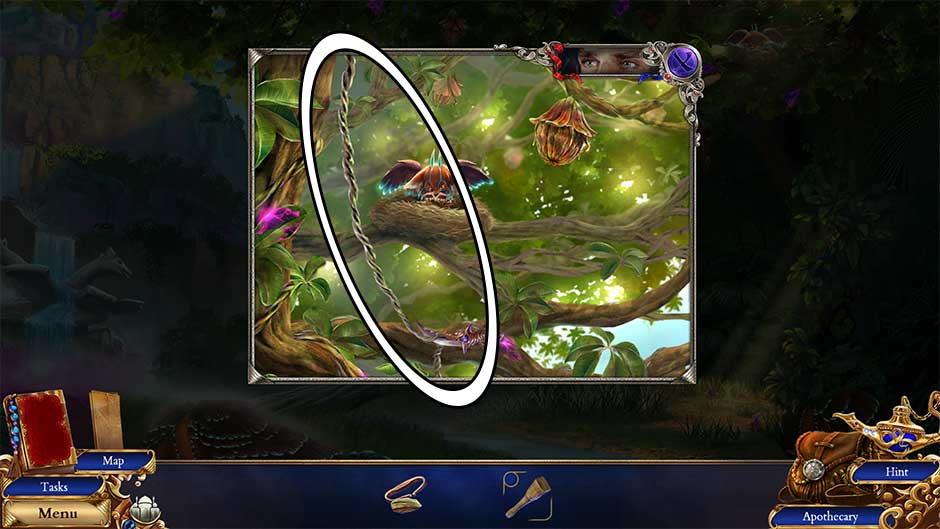
- Examine the collapsed Simurgh on the ground in front of Darius. Clicking on the Simurgh will reveal a new recipe for your Apothecary: Smelling Draught.
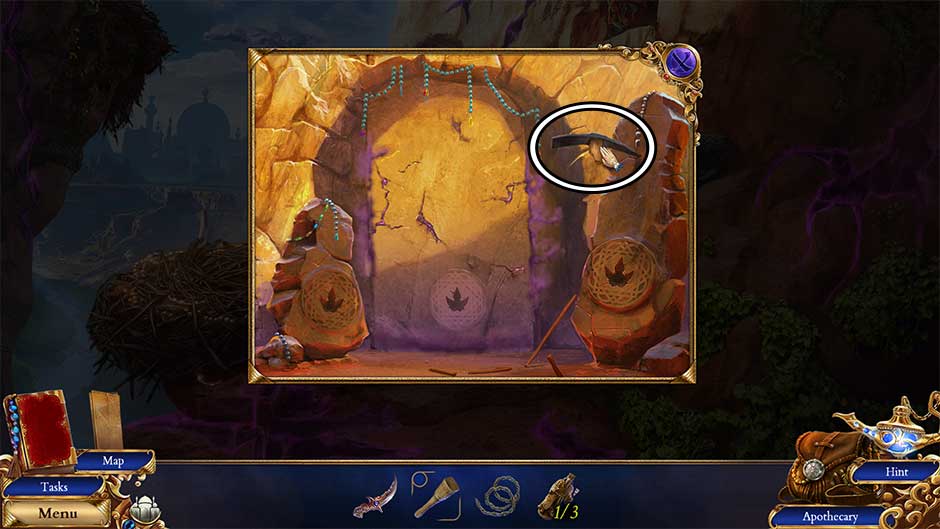
- Click on the Crooked Cane lying next to the creature to add it to your inventory.

- Take a closer look at the tree in the upper right corner again. Use the Crooked Cane to retrieve the Flabberfruit and add it to your inventory.
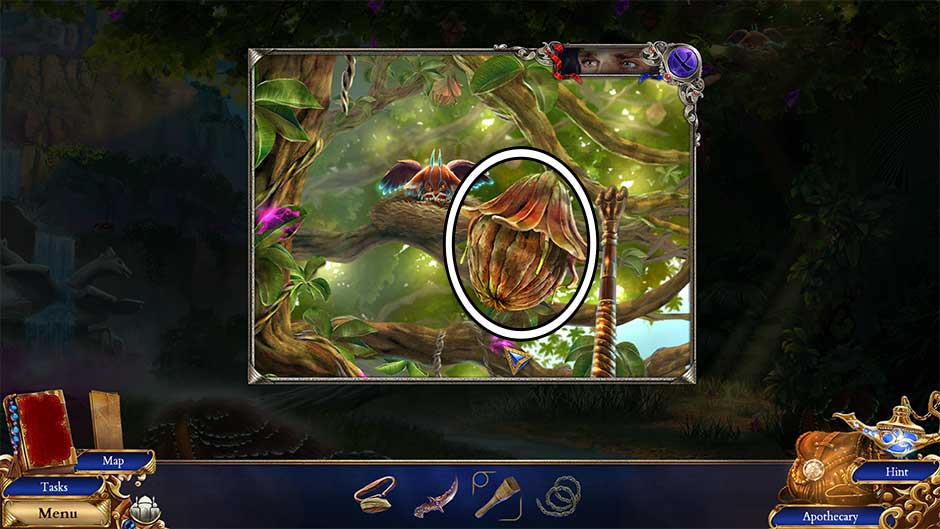
- Select the Flabberfruit from your inventory. Use the Knife to cut it open. You’ll obtain the Flabberfruit Juice and the Sweet Peel. The Knife will also be returned to your inventory.
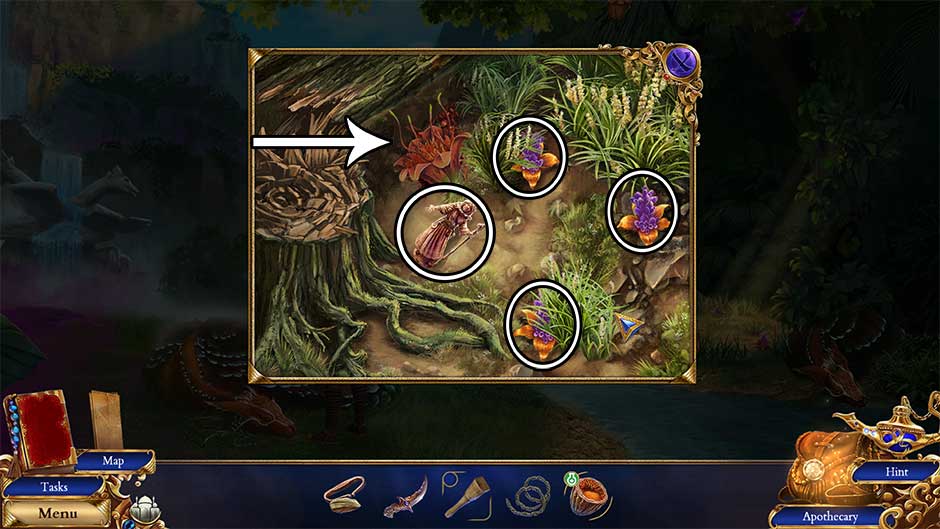
- Examine the patch of ground illuminated by sunlight on the right.
- Place the Sweet Peel on the ground to distract the ants, then click on the Sandstone Figurine 1/3 and the Ant Lavenders 3/3 to add them to your inventory.
- Proceed up the path to the next area.
Nests
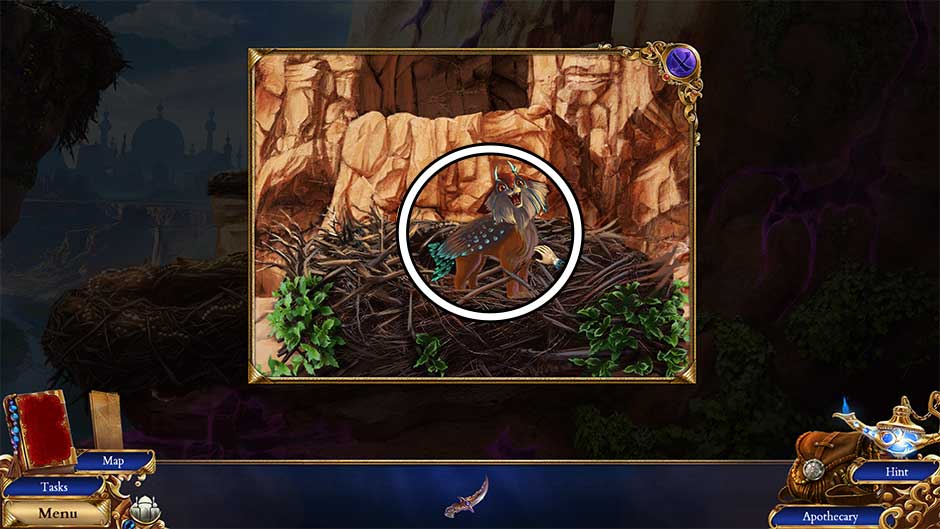
- Click on Palace Marking 7/32 up on the left cliff edge.
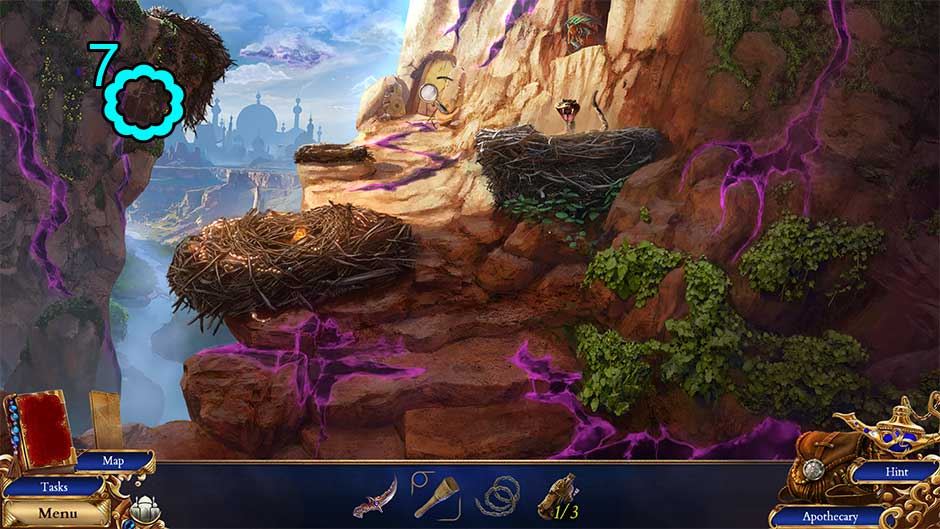
- Take a closer look at the doorway straight ahead. Click on the Pickaxe Head to add it to your inventory.
- Select the Pickaxe Handle in your inventory. Attach the Pickaxe Head to assemble the completed Pickaxe.
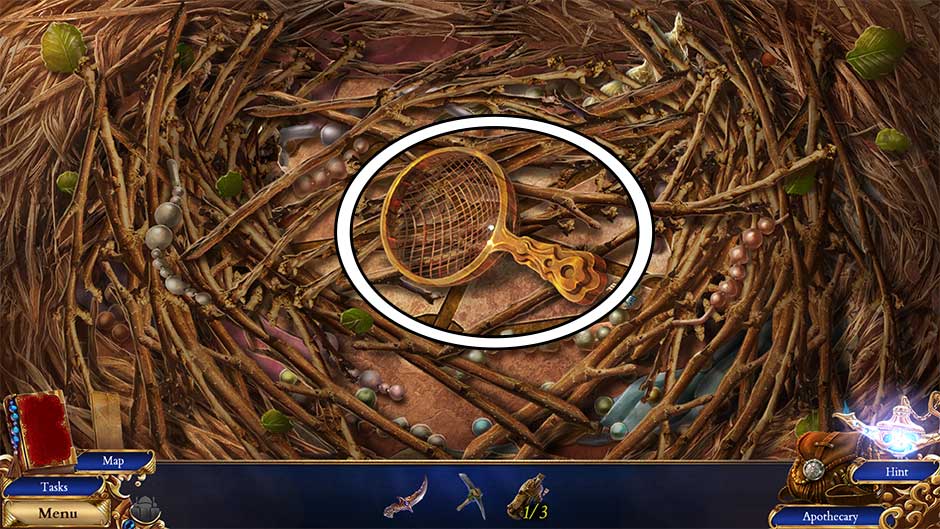
- Take a closer look at the nest on the left.
- Click on the Strainer to add it to your inventory. Then, click on the surrounding branches until the slab in the center of the nest is revealed. You’ll return here later.
- Go back down to the Seat of the Simurghs.
Seat of the Simurghs
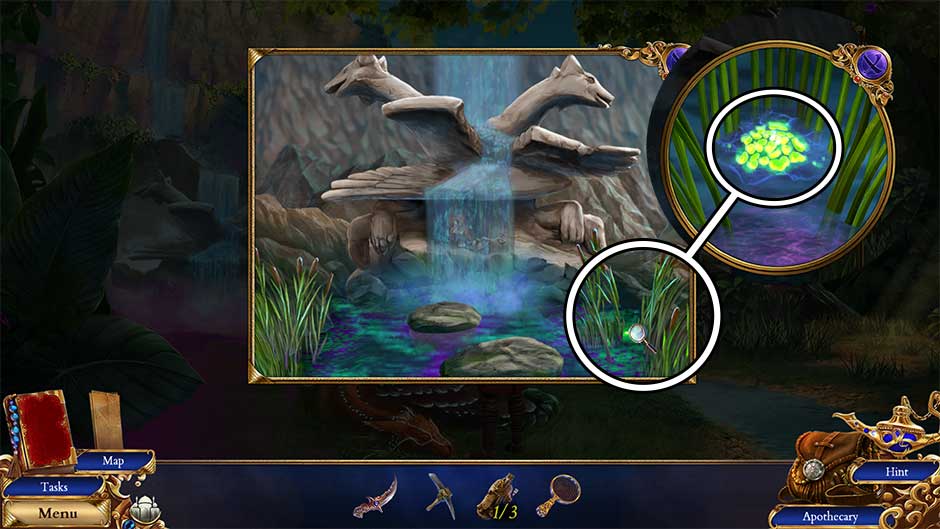
- Zoom in on the waterfall and stone statue in the distance.
- Examine the patch of grass on the lower right. Click to move it aside, then use the Strainer to retrieve the Wild Duckweed.
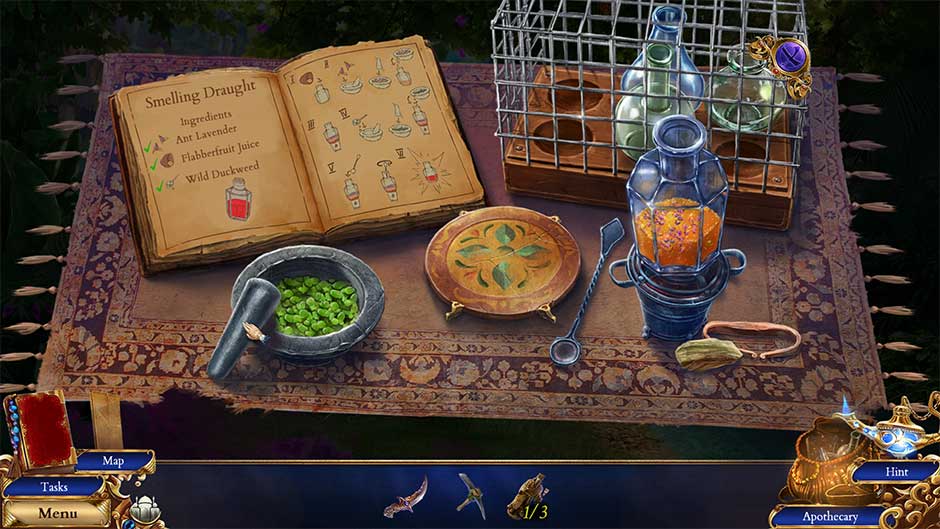
- Click on the Apothecary to open it. It’s time to create the Smelling Draught!
- Pour the Flabberfruit Juice into the glass vial.
- Place the Ant Lavenders 3/3 into the mortar. Use the pestle to grind them down into a fine powder, then pour that powder into the glass vial.
- Use the Flint and Steel to light the burner. Place the glass giant on top of the burner.
- Place the Wild Duckweed into the mortar. Use the pestle to grind it down, then pour it into the glass vial.
- Use the spoon lying next to the burner to mix the contents of the glass vial.
- Once the contents of the glass vial have been mixed, click to add the completed Smelling Draught to your inventory.
- Zoom in on the Simurgh lying on the ground in front of Darius. Use the Smelling Draught to awaken him.
- Once awakened, click on the Feather of Trust to add it to your inventory.
- Speak with Darius again. Click Leave once finished.
- Take a closer look at the trees in the upper right corner.
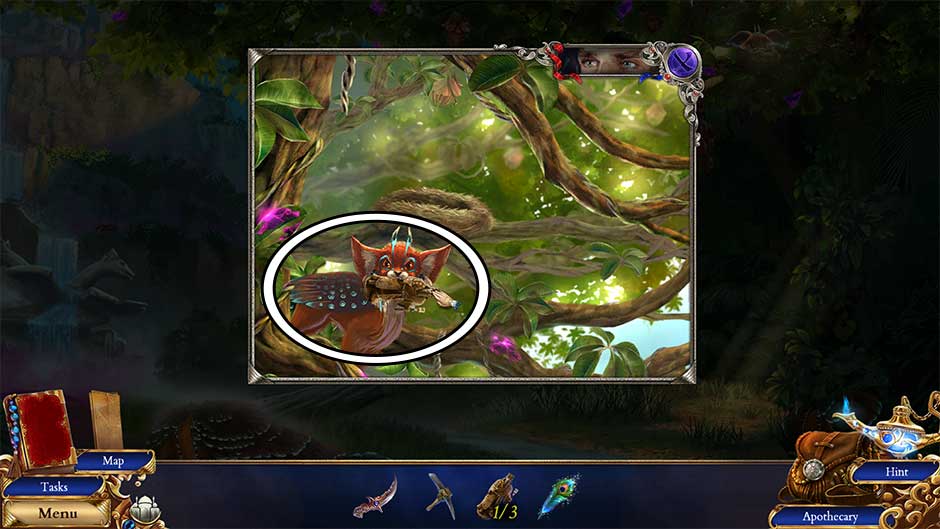
- Show the Feather of Trust to the Simurgh kitten. Retrieve the Sandstone Figurine 2/3 from the little one.
- Head back down to the Shelf area.
Shelf
- Take a closer look at the base of the long chain attached to the cliff ahead.
- Use the Pickaxe to dislodge the base of the chain.
- A hidden object area will appear over the crates that come crashing down. Find the objects listed at the bottom of the screen. Their locations are shown below. Once you’ve finished locating all the hidden objects, the box on the right will open. Click on the Grappling Hook to add it to your inventory.
- Examine the edge of the cliff that Darius is standing near.
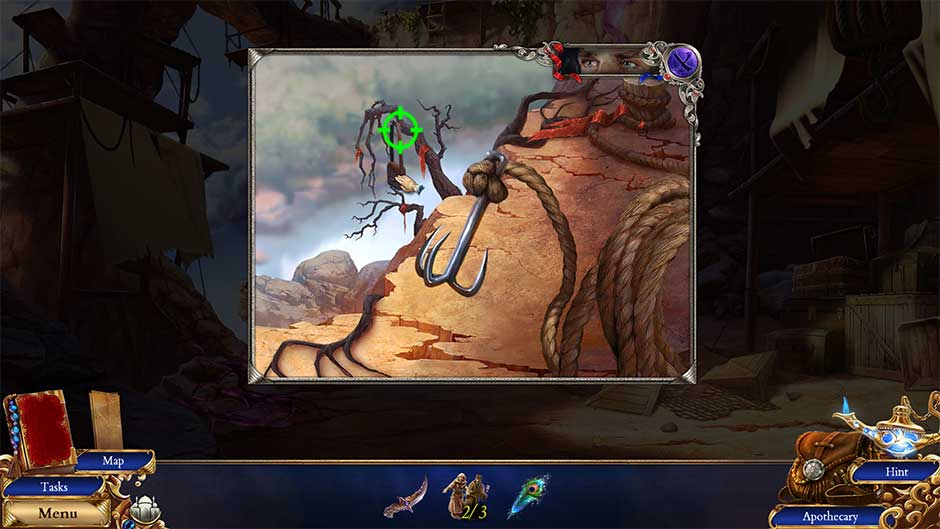
- Use the Grappling Hook to retrieve the bag hanging below. Click when the viewfinder turns green to grab it.
- Once you’ve retrieved the bag, click to open it and collect the Iron Key
- Take a closer look at the stack of boxes on the right again.
- Use the Iron Key to open the lockbox. Pick up the Flat Wooden Bowl
- Return to the Seat of the Simurghs.
Seat of the Simurghs
- Take a closer look at the waterfall and stone statues again.
- Place the Flat Wooden Bowl into the break in the statue, through which water is pouring through. This will stop the flow of water, revealing another baby Simurgh.
- Show the Feather of Trust to the kitten and collect the Sandstone Figurine 3/3 in its mouth.

- Head up the path to the Nests.
Nests
- Zoom in on the nest on the left again. Place the Sandstone Figurines 3/3 into the surface slots to trigger a puzzle.
- Move each figurine to the matching symbol. Click on a figure adjacent to the empty space to move it to that location. A figure will light up blue once it’s in the correct location. The puzzle solution is shown below.
- Upon completing the puzzle, click on the Charming Flute to add it to your inventory.
- Take a closer look at the nest on the right.
- Use the Charming Flute to put the aggressive cobra to sleep.
- One the snake is pacified, show the Feather of Trust to the baby Simurgh. Click on it to rescue it from the nest once it bounds off the rock shelf.
- Examine the door up ahead where the baby Simurghs are gathered. Click on the kittens to encourage them to open the doorway, giving you access to the Treasury.
Treasury
- The room is dark. Take a closer look at the glowing bottle on the left.
- Use the Knife to cut away the cord binding the bottle, then click on the cork to remove it, illuminating the room.
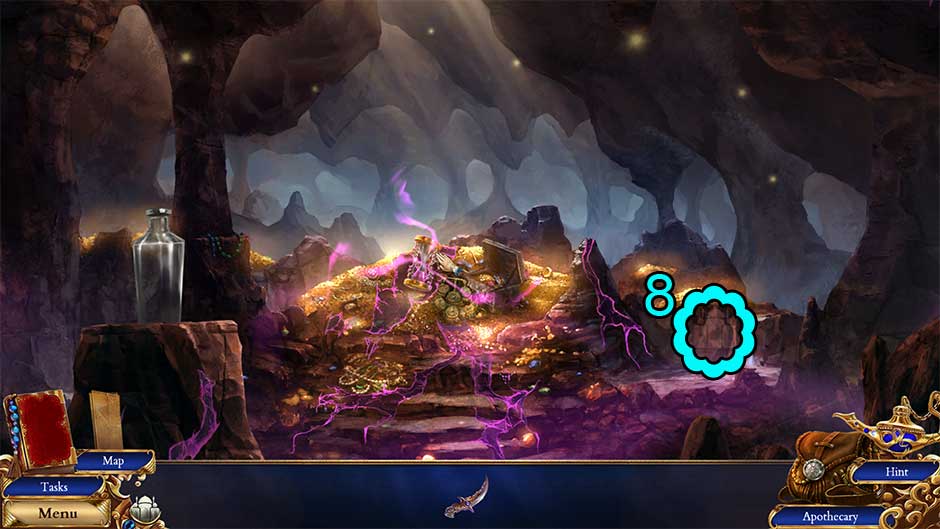
- Click on the Palace Marking 8/32 next to the trickle of water.
- Click on the enchanted hourglass lying in the pile of treasure ahead. A sand demon will appear, and a battle will ensue.
- Defend yourself by choosing the blue sphere that does not match the enemy sphere. The solution is shown below.

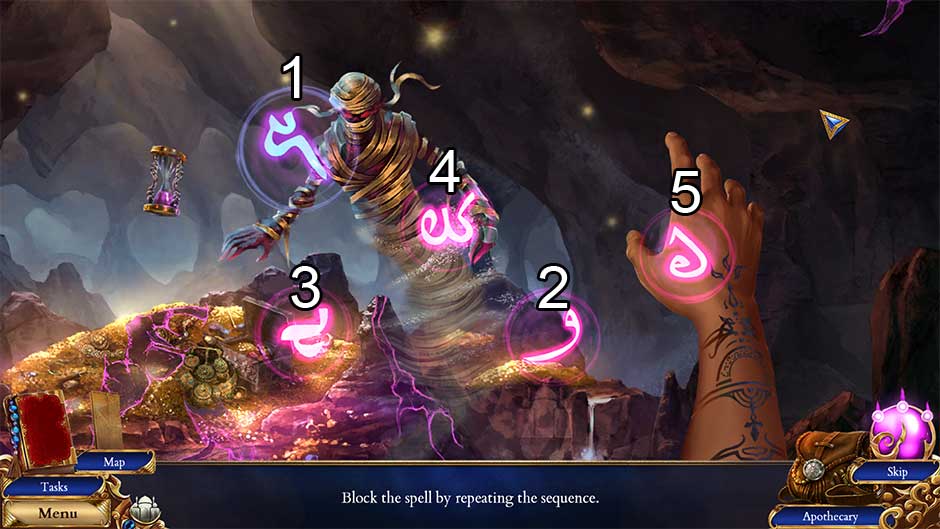
- Block the spell by repeating the sequence. Click on the orbs in the sequence shown below to solve the puzzle.
- Turn all the runes blue to repel the enemy attack. Click on the orbs in the sequence shown in the screenshot below.
- Once the sand demon has been vanquished, return to the Seat of the Simurghs.
Seat of the Simurghs
- Speak with Darius and watch the cutscene that follows.
Chapter 3 – Misty Oasis
Ancient Genie Estate
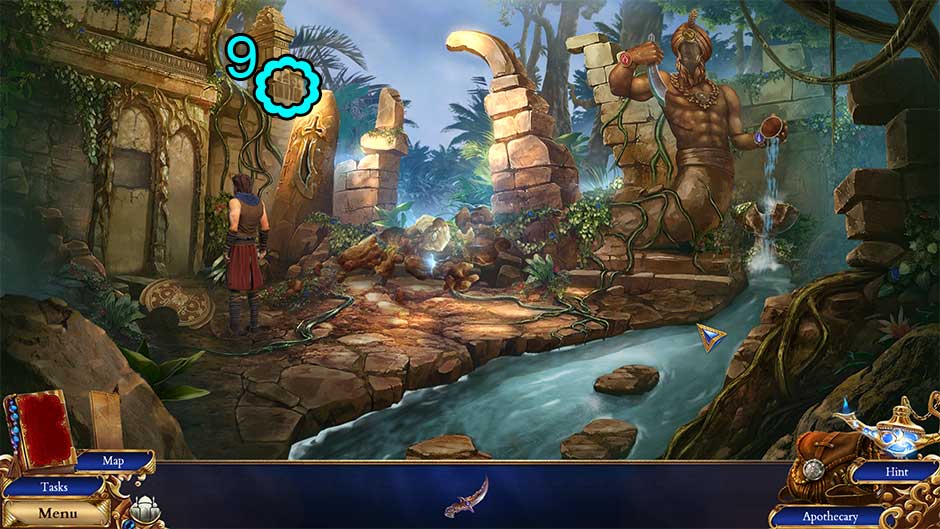
- Click on the Palace Marking 9/32 on the stone parapet above Darius.
- Take a closer look at the pile of stones blocking the path up ahead. Attempt to remove the blue crystal, only to have a large stone golem take form.
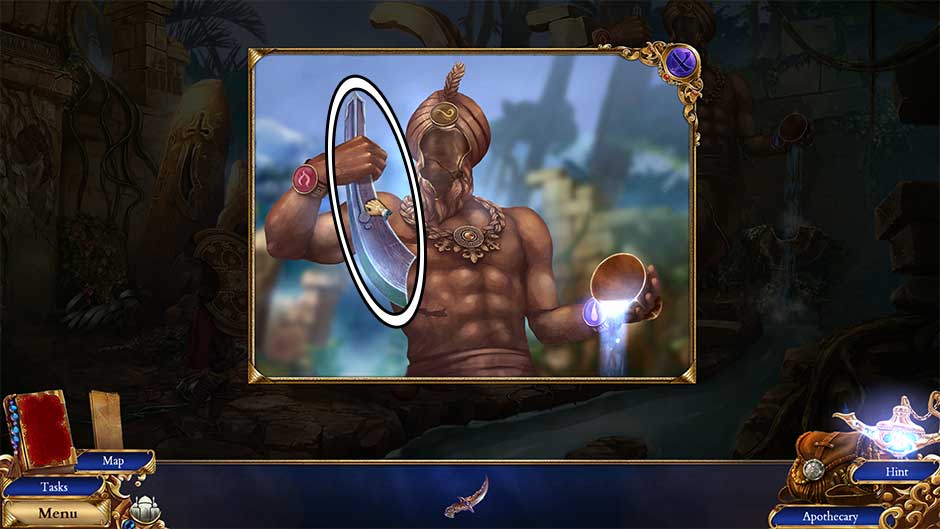
- While Darius fights the monster, take a closer look at the large statue on the right. Click on the Sword Blade to add it to your inventory.
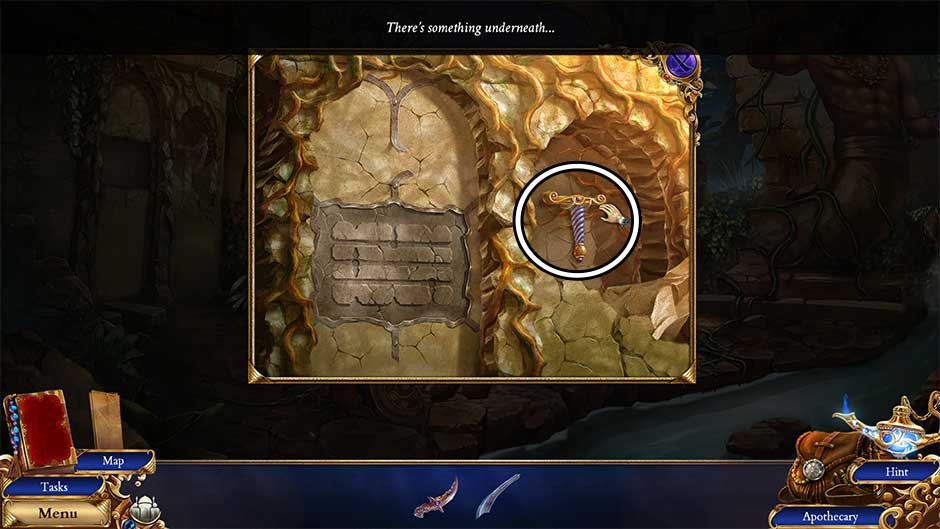
- Zoom in on the hole in the stone wall on the left.
- Click on the loose stones on the right to move them aside, revealing the location of the Sword Hilt.
- Examine the pillar with the sword indentation to the left of the stone golem. Insert the Sword Blade and the Sword Hilt into the slots to trigger a puzzle.
- Select a blue button on the left, then click on the blue button on the right that matches the symbol on the left. The solution is shown below.

- Upon completing the puzzle, click on the charged Ethereal Sword to add it to your inventory.
- Give the Ethereal Sword to Darius.
- Once the golem has been defeated, zoom in on the pile of rocks that’s left of it. Click on the Cloudy Crystal to add it to your inventory.
- Proceed forward into the Ancient Estate.
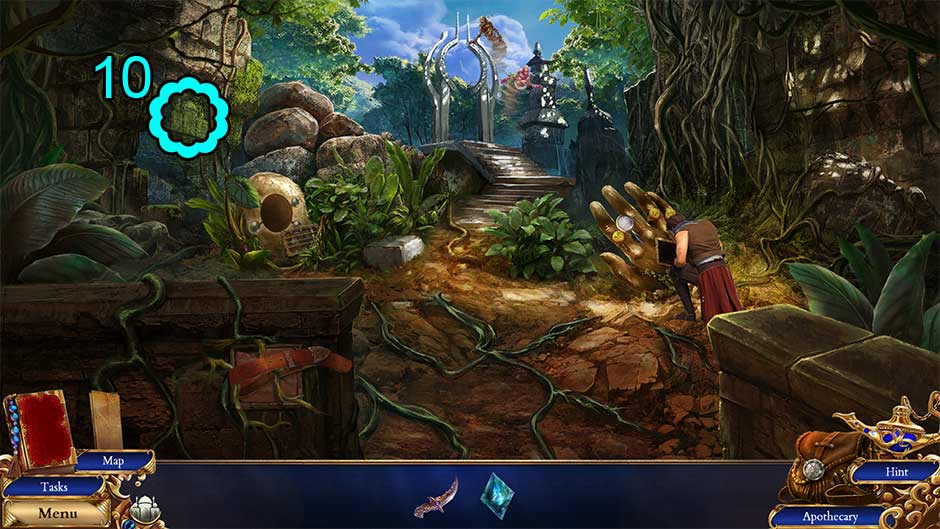
Ancient Estate
- Click on the Palace Marking 10/32 hidden in the moss on the left.
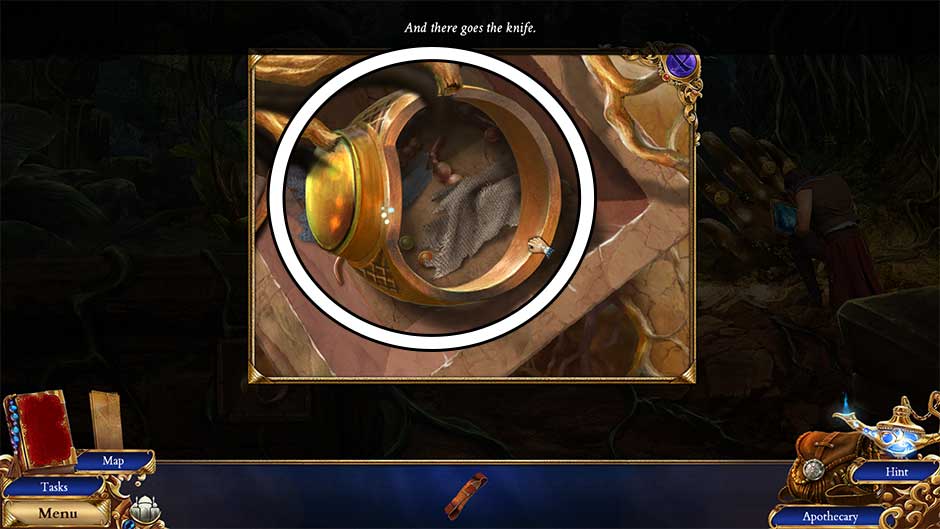
- Take a closer look at the panel fastened by the belt at the bottom of the screen.
- Click on the Leather Belt to add it to your inventory, then use the Knife to cut away the vines. Collect the Large Ring
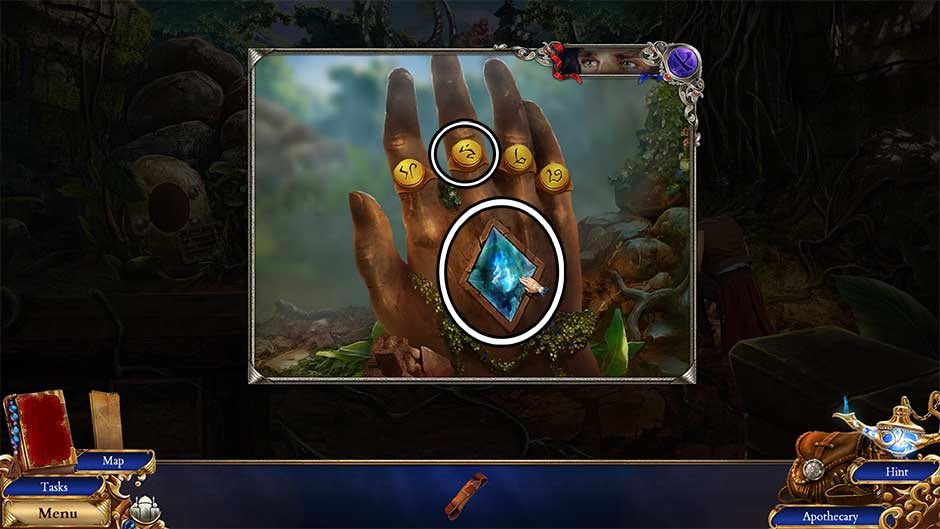
- Examine the large gold hand on the right. Place the Large Ring on the middle finger, then insert the Cloudy Crystal into the back of the hand. Click on it to activate its powers.
- Back in the main area, take a closer look at the gold hollow on the left.
- Pick up the Abacus and the Empty Element Containers (x3).
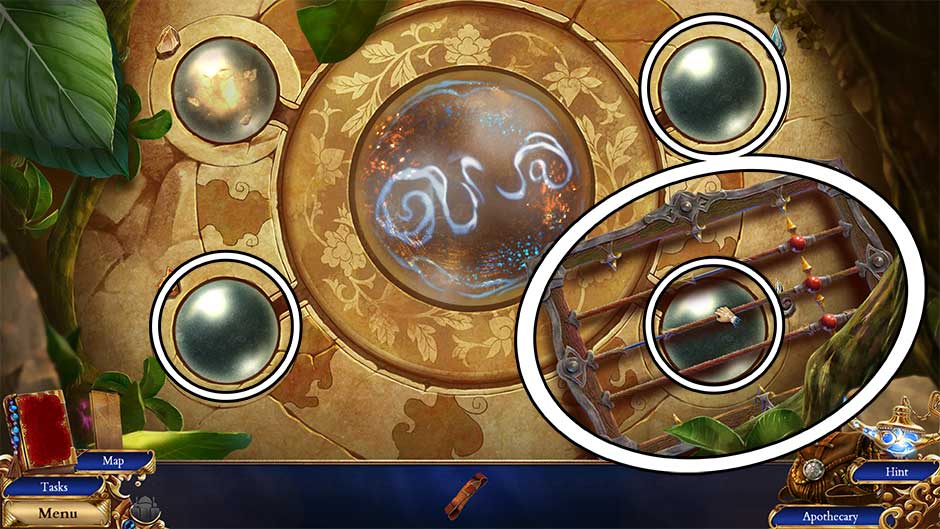
- Select the Abacus from your inventory. Move the red dials into the locations shown below to solve it. Upon completing the interaction, the Solved Abacus will be added to your inventory.
- Go back down to the Ancient Genie Estate.
Ancient Genie Estate
- Take a closer look at the stone wall on the left.
- Insert the Solved Abacus into the indentation in the wall to reveal a secret compartment. Collect the Golden Mask and the Golden Cauldron
- Back in the main area, take a closer look at the large statue on the right.
- Place the Golden Mask onto the statue’s face and the Golden Cauldron into the statue’s right hand.
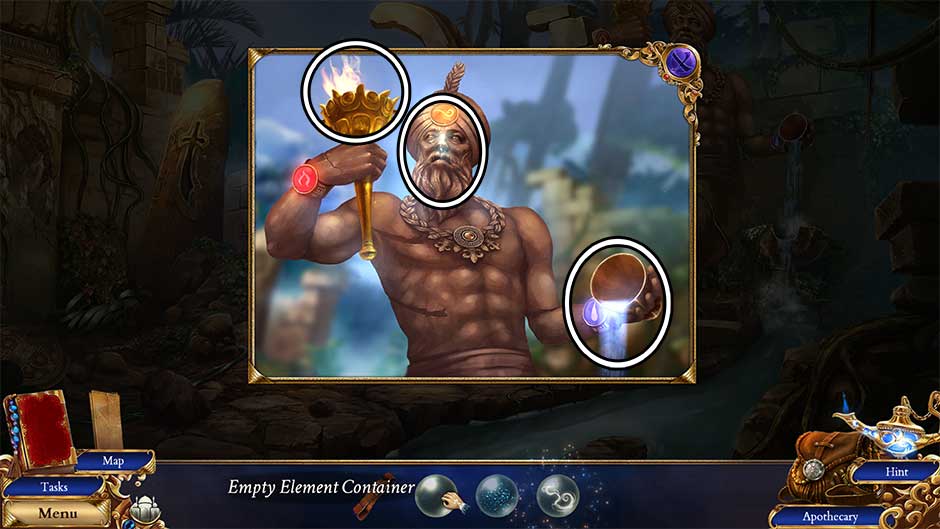
- Use an Empty Element Container on the water pouring from the statue’s left hand to receive the Essence of Water.
- Use an Empty Element Container on the air spouting from the statue’s mouth to receive the Essence of Air.
- Use an Empty Element Container on the torch in the statue’s hand to receive the Essence of Fire.
- Head back up to the Ancient Estate.
Ancient Estate
- Examine the golden alcove on the left again.
- Place the Essence of Water, the Essence of Fire, and the Essence of Air into their corresponding slots, triggering a puzzle.
- Rotate the rings to rearrange the picture. The puzzle solution is shown below.
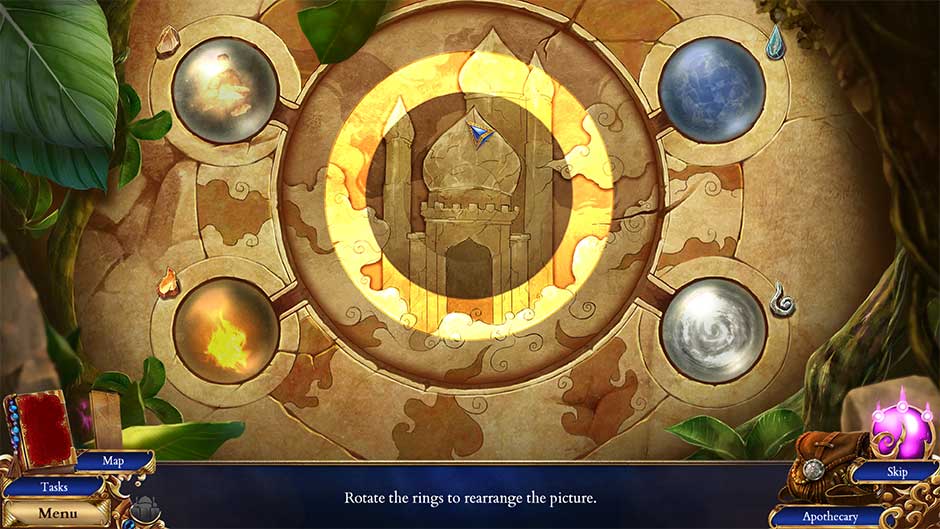
- Once the puzzle is completed, a portal will open to the Misty Oasis. Proceed through to the next location.
Genie Entryway
- Click on the Palace Marking 11/32 near the domed roof on the left.
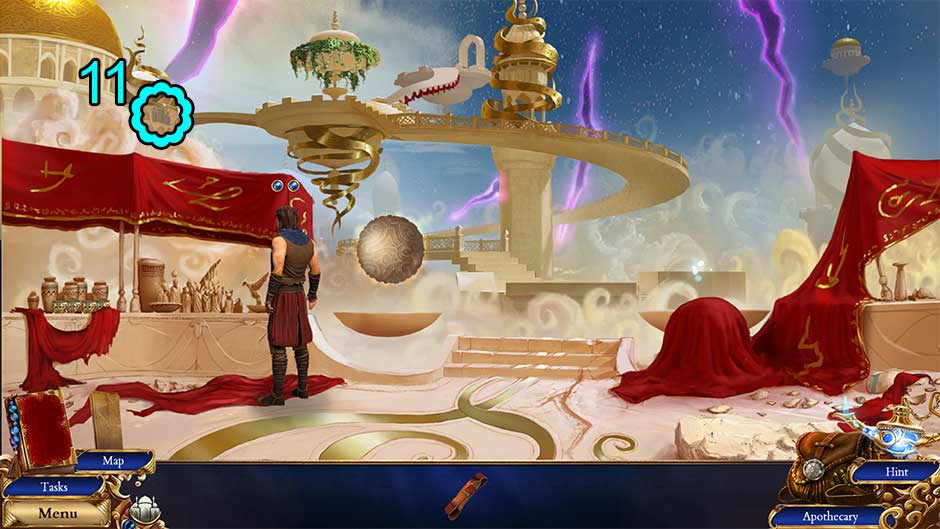
- Speak with Darius. Click Leave once finished.
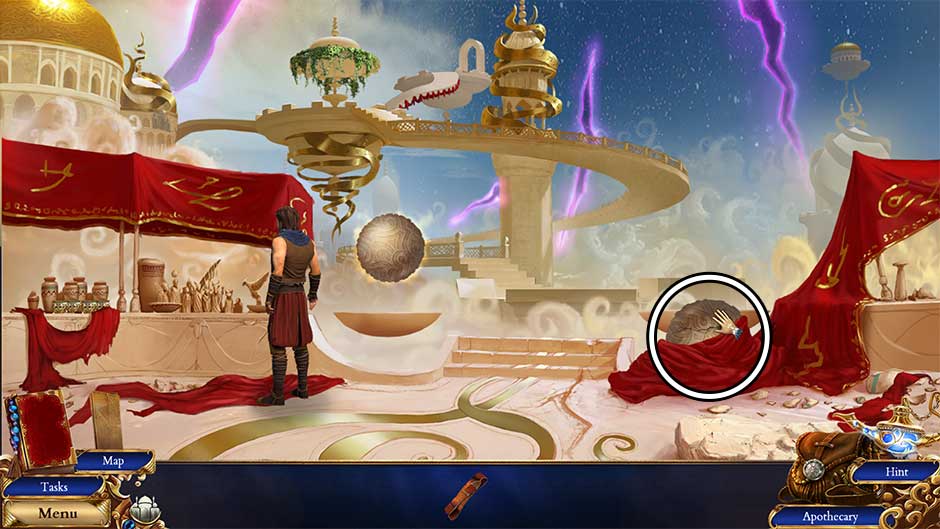
- Click on the red cloth covering the round object on the right. Pick up the Broken Power Orb lying beneath.
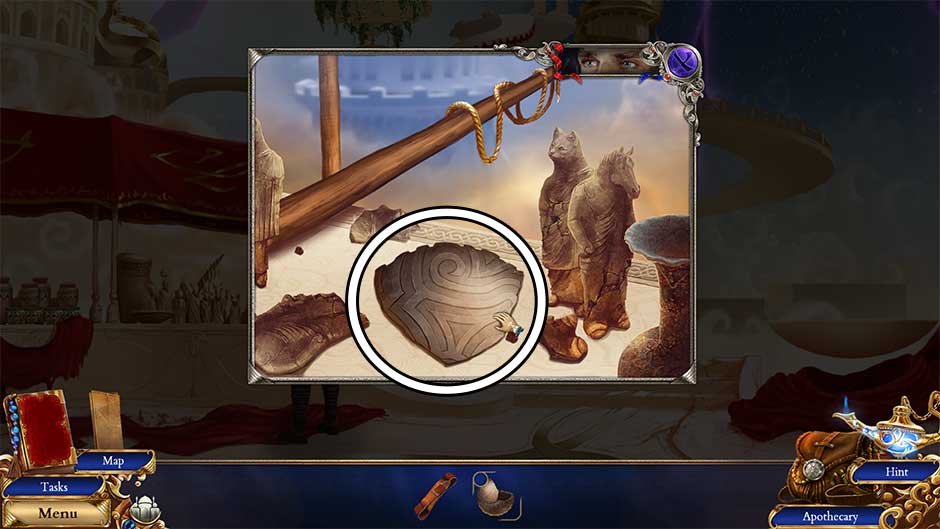
- Take a closer look at the table on the left, in front of Darius.
- Remove the debris covering the Piece of Power Orb and add it to your inventory.
- Select the Broken Power Orb from your inventory. Click on the piece on the upper left to connect it to the orb, then select the Piece of Power Orb to complete the broken sphere. Use the Leather Belt to hold the pieces in place, adding the restored Power Orb to your inventory.
- Back in the main area, zoom in on the floating basin on the right, next to the stairs. Place the Power Orb on the pedestal.
- A bridge will form, allowing access to the next area. Proceed across to Orion’s Arbor.
Orion’s Arbor
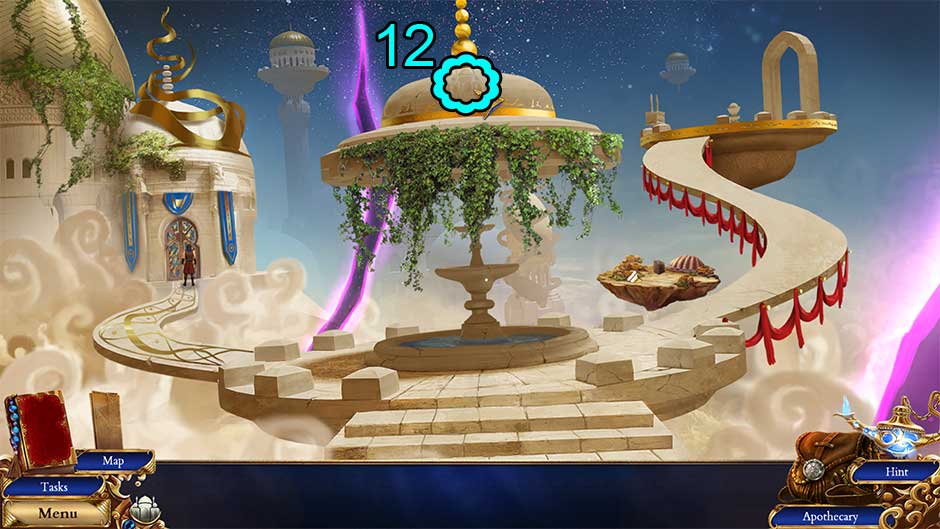
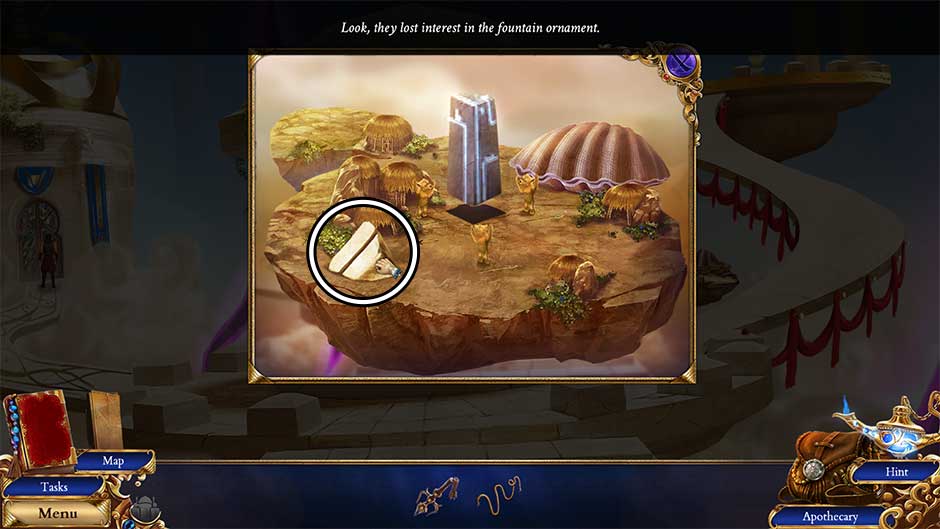
- Click on Palace Marking 12/32 on the overhang above the fountain.
- Take a closer look at the palace door on the left. Click on the Wormhole Token (Crypt) to add it to your inventory.
- Back in the main area, proceed up the path on the right.
Portal Platform
- Click on Palace Marking 13/32 at the bottom of the far towers.
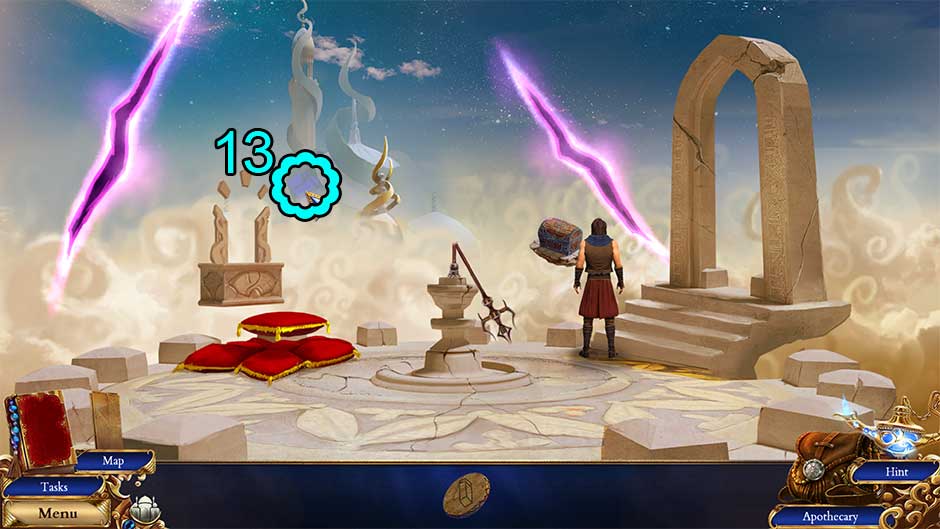
- Examine the pedestal in the center of the platform. Pick up the Broken Portal Conductor and the Wormhole Token (Peri Hamlet).

- Take a closer look at the floating platform on the left, just beyond the red cushions. Place the Wormhole Token (Crypt) and Wormhole Token (Peri Hamlet) on their respective pedestals.
- Click on the Crypt Token on the left pedestal to open a wormhole to the Crypt. Click on the Harpoon to add it to your inventory.

- Make your way back to the Genie Entryway.
Genie Entryway
- Examine the table of stone figures on the left. Use the Harpoon to retrieve the Thick Rope from the pole, then click to add it to your inventory.

- Return to the Portal Platform.
Portal Platform
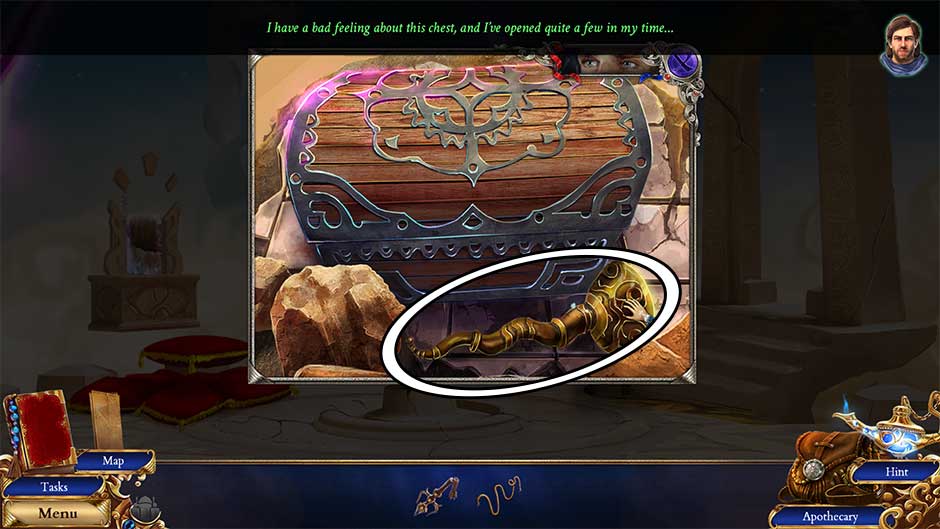
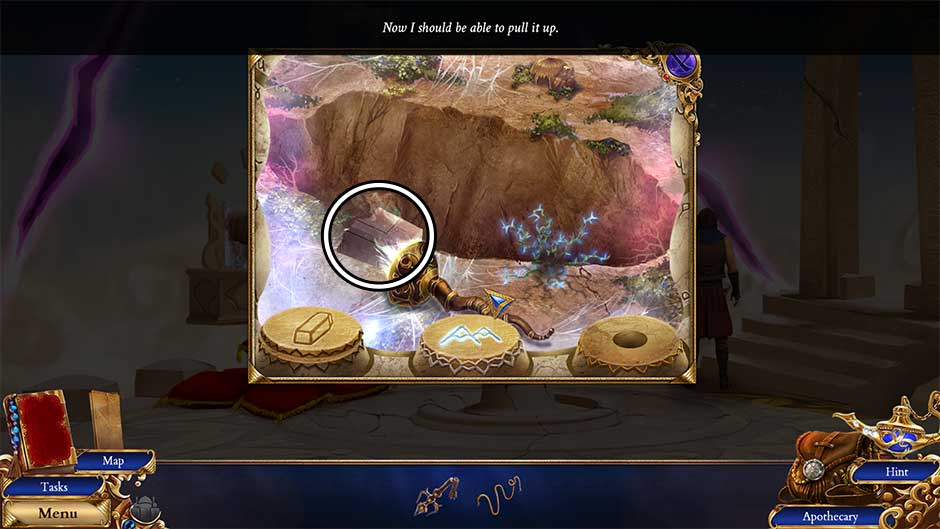
- Zoom in on the floating chest in front of Darius. Use the Thick Rope to bring it closer.
- Click on the Twisted Torch to add it to your inventory.
- Back in the main area, examine the floating wormhole platform on the left.
- If the portal isn’t open to the Crypt already, click on the leftmost Crypt Token to open up the wormhole.
- Use the Twisted Torch on the bright flame to acquire the Burning Twisted Torch.
- Select the middle Peri Hamlet Token to open a new wormhole.
- Use the Burning Twisted Torch to burn away the webs, then click on the Monolith Part to add it to your inventory.
- Head back to Orion’s Arbor.
Orion’s Arbor
- Take a closer look at the small floating island on the right.
- Place the Monolith Part on top of the floating artifact in the center of the island.
- Collect the Fountain Piece to add it to your inventory.
- Zoom in on the fountain straight ahead.
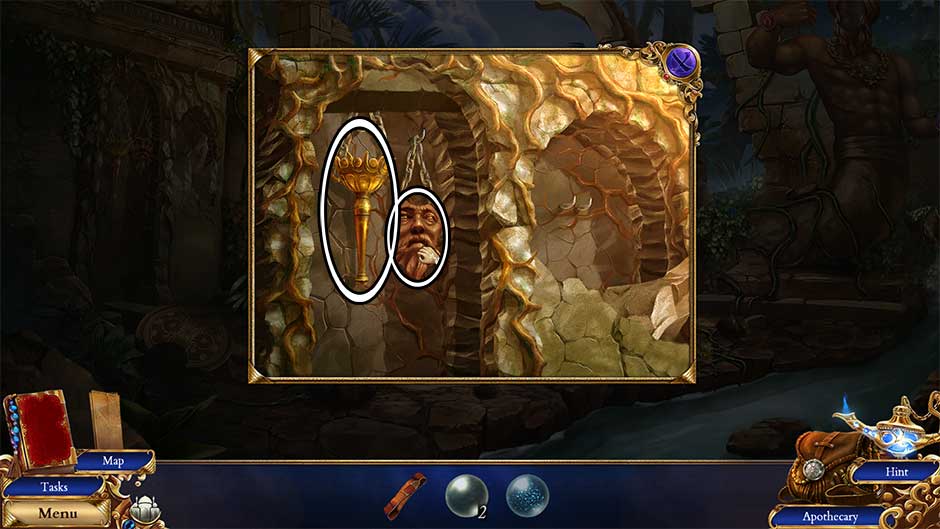
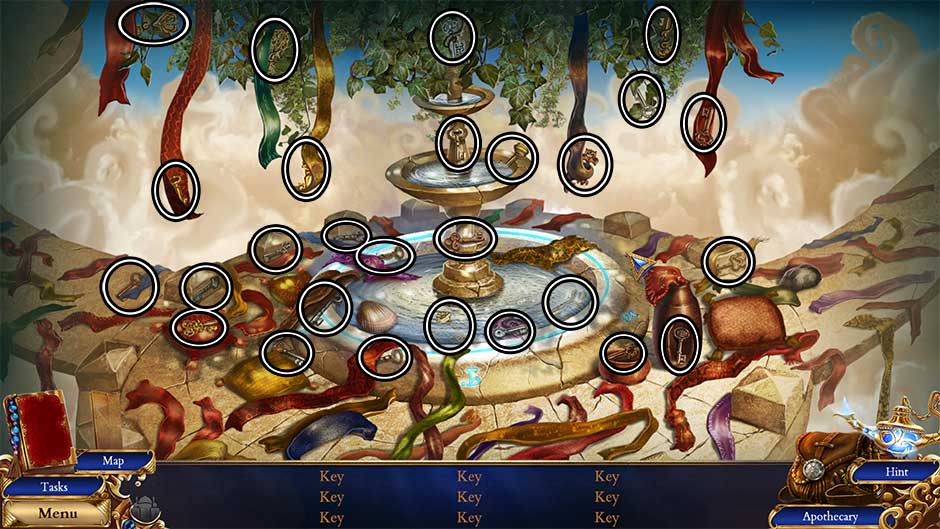
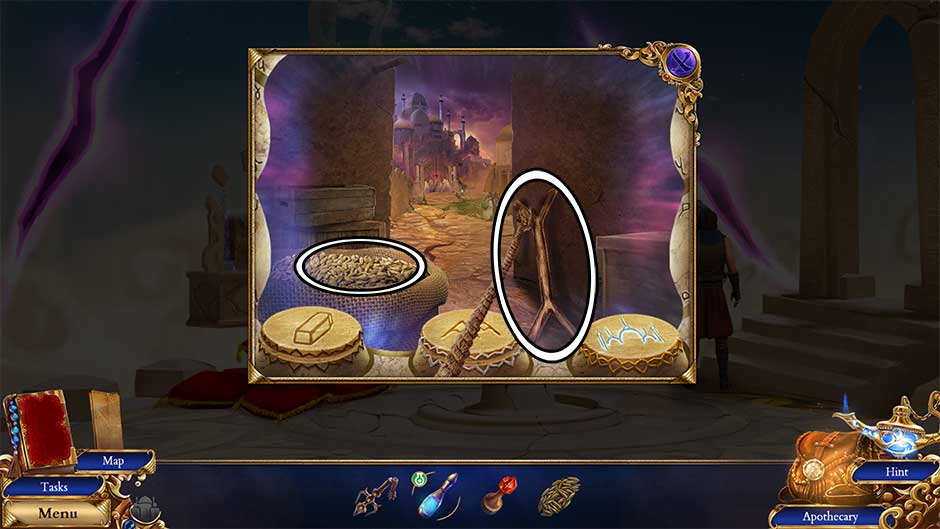
- Place the Fountain Piece into the broken section of fountain to trigger a hidden object area to appear.
- Find the items listed at the bottom of the screen. There are 27 total keys to find, and their locations are shown below. Upon completing the hidden object scene, Orion’s Mansion Key will appear. Click on it to add it to your inventory.
- Examine the door on the left again. Use Orion’s Mansion Key to open the door, then enter into the Great Hall.
Chapter 4 – Orion’s Mansion
Great Hall
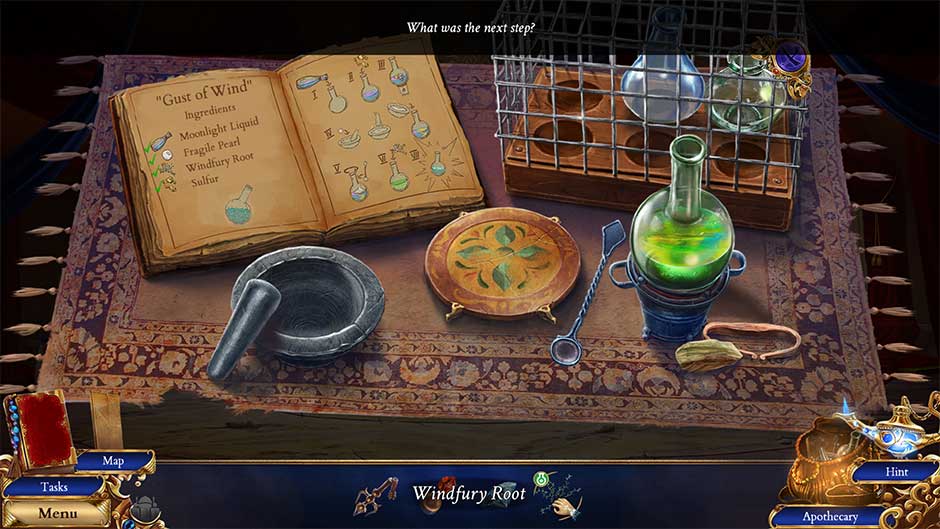
- A brief cutscene will occur, at the end of which you will learn the recipe for Gust of Wind.
- Click on Palace Marking 14/32 above the door on the left.
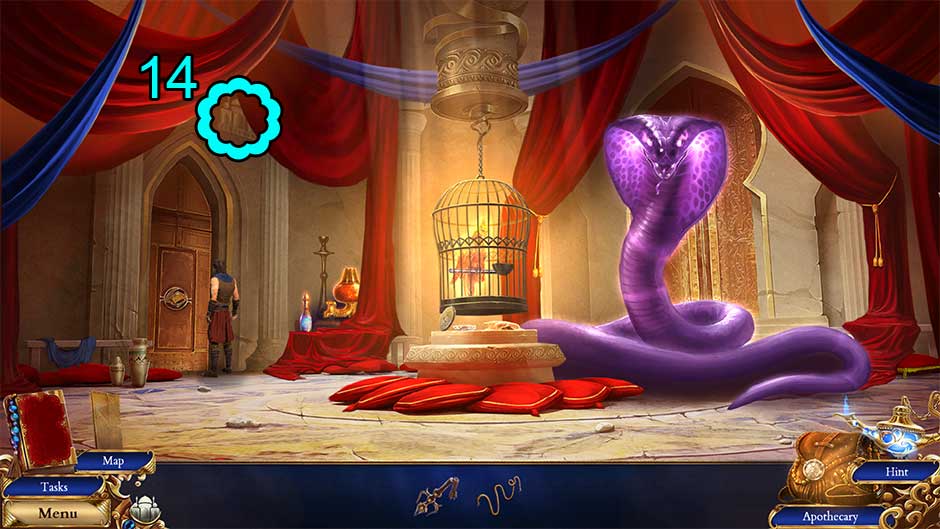
- Zoom in on the cage straight ahead and add the Wormhole Token (Khur) to your inventory.
- Examine the potions table between Darius and the cage. Click on the Moonlight Liquid to add it to your inventory. You’ll be returning here later.

- Take a closer look at the pots to the left of the left doorway. Open the note here and read it, adding the Red Pawn to your inventory.

- Make your way back to the Portal Platform.
Portal Platform
- Take a closer look at the floating wormhole platform on the left.
- Insert the Wormhole Token (Khur) into the rightmost pedestal, then click on the button to open a new portal.
- Use the Thick Rope to retrieve the Hardened Rack propped up against the right wall, then click on the Seeds to add them to your inventory.
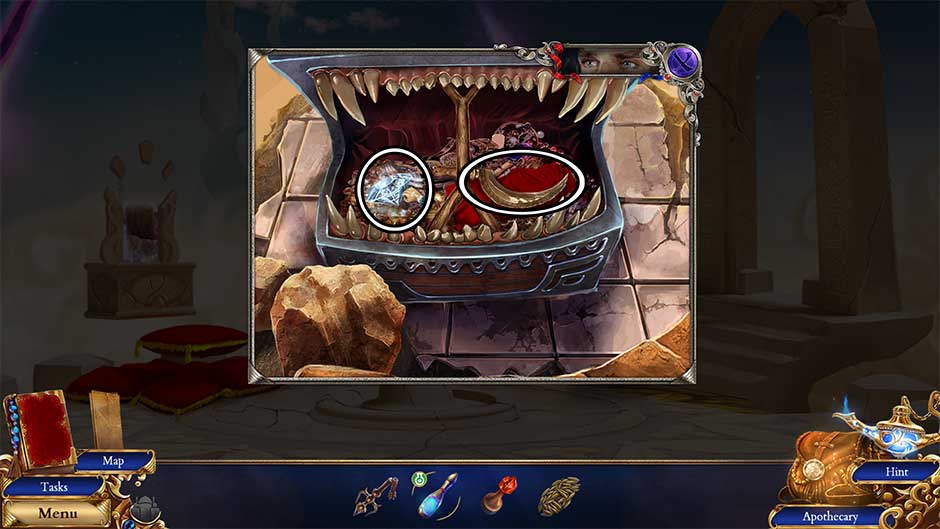
- Back in the main platform area, take a closer look at the floating chest in front of Darius.
- Place the Hardened Rack into the chest’s mouth to prop it open. Collect the Sharp Diamond and the Ornate Sickle
- Zoom in on the wormhole platform on the left again.
- Press the middle Peri Hamlet Token to open a new wormhole.
- Use the Ornate Sickle to cut the Windfury Root, then click to add it to your inventory.
- Head down to Orion’s Arbor.
Orion’s Arbor
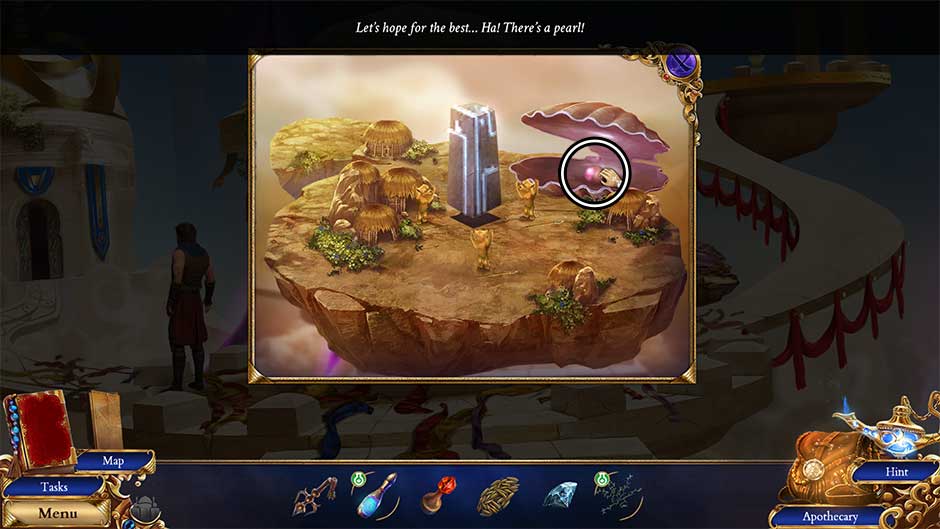
- Zoom in on the small floating island on the right again.
- Use the Ornate Sickle to cut open the clam, then click to add the Fragile Pearl to your inventory.
- Head back to the Great Hall.
Great Hall
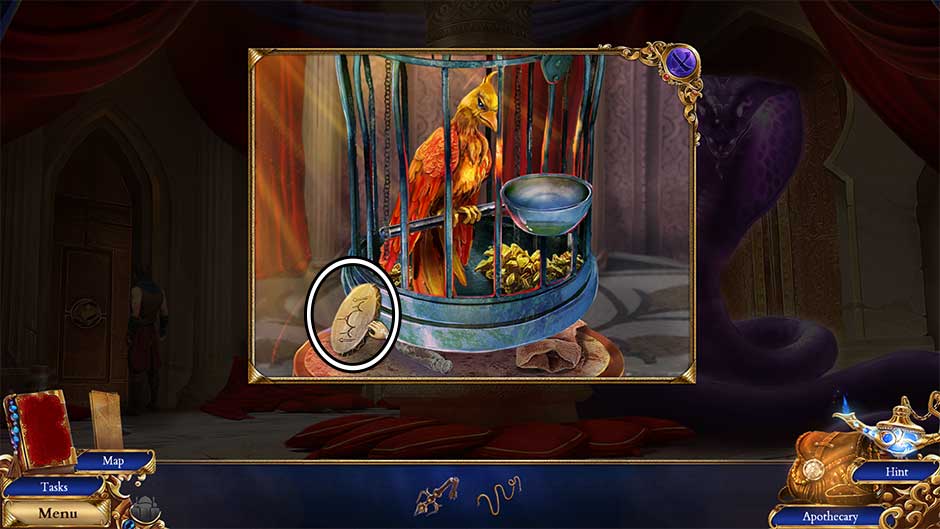
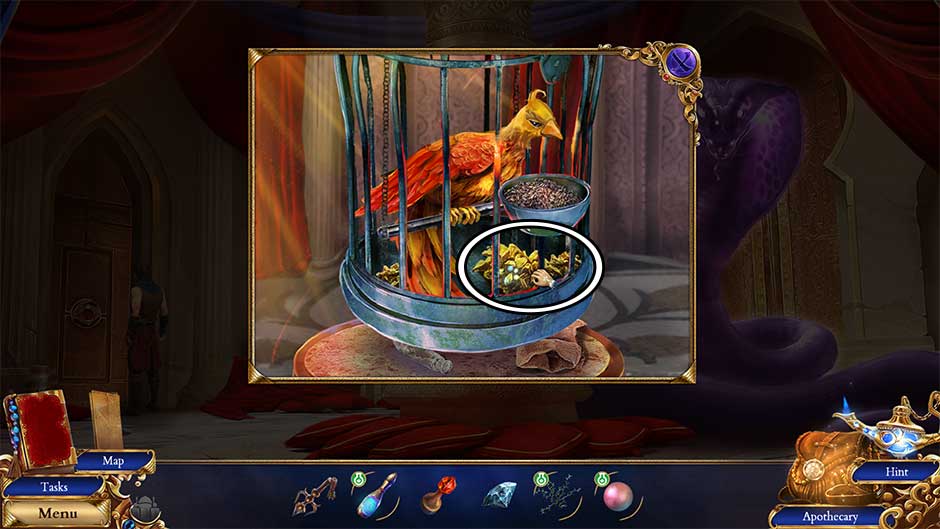
- Zoom in on the cage straight ahead.
- Place the Seeds inside the dish so the phoenix can feed, then collect the Sulfur in the bottom of the cage.
- Open the Apothecary.
- Pour the Moonlight Liquid into the glass flask.
- Add the Sulfur to the glass flask.
- Use the flint and steel to light the burner, then place the glass flask on top to brew.
- Place the Pearl into the mortar and use the pestle to crush it into powder. Add the powder from the mortar to the glass flask.
- Use the spoon to stir the contents of the flask.
- Add the Windfury Root to the mixture inside the flask.
- Once the contents have settled, click to add the Gust of Wind to your inventory.
- Back in the main area, use the Gust of Wind on the shadow cobra to banish it.
- Click on the gold doors on the right to open them, then proceed forward into Orion’s Workshop.
Orion’s Workshop
- Click on Palace Marking 15/36 above the bookshelves on the right.

- Take a closer look at the red curtain covering the mirror straight ahead.
- Collect the Cyan Pawn to open the curtain, then exit the close-up for now.
- Back in the main area, examine the pentagonal box on the right.
- Click on the Lace Napkin draped over the box to add it to your inventory.
- Place the Red Pawn and the Cyan Pawn into the slots on top of the box to trigger a puzzle.
- Swap the pawns so that each color matches the slot. The puzzle solution is shown below. Upon completing the puzzle, read the note inside the box and collect The Doorkeeper Eye.

- Return to the Great Hall.
Great Hall
- Examine the door on the left. Insert The Doorkeeper Eye into the slot in the door to open it.
- Enter into the Room of Curios.
Room of Curios
- Click on Palace Marking 16/36 above the green drape on the right.
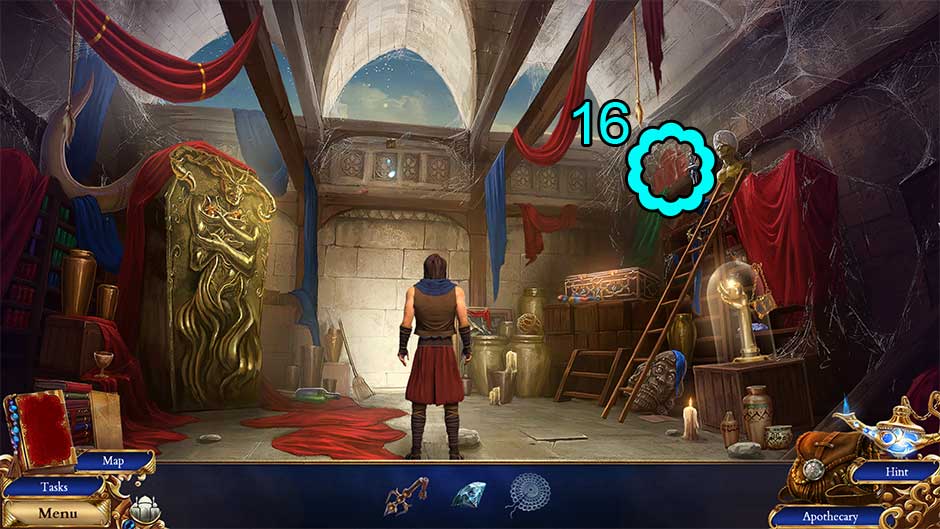
- Click the ladder on the right to place it in the correct position for Darius.
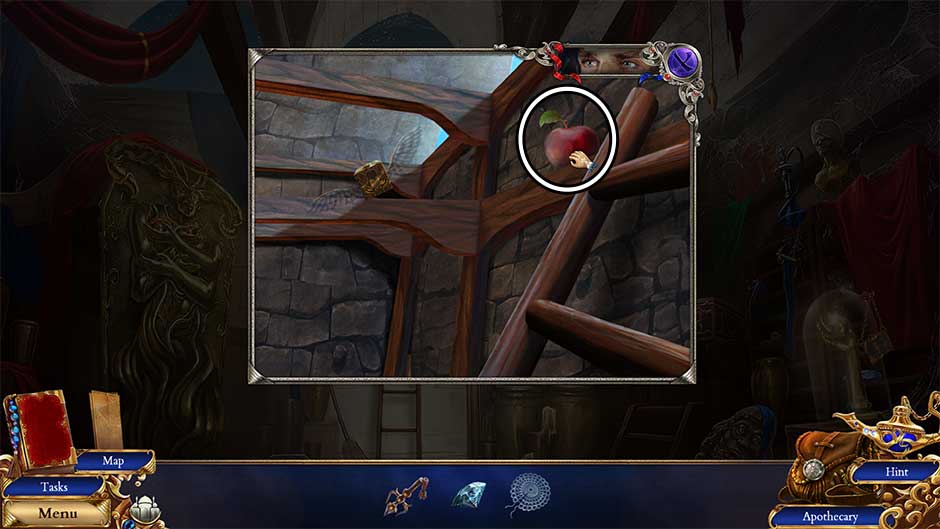
- Take a closer look at the top of the ladder.
- Collect the Apple.
- Examine the glass dome casing on the right.
- Use the Sharp Diamond to cut open the glass. Collect the Golden Apple
- Place the Apple into the palm of the gold hand, then collect now-Golden Apple (2) to add it to your inventory as well.
- Back in the main area, examine the large gold ornamental plate on the left.
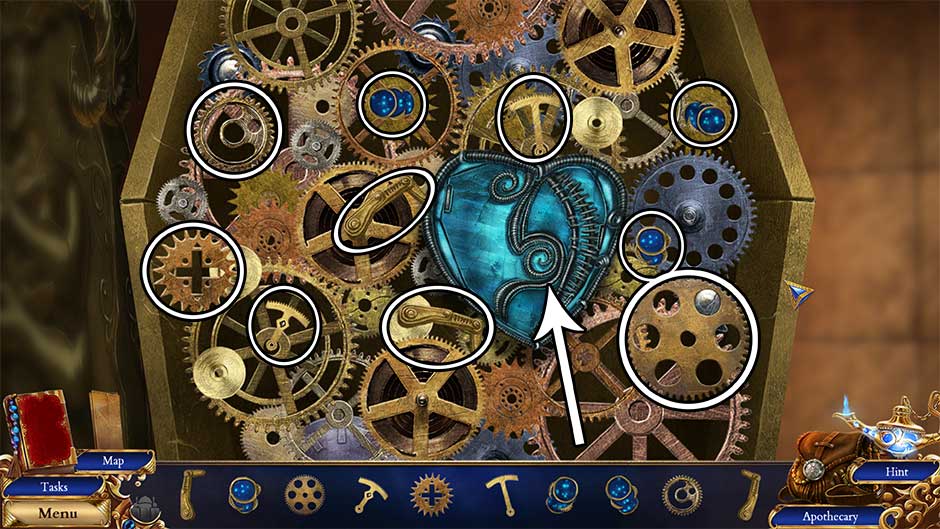
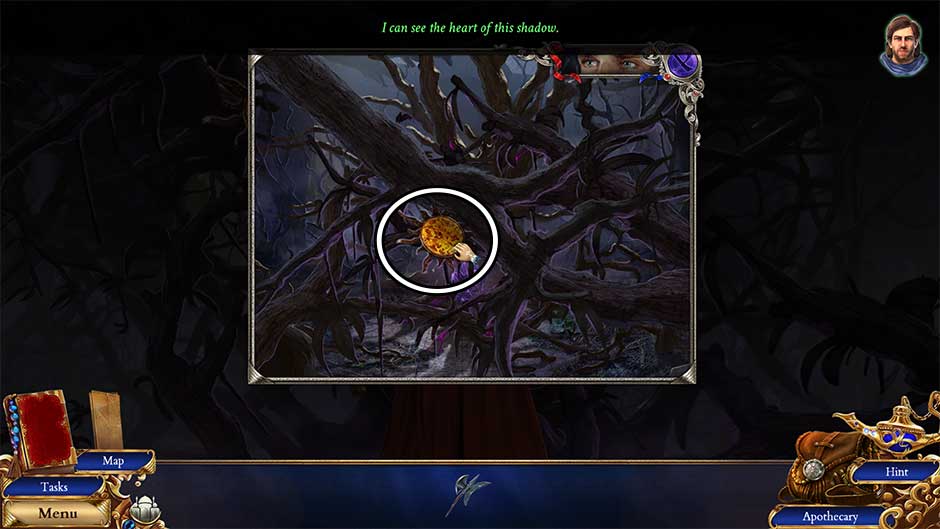
- Place the Golden Apple (x2) into the empty hands to open the faceplate, revealing a puzzle beneath.
- Find the objects shown at the bottom of the screen. Their locations are shown below. Upon completing the puzzle, the blue heart will open, revealing the Star Lever.
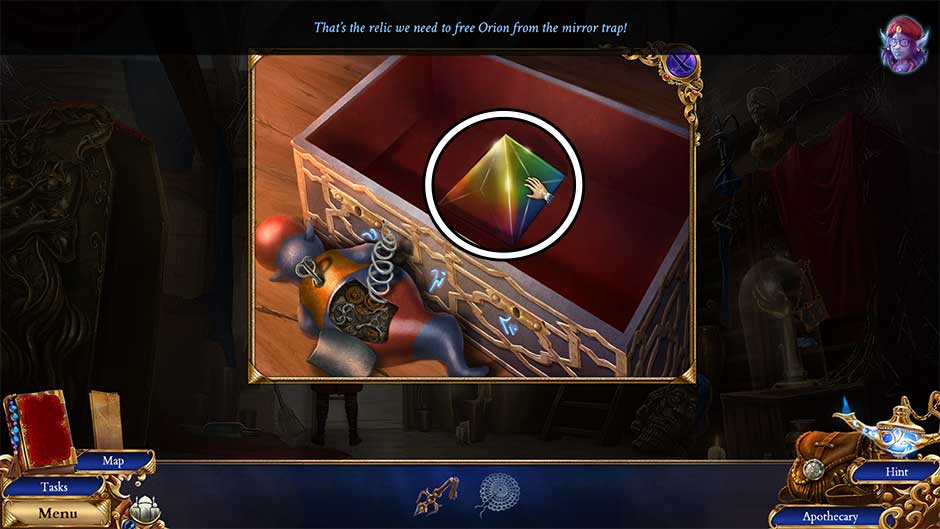
- In the main portion of the room again, take a closer look at the ornamental box in the far right corner.
- Insert the Star Lever into the top of the box to open it. Collect the Mirror Prism
- Return to Orion’s Workshop.
Orion’s Workshop
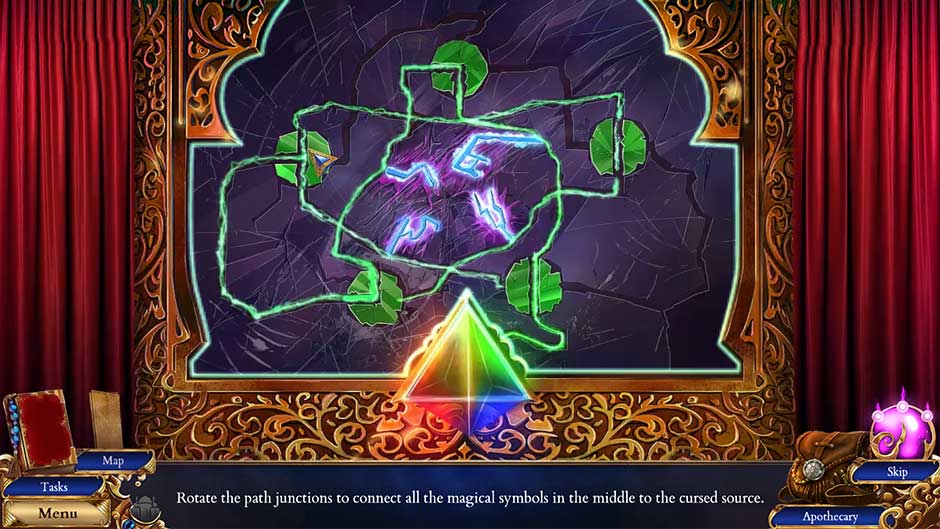
- Examine the mirror straight ahead.
- Insert the Mirror Prism into the triangular slot to trigger a puzzle.
- Rotate the path junctions by clicking on them to connect all the magical symbols in the middle to the cursed source. The puzzle solution is shown below.
- Upon completing the puzzle, Orion will be freed. Proceed through the newly-opened doorway into the Library.
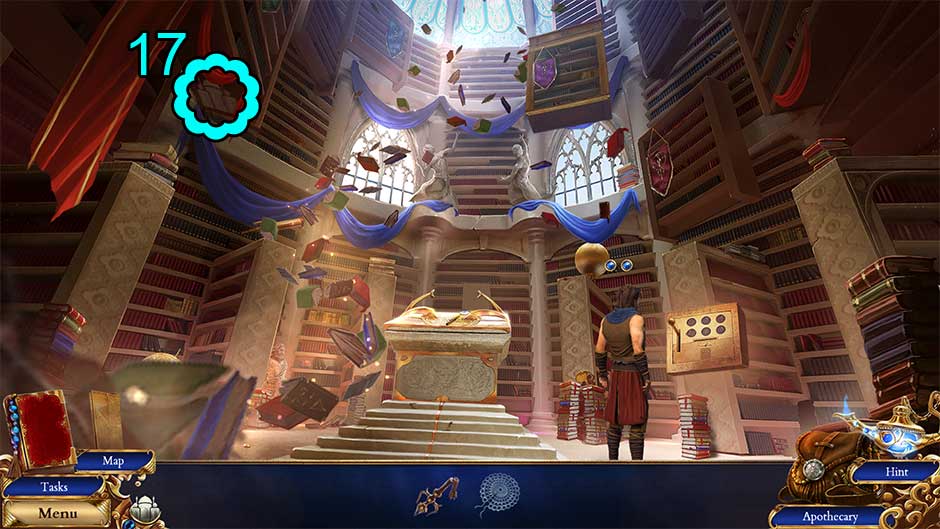
Library
- Click on Palace Marking 17/32 on the underside of the upper left bookcase.
- Speak with Darius. Select Leave once finished.
- Examine the large stand up ahead. Click on the Magnifying Glass to add it to your inventory.
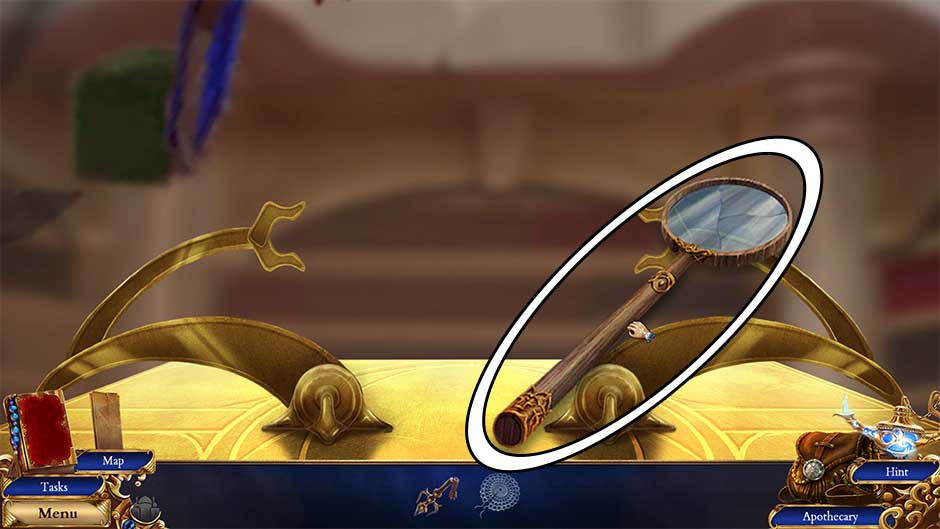
- Select the Magnifying Glass in your inventory for a closer view. Click on the glass to knock it out of the frame, then attach the Lace Napkin to the frame to acquire the Butterfly Net.
- Return to the Room of Curios.
Room of Curios
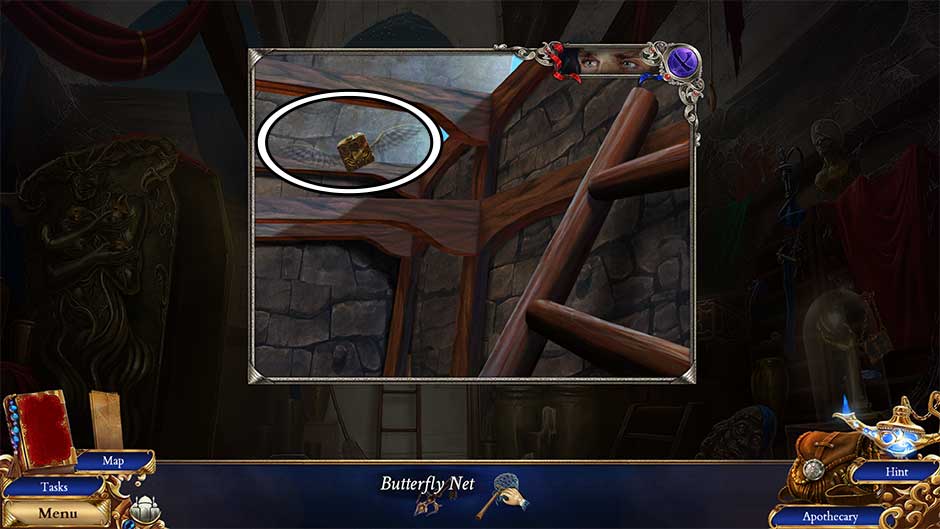
- Zoom in on the area on top of the ladder.
- Use the Butterfly Net to catch the Winged Pyxis, adding it to your inventory.
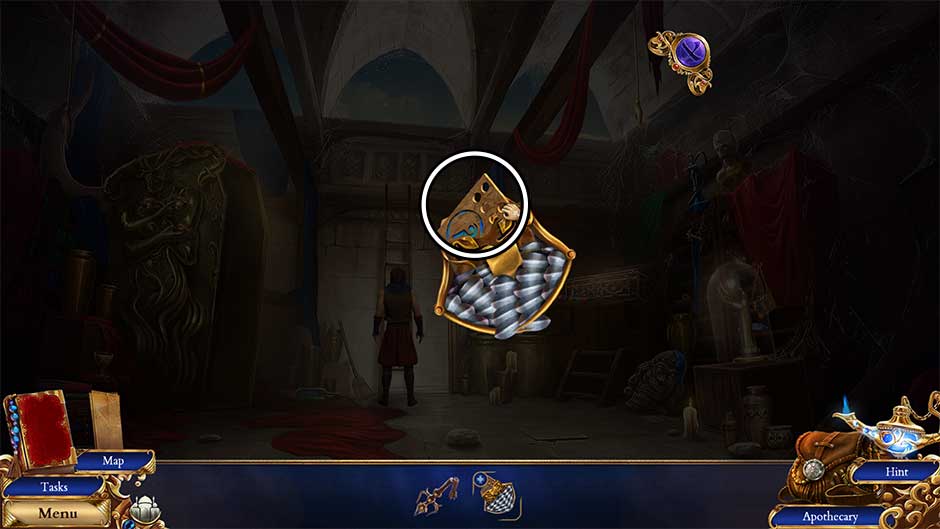
- Select the Winged Pyxis in your inventory. Click on both wings to fold them up under the bottom of the cube. Click on the middle latch, then click the top of the cube to remove it, revealing an item inside. Collect the Library Card (Wands) hidden within.
- Return to the Library.
Library
- Take a closer look at the card mechanism on the right.
- Insert the Library Card (Wands) into the slot, then click the lever on the left.
- Examine the bookcase with the purple banner that drops down.
- Click on the Encrypted Cube embedded in the shelf to add it to your inventory.
- Zoom in on the pedestal in the middle of the room. Place the Encrypted Cube on the pedestal. A puzzle will be triggered.
- Rearrange the strips to form the whole picture. The puzzle solutions are shown below.
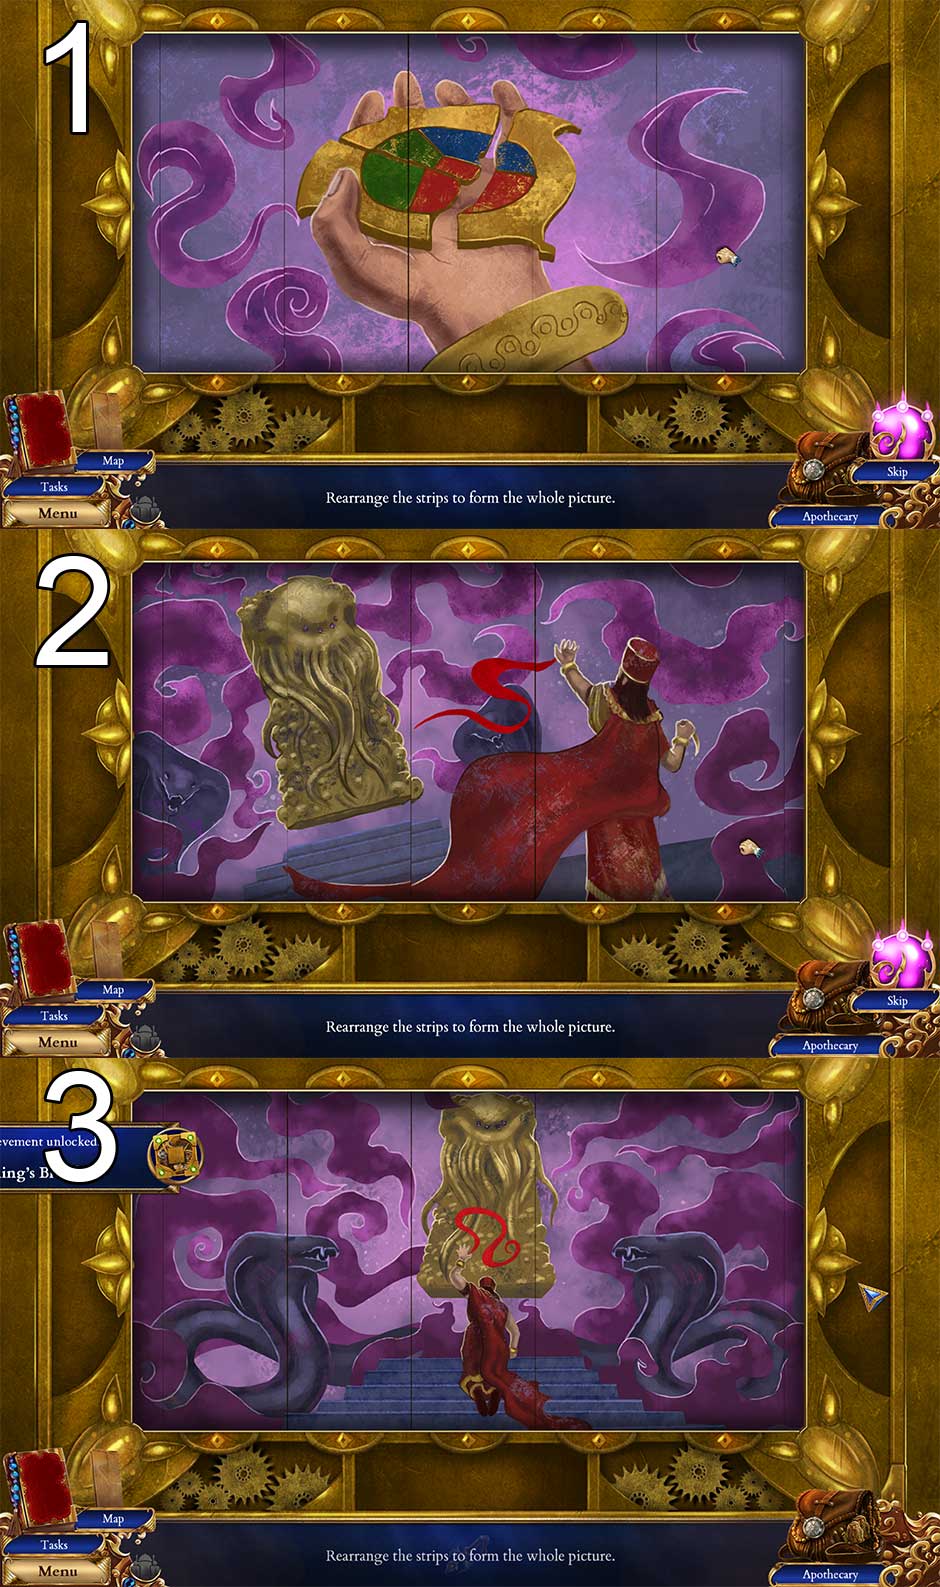
- Once the puzzle has been completed, the Solved Cube will be added to your inventory.
- Take a closer look at the bookcase with the purple banner again.
- Place the Solved Cube into the slot in the shelf, then click to collect the Great Book of Magic Wands to add it to your inventory.
- Exit the Library into Orion’s Workshop.
Orion’s Workshop
- A brief cutscene will take place. Once finished, take a closer look at the bookstand on the left, between Darius and Orion.
- Place the Great Book of Magic Wands onto the bookstand.
- Place the Broken Portal Conductor on the workbench, then pick up the Pincers and the Stoneware Dish. We’ll be returning here shortly.
- Go to the Great Hall.
Great Hall
- Take a closer look at the potion table between the left doorway and the cage.
- Place the Stoneware Dish on the table, then click on the faucet to fill it with Enchanted Resin.

- Enter the Room of Curios.
Room of Curios
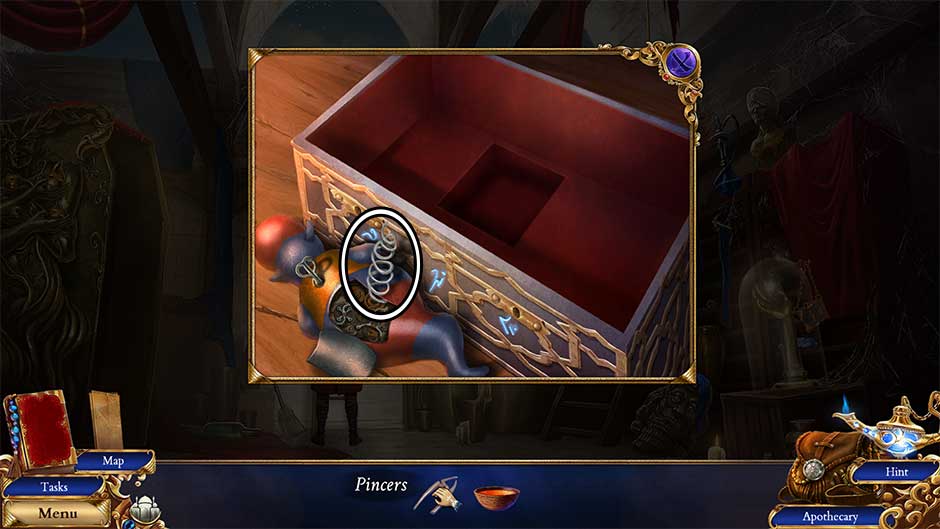
- Examine the ornate box in the far right corner again.
- Click on the panel on the back of the genie toy in the lower left corner of the closeup. A spring will pop out. Use the Pincers to remove the Steel Spring and add it to your inventory.
- Before leaving the room, take a closer look at the glass dome on the right again. Place the Steel Spring into the golden hand, then click on the resulting Golden Frame to add it to your inventory.
- Head back to Orion’s Workshop.
Orion’s Workshop
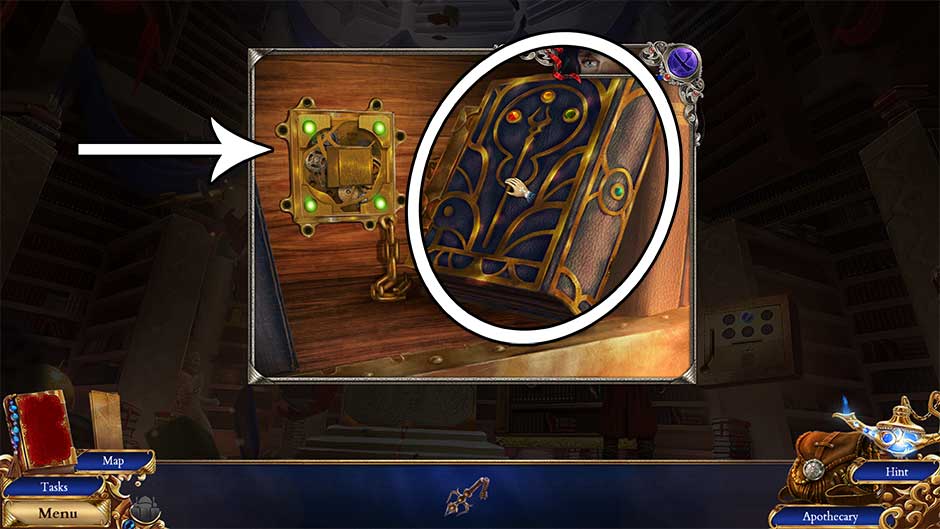
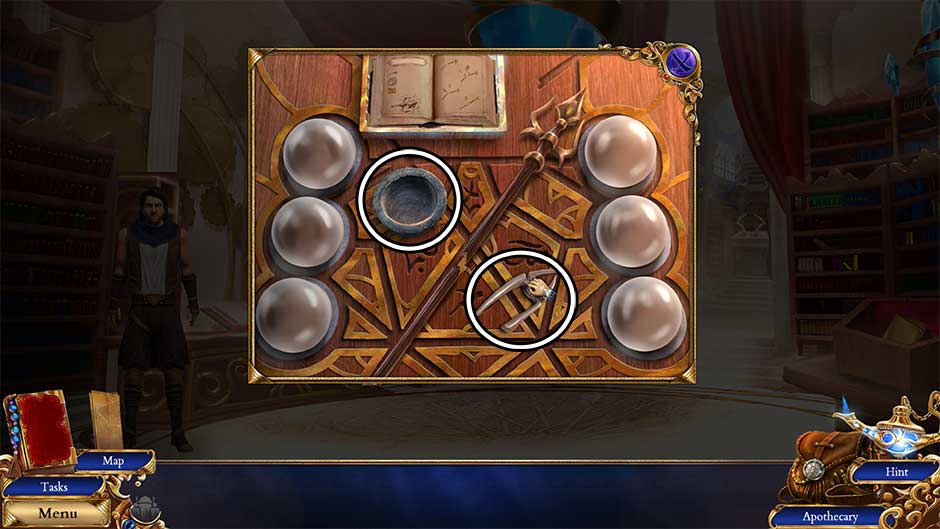
- Take a closer look at the workbench on the left.
- Pour the Enchanted Resin over the broken conductor pole.
- Attach the Golden Frame to the break in the conductor pole.
- Now it’s time to charge it with magic. Click on the glass orbs on either side of the conductor, so that each side matches the corresponding image shown in the book at the top of the closeup. The puzzle solution is shown below.
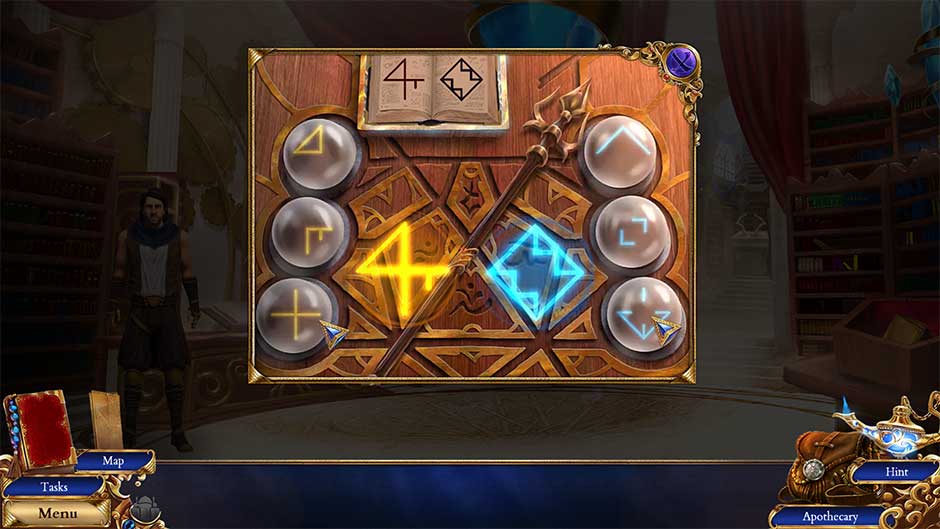
- Upon completing the puzzle, click on the repaired Portal Conductor (Inactive) to add it to your inventory.
- Give the Portal Conductor (Inactive) to Orion.
- A brief cutscene will follow, taking you back to the Portal Platform.
Portal Platform
- Examine the pedestal in the middle of the platform. Place the Portal Conductor (Active) into the pedestal.
- After the cutscene, enter through the portal on the right.
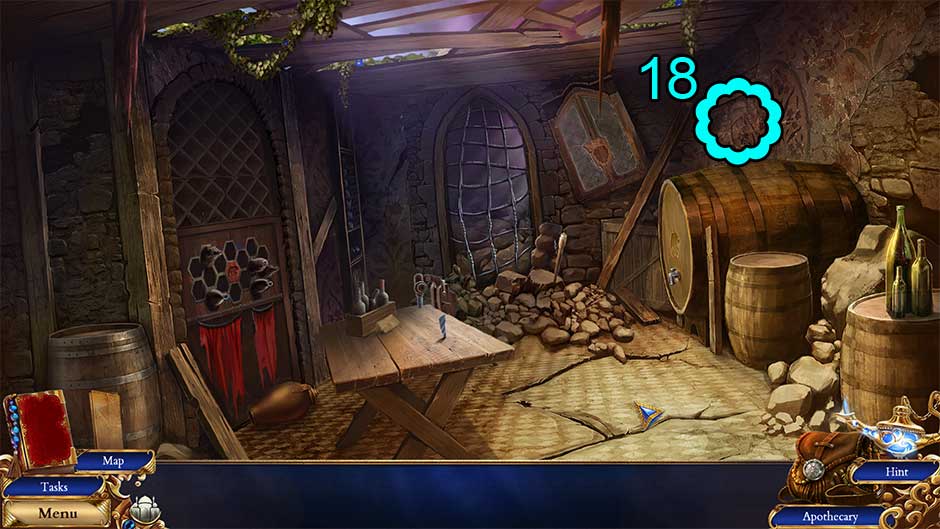
Chapter 5 – The Radiant City of Khur
Vineyard Basement
- Click on Palace Marking 18/32 above the large barrel on the right.
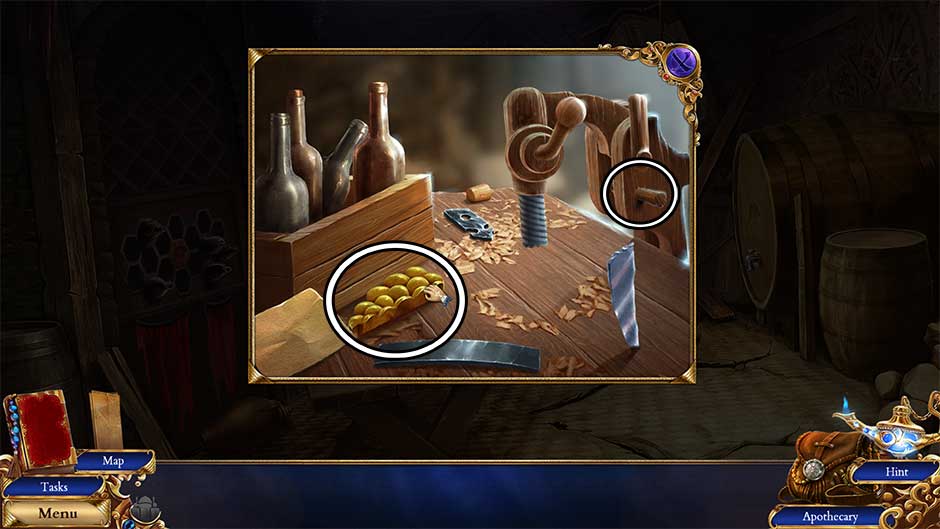
- Take a closer look at the wooden table.
- Click on the note to read it.
- Pick up the Grape Symbol and the Wooden Wedge.
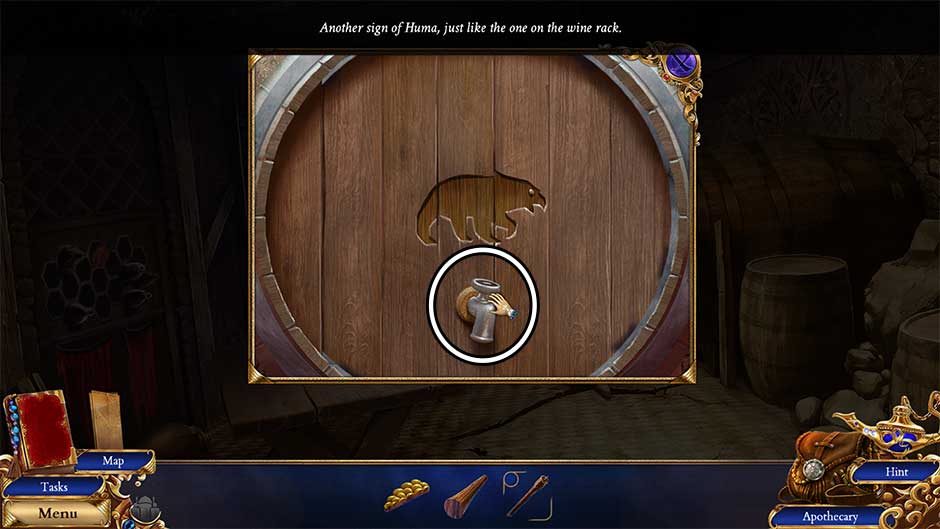
- Zoom in on the large barrel on the right. Click on the Cork with Tap to add it to your inventory.
- Examine the doorway straight ahead.
- Collect the Large Candleholder on the right.
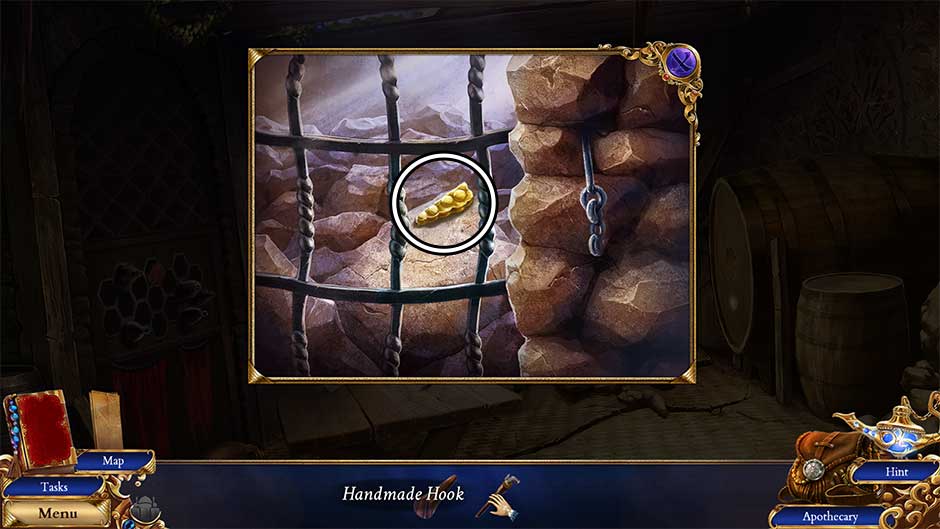
- Select the Large Candleholder in your inventory. Click on the candle to remove it, then attach the Cork with Tap in its place. You will acquire the Handmade Hook.
- Use the Handmade Hook to retrieve the Grape Symbol (right).
- Zoom in on the crooked cabinet on the back wall.
- Place the Grape Symbol and Grape Symbol (right) into the slot in the cabinet doors.
- Click to open the cabinet, then collect the Oxidizing Mineral and Peculiar Wine Bottle
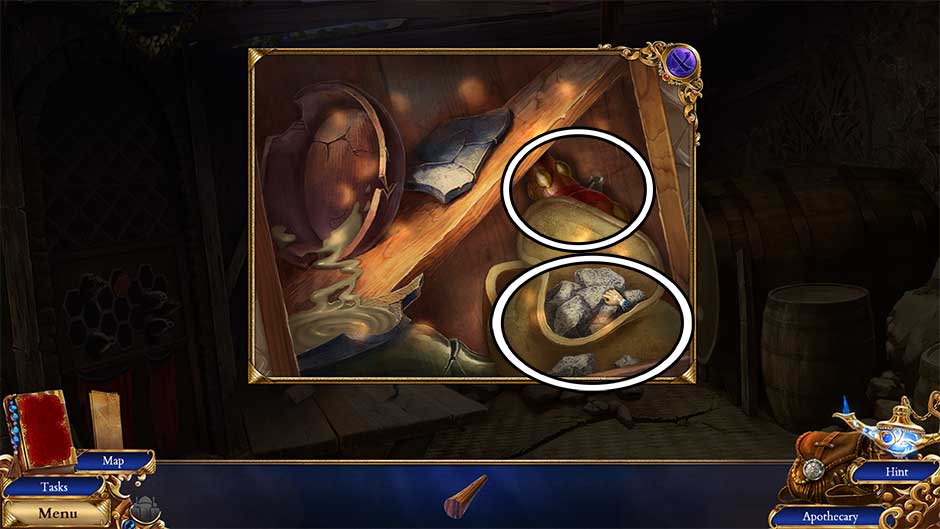
- Take a closer look at the wine rack on the left.
- Click on the red hexagon in the center to reveal the center slot. Insert the Peculiar Wine Bottle into this slot to trigger a puzzle.
- Rotate the hexagonal pieces by clicking on them to reveal the image. The puzzle solution is shown below.

- Upon completing the puzzle, a secret passage will open up in the large barrel on the right.
- Take a closer look at the large barrel on the right.
- Click on the front panel of the barrel to reveal the new passage. When you try to go through, swords will bar your path.
- Carefully disarm the trap by pushing the blades back. Click and hold a blade, moving it to the edge of the frame. Start with the ones in front. Disarm the blades in the trap in the order shown in the screenshot below to solve the puzzle.
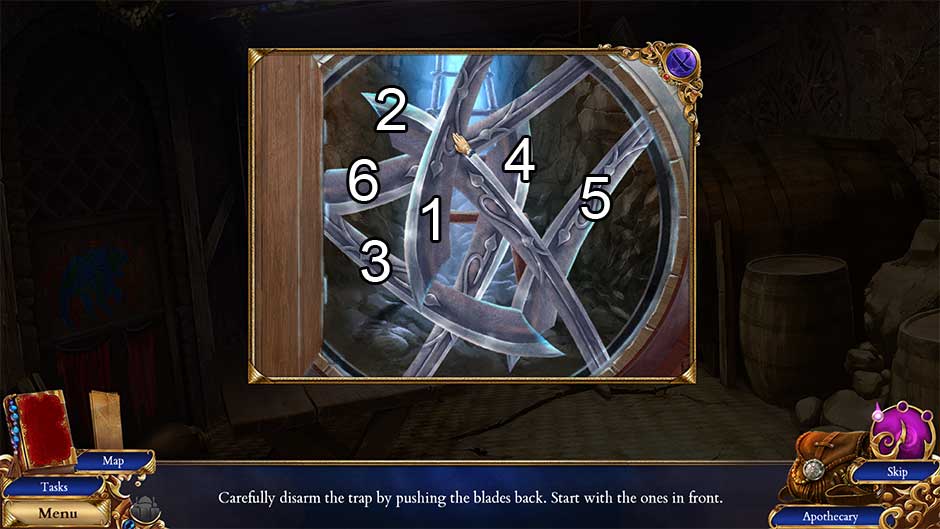
- Continue through the secret passage to the next area.
Desolated City Vista
- Click on Palace Marking 19/32 on the far building ahead.
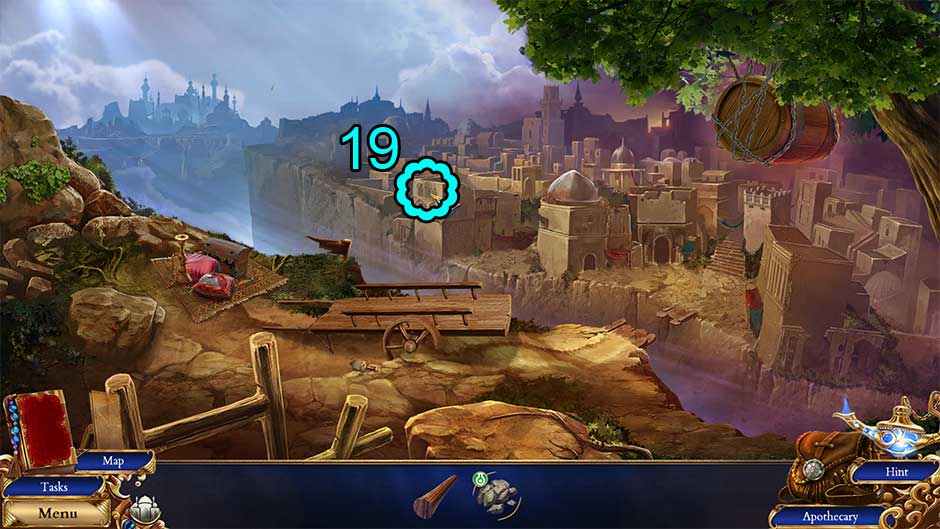
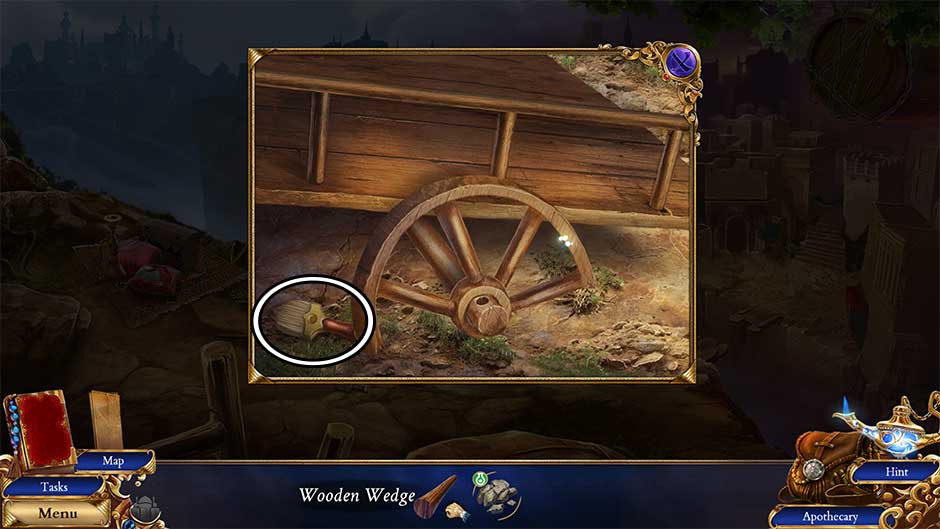
- Take a closer look at the wheel of the cart ahead. Click on the Brush to add it to your inventory.
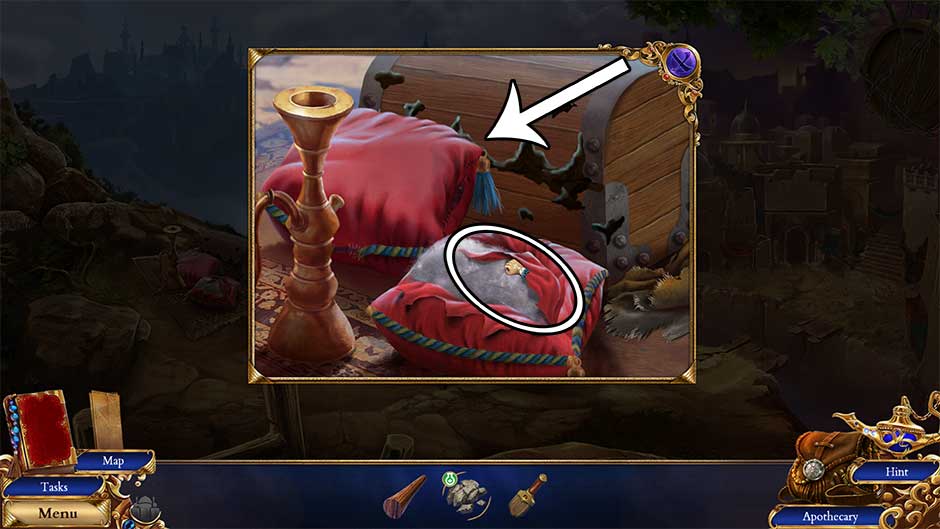
- Zoom in on the carpet on the left. Click on the left pillow to move it aside for later, then click on the Torn Pillowcase to add it to your inventory.
- Go back to the Vineyard Basement.
Vineyard Basement
- Examine the crooked cabinet on the back wall. Use the Brush on the grease spill inside to obtain the Greasy Brush.
- Take a closer look at the wooden table.
- Use the Torn Pillowcase on the piece of broken glass to obtain the Shiv.
- Return to the Desolate City Vista.
Desolate City Vista
- Examine the carpet on the left again.
- Use the Shiv to cut open the chest.
- Click to open the chest, then collect the Wagon Jack
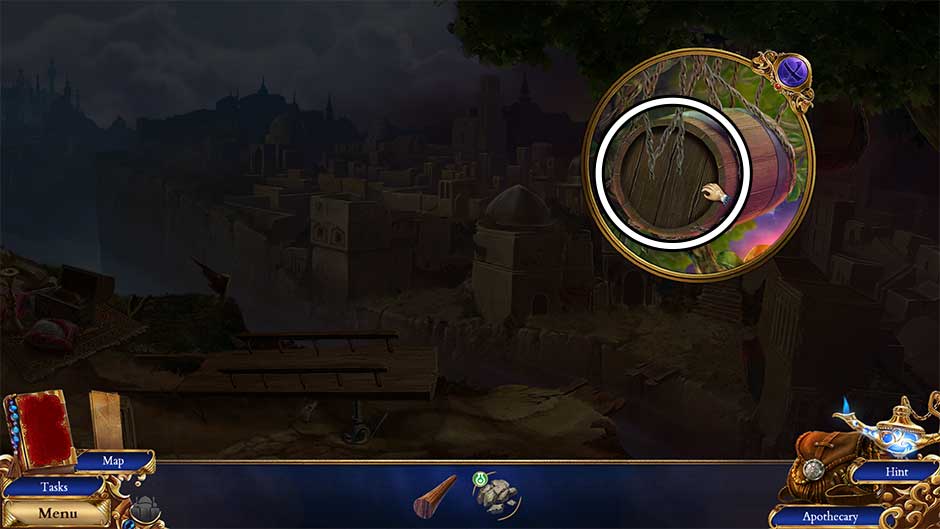
- Take a closer look at the barrel hanging from the tree on the upper right.
- Use the Shiv to cut the barrel free, then click on the Barrel Head to add it to your inventory.
- Head back to the Vineyard Basement.
Vineyard Basement
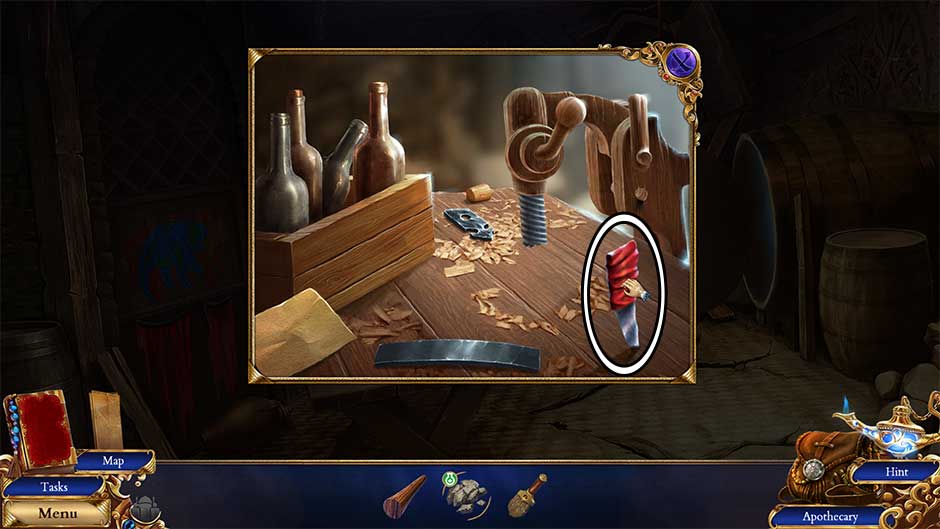
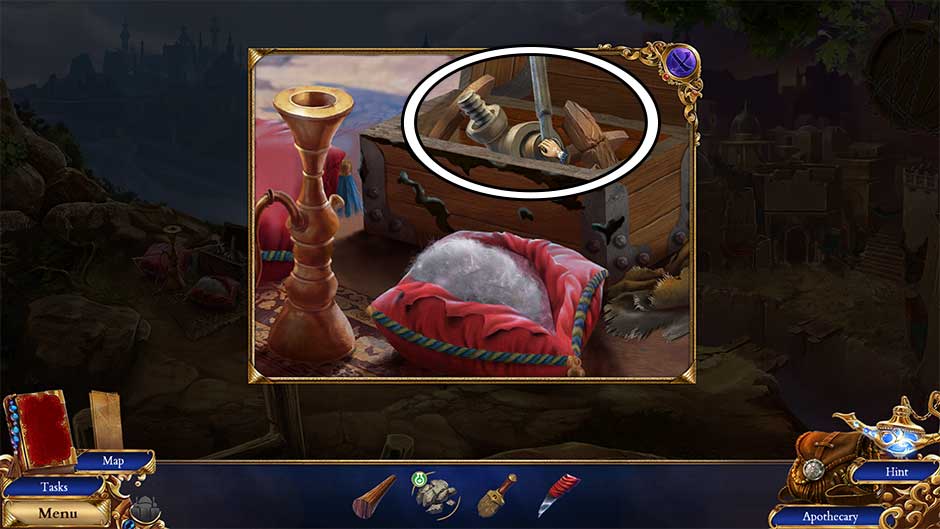
- Examine the wooden table once again.
- Place the Barrel Head on the table.
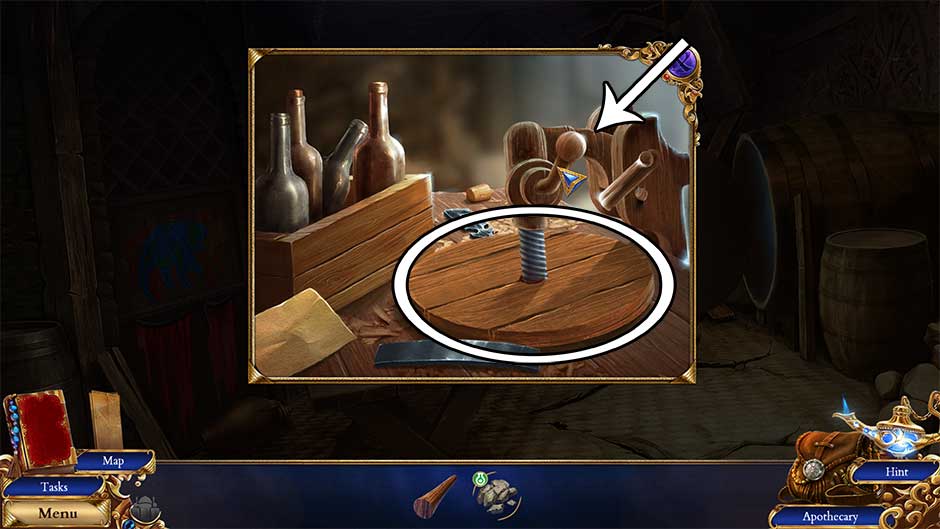
- Click on the drill to lower it against the barrel head, then click on the crank to drill it.
- Pick up the Makeshift Wheel.
- Go back to the Desolate City Vista.
Desolate City Vista
- Zoom in on the wagon straight ahead.
- Use the Wagon Jack to prop up the wagon.
- Click on the wheel to remove it, then use the Greasy Brush on the wagon peg.
- Place the Makeshift Wheel onto the peg, followed by the Wooden Wedge to secure it.
- Back in the main area, click on the wagon to create a makeshift bridge across the chasm. Continue to the next location.
Suburb Market
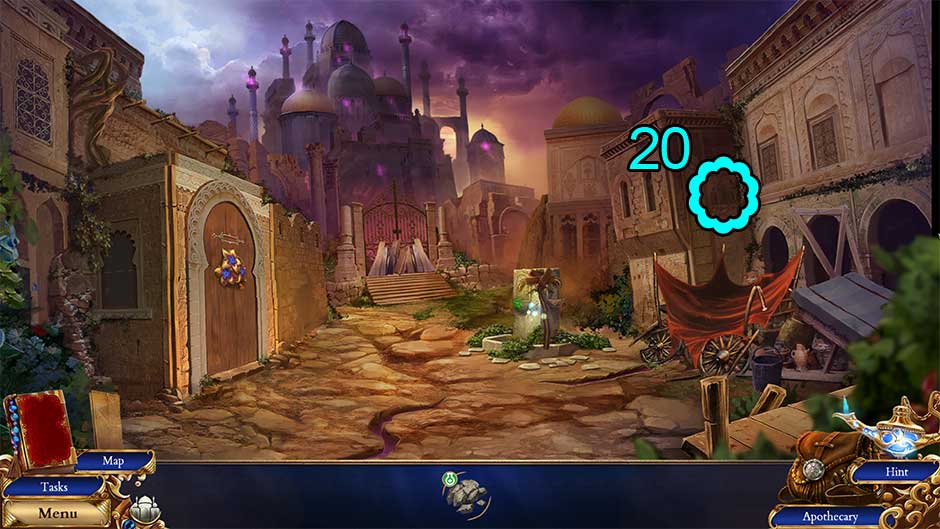
- Click on Palace Marking 20/32 above the fallen tent on the right.
- Take a closer look at the fountain ahead.
- Click on the Support Pole to remove it from the fountain and add it to your inventory.
- Additionally, pick up the Pebble and add it to your inventory.
- Use the Support Pole on the tent on the right to reveal a hidden object area.
- Find the objects shown at the bottom of the screen. Their locations are shown below. Upon finding all the items, the box on the right can be opened, revealing the Locksmith’s Toolbag

- Select the Locksmith’s Toolbag in your inventory. Click on the buckles to open the bag, then collect the Lockpick
- Take a closer look at the door on the left.
- Knock on the door and speak with the resident inside.
- After talking with the man, click on the Wedding Decoration hanging on the door to add it to your inventory.
- Select the Wedding Decoration in your inventory. Click on each of the flowers to remove them, followed by the red ribbon. Click on the remaining Rubber to add it to your inventory.
- Examine the gate straight ahead.
- Click on the boards propped up against the gate to remove them. Note the torn cloth hanging from one of the bars as well as the note over the lock.
- Use the Lockpick on the gate lock. Rotate each of the picks until the tumblers are in the correct locations to open the gate. The solution is pictured below.
- Click on the unlocked gate to open it and proceed forward to the next location.
Dry Well Alley
- Upon entering the alley, a sand demon will manifest. Defend yourself!
- Defend yourself by choosing the blue sphere that does not match the enemy sphere. The solution is shown below.
- Block the spell by repeating the sequence. Click on the orbs in the order shown in the screenshot below.
- Turn all the runes blue to repel the enemy attack. Clicking on a rune will switch its color, along with the colors of the runes around it. Upon turning all the runes blue, the sand demon will be defeated.
- Click on Palace Marking 21/32 between the two boarded doorways.
- Examine the nest on the right. Click on the Wood Saw to add it to your inventory.
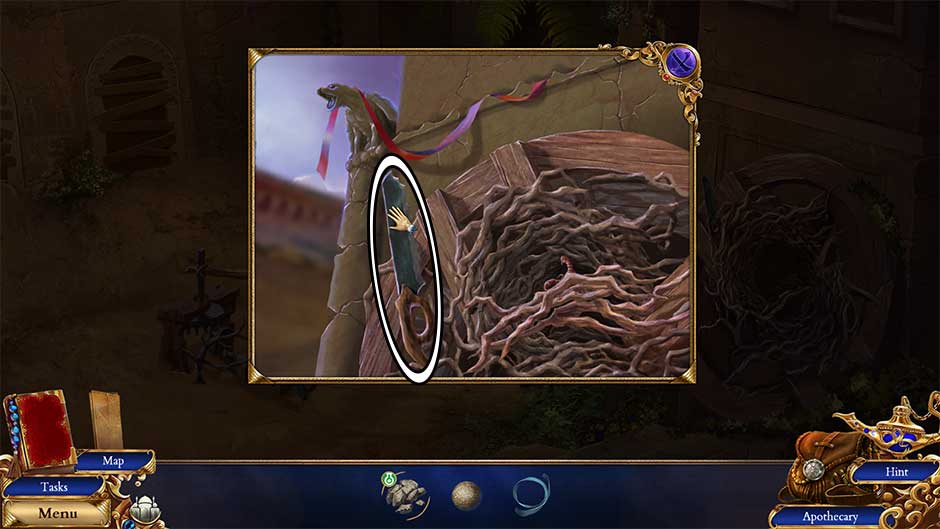
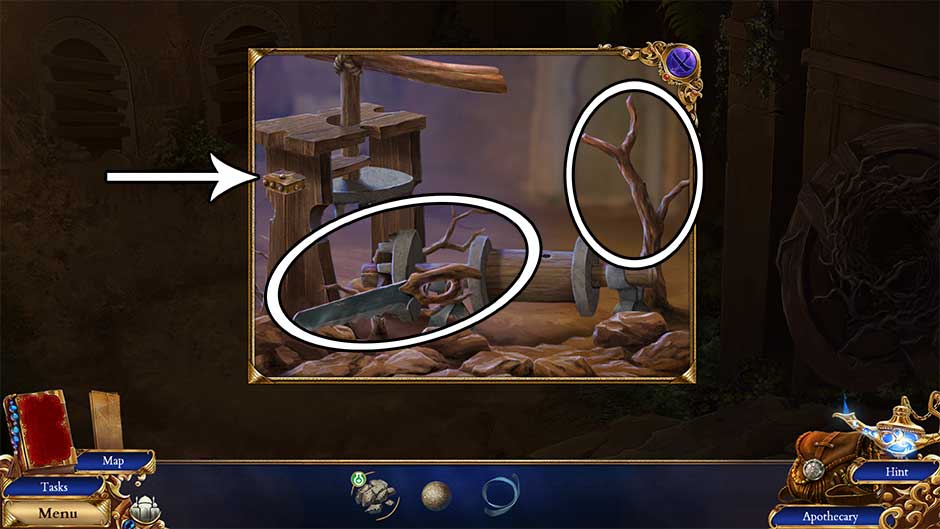
- Zoom in on the crank device at the bottom of the stairs.
- Use the Wood Saw to cut away the branches. The Slingshot Frame will be added to your inventory.
- Click on the wedge to lower the left wheel. You’ll be returning here soon.
- Select the Slingshot Frame in your inventory. Attach the Rubber and add the Pebble to acquire the Slingshot.
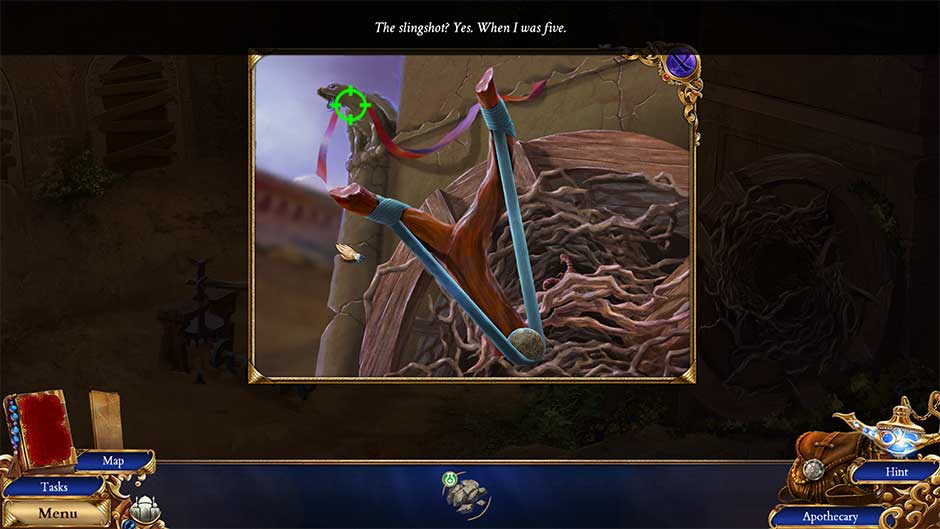
- Examine the nest on the right again. Use the Slingshot to shoot down the ribbon. Click to shoot once the viewfinder turns green, then click on the Long Thick Sash to add it to your inventory.
- Select the Long Thick Sash in your inventory. Click to unfurl it and acquire the Untangled Sash. Interact with the end of the Untangled Sash to turn it into the Sash with a Noose.
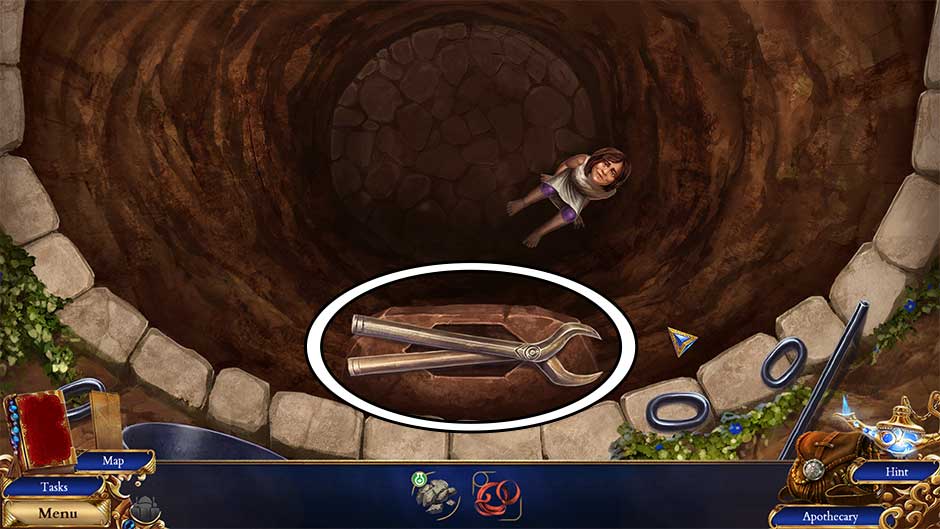
- Zoom in on the large, dry well. Click on the Tongs to add them to your inventory.
- Return to the Suburb Market.
Suburb Market
- Take a closer look at the broken fountain. Use the Tongs to retrieve the Hook and add it to your inventory.

- Select the Sash with a Noose in your inventory. Attach the Hook to acquire the Long Thick Sash with hook on it.
- Go back to the Dry Well Alley.
Dry Well Alley
- Take a closer look at the crank at the base of the stairs again. Attach the Long Thick Sash with hook to the spindle.
- Zoom in on the dry well. Use the Long Thick Sash again, this time on the girl trapped in the bottom of the well. Once the sash has been wrapped around her, go back to the closeup of the crank.
- Click on the handle at the top of the crank to reel in the sash, freeing the girl from the well.
- Return to the Suburb Market.
Suburb Market
- Speak with the family after saving their daughter. Once finished, enter the Wedding Abode.
Wedding Abode
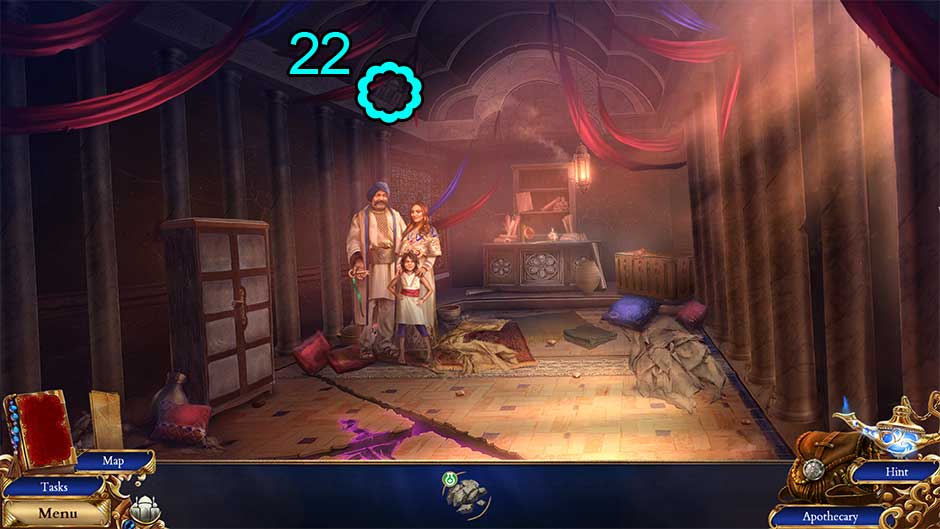
- Click on Palace Marking 22/32 above the family.
- Take the Supply Cabinet Key from the father.
- Examine the cabinet on the left.
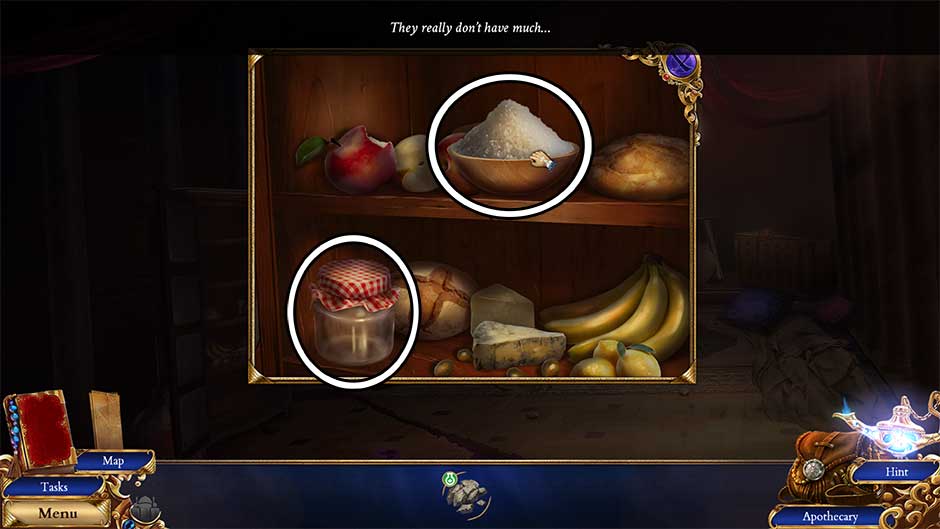
- Insert the Supply Cabinet Key into the lock to open the cupboard. Collect the Salt and the Jar with Elastic Cover
- Zoom in on the dresser at the back of the room.
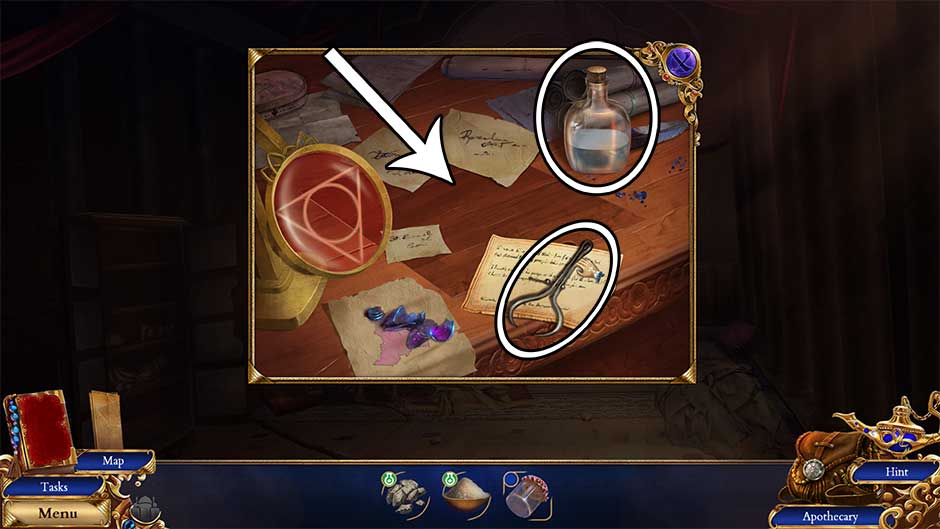
- Collect the Caliper and the Strong Alcohol.
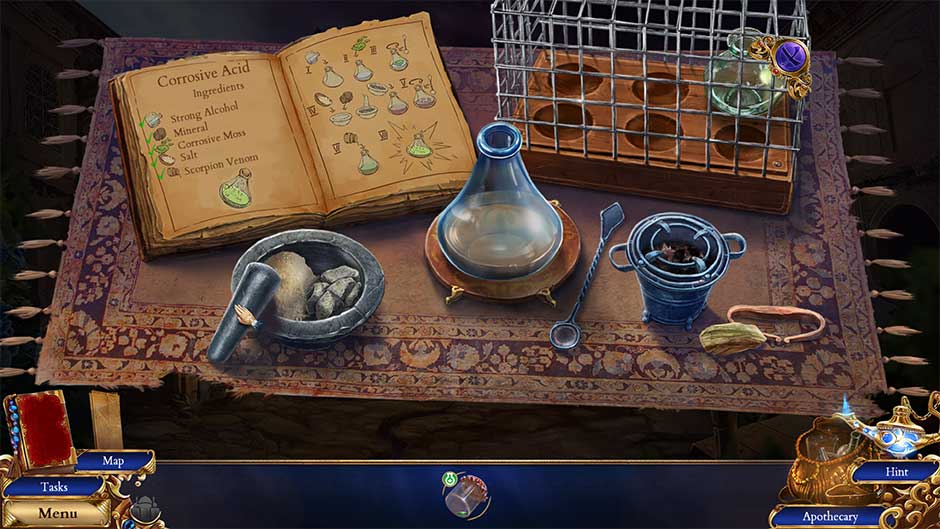
- Read the note lying on the desk, then click on the hidden panel to open it, revealing a locked box. Click on the box to discover a new Apothecary recipe: Corrosive Acid.
- Back in the main room, examine the chest in the rear right corner. Click on the Safety Gloves to add them to your inventory.
- Make your way back to the Dry Well Alley.
Dry Well Alley
- Select the Jar with Elastic Cover in your inventory. Add the Caliper to obtain the Venom Sampler.
- Take a closer look at the nest on the right. Use the Venom Sampler on the scorpion in the nest to acquire the Gossamer Scorpion Venom.
- Head down to the Suburb Market.
Suburb Market
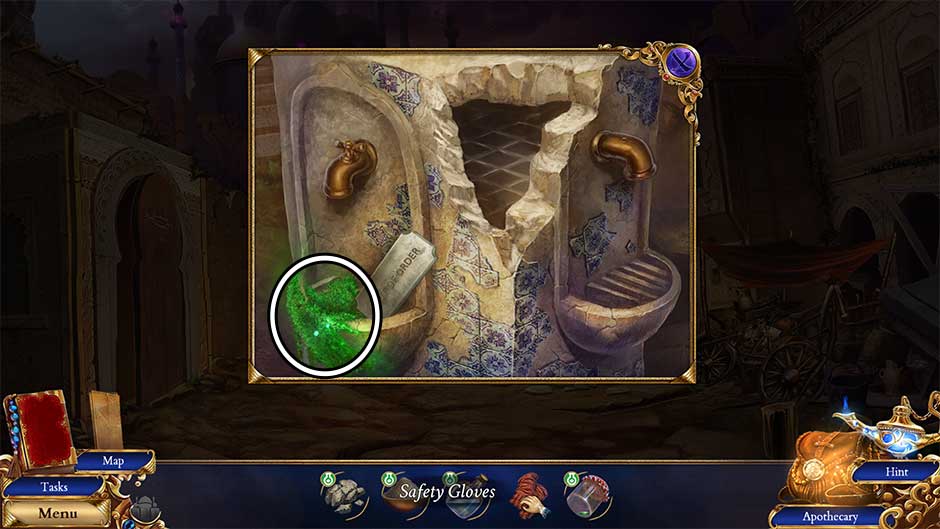
- Examine the broken well again. Use the Safety Gloves to add the Corrosive Moss to your inventory.
- Open the Apothecary.
- Pour the Strong Alcohol into the glass flask.
- Add the Corrosive Moss to the flask.
- Use the spoon lying next to the flask to stir its contents.
- Pour the Salt and the Oxidizing Mineral into the mortar. Use the pestle to crush the contents, then pour the resulting powder into the flask.
- Use the spoon to stir the flask’s contents again.
- Add the Gossamer Scorpion Venom to the flask.
- The mixture is now complete. Click to add the Highly Corrosive Acid to your inventory.
- Enter the Wedding Abode.
Wedding Abode
- Examine the dresser at the back of the room.
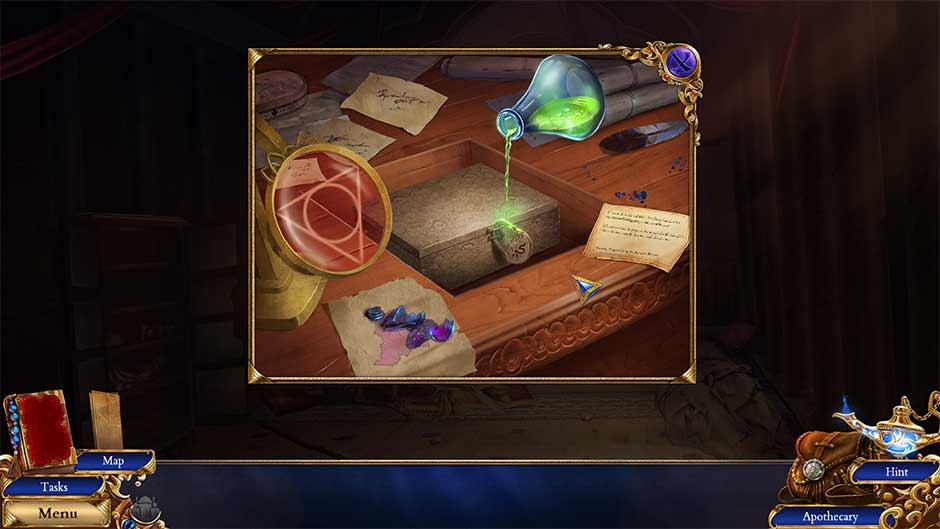
- Use the Highly Corrosive Acid on the lock, then click to open the box. Examine the contents inside to retrieve a note and the Curious Relic.
- Return to the Dry Well Alley.
Dry Well Alley
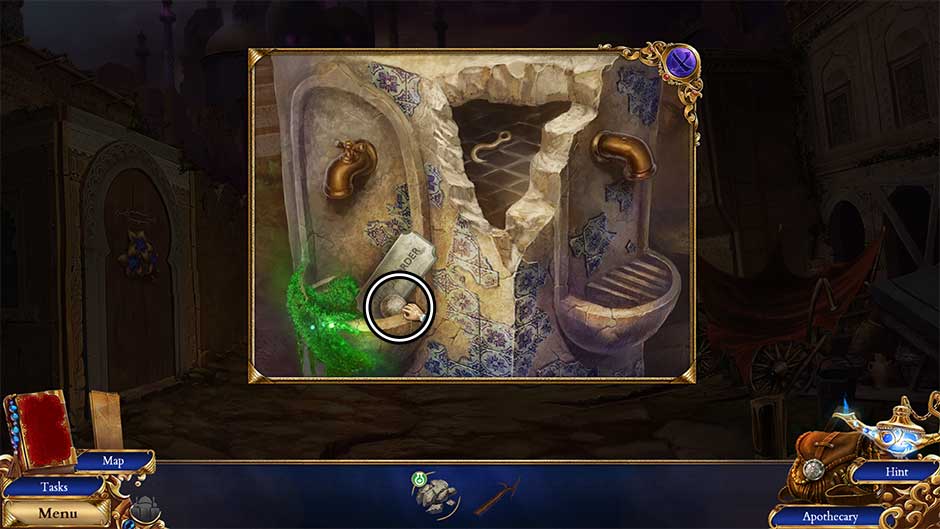
- Take a closer look inside the dried well.
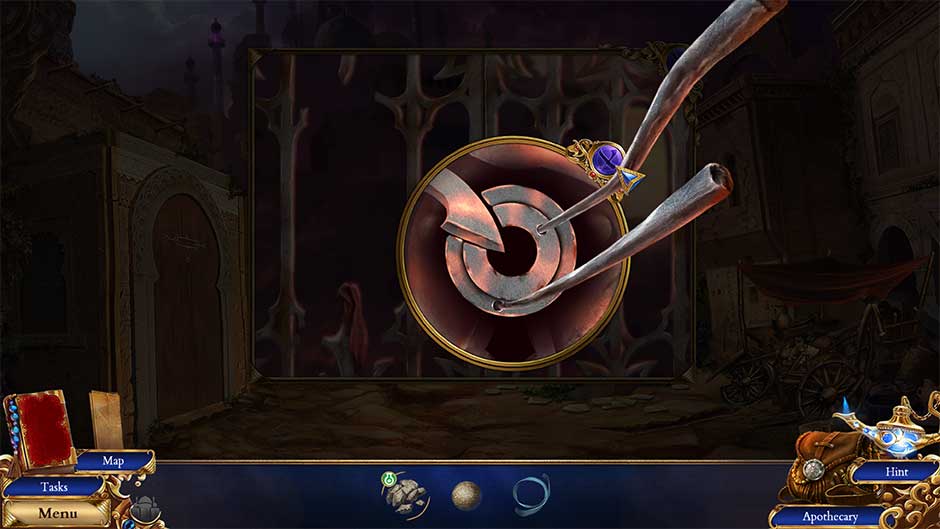
- Insert the Curious Relic into the slot toward the bottom of the well to trigger a puzzle.
- Connect symbols of the same color to create an uninterrupted line. The puzzle solution is shown below.
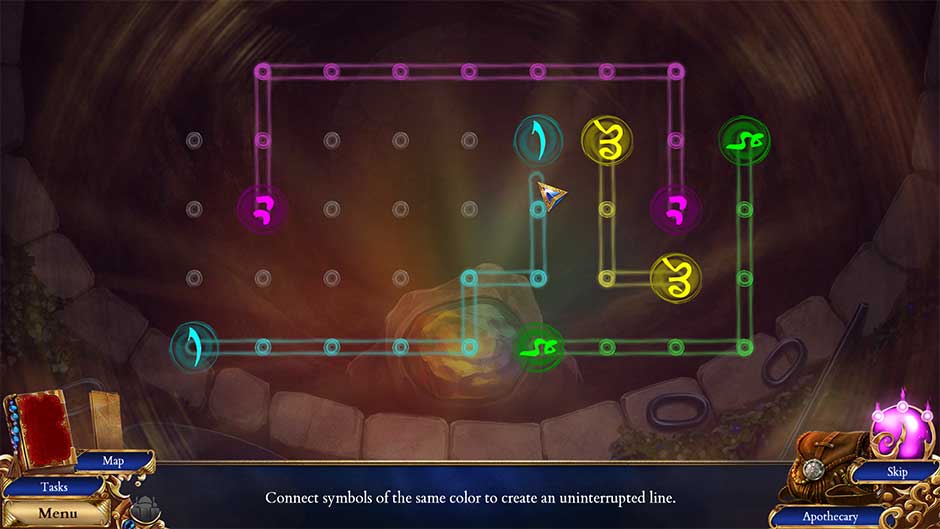
- Once the puzzle is complete, a new passageway will open. Proceed down into the Old Qanat Root.
Old Qanat Root
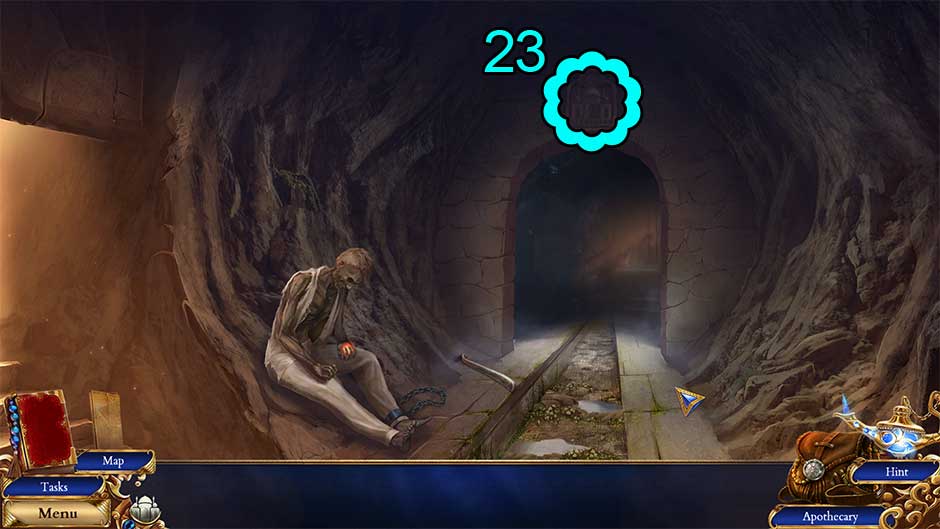
- Click on Palace Marking 23/32 above the archway.
- Pick up the Old Crowbar lying on the floor next to the corpse.
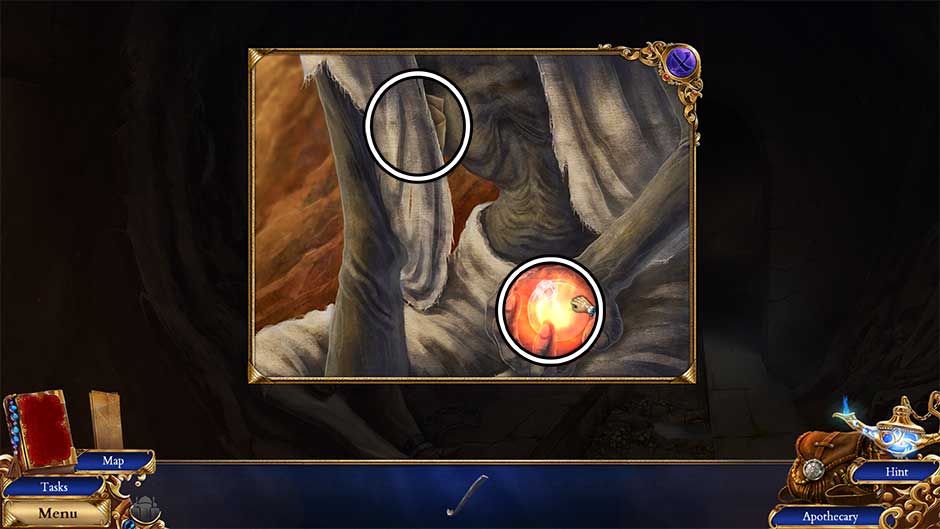
- Examine the corpse.
- Click on the fingers to open the hand and collect the Living Flame.
- Click on the shirt to reveal a pocket beneath. Examine it further to reveal the Cryptic Map.
- Make your way back to the Wedding Abode.
Wedding Abode
- Take a closer look at the chest in the rear right corner.
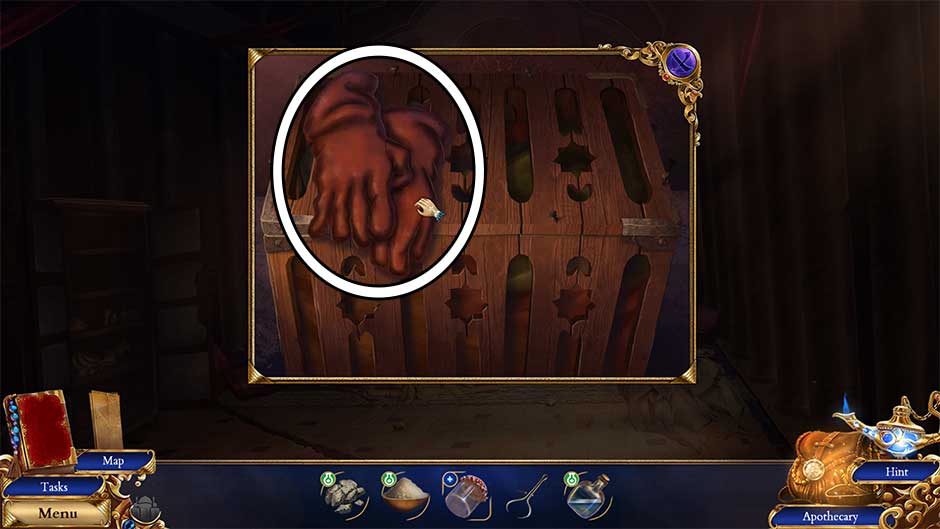
- Use the Old Crowbar to pry open the top of the chest. Pick up the Huge Firecracker
- Examine the dresser at the back of the room.
- Take a closer look at the red lens on the left. Place the Cryptic Map under the lens to decipher it, adding the Palace Escape Route to your inventory.
- Return to the Old Qanat Root.
Old Qanat Root
- Proceed through the archway into the Maze.
Maze
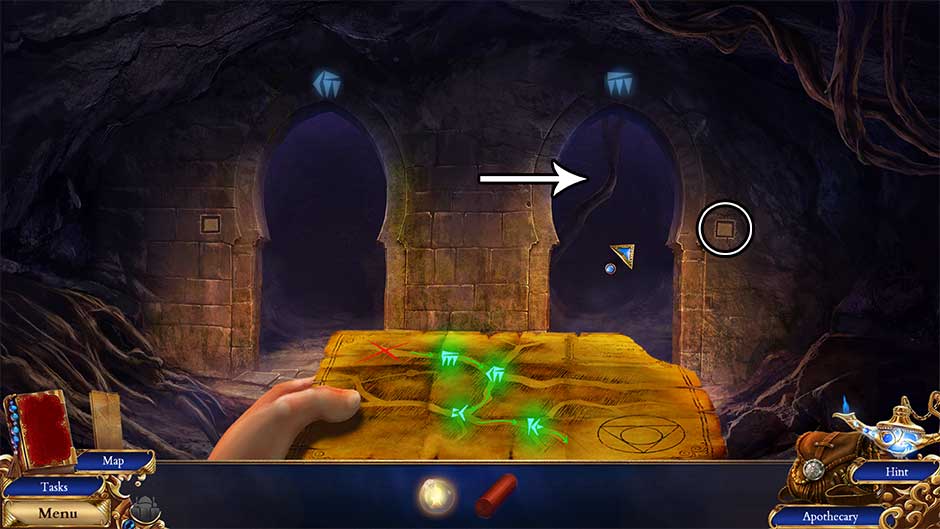
- Click the button next to the doorway, then proceed through the doorway on the right.
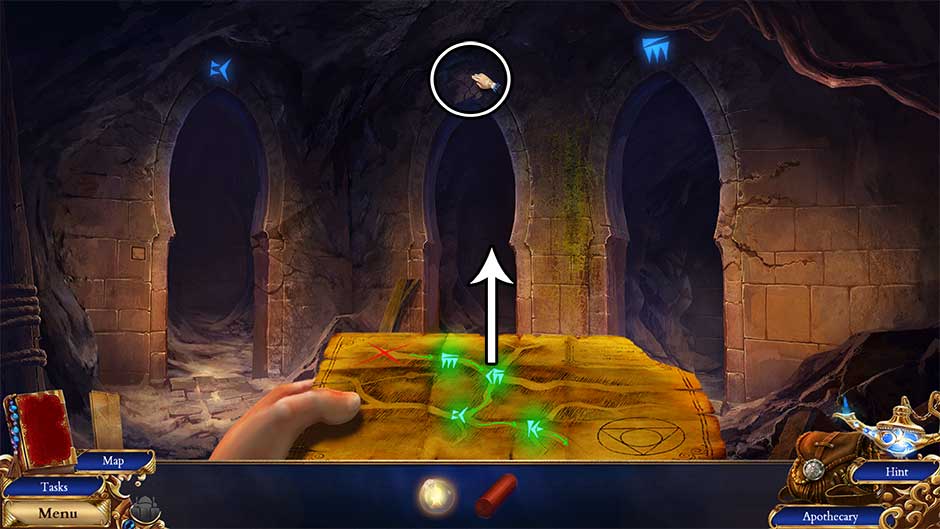
- In the next room, click on the stones obscuring the symbol over the middle doorway, then continue through this door.
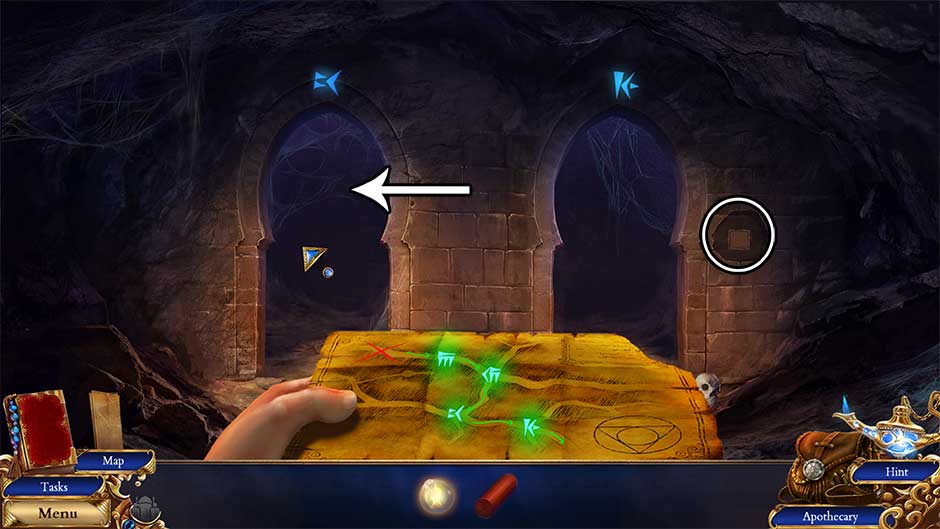
- Remove the skull in the right alcove in the next room, pressing the button to reveal the symbols. Continue through the left doorway.
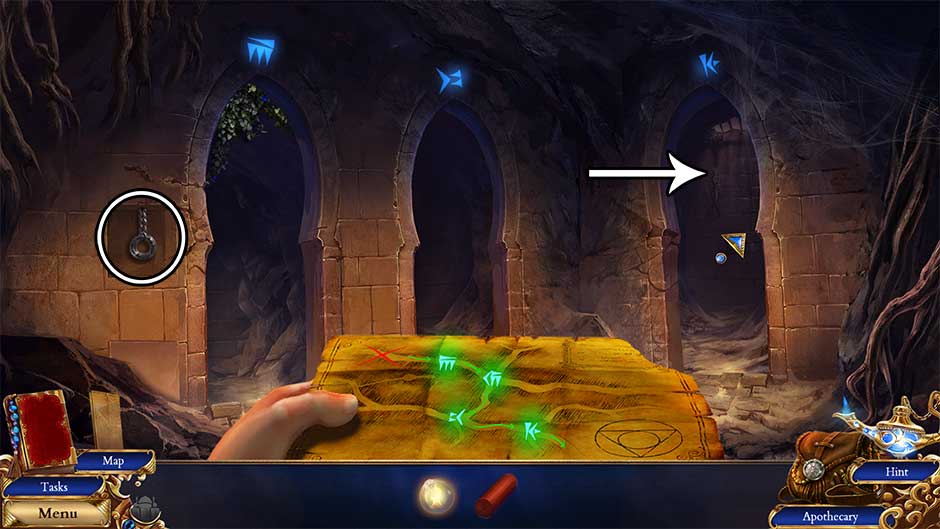
- In the final room, click on the panel on the left wall to reveal a pulling chain. Click on the chain to reveal the symbols, then continue through the rightmost doorway.
Old Qanat End
- Now at the end of the maze, click on Palace Marking 24/32 on the right.
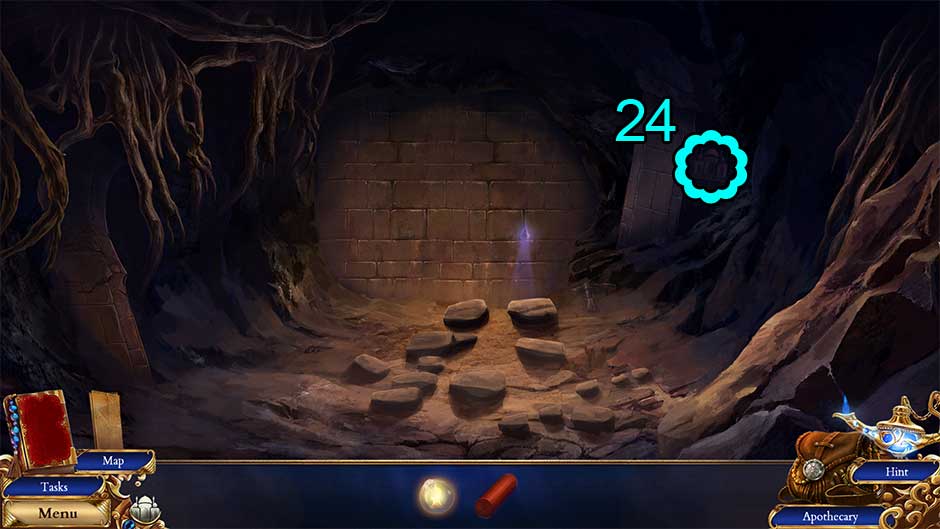
- Take a closer look at the hole in the wall straight ahead. Insert the Huge Firecracker into the hole and use the Living Flame to ignite it.
- The wall blocking your path will be blown away. Continue forward into the palace.
Chapter 6 – The Palace
Palace Prison
- Click on Palace Marking 25/32 on the floor.
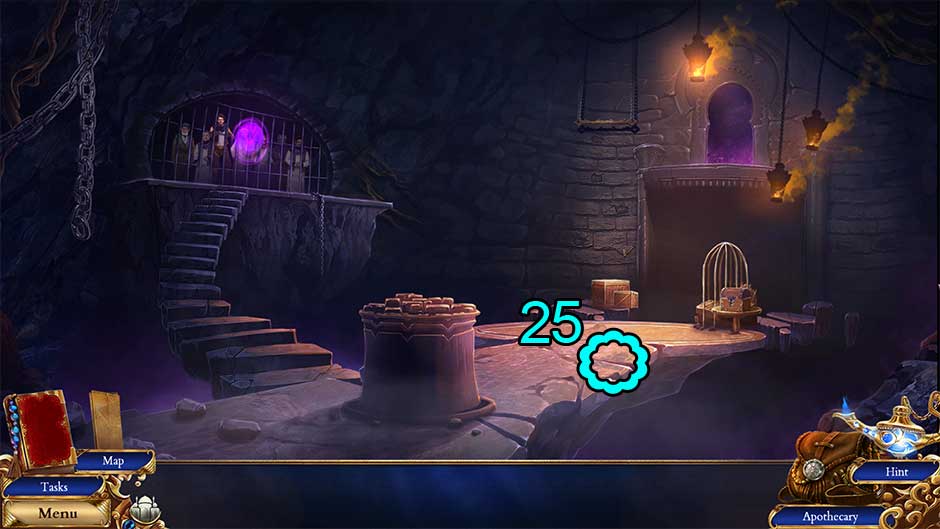
- Take a closer look at the stack of crates at the far end of the room.
- Click on the Stained Key to add it to your inventory.
- Take a closer look at the cage on the right.
- Use the Stained Key to open the locked chest, then collect the Stained Glass Pieces
- Examine the pedestal in the center of the room.
- Click on the Trigger Frame in the lower left corner to add it to your inventory.
- Select the Trigger Frame from your inventory and add the Stained Glass Pieces to trigger a puzzle.
- Assemble the pieces to create the correct shape. The puzzle solution is pictured below. Once the puzzle is complete, the Prison Mechanism Trigger will be added to your inventory.
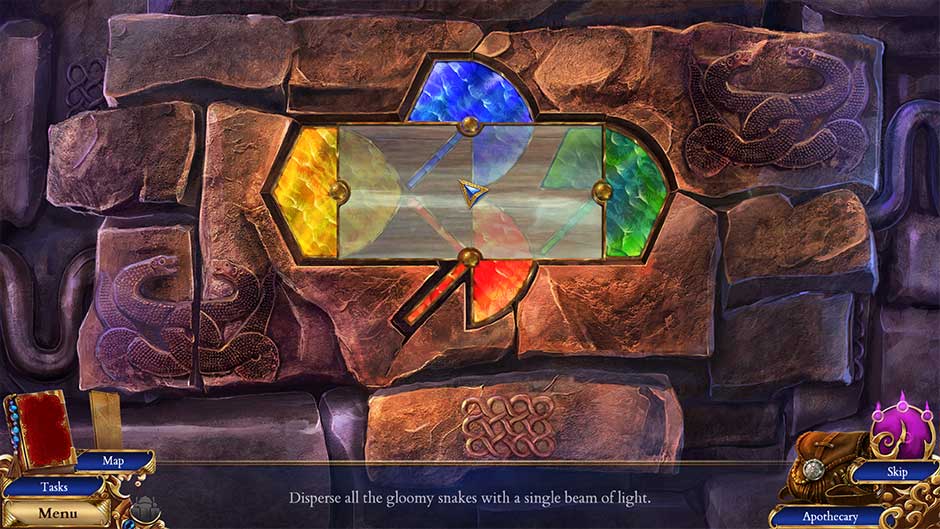
- Place the Prison Mechanism Trigger into the slot in the stone to trigger another puzzle.
- Disperse all the gloomy snakes with a single beam of light. The puzzle solution is shown below.
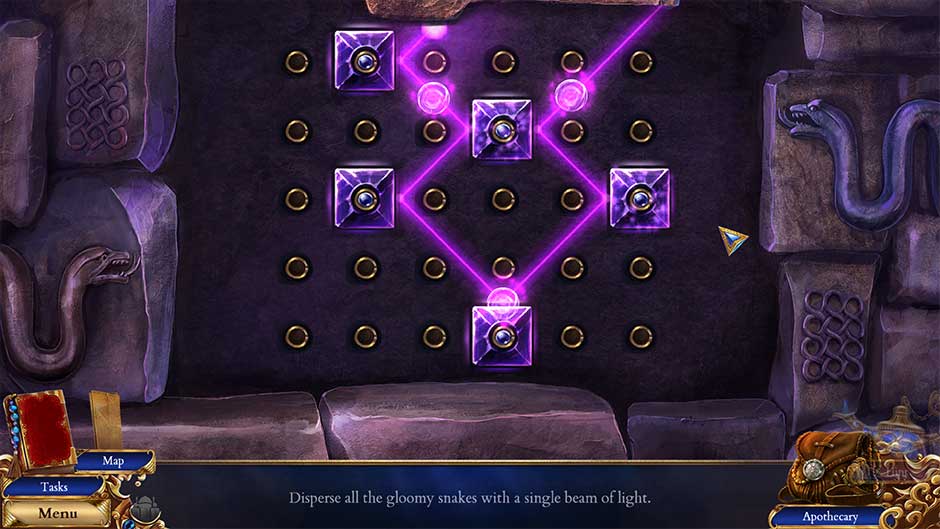
- Once the puzzle is complete, a cutscene will follow. The prisoners have been freed!
- Speak with Darius. Click Leave once finished.
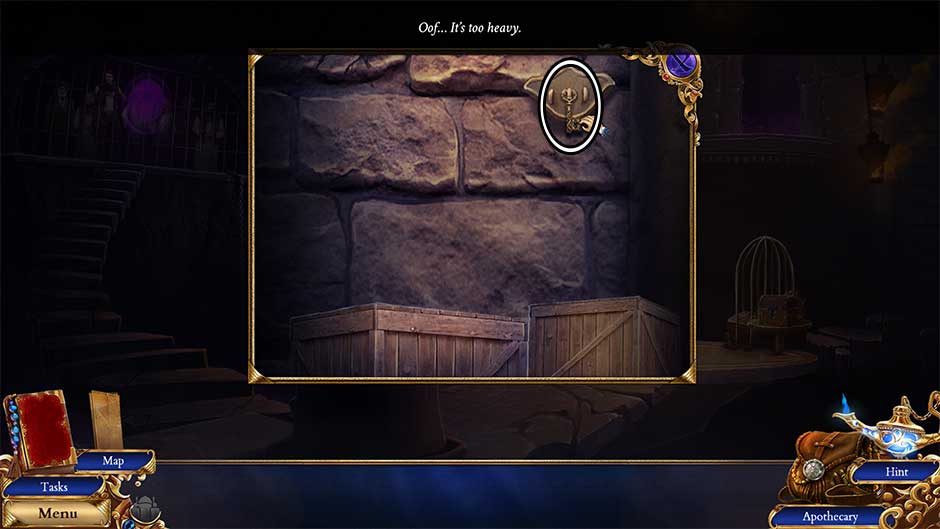
- Take a closer look at the pile of boxes in front of Darius.
- Place the box on the right on top of the leftmost box.
- Click on the holes in the wall, using them as handholds as you proceed upward. Grab the bar at the top.
- With Darius at the top of the platform and the stairs on the right now accessible, head through the doorway on the right into the War Room.
Royal Guard Quarters
- Now in the Royal Guard Quarters, or War Room, click on Palace Marking 26/32 on the left pillar.
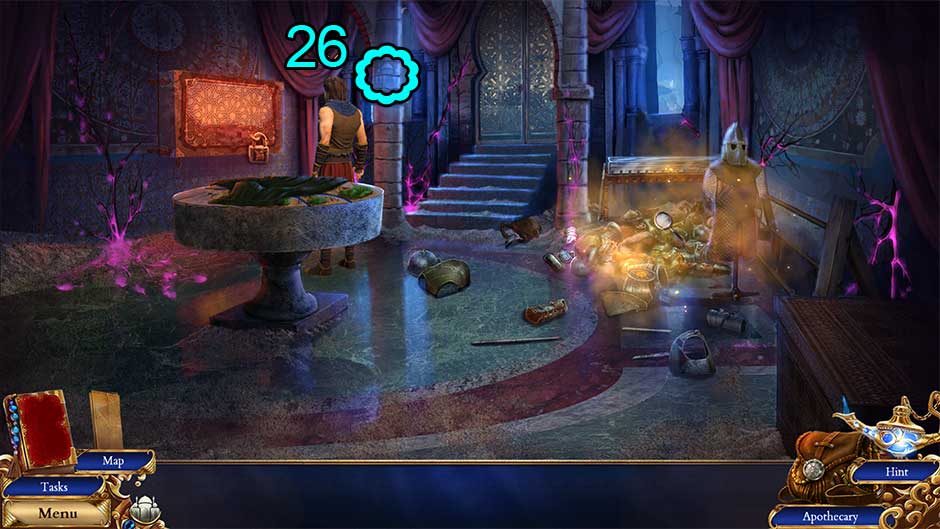
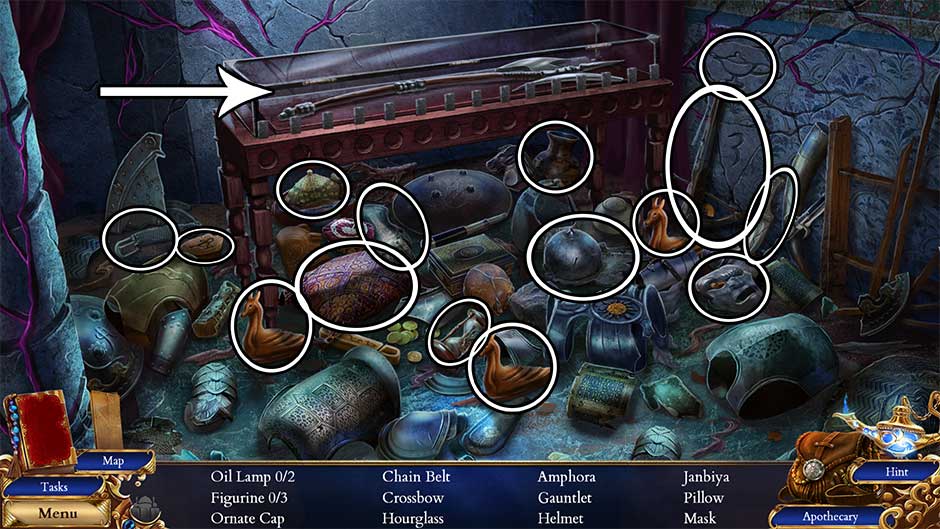
- Click on the hidden object area over the pile of armor on the right.
- Find the items listed at the bottom of the screen. Their locations are shown below. Upon finding all the items, click on the Halberd in the case to add it to your inventory.
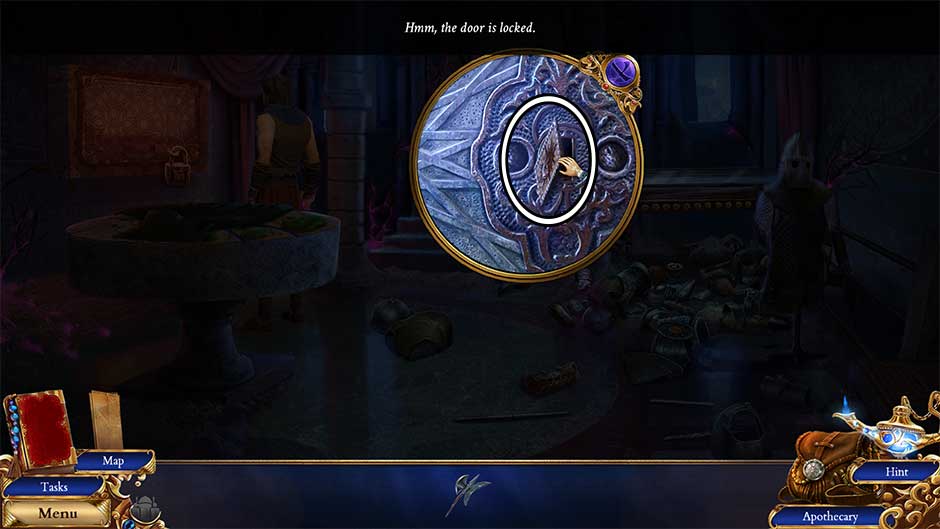
- Speak with Darius. Click Leave once finished.
- Examine the door straight ahead. Click on the Guardsman Pouch Pin wedged into the lock to add it to your inventory.
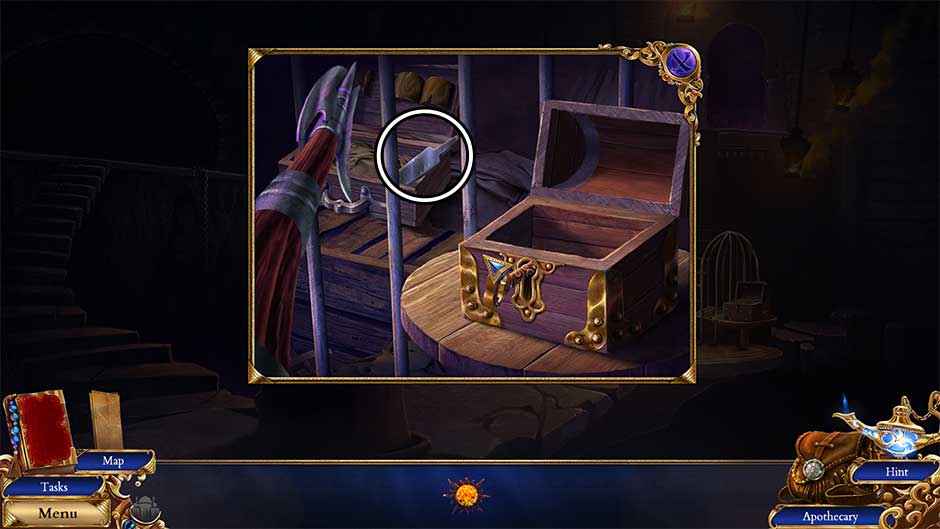
- Take a closer look at the round table on the left.
- Click on the cloak to remove it from the table.
- Click on the Guardsman’s Pouch sitting on the table to add it to your inventory.
- Select the Guardsman’s Pouch in your inventory. Use the Guardsman Pouch Pin on the slot in the front of the pouch to open it. Read the note inside and collect the small box in the right pocket.
- Click on the latches at the front of the box to open it, then click on the silver piece to turn it into the Spare Guardsman Key.
- Take a closer look at the door at the far end of the room again. Use the Spare Guardsman Key on the lock to open the door. Enter the next room.
Palace Foyer
- Zoom in on the tree straight ahead. Click on the Sun Seal to add it to your inventory.
- Backtrack to the Palace Prison.
Palace Prison
- Take a closer look at the cage on the right.
- Use the Halberd to pull the box on the left closer.
- Click on the File to add it to your inventory.
- Return to the Royal Guard Quarters.
Royal Guard Quarters
- Take a closer look at the illuminated box on the left wall.
- Use the File to remove the lock at the bottom of the frame.
- Click to remove the panel once the lock has been removed. Insert the Sun Seal into the slot.
- Click to open the box and collect the Radiant Sword
- Enter the Palace Foyer.
Palace Foyer
- Take a closer look at the tree up ahead.
- Use the Radiant Sword against the corrupted tree branches.
- When the purple crystal is revealed, use the Radiant Sword to smash it.

- With the corrupted tree gone, you can now access the full room.
- Click on Palace Marking 27/32 toward the upper left.

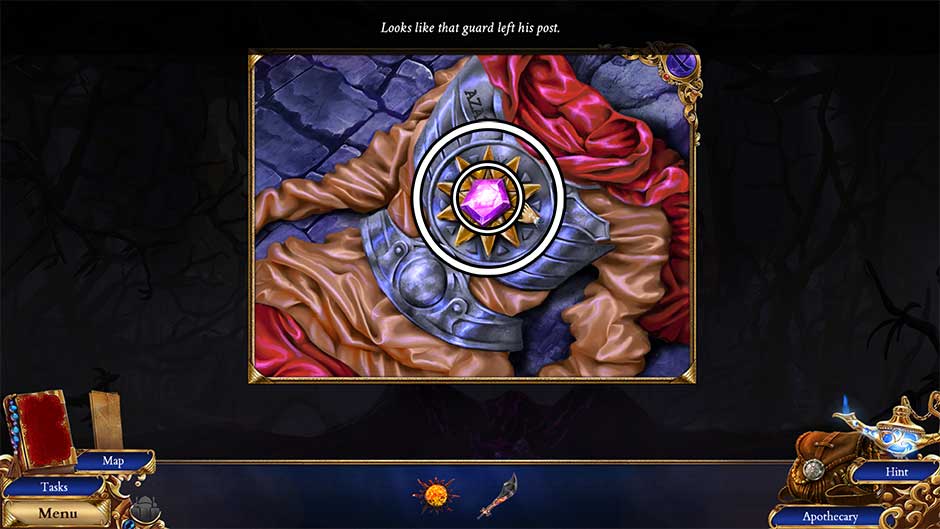
- Examine the door up ahead. Click on the Seal Wrench to add it to your inventory.
- Zoom in on the armor lying on the left side of the steps, just below Darius.
- Click on the Gloomy Jewel to add it to your inventory.
- Use the Seal Wrench to remove the Star Seal, then click on it to add it to your inventory as well.
- Examine the door up ahead again.
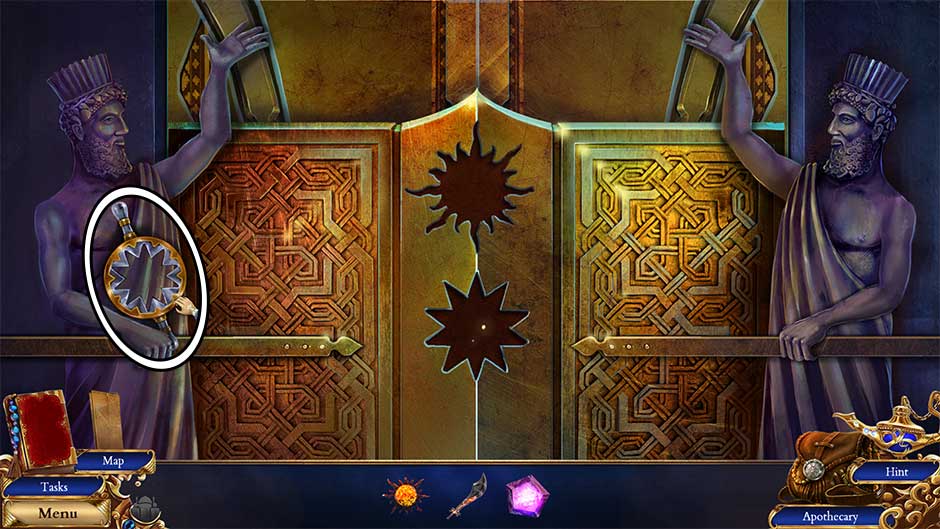
- Place the Star Seal and the Sun Seal into their respective slots in the door. This will trigger a puzzle.
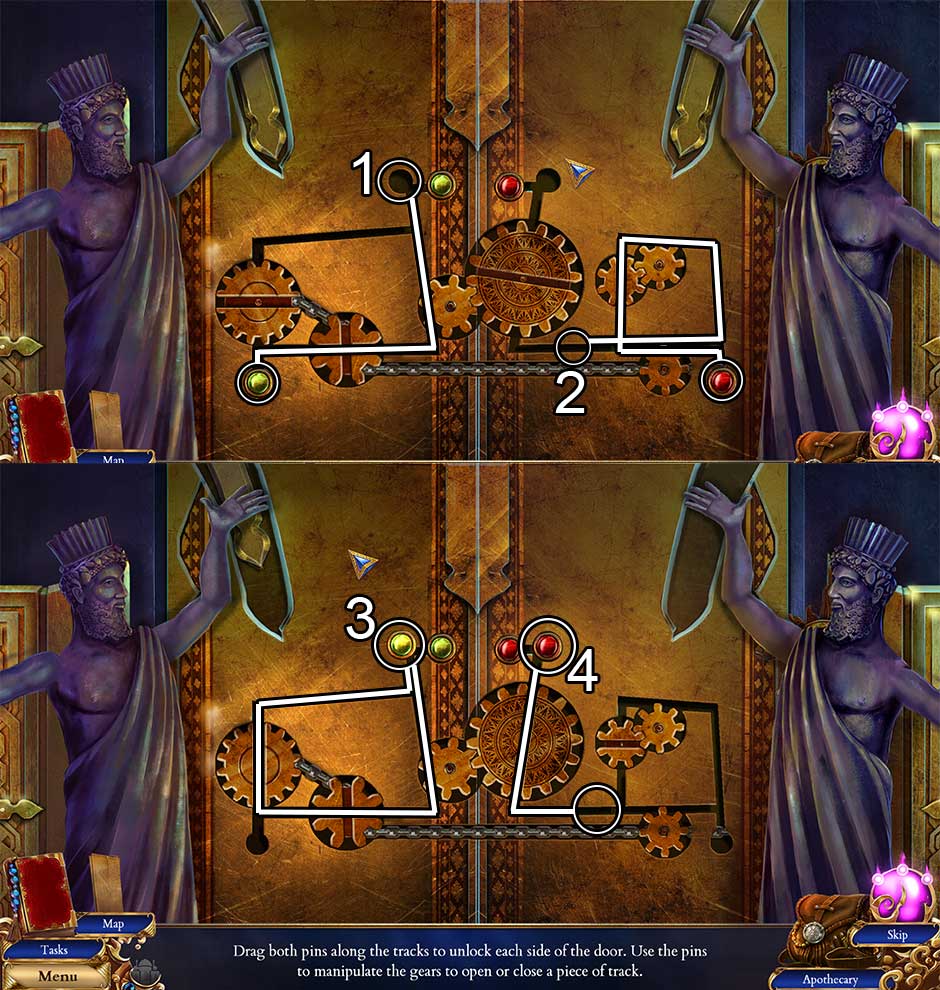
- Drag both pins along the tracks to unlock each side of the door. Use the pins to manipulate the gears to open or close a piece of track. Refer to the screenshot below and follow the steps listed to complete the puzzle:
- Move the yellow pin through the path shown until it comes to rest in the upper slot.
- Move the red pin 1 circuit around the path shown, leaving it in the circled location.
- Move the yellow pin 1 full circuit as shown in the image below, until it comes to rest in the slot again.
- Move the red pin the rest of the way up to its respective slot, finishing the puzzle. Solving the puzzle will give you access to the next room.
Throne Room
- A cutscene will occur. Afterward, you will have full access to the room.
- Click on Palace Marking 28/32 above the right lion.
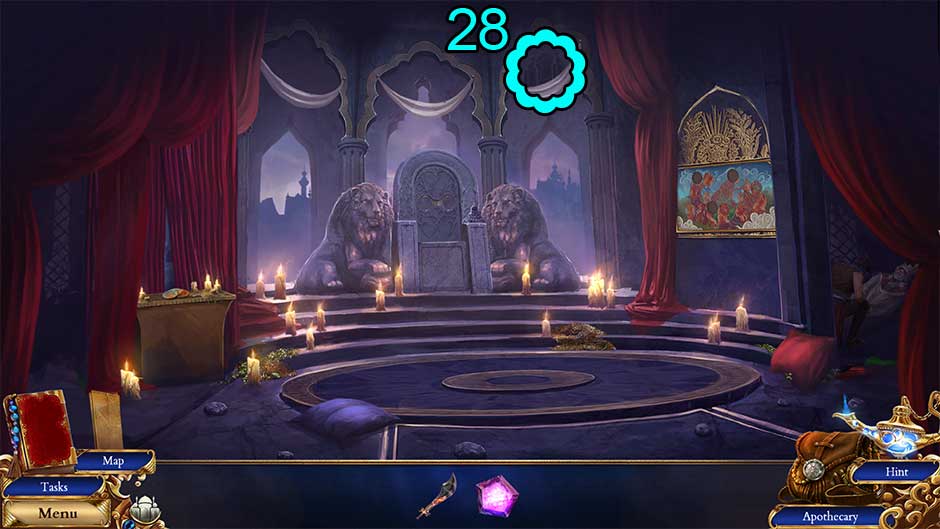
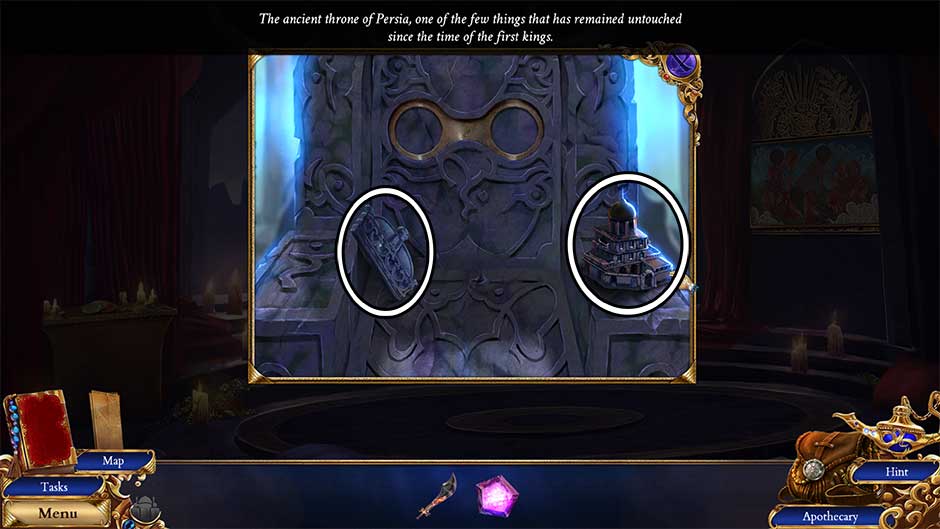
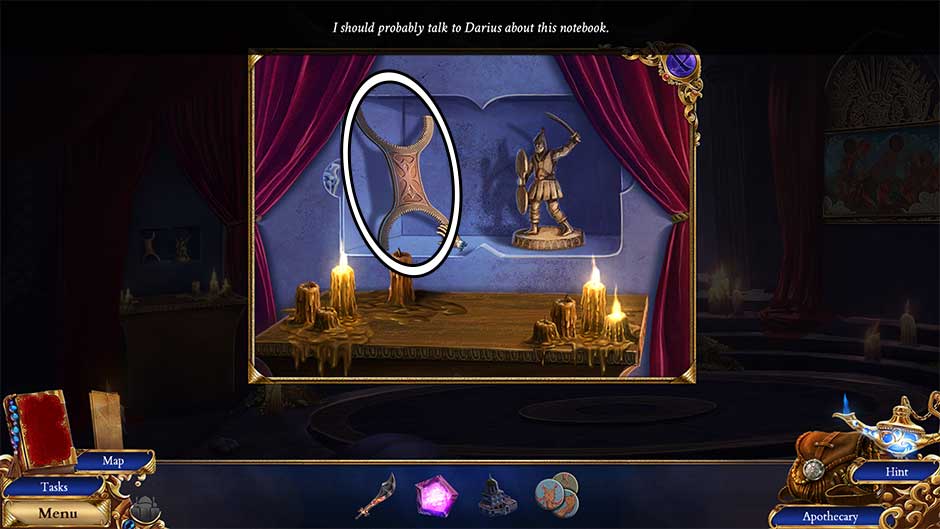
- Take a closer look at the throne. Pick up the Palace Figurine and the Royal Family Emblem.
- Examine the pedestal on the left.
- Pick up the Mosaic Pieces lying on top of the table.
- Click on the red curtains to reveal an alcove in the wall. Insert the Royal Family Emblem.
- A hidden compartment will be revealed. Examine the figure and read through the journal. Afterward, collect the Old Matrix.
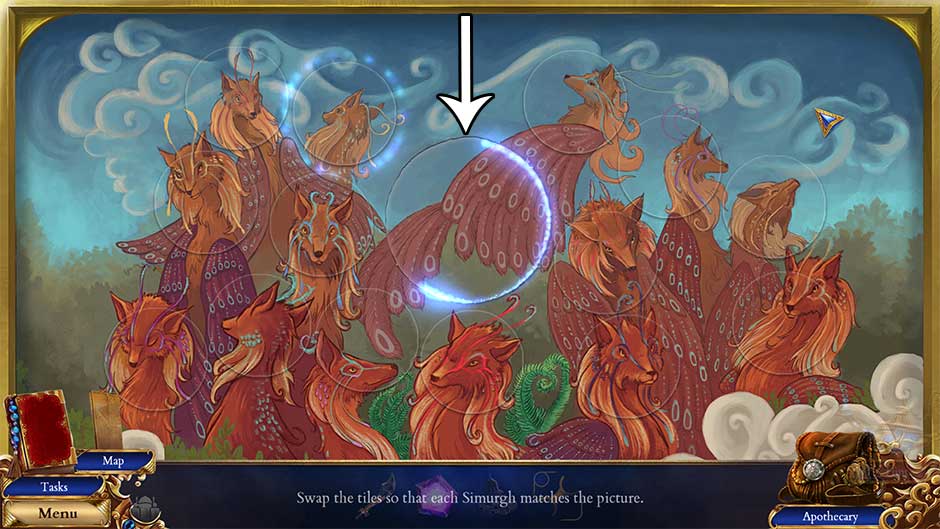
- Examine the mosaic on the right wall.
- Insert the Mosaic Pieces into the slots to trigger a puzzle.
- Swap the tiles so that each Simurgh matches the picture. The puzzle solution is shown below. Upon completing the puzzle, collect the Old Simurgh Token.
- Make your way back to the Royal Guard Quarters.
Royal Guard Quarters
- Take a closer look at the round table.
- Place the Palace Figurine into the slot in the center of the table to trigger a puzzle.
- Push down the emerging Genie towers in the correct order by clicking on them. The correct order is shown below. Once the puzzle is finished, collect the Old Genie Badge that is revealed.
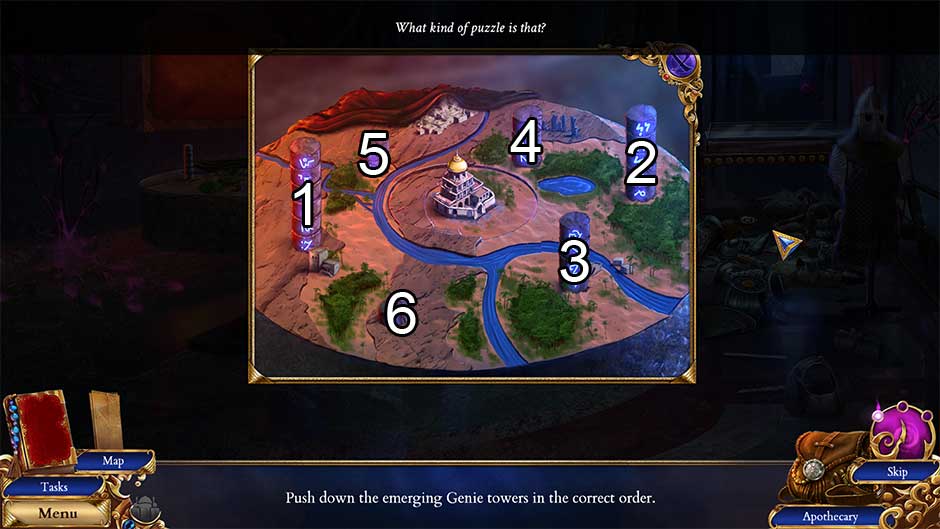
- Select the Old Matrix in your inventory. Insert the Old Simurgh Token and the Old Genie Badge to acquire the completed Elder Passage Unlocker.
- Return to the Throne Room.
Throne Room
- Take a closer look at the throne again. Insert the Elder Passage Unlocker into the slot in the back of the throne. Once the handprint appears, click on it to reveal a hidden passage.
- Enter the Elevator.
Crashed Elevator
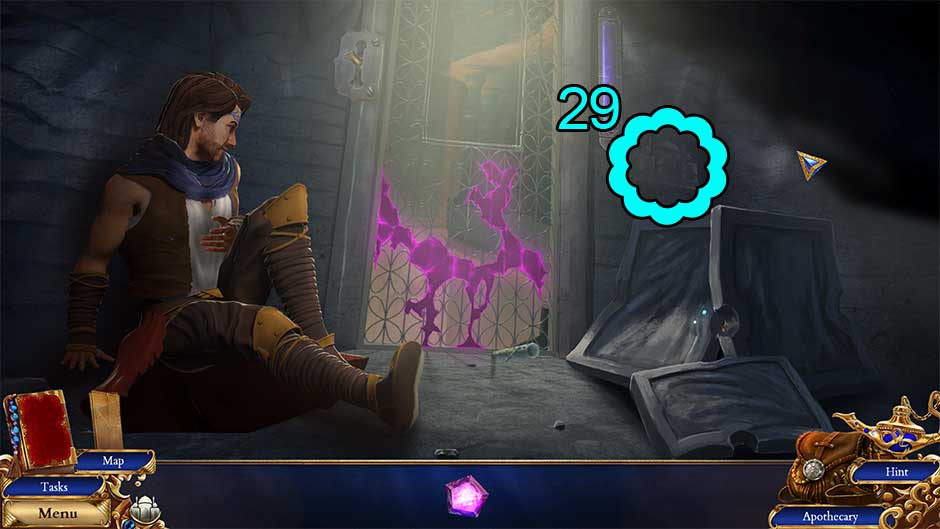
- Click on Palace Marking 29/32 on the right.
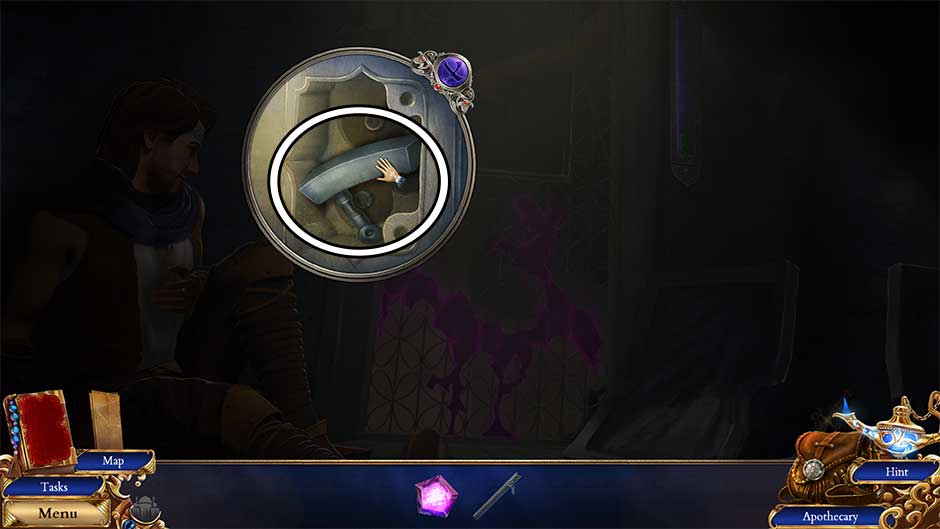
- Examine the grating ahead. Pick up the Steel Baton lying on the floor.
- Take a closer look at the panels on the right.
- Use the Steel Baton to pry the panels apart.
- Click on the Old Coin to add it to your inventory.
- Zoom in on the elevator lock on the left side of the door grate.
- Use the Old Coin to remove the screws from the panel.
- Remove the debris inside the lock, then click on the Arched Piston to add it to your inventory.
- Select the Arched Piston in your inventory. Add the Steel Baton to acquire the Makeshift Lever.
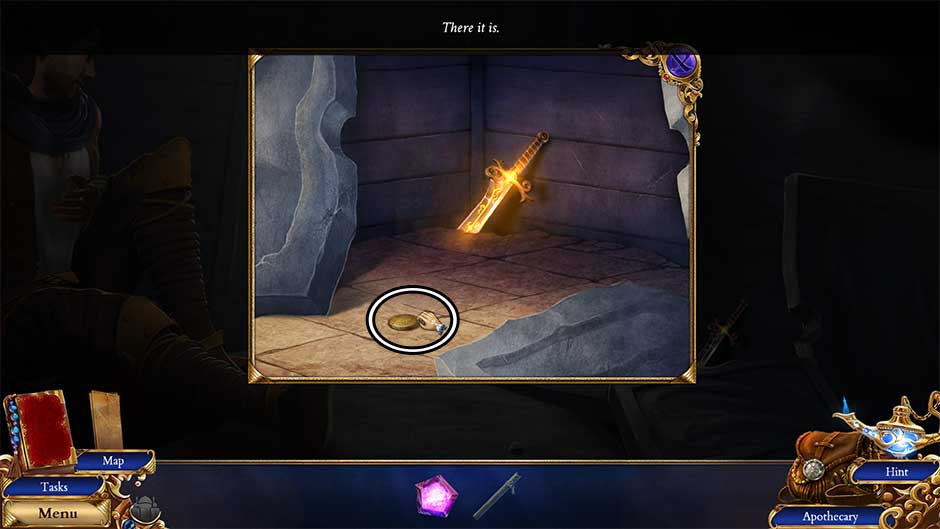
- Examine the panels on the right again.
- Use the Makeshift Lever to retrieve the Radiant Sword and add it to your inventory.
- Zoom in on the door grate straight ahead.
- Use the Radiant Sword to remove the corruption.
- Use the Makeshift Lever to pry the grating open, providing a way out.
Elder Passage
- Click on Palace Marking 30/32 at the top of the cavern.
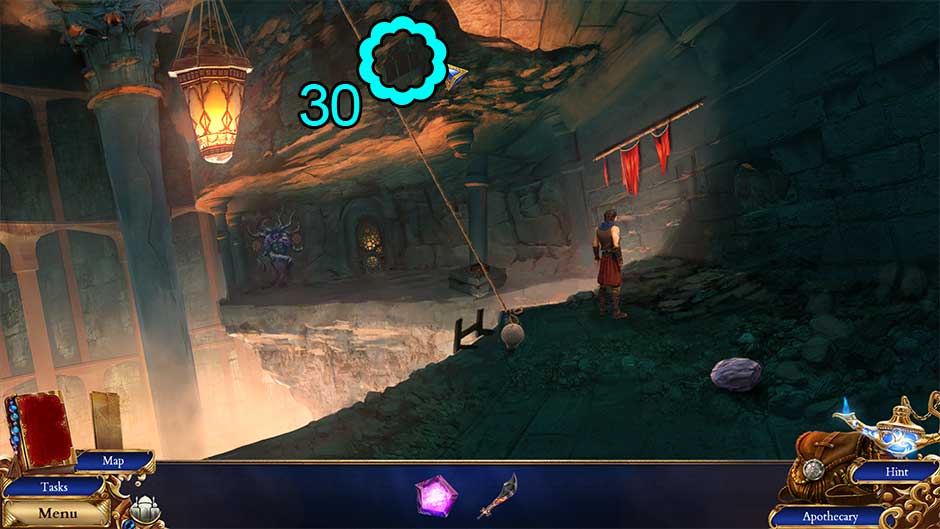
- Pick up the Heavy Rock on the bottom right to add it to your inventory.
- Take a closer look at the base of the tied rope.
- Click on the ladder to bring it up from the cliff. Collect the Nails 4/4.
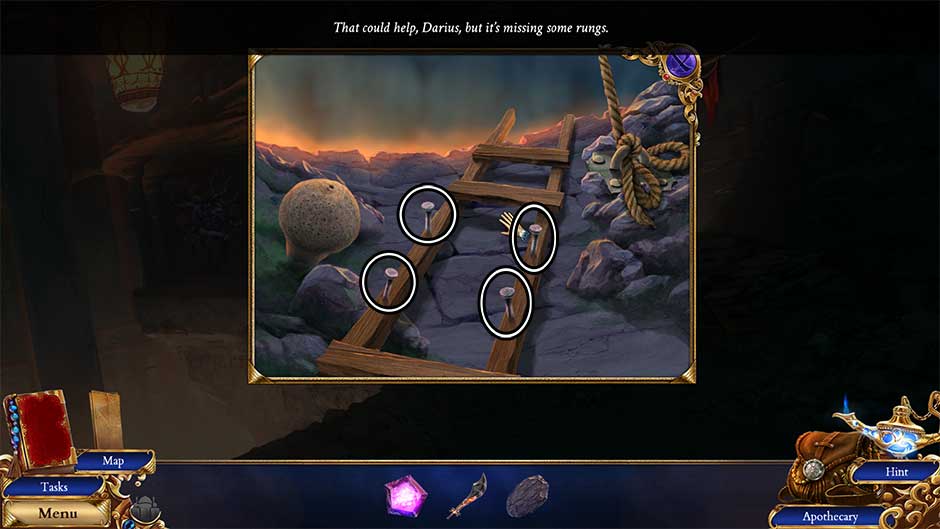
- Examine the portion of wall below the hanging red banners.
- Remove the Ladder Rungs embedded in the wall.
- Zoom in on the base of the tied rope again.
- Place the Ladder Rungs on the ladder frame, followed by the Nails 4/4. Use the Heavy Rock to secure them, then click to add the Old Ladder to your inventory.
- Examine the portion of wall belong the hanging red banners again.
- Place the Old Ladder up against the wall.
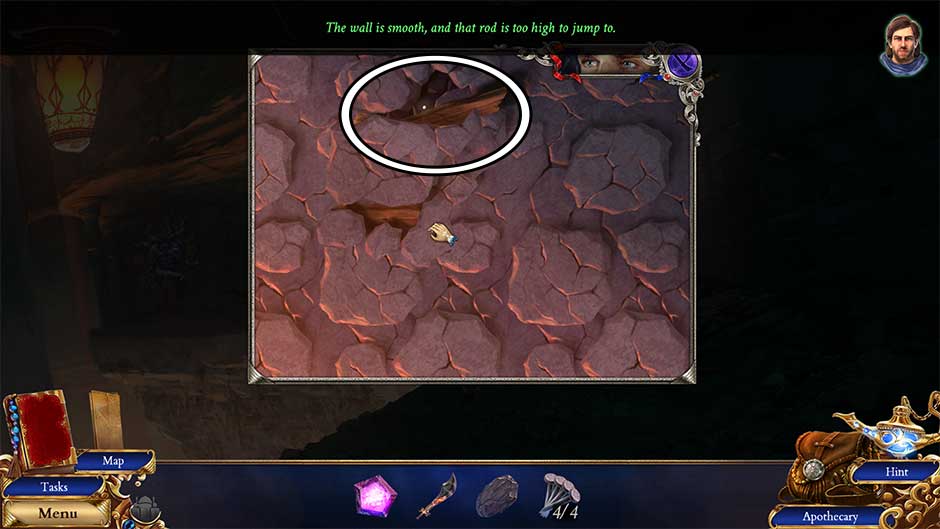
- Head up and over to the left, making your way across the rod. Once it falls, head toward the upper left until you reach safety.
- Take a closer look at the pedestal to the right of Darius in the distance.
- Click on the Elevator Chain to add it to your inventory.
- Examine the ominous purple statue on the far end of the room.
- Click on the right hand to add the Claw to your inventory.
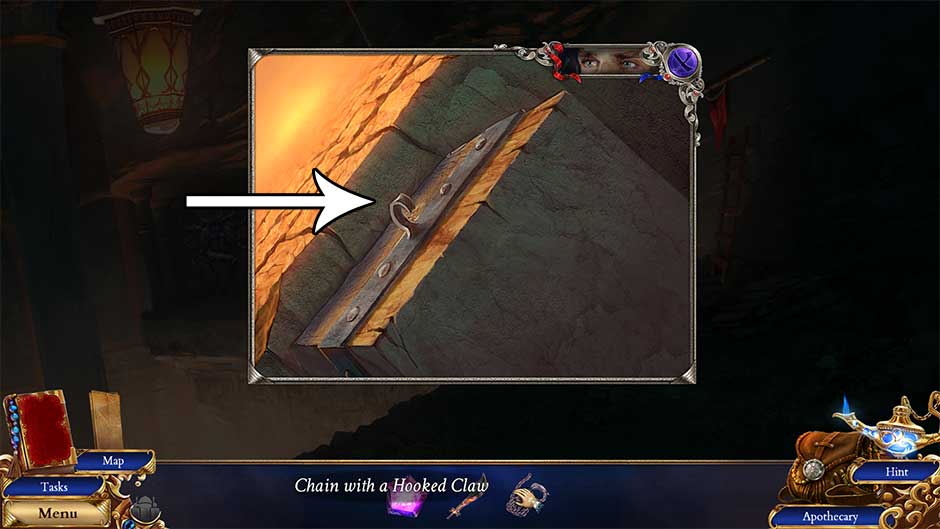
- Select the Elevator Chain in your inventory. Attach the Claw to the chain to acquire the Chain with a Hooked Claw.
- Take a closer look at the pedestal to the right of Darius again.
- Hang the Chain with a Hooked Claw from the hook on the edge of the block.
- Examine the base of the tied rope again.
- Click on the rope to untie it, freeing the chandelier.
- A path has been created to the other side! Examine the ominous purple statue Darius is now standing next to in the distance.
- Click on the opposite panel from Darius to open a secret passage.
- Enter the Secret Room.
Zaved’s Hideout
- Speak with Darius. Click Leave once finished.
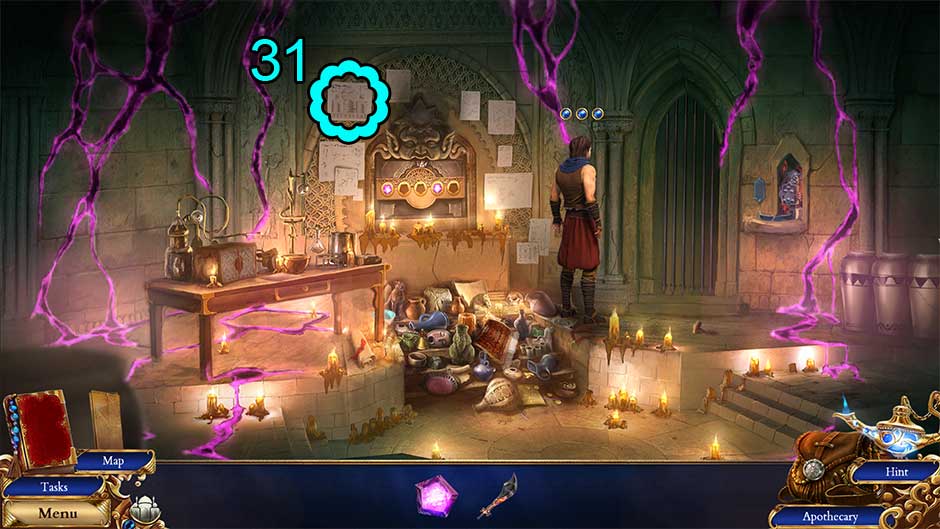
- Click on Palace Marking 31/32 on the paper on the upper left.
- Examine the alcove in the right wall.
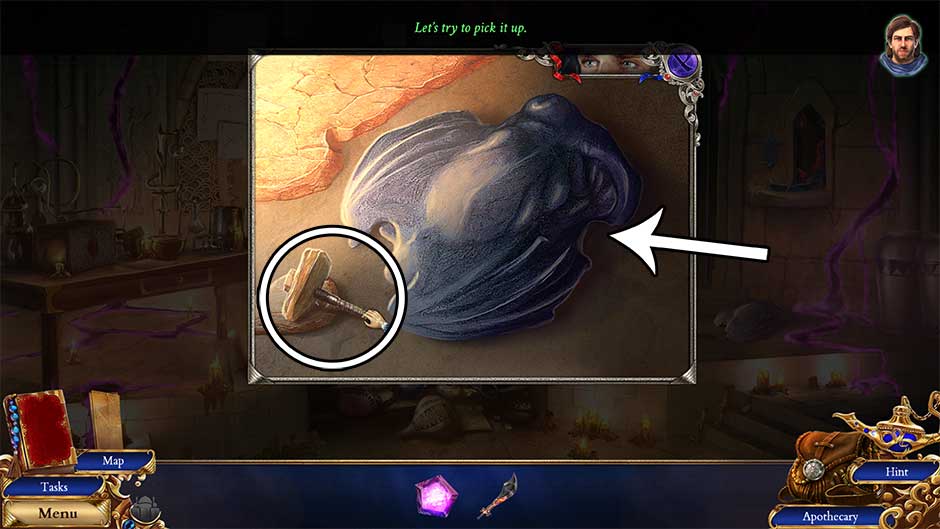
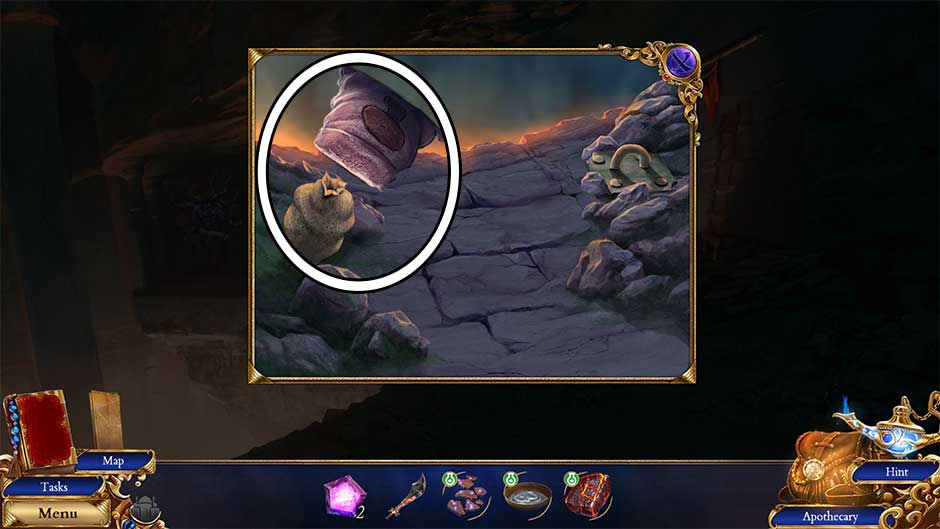
- Click on the lever. The statue will fall from the alcove.
- Take a closer look at the freshly-fallen statue on the floor.
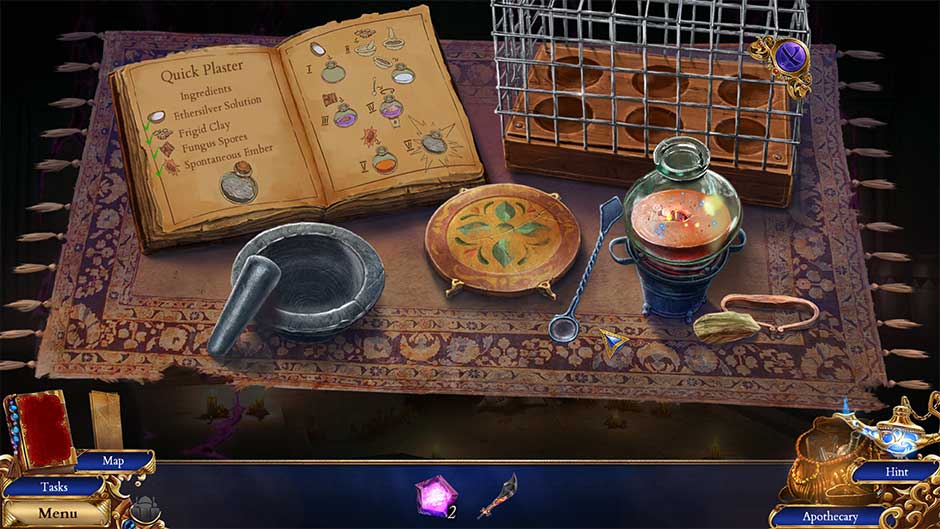
- Click on the statue to remove it, revealing an indentation in the floor. The recipe Quick Plaster will be added to your Apothecary.
- Collect the Handle with a Screw.
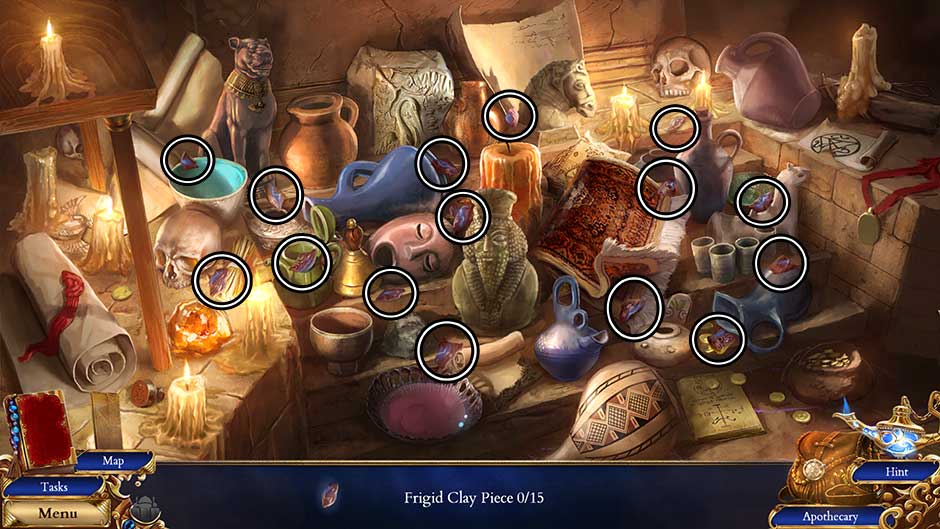
- A hidden object area will appear in the middle of the room.
- Find all the items listed at the bottom of the screen. Their locations are shown below. Upon completing the area, the Frigid Clay will be added to your inventory.
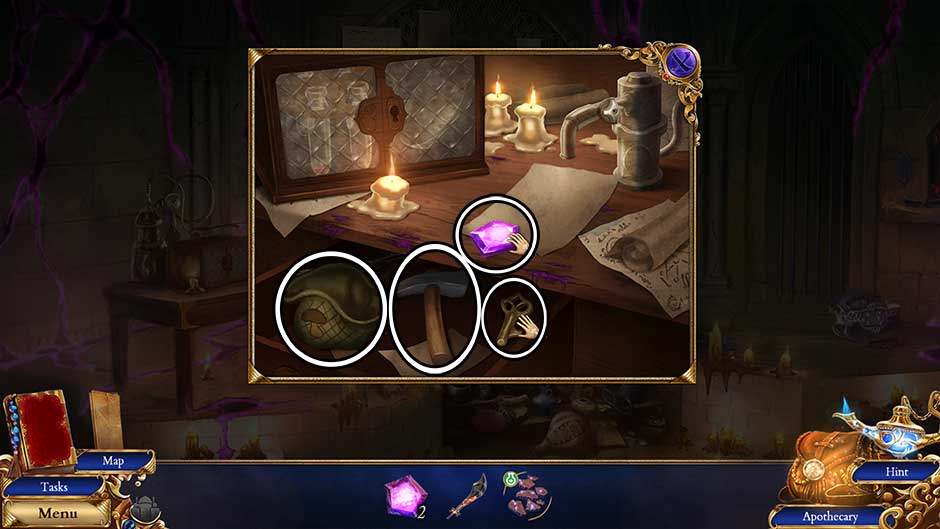
- Take a closer look at the table on the left.
- Click on the Gloomy Jewel (2) to add it to your inventory.
- Use the Handle with a Screw in the hole in the drawer to open it, then collect the Chemical Cabinet Key, the Rock Pick, and the Spore Pouch
- Read the note lying on the table.
- Use the Chemical Cabinet Key on the cupboard in the upper left corner to open it, then collect the Tin Bowl. Click on the vial stand to rotate it until you find the Vial of Condensed Ethersilver, then add that to your inventory as well.
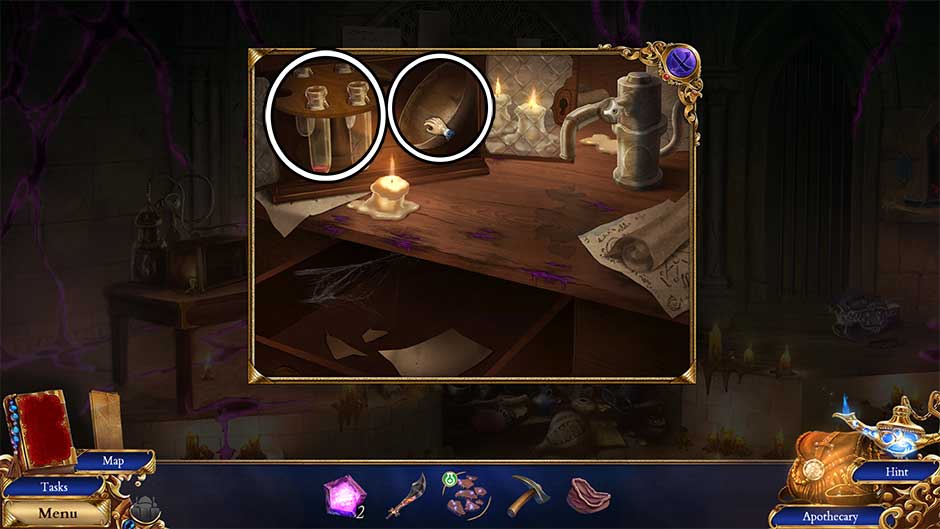
- Place the Tin Bowl on the table below the faucet. Click on the faucet dial to fill it with water.
- Pour the Vial of Condensed Ethersilver into the bowl of water to acquire the Ethersilver Solution.
- Examine the alcove in the right wall again.
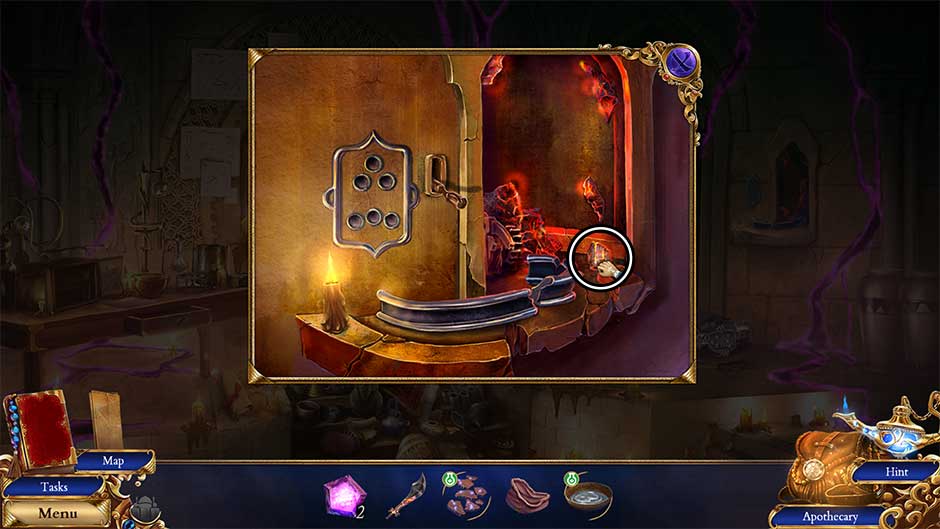
- Use the Rock Pick on the glowing embers to chip a piece away. Pick up the resulting Spontaneous Ember.
- Go back to the Elder Passage.
Elder Passage
- Examine the mushroom on the ground where the rope was previously tied down.
- Use the Spore Pouch on the fungus to acquire the Diluted Fungus Spores.
- Return to Zaved’s Hideout.
Zaved’s Hideout
- Open the Apothecary.
- Pour the Ethersilver Solution into the glass flask.
- Add the Frigid Clay to the mortar. Use the pestle to crush it to powder, then pour it into the flask.
- Add the Diluted Fungus Spores to the flask.
- Light the burner. Place the flask on the burner and stir the contents with the spoon.
- Drop the Spontaneous Ember into the flask.
- Click on the resulting Quick Plaster to add it to your inventory.
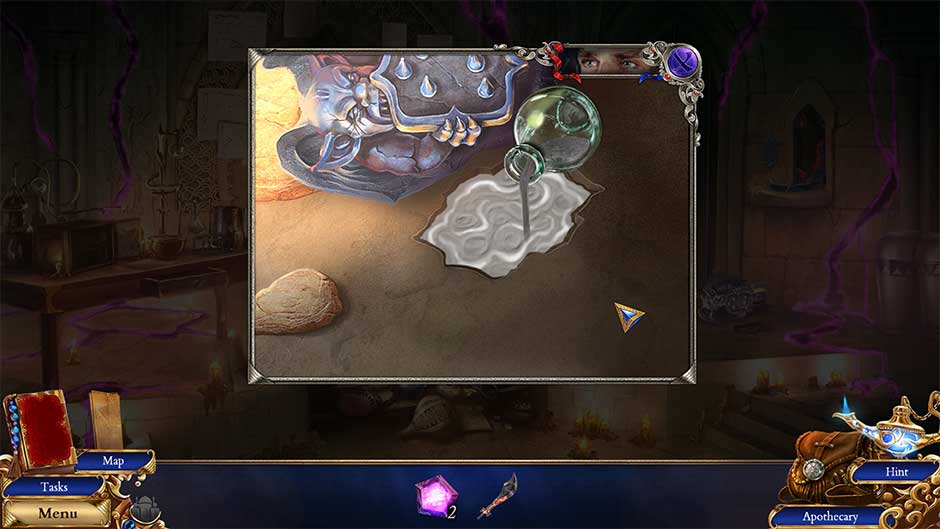
- Take a closer look at the toppled statue on the floor on the right.
- Pour the Quick Plaster into the indentation in the floor.
- Click on the Copy Key that forms to add it to your inventory.
- Zoom in on the alcove on the right wall again.
- Use the Copy Key on the oddly-shaped keyhole.
- A new door will open. Enter through to the next area.
Tainted Sepulcher
- Click on Palace Marking 32/32 under the stairs on the left.
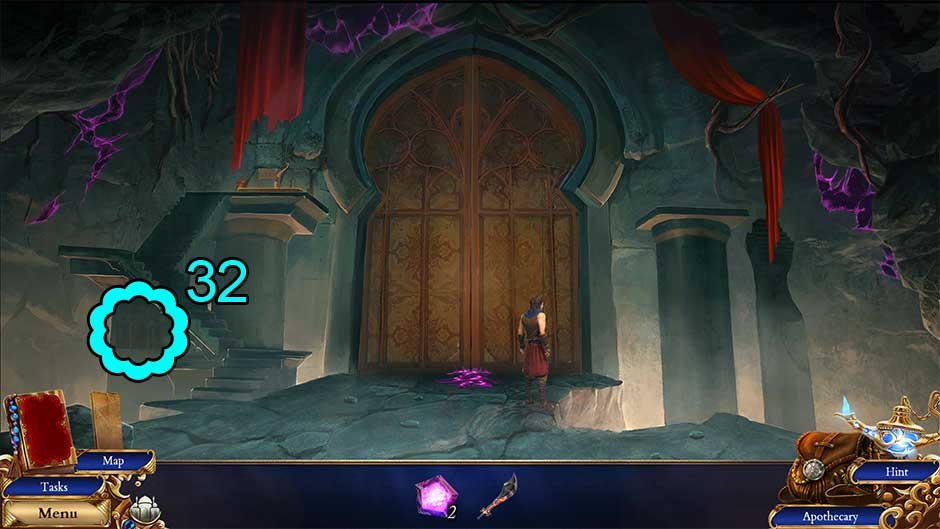
- Examine the pool of corruption in front of the large door.
- Use the Radiant Sword on the crystalized corruption. Click on the resulting Gloomy Jewel (3) to add it to your inventory.
- Return to Zaved’s Hideout.
Zaved’s Hideout
- Take a closer look at the altar-like alcove in the wall straight ahead.
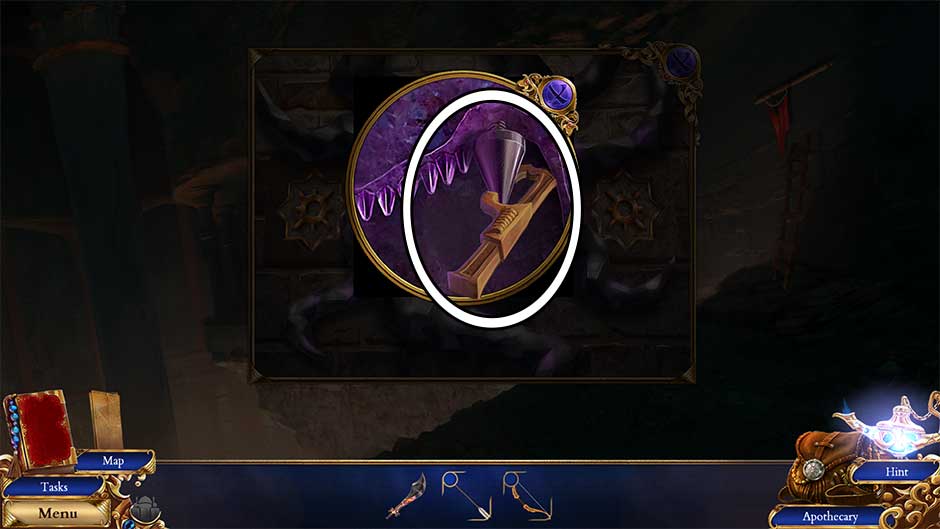
- Place the Gloomy Jewels (x3) into the empty slots. This will trigger a puzzle.
- Use the side buttons to rotate the dial and activate all the grey pieces of the image. The puzzle solution is shown below.
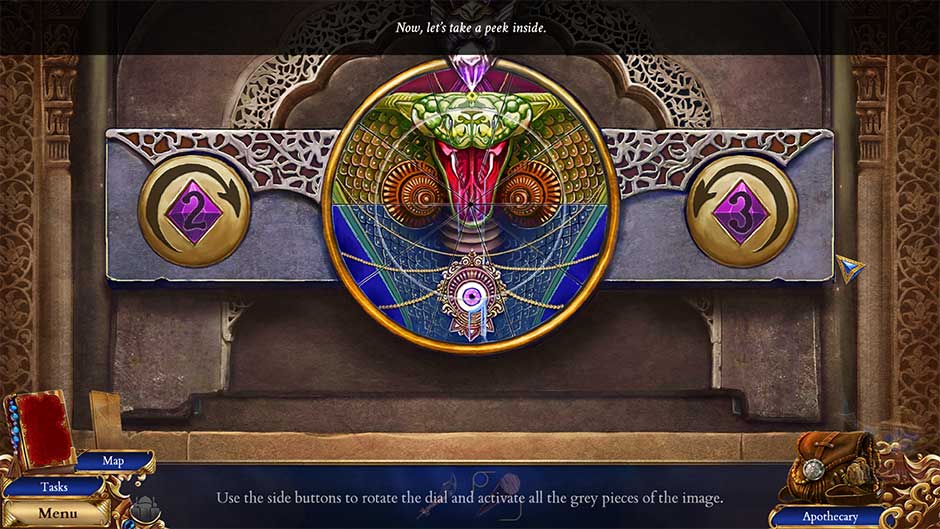
- Once the puzzle is completed, a hidden compartment will be revealed.
- Click on the Luthier Pliers to add them to your inventory. Use the Luthier Pliers on the peg at the bottom of the lute string to loosen it and collect the Thick String.
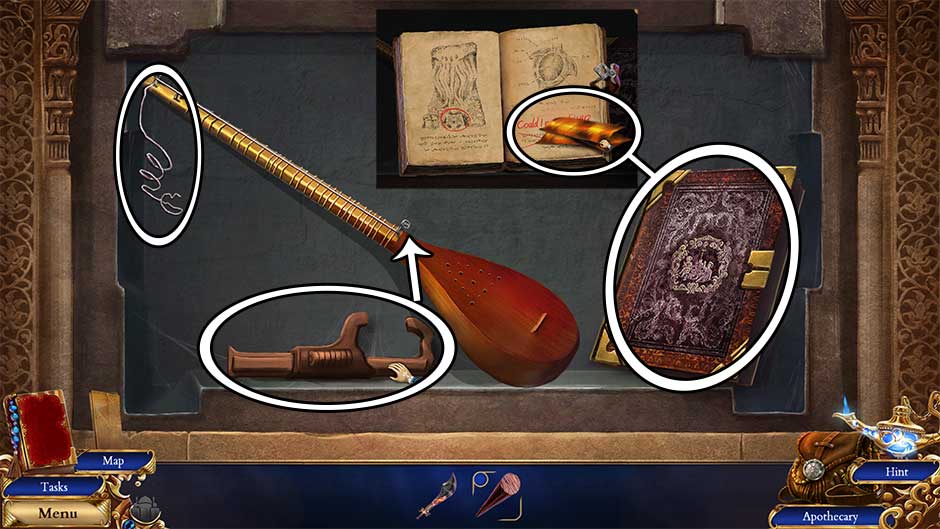
- Open the book on the right and collect the Quills tucked between the pages.
- Head back to the Elder Passage.
Elder Passage
- Take a closer look at the ominous sculpture at the far end of the room.
- Examine the mouth of the sculpture. Use the Luthier Pliers to remove the Balanced Fang and add it to your inventory.
- Return to the Tainted Sepulcher.
Tainted Sepulcher
- Take a closer look at the platform on the upper left.
- Click on the leather quiver to open it and collect the Arrow Shaft Pick up the Stringless Bow as well.
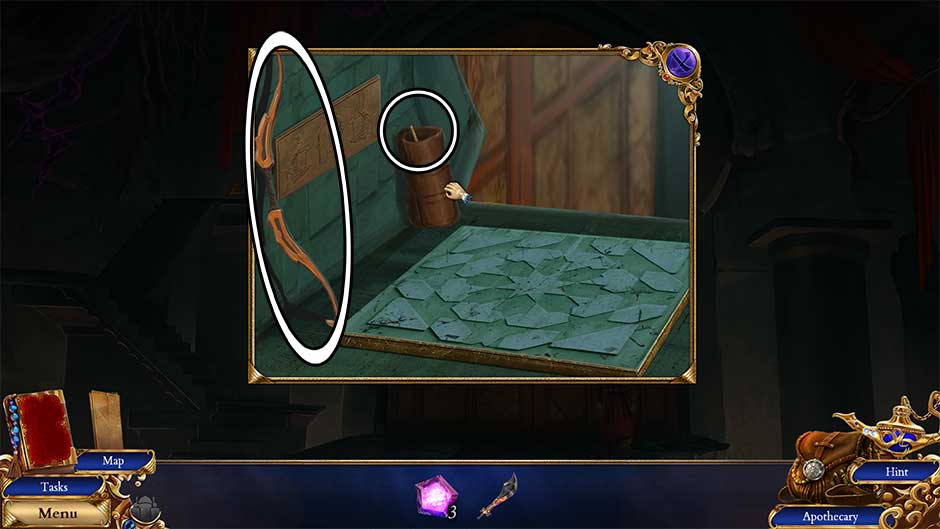
- Select the Stringless Bow in your inventory and combine it with the Thick String to acquire the Bow.
- Select the Arrow Shaft in your inventory. Attach the Quills to one end and the Balanced Fang to the other to acquire the Arrow.
- Select the Bow from your inventory. Add the Arrow to obtain the completed Bow and Arrow.
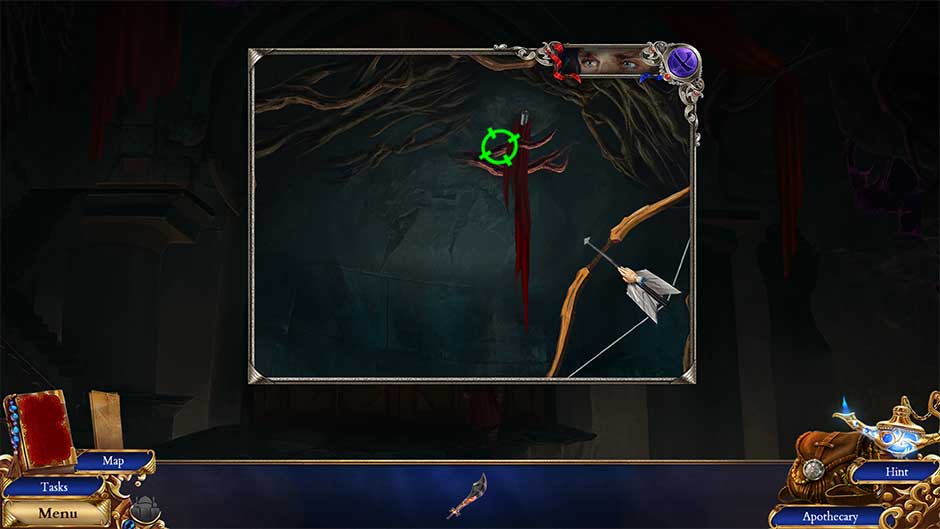
- Take a closer look at the top of the right column.
- Use the Bow and Arrow to shoot down the red cloth when the viewfinder turns green.
- Click on the red cloth once it falls. Use it to climb up the chips in the column until you reach the top.
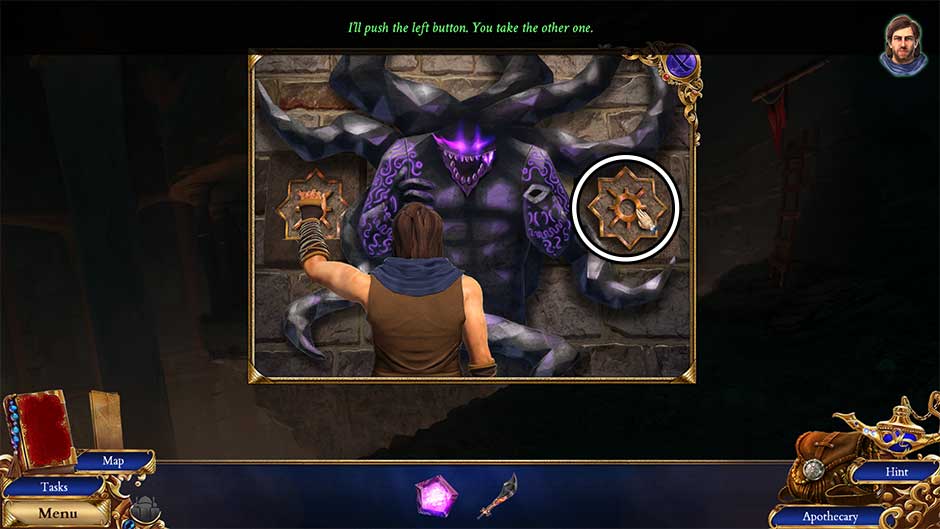
- With Darius on the right platform, it’s time for you to return to the left.
- Zoom in on the top of the left column and press the large floor button.
Final Chamber
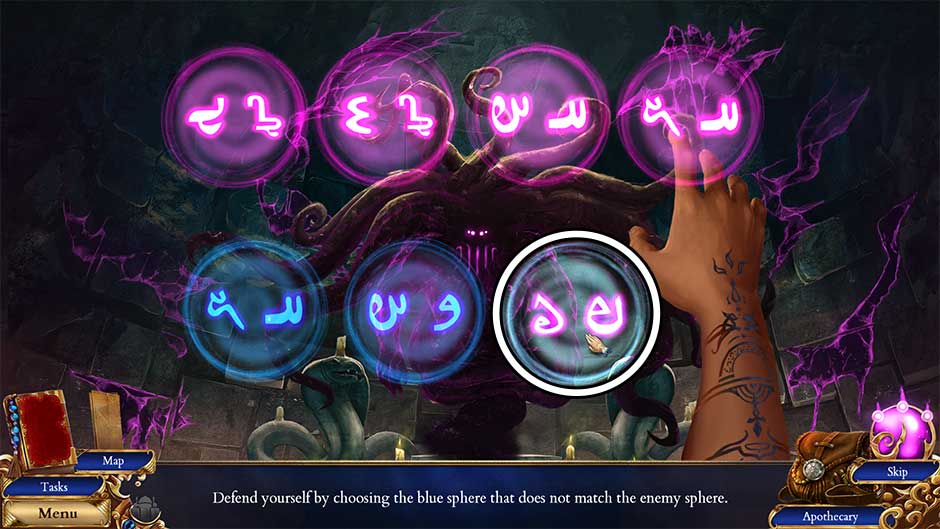
- A cutscene ensues. Defend yourself by choosing the blue sphere that does not match the enemy sphere. The solution is shown below.
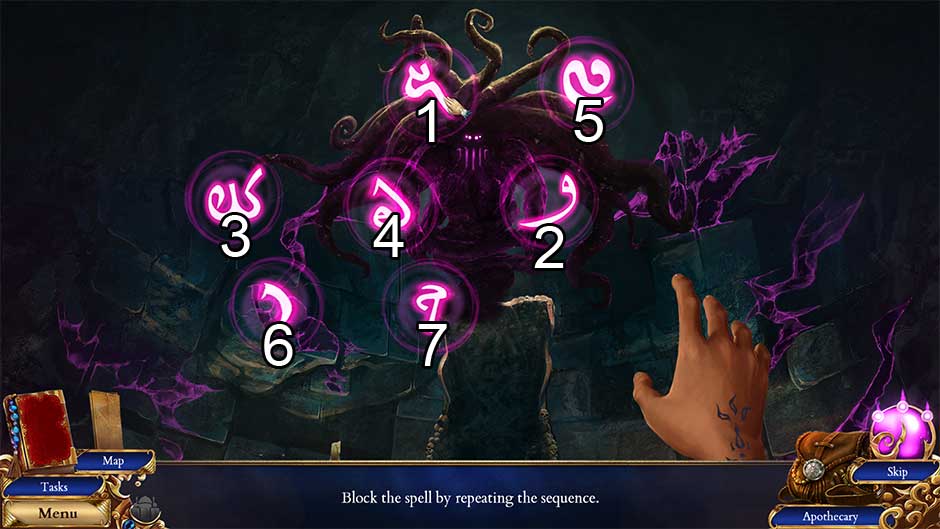
- Block the next spell by repeating the sequence. Click on the orbs in the order shown in the screenshot below to solve the puzzle.
- For the final attack, turn all the runes blue to repel the enemy attack. Clicking on a sphere will change the color of it, and all the surrounding spheres. Click on the spheres in the order shown below to solve the puzzle.
Congratulations! You’ve completed Persian Nights – Sands of Wonders!

Khur Palace Marking Collectible Locations
There are a total of 32 Khur Palace markings for you to find throughout your journey. The following is a list of collectible marking locations and where to find them.
- Temple Gate
- Temple Atrium
- Antechamber
- Genie Lamp Chamber
- Shelf
- Seat of the Simurghs
- Nests
- Treasury
- Ancient Genie Estate
- Ancient Estate
- Genie Entryway
- Orion’s Arbor
- Portal Platform
- Great Hall
- Orion’s Workshop
- Room of Curios
- Library
- Vineyard Basement
- Desolated City Vista
- Suburb Market
- Dry Well Alley
- Wedding Abode
- Old Qanat Root
- Old Qanat End
- Palace Prison
- Royal Guard Quarters
- Palace Foyer
- Throne Room
- Crashed Elevator
- Elder Passage
- Zaved’s Hideout
- Tainted Sepulcher

The Persian Nights – Sands of Wonders walkthrough is meant as a guide and does not contain cheats, hacks, or serials.