Welcome to the Alicia Griffith – Lakeside Murder Walkthrough. A famous crime author is found dead in a mystery that promises to be like no other. Are you ready to confront the surprises in store? Don’t be caught off guard – use the walkthrough to guide your investigation from start to finish!
Contents
General Tips & Tricks
Here are some tips that can help you play through the game easier:
You can chose between three difficulty modes:
Casual – Sparkles show areas of importance on the screen. Hint and Skip recharge faster. Taks list can be expanded.
Adventure – Hint and Skip recharge faster. Taks list can be expanded. Sparkles are disabled.
Challenge – Hint and Skip recharge slowly. Sparkles and extended Task list are disabled.
You can also customize settings by enabling or disabling segments of settings.
Difficulty and settings can be changed at any time during the game, just enter the gameplay settings via Menu.
Once the game starts you can chose to use Tutorial. At any time the tutorial can be skipped, but if you complete the tutorial you will get an achievement!

The Journal is located at the lower left part of the screen (“1”). It contains Journal entries, Records with some back-story information, and the Task list.
The Task list is very important because it can give you additional hints for solving the tasks. Depending on the difficulty settings, you can click on the task to get additional help.
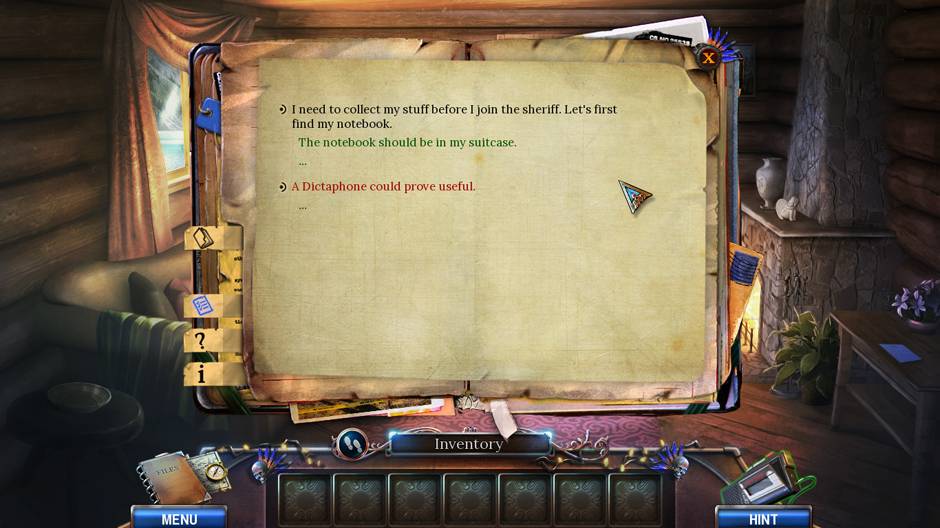
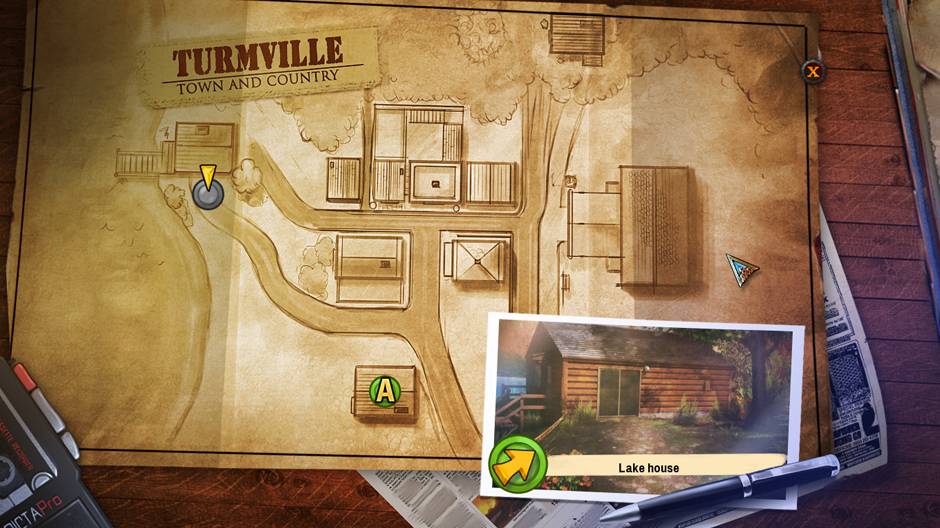
Once collected, Map (“2”) will be placed next to the Journal. Use it to fast travel between locations. It gives information of Alicia’s current location (marked as “A”) and currently selected location (marked as small yellow down arrow). Use the map to fast travel between locations. You can fast travel only between locations you’ve already visited.
Hint (“4”) button is located in the lower right corner of the screen. Hint is used to help you to collect items, make an action, or point you to a location where you need to go. Hints will not be spent if they point you to another location. Once spent, Hint needs some time to recharge. Recharge time depends on the game difficulty.
While solving a puzzle, the Hint button will be replaced with a Skip button. Once the Skip button is refilled you can use it to skip the puzzle.
Use the Footsteps icon (“3”) to help you more easily navigate the current location. Once clicked, it will show you all available exits from the current location.
Alicia Griffith – Lakeside Murder Walkthrough
Welcome to the Alicia Griffith: Lakeside murder Walkthrough! This guide gives detailed instructions on how to complete the game from start to finish. It will also help you gain special achievements hidden throughout the game.
Chapter 1: Lakeside
Detective Alicia Griffith rents a cabin by the lake near a small town of Turmville. There she meets local Sheriff Horace Williams. Ritual murder has happened and the Sheriff desperately needs the help. Alicia agrees to assist him in solving this mysterious murder.
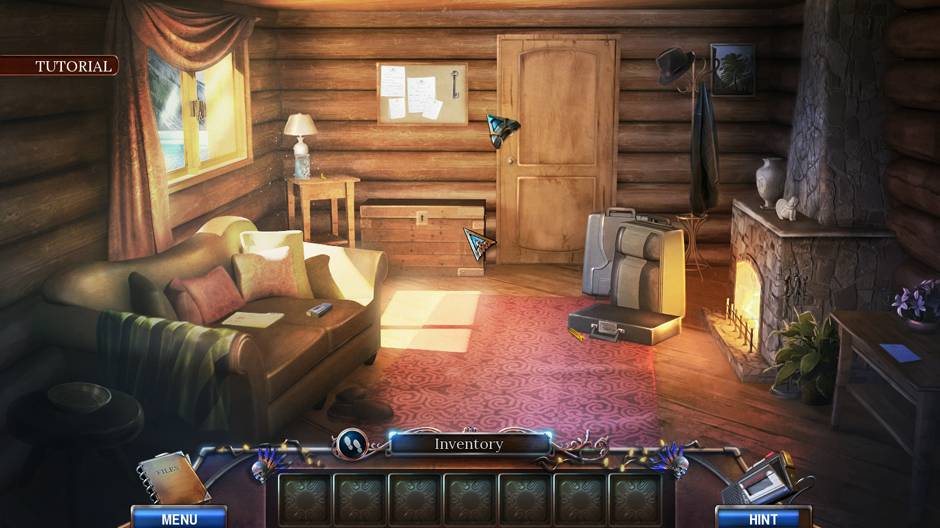
Location: Room
Alicia needs to take her stuff before going to the murder location.
Collect the Chest key from the board on the opposite wall.
Zoom in on the chest and use Chest key on the lock. Click two times on the key to open the lock.
- Chest opens.
- Collect the Screwdriver Tip from the chest.
Zoom in on the small desk next to the chest.
- Collect the Batteries.
- Collect the Turmville Brochure. You now have the Map. It will show your current location and allows you to fast travel from one place to another.
Zoom in on the suitcase.
- Collect the Screwdriver Hold.
- Combine the Screwdriver Tip and Screwdriver Hold in your inventory by dragging one item over the other.
- You now have the Screwdriver.
- The lock on the suitcase is broken. Use the Screwdriver to remove the front plate.
- To open the suitcase you need to solve the puzzle. Click on the suitcase lock to play the puzzle.
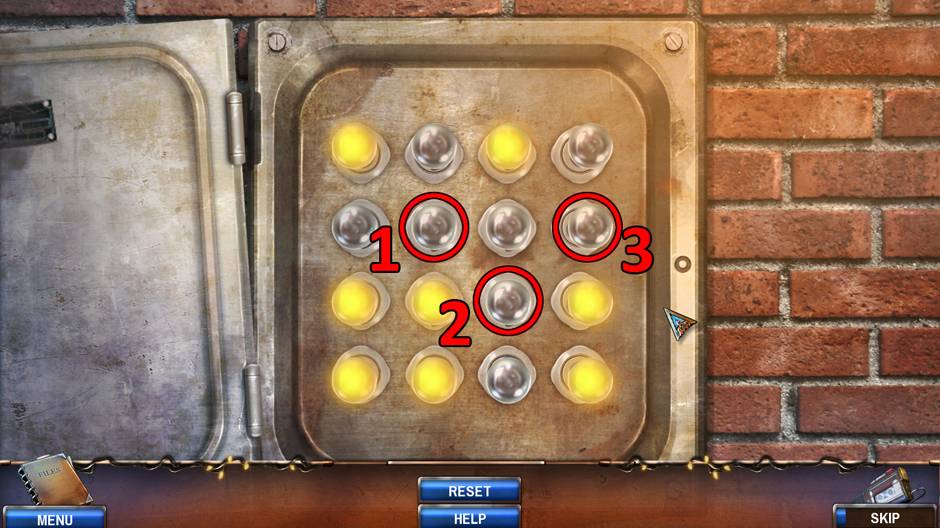
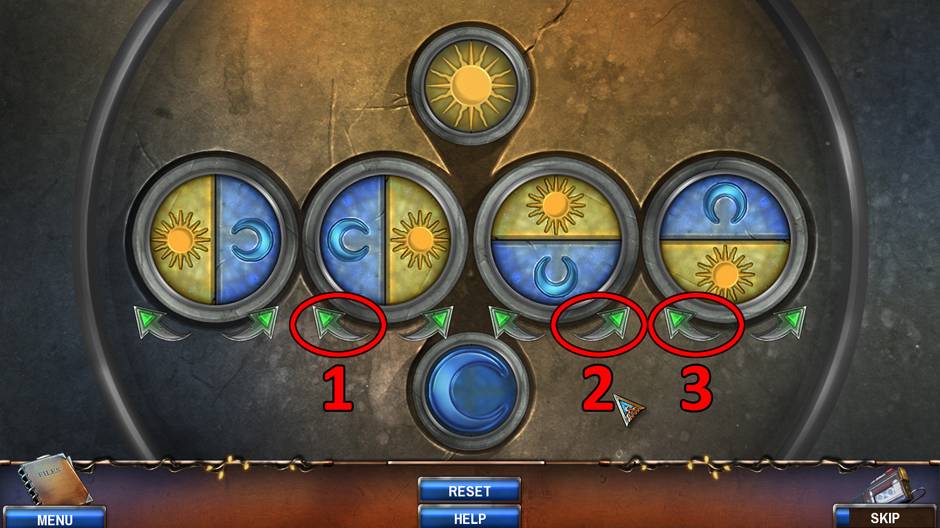
Puzzle solution:
Click two times on the arrow-button marked with “1”.
Click once on the arrow-button marked with “2”.
Click once on the arrow-button marked with “3”.
Click once on the arrow-button marked with “4”.
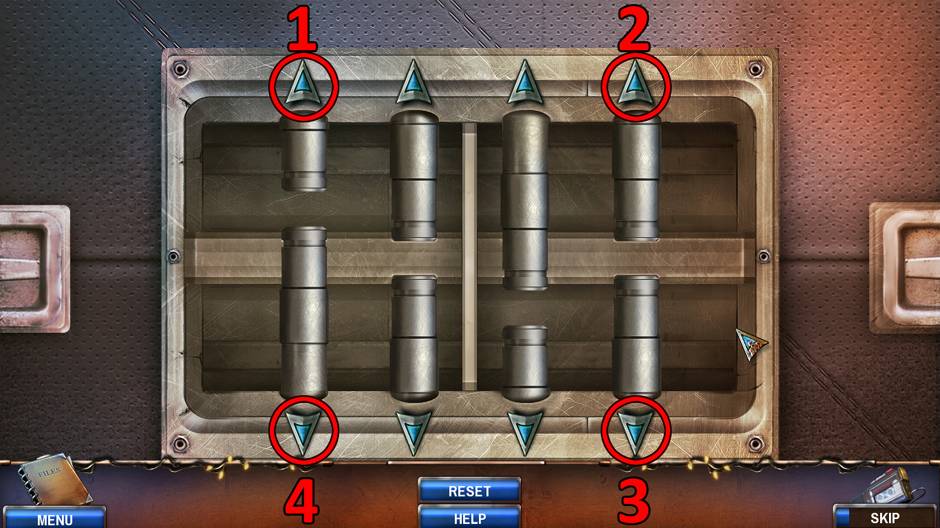
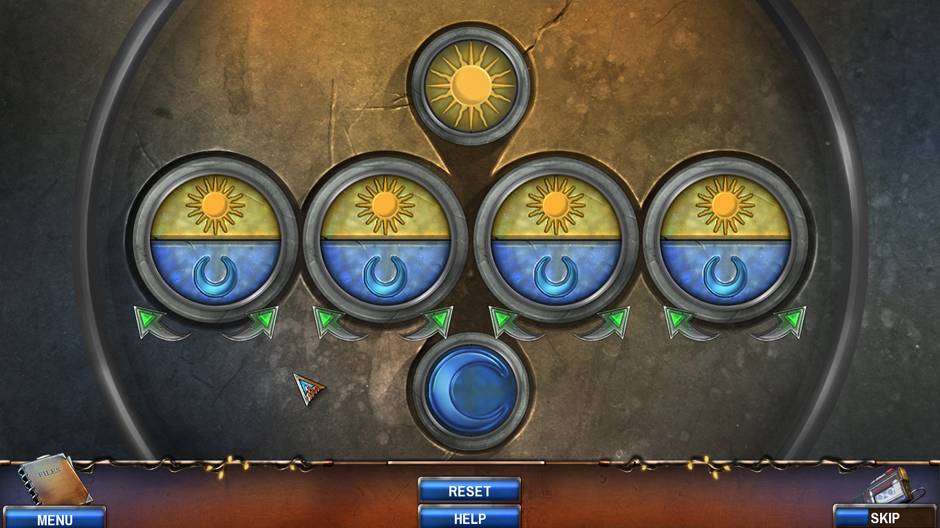
The picture below shows final position of the pins.
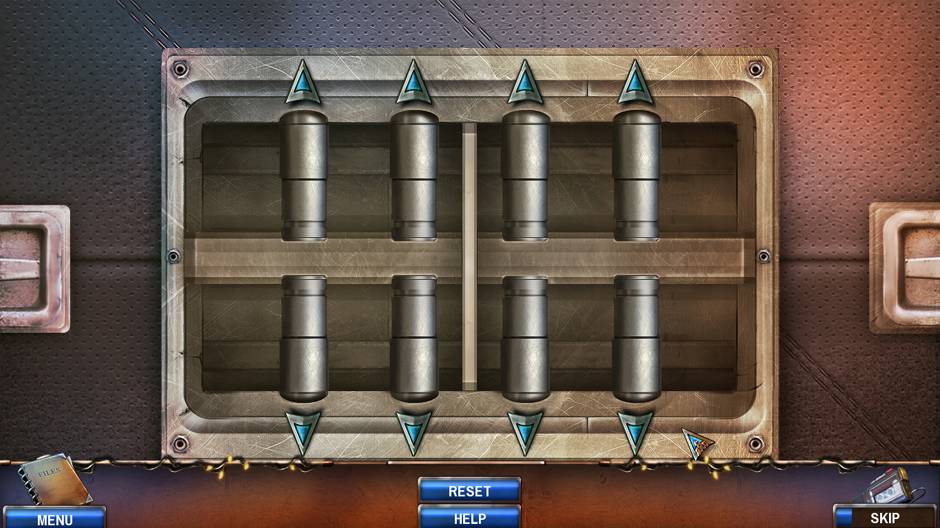
- After solving or skipping the puzzle the suitcase is opened.
- Collect Files Notes and the Cassette from the suitcase.
Zoom in on the cassette player on the sofa.
- Place the Batteries and the Cassette into cassette player.
Collect the Case file from the sofa.
If you have played the Tutorial, you are awarded with the “Professor” hidden achievement.
Exit the room.
Location: Lake House
Help Alicia find the murder weapon and any additional clues.
Talk to Sheriff Williams.
Collect the Broken Shovel
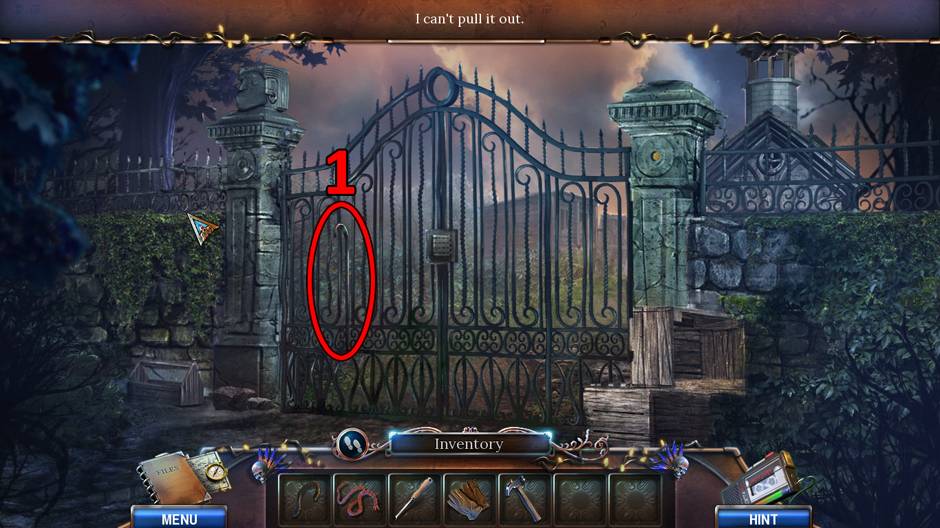
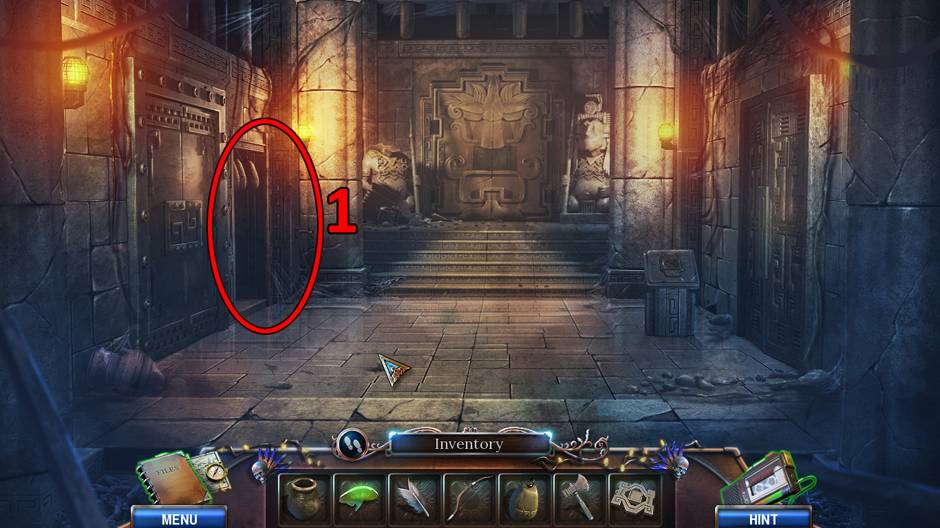
Zoom in on the bush (“1”).
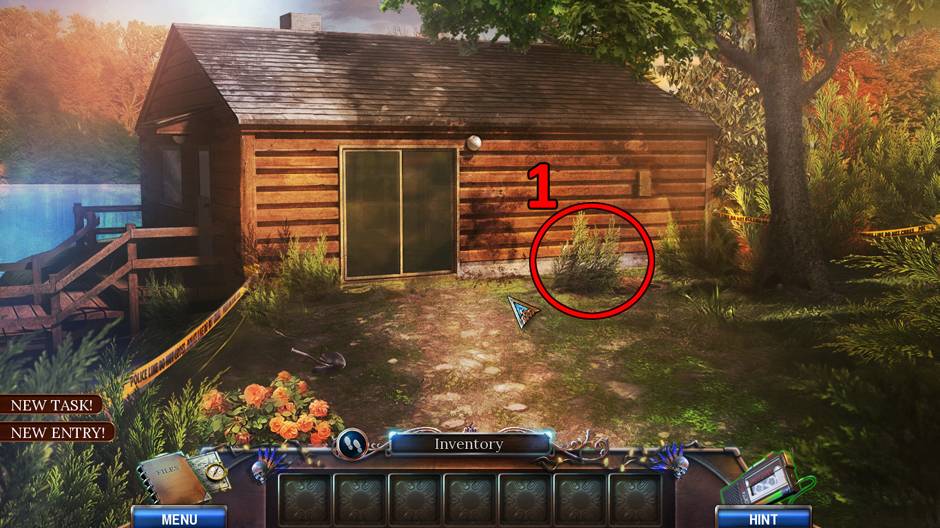
- Remove placed bush branch to discover a fresh mound.
- Close the zoom.
Open the lake house doors and go inside.
Location: Inside the Lake House
Click on the murder location. This will add a New Task to the Journal.
Collect the Flashlight from the right window.
Zoom in on the fireplace.
- Collect the Poker.
- Use the Poker on the Warrior Figurine inside the fireplace.
- You now have the Warrior Figurine.
Zoom in on the desk with the typewriter.
- Collect the Warrior Figurine.
- Collect the Scissors.
- Click on the small drawer. It is locked.
- Close both zoom locations.
Zoom in on the broom next to the fireplace.
- Use the Scissors on the broom to get a Handle.
In your inventory, combine the Handle and Broken Shovel. Now you have the Shovel.
Zoom in on the location on the left desk. The location is marked by number 2.
- Collect the Warrior figurine.
- Collect the Solar charger.
Exit the house.
Location: Lake House
Zoom in on the fresh mound (where the fake bush was).
- Use the Shovel on the fresh mound.
- Click on the chest. New Task is added to the Journal.
- Take the wallet next to the chest. You will get the Small key from the wallet.
- Close the zoom.
Zoom in on the small cabinet on the right side of the house wall.
- Use the Poker on the padlock.
- The padlock will open. Click on the padlock to remove it.
- The cabinet will open.
- Collect the Pliers.
Go back into the lake house.
Location: Inside the Lake House
Zoom in on the desk with the typewriter.
- Zoom in on the drawer.
- Use the Small Key on the lock.
- Click on small key multiple times to open the lock.
- The drawer will open.
- Collect the UV Light Bulb.
- Collect the Camera – low power.
- Inside your inventory combine the UV Light Bulb and Flashlight. You now have the UV Flashlight.
- Use UV Flashlight on the paper in the typewriter. You have unlocked the hidden achievement “Bookworm” and gotten an additional Journal entry.
Use the UV Flashlight on the murder location on the house floor.
Puzzle starts.
Puzzle solution:
Here are the locations of markings and colors. You need to click on all markings of the same color in a row to keep them visible.
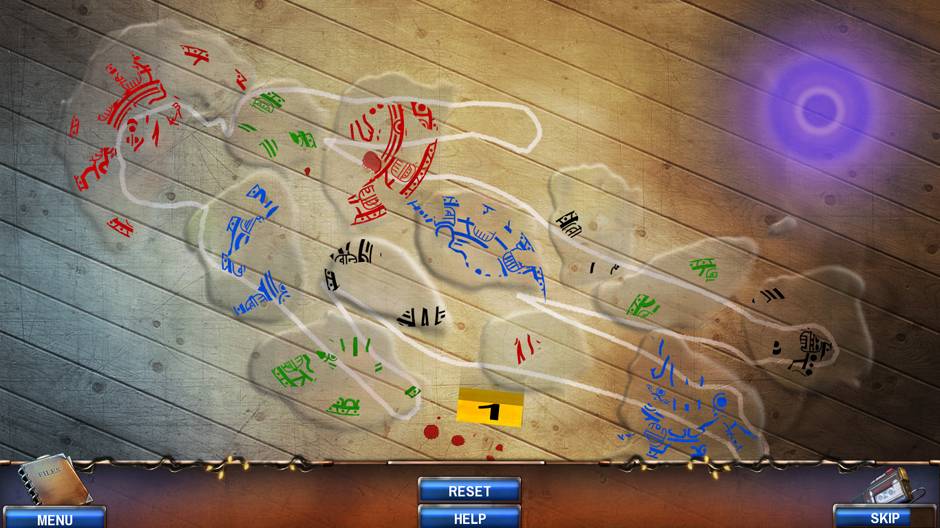
After you solved or skipped the puzzle, Net Task is added to the Journal.
Zoom in on the left window.
- Place the Solar Charger on the window.
- Place Camera – Low Power on the window.
- A sound will indicate when the camera is charged.
- Collect the Digital Camera.
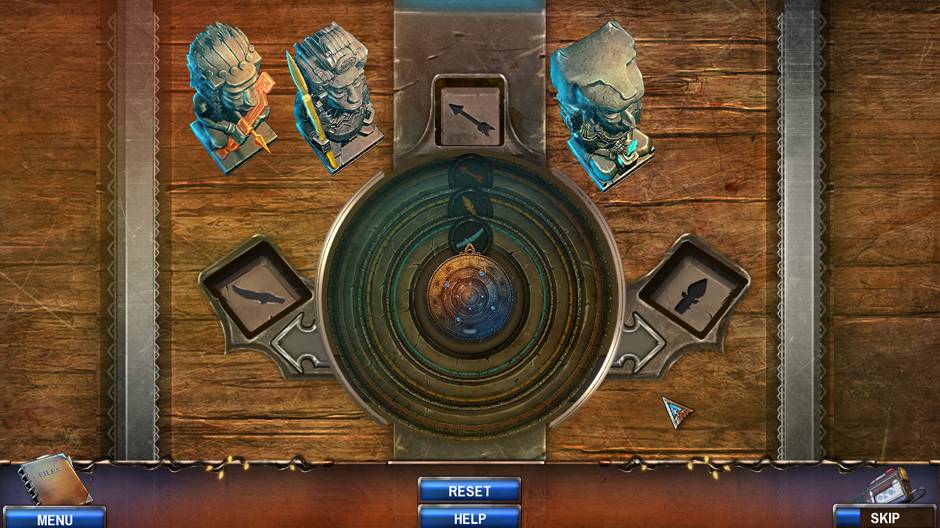
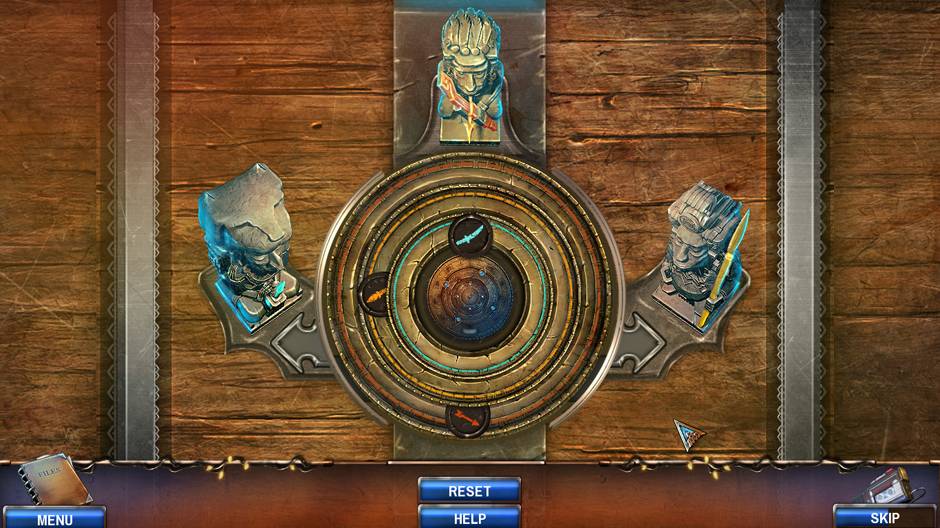
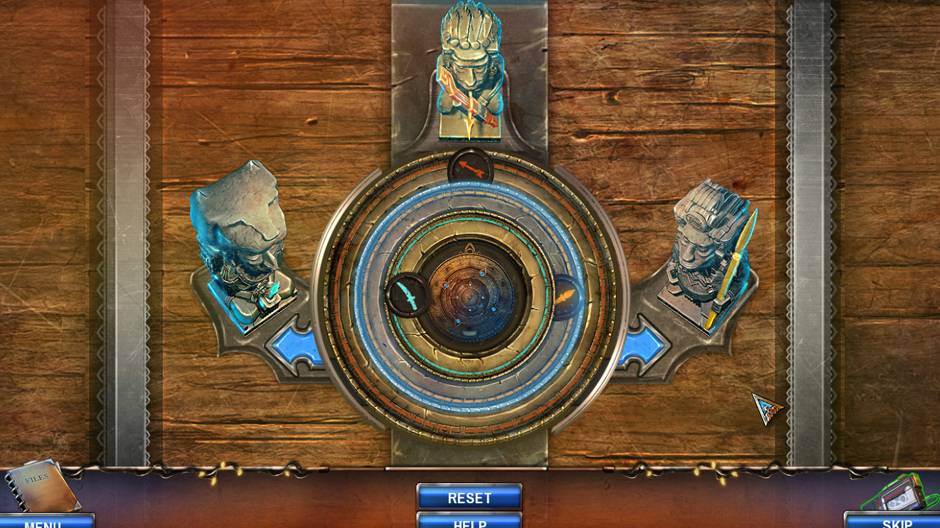
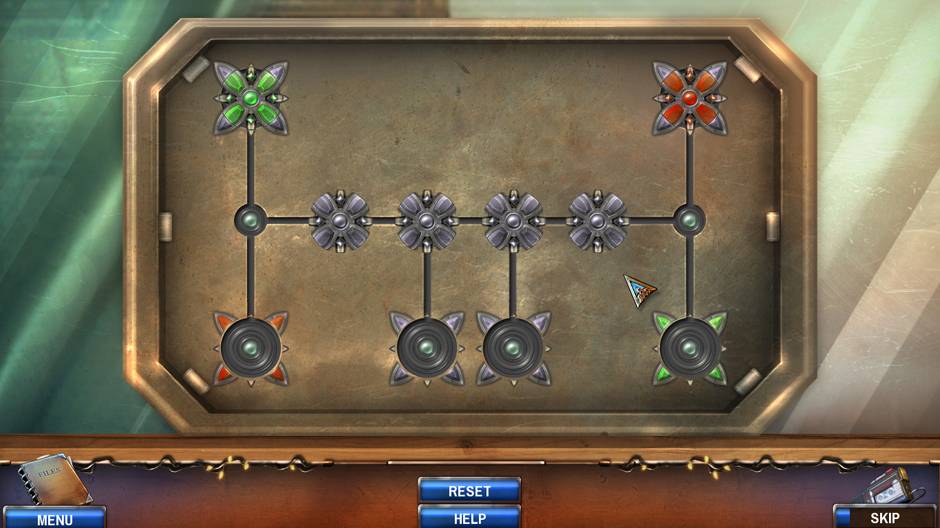
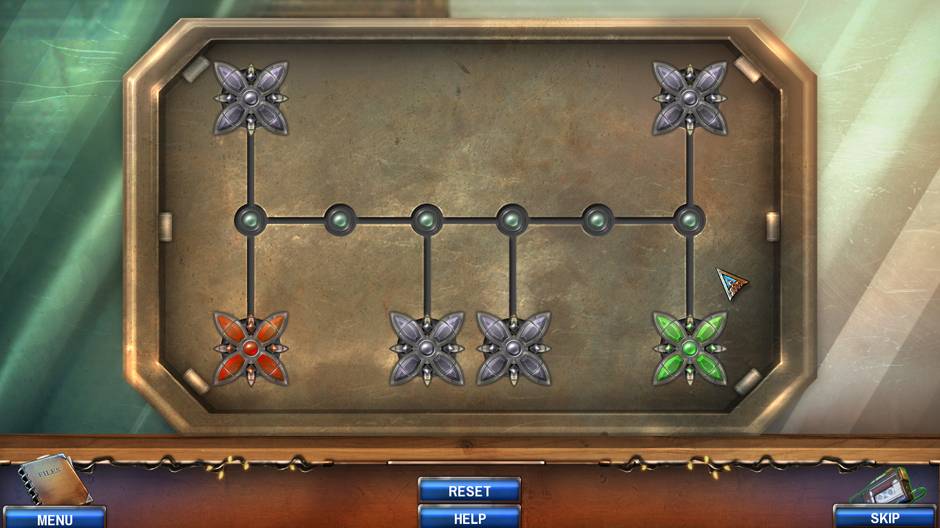
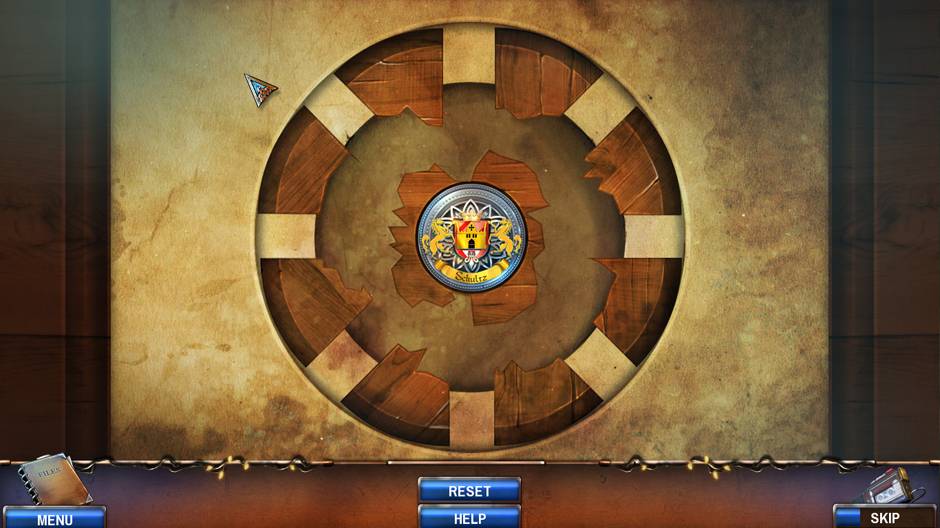
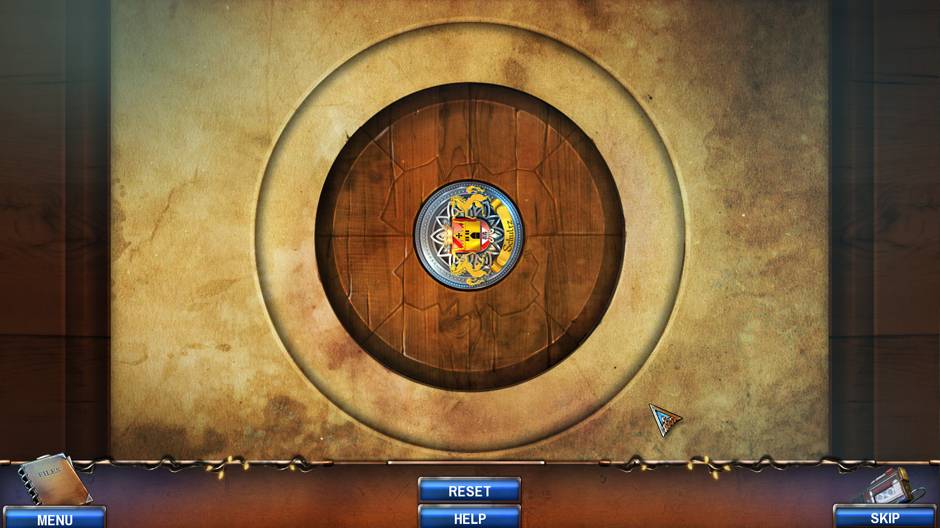
Use the Digital Camera on the signs on the house floor.
Puzzle starts.
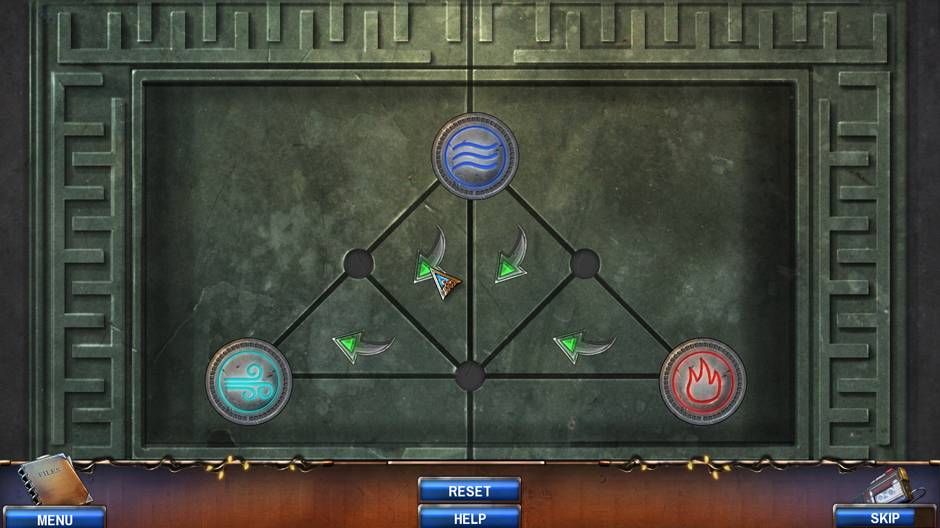
Puzzle solution:
Use the arrows to rotate segments of different color. The final image should look like this. The final image may be on a different angle.
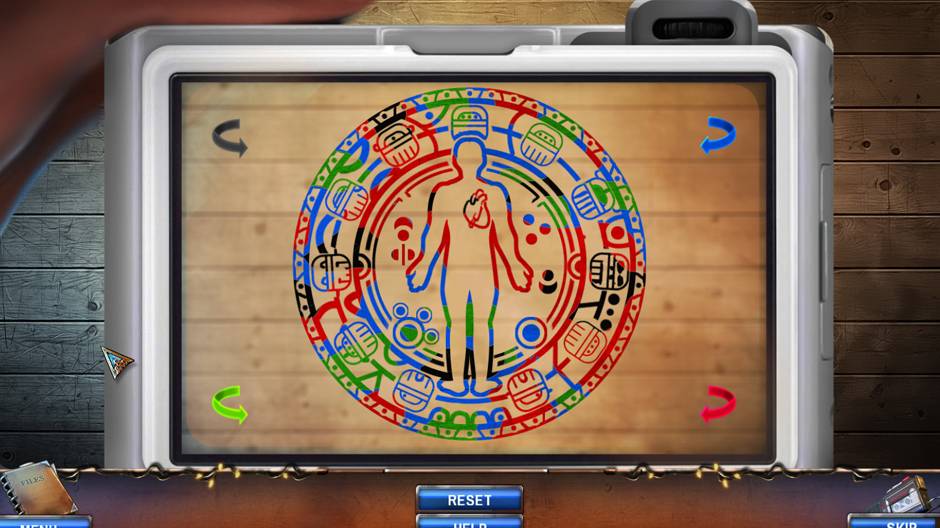
First drag and place the medallion into the center slot.
After you solved or skipped the puzzle, Net Task is added to the Journal.
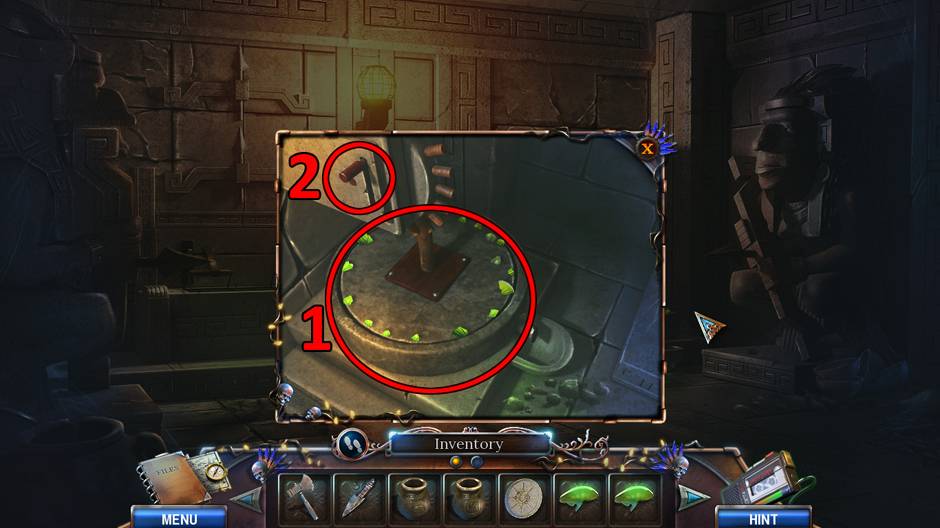
A new zoom will open.
- Use the Pliers to remove four nails (“1” to “4”).
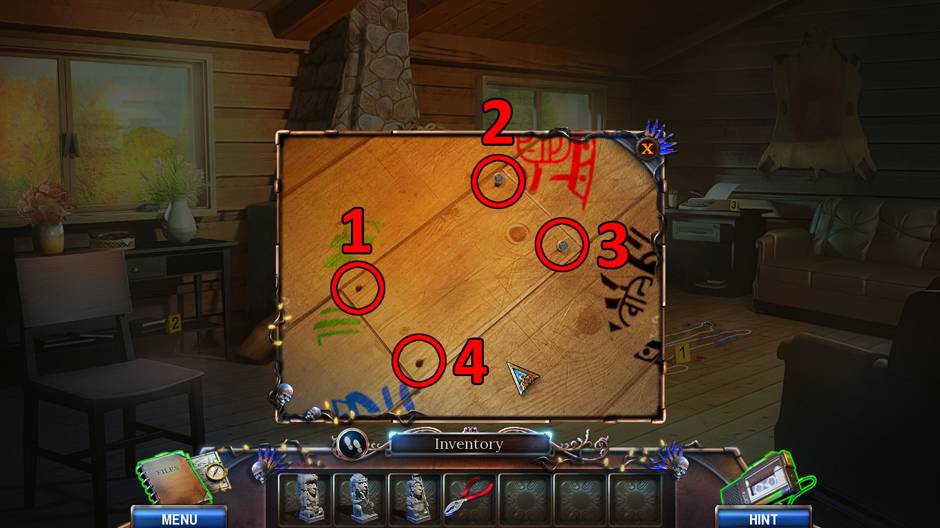
- Click on the floor segment. A hidden compartment underneath the floor is now open.
- Collect the Medallion.
Exit the house.
Location: Lake House
Zoom in on the fresh mound (where the fake bush was).
- Click on the chest to start a puzzle.
Signs of different weapons are now shown.
Place the corresponding warrior figures into slots with weapons.
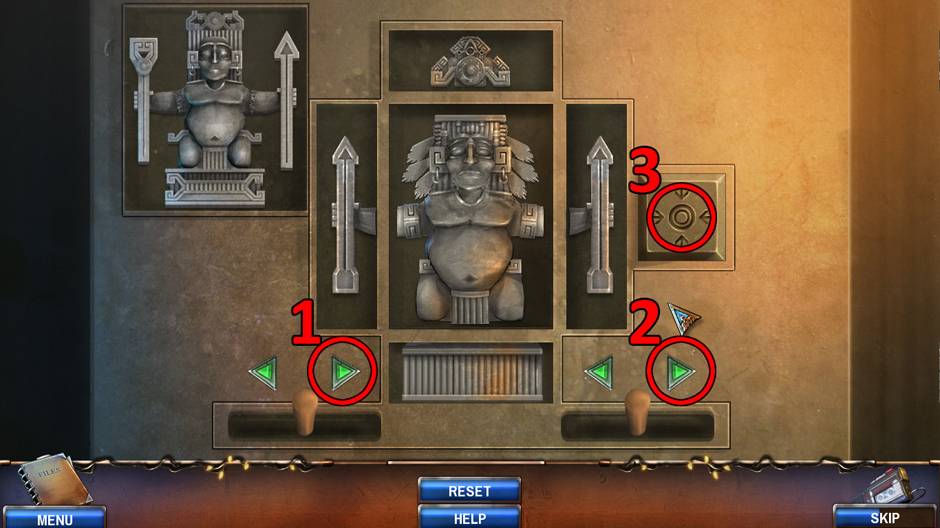
Select and use arrow buttons to rotate the rings with weapon signs so that each sign is close to the warrior figurine carrying that type of weapon.
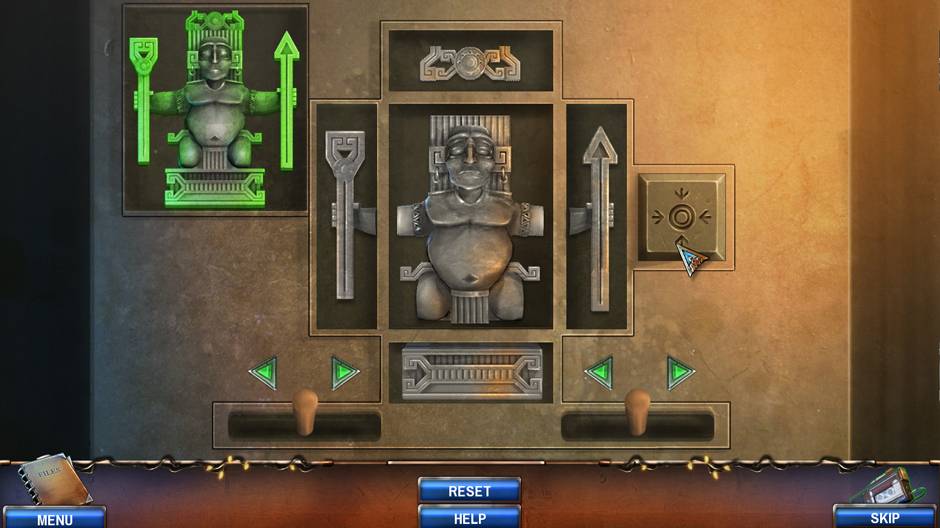
The final position is shown in the picture below.
After you solved or skipped the puzzle inside the chest, the murder weapon and additional clues are found. You should now go to Turmville and inform Sheriff Williams.
Use the map to get to Turmville or exit the location by going back down the path.
Chapter 2: Turmville
Alicia needs to talk to Sheriff Williams and find information about the ritual murder.
Location: Turmville
Zoom in on the board next to sheriff’s office doors.
- Collect the Small Knife.
- Click on the note to get the hidden achievement “Turnip”.
Enter the sheriff’s office.
Location: Sheriff’s Office
Talk to Sheriff Williams and find out about his Deputy, Ely Dillard. You should talk to him. Ely is behind the sheriff’s office.
Exit the sheriff’s office via the back door.
Location: Behind the Office
Talk to Deputy Ely Dillard. He is stuck on the roof and you should help him by placing the ladder next to him.
Zoom in on the ladder on the floor.
- The ladder has been broken and you can’t repair it. New Task is added to the Journal.
- Close the zoom.
Talk to the Deputy again. He unintentionally drops the garage keys into the drain.
- A zoom of the drain will open. The bolts are rusty and you can’t open it.
- Close the zoom.
Collect the Screwdriver from the barrel.
Return to the sheriff’s office.
Location: Sheriff’s Office
Talk to Sheriff Williams. This will give you the hidden achievement “Helpful Advice”.
Exit the office and head to the Turmville streets.
Location: Turmville
Exit this scene by going right.
Location: Turmville – Library
Zoom in on the toolbox next to the stairs.
- Dials on the toolbox are stuck. Use the Screwdriver on the dials.
- Puzzle starts:
Puzzle solution:
To open this toolbox you need to spell deputy’s surname “Dillard”. Each dial is rotated by using up and down buttons. The first dial is broken and it rotates the second dial, too, so you need to set this dial first. Letter “D” is scratched on it. After setting that one, the rest is easy.
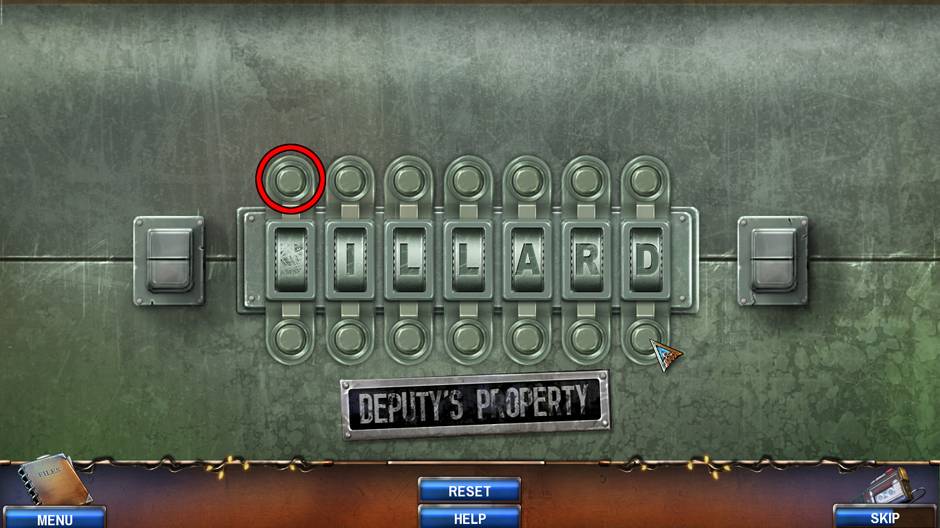
After you finish or skip this puzzle the toolbox will open.
- Collect the Oil Can and Walnut Pie.
Zoom in on the plaque under the statue.
- This is the statue of Allison Woods.
- You are awarded with a hidden achievement “Just Being Informed”.
- Close the zoom screen.
Go to the library entrance.
Location: Library Entrance
Zoom in on the doors.
- They’re locked.
- Close the zoom screen.
Zoom in on the panel on the left wall.
- The wrench is stuck. Click on it to start a puzzle.
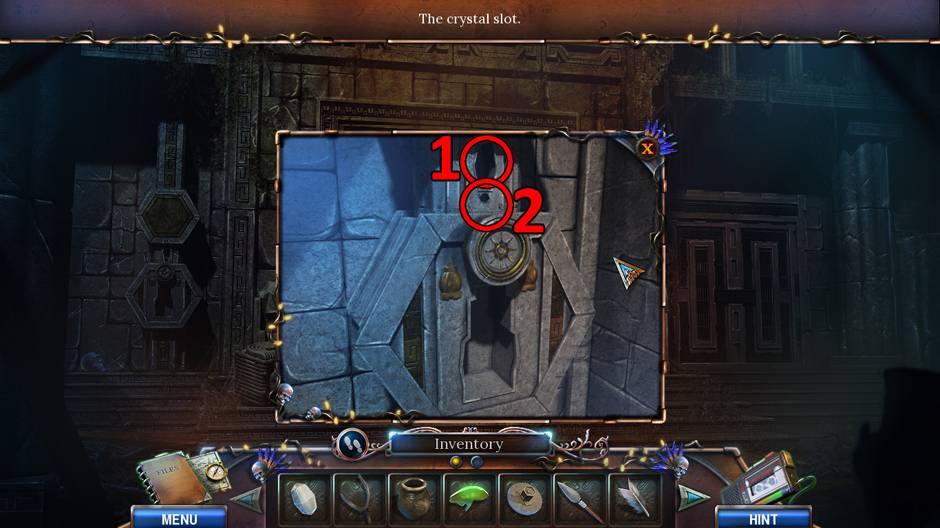
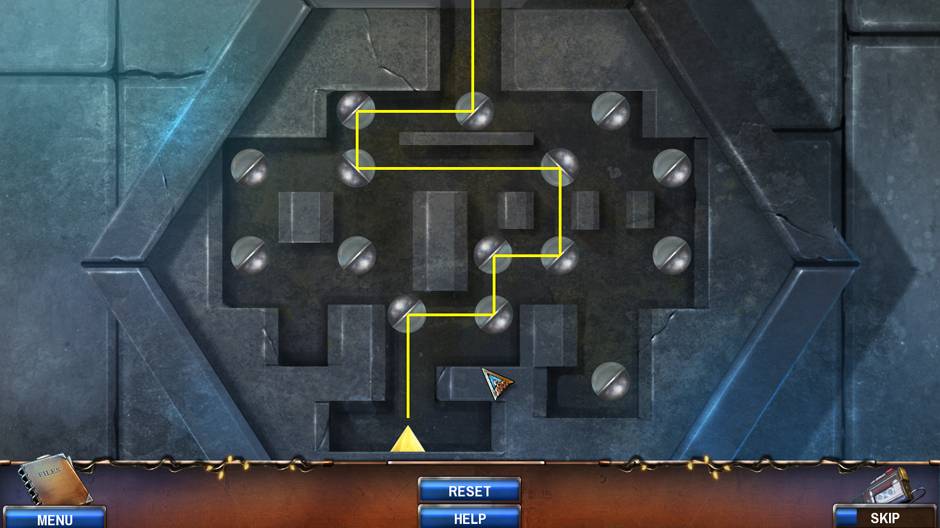
Puzzle solution:
Drag the points in the order shown below:
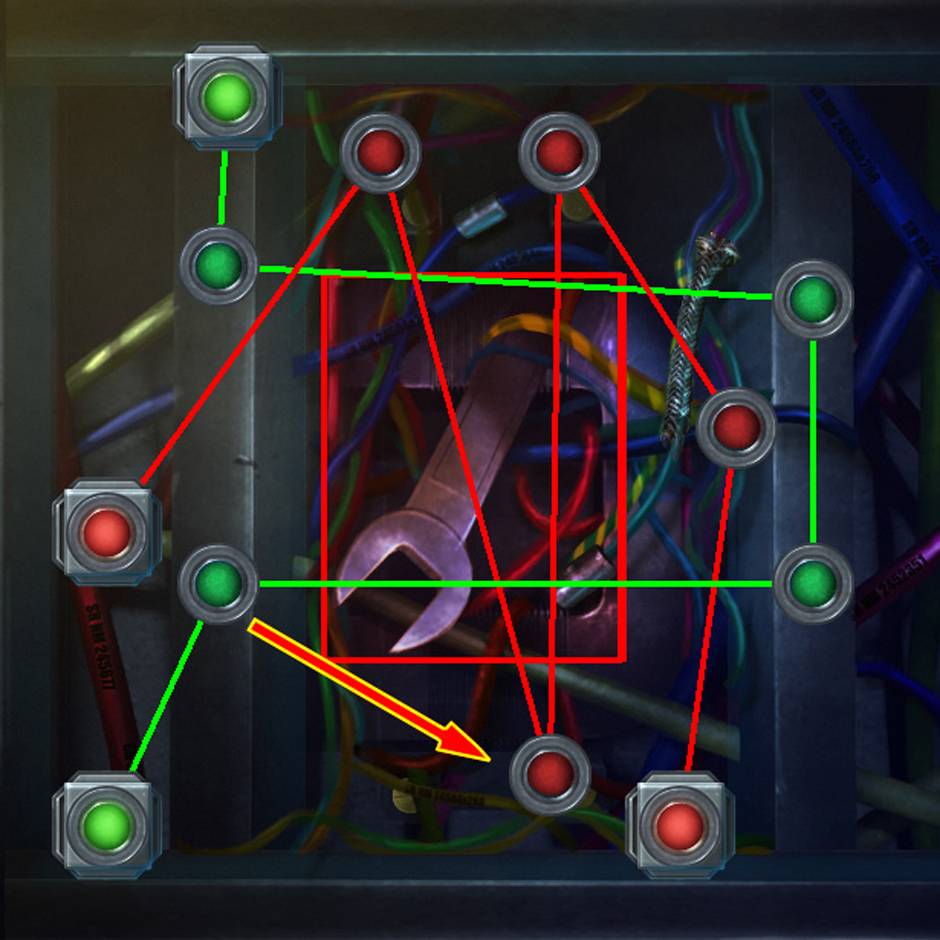
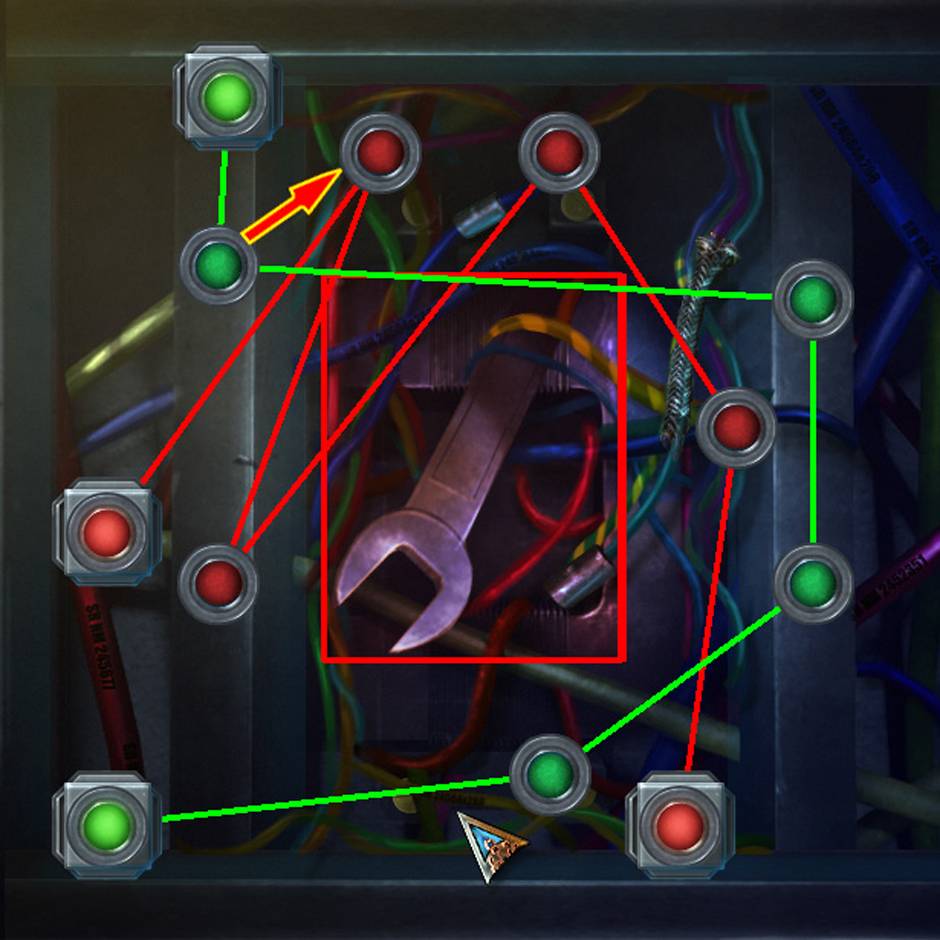
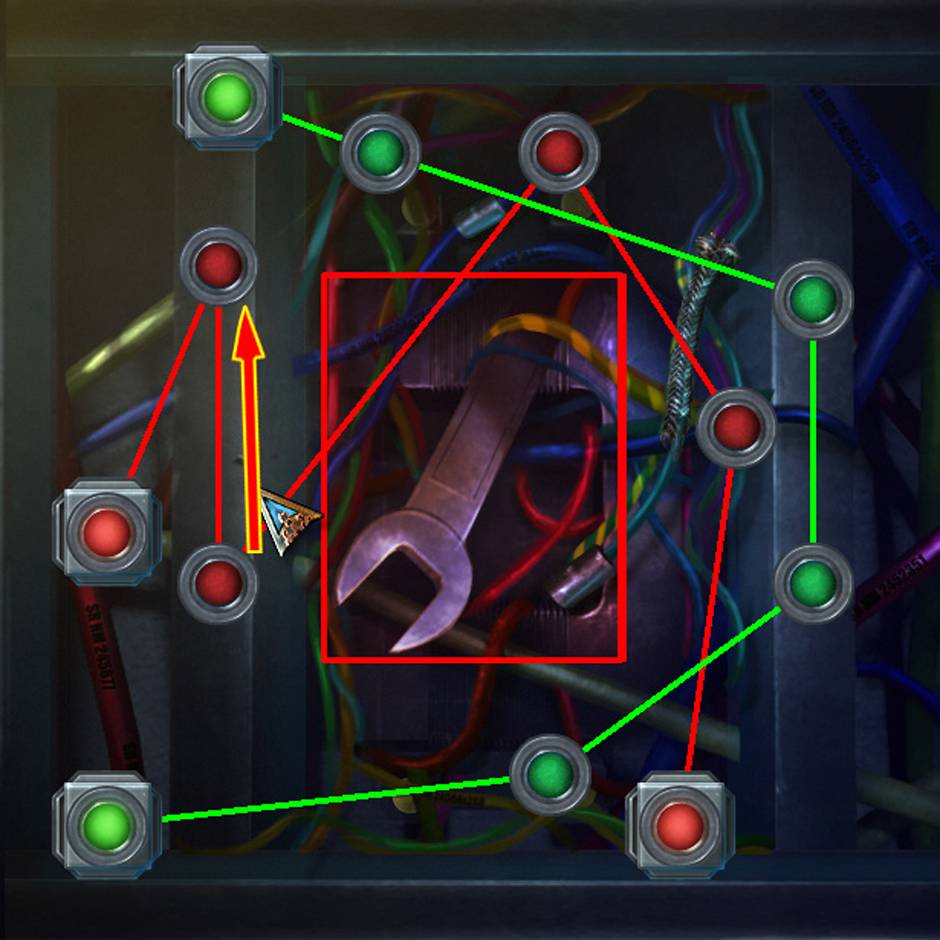
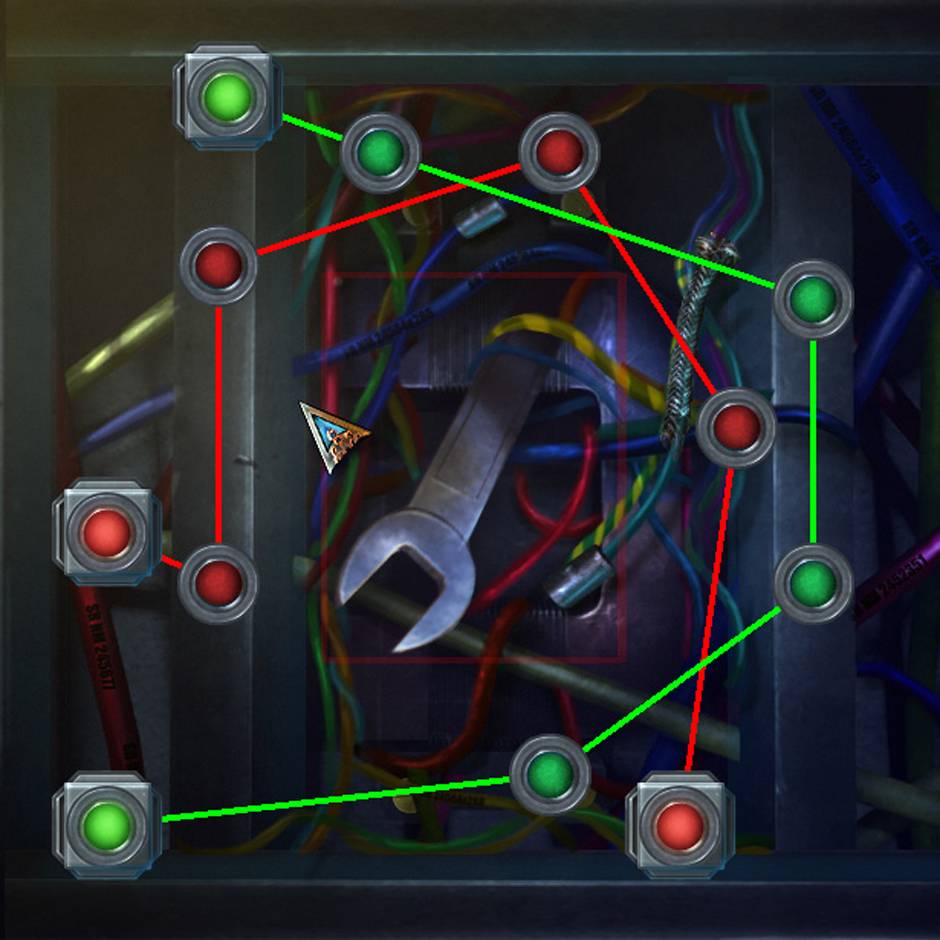
- After you finish or skip this puzzle, you will get the Wrench.
- You can now see the magnet that was obscured by the wrench. Zoom in on the magnet.
- The magnet is screwed tightly.
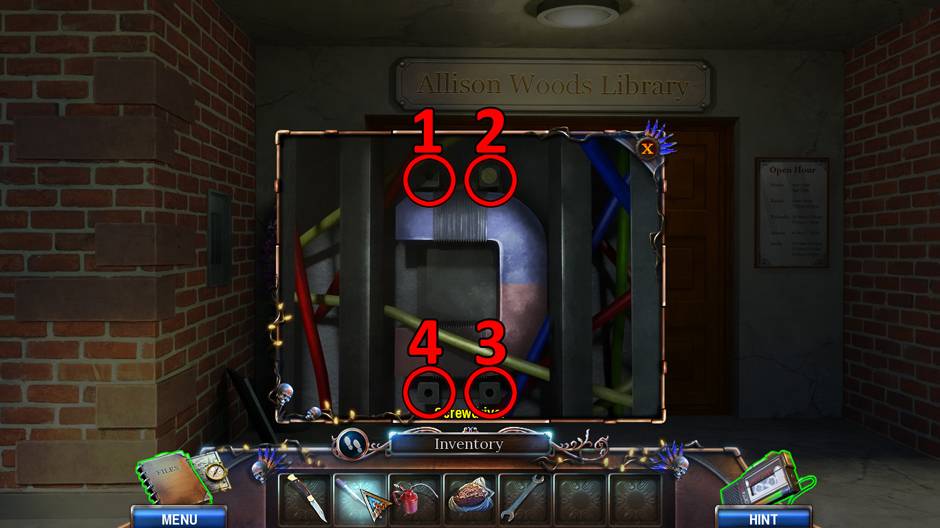
- Use the Screwdriver to unscrew four screws (“1” to “4”) holding the magnet.
- Collect the Magnet.
Go to the location behind the office.
Location: Behind the Office
Zoom in on the drain.
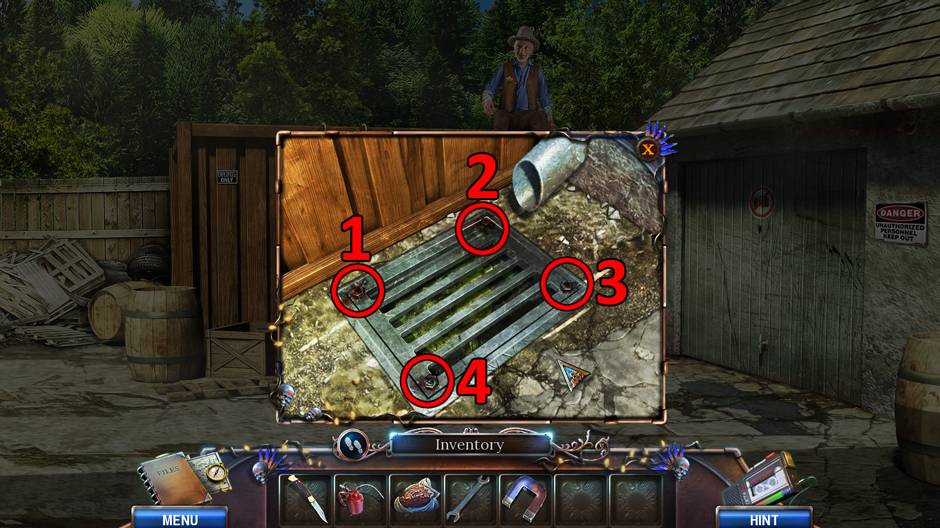
- Use the Oil Can on each of the four rusty bolts (“1” to “4”).
- Now you can use the Wrench on each of the bolts.
- Click on the drain hatch to open the drain.
- Use the Magnet on the open drain. You will get the Garage Keys.
Zoom in on the garage lock.
- Use the Garage Keys on the lock.
- Click on the keys to open the garage.
Zoom in on the garage.
- Collect the Rope and the Rake.
Zoom in on the ladder.
- Use the Rope to repair the broken steps.
- Collect the repaired Ladder.
Place the Ladder on the ladder holds next to Deputy Dillard.
Talk to the deputy. Apparently while he was getting down the ladder, the wind blew his hat away. You need to find it before he is willing to talk to you.
Go to the Turmville location.
Location: Turmville
Zoom in on the lamppost left of the Tourist office.
- Use the Rake to get the Deputy’s Hat.
Go back behind the sheriff’s office to give the hat to Deputy Dillard.
Location: Behind the Office
Give the Deputy’s Hat to the deputy and then talk to him.
He gives you the Library Key.
Go to the library entrance.
Location: Library Entrance
Zoom in on the library door.
- Use the Library Key on the lock.
- Click on the key a few times to open the door.
The door will open.
Enter the library.
Location: Library
Zoom in on the inner garden doors.
- The doors are locked. A note suggests Albert has the key. You should find out who Albert is.
- Close the zoom screen.
Zoom in on the glass cabinet left of the garden door.
- There is a plate on the cabinet lock.
- Use the Small Knife on the plate to remove it.
- The magnetic lock mechanism is now visible. Click on it to start the puzzle.
Puzzle solution:
Click on the button marked with “1”.
Then click on the button marked with “2”.
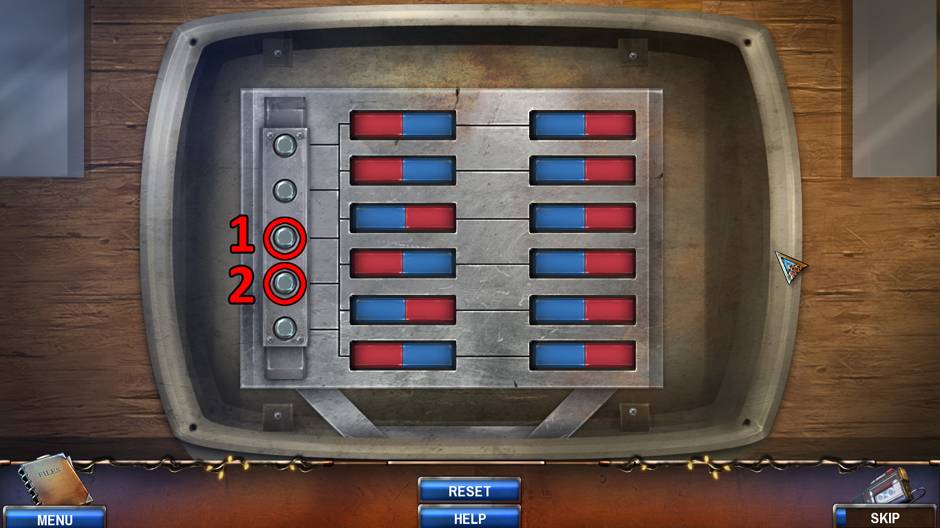
The final position of the magnets is shown in the picture below.
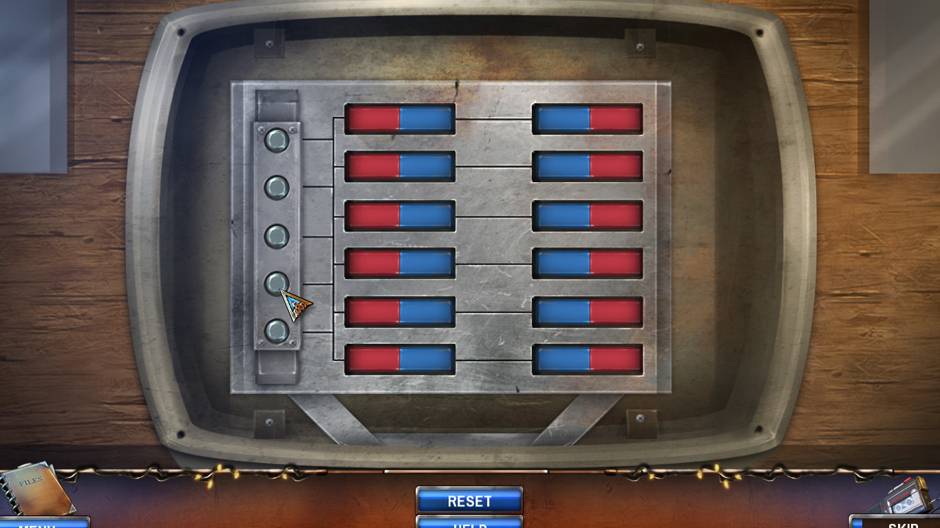
- After you finish or skip the puzzle, the cabinet will open.
- Collect the CD marked “Albert” and Duct Tape.
Zoom in on the bookshelf above the yellow flower.
- Collect the Paperclip and Botanic Dictionary.
- You may also collect the Allison Wood biography to get an additional Journal entry.
- Close the zoom if it is still open.
Collect the file from the topmost shelf. In the file, you will find the Picture Part.
Go back to the sheriff’s office.
Location: Sheriff’s office
Zoom in on the computer case and click on the power button. The monitor cable just burned out!
Zoom in on the monitor cable.
- Collect the Small Key tangled in the spider web.
- Click on the monitor cable. It seems that the computer jack on the cable is still functional.
- Close the zoom.
Zoom in on the medicine cabinet.
- Use the Small Key on the lock.
- Click on the key to open the cabinet.
- Collect the Wire Cutters.
Zoom in on the coffee maker.
- Use the Wire Cutters on the cable to cut it off. You get the power Cable.
Zoom in on the monitor cable.
- Use the Wire Cutters to cut off the burned cable part.
- Connect the Cable from your inventory with the wall plug.
- Use the Duct Tape to connect the two cable parts. The monitor should work now.
Zoom in on the computer case and click on the power button.
- Albert’s CD is placed and the monitor shows the password screen with some Latin plant names. You don’t have enough information to break this password.
Go back to the library entrance.
Location: Library Entrance
Use the Botanic Dictionary on the plant here. You get the Journal entry with the plant’s Latin name.
Enter the library.
Location: Library
Use the Botanic Dictionary on both plants here. You get the Journal entries with plants’ Latin names.
Go back to sheriff’s office.
Location: Sheriff’s Office
Now you know the Latin names of all three of Albert’s plants and can break the password. Click on the monitor to start the puzzle.
Puzzle solution:
The hardest part of this puzzle was to find a way to figure out the Latin names of the plants Albert uses as passwords.
Just click on the arrow buttons until you get all three Latin names marked in red. Then hit the OK button.
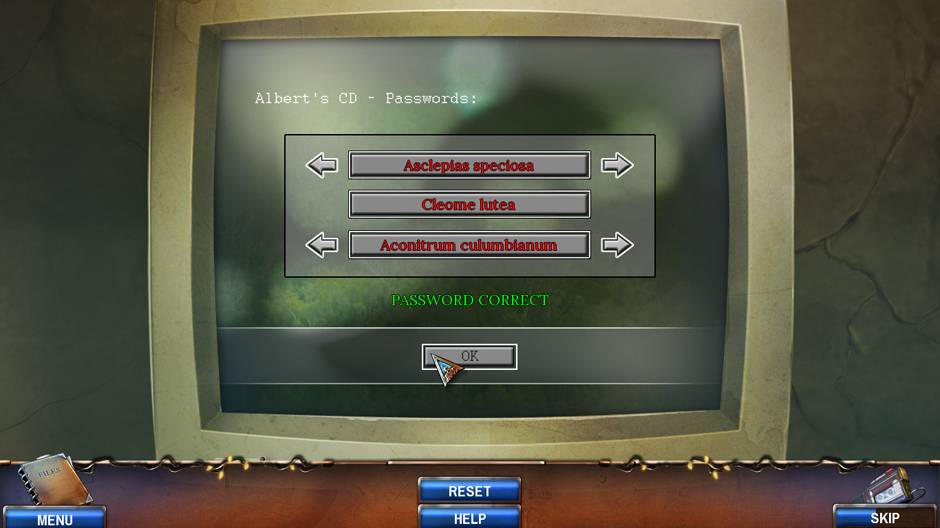
After you finish or skip the puzzle, Albert’s hut location is added to the map.
You need to go to the forest now. Exit the sheriff’s office and go right.
Location: Turmville – Library
Follow the path to the forest next to the blue truck.
Location: Forest Path
Collect the Mattock.
Zoom in on the tree hole. Something shiny is in there, but there is also an animal lurking in the hole. You need to get rid of the animal if you want that shiny thing.
Close the zoom screen.
Go further down the path.
Location: Forest Hut
Click on the stone next to the hut door. It seems it is intentionally put there. You need some leverage to move it.
Use the Mattock with this rock. The rock will be moved.
Click on the hole that was hidden by the rock. A puzzle starts.
Puzzle solution:
You need to drag the stones and fully reveal the trap door underneath.
This is the start state:
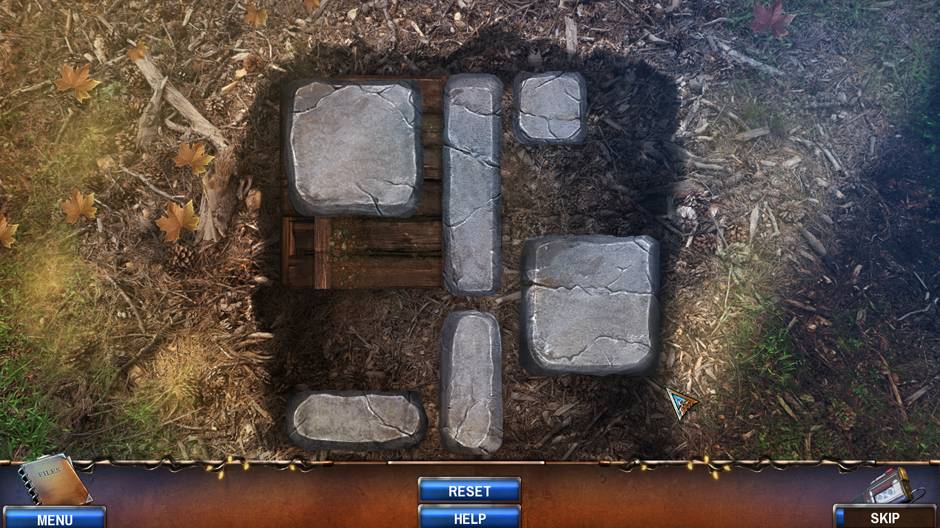
The end state should look like this:
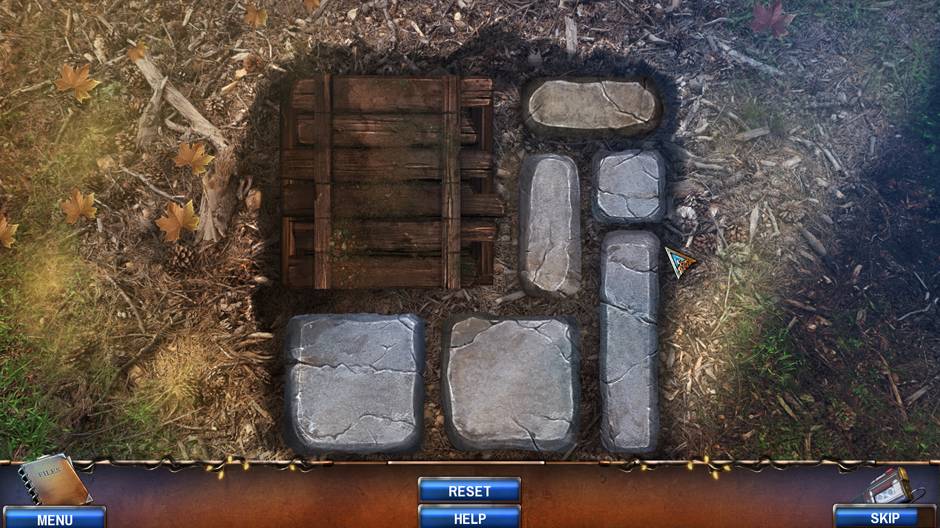
- After you finish or skip the puzzle, a zoom screen will open.
- There is a small trap door. Click on it. The door opens.
- Collect the Hut Key.
Zoom in on the hut door.
- Use the Hut Key to open the door.
Get inside the hut.
Location: Albert’s Hut
Click on the deer head to gain the hidden achievement “Poor Deer”.
Collect the Old Umbrella from Albert’s bed.
Zoom in on the old oven.
- Click on the oven grate to open it.
- Use the Walnut Pie with the oven to gain the hidden achievement “Baker”.
- Close the zoom screen.
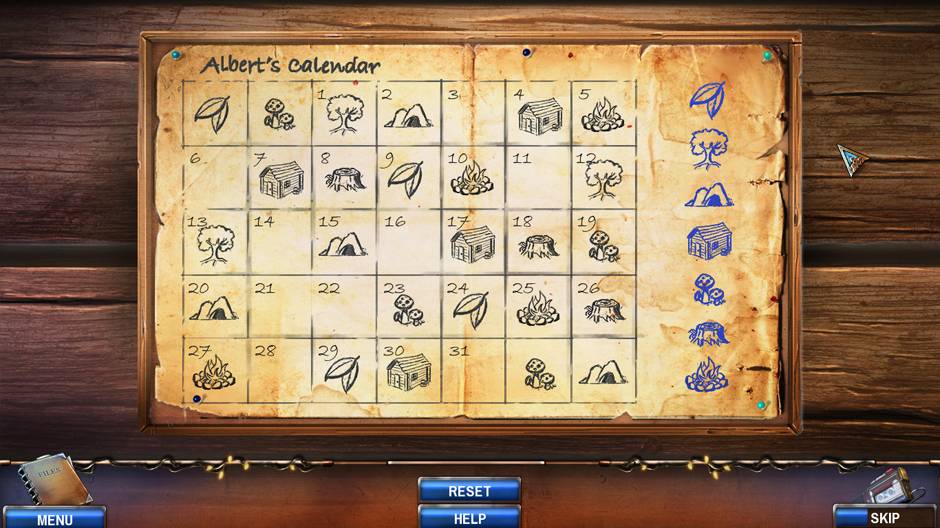
Click on Albert’s calendar on the wall. Something is missing here. Some of the days don’t have markings.
Zoom in on Albert’s desk.
- Collect the Pencil.
- Click on the open book to get an additional Journal entry.
- Use the Paperclip on the Jewelry box to pick the lock. The box will open.
- Collect Allison’s Bracelet.
Go back to Allison’s statue in front of the library.
Location: Turmville – Library
Zoom in on Allison’s statue.
- Zoom in on the hand holding the flower.
- Use Allison’s Bracelet on the hand.
- The hand will open and you get the Bronze Flower.
Go back to the hut.
Location: Albert’s Hut
Zoom in on the cabinet drawer.
- There is one flower slot; place the Bronze Flower on it.
- The drawer will open.
- Collect the Shed Key and the Forest Map.
- Take back the Bronze Flower. You will need it later.
Use the Forest Map on Albert’s wall calendar.
A puzzle starts.
Puzzle solution:
Each row and column can have only one of the signs. Click and drag the blues signs into the correct empty locations on the calendar.
Start position:
End position:
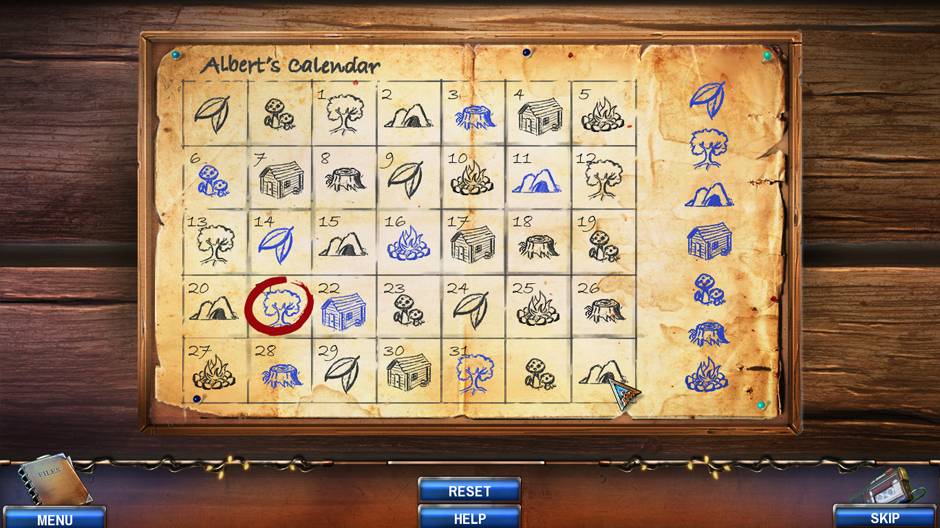
After you finish or skip this puzzle, Albert’s current position in the forest will be marked on the map.
Exit the hut and go down the forest path left of the hut entrance.
Location: Forest
You meet Albert. He’s quite a character… After the dialogue he will give you a second Bronze Flower.
Go back to the hut.
Location: Albert’s Hut
Zoom in on the top showcase on the cabinet.
- Place the two Bronze Flowers into the slots.
- A puzzle starts.
Puzzle solution:
Click and drag the flowers into the correct places. There are four black, one red, and one green flower.
Start position:
End position:
- After you finish or skip this puzzle, the showcase will open.
- Collect the Framed Turris flower. There is something written underneath the flower. You will need to open the frame without breaking it.
Exit the hut.
Location: Forest Hut
Zoom in on the shed.
- Zoom in on the padlock.
- Use the Shed Key on the padlock to open the shed.
- Collect the Axe and the small Petrol Can.
Zoom in on the wooden stump.
- Collect the Wooden Log.
- Place the Wooden Log on the stump.
- Use the Axe on the Wooden Log to get the Logs.
Enter Albert’s hut.
Location: Albert’s Hut
Zoom in on the old oven.
- Place the Logs into the oven.
- Close the zoom screen and go to the forest path.
Location: Forest Path
Place the Walnut Pie on the rock next to the tree with the hole in it.
A squirrel comes out and eats the pie.
Zoom in on the hole in the tree.
- Use the Old Umbrella to get the shiny item from the hole.
- You get the Empty Lighter.
In your inventory, combine the Empty lighter and the small Petrol Can.
You get the filled Lighter.
Go back to Albert’s hut.
Location: Albert’s Hut
Zoom in on the old oven.
- Use the Lighter on the logs inside.
- The fire is now lit.
- Place the Framed Turris next to the fire to melt the wax holding the frame and back paper.
You get Allison’s Paper, but only her signature can be seen. The pencil markings are long faded.
You need to use an old detective trick to find out what has been marked on this paper.
In your inventory, use the Pencil with Allison’s Paper.
You discover Allison’s map!
Go to Albert.
Location: Forest
Talk to Albert. He will take Allison’s Map and will give you the Library Garden Key.
Albert has gone, but he left his bag.
Zoom in on the bag.
- Collect the Shears.
Zoom in on the bushes above the small pond. Something is hidden behind the thick vegetation.
- Use the Shears on it.
- It reveals a hidden grave. But something is missing here.
- Close the zoom screen.
Get back to the library.
Location: Library
Zoom in on the library garden door.
- Use the Library Garden Key to open the door.
Enter the library garden.
Location: Library Garden
Click on the closet. It is blocking the archive room door. You will need some leverage to move it from the door.
Zoom in on the file next to the well.
- Click on the file. In the file you will find the second Picture Part.
Zoom in on the well mechanism.
- Use the Wrench with the bolt to take it off.
- Collect the well Wheel with Handle.
In your inventory, use the Wrench on the Wheel with Handle to separate the two.
Now you have both the Wheel and the Handle.
Go back to the forest path.
Location: Forest Path
Zoom in on the old wheelbarrow tangled with the vine.
- Use the Shears to remove the vine.
- The wheelbarrow is missing the wheel. Use the Wheel on it.
- Collect the Wheelbarrow.
Go back to the library garden.
Location: Library Garden
Use the Wheelbarrow with the closet to move it. The door is now accessible.
Click on the door to open it.
Enter the archive room.
Location: Archive Room
It is dark in here.
Zoom in on the wall switch.
- Click on the switch. Nothing happens.
- Close the zoom screen.
Zoom in on the box lying on the floor.
- The box is closed.
- Use the Small Knife to open the box.
- The box will open.
- Collect the Electric Fuses.
Return to the library garden.
Location: Library Garden
On the wall to the right of the door there is a fuse box.
Zoom in on the fuse box. Fuses are missing.
- Use the Electric Fuses on the fuse box.
- A puzzle starts.
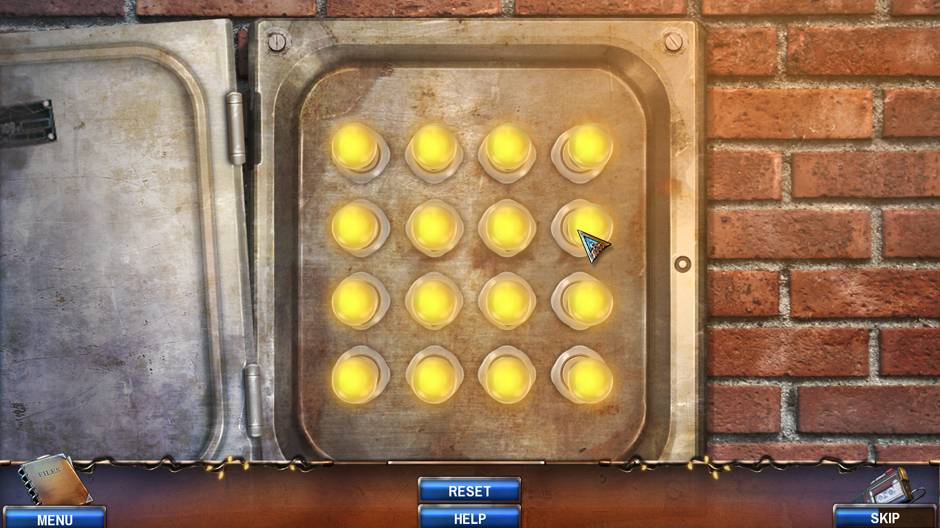
Puzzle solution:
Click on the light bulb marked with “1”.
Click on the light bulb marked with “2”.
Click on the light bulb marked with “3”.
All light bulbs are lit:
After you finish or skip the puzzle. go back into the archive room.
Location: Archive Room
It is dark in here.
Zoom in on the wall switch.
- Click on the switch.
The light is turned on and it reveals scattered file cabinets without labels on them. You need to somehow figure out which one contains the newspapers you need.
Collect the file from the shelf to the left of the scattered cabinets. In the file you will find the third Picture Part.
Zoom in on the cabinet door above the shelf where you found the file.
- The handle is missing.
- Use the Handle on cabinet door.
- Click on the door to open it.
- Collect the Metal Plate.
- Use all three Picture Parts on the cabinet door with the fourth picture part already on it.
- Collect the Archive Room Picture.
Use the Archive Room Picture on the scattered file cabinets.
- Zoom in on the file drawer.
- Click on the file drawer to open it.
- Click on the newspapers inside the drawer.
You have now found out about the old murder the deputy was talking about. Alicia needs to talk with sheriff to see if there are any living relatives of the murdered woman.
But first, you can solve another mystery. Go to the forest.
Location: Forest Path
Zoom in on the unmarked grave.
- Use the Metal Plate on the wooden grave mark.
- The plate fits, and you are awarded with the hidden achievement “Unmarked Grave”.
Go to the sheriff’s office.
Location: Sheriff’s Office
Talk with Sheriff Williams. He will inform Alicia about Eugene Schultz, son of the long-murdered Marie Schultz. Eugene lives in the mansion. The Sheriff points Alicia to the location.
Chapter 3: Mansion
Alicia needs to find out more about the Schultz family and the murder that took place here long ago.
Location: Mansion
Zoom in on the mansion door.
- The door is locked.
- Close the zoom.
Zoom in on the door bell.
- Click on it.
- The bell doesn’t work.
- Close the zoom.
Zoom in on the left window.
- Collect the Metal Hook.
- Close the zoom.
Zoom in on the coal chute underneath the left window.
- The hatch is stuck via a fallen branch, and part of it is broken.
- Collect the Wooden Peg (“1”) that was part of the hatch.

- Close the zoom.
Zoom in on the flower pot to the right of the mansion door.
- Collect the String from the dried flower.
- You can also move the flower pot. There was once a key here.
- Close the zoom.
Exit the scene to the right.
Location: Garden Gate
Zoom in on the toolbox left of the gates.
- Collect the Chisel.
- Inspect the Hammer. It is broken; the hammer head is loose.
- Use the Wooden Peg on the hammer to repair it.
- Collect the Hammer.
Collect the Working Gloves from the box to the right of the gates.
On the left gate door there is a partly bent metal beam (“1”).
Use the Hammer on it.
Now you have the Metal Beam.
Return to the Mansion entrance.
Location: Mansion
Zoom in on the coal chute underneath the left window.
- Use the Metal Beam on the tree branch.
- The branch will move.
- Click on the hatch to open it.
- It is too dark to see inside.
- Close the zoom.
Zoom in on the left window.
- Take the note from the window.
- There are also broken pot parts here. A key was placed underneath it, and has apparently fallen into coal chute when the tree branch hit the window.
- Collect the Coin.
Zoom in on the lamp to the left of the door.
- It is screwed tightly.
- Use Coin on the three screws to unscrew them.
- Remove the lamp cover.
- Collect the Light Bulb.
- Close the zoom.
Zoom in on the door bell.
- Use the Chisel on it.
- Hit the chisel with the Hammer.
- The door bell is now open.
- Take the Wires.
Zoom in on the lamp to the left of the door.
- Connect the Wires to the lamp socket.
Attach the Light Bulb to the hanging wires.
Click on the light bulb to move it into the chute.
Zoom in on the coal chute.
- You can see the key now, but you can’t reach it.
- In your inventory, connect the String and Metal Hook.
- You now have the Hook on a String.
- Use the Hook on a String to get the Mansion Key.
Zoom in on the mansion door.
- Use the Mansion Key on the lock.
The door will open.
You can now enter the mansion.
Location: Main Hall
Enter the room to the left.
Location: Study
You meet Eugene Schultz. He is sitting in his chair next to the fireplace and holds a book tightly. You try to talk to Eugene, but he is not making much sense. Besides; he thinks you are his servant, and wants some mint tea. Maybe he’ll be more willing to talk if you make him some tea.
Zoom in on the table next to Eugene.
- Collect the Small Scissors.
- Collect the Empty Teapot.
- Collect the Used Gum stuck to the bowl on the left.
- Close the zoom.
Zoom in on the cabinet.
- Click on the handle to open it.
- Click on the cat statue. The cat’s head is missing.
- Collect the metallic plate. It is some kind of Food Calendar.
- Close the zoom.
Exit the room.
Location: Main Hall
Zoom in on the basement door.
- Use the Food Calendar on the round slot.
- Click on it to start a puzzle.
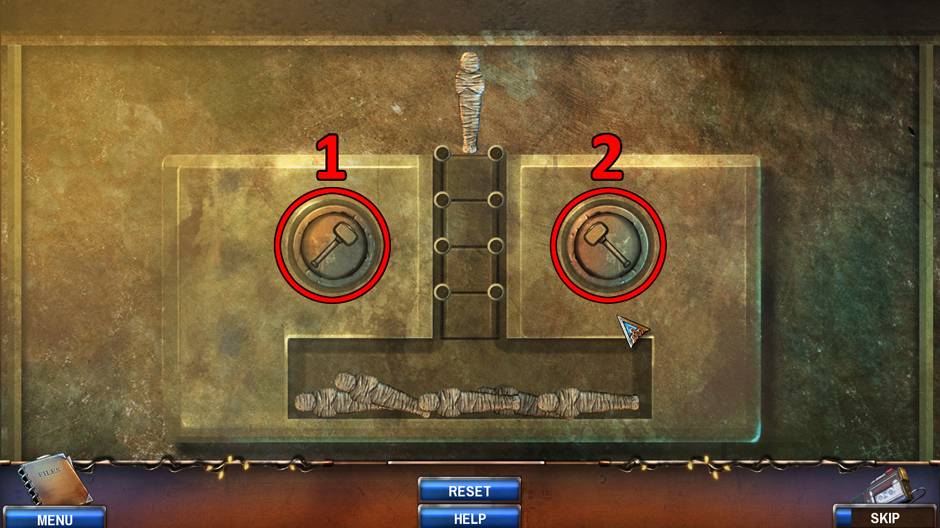
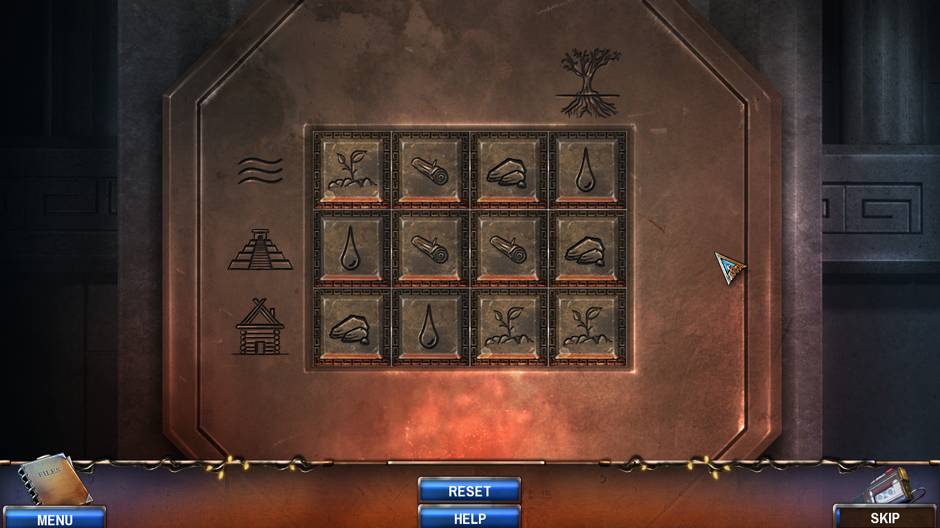
Puzzle solution:
By clicking on a food symbol, it will switch places with the sign above it. You need to match the signs with the note on the right. On the note, the first (bottom) sign is missing. It is the pig.
Start position:
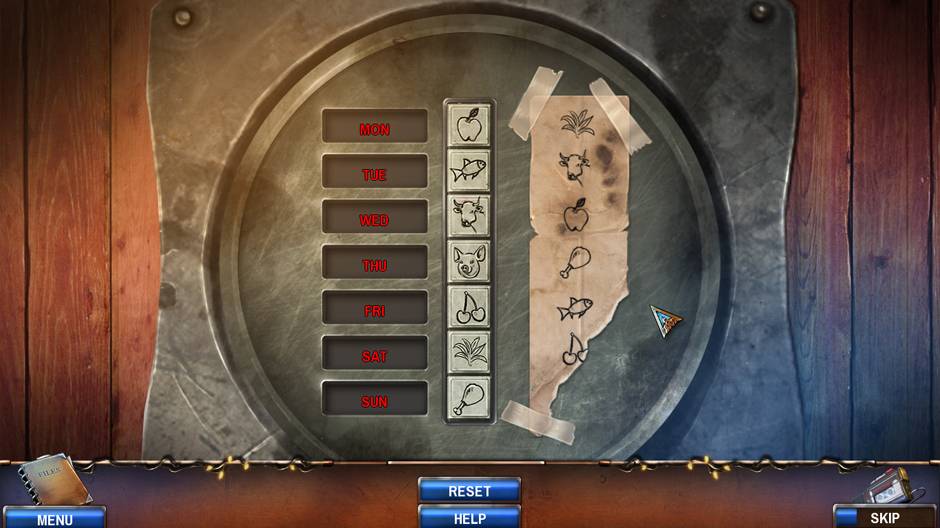
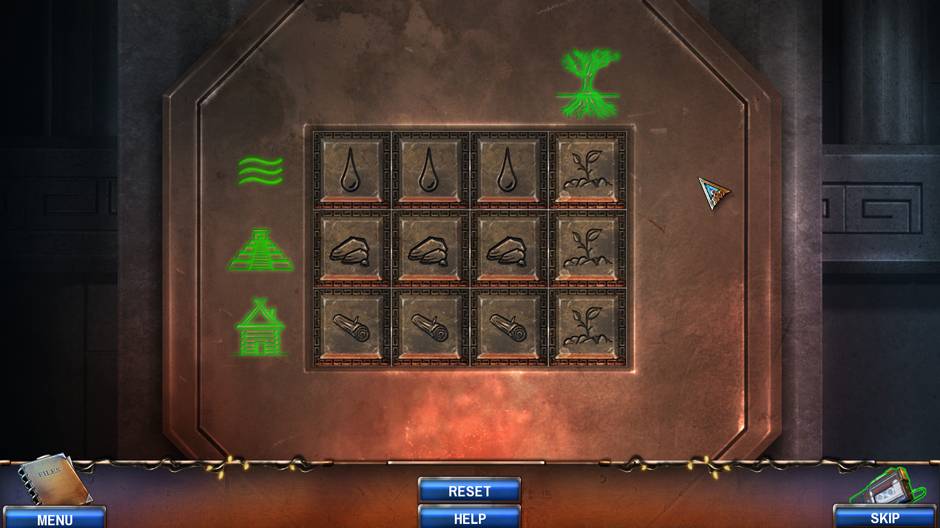
End position:
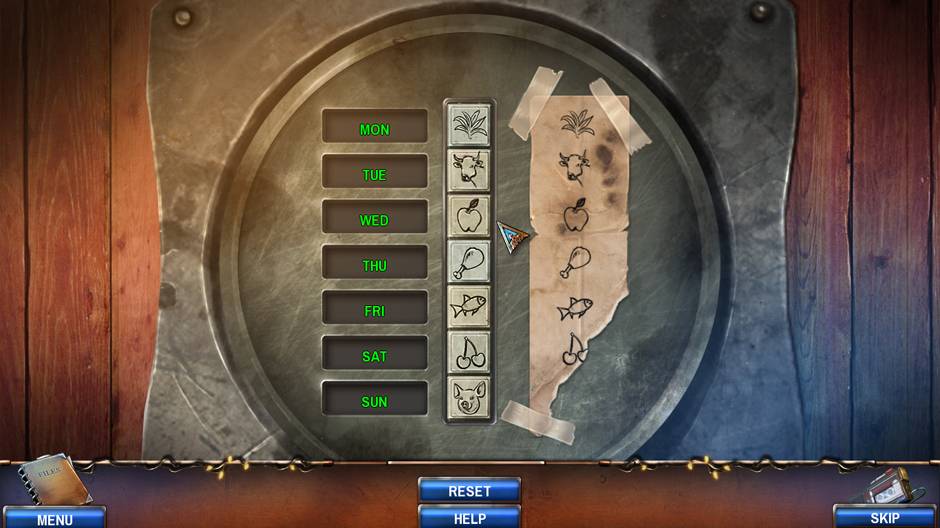
After you finish or skip this puzzle, the basement door will open.
Enter the basement.
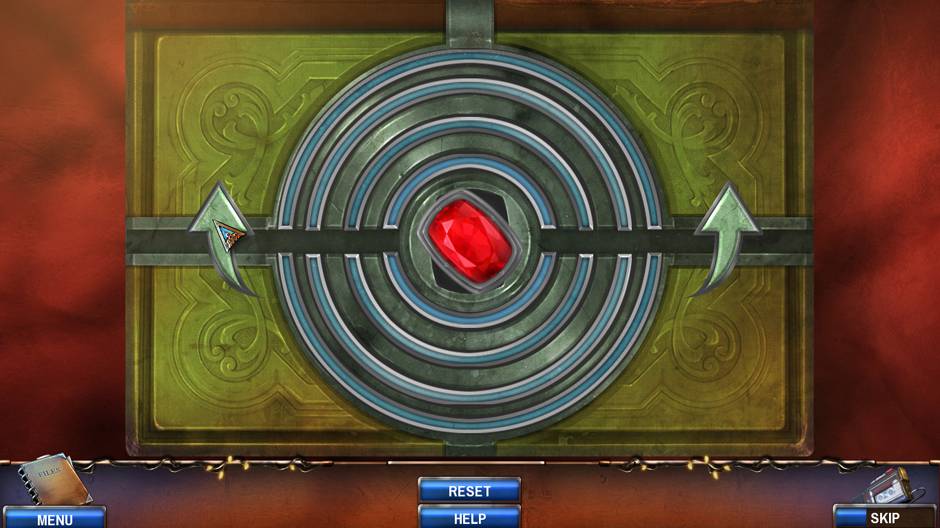
Location: Basement
The basement looks older than the house. You should investigate it.
Zoom in on the paint on the wall (“5”).
- Old, thick paint is covering something beneath.
- Close the zoom.
Collect the Spatula (“1”) and can of Dry Tar (“2”) from the boxes under the shelves.
Zoom in on the water pipe.
- Use the Empty Teapot on the pipe (“3”) to fill it with water.
- You now have the Teapot with Water.
Zoom in on the tied bag on the floor to the right (“6”).
- Collect the Thin Stick.
- Use the Small Scissors on the rope to open the bag.
- Collect the Green Marble.
Zoom in on the topmost shelf (“4”).
- Yuck! There is a rat on it. But there is also a can of mint tea. You need to get rid of the rat to take the tea.
- Close the zoom.
Exit the basement.
Location: Main Hall
Zoom in on the cabinet on the first floor.
- The cabinet door is stuck and can’t be opened.
- Use the Chisel on the door to force it open.
- Collect the Sleeping Pills.
- There is also an old plush cat here, but it’s falling apart. You will only need it’s head, though.
- Use the Small Scissors to get the Cat’s Head.
Go to the study.
Location: Study
Zoom in on the fireplace.
- Put the can of Dry Tar into it.
- Soon, the tar has melted. Use the Working Gloves to take the can of Molten Tar.
- Close the zoom.
Zoom in on the cabinet with the broken cat statue.
- Use the Molten Tar on it.
- Now stick the Cat’s Head onto it.
- The cat is still missing one eye.
- Place the Used Gum on the cat’s head.
- Now stick the Green Marble onto it.
- Collect the Cat Statue. Hopefully it is convincing enough to scare the rat off.
Go back to the basement.
Location: Basement
Zoom in on the shelf with the rat on it.
- Place the Cat Statue on the shelf.
- Hooray, the rat ran off!
- Now you can collect the Mint Tea from the can.
Return to the study to make the tea for Eugene.
Location: Study
Zoom in on the fireplace.
- Put the Teapot with Water on it.
- Soon, the water will be boiling.
- Use the Working Gloves to collect the teapot with Hot Water.
- Close the zoom screen.
Zoom in on the small desk.
- Pour the Hot Water into the teacup.
- Then place the Mint Tea into the teacup.
- The tea is ready!
- Close the zoom screen.
Talk to Eugene. He takes the tea and sends Alicia out of the room! This didn’t help.
Location: Main Hall
Go back to the study.
Location: Study
Zoom in on the small table.
- Put the Sleeping Pills into the teacup.
- Close the zoom screen.
Talk to Eugene again. Again, he sends Alicia out of the room.
Location: Main hall
Go back to the study. Eugene is now asleep.
Zoom in on the book Eugene is holding.
- The book is locked.
- Take Eugene’s Ring from his hand.
- Furthermore, collect Eugene’s Brooch with the family crest on it.
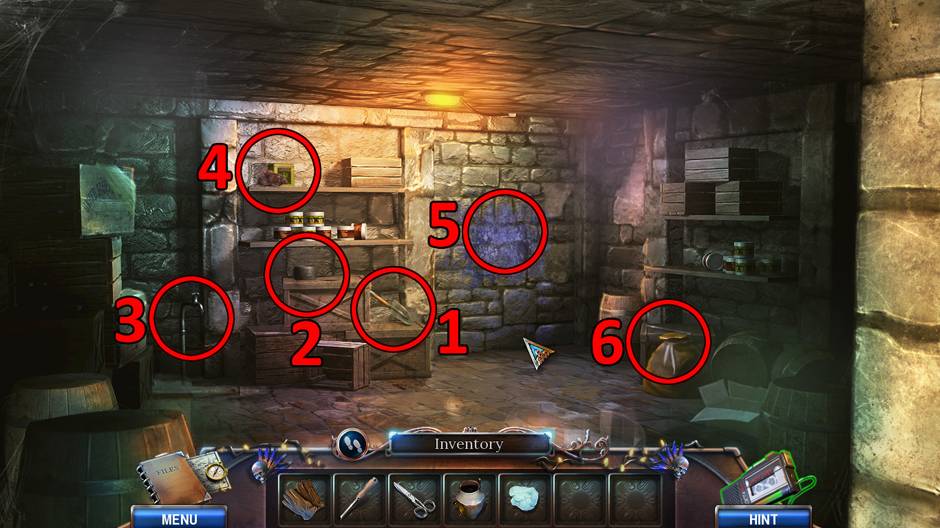
- Use Eugene’s Ring on the book.
- A puzzle starts.
Puzzle solution:
Click once on the arrow button marked with “1”.
Click once on the arrow button marked with “2”.
Click twice on the arrow button marked with “1”.
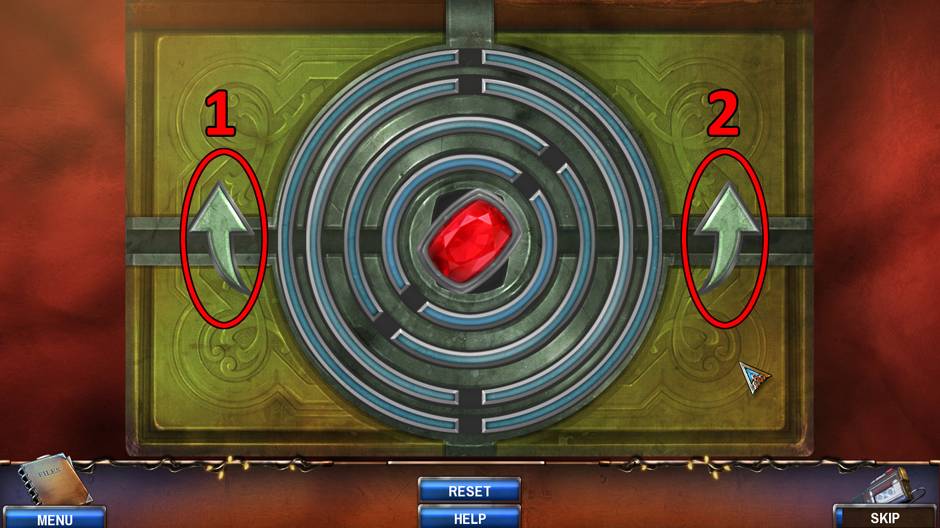
End position:
- When you finish or skip the puzzle, the book will open. It’s a Schultz family album.
Click on the open family album. You will learn about the Schultz family.
- Collect Eugene’s Key that was inside the album.
- Close the zoom.
Exit the study.
Location: Main Hall
Zoom in on the door on the first floor.
- Use Eugene’s Key to open the door.
The bedroom door will open.
Enter the bedroom
Location: Bedroom
It’s the bedroom of Eugene’s parents. No one has been here in a long time.
Click on the small painting to the left of the stone head. You will gain the achievement “Art Critic”.
Zoom in on the picture behind the bed.
- It’s a picture of Eugene’s parents.
- Click on the picture side to turn it around.
- There is a slot on the picture back.
- Use Eugene’s Brooch on the slot.
- A puzzle starts.
Puzzle solution:
Click on it to rotate the center piece and click on side pieces to fit them on center piece.
Start position:
End position:
- After you finish or skip the puzzle, you will find the Grave Plate of Marie Schultz was hidden behind the slot.
Zoom in on the area under the bed.
- Take the Wire Brush.
- Click on the small chest to drag it closer.
- The chest is closed, but something is missing on the hatch.
- Close the zoom.
Zoom in on the pedestal with the stone head.
- Collect the Strange Coin.
- Use the Thin Stick on the small hole.
- Click on the stick. A stone head pops out.
- Collect the Head Statue.
Go to the garden gate.
Location: Garden Gate
Zoom in on the stone pillar without a stone head.
- Place the Head Statue on the pillar.
- A coin pops out.
- Take the Strange Coin.
Now go to the basement.
Location: Basement
Zoom in on the paint on the wall.
- Use the Wire Brush on the wall.
- Paint is removed and a metal plate with two slots revealed.
- Place the Strange Coins into the slots.
- Click on the plate to start a puzzle.
Puzzle solution:
Use the two big buttons to slide the tracks with sign halves. When the tracks are aligned, and signs on them match the signs in the list below, click the middle button. The sign on the list below will turn blue. Do this for all the signs in the list, and do this in the right order (from left to right).
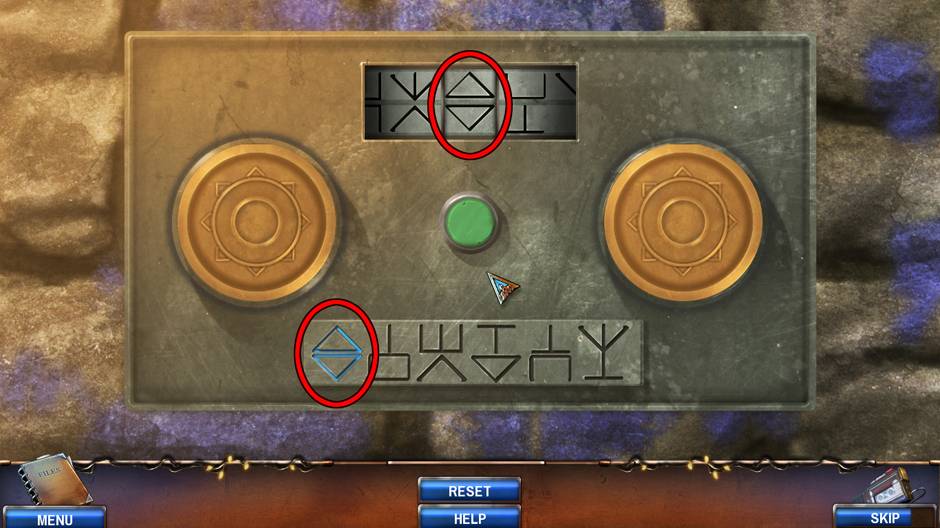
After you finish or skip the puzzle, the hidden entrance will open.
Go through the entrance.
Location: Dungeon
It looks like this place is an old dungeon where ritual murders took place.
Zoom in on the boxes and rope in the left corner of the room.
- Collect the Strange Artifact with four skulls.
- Close the zoom screen.
Return to the garden gate.
Location: Garden Gate
Zoom in on the garden gate lock.
- Place the Strange Artifact into the slot there.
- Click on the lock mechanism to start the puzzle.
Puzzle solution:
Drag the skulls so all four of them have glowing eyes.
Drag the skull marked with “2” to the right.
Drag the skull marked with “4” to the right.
Drag the skull marked with “2” to the right.
Drag the skull marked with “4” to the right.
Drag the skull marked with “3” to the left.
Drag the skull marked with “2” to the right.
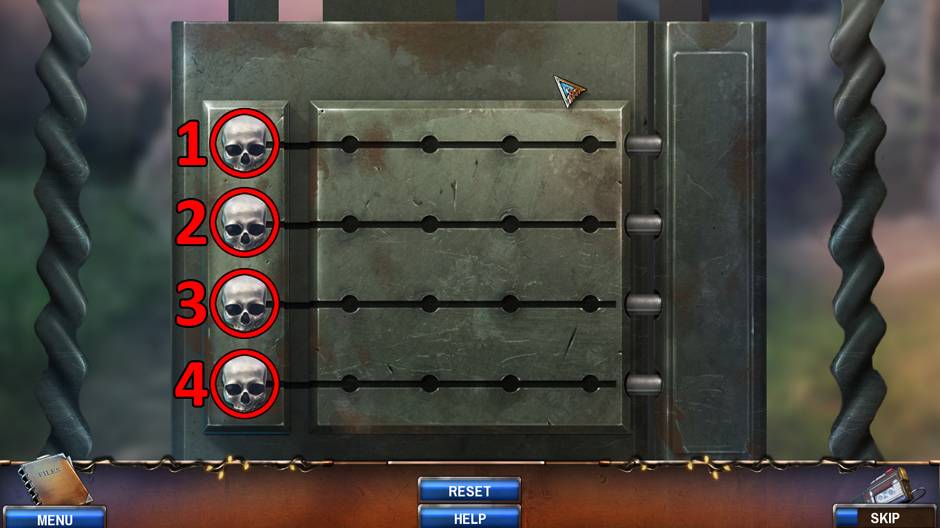
End position:

After you finish or skip the puzzle, the garden gate will open.
Go through the open gate.
Location: Crypt Garden
There is a crypt and few unmarked graves here.
Collect the unlit Oil Lamp hanging on a tree branch.
Zoom in on the closest grave to the right of the crypt.
- Collect the Chain Cutters.
- Close the zoom screen.
Zoom in on the crypt door.
- The crypt is locked. It needs two keys in order to open.
- A New Task is added to the Journal.
- Close the zoom screen.
Enter the small shed.
Location: Garden Shed
- Zoom in on the chained pickaxe.
- Use the Chain Cutters to break the chain.
- Collect the Pickaxe.
Click on the numbers carved on the boxes to the left. You will get the hidden achievement “Mathematician”.
Zoom in on the pulley hanging close to the roof.
- Use the Pickaxe to get the Pulley.
Go back to the crypt garden.
Location: Crypt Garden
To find out more about the Marie Shultz murder, you should locate her grave by trying to fit the grave name plate on the right grave.
Zoom in on the right grave located under the tree.
- Use the Grave Plate on the tombstone. It fits; this is Marie Schultz’ grave.
Zoom in on Marie’s grave mound.
- Use the Spatula to remove the dirt.
- Use the Pickaxe to break the coffin.
- Collect the Ritual Dagger. It is the same one as from the lake house.
- Collect Marie’s Medallion.
Go to the bedroom.
Location: Bedroom
Zoom in on the small chest.
- Use Marie’s Medallion on the chest slot.
- Click on the hatch to open the chest.
- Collect the Crypt Key.
Now go to the dungeon.
Location: Dungeon
Zoom in on the big rock plate on the floor. The rock is loose.
- Use the Pickaxe to remove the rock plate.
- Collect another Ritual Dagger.
Zoom in on the golden plate located on the right side of the far wall.
- There are two narrow holes on the plate.
- Place both Ritual Daggers into the narrow holes.
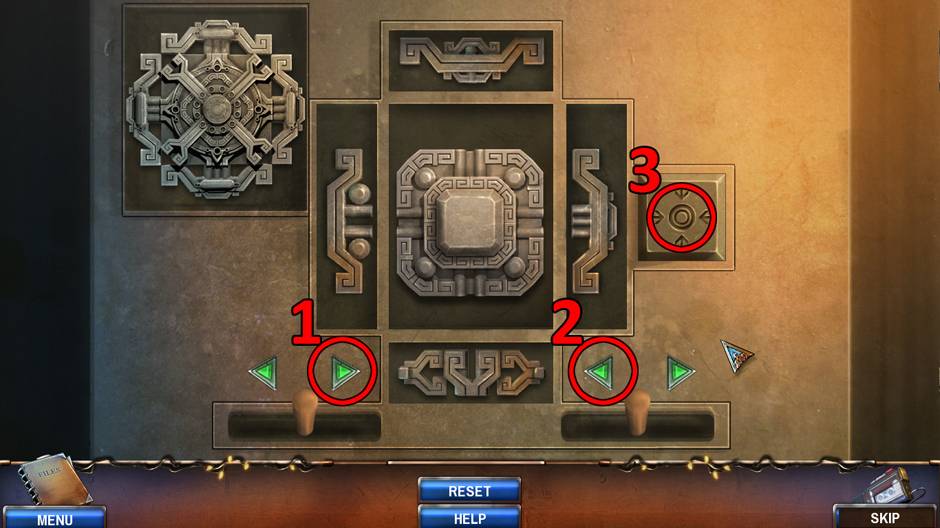
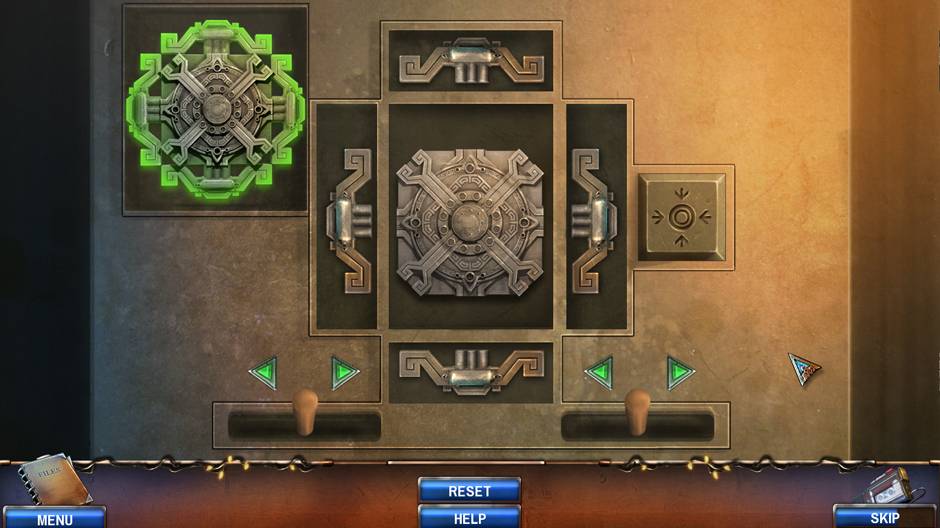
- Click on the plate to start the puzzle.
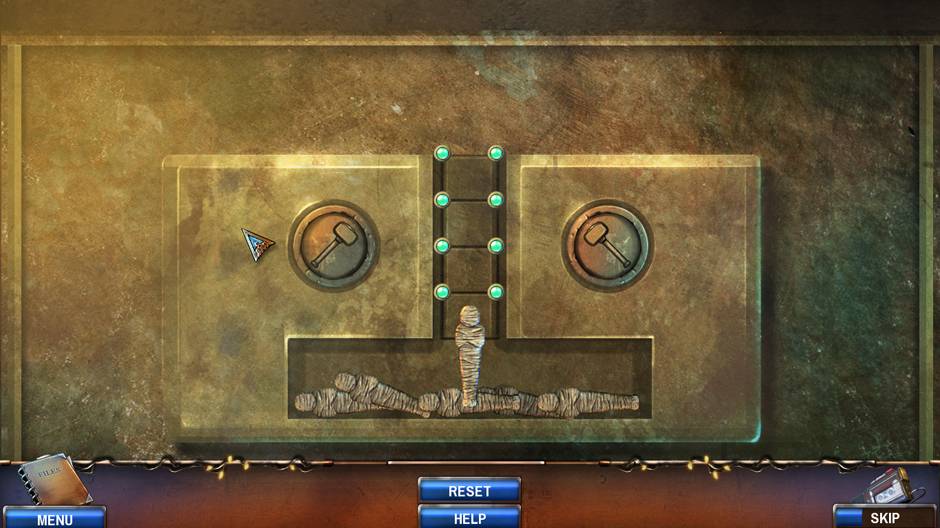
Puzzle solution:
Click once on the arrow button marked with “1”.
Click once on the arrow button marked with “2”.
Click once on the arrow button marked with “3”.
Click twice on the arrow button marked with “4”.
Click once on the arrow button marked with “5”.
Click once on the arrow button marked with “3”.
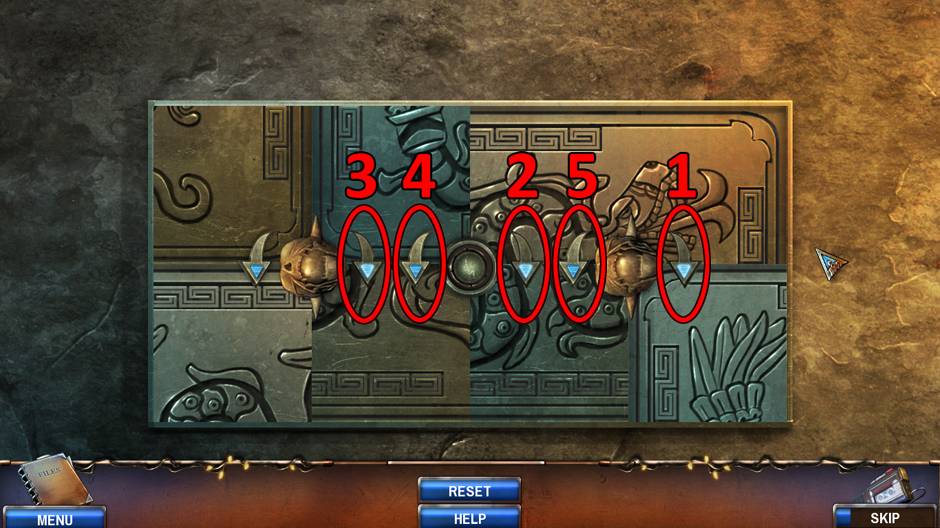
End position:
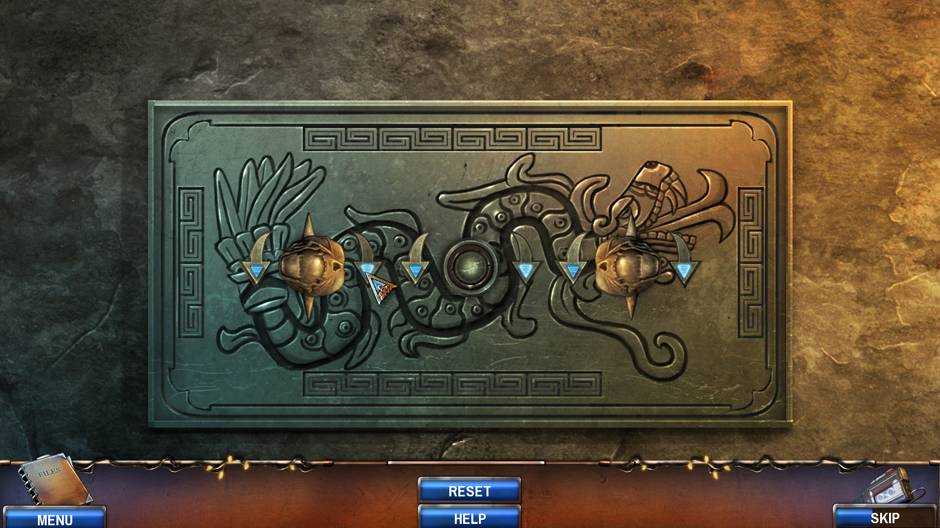
- After the puzzle is finished or skipped, a small niche in the wall will open.
- Collect the second Crypt Key.
Zoom in on the boxes and rope in the left corner of the room.
- Use the Wire Cutters to get the Bloody Rope.
Now go to the crypt garden.
Location: Crypt Garden
Zoom in on the crypt doors.
- Place both Crypt Keys into the keyholes.
- Click on the keys to start the puzzle.
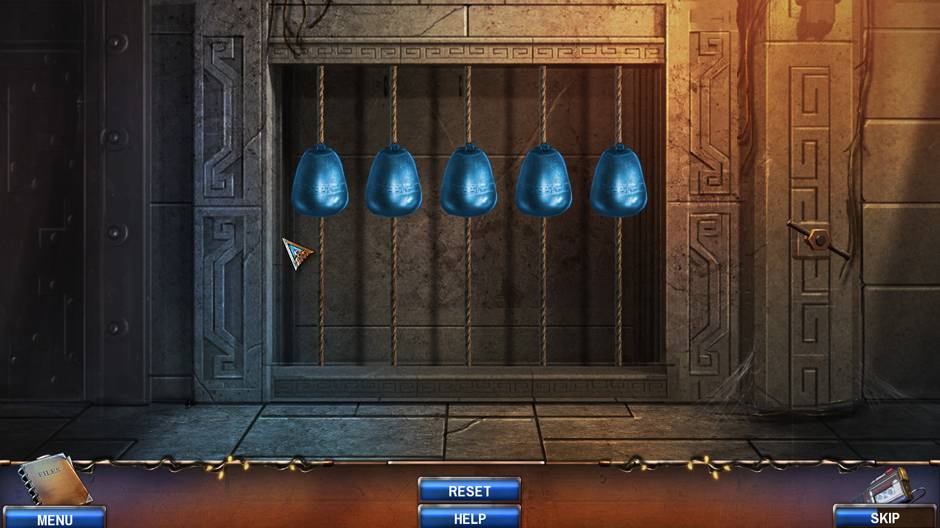
Puzzle solution:
Align the pins as shown on the picture below:
After the puzzle is finished or skipped, the crypt doors will open.
Enter the crypt.
Location: Crypt
You should try to remove sarcophagus cover.
Use the Pulley on the hook on the wall to the left of the sarcophagus.
Now place the Bloody Rope on the pulley.
Pull the rope.
The sarcophagus cover will move.
Zoom in on the open sarcophagus.
- It is dark and the hole looks deep. There is also a small hook near the sarcophagus top.
Go back to the study room in the mansion.
Location: Study
Zoom in on the fireplace.
- Place the Oil Lamp close to the fireplace.
- You now have the Lighten Lamp.
Return to the crypt.
Location: Crypt
Zoom in on the open sarcophagus.
- Place the Lighten lamp on the hook.
- The hole is now lit and it seems as if it isn’t as deep as it looked.
- Enter the hole.
Location: Hidden Entrance
There is an opening that goes down deeper. You need to find a way to get down there.
Collect the Metal Insignia from the skeleton.
Go back to the small shed in the crypt.
Location: Garden Shed
Zoom in on an old helmet.
- Place the Metal Insignia on it.
- The cross on the top of the helmet will pop out.
- Collect the Metal Cross.
Return to the crypt.
Location: Crypt
Zoom in on the altar behind the sarcophagus.
- Place the Metal Cross in the slot on the small chest.
- Click on the chest to open it.
- The chest will open.
- Collect the Crypt Artifact.
Zoom in on the pillar to the left of the altar.
- Click on the markings on this pillar to get a Journal entry. It could help you later.
- Close the zoom screen.
Go into the sarcophagus hole.
Location: Hidden Entrance
Zoom in on the plate on the left wall.
- Place the Crypt Artifact into the slot.
- The mechanism will move.
- Click on the plate to start the puzzle.
Puzzle solution:
Click on the buttons marked as “1” and “2” in this order:
1-2-2-1-2-2-1-1
End position:
- After you finish or skip this puzzle, the niche in the wall will open.
- Collect the Ritual Hammer.
Go to the garden shed.
Location: Garden Shed
Zoom in on the big chest.
- Use the Ritual Hammer on the padlock to break it.
- Click on it to open the chest.
- Collect the Metal Ladder.
Exit the shed.
Location: Crypt Garden
- Zoom in on the grave placed between the crypt and the shed.
- On each side of the tombstone there is a Metal Pin. Collect both pins.
Go back into the sarcophagus hole via hidden entrance.
Location: Hidden Entrance
Zoom in on the back wall.
- Place both Metal Pins into the two metal holes in the wall.
- Use the Ritual Hammer on both pins to nail them into the holes.
Place the Metal Ladder on the pins.
Go down the ladder.
Chapter 4: Underground Temple
Alicia goes down into a dark cave. The entrance collapses behind her. She needs to find a new way out, but also the person responsible for the ritual killings.
Location: Cave
Zoom in on the metal cage on the left cave wall.
- Take the Crystal.
- Close the zoom.
Exit the cave.
Location: Ancient Graveyard
There is an old graveyard here. The deceased are placed on wooden bunks above the ground.
Collect the Y Stick placed next to the right grave bunk and wall.
Collect the Water Sign Urn on the path.
Collect the Pale Fungus located on the left wall next to the skeleton.
Zoom in on the skeleton.
- Click on the hand to move it.
- Open the book.
- Read about Professor Wright and his research.
- You will acquire an important Journal entry with guidelines. This will be important later.
- Collect the Stone Disc from the slot in the book.
- Close the zoom.
Zoom in on the closest grave bunk next to the path.
- Take the Spear.
- Take the Feather.
- Click on the part of the leather cover on the skeleton’s chest to remove it.
- Collect the Necklace Half.
Zoom in on the further grave bunk next to the path.
- Take the Bow.
- Take the Necklace Half.
In your inventory, combine both Necklace Halves to get the Necklace Key.
Go further down the path.
Location: Old Temple
Zoom in on the stone mechanism to the left.
- Place the Crystal (“1”) into the topmost hole.
- Place the Necklace Key (“2”) into the small hole underneath the crystal hole.
- Click on the necklace key.
- The puzzle will start.
Puzzle solution:
Click on the lenses to align the light beam as shown in the picture:
- After you finish or skip this puzzle, the crystal will be lit.
- Collect the Lit Crystal.
- Close the zoom.
Zoom in on the right statue next to the main temple gate.
- There is a small six-sided slot in the statue’s arm. Use the Stone Disc on it.
- Click on the stone disk. The statue’s arm will move.
- Collect the Pot with Holds.
In your inventory, combine the Pot with Holds with the Y Stick to get the Pot on a Stick.
Go back to the ancient graveyard.
Location: Ancient Graveyard
On the left top part of the cave wall there are some stalactites with green acid on them.
Use the Pot on a Stick on those stalactites to fill the pot with acid.
You now have the Pot of Acid.
Go back to the cave.
Location: Cave
Zoom in on the metal cage on the left cave wall.
- Place the Lit Crystal in the cage.
The cave is now lit.
Collect the Pale Fungus from the left wall.
Collect the Stone Weight from the floor next to the wooden door on the right.
Zoom in on the wooden door lock.
- The lock is rusty.
- Use the Pot of Acid on the lock to remove the rust.
- Click on the lock to open the door.
Go through the newly opened door.
Location: Cave Room
Zoom in on the stone desk to the left.
- It looks like some kind of primitive machine.
- Collect the Ancient Axe.
- Close the zoom screen.
Zoom in on the skeleton.
- Take the Guardian Necklace.
Zoom in on the wall plate on the far wall in the lit area of the room.
- Use the Spear to remove the plate.
- Collect the Saw and box with Statue Elements.
Zoom in again on the stone desk to the left.
Place the Statue elements (“1”) in the big hole under the desk top.
- In your inventory, combine the Saw and Spear to get the Two Sticks.
- Place the Two Sticks into the two horizontal slots (“2”) on the desk top.
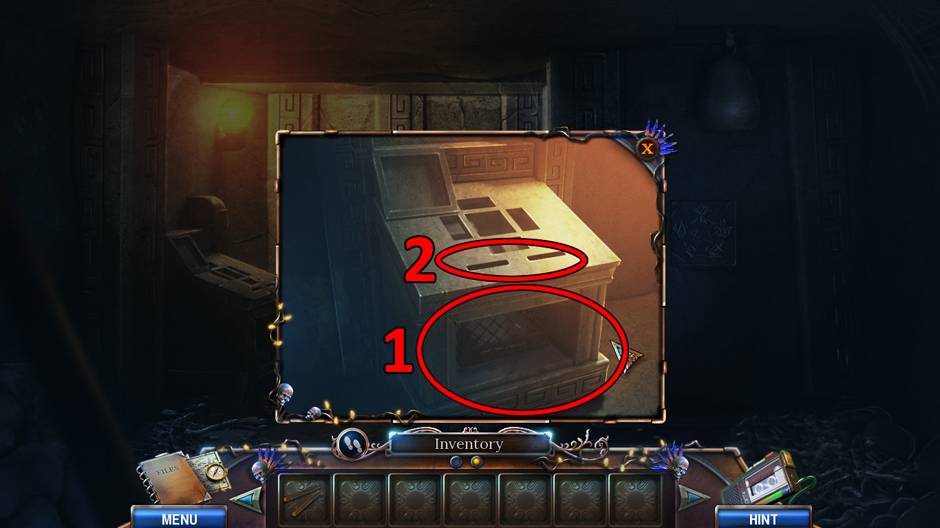
- Close the zoom screen.
Inspect the signs on the plate located on the right, underneath the stone weight.
You will unlock the hidden achievement “Explorer”, and an additional Journal entry which could help you later in the game.
Go back to the ancient graveyard.
Location: Ancient Graveyard
Zoom in on the skeleton of Professor Wright.
- Use the Ancient Axe to break the small chest lock.
- Click on the chest to open it.
- Collect the Chieftain Statue.
- Close the zoom screen.
Return to the cave room.
Location: Cave Room
Zoom in on the stone desk to the left.
- Place the Chieftain Statue into the big slot at the desk top.
- Click on the handles to start the puzzle.
Puzzle solution:
Click once on the arrow button marked with “2”.
Click three times on the arrow button marked with “1”.
Click once on the button marked with “3”.
End state:
- After you finish or skip this puzzle, you will get the second Chieftain Statue.
- Take the first Chieftain Statue from the desk. You will need both of these statues.
- Close the zoom screen.
Go to the temple entrance.
Location: Old Temple
Place both Chieftain Statues into the main gate slots.
The main gates will open.
Go inside the temple.
Location: Temple Hall
Zoom in on the area with the stone weights located next to the doors on the left wall (“1”).
- Take the Handle on the right.
- Close the zoom screen.
Go further down the hall.
Location: Throne Room Doors
Zoom in on the skeleton underneath the left statue.
- Collect the Broken Arrow Stick and the Guardian Necklace.
- Close the zoom screen.
Go to the temple entrance.
Location: Old Temple
Zoom in on the closed gates to the right.
- Place both Guardian Necklaces into the slots.
- The puzzle will start. A Journal entry will be gained, together with the hidden achievement “Explorer”, which could help you in solving this puzzle.
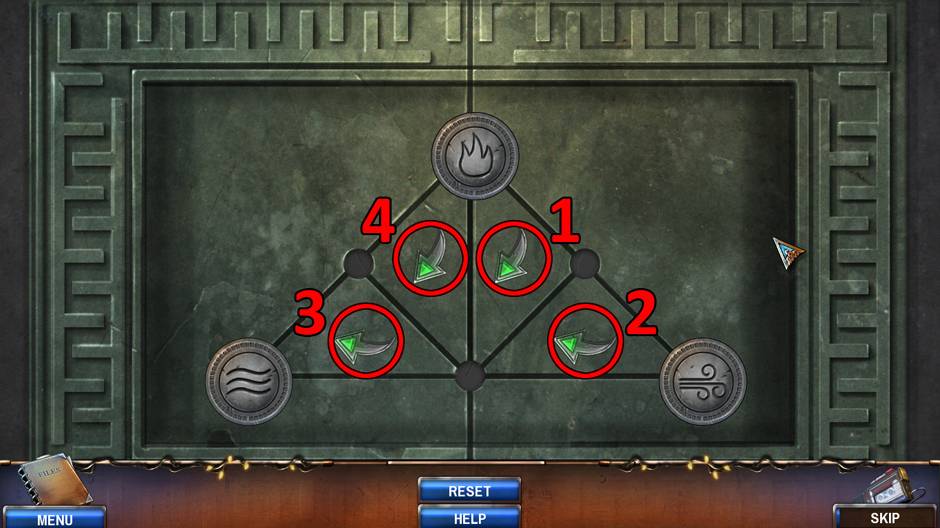
Puzzle solution:
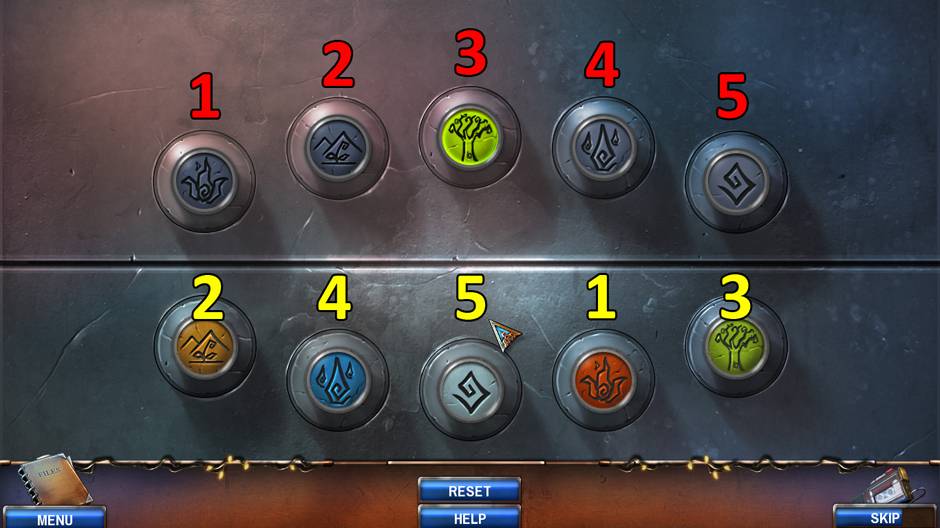
For each sign in the upper part of the screen, click its counterpart in the bottom part of the screen.
If sign Fire is lit (“1red”) click on the button Water (“4yellow”).
If sign Soil is lit (“2red”) click on the button Tree (“3yellow”).
If sign Tree is lit (“3red”) click on the button Metal (“5yellow”).
If sign Water is lit (“4red”) click on the button Soil (“2yellow”).
If sign Metal is lit (“5red”) click on the button Fire (“1yellow”).
After you finish or skip this puzzle, the gates will open.
Enter the new room.
Location: Chieftains Crypt
Zoom on the right chieftain’s skeleton.
- Take the Chieftain Sign.
- Close the zoom screen.
Zoom on the center chieftain’s skeleton.
- Take the Chieftain Sign.
- Close the zoom screen.
Zoom on the left chieftain’s skeleton.
- The chieftain sign is missing here.
- Close the zoom screen.
Zoom in on the pedestal located between the left and center chieftain skeletons.
- Take the Sacred Scroll. The scroll seems to be empty.
Zoom in on the pedestal located between the right and center chieftain skeletons.
From Professor Wright’s notes, you learn about the chieftains and the great energy they possessed… and may still possess.
Again zoom in on the pedestal located between the right and center chieftain skeletons.
- Take the Scepter Rod.
Go to the cave room.
Location: Cave Room
Place the Handle into the hole on the wall close to the stone weight.
Click on the handle.
The stone weight is now lowered onto the floor.
Use the Ancient Axe to cut the rope.
Take the Stone Weight and the Handle you placed here.
Now go to the temple hall.
Location: Temple Hall
Zoom in on the area with the stone weights located next to the doors on the left wall.
- Place both Stone Weights into the two locations where weights are missing.
- Place the Handle back into the hole from where you first took it.
- Click on the handle to start the puzzle.
Puzzle solution:
Move the weight marked with “5” down.
Move the weight marked with “1” up.
Move the weight marked with “3” down.
Move the weight marked with “1” up.

End position:
After you finish or skip this puzzle, the gates left of the stone weights mechanism will open.
Enter the newly accessible room.
Location: Armory
Take the Blacksmith Tongs from underneath the work bench on the left.
Collect the box of Ancient Elements located between the work bench to the left and the grinder to the right.
Go back to the ancient graveyard.
Location: Ancient Graveyard
Zoom in on the skeleton of Professor Wright.
- Use the Blacksmith Tongs to get the Arrow Tip stuck in the skeleton’s chest.
Go to the cave room.
Location: Cave Room
Zoom in on the stone desk to the left.
- Place the Ancient Elements into the large hole under the desk top.
- Place the Chieftain Sign into the big slot at the top of the desk.
- Click on the handles to start the puzzle.
Puzzle solution:
Click once on the arrow button marked with “2”.
Click two times on the arrow button marked with “1”.
Click once on the button marked with “3”.
End state:
- After you finish or skip this puzzle you will get the second Chieftain Sign.
- Take the Chieftain Statue from the desk.
Go back to armory.
Location: Armory
Zoom in on the work bench to the left.
- Place the Arrow Tip, the Feather, and the Broken Arrow Tip into the slots.
- You will get the Arrow.
Go to the throne room doors.
Location: Throne Room Doors
Zoom in on the doors.
- Place the three Chieftain Signs into the slots.
- The puzzle will start.
Puzzle solution:
Click once on the arrow button marked with “1”.
Click once on the arrow button marked with “2”.
Click once on the arrow button marked with “3”.
Click once on the arrow button marked with “4”.
End position:
After you finish or skip this puzzle, the doors to the throne room will open.
Enter the throne room.
Location: Throne Room
You enter the room and find Herman Schultz there. He was the one behind the murder, but also other murders. He is now weak due to absorbing energy from a new victim, which is quite painful. However he is still very dangerous, and you can’t get past him.
Zoom in on the pedestal to the left of Herman.
- Collect the round Metal Cage.
- Close the zoom.
Zoom in on the pedestal next to Herman.
- Collect the Ancient Dagger.
- Close the zoom.
Take the Wind Sign Urn from the right pit.
Click on the right pit to get the hidden achievement “Bone Finder”.
Zoom in on the niche in the pillar to the right.
- There is a statue in it. You can’t move it.
- Use the Blacksmith Tong to remove the gold crown from the statue.
- You now have the Scepter Top.
- Now the statue can be moved. Take the Sun God Statue.
Zoom in on the plate on the left pillar.
- The plate has some strange signs. You will need something to decode it.
- Close the zoom.
Go back to the temple hall.
Location: Temple Hall
Zoom in on the small pedestal next to the doors on the right.
- Use the Ancient Dagger to get the metal Water Sign.
Zoom in on the right doors.
- In your inventory, combine the Scepter Rod and Scepter Top to get the Sun Scepter.
- Place the Sun Scepter into the scepter slot.
The doors will open.
Enter the newly open room.
Location: Sacred Chamber
Take the Fire Sign Urn from the small pedestal to the left.
Zoom in on the center pedestal.
- Place the Sacred Scroll on it.
- Close the zoom.
Zoom in on the pedestal to the right.
- Hinges are holding the metal cage on the well.
- Use the Ancient Axe on the two hinges to break them.
- The metal cage is removed and the well is opened.
- Take the metal Cage Part.
- Use the Water Sign Urn on the well to fill it with water.
- You now have the Full Water Urn.
Go to the temple entrance.
Location: Old Temple
Zoom in on the crystal charging mechanism to the left.
- Place the Sun God Statue into the statue slot.
- Above it, a round plate with the sun symbol pops out.
- Take the Sun Symbol.
Go to the chieftains’ crypt.
Location: Chieftains’ Crypt
In your inventory, combine the Bow and Arrow to get the combined item Bow and Arrow (well, you need them together to work!).
Use the Bow and Arrow on the pale fungus located on the right statue head.
A fungus chunk will fall down onto the floor.
Collect the Pale Fungus.
Place the Metal Cage on the hook above the right dead chieftain.
Place the Cage Part on the cage part above left dead chieftain.
Place the Full Water Urn under the right chieftain’s body.
Zoom in on the right chieftain’s body.
- Place the Water Sign into the chieftain’s necklace.
- Close the zoom.
Now go to the armory.
Location: Armory
Zoom in on the small wall plate between the workbench and grinder.
- Use the Ancient Dagger to get the metal Fire Sign.
Zoom in on the grinding machine to the right.
- Place the Pale Fungus on it (“1”).
- Click on the handle (“2”).
- Grind the fungus into green glowing dust using the grinder.
- Collect the Fungus Powder.
- Do the same for all fungus items.
Go to the secret chamber.
Location: Sacred Chamber
Zoom in on the wall slot behind the central pedestal.
- Place the Sun Sign into it.
- A puzzle will start.
Puzzle solution:
Click once on the arrow button marked with “1”.
Click once on the arrow button marked with “3”.
Click once on the arrow button marked with “2”.
Click once on the arrow button marked with “1”.
End position:
After you finish or skip this puzzle, the light from the ceiling will hit the central pedestal.
Zoom in on the center pedestal.
- The light beam has made hidden signs on the scroll visible.
- Take the Sacred Text.
Go to the throne room entrance.
Location: Throne Room Doors
Zoom in on the dead guardian skeleton.
- Use the Ancient Dagger on the belt to cut it.
- You now have the Leather Belt.
Enter the throne room.
Location: Throne Room
Zoom in on the plate on the right pillar.
- Use the Sacred Text on the plate with signs.
- You have decoded the signs.
- Click on the plate to start the puzzle.
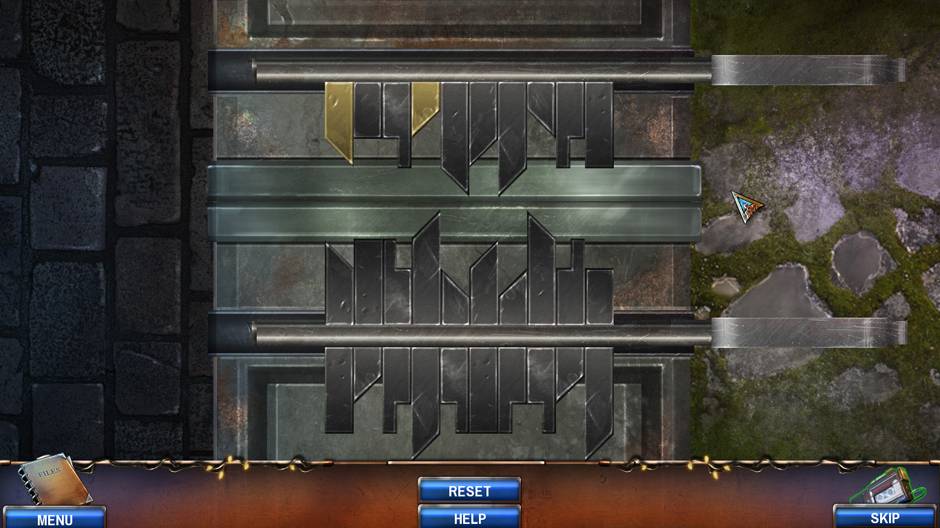
Puzzle solution:
Move the signs so they correspond to the end picture shown below.
Start position:
End position:
- After you finish or skip this puzzle, the plate will be removed.
- Use the Ancient Dagger on the small metal plate to take it.
- You now have the metal Wind Sign.
Zoom in on the lava pit to the left.
- In your inventory, combine the Leather Belt with the Fire Sign Urn.
- You now have the Fire Urn on a Belt.
- Use it on the lava to get the Full Fire Urn.
Go to the chieftains’ crypt.
Location: Chieftains’ Crypt
Zoom in on the central stone head.
- There is a wind sign in the statue’s mouth. Wind is heard from inside.
- Break it with the Ancient Axe.
- Use the Wind Sign Urn on the statue’s mouth.
- You now have the Full Wind Urn.
Everything is ready for extracting the energy from the dead chieftains, as shown on the instructions found in Professor Wright’s book.
Place the Full Fire Urn under the left chieftain’s body.
Place the Full Wind Urn under the central chieftain’s body.
Zoom in on the left chieftain’s body.
- Place the Fire Sign into the chieftain’s necklace.
- Sprinkle the Fungus Dust onto the necklace.
- Energy goes out of chieftain’s’ body through the necklace sign and gets trapped in the metal cage above the body.
Take the cage with the Fire Energy.
Zoom in on the central chieftain’s body.
- Place the Wind Sign into the chieftain’s necklace.
- Sprinkle the Fungus Dust onto the necklace.
- Energy goes out of chieftain’s’ body through the necklace sign and gets trapped in the metal cage above the body.
Take the cage with the Wind Energy.
Zoom in on the central chieftain’s body.
- Sprinkle the Fungus Dust onto the necklace (you placed the sign into the necklace before).
- Energy goes out of chieftain’s’ body through the necklace sign and gets trapped in the metal cage above the body.
Take the cage with the Water Energy.
Now you can go to the throne room and confront Herman.
Location: Throne Room
Place the cage with the Wind Energy on the central pedestal with the wind sign.
Zoom in on the left pedestal with the fire sign.
- Place the cage with the Fire Energy on it.
Zoom in on the right pedestal with the water sign.
- Place the cage with the Water Energy on it.
The three forms of energy build up, destroying Herman’s energy field. Alicia manages to run pass him and save herself before the temple collapses. It is over…
But wait. Someone is watching from the forest… a soldier. It seems that this case involving Alicia was not a coincidence after all. What does that mean?
We all hope there will be a sequel…
Thanks for playing Alicia Griffith – Lakeside Murder!
This walkthrough was provided by Agrostemma Games and published by GameHouse. The Alicia Griffith – Lakeside Murder walkthrough is meant as a guide and does not contain cheats, hacks, or serials.

