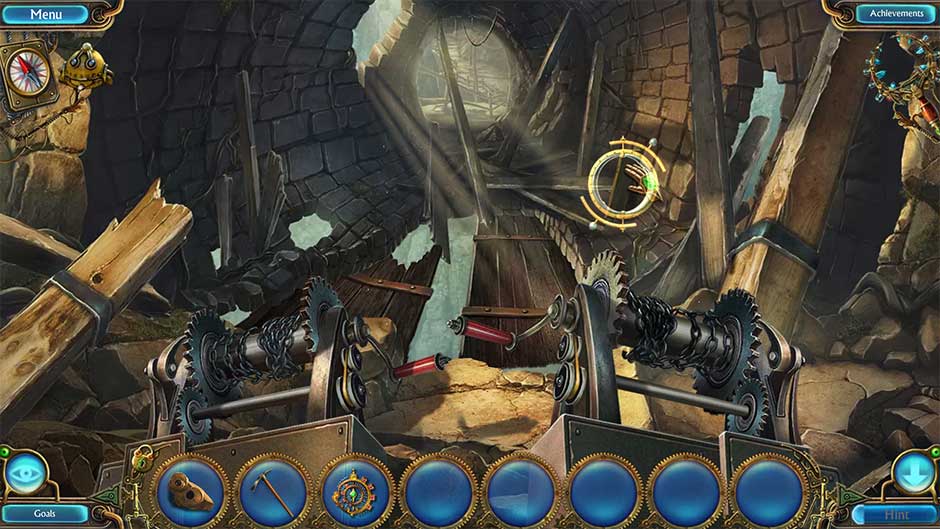
Welcome to the Kingdom of Aurelia – Mystery of the Poisoned Dagger walkthrough. The princess of Aurelia has fallen victim to a mysterious spell after being cut with a cursed dagger. Is the good wizard Pharion to blame? It’s up to you and Tim to uncover the culprit before they do more damage in this fantastical steampunk hidden object adventure. Our walkthrough will guide you with all the tips and tricks you need to stay one step ahead of the game.
Contents
General Tips & Tricks
Whether you’re new to the game or just need a finger pointing you in the right direction, this section will provide you with all the general tips and tricks you need to get started.
- Your current Goals can be accessed by clicking on the Goals button in the lower left corner of the screen. Selecting this button will show you all current objectives, as well as any you’ve completed per chapter.
- The Inventory is shown at the bottom of the screen. Click on the lock icon on the left side to lock it into place, or unlock it to let it disappear at the bottom of your screen when it’s not being used. All Key Items you uncover while playing will be stored here.
- Items with a + sign next to them indicate they can be interacted with further. Click on the item to have a closer look. Interacting with an item may require using an additional item to complete it.
- The Hint button is located in the lower right corner of the screen. Click on this to receive a hint regarding where you should go or what you should do next.
- During puzzles, the Hint button will become a Skip
- Both Hints and Skips are unlimited, but will require time to charge up before use.
- Click on the eye icon in the lower left corner to view all Active Areas you can interact with.
- The Mobile Projector is located in the upper left corner of your screen. Once found, you can use this to view a map of your current chapter. You can also fast-travel between locations by clicking on their icons.
- Tim the Robot is a metal companion you will find during the game’s first chapter. Located in the upper left corner, Tim can reach locations you can’t, and will flash green whenever you enter a room where he can be used.
- The Achievements tab is located in the upper right corner. Use this to keep track of all achievements while playing the game.
- Once you’ve completed the game’s main adventure, you can access the Extra Gameplay by clicking on the Extras tab in the game’s Main Menu.
Kingdom of Aurelia – Mystery of the Poisoned Dagger Walkthrough
Twelve years ago the Kingdom of Aurelia was captured by a tyrant. With the help of the great wizard Pharion, the princess of the land was able to reclaim her kingdom. However, during the celebration, a stranger cut the hand of the princess, sending her into an accursed sleep. Her friend Tim, who witnessed the attack, will need to chase down her attacker and try to save her, before it’s too late!
Chapter 1 – Palace
Bedroom
- Select the Amulet in your inventory and show it to the King. You will trigger a cutscene.
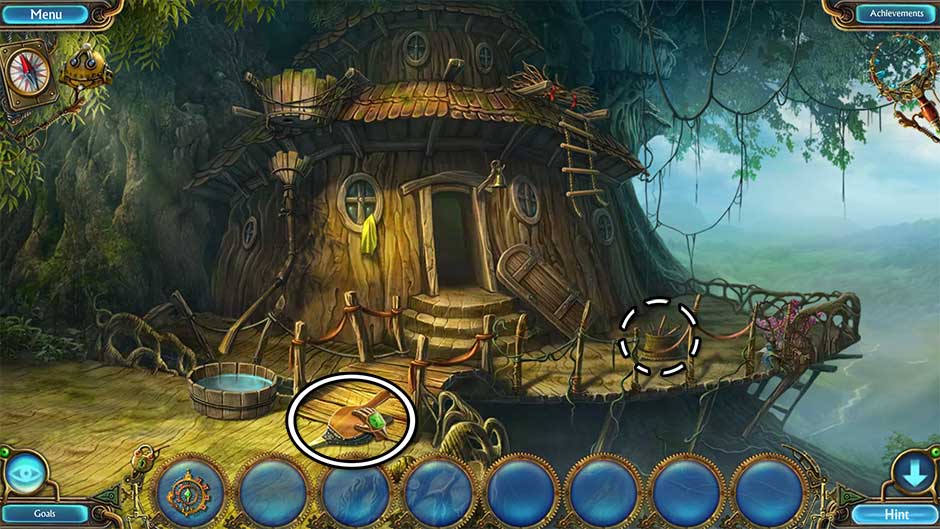
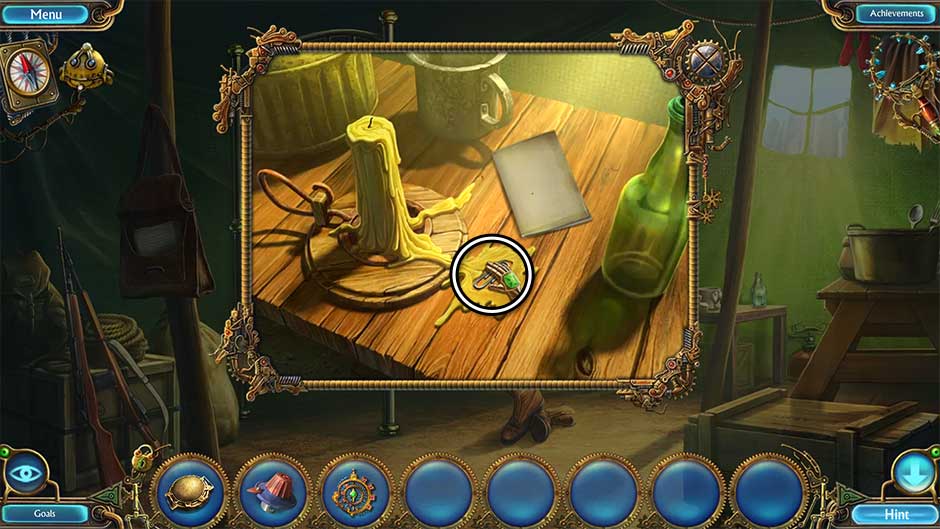
- Examine the round, green ottoman in the lower right corner.
- Click on the Brush and the Part of Dial 1/4 to add them to your inventory.
- Take a closer look at top of the cabinet to the left of the bed.
- Click on the Part of Dial 2/4 to add it to your inventory.
Kingdom of Aurelia – Mystery of the Poisoned Dagger – Chapter 1 – Part of Dial Location
- Look at the Princess’s bed.
- Read the scroll lying on the bed.
- Click on the Part of Dial 3/4 to add it to your inventory.
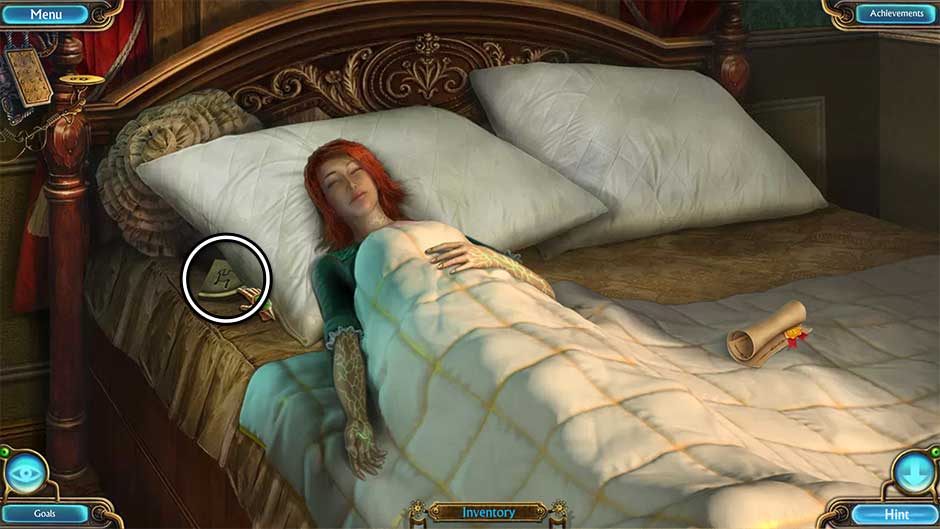
Kingdom of Aurelia – Mystery of the Poisoned Dagger – Chapter 1 – Part of Dial Location 2
- Enter through the door on the left.
Parlor
- Click on the woman in the Parlor to trigger a cutscene.
- Once the woman has left, return to the Bedroom.
Bedroom
- Read the letter lying on the floor in front of the bed, and the letter on the dresser on the right.
- Return to the Parlor.
Parlor
- Examine the globe on the coffee table.
- Click on the Powder Box to add it to your inventory.

Kingdom of Aurelia – Mystery of the Poisoned Dagger – Chapter 1 – Powder Box Globe
- Click on the Powder Box in your inventory to examine it further.
- Click on the Powder Box to open it.
- Select the Brush from your inventory and use it on the Powder Box to acquire the Brush with Powder.
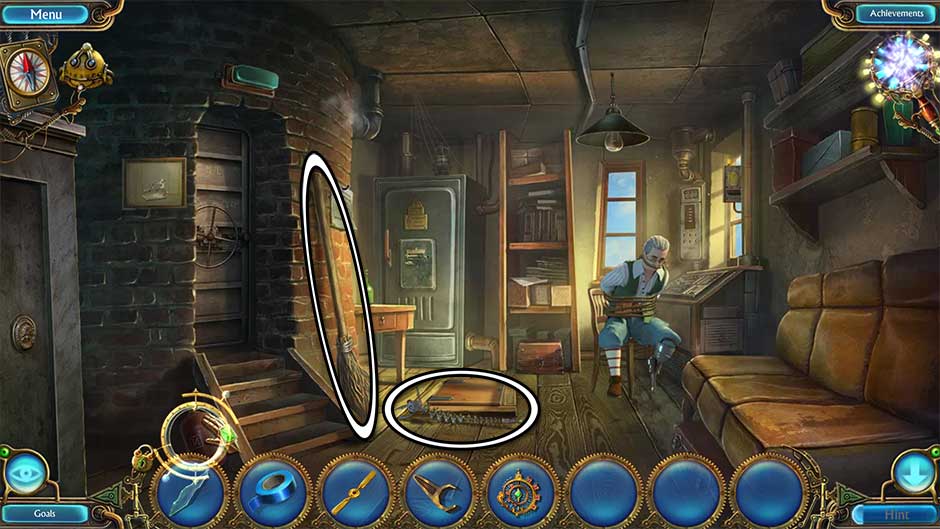
- Take a closer look at the book stand on the right.
- Click on the compass-like Mobile Projector. It will be added to the upper left corner of your screen. Click on it to access your Map.
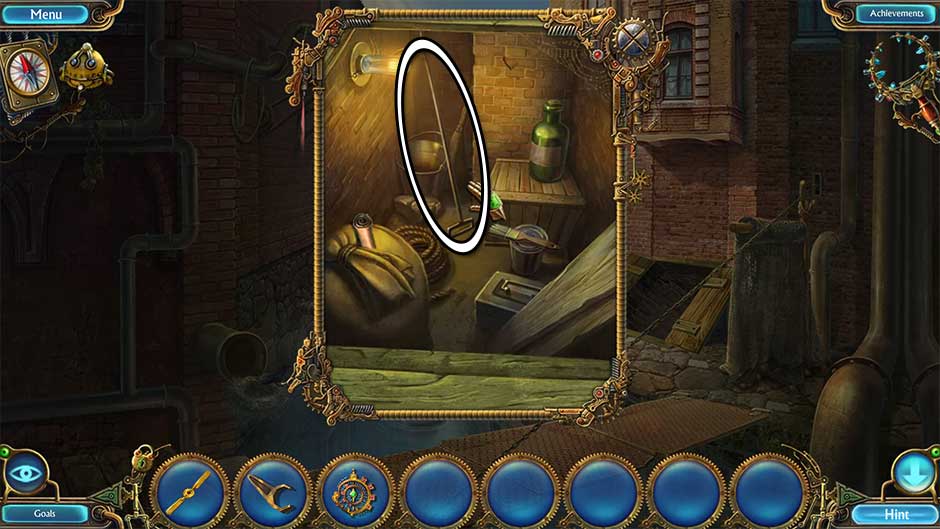
- Examine the broken window on the left.
- Click on the cloth stuck on the broken window pieces to open the pocket.
- Click on the Pliers inside to add them to your inventory.
- Read the note left inside the pocket.
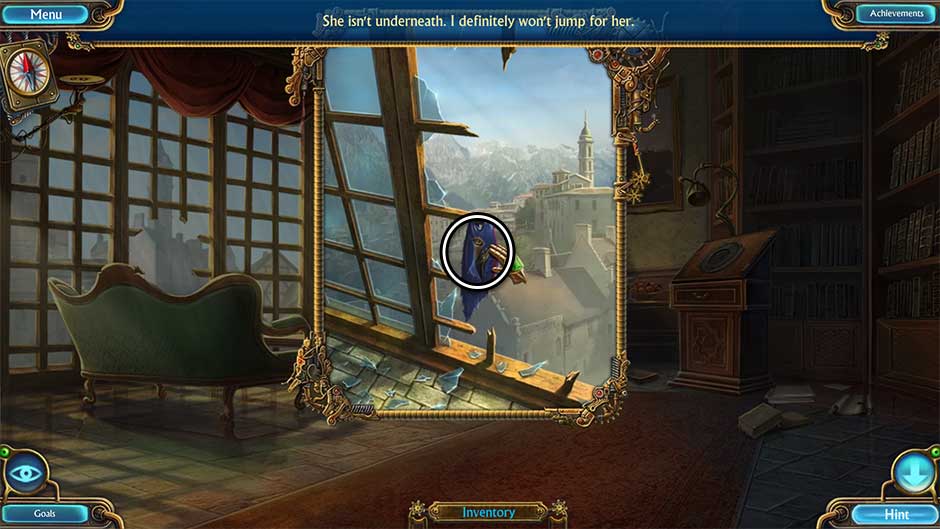
Kingdom of Aurelia – Mystery of the Poisoned Dagger – Chapter 1 – Pliers Location
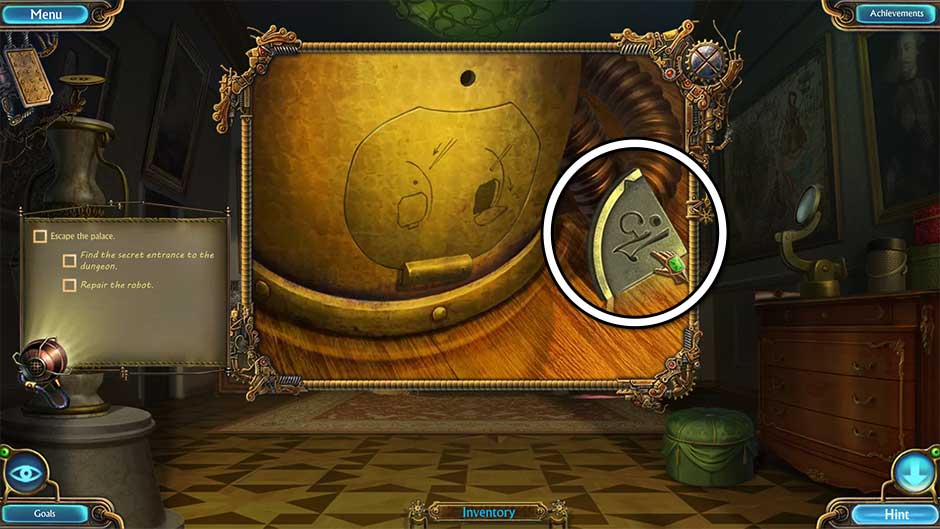
- Zoom in on the mantle of the fireplace.
- Click on the Part of Dial 4/4 to add it to your inventory.
Kingdom of Aurelia – Mystery of the Poisoned Dagger – Chapter 1 – Final Part of Dial Location
- Examine the book stand on the right again.
- Use the Parts of Dial 4/4 on the groove in the center of the stand.
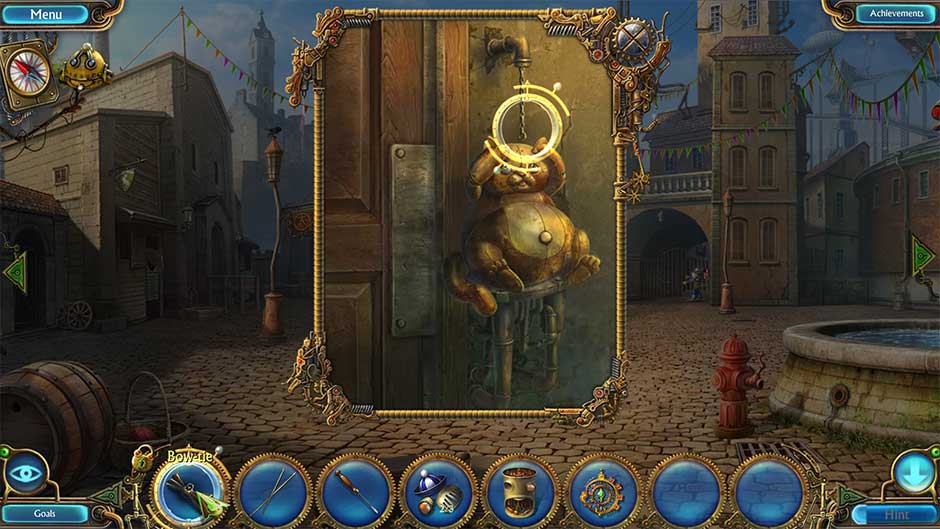
- Next, use the Brush with Powder to reveal the hidden runes, triggering a puzzle.
- Rotate the inner circle until the runes match the ones on the outer circle. Click on a rune to rotate it. Once the runes match, click on the button on the upper right to open the book. The solution is shown below.
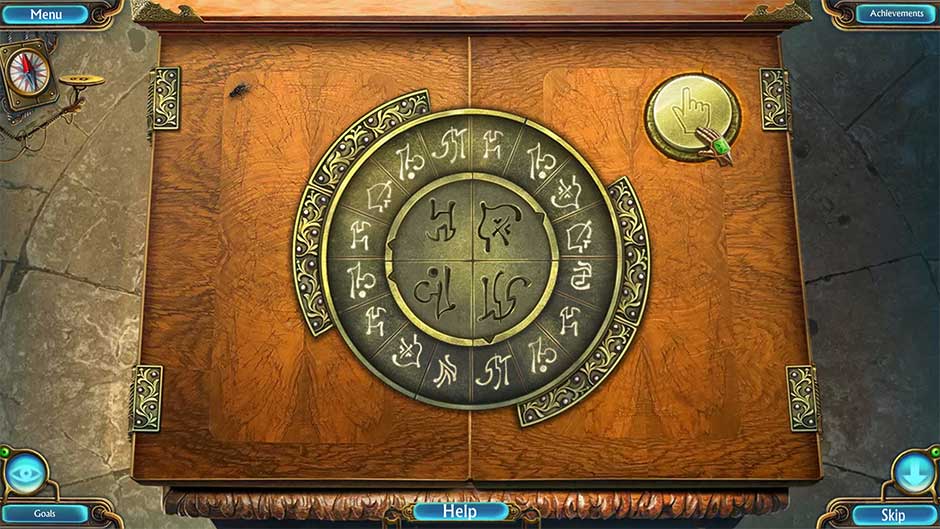
Kingdom of Aurelia – Mystery of the Poisoned Dagger – Chapter 1 – Book Stand Puzzle Solution
- Upon completing the puzzle, click on the Crystal to add it to your inventory. You may also choose to click on the book pages to view the solutions for the upcoming puzzles you will face in this chapter.
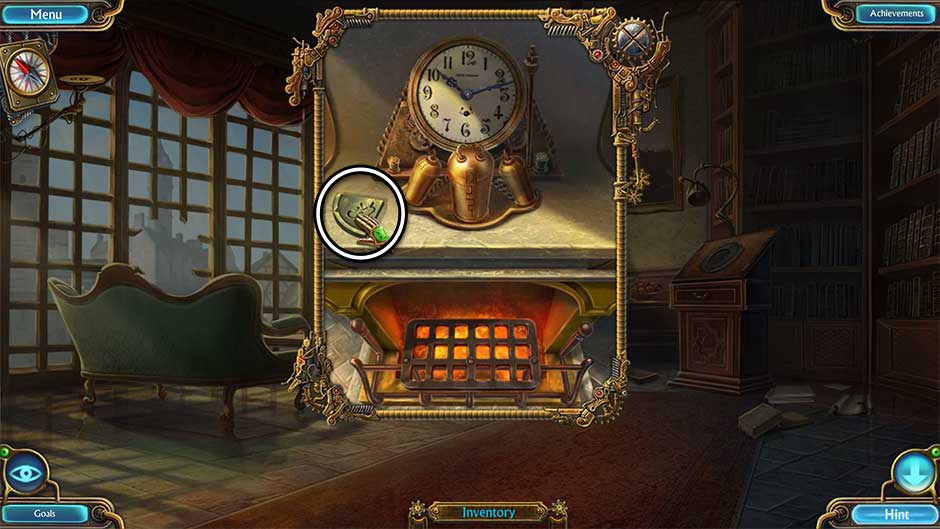
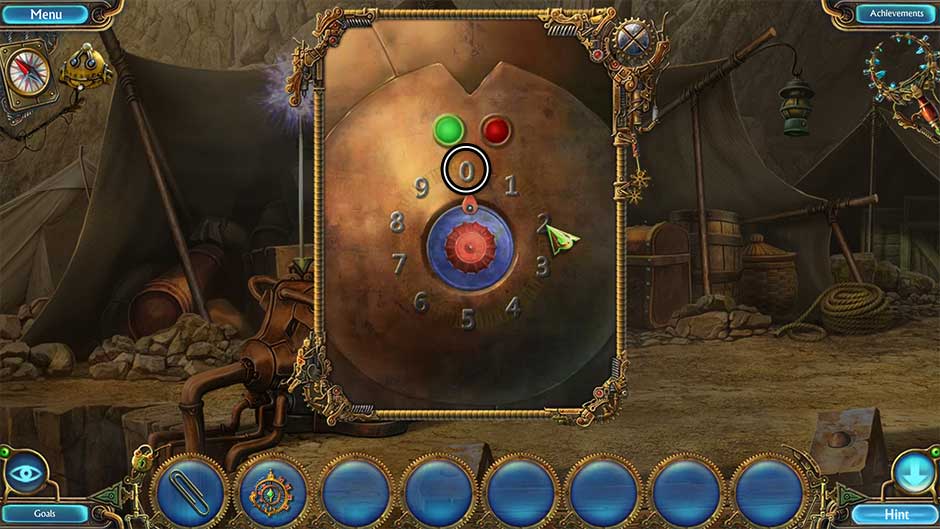
- Examine the mantle of the fireplace again.
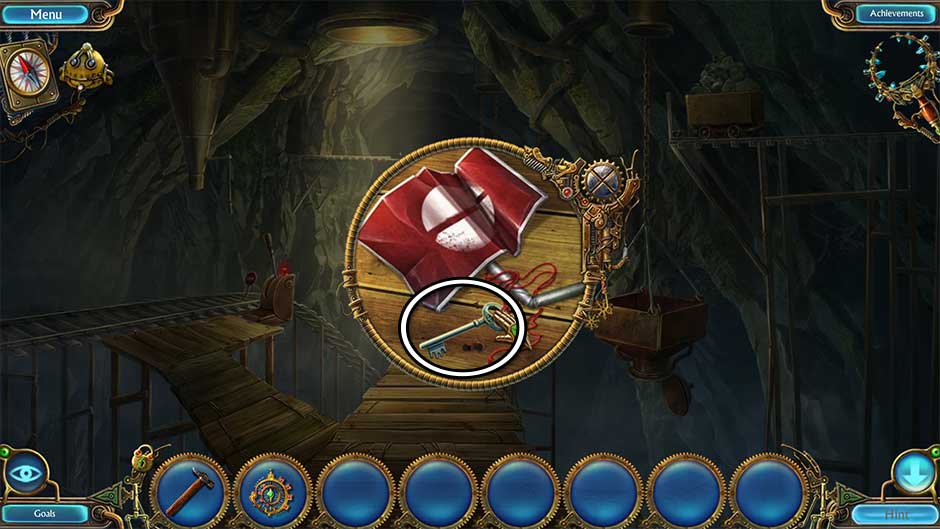
- Click and hold the clock hands on the face of the clock, turning clockwise until the time reads 4:00. Upon completing the puzzle, click on the Red Key to add it to your inventory.

Kingdom of Aurelia – Mystery of the Poisoned Dagger – Chapter 1 – Red Key Location
- Take a closer look at the globe sitting on the coffee table again.
- Click on 1) the red continent with the eye symbol, 2) the blue continent with the star symbols, and 3) the blue and white continent with the arrow symbol. A compartment will open, revealing the location of the Blue Key.
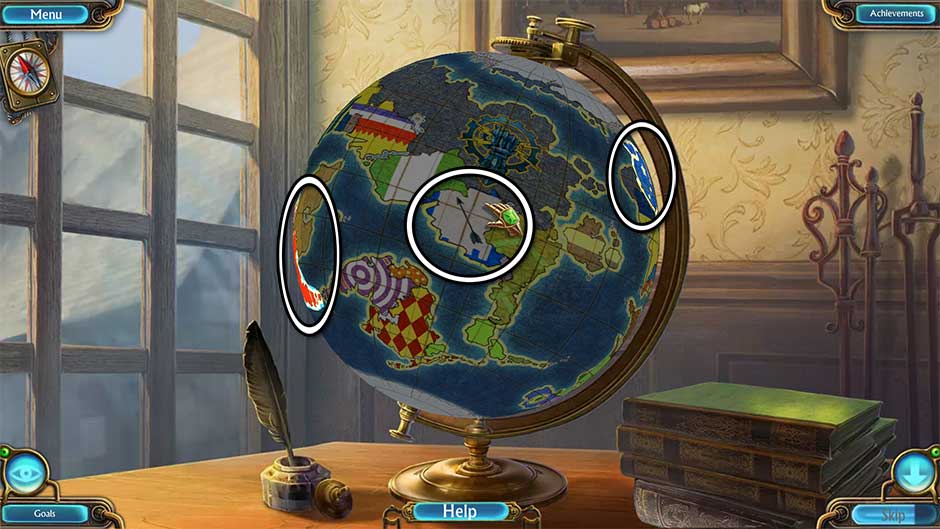
Kingdom of Aurelia – Mystery of the Poisoned Dagger – Chapter 1 – Blue Key Location
- Return to the Bedroom.
Bedroom
- Examine the map mural on the right wall.
- Use the Pliers to remove the Nail, adding both it and the Tree to your inventory.
- Once these have been added to your inventory, the mural will fall, revealing a secret compartment. Read the notes if you wish, but don’t forget to collect the Lock Part in the bottom right corner.
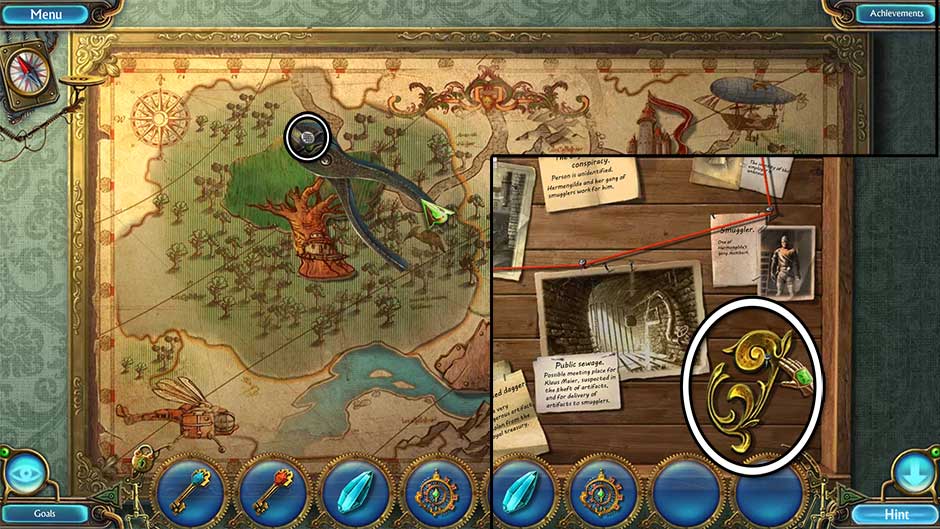
Kingdom of Aurelia – Mystery of the Poisoned Dagger – Chapter 1 – Bedroom Mural
- Take a closer look at the bottom portion of the cabinet to the left of the bed.
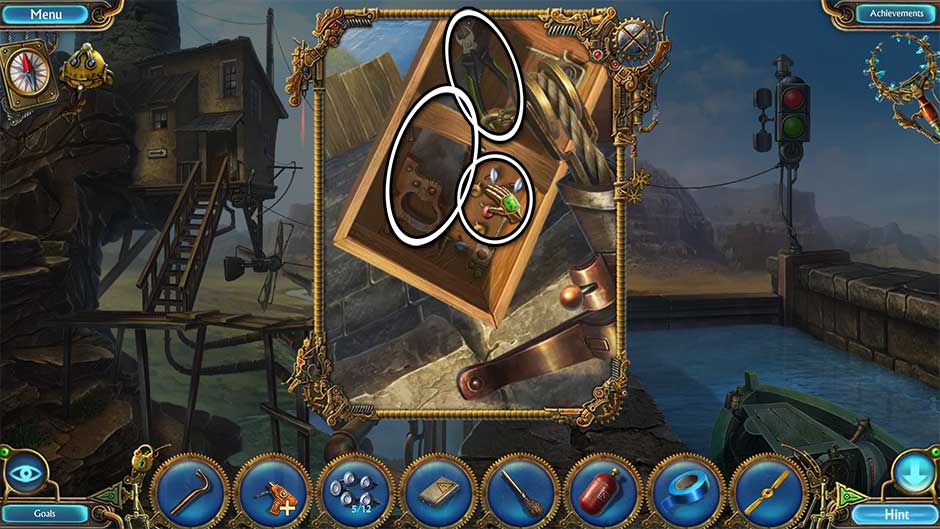
- Place the Lock Part in the left slot to open the cabinet, revealing a hidden object area.
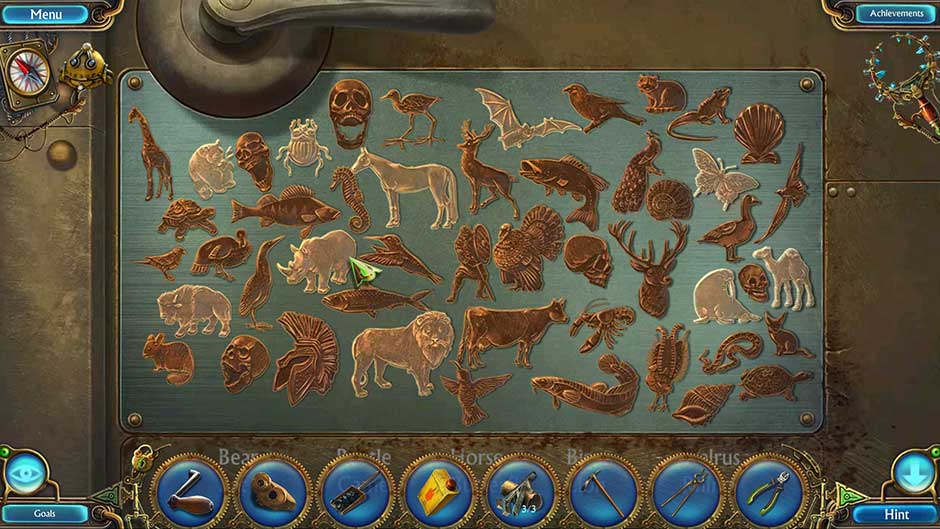
- Find the items shown at the bottom of the screen. Their locations are shown below. Refer to these steps to locate them all.
- Collect the Buttons and use them on the encryption machine.
- Collect the Pincers from the encryption machine and use them on the crab.
- Take the Handle from the crab and use it on the drawer on the right.
- Open the drawer and use the Scissors inside to open the pale blue-green box on the lower left.
- Collect the Head from inside the box and place it on the suit of armor.
- Click on the five Pins to collect them, then use them on the blue pin cushion.
- Take the Corkscrew Handle from the pin cushion and use it on bottle inside the suit of armor.
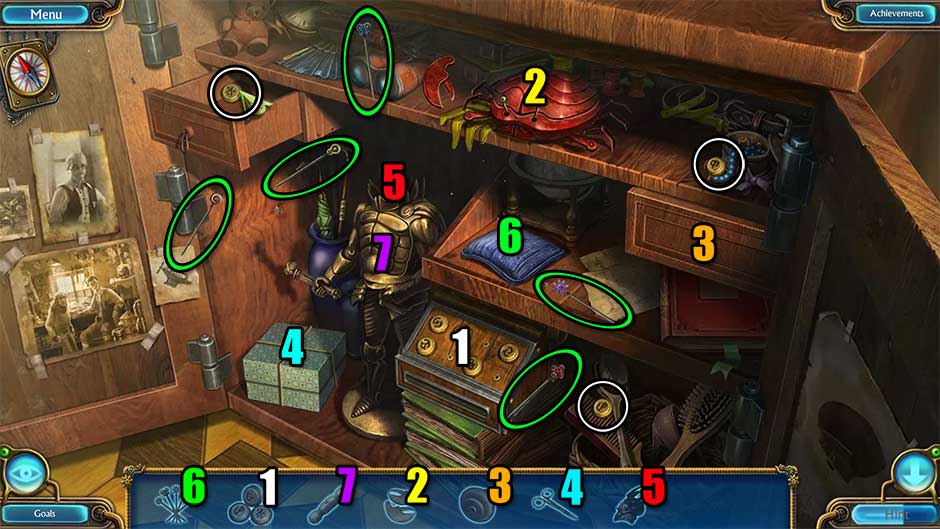
Kingdom of Aurelia – Mystery of the Poisoned Dagger – Chapter 1 – Bedroom Hidden Object Scene
- Upon completing the hidden object area, click on the Corkscrew to add it to your inventory.
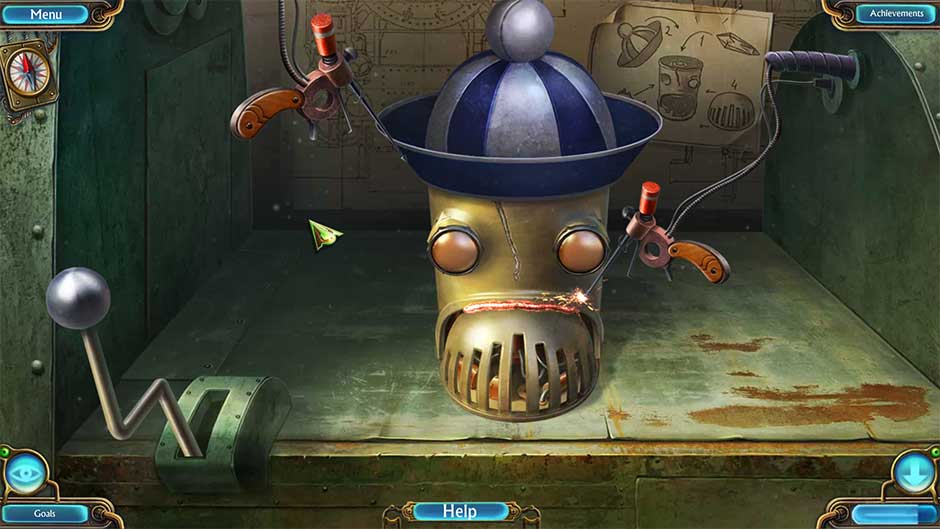
- Zoom in on the gold device on top of the cabinet.
- Use the Nail to open the hidden panel.
- Insert the Crystal into the device.
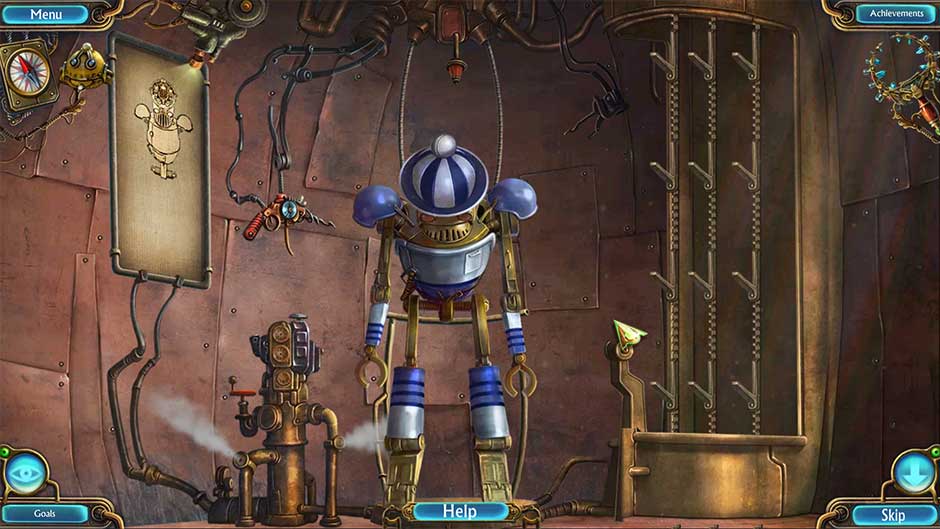
- Click on the device on top of the cabinet to collect Tim the Robot. Tim will be added to the upper left corner of your screen. Tim can fly and is capable of reaching places that you can’t, making him especially useful when it comes to retrieving items out of reach. Keep an eye on Tim’s lights – they will blink green in a location where Tim can help you.
- Click on Tim the Robot to select him, then click on the shield above the bed. He will rotate the shield, revealing a hidden pedestal.
Kingdom of Aurelia – Mystery of the Poisoned Dagger – Chapter 1 – Hidden Pedestal
- Take a closer look at the pedestal on the lower left.
- Click on the knob near the top of the pedestal to shift it from the left side, to the right side. A hidden panel will appear.
- Insert the Tree into the groove in the panel, then click on the knob to shift it to the center of the slide.
- Collect the Green Key inside the pedestal to add it to your inventory.
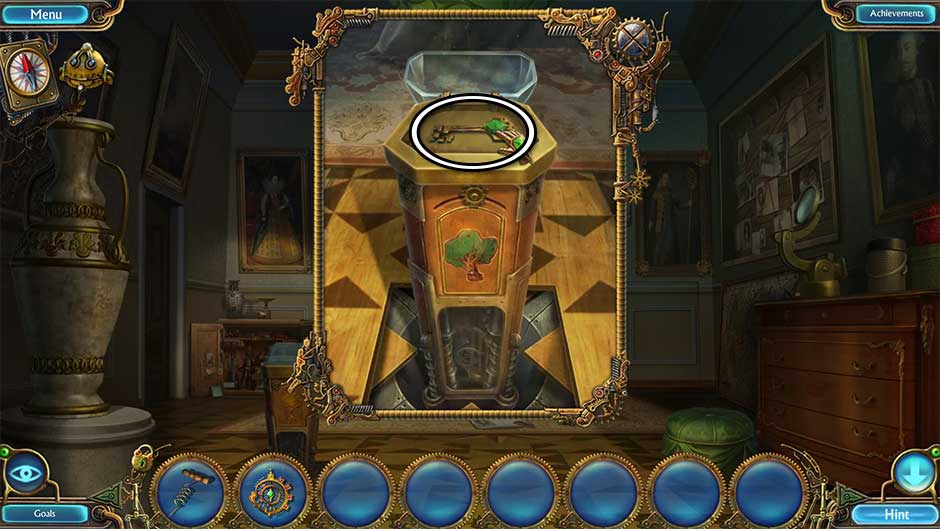
Kingdom of Aurelia – Mystery of the Poisoned Dagger – Chapter 1 – Green Key Location
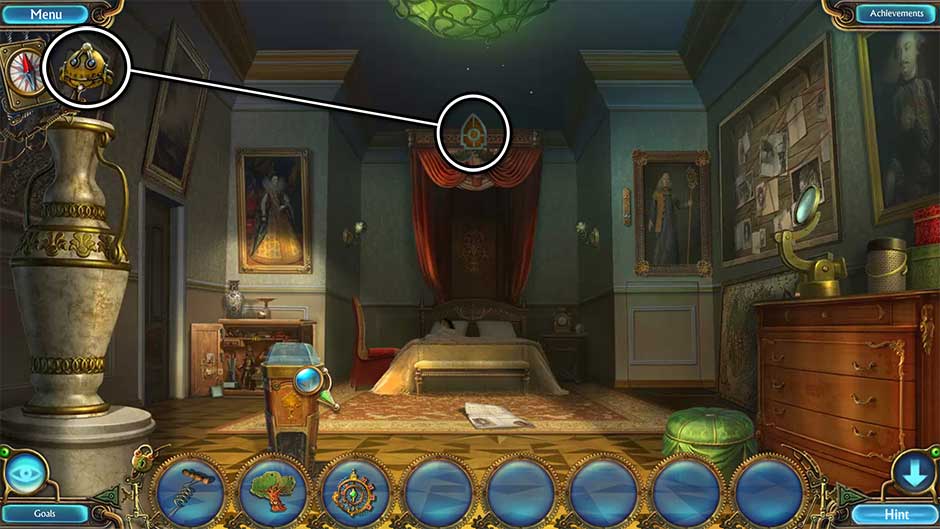
- Zoom in on the portrait of Pharion on the right.
- Click on the painting to shift it to the right.
- Insert the Red Key, the Blue Key, and the Green Key into their respective locks. Click on each to unlock them, revealing a secret passage beneath the painting.
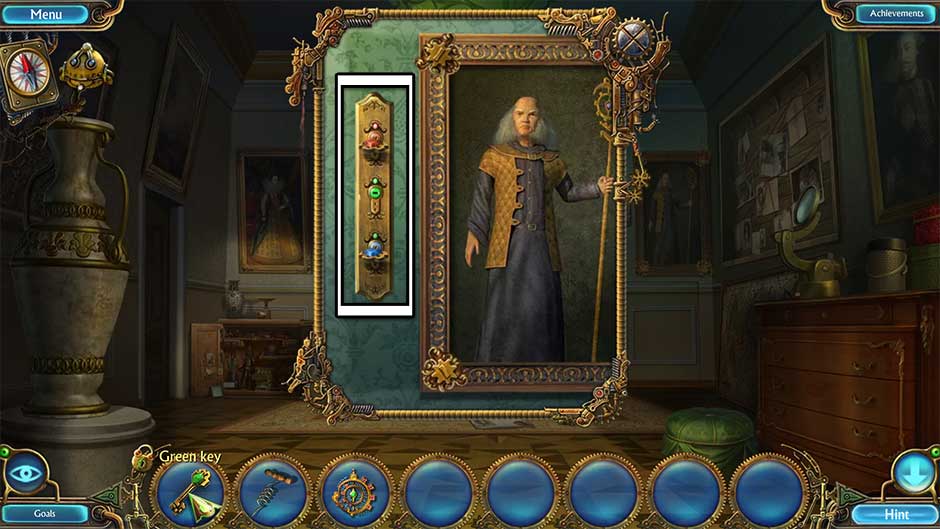
Kingdom of Aurelia – Mystery of the Poisoned Dagger – Chapter 1 – Colored Locks
- Completing the task will unlock an achievement: Royal Key-keeper.
- Proceed through the passage beneath the painting to the next location.
Underground Passage
- Click on the soldier to trigger a cutscene.
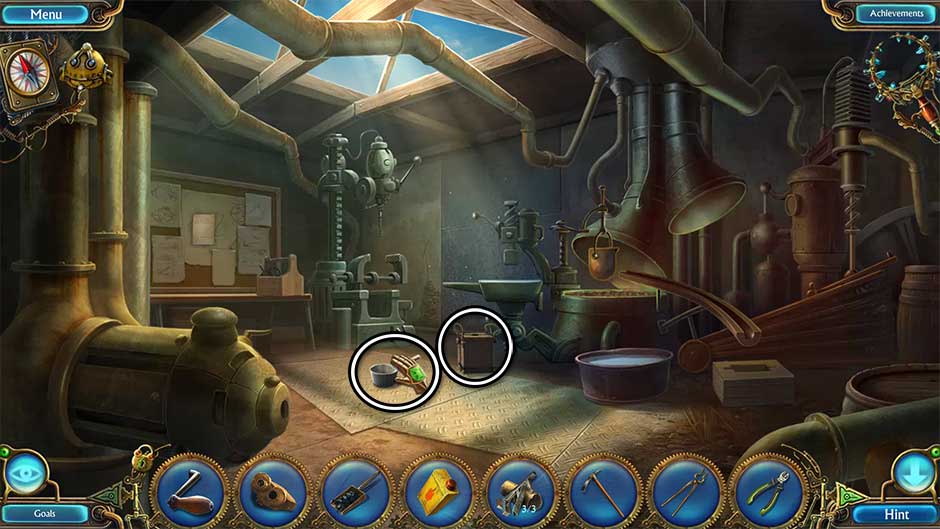
- Click on the Mallet lying on the floor to add it to your inventory.
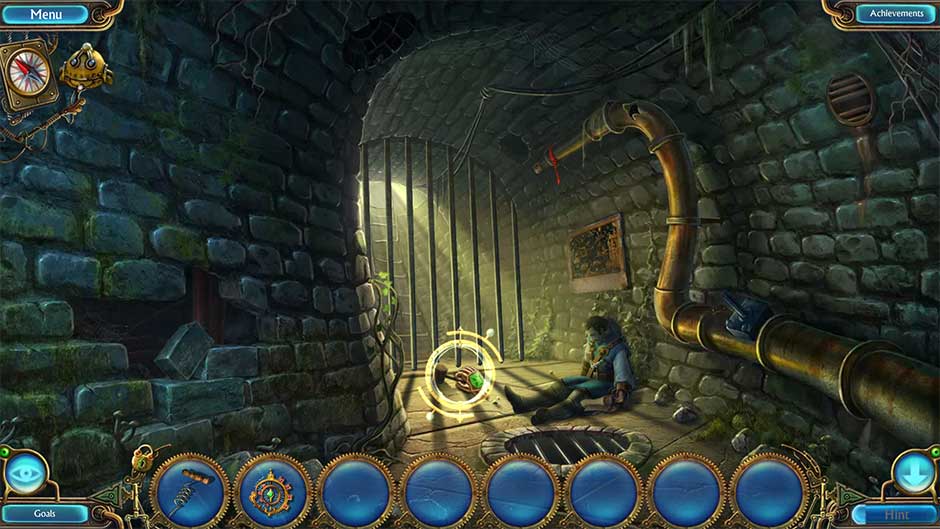
Kingdom of Aurelia – Mystery of the Poisoned Dagger – Chapter 1 – Mallet Location
- Zoom in on the soldier.
- Read the note in the soldier’s hand.
- Click on the Tongs to add them to your inventory.
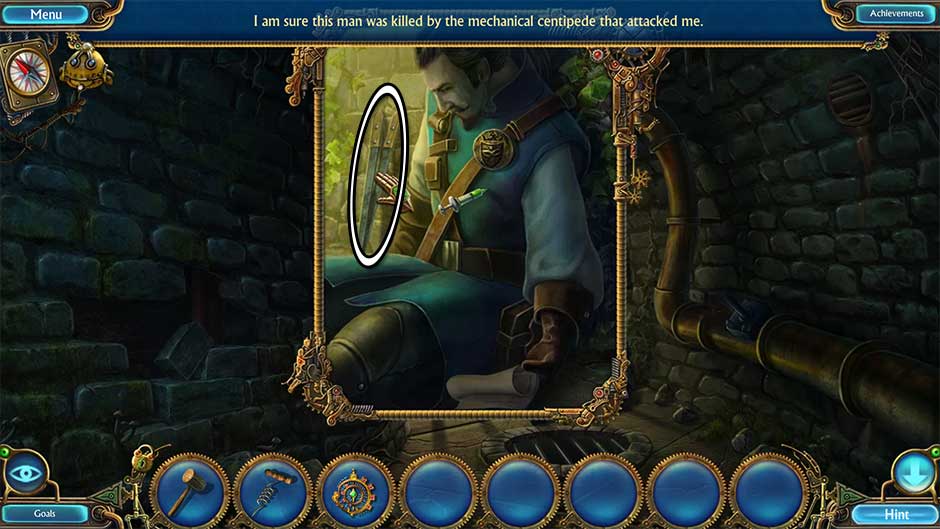
Kingdom of Aurelia – Mystery of the Poisoned Dagger – Chapter 1 – Tongs Location
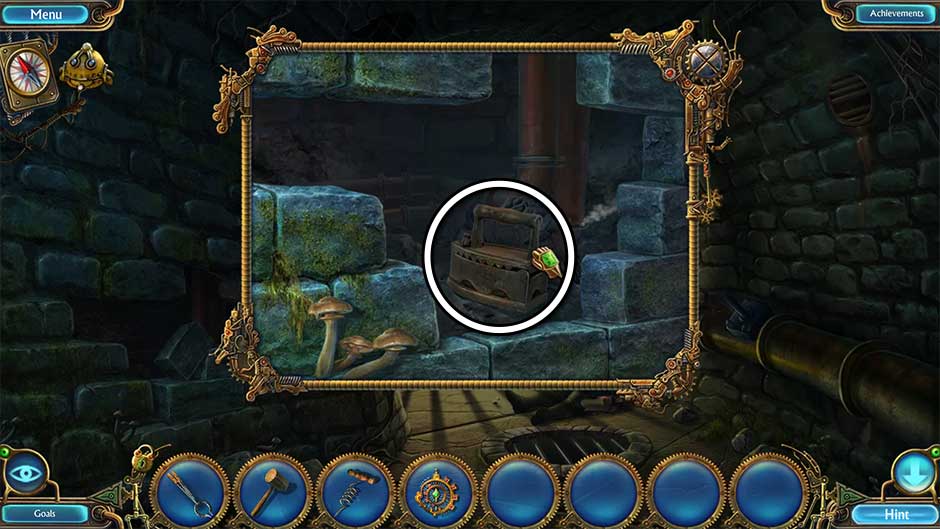
- Take a closer look at the hole in the wall on the left.
- Use the Mallet to knock out the loose stone bricks.
- Click on the Iron to add it to your inventory.
Kingdom of Aurelia – Mystery of the Poisoned Dagger – Chapter 1 – Iron Location
- Return to the parlor.
Parlor
- Take a closer look at the fireplace.
- Use the Tongs to retrieve the Hot Coal.
- Select the Iron in your inventory, then click on it to open it. Insert the Hot Coal, then click to close the Iron. The Hot Iron will be added to your inventory.
- Return to the underground passage.
Underground Passage
- Examine the picture frame above the fallen soldier.
- Use the Hot Iron to reveal a hidden object puzzle.
- Click on the items displayed in the list. Their locations are shown below.
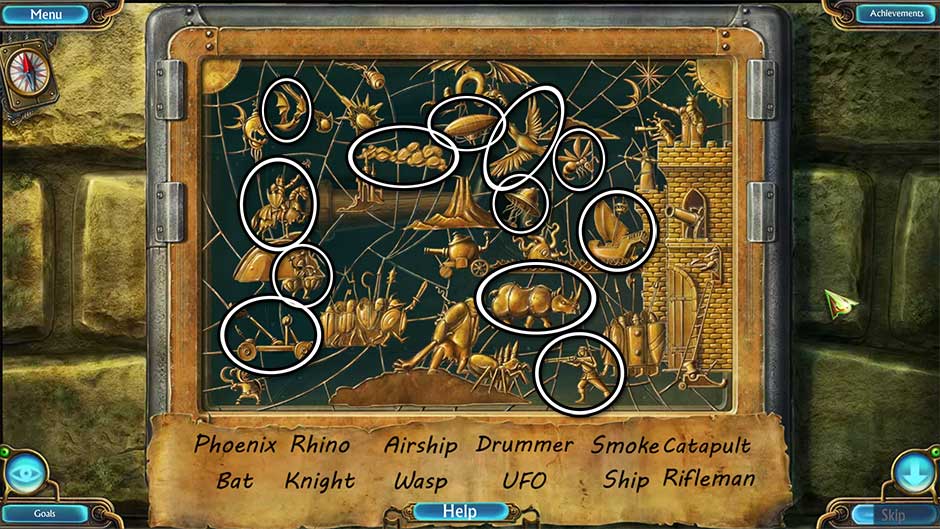
Kingdom of Aurelia – Mystery of the Poisoned Dagger – Chapter 1 – Underground Passage Hidden Object Puzzle
- Upon completing the puzzle, a hidden compartment will be revealed. Click on the lever inside.
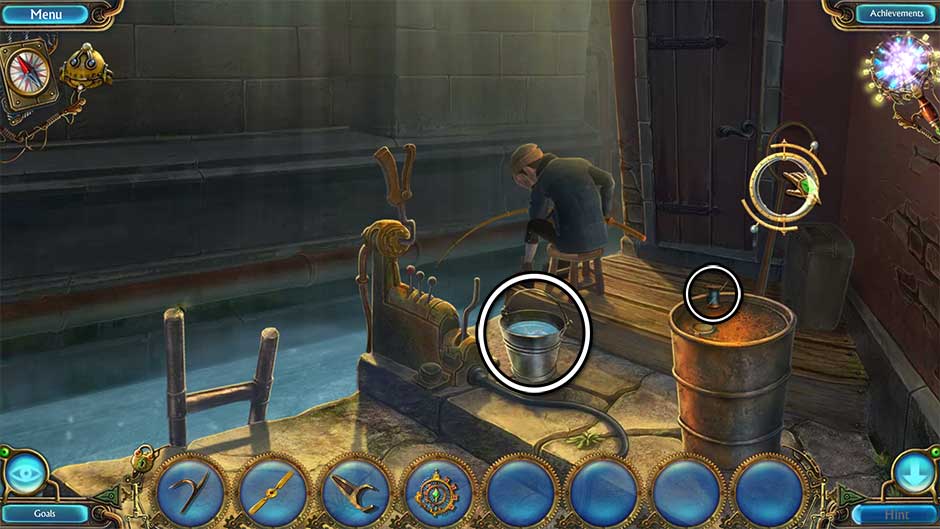
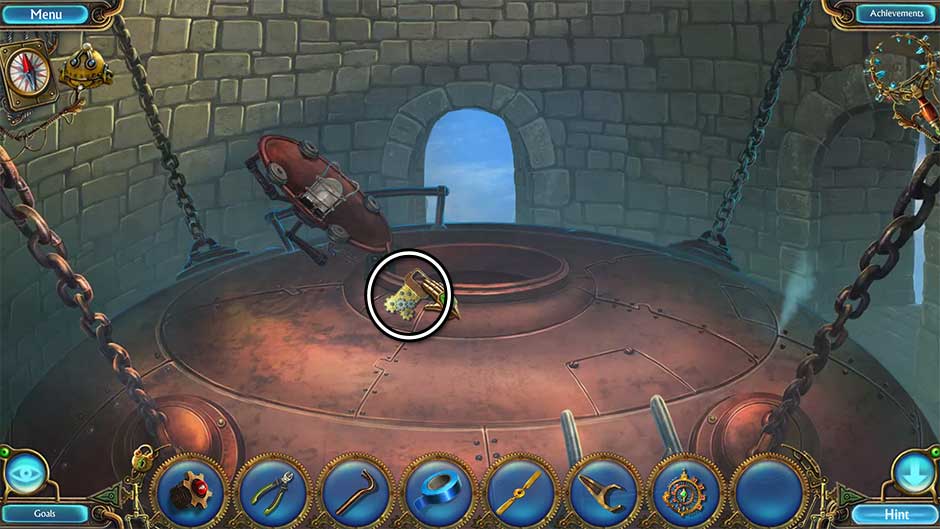
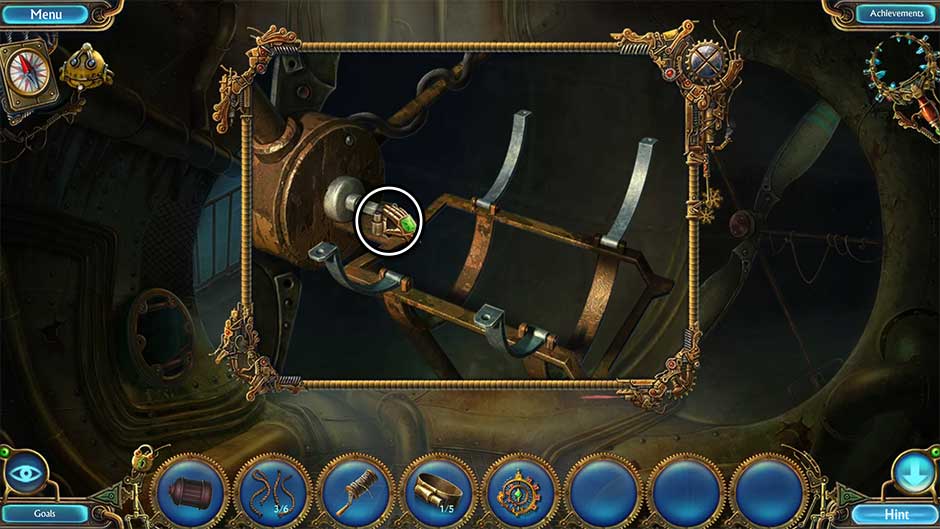
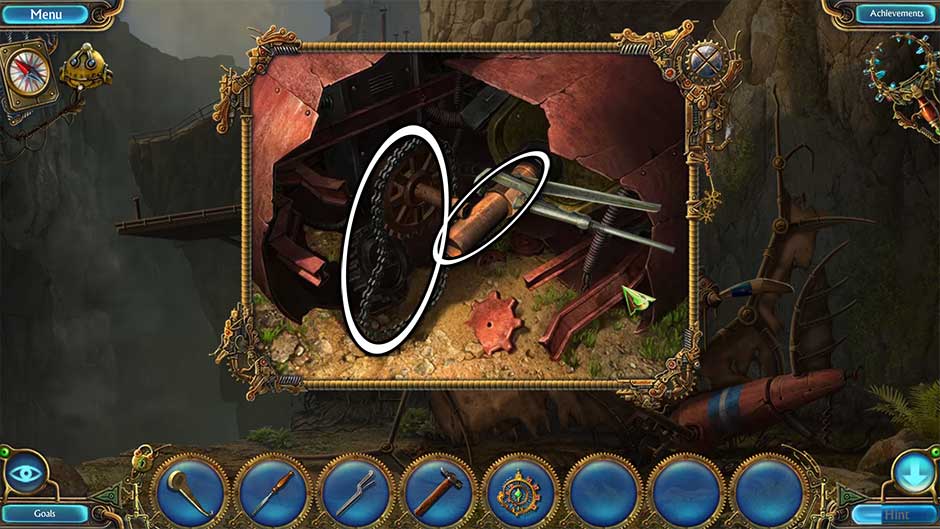
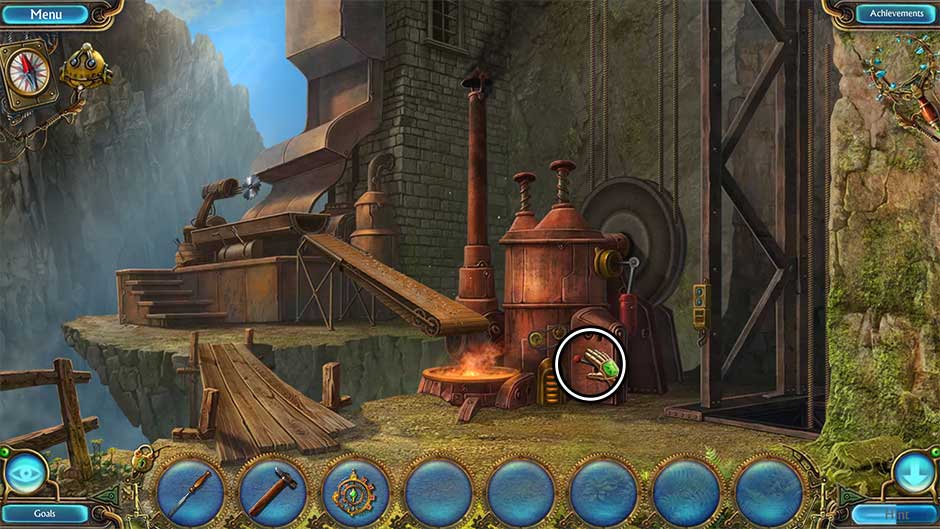
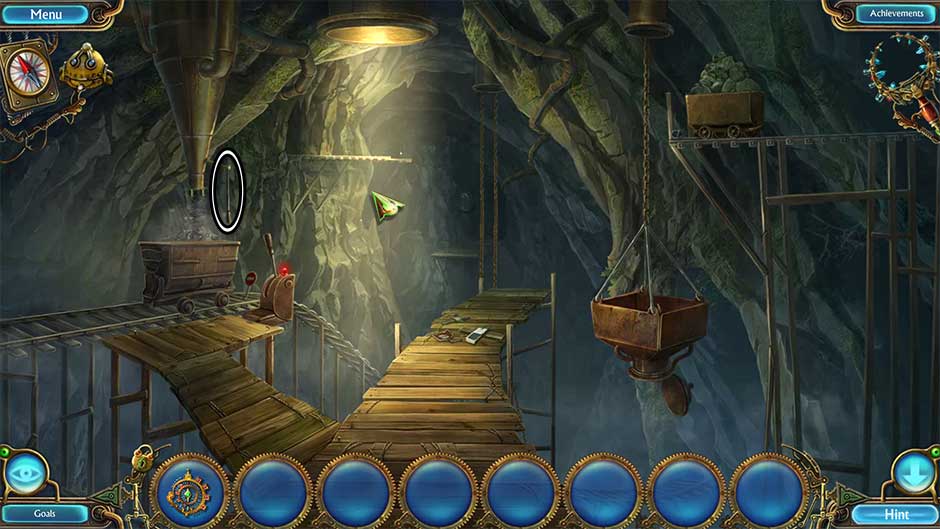
- Zoom in on the first of the vessels hanging from the ceiling.
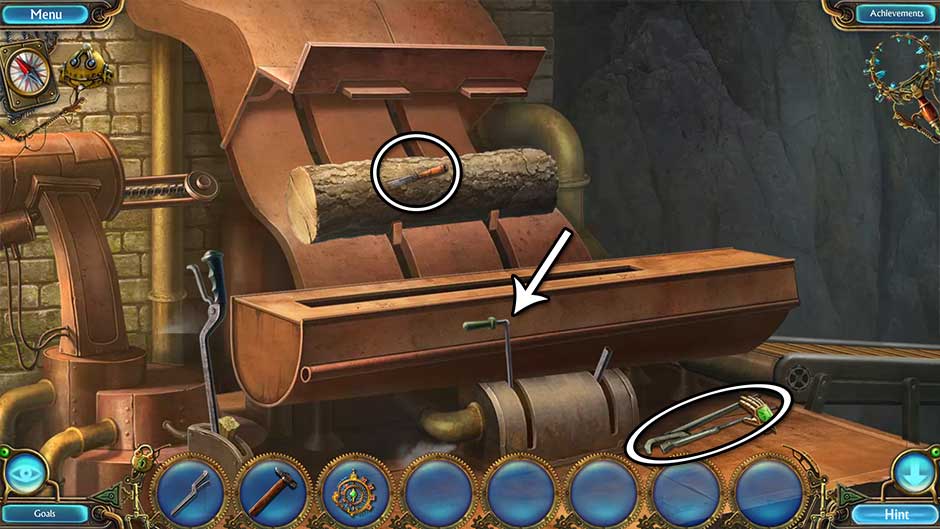
- Collect the Valve
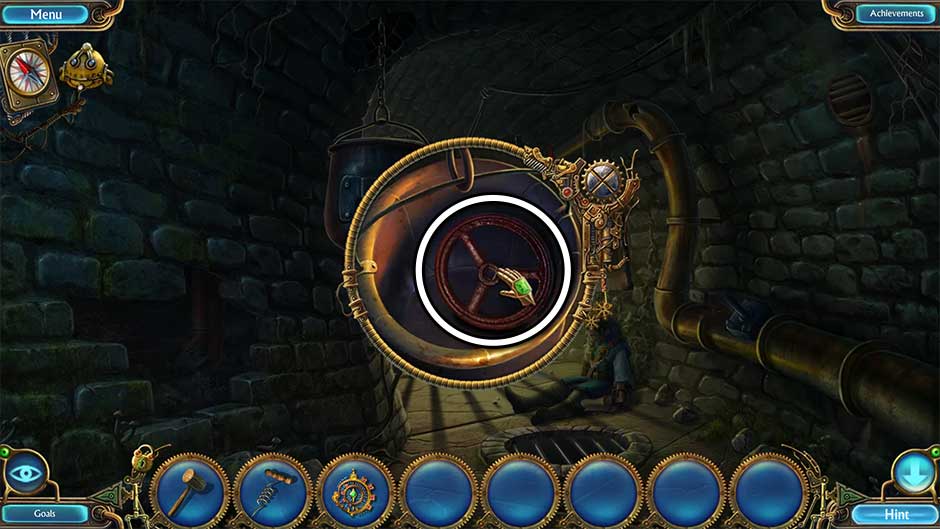
Kingdom of Aurelia – Mystery of the Poisoned Dagger – Chapter 1 – Valve Location
- Use the Valve on the pipe on the right. Click on the valve to turn it, turning on the flow of water.
- Take a closer look at the pipe above the second vessel.
- Use the Corkscrew on the Cork to retrieve it and add it to your inventory.
- Examine the leak in the pipe on the upper right.
- Insert the Cork into the break in the pipe, then use the Mallet to secure it.
- The portcullis will open. Proceed through to the next area.
Chapter 2 – Square
Square
- Proceed forward to the gate at the other end of the square.
Town Gate
- Examine the posters on the left wall, as well as the robot guard. The robot will fall apart.
- Click on the Mechanical Soldier’s Broken Head, the Mechanical Soldier Part 1/3, and the Ladder to add them to your inventory.
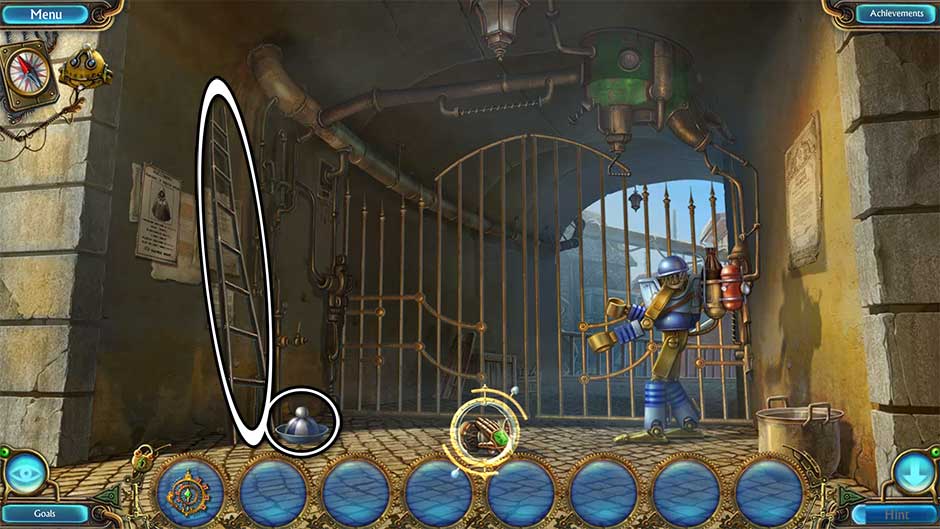
Kingdom of Aurelia – Mystery of the Poisoned Dagger – Chapter 2 – Town Gate Items
- Go back to the square.
Square
- Click on the statue ahead to move closer.
Statue
- Read the note hanging on the right side of the statue base.
- Click on the Hay to add it to your inventory. This will reveal the Mechanical Soldier Part 2/3, which you should also collect.
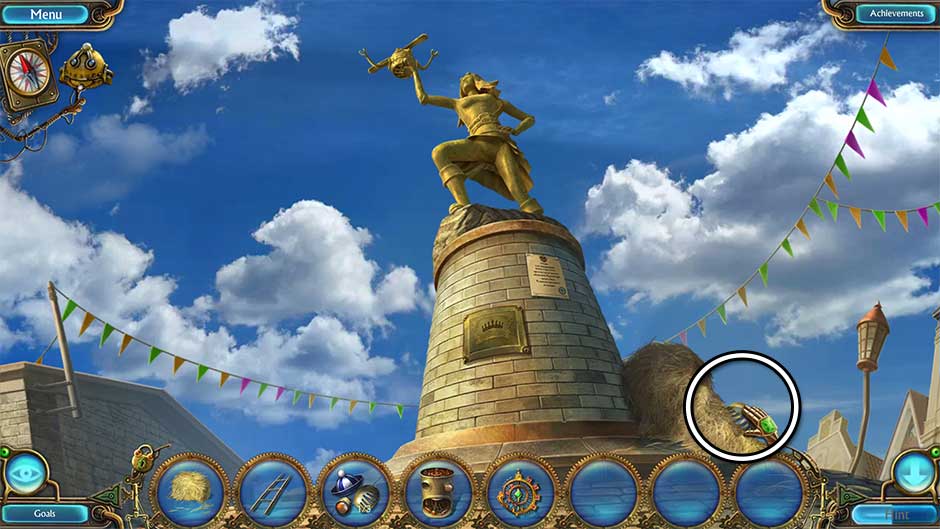
Kingdom of Aurelia – Mystery of the Poisoned Dagger – Chapter 2 – Statue Items
- Place the Ladder on the left side of the statue. We’ll climb to the top later.
- Go back down to the square.
Square
- Take a closer look at the stables on the left.
- Give the Hay to the horse and take the Screwdriver.
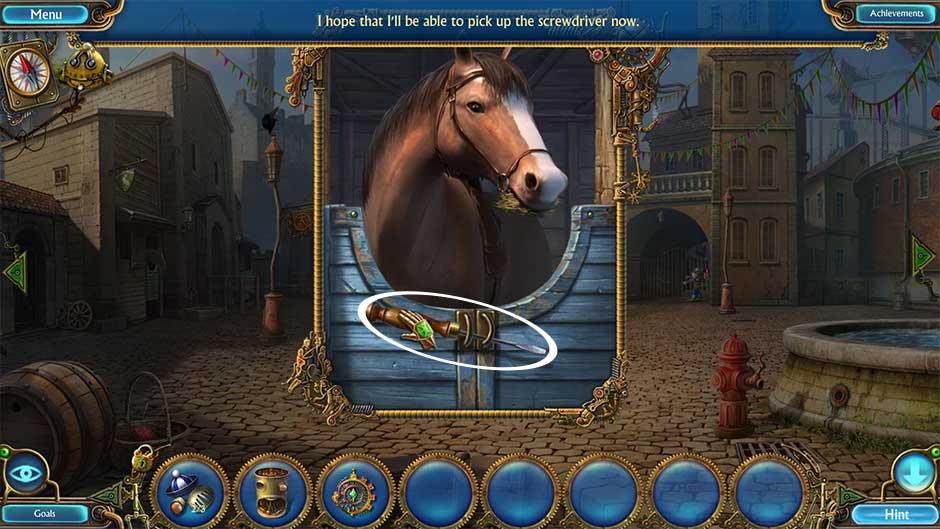
Kingdom of Aurelia – Mystery of the Poisoned Dagger – Chapter 2 – Screwdriver Location
- Zoom in on the basket next to the barrel in the lower left corner of the screen.
- Click on the Needles in the yarn to add them to your inventory.
- Examine the signpost of the house in the distance – between the statue and the street lamp, beneath the water tower.
- Use the Screwdriver to acquire the Bow-tie.
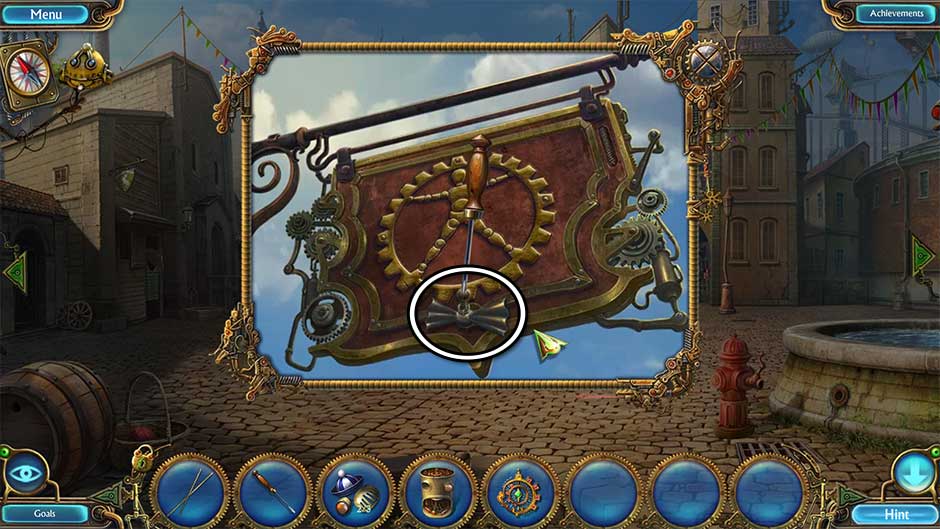
Kingdom of Aurelia – Mystery of the Poisoned Dagger – Chapter 2 – Retrieving the Bow-tie
- Take a closer look at the door of the gold-colored house to the immediate left of the statue.
- Attach the Bow-tie to the chain above the mechanical cat.
Kingdom of Aurelia – Mystery of the Poisoned Dagger – Chapter 2 – Opening the Workshop Door
- Enter through the newly unlocked door.
Workshop
- Speak with Leonard, the engineer.
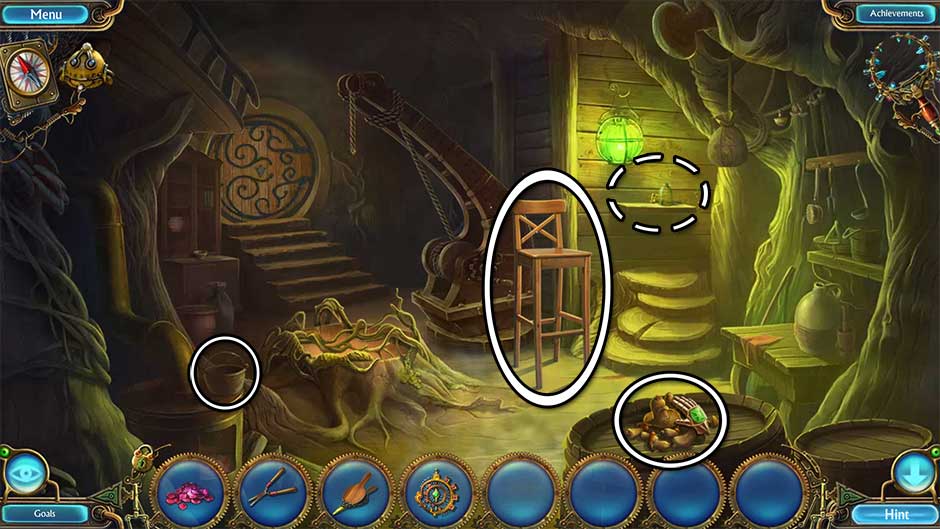
- Examine the cabinet on the far end of the room, toward the upper left.
- Click on the latches on either side of the bottom of the cabinet to open them. Use the Needles to secure them in place.
- Open the cabinet, then collect the Wrench and the Fish
Kingdom of Aurelia – Mystery of the Poisoned Dagger – Chapter 2 – Workshop Items
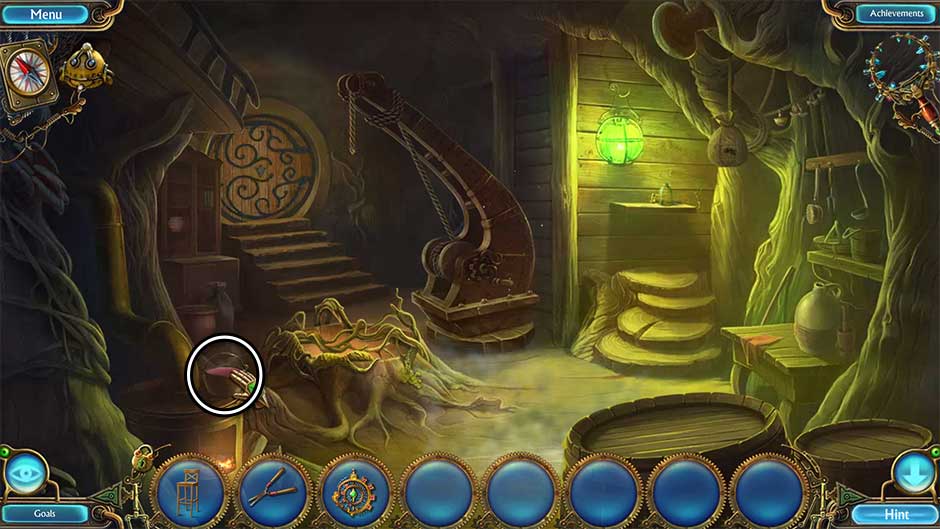
- Examine the rear right corner of the room.
- Click on the Abrasive to add it to your inventory.
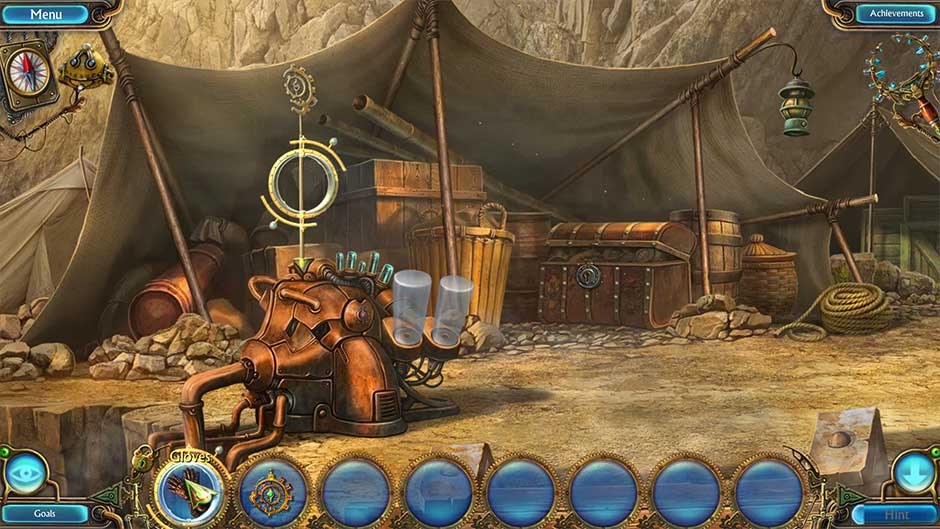
- Collect the Hose from the nearest end of the workbench on the left.
Kingdom of Aurelia – Mystery of the Poisoned Dagger – Chapter 2 – Hose Location
- Examine the device on the left side of the workshop.
- Place the Fish on the stand and click on the side panel to open it.
- Select the red and blue wires to attach them to the fish. Click on the gold wheel on the right to activate the machine, charging the fish.
- Once finished, click on the Charged Fish to add it to your inventory.
- Exit to the square.
Square
- Attach the Hose to the red fire hydrant on the right. Click on the lever at the end of the hose to activate it.
- Take a closer look inside the fountain.
- Try to click on the item in the water – those pesky mechanical crabs will try to stop you. Place the Charged Fish into the water to trigger a minigame.
- Crush all the crabs in the jaws of the mechanical fish. Point and click next to the crabs to scare them into the direction of the fish. Once they’re close enough, they’ll be eaten.
- Once all the crabs have been devoured, click on the Mechanical Soldier Part 3/3 to add it to your inventory.
Kingdom of Aurelia – Mystery of the Poisoned Dagger – Chapter 2 – Mechanical Soldier Part 3
- Head forward to the statue.
Statue
- Take a closer look at the top of the statue.
- Use the Abrasive to dust off the top of the statue.
- Use the Screwdriver to remove the Propeller and add it to your inventory.
- Use the Wrench to remove the stand, revealing the Crystal, which you should also collect.
- Go back to the workshop.
Workshop
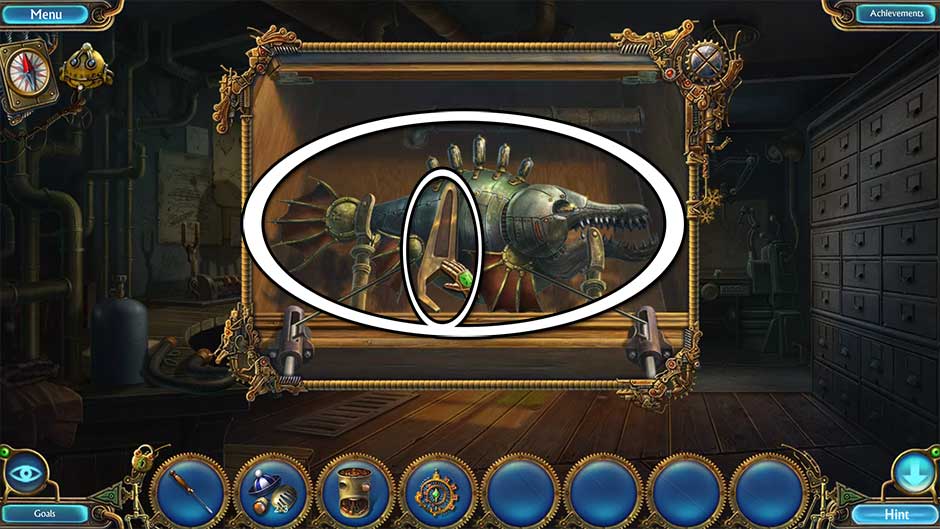
- Take a closer look at the back right portion of the workshop.
- Place the Mechanical Soldier’s Broken Head, the Mechanical Soldier Parts 3/3, and the Crystal on the table to trigger a puzzle.
- Repair the Mechanical Soldier’s head using the parts you collected. Place the Crystal into the slot in the top of the head, then place the other parts according to their correct locations shown in the screenshot below. Finish it by using the tools to secure the parts in place.
Kingdom of Aurelia – Mystery of the Poisoned Dagger – Chapter 2 – Mechanical Soldier Assembly Puzzle Solution
- Upon completing the puzzle, the Mechanical Soldier’s Head will be added to your inventory.
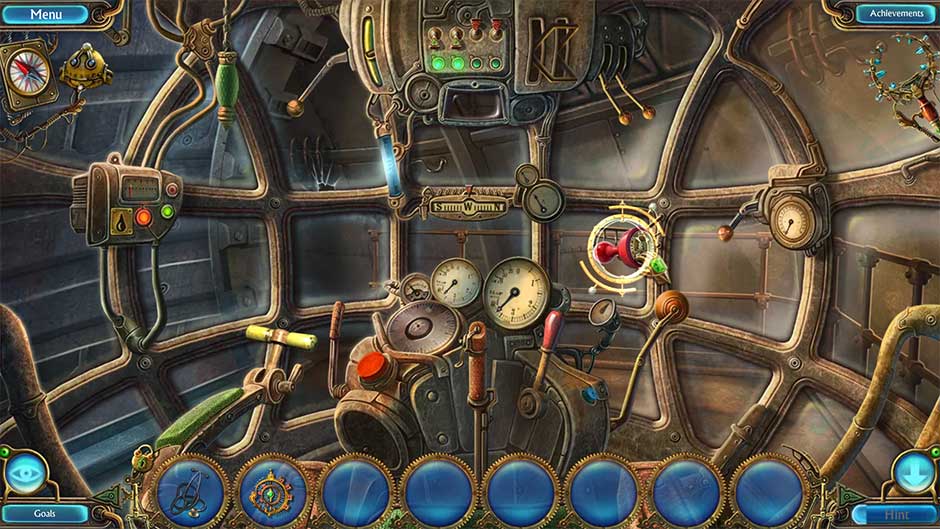
- Speak with Leonard. He will give you the Mindscope. The Mindscope will be kept in the upper right corner of your screen. Use it to read the thoughts of any living creature, including robots!
- Click on Leonard again to trigger a cutscene.
- Zoom in on the open window at the back of the workshop.
- Select Tim the Robot on the upper left and use him to retrieve the item from the ledge.
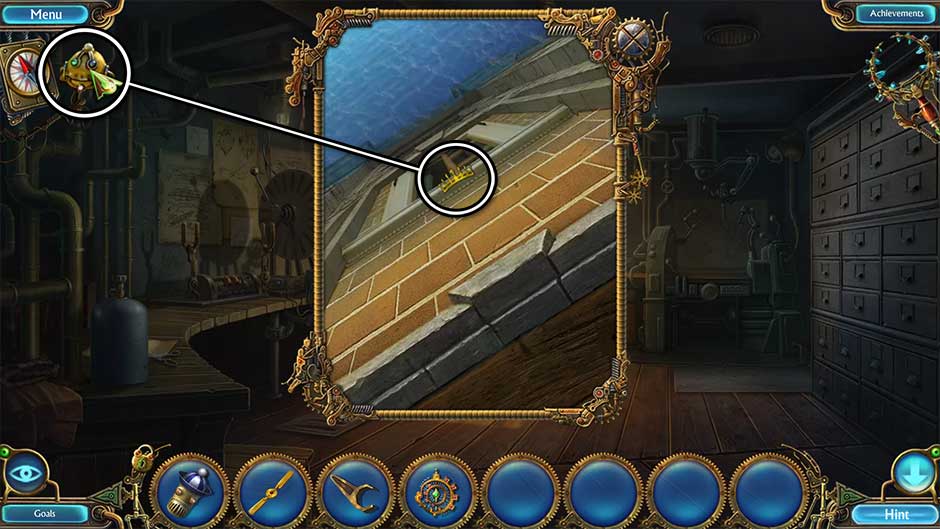
Kingdom of Aurelia – Mystery of the Poisoned Dagger – Chapter 2 – Window Item Retrieval
- Once the item has been retrieved, the robot will drop it in the middle of the workshop floor. Click on the Crown to collect it.
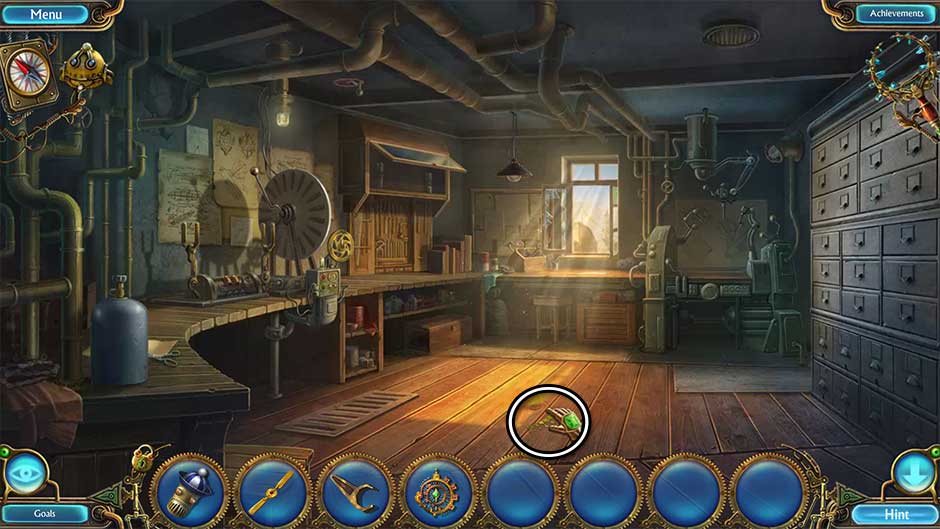
Kingdom of Aurelia – Mystery of the Poisoned Dagger – Chapter 2 – Crown Location
- Return to the town gate.
Town Gate
- Place the Mechanical Soldier’s Head on the robot body on the right.
- Select the Mindscope on the upper right and use it to read the thoughts of the robot. Hover the Mindscope over the robot’s head and click to read its thoughts.
- Head back to the statue.
Statue
- Take a closer look at the plaque on the side of the statue base.
- Insert the Crown into the slot to open a secret compartment. Collect the Halberd
- Backtrack to the town gate.
Town Gate
- Give the Halberd to the mechanical soldier. Click on the soldier once more to open the gates.
- Proceed through the gates to the next location.
Chapter 3 – Canal
Bridge
- Once you enter the area, click to trigger a cutscene.
- Select Tim the Robot and click on the raised bridge on the other end of the canal.
- Zoom in on the buoy in the canal.
- Note the fish skeleton. Click on the Lightbulb to add it to your inventory.
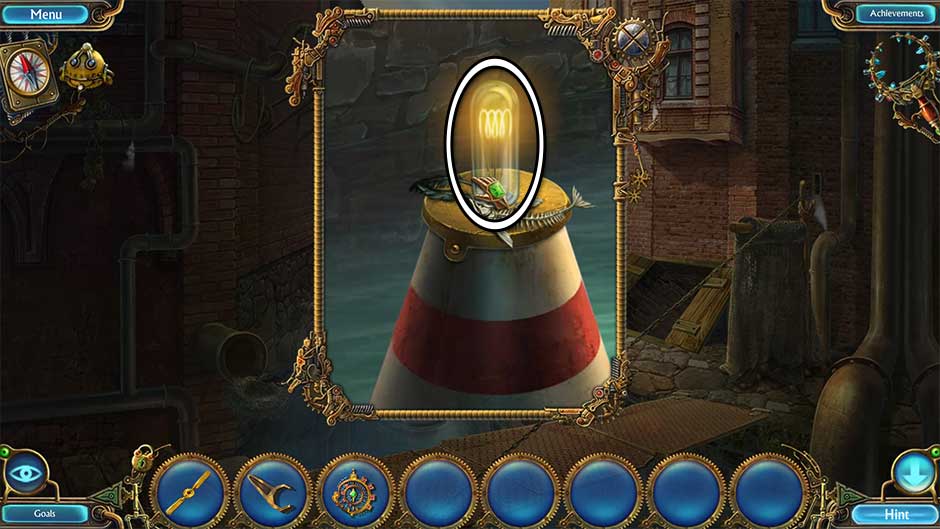
Kingdom of Aurelia – Mystery of the Poisoned Dagger – Chapter 3 – Lightbulb Location
- Click on the cellar doors across the way to open them and take a closer look inside.
- Read the note tucked away on the sack on the left.
- Screw the Lightbulb into the socket in the upper left corner.
- Now that the cellar is illuminated, click on the Gaff to add it to your inventory.
Kingdom of Aurelia – Mystery of the Poisoned Dagger – Chapter 3 – Gaff in the Cellar
- Proceed forward toward the boy in the distance.
Canal Edge
- Click on the boy to speak with him.
- Collect the Scoop Base and the Fish by clicking on the bucket of water. Collect the Coil from the top of the barrel on the right.
Kingdom of Aurelia – Mystery of the Poisoned Dagger – Chapter 3 – Canal Items
- Go back to the bridge.
Bridge
- Zoom in on the buoy again.
- Place the Fish on top of the buoy.
- Use the Gaff to push the buoy closer to the crow.
- Once the crow has left the nest, click on it for a closer view.
- Collect the Scissors and the Hairpin from the nest to add them to your inventory.
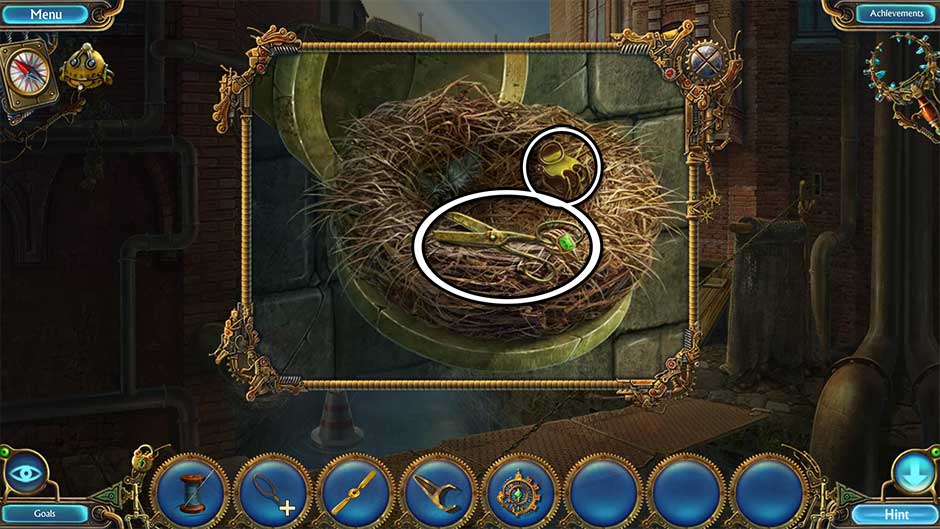
Kingdom of Aurelia – Mystery of the Poisoned Dagger – Chapter 3 – Nest Items
- Select the Scissors and use them to cut the Net hanging on the right side of the screen, toward the end of the bridge.
- Select the Scoop Base in your inventory. Add the Net to the base, followed by the Coil. You will obtain the finished Scoop Net.
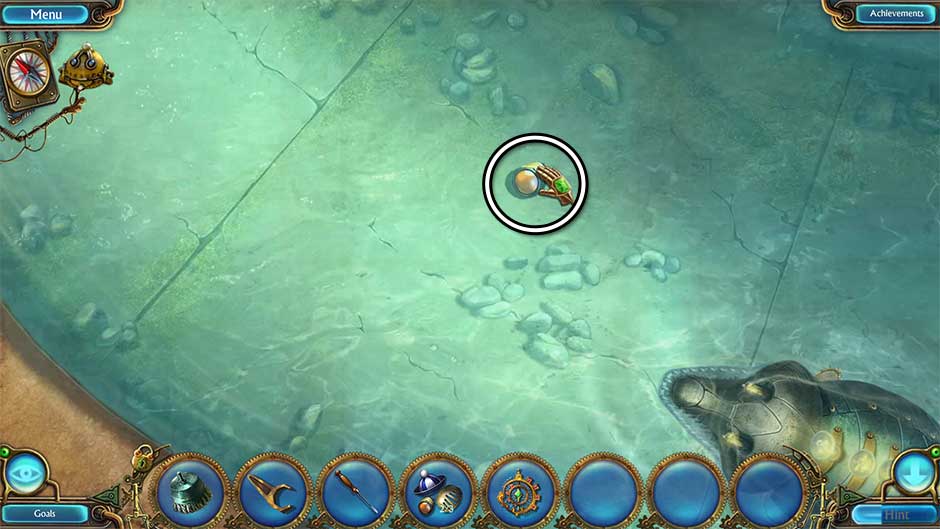
- Take a closer look at the buoy again.
- Use the Scoop Net to catch the crow. Click on it to obtain the House Key.
- Return to the canal edge.
Canal Edge
- Speak with the boy. He will offer you his boat.
- Click on the lever to the left of the boy to bring about the boat you will be using.
- Continue down the ladder into the boat.
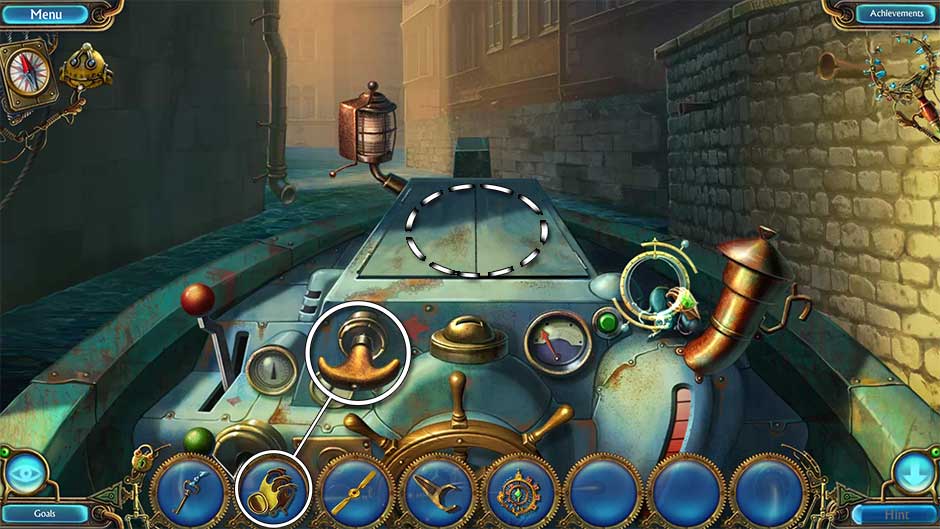
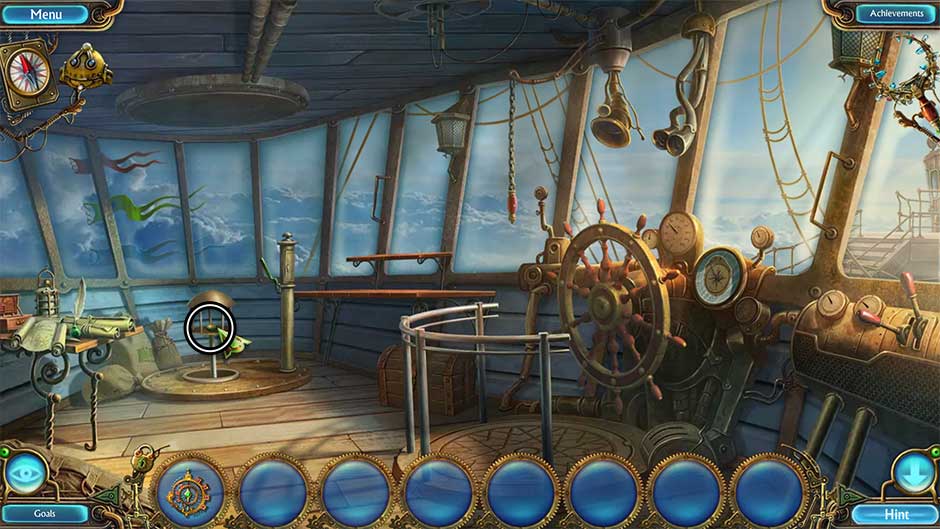
Boat
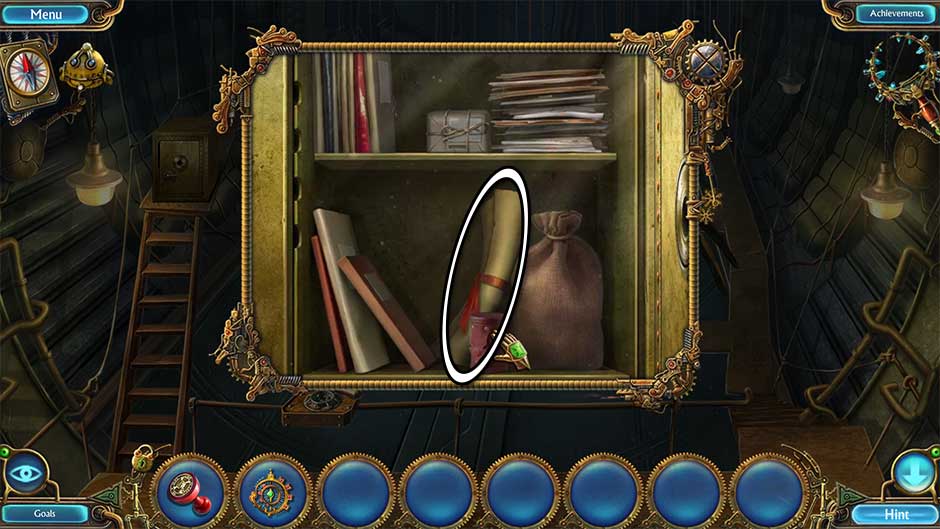
- Use the Hairpin on the lever on the left above the wheel to hold the hatch open. Collect the Pump and the Statuette 1/2.
Kingdom of Aurelia – Mystery of the Poisoned Dagger – Chapter 3 – Boat Items
- Click on the tube cap on the right to open it. We’ll be returning here to complete this task later.
- Go back up to the canal edge.
Canal Edge
- Take a closer look at the door on the right.
- Use the House Key to open the door. Click once to turn it.
- Enter the house.
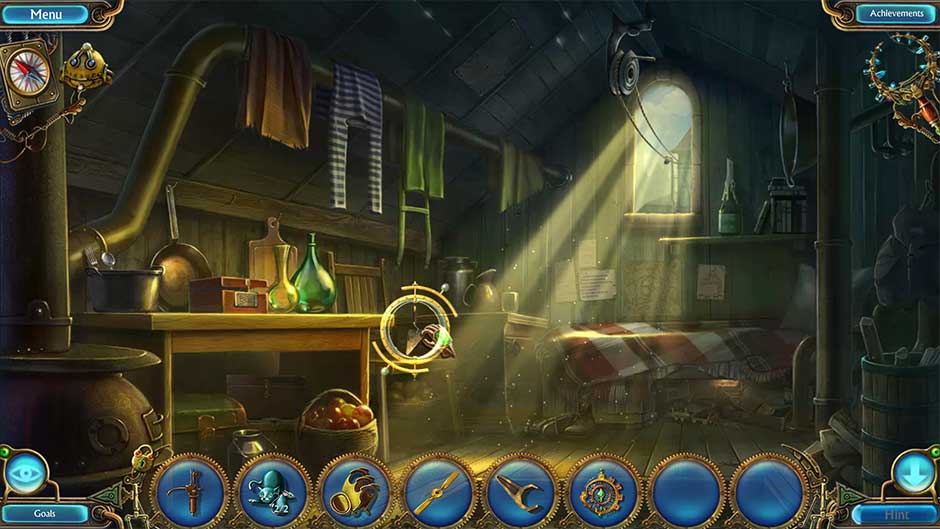
House
- Click on the area under the bed to enter a hidden object scene.
- Find the items shown at the bottom of the screen. Their locations are shown below. Refer to this sequence to find them all.
- Collect the Saber.
- Collect the Matches.
- Use the Matches to light the lantern and collect the Sailor 1/4.
- Place the Saber in the pirate’s hand to open the chest and reveal the Star.
- Use the Star to open the pouch, revealing the Flag.
- Place the Flag on the tower to collect the Sailor 2/4.
- Collect Sailor 3/4 and Sailor 4/4.
- Place the Sailors on the ship to reveal the Gun.
- Give the Gun to the robot to shoot down the balloon, revealing the Wheel.
- Place the Wheel on the train to uncover the Statuette 2/2.
- Find the items shown at the bottom of the screen. Their locations are shown below. Refer to this sequence to find them all.
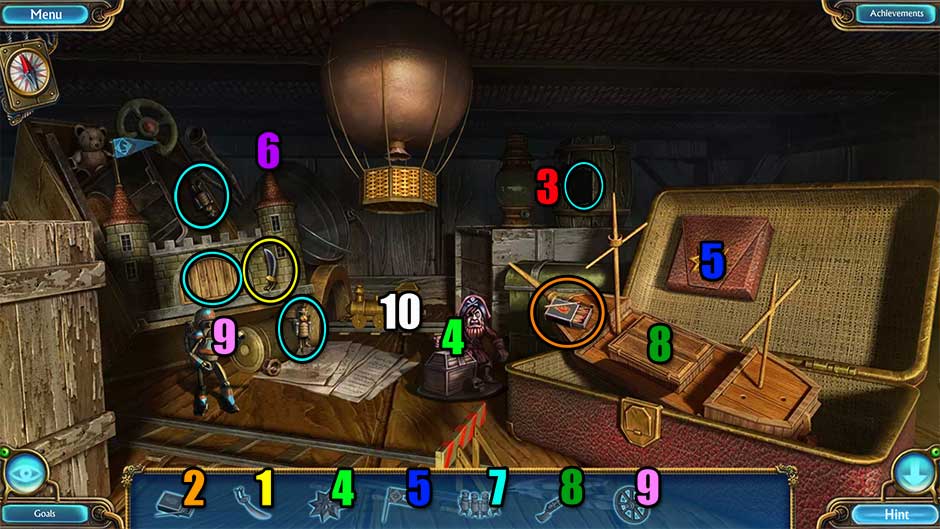
Kingdom of Aurelia – Mystery of the Poisoned Dagger – Chapter 3 – House Hidden Object Scene
- Upon completing the area, the Statuette 2/2 will be added to your inventory.
- Click on the Spatula sitting on the chair to collect it.
Kingdom of Aurelia – Mystery of the Poisoned Dagger – Chapter 3 – Spatula Location
- Examine the box on the table on the left.
- Use the Statuettes x2 on the box track to trigger a puzzle.
- Swap cats and mice. Figures can only be moved forwards. To start over, press the reset button. Referring to the screenshot here as reference, the solution is as follows:
- Move Mouse 4 to H.
- Move Cat 7 to Mouse 4’s starting position.
- Move Mouse 4 from H to Cat 7’s starting position.
- Move Mouse 3 to B.
- Move Cat 8 to Mouse 3’s starting position.
- Move Mouse 3 from B to Cat 8’s starting position.
- Move Cat 6 to E.
- Move Mouse 1 to Cat 6’s starting position.
- Move Cat 5 to Mouse 1’s starting position.
- Move Mouse 2 to Cat 5’s starting position.
- Move Cat 6 to Mouse 2’s starting position.
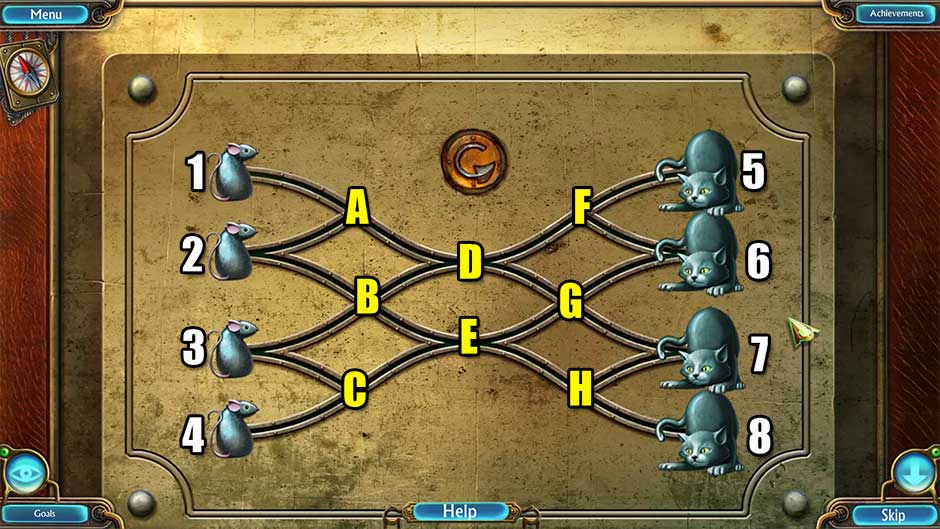
Kingdom of Aurelia – Mystery of the Poisoned Dagger – Chapter 3 – Cat and Mouse Puzzle Solution
- Upon completing the puzzle, examine the box sitting on the table again. Collect the Insulating Tape and the Boat Key inside to add them to your inventory.
- Take a closer look at the window.
- Attach the Hairpin to the rope and click on the reel to retrieve the Teapot.
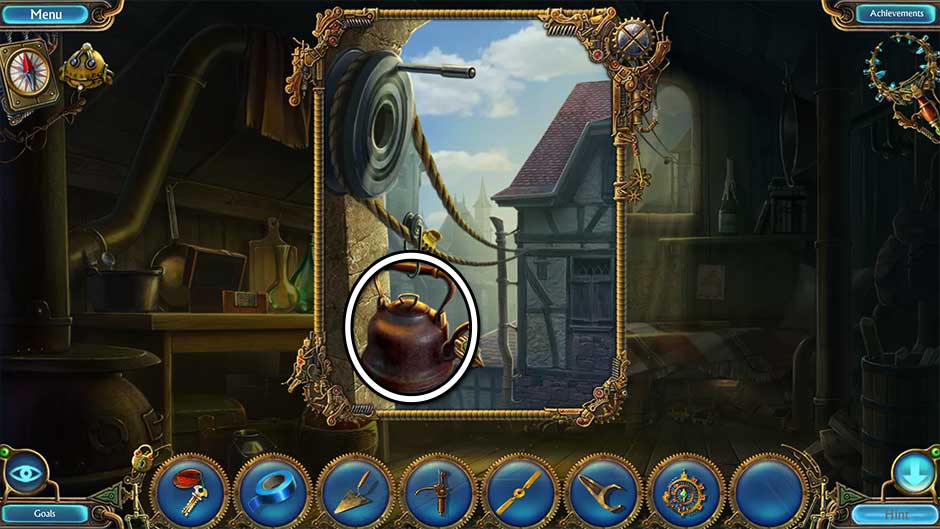
Kingdom of Aurelia – Mystery of the Poisoned Dagger – Chapter 3 – Teapot Location
- Head back down to the canal edge.
Canal Edge
- Take a closer look at the barrel on the right.
- Use the Spatula to pry open the lid, then insert the Pump.
- Place the Teapot on the ground next to the barrel and click on the Pump to fill it. Click on the resulting Teapot with Fuel to collect it.
- Go down to the boat.
Boat
- Insert the Boat Key into the ignition.
- Pour the Teapot with Fuel into the tube on the right.
- Click on the key to start the engine, taking the boat to the next location.
Chapter 4 – Sluice
Sluice
- Zoom in on the telescope straight ahead. You will unlock the achievement Detective.
- Examine the control panel toward the bottom of the screen.
- Use the Insulating Tape to repair the wire.
- Move the switches into the following positions:
- Red – up
- Yellow – down
- Green – down
- Blue – up
- The staircase will slide into position on the left. Take a closer look at the shack at the top of the steps.
- Use the Wrench to break the window open.
- Collect the Glass Shard and click on the latch to open the door.
- Enter the control booth.
Control Booth
- Click on Leonard to trigger a cutscene.
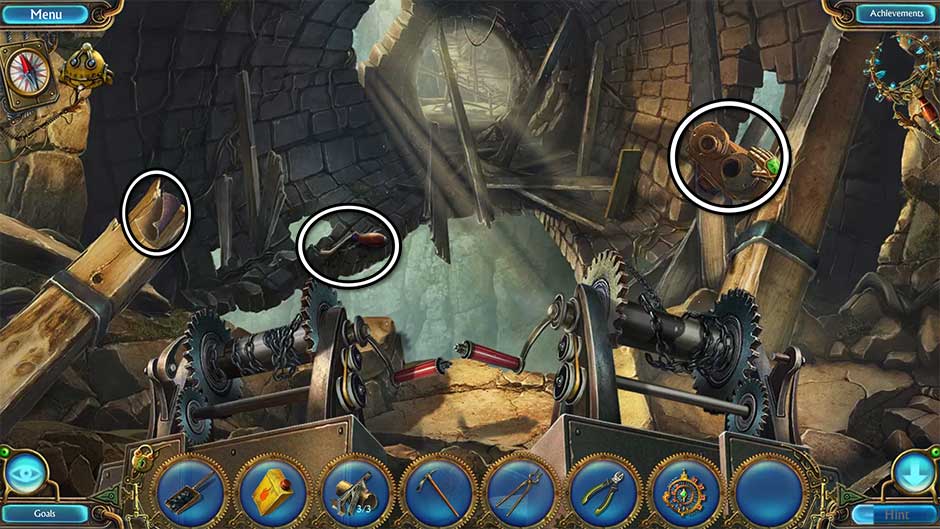
- Once the mechanical insect is destroyed, collect the Cylinder, the Broom, and zoom in on the mechanical insect – opening the top to collect the Battery
Kingdom of Aurelia – Mystery of the Poisoned Dagger – Chapter 4 – Control Booth Items
- Use the Glass Shard to untie Leonard and speak with him. He will give you the Cellar Key, unlocking the achievement Rescuer.
- Take a closer look at the bulletin board to the left of the door.
- Click on the Thumbtacks Part 5/12 and the Scheme to add them to your inventory.
- Zoom in on the hatch in the floor, right next to the remains of the mechanical insect.
- Use the Cellar Key on the lock and click to open it.
- Collect the Broken Drill, the Crowbar, and the Hook from the floor cache.
- Head back out to the sluice.
Sluice
- Zoom in on the end of the sluice straight ahead.
- Attach the Hook to the winch on the crane, then click on the lever to use it.
- Click on the Thumbtacks Part 12/12, the Saw, and the Nippers to add them to your inventory.
Kingdom of Aurelia – Mystery of the Poisoned Dagger – Chapter 4 – Sluice Crane Items
- Take a closer look at the propeller next to the control booth staircase.
- Use the Thumbtacks to repair the propeller. Click after each blade repair to move onto the next until all four blades are replaced, restoring power to the control booth.
- Enter the control booth.
Control Booth
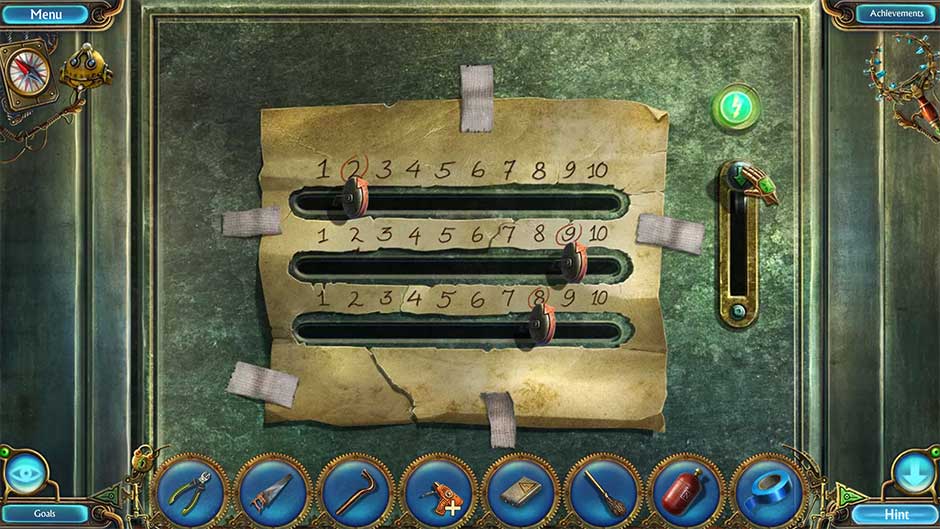
- Examine the generator at the back of the room.
- Place the Scheme on the front of the panel, completing the sheet of paper.
- Move the dials to their correct locations according to the circled numbers, then click on the power lever on the right. The solution is shown here.
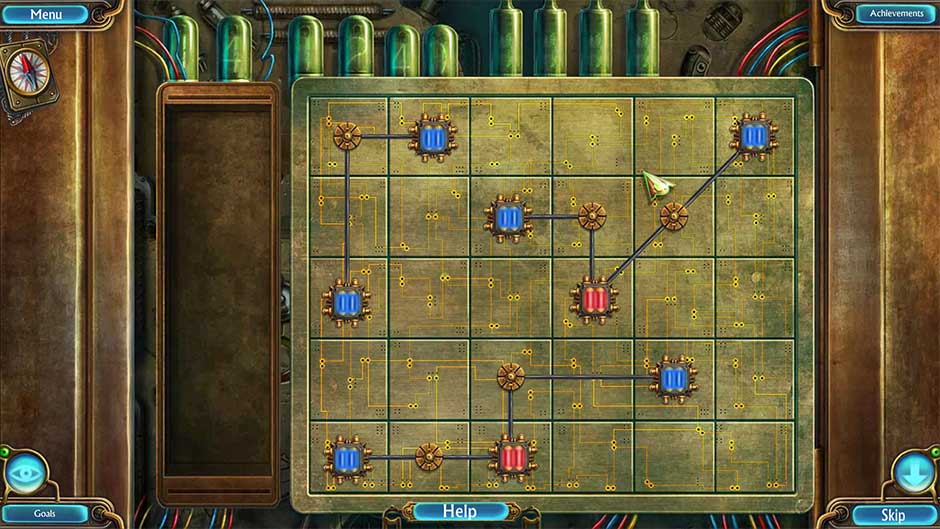
Kingdom of Aurelia – Mystery of the Poisoned Dagger – Chapter 4 – Generator Panel Solution
- A puzzle will be revealed. Move the bulbs so that the red ones match the red circles and the green ones match the green circles. If you need to start over, click the reset button. The puzzle solution is shown here:

Kingdom of Aurelia – Mystery of the Poisoned Dagger – Chapter 4 – Colored Bulbs Puzzle Solution
- Upon completing the puzzle, the door on the left will open. Proceed through to the next location.
Tank Storage
- Examine the pipes at the bottom center of the screen.
- Use the Cylinder on the device.
- Click on the lever on the upper right to fill the cylinder until it starts to frost. Click on the resulting Cylinder with Nitrogen to add it to your inventory.
- Take a closer look at the vice toward the bottom left.
- Click on the crank to loosen the vice, acquiring the Borer.
- Place the Broom into the clamp. Use the Saw to cut the handle. You will get the resulting Broom Pieces.
- Click on the Broken Drill in your inventory to take a closer look.
- Click on the back panel to open it and insert the Battery.
- Attach the Borer to the front of the drill. Click on it to add the completed Drill back to your inventory.
- Zoom in on the right wall of the room, beneath the platform.
- Use the Drill on the wall to widen the holes.
- Use the Broom Pieces to create makeshift steps.
- Climb up the newly formed ladder to the next location.
Tank Top
- Examine the bomb straight ahead.
- Use the Cylinder with Nitrogen on the gears to freeze them in place, then click on the Fuse to add it to your inventory.
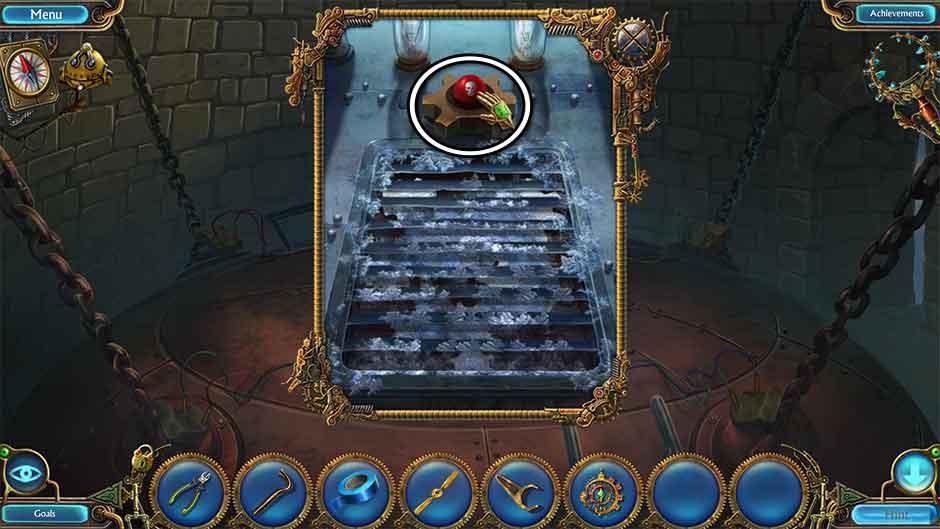
Kingdom of Aurelia – Mystery of the Poisoned Dagger – Chapter 4 – Bomb Fuse
- Use the Nippers to cut the wires at all four corners of the bomb.
- Click on the bomb again to lift the lid of the tank and take a closer look inside.
- Click on the valve inside to open the compartment below.
- Click on Tim the Robot and use him to retrieve the card down inside the hollow.
- Click on the Access Card to add it to your inventory.
Kingdom of Aurelia – Mystery of the Poisoned Dagger – Chapter 4 – Access Card
- Once you’ve collected the card, a cutscene will follow.
Inside Tank
- Use the Crowbar to remove the grate on the left and take a closer look inside.
- Use the Wrench to remove the top bolt, then remove the broken component and replace it with the Propeller from your inventory.
- Click on the bolt to return it to the top of the propeller, then use the Wrench to fasten it. You will reacquire Tim the Robot.
- Select Tim the Robot and use him on the right porthole. He will open the top hatch.
- Exit the inside of the tank through the top hatch.
Tank Top
- Go back to the control booth.
Control Booth
- Leonard is lying on the floor. Click on him for a closer view.
- Click on the device on the back of Leonard’s neck to trigger a cutscene.
- Click on Leonard once more to speak with him.
- Take a closer look at the window to the right of Leonard.
- Use the Access Card on the slot.
- Once you’ve spoken with Leonard again, exit to the sluice.
Sluice
- Enter the boat on the right.
Boat
- Once you’ve entered the boat, a cutscene will take you to the next chapter and location.
Chapter 5 – Cave
Underground River
- Use the Crowbar on the crate on the right to open it, creating a makeshift bridge.
- Select Tim the Robot and use him to knock down the item sitting in the rafters.
Kingdom of Aurelia – Mystery of the Poisoned Dagger – Chapter 5 – Rafter Item
- Take a closer look at the item floating in the water.
- Click on the Emblem of Skull on the right end of the item to add it to your inventory.
- Examine the inside of the crate on the right to obtain the achievement Customs Officer.
- Zoom in on the top of the crate ahead in the distance.
- Collect the Machete sitting on the stand. You’ll be returning here later.
- Take a closer look at the portcullis on the far end of the cavern.
- Insert the Emblem of Skull into the slot in the lock to open it.
- Proceed through the open door to the next location.
Stairwell
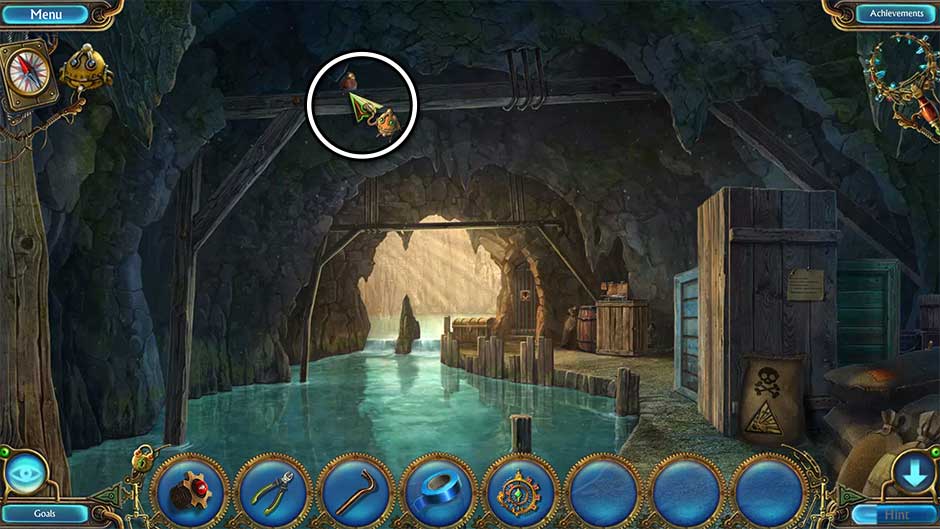
- Click on the Scoop and the Slip of Paper to add them to your inventory.
Kingdom of Aurelia – Mystery of the Poisoned Dagger – Chapter 5 – Stairwell Items
- Go back to the underground river.
Underground River
- Examine the inside of the large crate on the right.
- Attach the Slip of Paper to the line at the top of the screen to trigger a puzzle.
- Find all the items whose outlines are shown on the slip of paper at the top of the screen. Their locations are shown below.
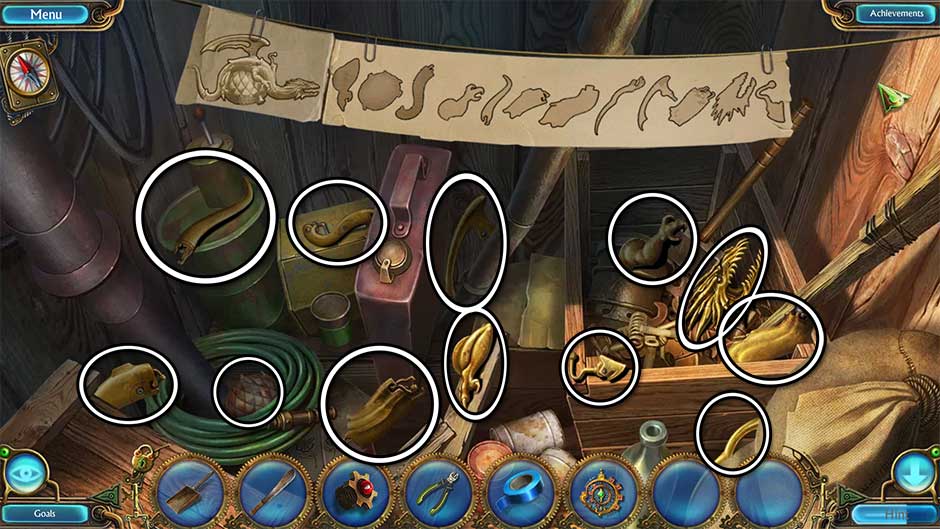
Kingdom of Aurelia – Mystery of the Poisoned Dagger – Chapter 5 – Dragon Pieces
- Once you’ve found all the pieces, the Dragon Parts will be added to your inventory.
- Take a closer look at the top of the crate where you previously found the Machete.
- Place the Dragon Parts on the board to trigger a puzzle.
- Arrange the dragon parts so that they form a completed blowtorch. Refer to the schematic in the upper left corner to see the easiest way to assemble it. The complete blowtorch and final piece are pictured below.
Tip! If you appear to be missing a piece, look at the top of the assembly stand. The cursor in the screenshot below shows the location.
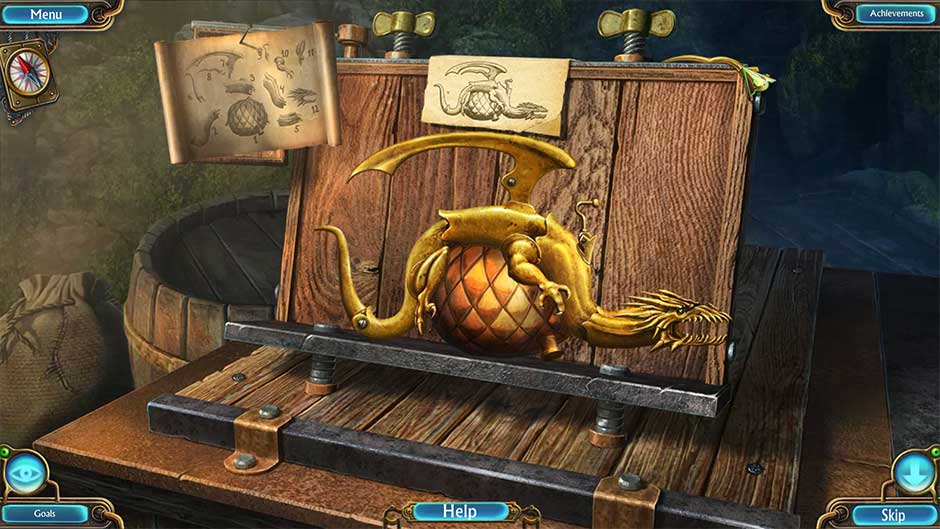
Kingdom of Aurelia – Mystery of the Poisoned Dagger – Chapter 5 – Dragon Blowtorch
- Examine the sack with the skull and crossbones in front of the large crate on the right.
- Use the Machete to cut open the sack.
- Use the Scoop on the resulting pile to obtain the Scoop with Gunpowder.
- Return to the stairwell.
Stairwell
- Examine the grate over the porthole on the right.
- Use the Blowtorch on the bars to remove them.
- Collect the Decoder 1/2 to add it to your inventory.
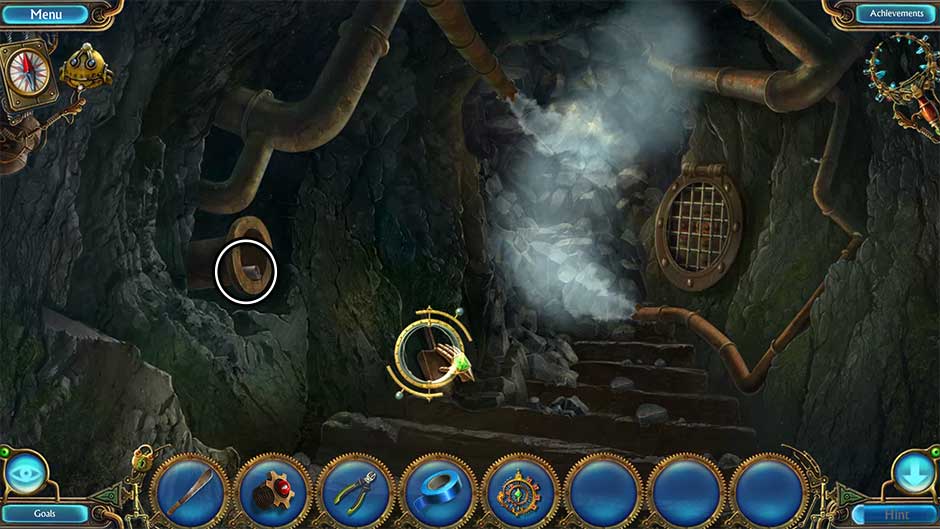
Kingdom of Aurelia – Mystery of the Poisoned Dagger – Chapter 5 – Decoder Location
- Zoom in on the pile of rubble at the far end of the shaft.
- Click on the Chest Key at the bottom of the cave-in to add it to your inventory.
Kingdom of Aurelia – Mystery of the Poisoned Dagger – Chapter 5 – Chest Key Location
- Go back out to the underground river.
Underground River
- Take a closer look at the chest at the far end of the dock.
- Insert the Chest Key into the lock and click to turn it.
- Collect the Grease, the Decoder 2/2, and the Jug to add them to your inventory.
- Select the Jug in your inventory. Pour in the Scoop with Gunpowder. The Scoop will be returned to your inventory.
- Next, cap off the Jug with the Fuse. You will acquire the Jug with Gunpowder.
- Enter the stairwell again.
Stairwell
- Zoom in on the porthole on the right again.
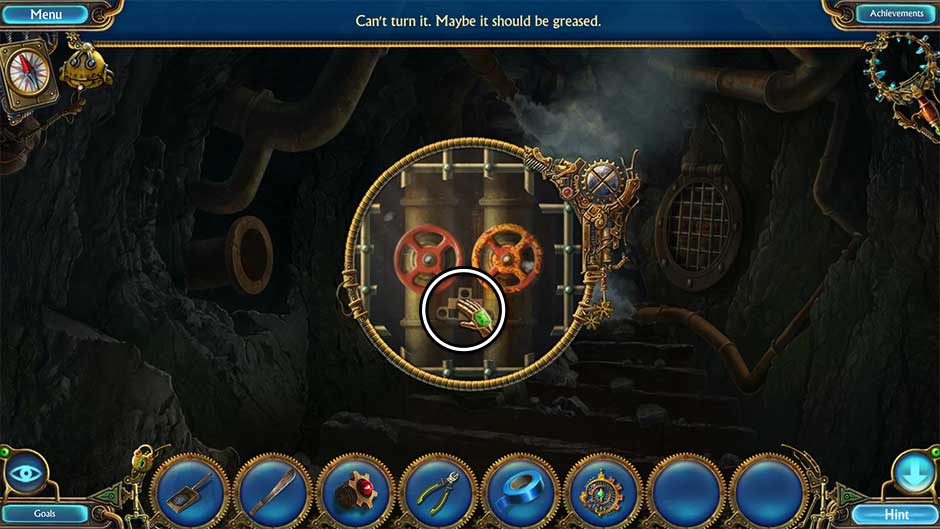
- Use the Grease on the right valve to restore it to working order, then click to activate it, removing the steam from the shaft.
- Examine the pile of rubble ahead.
- Place the Jug with Gunpowder over the pile of rubble.
- Quickly exit back out to the underground river area.
Underground River
- As soon as you enter the chamber, the makeshift bomb in the other room will explode.
- Enter the stairwell again.
Stairwell
- Proceed up the cleared stairway to the next location.
Cliff Dock
- Use the Machete on the ivy on the right.
- Proceed up the steps on the right to the next location.
Overlook
- Read the note next to the phone if you wish.
- Select Tim the Robot and select the pipe leading up from the shack.
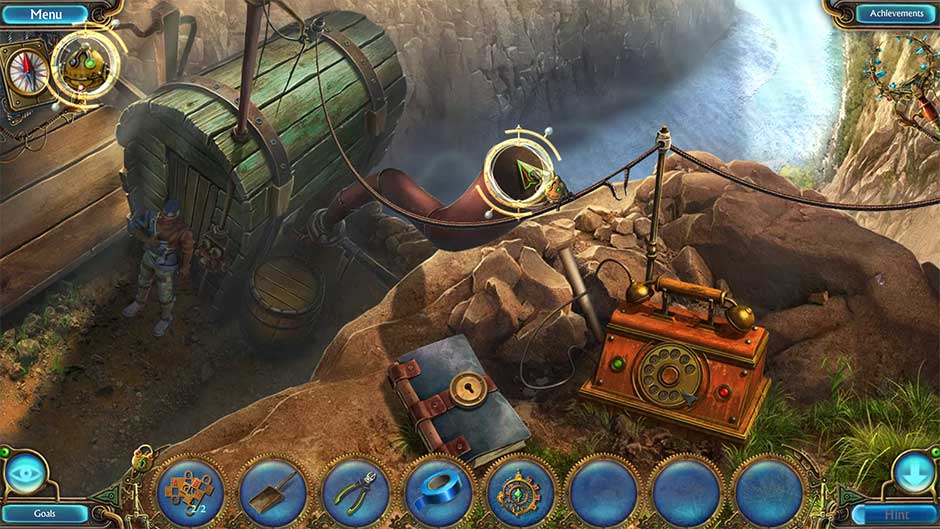
Kingdom of Aurelia – Mystery of the Poisoned Dagger – Chapter 5 – Use Tim the Robot at the Overlook
- Click on the Key that the robot drops on top of the blue journal to add it to your inventory.
- Use the Key on the blue journal’s lock, then click to open it and take a closer look inside.
- Use the Decoders on the pages to trigger a puzzle.
- To find the phone number needed, place the decoder’s plates in such a way that the signs that appear in the square decoder windows correspond to the signs shown next to the windows on the decoder. Doing this will reveal the correct numbers in the round windows. The puzzle solution is pictured below.
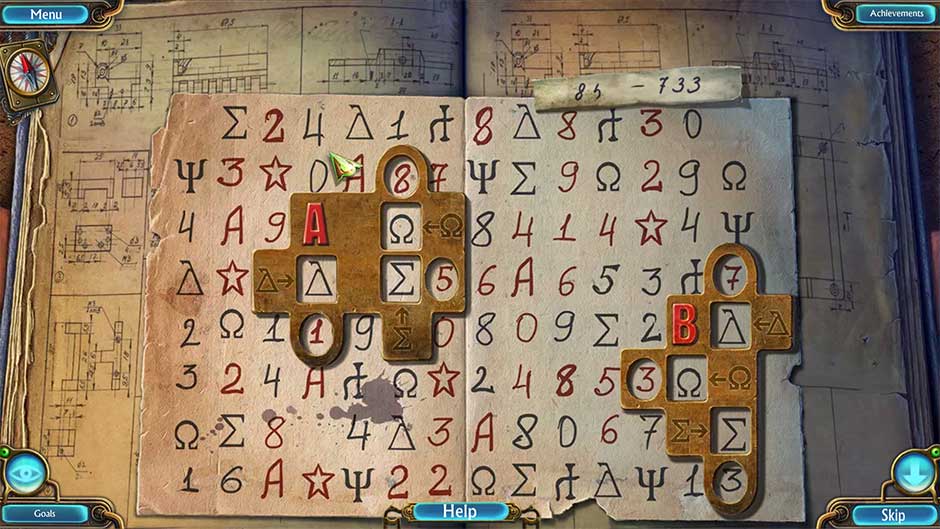
Kingdom of Aurelia – Mystery of the Poisoned Dagger – Chapter 5 – Decoder Puzzle Solution
- Upon completing the puzzle, the Paper Code will be added to your inventory.
- Use the Insulating Tape to repair the broken phone wire.
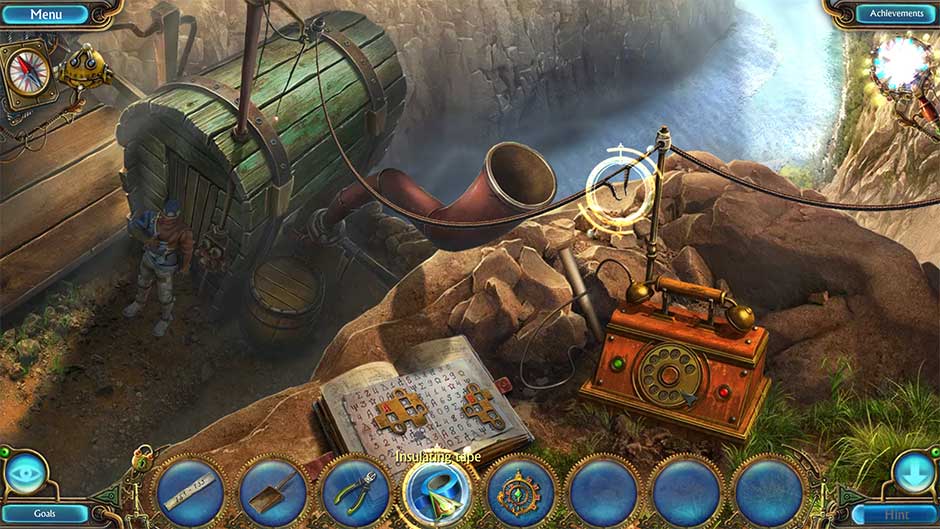
Kingdom of Aurelia – Mystery of the Poisoned Dagger – Chapter 5 – Repair the Phone Wire
- Zoom in on the phone toward the right.
- Click on the receiver to remove it.
- Apply the Paper Code to the phone. Click on the numbers shown to dial the number. When dialing, click on the number and hold the click as you move the cursor over to the finger stop, then release. Dial the number 851-733.
- Go back down to the cliff dock.
Cliff Dock
- Select the Mindscope on the upper right and use it to read the thoughts of the guard.
- Enter the balloon basket on the left.
Chapter 6 – Canyon
Toppled Tower
- Collect the Tongs and the Mattock, the latter located in the tool box on top of the post on the right.

Kingdom of Aurelia – Mystery of the Poisoned Dagger – Chapter 6 – Toppled Tower Items
- Continue forward toward the toppled tower.
Catwalk
- Pick up the Pieces of Iron x3 and the Canister to add them to your inventory.

Kingdom of Aurelia – Mystery of the Poisoned Dagger – Chapter 6 – Catwalk Items
- Use the Mattock on the cliff face on the left.
- Use the Scoop to pick up the Coal.
Kingdom of Aurelia – Mystery of the Poisoned Dagger – Chapter 6 – Pile of Coal
- Click on the door on the right to open it and proceed through to the next location.
Tower Interior
- Collect the Telescope without Lens, the Sandpaper, and the Handle to add them to your inventory.
Tip! You may need to click on the lever on the left to restore the bridge and reach the Handle.
Kingdom of Aurelia – Mystery of the Poisoned Dagger – Chapter 6 – Tower Interior Items
- Go back out to the catwalk.
Catwalk
- Examine the door of the shack on the other end of the catwalk.
- Use the Sandpaper on the plaque face to trigger a puzzle.
- Locate the items listed at the bottom of the screen. Their locations are shown below.
Kingdom of Aurelia – Mystery of the Poisoned Dagger – Chapter 6 – Animal Hidden Object Puzzle
- Upon completing the puzzle, the door to the shack will open. Enter it to reach the next area.
Workshop
- Pick up the Bucket and the Matrix to add them to your inventory.
Kingdom of Aurelia – Mystery of the Poisoned Dagger – Chapter 6 – Workshop Items
- Insert the Handle into the slot in the machine on the lower left. Click to turn it.
- Use the Bucket on the container of water on the right to acquire the Bucket with Water.
- Place the Matrix into the slot in the block at the bottom of the chute on the right.
- Take a closer look at the machine in the rear corner of the workshop.
- Pick up the Matches sitting on the left side of the machine to add them to your inventory.
- Examine the furnace toward the right.
- Place the Pieces of Iron 3/3 into the pot.
- Pour the Coal into the bottom of the furnace, then pour the contents of the Canister over top.
- Use the Matches to light the fuel.
- Now that the furnace is lit, click on the pot to pour the contents down the chute. Use the Tongs to remove the Matrix once again.
Kingdom of Aurelia – Mystery of the Poisoned Dagger – Chapter 6 – Furnace
- Select the Matrix in your inventory. Use the Nippers to remove the wire surrounding it, then click to open the mold. Use the Bucket with Water to cool the contents and acquire the Template.
- Examine the machine in the rear corner again.
- Place the Template into the machine grip and press the red button. You will obtain the Detent.
- Return to the tower interior.
Tower Interior
- Place the Detent on the peg of the crank on the right.
Kingdom of Aurelia – Mystery of the Poisoned Dagger – Chapter 6 – Using the Detent
- Click on the right lever so that the bridge is restored. If you haven’t done this for the left side yet, click the lever here as well so that the floor is completely restored.
- Click on the Board 1/3 to add it to your inventory.
Kingdom of Aurelia – Mystery of the Poisoned Dagger – Chapter 6 – Tower Interior Board
- Continue through the interior of the tower toward the far end and to the next location.
Cliffside
- Collect the Board 2/3 and the Board 3/3.
Kingdom of Aurelia – Mystery of the Poisoned Dagger – Chapter 6 – Cliffside Board Locations
- Use the Mattock on the cliff face on the right to create a series of steps leading to the boiler.
- Proceed up the path to the next location.
Lookout
- Use the Boards x3 on the wheel ahead to restore it.
- Take a closer look at the base of the wheel.
- Click on the Handle and the Magnet to add them to your inventory.
- Place the Telescope without Lens on top of the stand straight ahead.
- Go back to the cliffside.
Cliffside
- Examine the steaming boiler.
- Attach the Handle to the valve and click to operate it, eliminating the steam.
- Click on the Lens to add it to your inventory.
Kingdom of Aurelia – Mystery of the Poisoned Dagger – Chapter 6 – Lens Location
- Return to the lookout.
Lookout
- Zoom in on the telescope.
- Place the Lens into the socket on the right.
- Click on the telescope to view the airship.
- Note the code written on the side of the vessel: 248.
- Examine the base of the wheel again.
- Use the arrows to input the code 248.
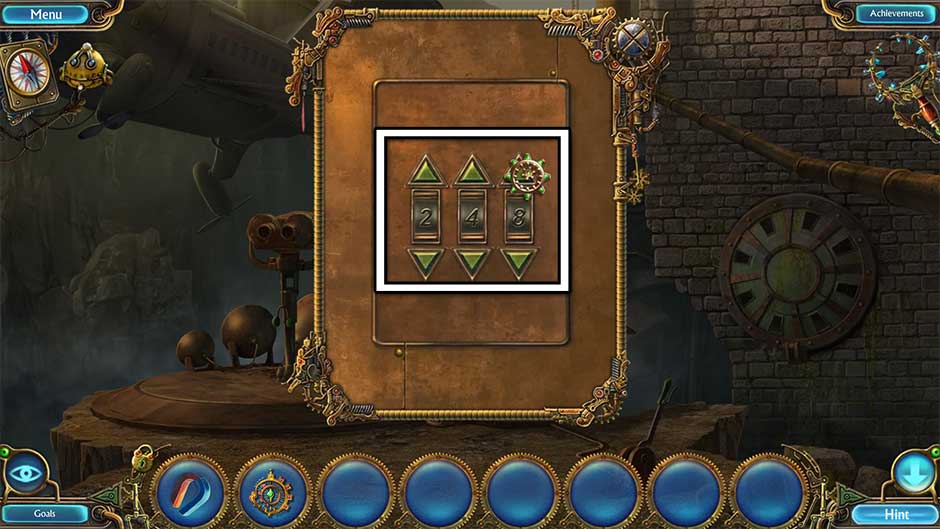
Kingdom of Aurelia – Mystery of the Poisoned Dagger – Chapter 6 – Code Combination
- Once the panel is open, collect the Wing Bolt in the bottom right corner.
- Head back down to the cliffside.
Cliffside
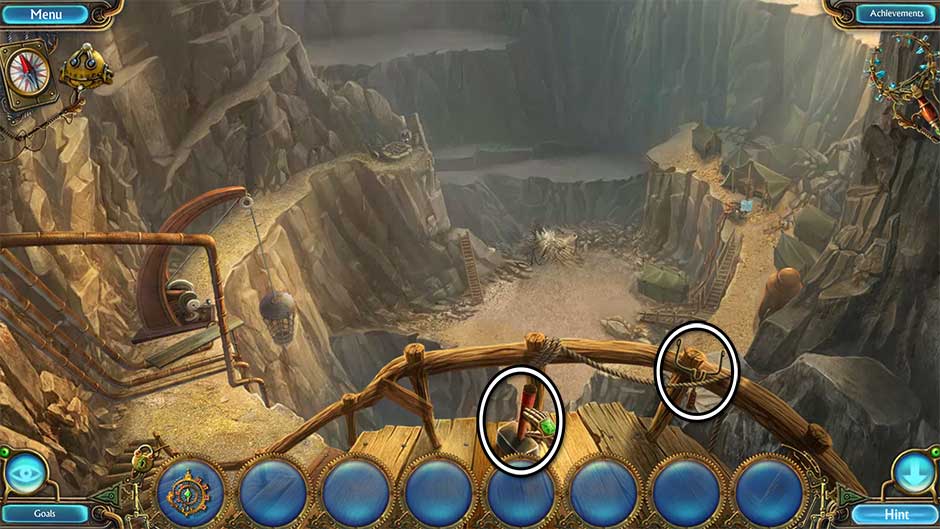
- Examine the middle section of pipe ahead, about halfway down the path.
- Insert the Wing Bolt into the hole filled with steam to fill it.
- Click on the Toothed Rack to add it to your inventory.
Kingdom of Aurelia – Mystery of the Poisoned Dagger – Chapter 6 – Toothed Rack Location
- Return to the lookout.
Lookout
- Zoom in on the base of the wheel again.
- Insert the Toothed Rack into the right side of the inner panel.
- Click on the lever with the green handle in the lower right corner.
- A hatch will open on the right. Proceed through the hatch to the next location.
Chapter 7 – Pirate Base
Junction
- Click on the bars on the left to open the hatch and proceed down inside.
Rafters
- Pick up the Latch and the Clamp 1/5.
- Attach the Magnet to the rope on the far right rafter, then click on it to retrieve the Wrench and add it to your inventory.

Kingdom of Aurelia – Mystery of the Poisoned Dagger – Chapter 7 – Rafter Items
- Go back to the junction.
Junction
- Take a closer look at the grate over the porthole on the lower left.
- Use the Wrench to remove the screws on the grate.
- Click on the Red Cross to add it to your inventory.
- Zoom in on the first aid kit straight ahead.
- Insert the Red Cross into the slot on the panel to open it.
- Click on the Laxative to add it to your inventory.

Kingdom of Aurelia – Mystery of the Poisoned Dagger – Chapter 7 – Laxative Location
- Head back down to the rafters.
Rafters
- Select Tim the Robot and use him to rattle the lamp (shown below).
Kingdom of Aurelia – Mystery of the Poisoned Dagger – Chapter 7 – Distract the Guard
- Use the Laxative on the white mug sitting to the right of the guard below. You will unlock the achievement Trickster.
- Click on the ladder on the far wall ahead to lower it, then proceed down to the next location.
Control Room
- Use the Latch to secure the door on the right.
- Watch the door on the right. The guard will attempt to escape using the Access Card. When it appears, click on it quickly to add it to your inventory.
Kingdom of Aurelia – Mystery of the Poisoned Dagger – Chapter 7 – Acquire the Access Card
- Take a closer look at the control panel ahead.
- Click on the Bobbin to collect it.
- Insert the Access Card into the slot on the lower right, then look at the screen to enter a puzzle.
- Drag the number snakes onto the squares with the matching numbers. Click and hold a number snake, then drag to move it to the desired location. The step-by-step puzzle solution is shown below.

Kingdom of Aurelia – Mystery of the Poisoned Dagger – Chapter 7 – Number Snake Puzzle Solution
- Upon completing the puzzle, a new door will open. Climb back up to the rafters.
Rafters
- Continue through the circular doorway that’s now open on the back wall ahead.
Catwalk
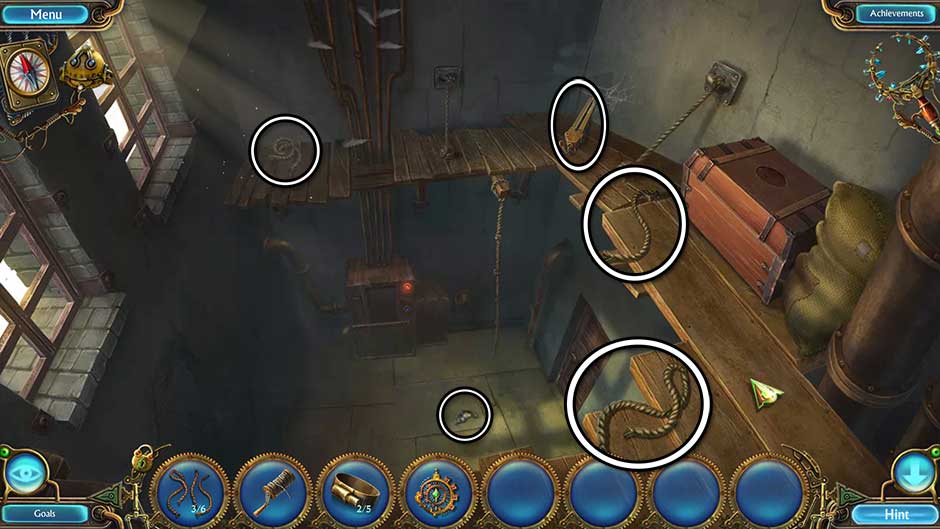
- Collect the Pieces of Rope 3/6 and the Note with Code.
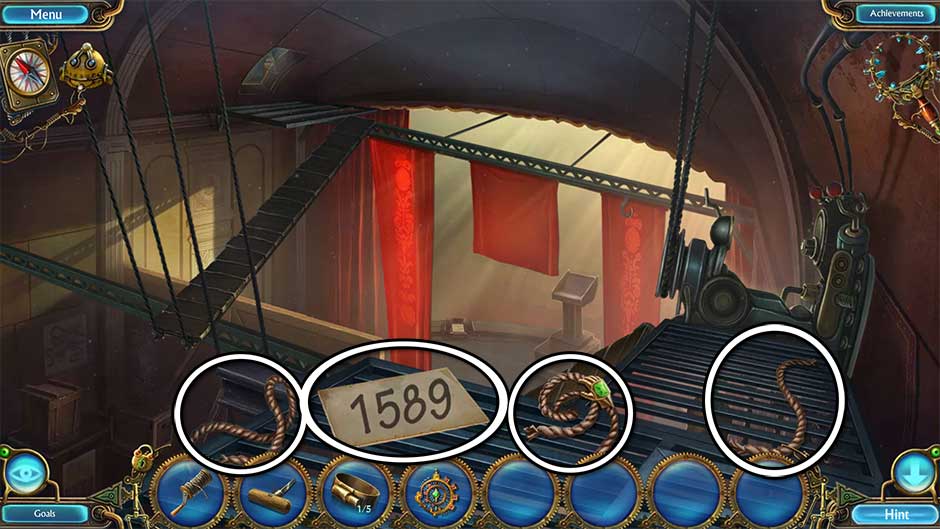
Kingdom of Aurelia – Mystery of the Poisoned Dagger – Chapter 7 – Catwalk Items
- Head back to the control room.
Control Room
- Take a closer look at the control panel.
- Place the Note with Code below the number pad on the left. Input the code 1589.
- Return to the junction.
Junction
- Take a closer look at the right passageway.
- Use the Wrench to remove the screws.
- Click on the metal fasteners to remove them, then click on the Engine and the Clamp 2/5 to add them to your inventory.
Kingdom of Aurelia – Mystery of the Poisoned Dagger – Chapter 7 – Turbine Items
- Return to the catwalk.
Catwalk
- Insert the Engine into the device on the right.
- Proceed through the doorway in the upper left corner.
Storage
- Collect the Pieces of Rope 6/6 and the Crossbow Base.
- Attach the Rope to the far board and use it to reach the Skull’s Emblem 1/2 lying on the floor.
Kingdom of Aurelia – Mystery of the Poisoned Dagger – Chapter 7 – Storage Room Items
- Examine the door at the bottom of the room.
- Click on the Clamp 3/5 on the upper left corner of the panel to add it to your inventory.
- Recollect the hanging Rope you used to reach the bottom of the room to add it back to your inventory.
- Return to the catwalk.
Catwalk
- Attach the Rope to the hook over the rightmost red banner.
- Zoom in on the podium on the stage below.
- Read the note if you wish.
- Collect the Skull’s Emblem 2/2 and the Arrow.
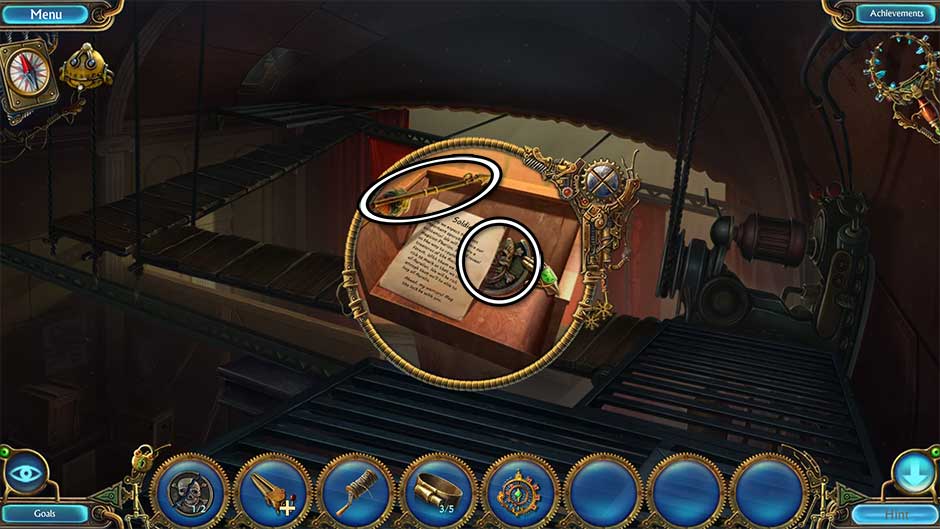
Kingdom of Aurelia – Mystery of the Poisoned Dagger – Chapter 7 – Podium Items
- Click on the Rope to add it back to your inventory.
- Head back to the storage room.
Storage Room
- Attach the Rope to the walkway again.
- Examine the chest on the right.
- Insert the Skull’s Emblem into the slot in the top of the chest.
- Click on the chest to open it. Collect the Map, Clamp 4/5 and Clamp 5/5
- Take a closer look at the top of the pipes on the opposite wall.
- Use the Clamps x5 on the holes spewing steam to seal them.
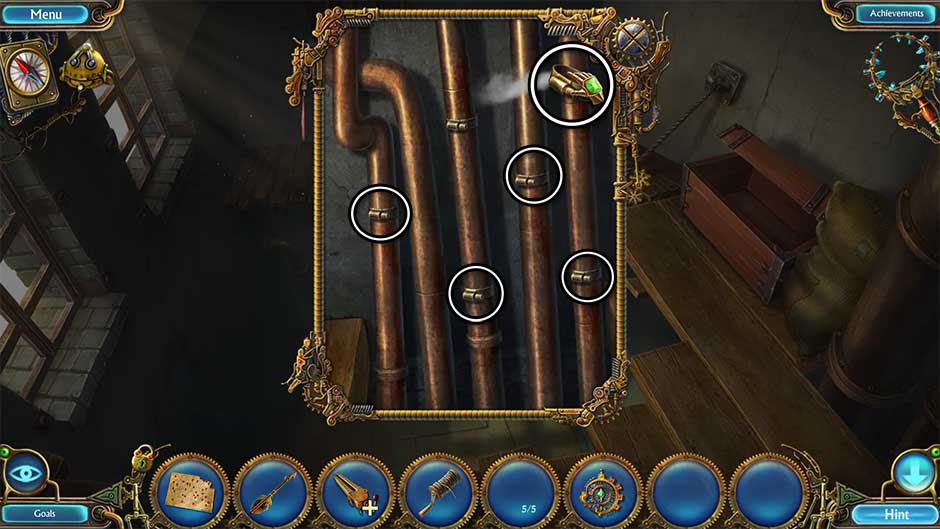
Kingdom of Aurelia – Mystery of the Poisoned Dagger – Chapter 7 – Clamp the Pipes
- Zoom in on the device all the pipes are connected to at the bottom of the room.
- Connect all the tubes so that they create a closed system. Click on a title to rotate it. The solutions are shown below.

Kingdom of Aurelia – Mystery of the Poisoned Dagger – Chapter 7 – Pipe Puzzle Solution
- Upon completing the puzzle, the Perforated Card will be added to your inventory.
- Zoom in on the door at the bottom of the room.
- Use the Perforated Card on the slot to open the lock.
- Enter through the now-open doorway to the next location.
Rooftop
- Pick up the Bow lying on the platform below.
Kingdom of Aurelia – Mystery of the Poisoned Dagger – Chapter 7 – Bow Location
- Select the Crossbow Base in your inventory. Attach the Bow, the Bobbin, and the Arrow to create the Crossbow.
Kingdom of Aurelia – Mystery of the Poisoned Dagger – Chapter 7 – Finished Crossbow
- Attach the Crossbow to the left side of the platform you’re standing on.
- Click on the arrow to fire the crossbow, then click on the bobbin to crank the gangplank closer.
- Enter the airship.
Chapter 8 – Airship
Main Deck
- Click anywhere to trigger a cutscene.
- Take a closer look at the far upper portion of the dome above the door straight ahead.
- Click on the Garden Knife to add it to your inventory.
- Place the Map in the frame to complete it. Click on the map once more to obtain the Hieroglyphs.
- Examine the panel on the left wall.
- Place the Hieroglyphs on the right side of the panel.
- Press the buttons according to the hieroglyphs displayed. The solution is shown below.
Kingdom of Aurelia – Mystery of the Poisoned Dagger – Chapter 8 – Hieroglyphs Puzzle Solution
- Zoom in on the maroon tool bag on the right side of the deck.
- Click on the bag to open it, then collect the Glass Dropper and the Stethoscope

Kingdom of Aurelia – Mystery of the Poisoned Dagger – Chapter 8 – Tool Bag Items
- Take a closer look at the tree ahead.
- Use the Garden Knife on the trunk, then use the Glass Dropper to obtain the Glass Dropper with Resin.
- Enter the room on the left.
Assembly Bay
- Collect the Glass Cutter sticking out of the robot’s head.
Kingdom of Aurelia – Mystery of the Poisoned Dagger – Chapter 8 – Glass Cutter Location
- Head back to the main deck.
Main Deck
- Proceed through the door straight ahead.
Cabin
- Take a closer look at the compass to the right of the helm.
- Use the Glass Cutter to cut open the display, then use the Garden Knife to pry apart the pegs holding in the Crystal. Click on it to add it to your inventory.
- Head back to the assembly bay.
Assembly Bay
- Insert the Crystal into the robot’s head to trigger a puzzle.
- Assemble the mechanical soldier by clicking pieces on the rack on the right and placing them into their correct locations. The solution is shown below.
Kingdom of Aurelia – Mystery of the Poisoned Dagger – Chapter 8 – Assembled Robot
- Upon completing the puzzle, you will unlock the achievement Mechanic.
Main Deck
- The newly assembled mechanical soldier will crank a wheel, opening up the center bay. Proceed down into the next area.
Docking Bay
- Proceed forward to enter the helicopter.
Helicopter
- Click on the Stamp to add it to your inventory.
Kingdom of Aurelia – Mystery of the Poisoned Dagger – Chapter 8 – Stamp Location
- Exit back out to the docking bay.
Docking Bay
- Zoom in on the safe at the top of the steps on the left.
- Use the Stethoscope on the safe to trigger a minigame.
- Click on the center dial, watching the stethoscope to see when you find the correct combination. Upon finding the correct combination, the dial will automatically change directions. To solve the puzzle, simply keep clicking on the center dial until the safe opens.
- Click on the safe handle to open it. Pick up the Scroll
Kingdom of Aurelia – Mystery of the Poisoned Dagger – Chapter 8 – Safe Scroll
- Return to the cabin.
Cabin
- Zoom in on the shelf ahead.
- Click on the door of the pneumatic tube on the left to open it.
- Use the Glass Dropper with Resin to repair the broken glass tube. Click on the upper section to connect it.
- Place the Scroll on the table and use the Stamp on the document.
- Click on the scroll again to place it inside the tube, then click on the lid to seal it. Click on the tube, followed by the green lever on the left to send it off.
- A secret compartment stand will appear. Click on the Button to add it to your inventory.
Kingdom of Aurelia – Mystery of the Poisoned Dagger – Chapter 8 – Hidden Button Location
- Make your way back to the docking bay.
Docking Bay
- Examine the control panel on the bottom rail, close to the steps.
- Place the Button in the metal frame, then click on it.
- Enter the helicopter.
Helicopter
- Click the red button on the fuel gauge on the left.
- Click the large red button on the left side of the center console to operate the flying machine.
Chapter 9 – Ancient Forest
Tree Hut
- Use Tim the Robot on the wooden board barrel in the top left corner of the hut in order to restore the flow of water down the pipe.
- Click on the Chimney Bellows to add them to your inventory.
- Zoom in on the broken basket below the incomplete ladder.
- Click on the Garden Pruner to collect it.
Kingdom of Aurelia – Mystery of the Poisoned Dagger – Chapter 9 – Hut Exterior Items
- Examine the pot of pink flowers on the right.
- Use the Garden Pruner on the thorn-covered branches to reach the Rose Leaf.
- Enter the hut.
Hut Interior
- Pick up the Mushrooms, the Empty Boiler, and the Chair.
- Zoom in on the shelf below the green lantern.
- Click on the Pounder to add it to your inventory.
Kingdom of Aurelia – Mystery of the Poisoned Dagger – Chapter 9 – Hut Interior Items
- Take a closer look at the bag hanging from the ceiling in the upper right corner.
- Use the Garden Pruner to cut open the bag.
- Click on the Green Leaves to collect them.
- Exit the hut.
Tree Hut
- Select the Empty Boiler and dip it in the barrel of water on the left to obtain the Boiler with Water.
- Place the Chair at the bottom of the incomplete ladder on the right. Click on the nest at the top for a closer view.
- Use the Garden Pruner to cut the red ribbons. Click to add the Twigs and the Watering Pot to your inventory.
- Examine the broken straw basket at the foot of the chair.
- Use the Twigs to repair the Basket, then once completed, click to add it to your inventory.
- Enter the hut again.
Hut Interior
- Examine the cabinet in the rear left corner of the room.
- There’s a note on the shelf showing you the next sequence of events.
- Place the Green Leaves, the Rose Leaf, the Mushrooms, and the Pounder on the countertop.
- Place all the ingredients into the mortar, then use the pestle (pounder) to crush them. Click to obtain the Mortar with Powder.
- Place the Boiler with Water on top of the stove in the lower left corner.
- Pour the Mortar with Powder into the pot of water on top of the stove.
- Use the Chimney Bellows to heat the stove, then click on the resulting Brew created in the pot to add it to your inventory.
Kingdom of Aurelia – Mystery of the Poisoned Dagger – Chapter 9 – Cooking the Brew
- Hang the Basket from the rope attached to the crane.
- Zoom in on the shelf on the right.
- Place the Watering Pot into the top of the glass bottle.
- Pour the Brew into the bottle. Click on the top, then the bottle itself to add the Spray with Brew to your inventory.
- Use the Spray with Brew on the vines covering the hole in the center of the room.
- Proceed down into the next location.
Quarry
- Click on the Mallet and the Slingshot to add them to your inventory.
Kingdom of Aurelia – Mystery of the Poisoned Dagger – Chapter 9 – Quarry Items
- Head down to the path on the left.
Quarry Shelf
- Head forward one more time on the left.
Giant Guard
- Examine the closed barrel on the left.
- Use the Hammer to break open the barrel.
- Click on the Spike Nail and the Plum inside to add them to your inventory.
- Go back to the quarry shelf.
Quarry Shelf
- Use the Spike Nail on the slot in the base of the crane at the very bottom of your screen.
- Use the Hammer to secure the nail.
- Click on the lever on the left to lift the suspended cage.
- Collect the Elastic caught on the side of the cage prison to add it to your inventory.
Kingdom of Aurelia – Mystery of the Poisoned Dagger – Chapter 9 – Slingshot Elastic Location
- Select the Slingshot in your inventory. Add the Elastic and the Plum to acquire the Slingshot with Plum.
- Head forward again.
Giant Guard
- Use the Slingshot with Plum on the suspended bucket (pictured here) to distract the giant:

Kingdom of Aurelia – Mystery of the Poisoned Dagger – Chapter 9 – Use Slingshot on Bucket
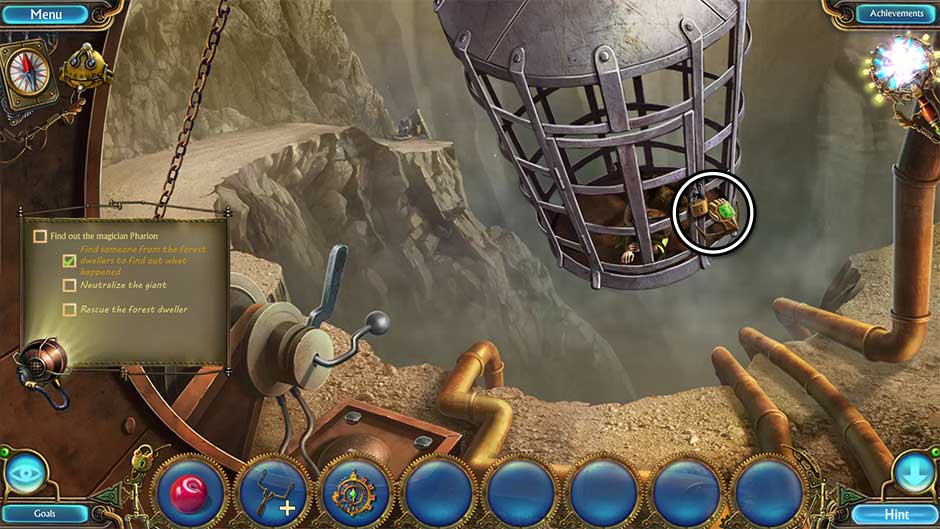
- Collect the Key on the right while the giant is distracted.
Kingdom of Aurelia – Mystery of the Poisoned Dagger – Chapter 9 – Collect the Key
- Go back to the quarry shelf.
Quarry Shelf
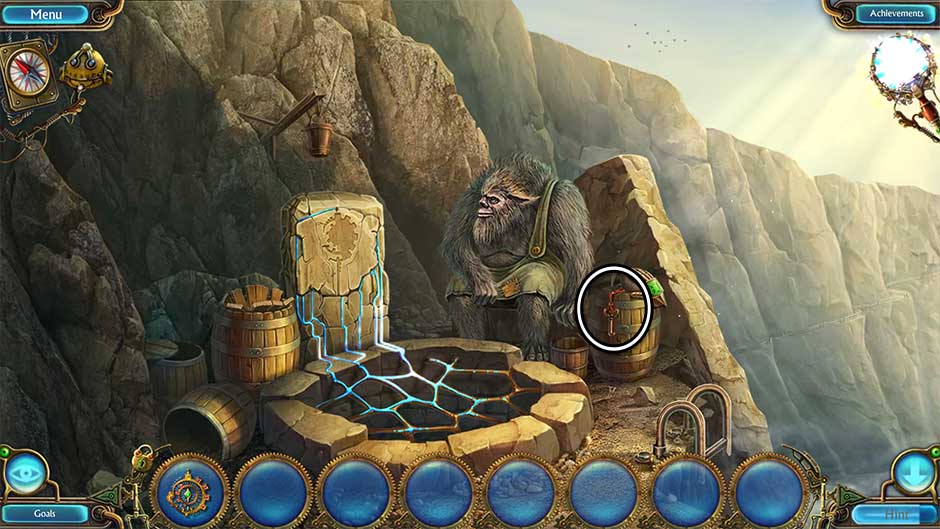
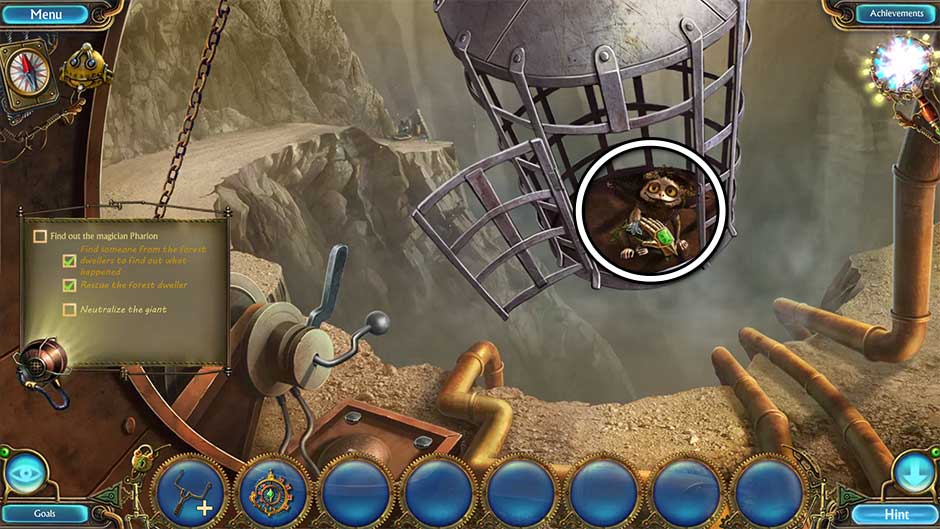
- Use the Key on the lock on the cage to open it.
- Speak with the forest dweller, then accept their gift of the Emblem. You will unlock the achievement Liberator.
Kingdom of Aurelia – Mystery of the Poisoned Dagger – Chapter 9 – Receiving the Emblem
- Backtrack to the hut interior.
Hut Interior
- Take a closer look at the round door at the back of the room.
- Insert the Emblem into the slot to unlock the door.
- Proceed through the door to the next location.
Brewery
- When you enter the room, you will walk straight into a hidden object scene. Locate all the items shown at the bottom of the screen. The sequence, and their locations, are shown and listed below.
- Collect the four Idols.
- Use the Idols on the chest to uncover the Can and the Picture.
- Use the Can to water the tree in the barrel at the back of the room.
- Insert the Picture into the frame, revealing the location of the Valve.
- Use the Valve on the pipe on the right and click to pour water into the cauldron, causing the Spindle to float to the top.
- Place the Spindle on the wheel and collect the resulting Yarn.
- Attach the Yarn to the stick leaning against the left side of the cauldron to acquire the Broom.
- Use the Broom on the pink piles of dust on the floor to collect them into Powder.
- Use the Powder on the hanging bag, then click on it to add the Sleeping Powder to your inventory.
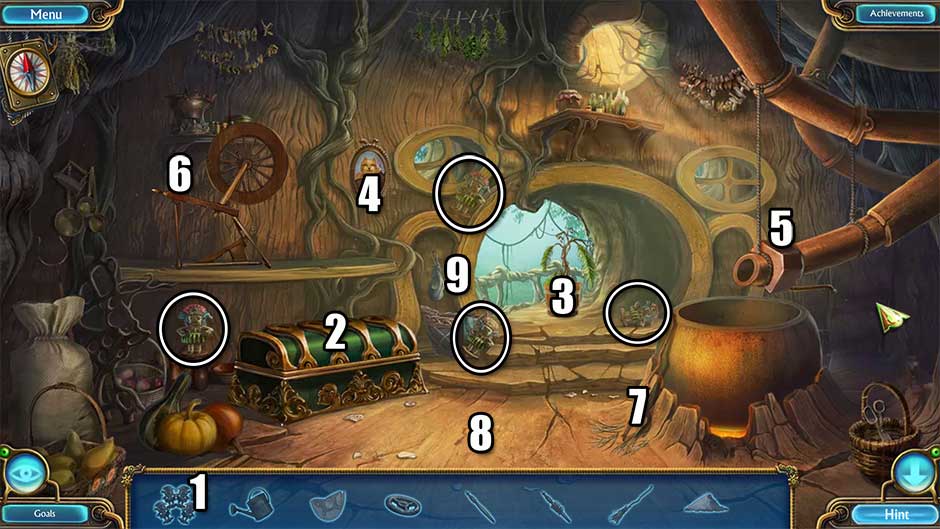
Kingdom of Aurelia – Mystery of the Poisoned Dagger – Chapter 9 – Brewery Hidden Object Scene
- Select the Slingshot in your inventory. Add the Sleeping Powder to acquire the Slingshot with Sleeping Powder.
- Return to the giant guard.
Giant Guard
- Use the Slingshot with Sleeping Powder on the giant. You will unlock the achievement David.
- Take a closer look at the well covered in the magical webbing.
- Speak with Pharion. He will give you the Rope Ladder.
- Attach the Rope Ladder to the top of the metal ladder rungs on the right.
- Continue down the ladder to the next location.
Camp
- Use the Mindscope on the forest dweller hiding behind the boulder.
- Click on the figure ahead in the distance. Once they’re gone, enter the tent.
Tent
- Examine the boots lying on the floor.
- Click on the Shoe Strings to collect them.
- Use the Mindscope on the sleeping villain.
- Exit the tent.
Camp
- Take a closer look at the table to the right of the tent.
- Pick up the Regulator and the Broken Knife. Take note of the schematic on the table before you leave.
- Select the Broken Knife in your inventory. Click on the handle to straighten it, then use the Shoe Strings to repair it. The fixed Knife will be added back to your inventory.
- Enter the tent again.
Tent
- Take a closer look at the bag on the left.
- Use the Knife on the cord holding the bag shut. Click to open the bag and take the Lens.
- Zoom in on the sleeping villain.
- Use the Knife to remove the amulet. The Transformation Amulet will be added to your inventory.
- Examine the table with the teapot on the right.
- Read the note lying on the table.
- Use the Lens to melt the wax, then click to acquire the Clip.
Kingdom of Aurelia – Mystery of the Poisoned Dagger – Chapter 9 – Clip in Wax
- Exit the tent.
Camp
- Use the Transformation Amulet on the forest dweller.
- Proceed up the steps.
Supply Tents
- Examine the large device.
- Fit the Regulator into the slot and set the dial to 0.
Kingdom of Aurelia – Mystery of the Poisoned Dagger – Chapter 9 – Regulator 0
- Zoom in on the large chest toward the right.
- Use the Clip to pick the lock.
- Collect the Gloves from inside the chest.
- Use the Gloves to remove the Magical Staff from the device and add it to your inventory.
Kingdom of Aurelia – Mystery of the Poisoned Dagger – Chapter 9 – Obtain the Magical Staff
- Return to the giant guard.
Giant Guard
- Examine the stone slab to the left of the sleeping giant.
- Insert the Magical Staff into the groove in the slate. A puzzle will be triggered.
- By clicking on the icons on the outer circle, rotate the icons on the inner circle so that all the signs match. Two tiles will rotate per tile clicked, and all follow the same pattern. The puzzle solution is shown below.
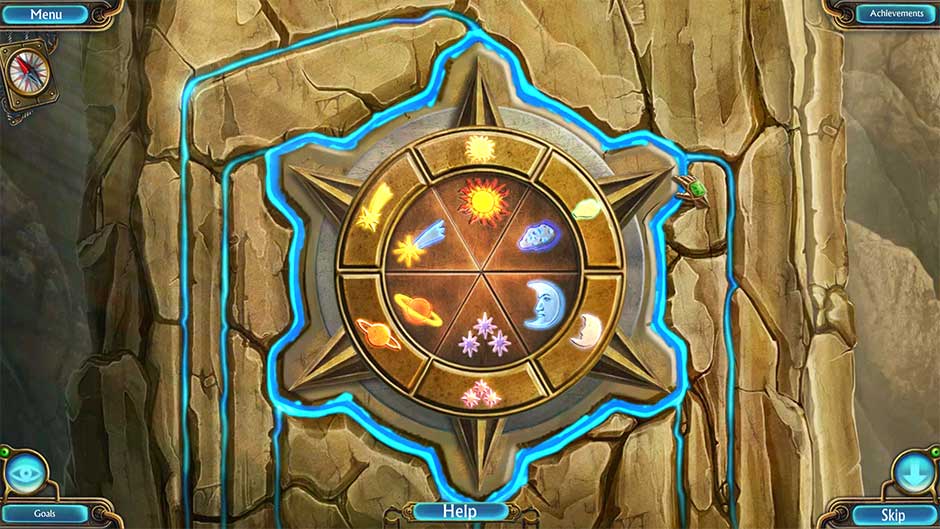
Kingdom of Aurelia – Mystery of the Poisoned Dagger – Chapter 9 – Magical Staff Puzzle Solution
- Return to the camp after speaking with Pharion.
Camp
- Click on Pharion to speak with him.
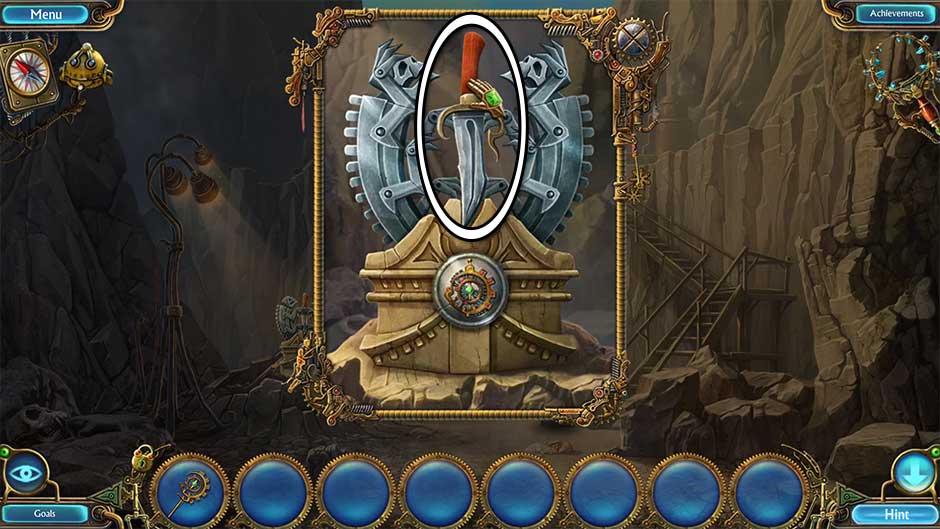
- Examine the dagger pedestal on the left.
- Insert the Amulet into the base of the pedestal, then click on the Dagger to obtain it.
Kingdom of Aurelia – Mystery of the Poisoned Dagger – Chapter 9 – Obtaining the Dagger
- A brief cutscene will ensue. Use the Magical Staff against the villain. You will unlock the achievement Sorcerer’s Apprentice.
- Give the Dagger to Pharion.
Congratulations! You’ve completed Kingdom of Aurelia – Mystery of the Poisoned Dagger! You can now access the game’s Bonus Gameplay via the Extras menu.
BONUS GAMEPLAY
After completing the main adventure of Kingdom of Aurelia – Mystery of the Poisoned Dagger, you will be able to access additional chapters. To do this, select the Extras tab in the game’s Main Menu, then select Bonus Gameplay to get started!
Chapter 10 – Mountain River
Camp
- Speak with Pharion. He will suggest you frisk the frigid villain, Marcus.
- Zoom in on the frozen villain.
- Click on the radio in Marcus’ hand to trigger a cutscene.
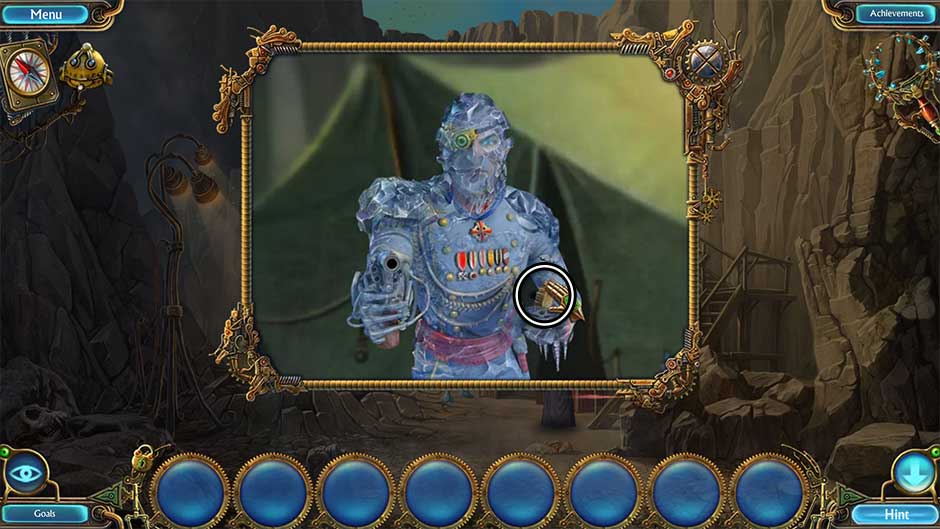
Kingdom of Aurelia – Mystery of the Poisoned Dagger – Chapter 10 – Take the Radio from Marcus
- Pharion will summon a portal. Enter the portal to reach the next location.
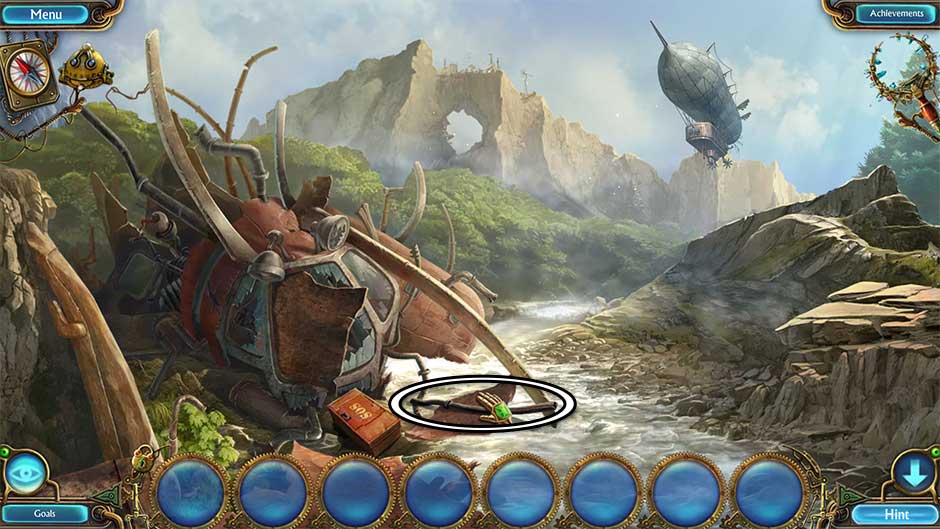
Crash Site
- Pick up the Tube to add it to your inventory.
Kingdom of Aurelia – Mystery of the Poisoned Dagger – Chapter 10 – Tube Location
- Use the Tube to pry the panel off the front end of the helicopter.
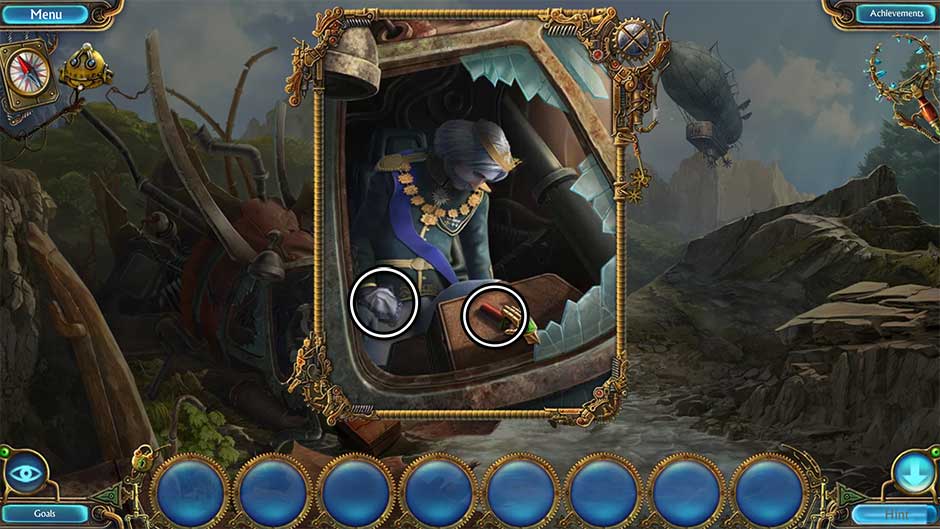
- Zoom in on the cockpit of the helicopter.
- Collect the Cartridge and the Napkin.
Kingdom of Aurelia – Mystery of the Poisoned Dagger – Chapter 10 – Cockpit Items
- Dip the Napkin into the river to acquire the Wet Napkin.
- Zoom in on the cockpit again.
- Use the Wet Napkin to revive the King.
- Speak with the King. He will give you the Key from Box.
- Examine the red S.O.S. box in front of the helicopter.
- Use the Key from Box to open the lid. Collect the Unloaded Rocket Launcher (Flare Gun), the Air Cylinder, and the Air Raft
- Pharion will arrive. Speak with him to acquire the Amulet.
- Select the Unloaded Rocket Launcher (Flare Gun) in your inventory. Click on the gun to open it. Insert the Cartridge and click again to complete reloading. You will acquire the Signal Pistol.
- Select the Signal Pistol and click on the airship in the upper right corner to signal it.
- Place the Air Raft over the helicopter panel that’s fallen into the river.
- Use the Air Cylinder on the raft to inflate it.
- Click on Hermengilda standing on the opposite shore to speak with her.
- Enter the helicopter between Hermengilda and the airship to reach the next area.
Chapter 11 – Air Port
Floating City
- Click on the Vacuum Cleaner in front of the barrels straight ahead to add it to your inventory.
Kingdom of Aurelia – Mystery of the Poisoned Dagger – Chapter 11 – Vacuum Location
- Examine the door of the blue building on the right.
- Click on the Door Handle. It will break off and be added to your inventory.
- Read the sign before leaving, noting the times.
- Take a closer look at the panel between the barrels straight ahead and the blue house on the right.
- Attach the Door Handle to the slot on the left, then click to open the panel. Use the Vacuum Cleaner on the bottom portion of the panel to clean it.
- Click on the number flaps until the time reads 10:00.
- Enter the blue building on the right.
Cashbox
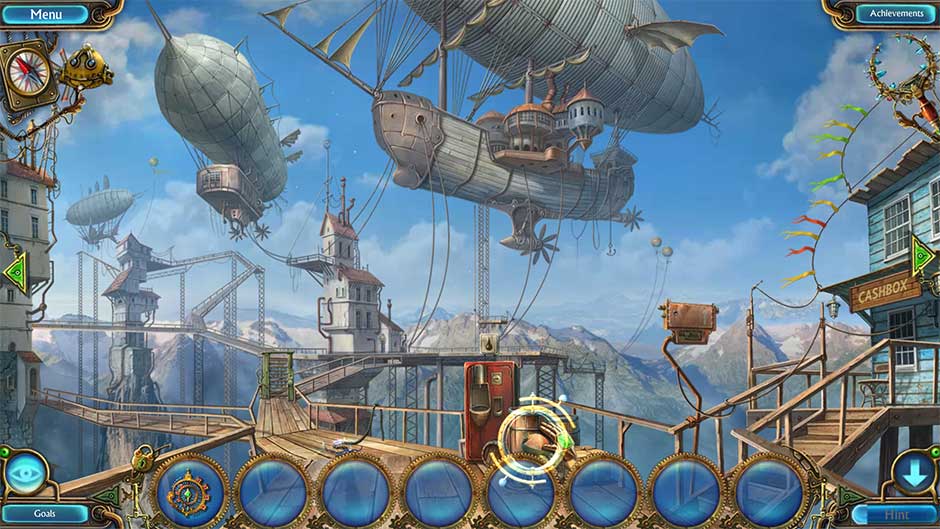
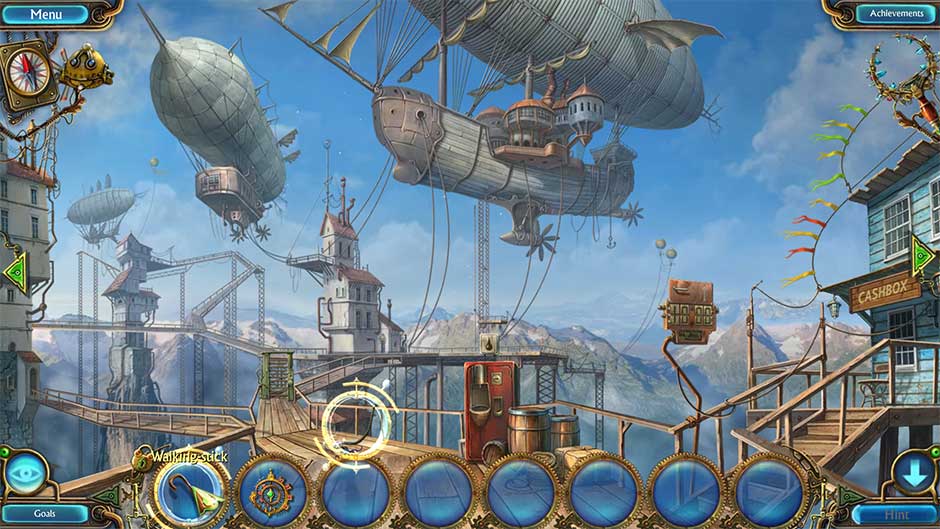
- Pick up the Walking Stick leading against the counter on the left.
- Go back out to the floating city.
Floating City
- Use the Walking Stick to remove the faulty wiring on the left walkway.
Kingdom of Aurelia – Mystery of the Poisoned Dagger – Chapter 11 – Remove the Faulty Wiring
- Zoom in on the green gate in the walkway on the left.
- Click on the Pincers sitting above the light dials to add it to your inventory.
- Enter the blue building again.
Cashbox
- Take a closer look at the cash register on the left.
- Use the Pincers to remove the Ticket and add it to your inventory.
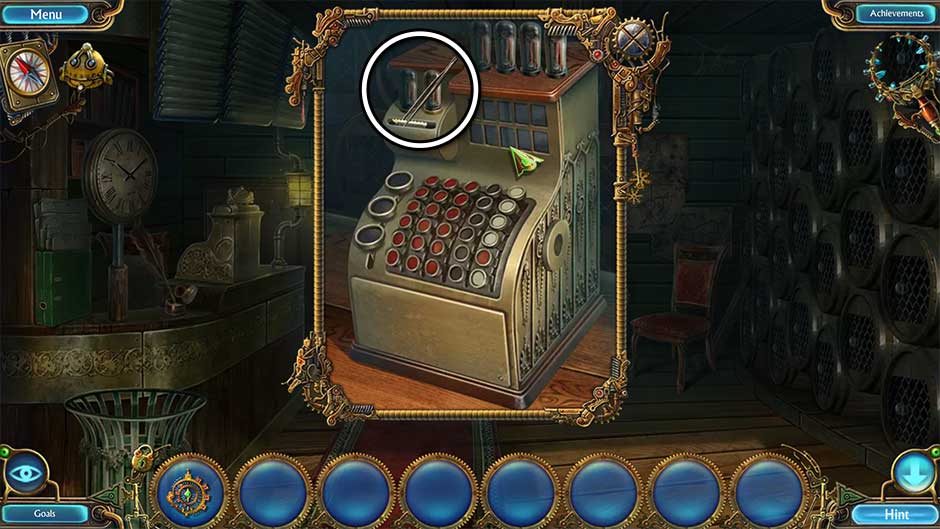
Kingdom of Aurelia – Mystery of the Poisoned Dagger – Chapter 11 – Retrieving the Ticket
- Exit the building.
Floating City
- Examine the green security gate again.
- Insert the Ticket into the slot to open the gate.
- Proceed forward through the green gate toward the tall white house in the distance.
Loading Dock
- Examine the cabinet on wheels on the left.
- Find the items outlined at the bottom of the screen. Their locations, and the sequence to find them are shown and listed below.
- Collect the four Dragon Heads.
- Use the Dragon Heads on the theater curtain to lift it and collect the Knife.
- Use the Knife to cut open the corner of the envelope and collect the Clip.
- Attach the Clip to the zipper on the bear to unzip it, then collect the Lance.
- Give the Lance to the knight on the stage. Pick up the Ballerina once the dragon is gone.
- Place the Ballerina on the stand on the right and collect the Acrobat.
- Put the Acrobat on the unicycle, then collect the Weight that falls out of the tube.
- Place the Weight on the scale and collect the Canister that pops up.
- Find the items outlined at the bottom of the screen. Their locations, and the sequence to find them are shown and listed below.
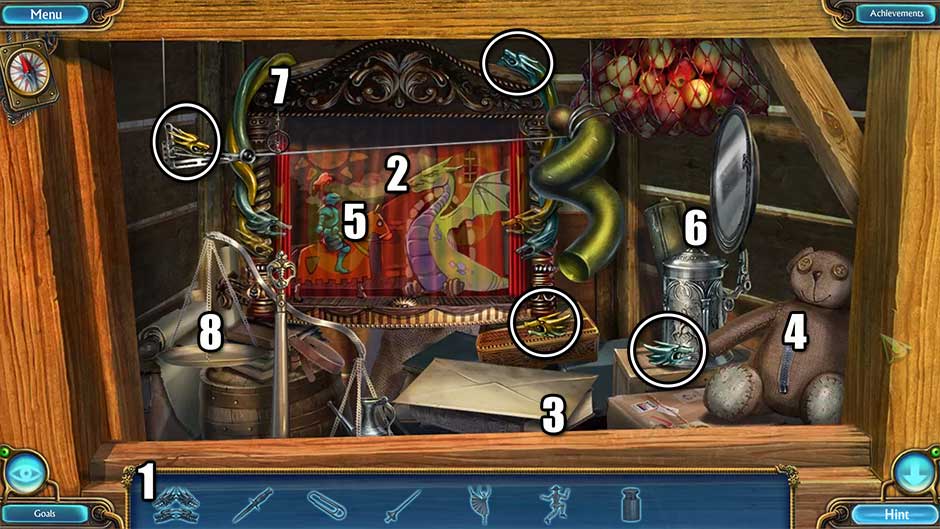
Kingdom of Aurelia – Mystery of the Poisoned Dagger – Chapter 11 – Loading Dock Hidden Object Scene
- Upon completing the area, the Canister will be added to your inventory.
- Take a closer look at the large bulletin board ahead.
- Click on the Handle from Cash Register and the Scheme to add them to your inventory.
Kingdom of Aurelia – Mystery of the Poisoned Dagger – Chapter 11 – Bulletin Board Items
- Return to the blue building.
Cashbox
- Zoom in on the cash register on the left.
- Insert the Handle from Cash Register into the slot on the right.
- Click on the handle to open the register and collect the 25 Cents Coin
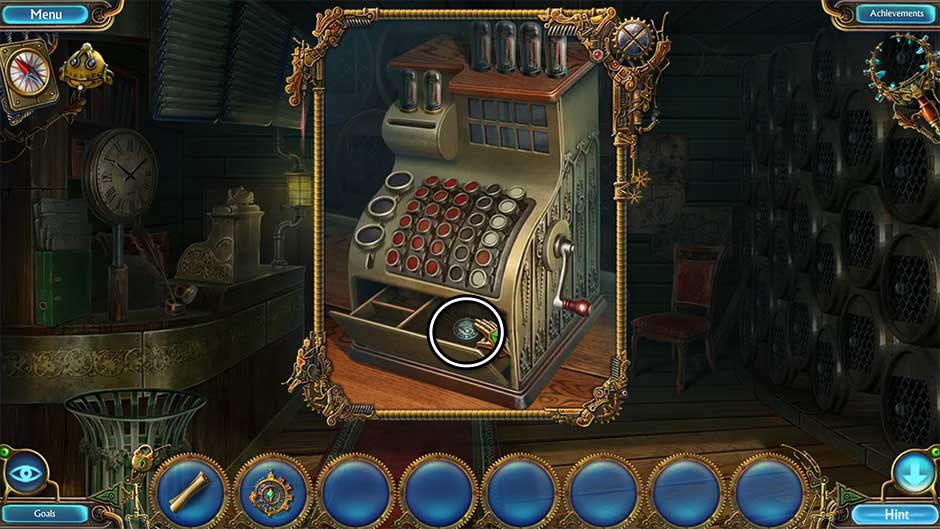
Kingdom of Aurelia – Mystery of the Poisoned Dagger – Chapter 11 – 25 Cent Coin Location
- Take a closer look at the lockers on the right.
- Use the 25 Cents Coin on the lower left locker and open it.
- Collect the Pneumatic Key inside to add it to your inventory.
- Exit to the floating city.
Floating City
- Zoom in on the door of the house on the far left.
- Insert the Pneumatic Key.
- Click on the red key icon on the right, as well as the up and down arrows on the left in order to operate the pressure gauge. To open the door:
- Increase the pressure to 120.
- Decrease the pressure to 40.
- Increase the pressure to 100.
- Once the door is open, enter the building.
Tower
- Pick up the Golden Coin lying on the floor to add it to your inventory.
Kingdom of Aurelia – Mystery of the Poisoned Dagger – Chapter 11 – Golden Coin Location
- Head back to the floating city area.
Floating City
- Take a closer look at the red machine ahead.
- Place the Canister beneath the spigot.
- Insert the Golden Coin into the coin slot.
- Collect the 50 Cents Coin and the Oil Can.
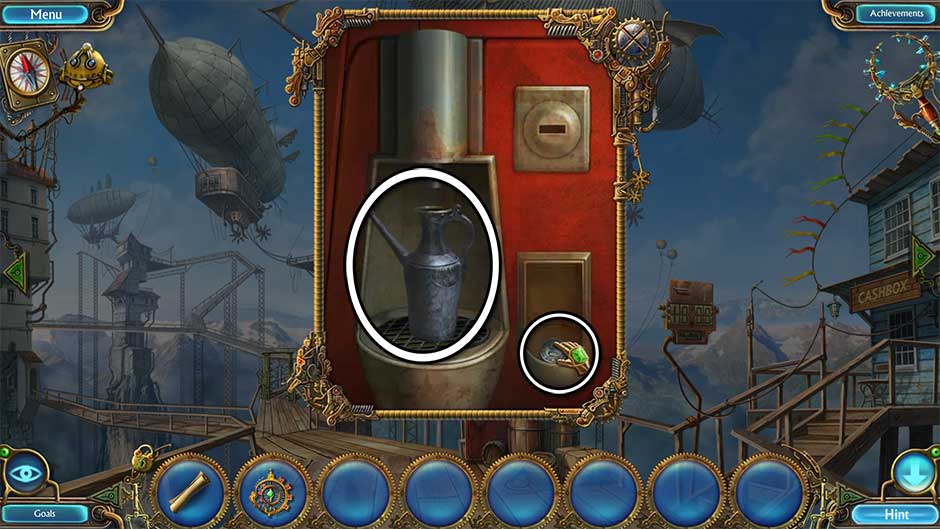
Kingdom of Aurelia – Mystery of the Poisoned Dagger – Chapter 11 – Filling the Oil Can
- Enter the blue building on the right.
Cashbox
- Examine the lockers on the right.
- Use the 50 Cents Coin on the top locker.
- Collect the Chain Saw inside to add it to your inventory.
- Take a closer look at the back doorway.
- Use the Chain Saw to obtain a section of wood containing the Glued Perforated Card.
- Return to the loading dock.
Loading Dock
- Pour the Oil Can on the section of flooring to the left of the pile of crates.
Kingdom of Aurelia – Mystery of the Poisoned Dagger – Chapter 11 – Use the Oil Can Here
- Click on the pile of crates to slide them over to the left.
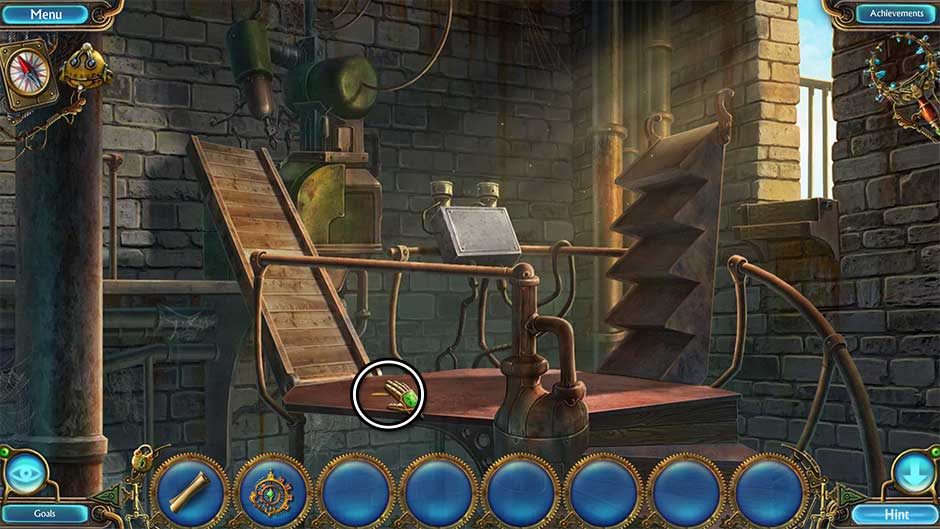
- Collect the Green Lamp attached to the top corner of the bulletin board to add it to your inventory.
Kingdom of Aurelia – Mystery of the Poisoned Dagger – Chapter 11 – Green Lamp Location
- Backtrack to the tower.
Tower
- Insert the Green Bulb into the leftmost light slot, shown below.
Kingdom of Aurelia – Mystery of the Poisoned Dagger – Chapter 11 – Insert Green Bulb
- Once the plank lowers, examine the machine on the back wall.
- Place the Glue Perforated Card on the grate, then click on the lever to operate the machine.
- Once finished, click on the Perforated Card to add it to your inventory.
- Return to the loading dock.
Loading Dock
- Examine the green chest toward the bottom of the screen.
- Place the Perforated Card over the lock slot, opening the chest.
- Collect the Red Lamp from the inside of the chest.
- Go back to the tower.
Tower
- Insert the Red Lamp into the right socket, next to the Green Lamp.
- Continue up the staircase that lowers on the right to the next location.
Signal Control
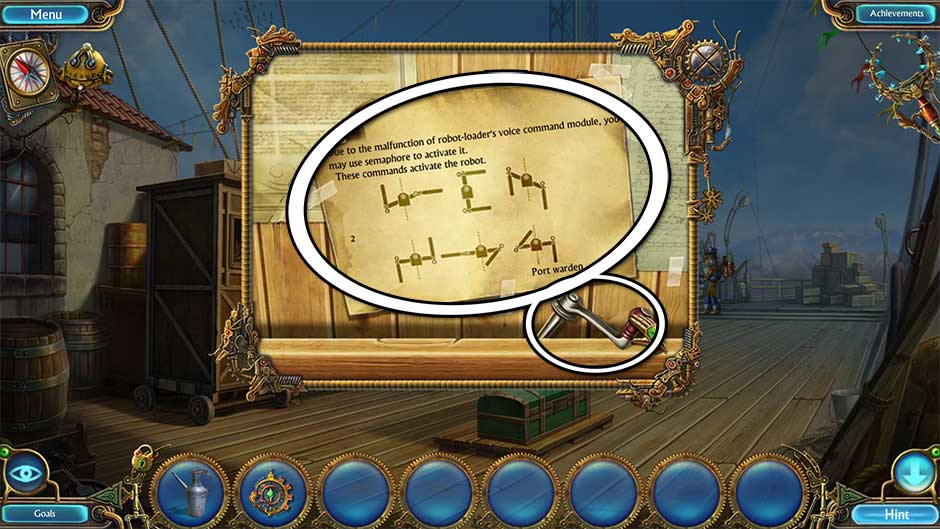
- Place the Scheme over the screen to trigger a puzzle.
- Operate the semaphore to signal the mechanical soldier below. Set the red, yellow, and green switches to the required positions, then click on the red lever to operate the semaphore. Once a position has been correctly reached, it will be crossed from the list. Refer to the screenshot below to view the puzzle solution.

Kingdom of Aurelia – Mystery of the Poisoned Dagger – Chapter 11 – Semaphore Signal Puzzle Solution
- Return to the loading dock.
Loading Dock
- Click on the mechanical soldier to have him move the cart backward.
- Click on the elevator in front of the soldier on the tower to lower it.
- Take the lift down to the next area.
Chapter 12 – Abandoned Mine
Plane Crash
- Examine the ground in the lower left corner.
- Click on the Rope to add it to your inventory.
Kingdom of Aurelia – Mystery of the Poisoned Dagger – Chapter 12 – Pick Up the Rope
- Tie the Rope to the broken propeller on the right.
- Select Tim the Robot and point him to the propeller where you tied the rope. He will tie it to the ladder in the distance.
- Examine the bottom portion of the plane wreckage.
- Click on the Hammer lying on the ground to add it to your inventory.
- Take a closer look at the plane’s cockpit.
- Click on the red button to activate the propeller.
- The ladder will be pulled down. Click on the ladder to continue up to the next area.
Machinery
- Zoom in on the red machinery straight ahead.
- Collect the Fragment of Lever from the gears.
- Continue forward, across the planks and up the steps to the next area.
Wood Cutter
- Click on the green lever to send a log down the chute.
- Click on the Gas Wrench and the Chisel to add them to your inventory.
Kingdom of Aurelia – Mystery of the Poisoned Dagger – Chapter 12 – Wood Cutter Items
- Examine the base of the large black lever on the left.
- Insert the Chisel into the wood block.
- Use the Hammer to break apart the wood block jamming the lever.
- Return to the crash site.
Plane Crash
- Zoom in on the lower left portion of ground again.
- Use the Gas Wrench to remove the bolt, adding the Part of Wing to your inventory.
- Examine the plane wreckage beneath the propeller.
- Use the Gas Wrench to remove the section of pipe, then click to add the Tube and the Chain to your inventory.
Kingdom of Aurelia – Mystery of the Poisoned Dagger – Chapter 12 – Crash Site Items
- Head back up toward the machinery.
Machinery
- Zoom in on the red machine ahead.
- Place the Chain on the gears.
- Take a closer look at the elevator shaft on the right.
- Use the Part of Wing to retrieve the Sawing Disk and add it to your inventory.
- Go to the wood cutter.
Wood Cutter
- Attach the Sawing Disk to the machine arm on the left, above the large black lever.
- Attach the Tube, then the Fragment of Lever to the broken lever on the right.
- Click on the large black lever on the left to cut the wood log.
- Click on the repaired right lever to activate the wood chipper.
- Head back down to the machinery.
Machinery
- Click on the red lever toward the bottom of the machine to activate the elevator on the right.
Kingdom of Aurelia – Mystery of the Poisoned Dagger – Chapter 12 – Activate the Elevator
- Enter the elevator.
Elevator
- Click on the yellow Glove toward the upper right corner to add it to your inventory.
- Return to the crash site.
Plane Crash
- Zoom in on the plane’s cockpit.
- Use the Chisel to pry open the cover on the left.
- Use the Glove to remove the Fuse, adding it to your inventory.
- Go back to the elevator.
Elevator
- Examine the panel straight ahead.
- Insert the Fuse into the slot on the left to trigger a puzzle.
- Use the cables on the left side of the field, placing them on the tiles in such a way that the indicator lights on the board remain the same color. One connection will result in a blue color, and two in a red color. The puzzle solution is pictured here:
Kingdom of Aurelia – Mystery of the Poisoned Dagger – Chapter 12 – Elevator Panel Puzzle Solution
- Now that the elevator is active, select the 3 button straight ahead.
- Once you arrive at the bottom level, exit the elevator.
Mine Shaft
- Click on the lever on the left once to summon the mine cart, and once more to send it down the track.
- Take a closer look at the items that fall on the walkway.
- Click on the Key to add it to your inventory.
Kingdom of Aurelia – Mystery of the Poisoned Dagger – Chapter 12 – Mine Cart Key
- Head back to the elevator.
Elevator
- Select the 2 button to go up one floor.
- Use the Key on the lock on the door on the left.
- Once the door opens, take a closer look inside.
- Locate the correct symbols of the zodiac as listed below. Their locations are pictured here.
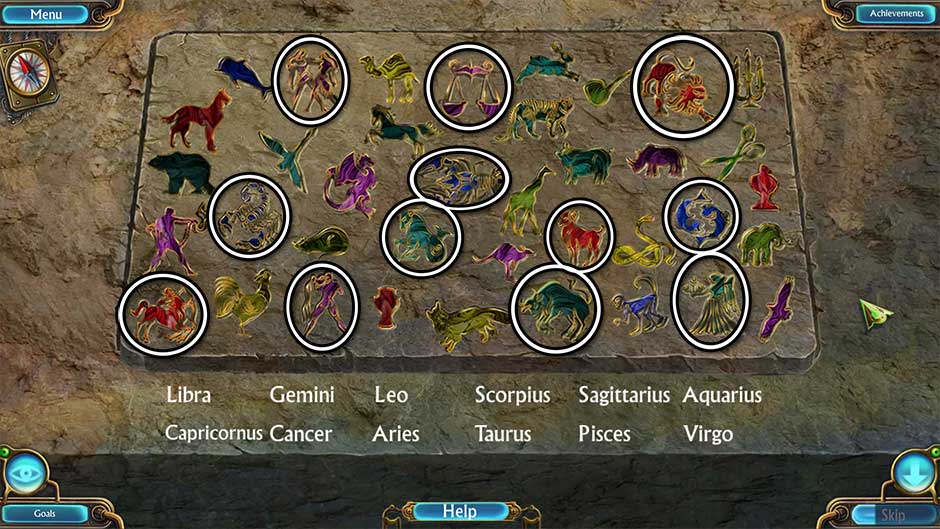
Kingdom of Aurelia – Mystery of the Poisoned Dagger – Chapter 12 – Zodiac Hidden Object Scene
- Upon completing the hidden object scene, click on the Pick inside the compartment to add it to your inventory.
- Select the 3 button again to head down to the bottom level, then enter the mine shaft again.
Mine Shaft
- Examine the large funnel chute hanging from the ceiling on the left.
- Insert the Pick into the hole in the side of the chute panel, then use the Hammer to open it.
- Click on the lever on the left to summon a mine cart.
- Click on the pull lever above the mine cart attached to the chute to fill the cart with cargo.
Kingdom of Aurelia – Mystery of the Poisoned Dagger – Chapter 12 – Fill the Mine Cart
- Click on the lever on the left to send the mine cart down the track.
- Once the path has been lowered, proceed forward to the next area.
Chamber
- Click on the buttons on the walls in the correct order to create a path to the power core. Refer to the screenshot below to see that order.
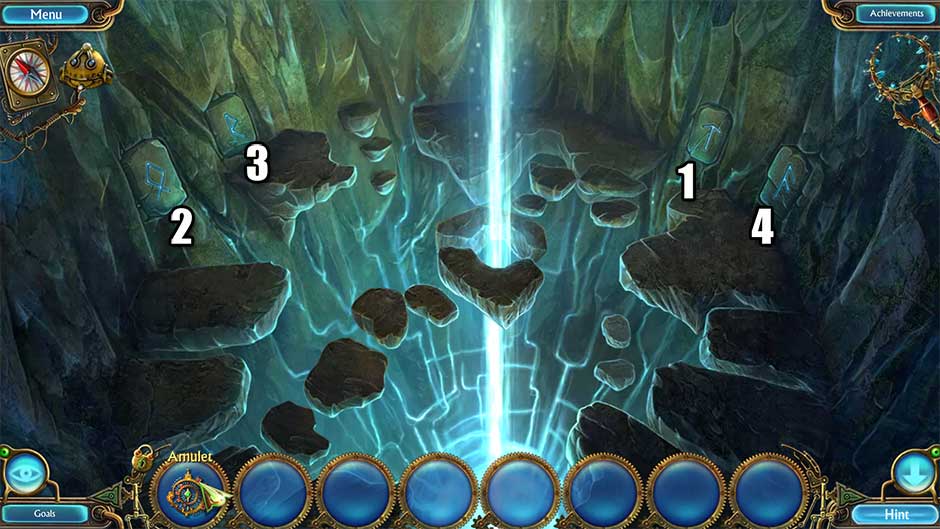
Kingdom of Aurelia – Mystery of the Poisoned Dagger – Chapter 12 – Creating the Path
- Once the path has been fully extended, use the Amulet on the source of power.
Congratulations! You’ve completed the bonus chapters of Kingdom of Aurelia – Mystery of the Poisoned Dagger!
The Kingdom of Aurelia – Mystery of the Poisoned Dagger walkthrough is meant as a guide and does not contain cheats, hacks, or serials.