Allison is an aspiring surgeon with big dreams of becoming a success. However, things grow complicated when she starts to develop feelings for the Head of the Hospital, and all while working near her old flame. Things take a dramatic turn with a horrifying accident that will affect all of the hospital staff. Our Heart’s Medicine – Time to Heal walkthrough covers all the twists and turns of this medical drama!
Contents
General Tips & Tricks
Welcome to the tips and tricks section of the Heart’s Medicine – Time to Heal walkthrough. This section covers the game’s basics, as well as essential how-to’s that will help you obtain the highest scores.
How to Play
Doctors and patients who enter the hospital will require Allison’s help! Most patients who enter the hospital will immediately sit down in one of the chairs in the waiting area. A bubble will pop up over their head indicating where they need to go. When this happens, click on the patient, then click on the station they need for treatment.
Once a patient has relocated to the station they need, another bubble will pop up over their head indicating which treatment they need. Treatments vary per department, however sometimes these bubbles will be filled with a color. Each color corresponds to a type of treatment. They are as follows:
- Green – This is a normal, quick treatment. Clicking on a patient with a green bubble will cause Allison to treat them immediately. No further treatment action is necessary.
- Purple – This treatment requires a touch input of some kind. For example: you may need to tap the button displayed multiple times, or move it back and forth along a slider. The treatment will be completed once the touch input has been completed.
- Blue – This treatment involves you to complete a minigame. All other department activities will temporarily pause while you’re playing this minigame. For more information on specific minigames, see the Minigames section of our guide below.
Once the patient has finished treatment, they will move to the checkout monitor at the nurse’s station. Click on the monitor to check out your patient. It’s that simple!
Scoring and Hearts
Each patient will enter the department with a certain number of hearts. The faster you complete actions and treat your patient, the more hearts you will earn! The happiest patients will have their hearts turn gold. Patients with gold hearts have infinite patience when waiting at the checkout monitor.
The trick to obtaining high scores is to check out patients in groups. Up to 5 people can be waiting at the register at any given time. If a patient has gold hearts while at the register, they will wait there until they’re checked out without losing any hearts, so don’t be in a rush! If a patient does not have gold hearts while waiting at the register, their happiness [hearts] will start to deplete over time. Checking patients out in groups will result in bonus points being added to your score. The more patients and the happier they are, the better!
If you don’t have 5 people at the register, but a patient is approaching the register while Allison is still checking others out, as long as Allison is still moving at the register the patient will be counted on that scoring chain.
Bonus Scores and Treatment Chains
In addition to checking out groups of people at the checkout register, Allison can obtain bonus points via helping patients and treating them quickly. Helping a patient before the color depletes from their bubble will result in a Quick Bonus. Treating multiple patients back-to-back will result in a Treatment Chain. Both add bonus points to your score.
Diamonds and Upgrades
Each level features a specific challenge. Completing the challenge successfully will reward you with a diamond. Diamonds can be saved and used to purchase various additions to the new hospital wing. Click on the diamond icon in the upper right corner of the level select screen to access the new hospital wing.
Additionally, each level you complete will reward you with coins. Coins can be used to purchase upgrades at the beginning of each level before it begins. Coins are universal, so you can use them in any department you want, whenever you want.
Heart’s Medicine – Time to Heal Walkthrough
Welcome to the Heart’s Medicine – Time to Heal walkthrough! Our guide covers every aspect of the game with level-by-level strategies. Complete every challenge with 3 stars and discover all the hidden locations of Oliver the guinea pig. Refer to the Contents section of our guide for quicker navigation!
The Ward: Level 1 – 10
It’s Allison’s first day as an intern in the Surgery department. But the first day is far from the easiest, especially when she finds out the position’s already been taken! Thankfully, there’s still room for a new intern in the Ward.
Introduction Cutscene
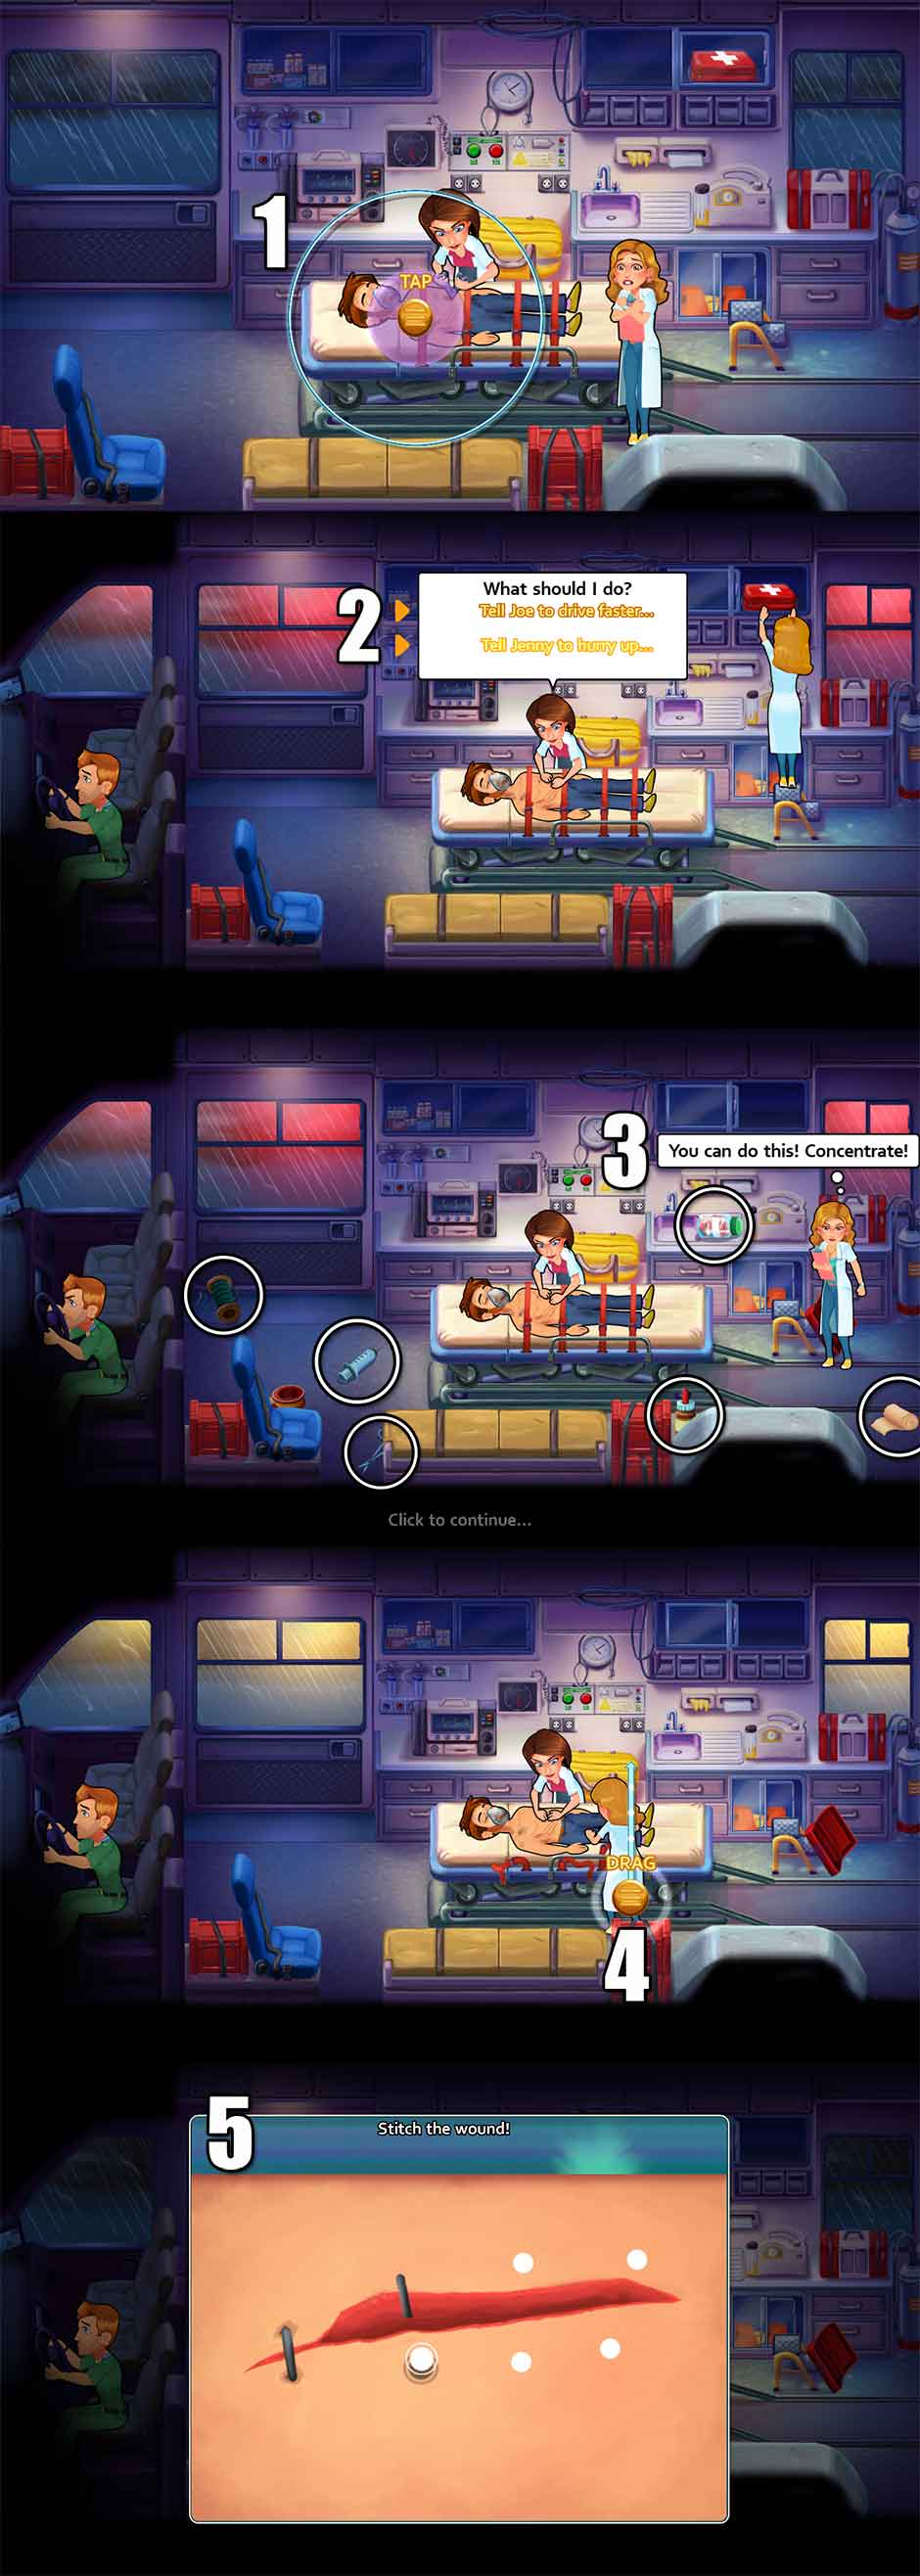
The scene begins with Joe, Allison, and Jenny rushing in an ambulance back to the hospital. A number of prompts will come up in this cutscene, teaching you touch input and the basic game mechanics. These steps are outlined below:
- Click/Tap on the button in the center of the circle until the entire circle is filled with the color purple.
- Choose how Allison should respond. You can choose either option with some slight variation.
- Locate the items scattered around the ambulance as Allison requests them. Their locations are shown in the screenshot below.
- Click and hold the button shown, dragging upward to remove the straps.
- Stitch up the wound. Click on the flashing white dot and hold, moving the stitch to the new flashing white dot. Repeat until the wound is stitched up completely.
Heart’s Medicine – Time to Heal Introduction Cutscene
Day 1 – A Stellar Performance! –
Score a star in the first half of your shift…
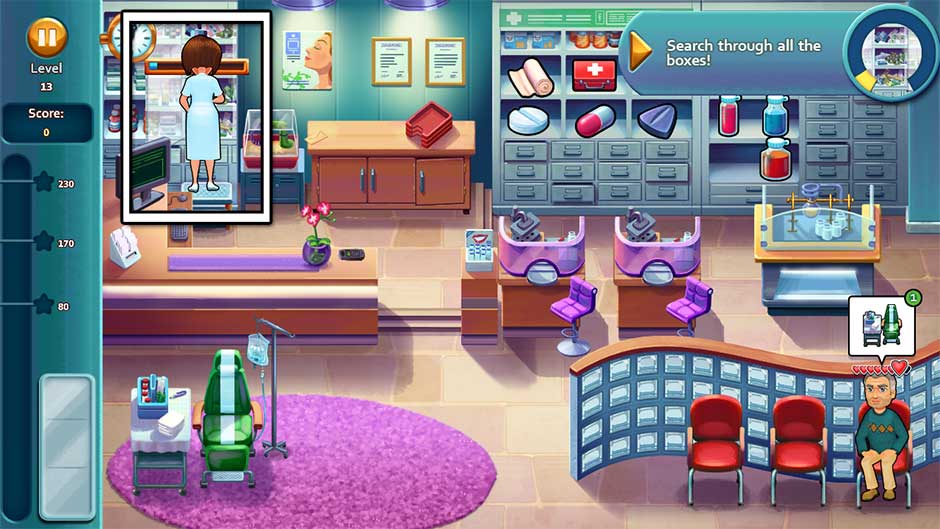
Oliver Location: In the middle of the floor, below the counter with the thermometer.
Tend to your first 3 patients before checking anyone out at the register. Once you’ve finished treating your third patient, go to the register and check out the group together. The shift clock will be 5 before halfway done at this point. Doing this will allow you to fulfill the day’s challenge while simultaneously reaching the highest score possible for the day if you continue to check out happy patients in groups.
Tip! Patients with gold hearts have an infinite amount of patience! Wait until you have a group of patients before checking them out at the nurse’s station in order to reach max group bonuses.
Day 2 – Cheer Up Earl! –
Cheer up Earl, he seems a little agitated!
Oliver Location: In the planter hedge in the lower left corner, between the first two waiting chairs.
Throughout the day, Earl will need special attention. Every time you need to tend to Earl, a “!” bubble will pop up over his bed. When this appears, click on Earl to cheer him up. Any other tasks you have lined up will be temporarily paused while Allison tries to calm Earl. Do this 4 times before the end of the day to achieve your goal.
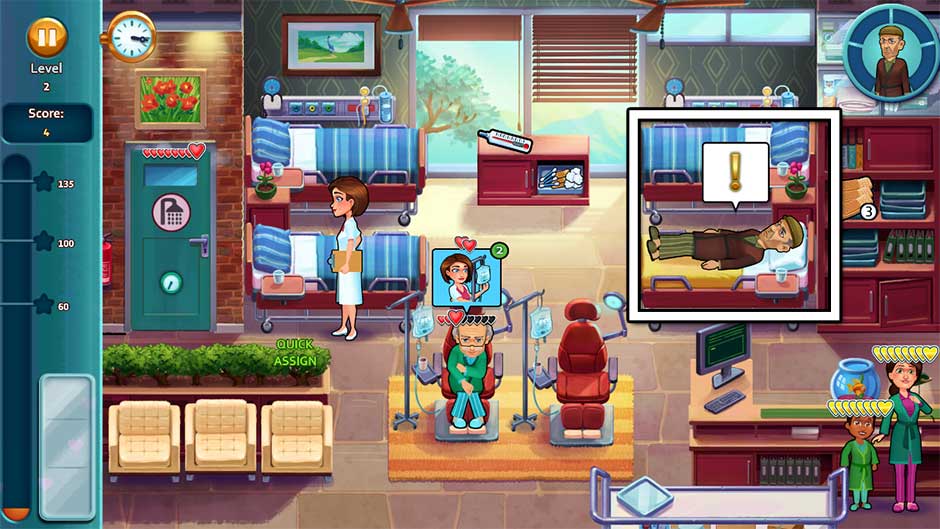
Heart’s Medicine – Time to Heal Level 2
Day 3 – Storage Delivery! –
Daniel wants to store some renovation materials in the ward.
Oliver Location: In front of the window, between the upper left gurney and the counter with supplies.
A delivery man will show up in the Ward several times today. When he pauses and a boxed package icon appears over his head, click on him to accept his delivery. Do this 4 times before the end of the day to complete your goal.
Tip! Patients on beds will still require items such as cotton swabs even when the delivery man is around. Place priority on helping these patients before accepting packages.
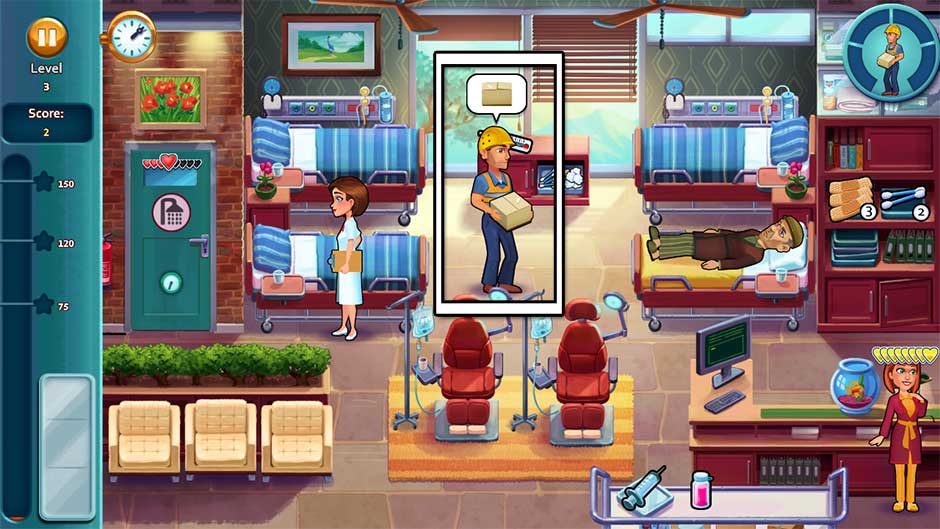
Heart’s Medicine – Time to Heal Level 3
Day 4 – Earl’s blood pressure! –
Earl’s blood pressure needs to be monitored!
Oliver Location: Just above the tray table in the bottom right corner of the screen, in front of the binders beneath the checkout.
Earl’s blood pressure needs to be checked throughout the day. This task is time-sensitive. There’s two places you can keep track of Earl’s blood pressure: via the meter over his bed, or the circular meter in the upper right corner of the screen. Click on Earl’s bed at any time to have Allison check his blood pressure. The best tactic to use throughout the day is to click on Earl’s bed to check his blood pressure every time you complete a task or help a patient.
Tip! Earl’s blood pressure meter will stop going down as soon as you click on his bed. Even if you’re mid-task with another patient or have several tasks lined up, clicking on his bed will prevent it from dropping any further, so don’t panic if it’s getting low – just click on him quickly!

Heart’s Medicine – Time to Heal Level 4
Day 5 – Work Efficiently! –
Deliver multiple items in one go, multiple times!
Oliver Location: At the checkout, in the same location behind the counter as Allison stands.
Have a minimum of two items on your tray and take them to patients back-to-back. The best time to do this is when you have two or more patients lying in the beds. Make sure you have the items both patients need, then click on the patients consecutively to fulfill a delivery of multiple items in one go. Do this successfully 4 times to complete the day’s goal.
Tip! Try not to wait too long! Plenty of patients will come in throughout the day, so if one patient is in a bed and no one else is around, don’t keep them waiting in hopes of doing a consecutive item delivery.
Day 6 – First Responder! –
Help 30 patients before their quick bonuses run out!
Oliver Location: In the top left corner of the cabinet that contains the adhesive bandages, cotton swabs, and cream.
Each time a patient enters and needs something, a bubble will pop up over their head. This bubble will usually start a particular color – green, blue, or purple. Help the patient before all the color drains from the bubble in order to obtain a quick bonus. Quick bonuses also apply when assigning a patient to a chair, shower, or bed quickly. You need to do this 30 times before the end of the day to complete the objective.
Tip! You do not need to per se help 30 individual patients. Each bubble with a quick bonus counts toward your total. For example – a patient may need 3 things from you: to use the shower, to be assigned a bed, and to have their temperature taken. Each one of these individual needs has a quick bonus attached to it. That means you have multiple chances with each patient.
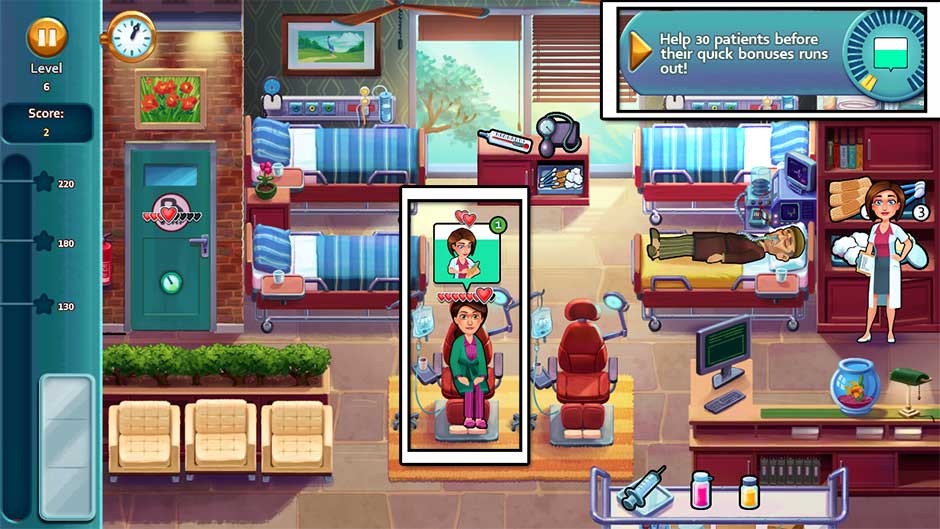
Heart’s Medicine – Time to Heal Level 6
Day 7 – Golden Groups! –
Check out 4 or more golden heart patients at once, multiple times!
Oliver Location: In the shower room on the left, over the red rug.
Serving patients quickly before their hearts start to deplete will improve their hearts. Serving a patient with quick bonuses will improve their hearts to such an extent, they will turn gold. Focus on serving patients as quickly as possible today. You will need at least 4 gold-heart patients at the register at the same time before checking them out to qualify toward the goal. You can have up to 5 patients at the register at a time. Do this three times before the end of the day to complete your objective.
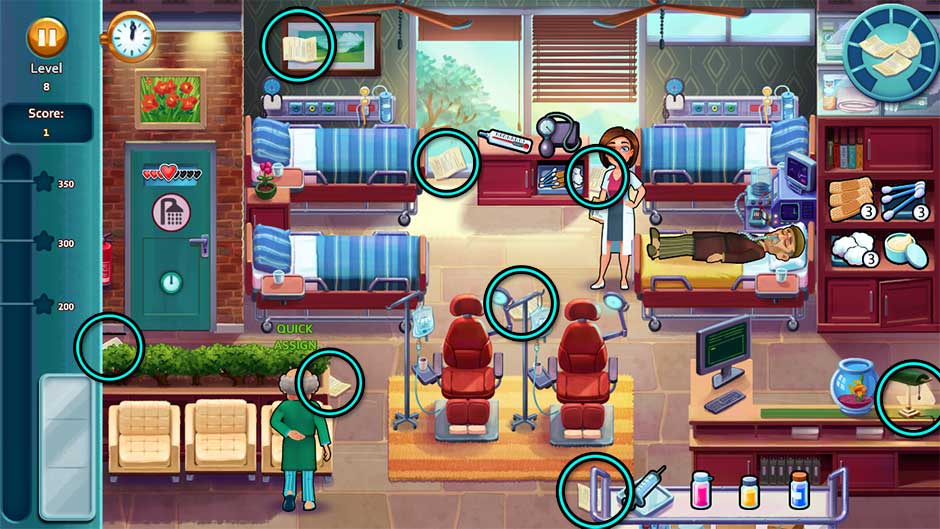
Day 8 – Earl’s Files! –
Earl’s files are scattered! Find them all!
Oliver Location: In the picture frame above the shower on the left.
There are 8 files scattered around the Ward. Find all of them before the day is done to complete your objective. Their locations are shown in the screenshot below.
Tip! Even if the day is over, as long as you still have patients, you still have time to find the files! The objective will not be marked as over until the last patient leaves.
Heart’s Medicine – Time to Heal Level 8
Day 9 – Keeping Stock! –
Never run out of stock!
Oliver Location: Behind the foot of Earl’s bed, peeking over the side.
Today’s goal is quite simple. Make sure the stock of bandages and cotton swabs doesn’t run out! Patients will need more of these today, so it’s a good idea to click on the stocking cabinet (pictured below) to refill your supplies every spare moment you have – usually best done after helping patients.
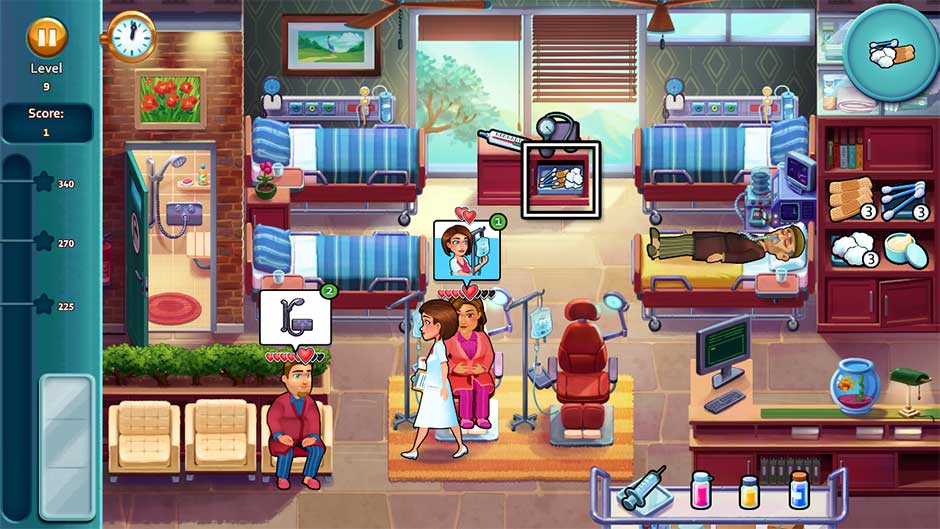
Heart’s Medicine – Time to Heal Level 9
Day 10 – A Good Effort! –
Help 10 patients in one minute!
Oliver Location: Around the left corner of the counter with the checkout monitor.
Today’s objective is straight-forward. You will need to help 10 patients within the span of a minute. The one-minute span is ongoing, so all you need to do is help 10 patients within a window of 60 seconds during any portion of the day. Treat patients as per normal and don’t let them back up. If you treat patients as per normal, you should reach your goal by the time the day reaches the halfway mark.
The Pharmacy: Level 11 – 20
Allison’s internship in the Ward is over, and now it’s time to join Ruth in the Pharmacy! Questions regarding the hospital’s supply of medicine has come into question, though. Can Allison get down to the root of the issue?
Day 11 – Knowing Your Stock! –
Score 9 hearts by finding medicine!
Oliver Location: Just above the pink carpet on the floor in the lower left corner.
Customers who go to the purple medicine counter will sometimes need you to find medication for them. When this happens, a blue pop-up showing Allison looking at boxes of medication will pop up. Click on this bubble to trigger a minigame. Find the medication! The quicker you do this, the more hearts your customer will receive. You can receive a maximum of 3 hearts per person per minigame. Score 9 hearts before the end of the day to meet your goal.
Tip! If you’re helping a patient at the green blood donation chair, you risk blocking Oliver. If you hear the guinea pig squeak, try moving to another location quickly to make sure you can see him.
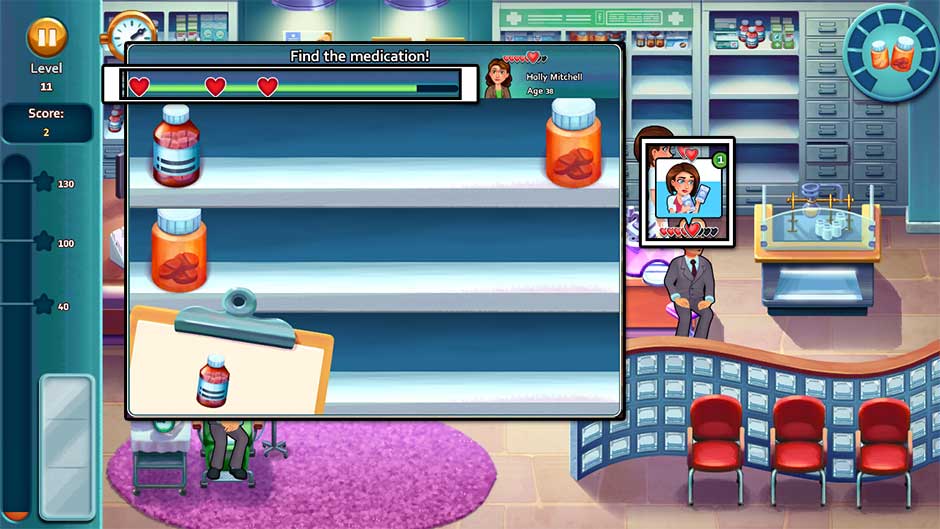
Heart’s Medicine – Time to Heal Level 11
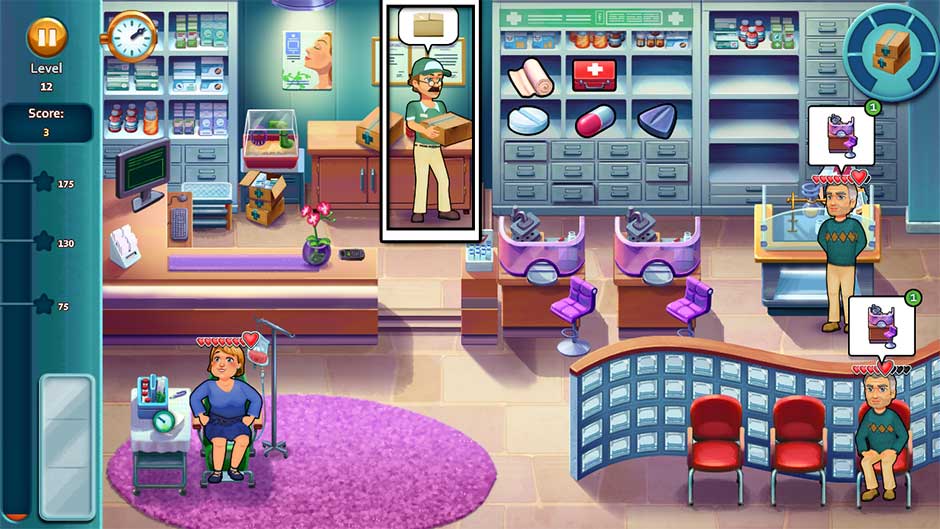
Day 12 – Delivery! –
The new medicine has arrived!
Oliver Location: In his cage habitat near the register, behind the checkout.
A delivery man will appear throughout the day. Whenever he’s ready to deliver a package, a bubble with a box icon will pop up over his head. Click on him to sign for the package. You will need to do this five times before the end of the day.
Tip! Worried you won’t have enough time to sign for the delivery? Don’t worry – after selecting the customers you need to help, you can click on the delivery man. Even if it takes you several seconds before you reach him, as long as he’s been clicked, he’ll wait.
Heart’s Medicine – Time to Heal Level 12
Day 13 – Box by Box –
Those pills have to be somewhere!
Oliver Location: Behind the glass divider wall, between the second and third waiting chairs in the lower right corner.
At the start of the day, there will be a brief cutscene before patients arrive. Click on the cabinet in the upper left corner to search for the medication. A “Find the medicine!” minigame will pop up, however you will not be able to find the bottle the doctors are searching for, since it’s not there.
Once the day begins, click on the cabinet in the upper left corner again. A meter will appear showing how far along Allison is in searching for the missing medication. Fill the bar completely before the end of the day to complete your goal. The best time to search for the medication is between helping customers, and after checking out groups at the register.
Heart’s Medicine – Time to Heal Level 13
Day 14 – Nothing to Waste! –
Don’t remove any items from your tray!
Oliver Location: Behind the small stepping stool to the immediate right of the checkout monitor.
Retrieve items per customers’ requests, and nothing more! If you’re attentive to their needs, you’ll sail through today without any problems.
Day 15 – The New Printer –
The new printer needs to be warmed up!
Oliver Location: Under the table at the second blood donor station.
Print 7 prescriptions before the day is done. When the printer is ready to print, a small “1” will appear in the upper right corner of the machine. Click on it to have Allison print off a prescription. The printer can only print off one prescription at a time, and requires time before it can print again. Keep an eye on it throughout the day – as soon as the number appears, you can print again. The circular meter in the upper right corner of your screen will keep track of your progress.

Heart’s Medicine – Time to Heal Level 15
Day 16 – Attention Everyone! –
Don’t treat the same patient twice in a row!
Oliver Location: To the left and just behind the glass wall divider next to the magazine rack.
Don’t treat the same patient twice in a row! Moving a patient to a station doesn’t count. However, hooking them up for blood donations, searching for medication, etc does. You’ll need to pay extra close attention to make sure you don’t serve the same customer twice. Wait as needed if only one customer is in the Pharmacy, and don’t panic! Another customer will show up soon enough.
Day 17 – First! –
Arrive at 12 stations before the patient gets there!
Oliver Location: Behind the base of the magazine rack.
When a patient needs to be moved to a station, click on the patient, then select the station the patient needs. Click on the station a second time quickly to have Allison move there. As long as she’s there before the patient, it’ll count toward your goal.
Tip! Don’t worry if the patient’s bubble blinks red when they arrive at a station if Allison is already there – particularly at the purple medication counter. A red-blinking bubble will not affect a customer’s hearts.
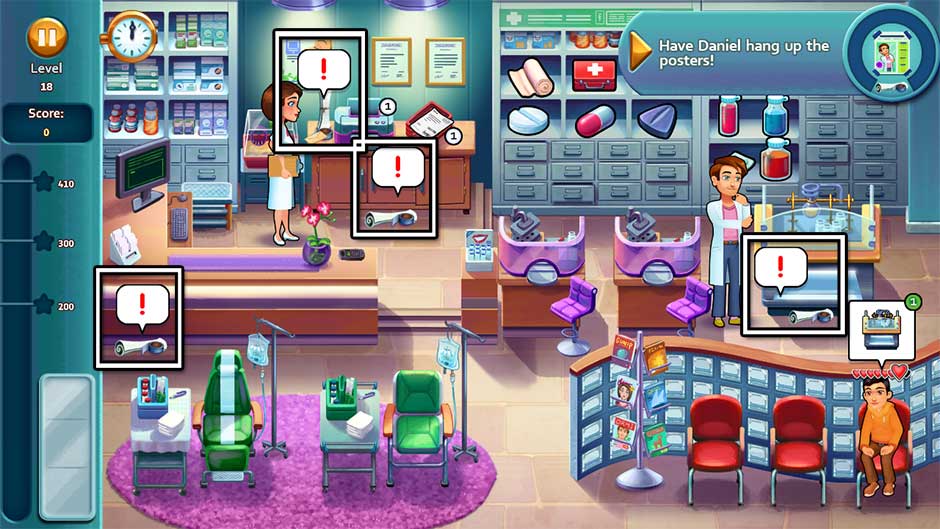
Day 18 – Promotions! –
The new wing needs some popularity! Luckily, Daniel is here to help!
Oliver Location: Just behind the right end of the checkout counter.
There are 4 posters that will need to be hung up before the end of the day. But don’t worry, Daniel’s on the job! Click on a poster marked with a “!” icon to have Daniel work on hanging it up. A meter will pop up showing his progress. Daniel’s progress does not affect Allison or the patients, so play as per normal and just make sure as soon as Daniel’s done hanging one poster, you immediately assign him to the next.
Tip! You’ll want 2 of the posters to be done being put up by the time the day reaches the halfway point. If you need to buy more time, the goal for the day won’t officially end until the last patient has been checked out. If you need to buy extra time to complete the goal, simply wait on checking out the final customer(s) while Daniel finishes hanging the final poster(s).
Heart’s Medicine – Time to Heal Level 18
Day 19 – Take a Number! –
Fill all the waiting spots!
Oliver Location: On the right side of the mixing station in the upper right corner.
Before the day is done, you’ll need to fill all three waiting chairs a total of 6 times. The best way to do this is as follows: At the start of the day, two customers will come in. Wait for a third. As soon as a third arrives (and one bar is filled on the goal meter in the upper right), move the most impatient customer/the customer that’s been waiting the longest to the station they need. Repeat this cycle, keeping two chairs filled at all times and the third being filled by new customers coming in in order to complete the goal quickly. As soon as the goal is completed, continue through the day as per normal.
Alternatively, you can also follow the strategy of keeping two customers in waiting chairs after the day has reached the halfway mark. Keep these two customers in the waiting chairs, moving the third customer that sits in a chair to the station they need as soon as they sit down. Using this strategy, you’ll be able to keep things under control easier, for the price of making two customers unhappy.
Tip! If using the second strategy, try to use two patient customers with a number of hearts already filled. Do not do this with the well-to-do man with the mustache, nor the shrewd woman with the spectacles.
Tip! Using the magazine stand in the waiting area does not count toward filling a waiting spot.
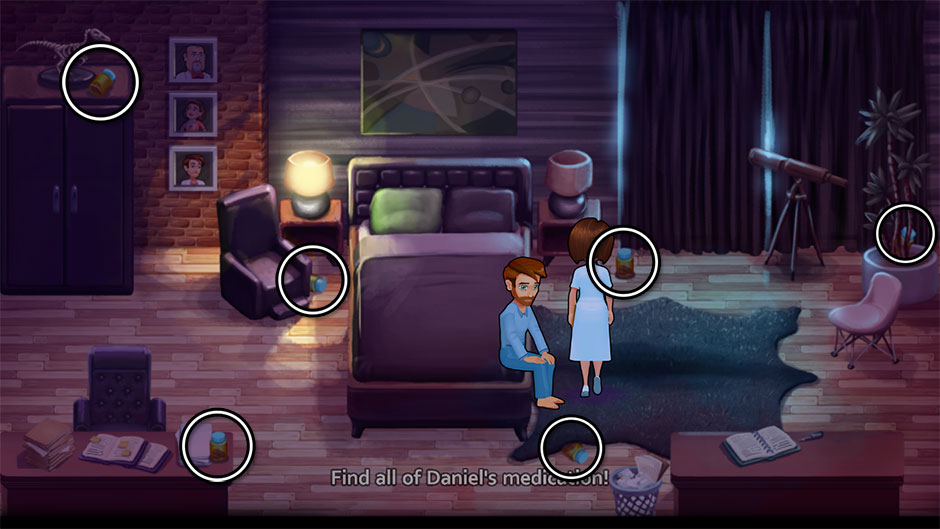
Cutscene – Cold Turkey –
After following the dialogue prompts, find all of Daniel’s medication hidden in his apartment. There are 6 bottles total, and their locations are shown below.
Heart’s Medicine – Time to Heal Cutscene – Cold Turkey
Day 20 – Just Browsing –
Have 20 patients use the magazine stand!
Oliver Location: Hiding behind the bottom left corner of Allison’s coat when she’s standing at the checkout monitor.
The best strategy to use today is to immediately move every patient that comes in to the magazine stand. To do this –
- Click on a patient as soon as they sit down in the waiting area.
- Select the magazine stand on the left side of the waiting area.
- As soon as the patient starts to read, immediately select them again and move them to the station they need.
If you do this with each customer that comes in, you’ll sail through the objective in no time!
Emergency Room: Level 21 – 30
Couple Sophia and Joe are more than just a dynamic dance duo, they’re also the king and queen of the E.R. Here, Allison will learn all the in’s and out’s of life-saving treatment, but not without reliving a few life-changing moments from her past…
Day 21 – Incoming! –
Treat the patients on stretchers within 6 seconds.
Oliver Location: On the top of the orange tray to the left of the checkout monitor.
Patients on stretchers refer to patients who are specifically wheeled in on white stretchers when the alarms go off. Carry a pair of Scissors and a Scalpel at all times – you won’t have time to treat the patient right away and retrieve an item if they need it! Put top priority on treating these patients as soon as they arrive, getting them off the stretchers as quickly as possible. If you use a pair of Scissors or Scalpel, make sure you restock it as soon as you’re done. Be aware that the 6-second timer will continue to tick down even while in the middle of treating the patient, and will not stop until they’ve been helped.
Day 22 – Quick and Clean! –
Spend under a total of 20 seconds disinfecting.
Oliver Location: On the left side and just behind the first examination chair from the right.
Patients sitting in the red-orange examination chairs may require disinfectant. When they do, a purple bubble with cotton swabs and a disinfectant bottle will appear. The number of cotton swabs in the bubble is important: this is the number you will need to click and gather from the tray in the lower left corner, before selecting the bottle of disinfectant. Once selected, take the item to the patient. You will need to perform a touch gesture in order to disinfect their wound. Click and hold (or tap and hold if on a mobile device) the button within the circle, rubbing up and down until the purple color fills the bubble completely. Your objective requires you do this quickly – the total time spent disinfecting patients will need to be under 20 seconds by the time the day finishes. You can keep track of the time spent on this action via the circular meter in the upper right corner of your screen.
Tip! To restock cotton swabs, click on the box of cotton swabs beneath the yellow scalpel toward the top of the screen. The moment the number of swabs on the tray on the lower left drops below 4, restock right away!
Heart’s Medicine – Time to Heal Level 22
Day 23 – Mr. Asher –
Administer Mr. Asher’s treatment!
Oliver Location: In the flower hedge in the lower right corner of the screen, between the first two waiting chairs.
Keep an eye on Mr. Asher on the stretcher in the lower left corner. When the “!” icon appears over him, click on him to administer his treatment. Follow the touch prompts – hold the button on the outside of the circle, moving around twice in a clockwise fashion to complete the first phase of treatment. Repeat this process a total of 4 times throughout the day when prompted to complete your goal.
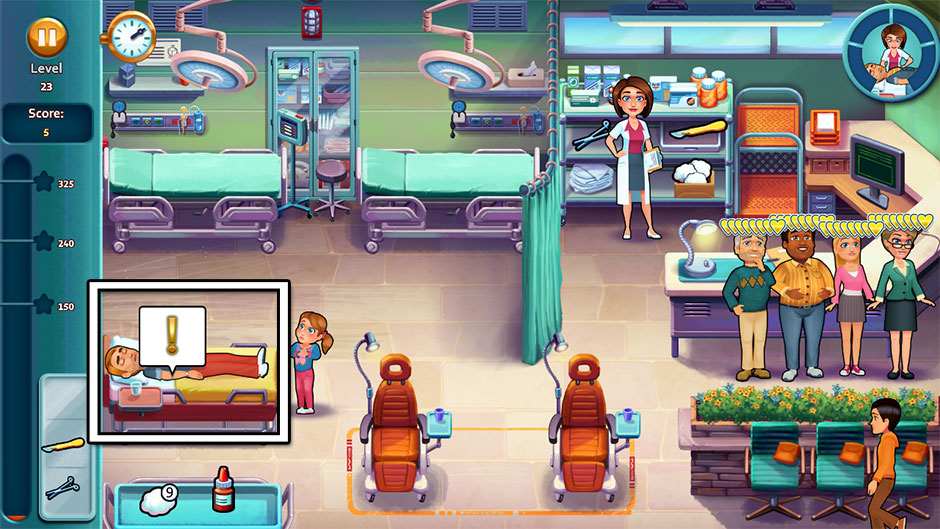
Heart’s Medicine – Time to Heal Level 23
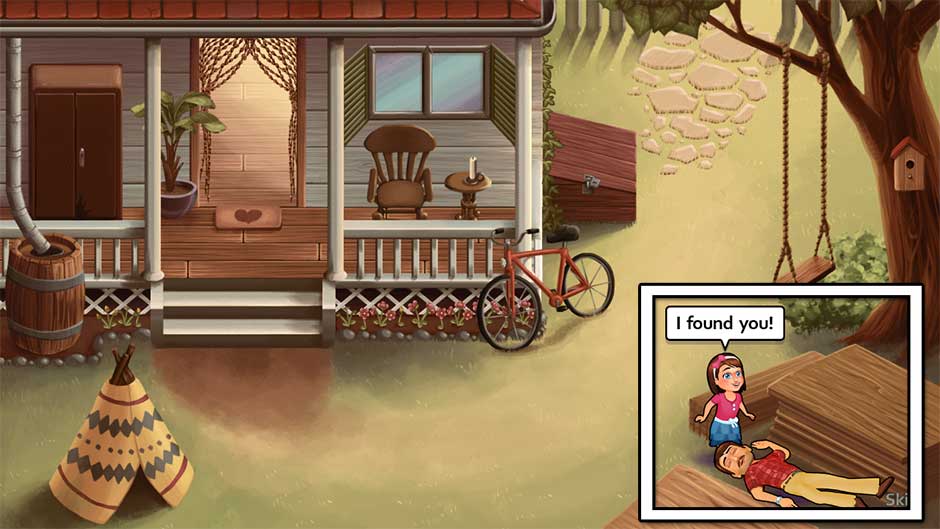
Cutscene – Hide and Seek –
Follow the dialogue prompts. Once the game begins, click on the large sheet of wood in the lower right corner to find Allison’s dad.
Heart’s Medicine – Time to Heal Cutscene – Hide and Seek
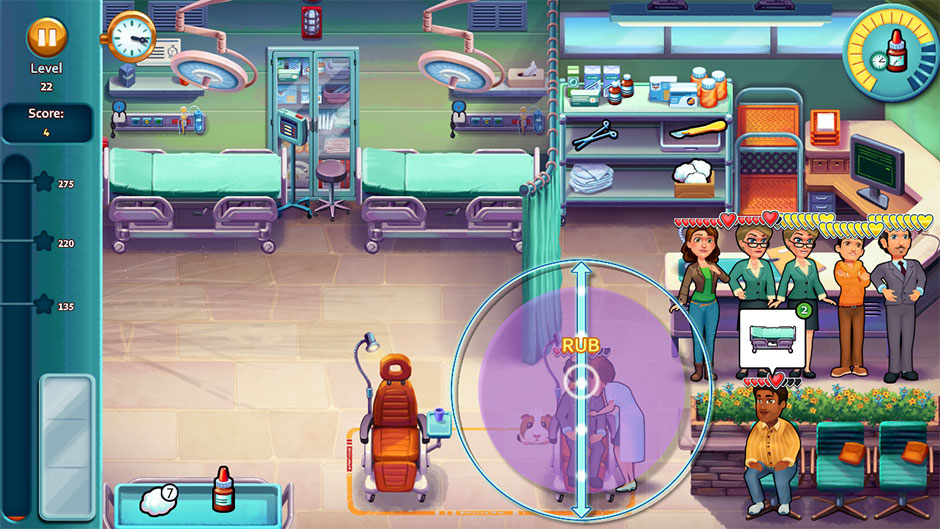
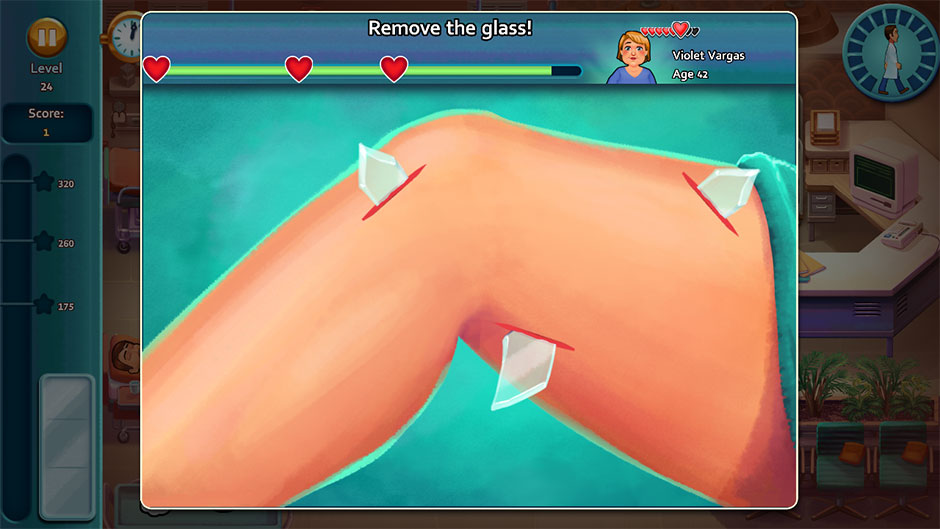
Day 24 – Quick Remove Glass! –
Score at least 15 hearts with the remove glass minigame.
Oliver Location: In the center of the blue mat on top of the counter with the checkout monitor, next to the desk lamp.
Patients who sit in the examination chairs will sometimes need glass removed. When this happens, a blue pop-up showing the doctor holding tweezers will appear. Click on the bubble to trigger the “Remove the glass!” minigame. Click and hold a glass shard, then move it out of the patient’s body and release. Do this with all the glass shards to complete the minigame. You can earn a total of 3 hearts per a patient if you remove the glass quickly enough. Score 15 hearts before the end of the day to achieve your objective.
Heart’s Medicine – Time to Heal Level 24
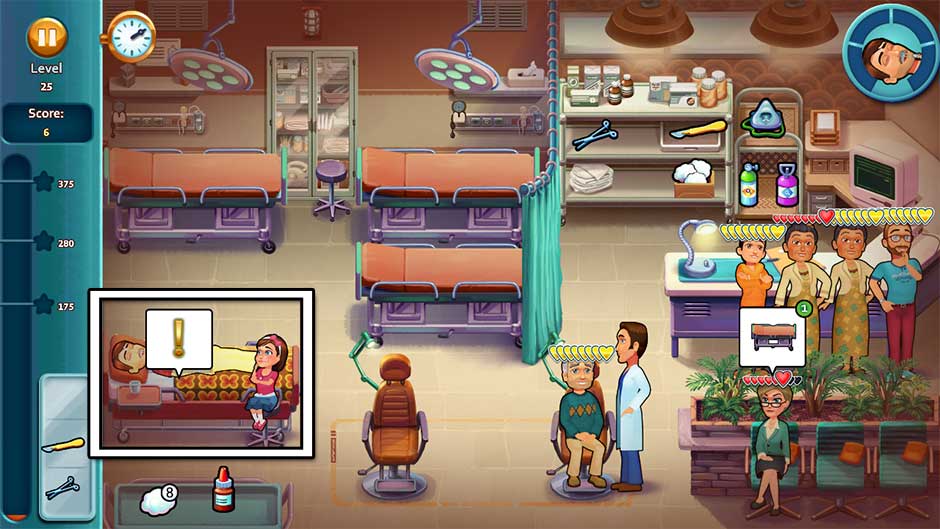
Day 25 – A Turn for the Worse –
Mr. Heart is not doing better.
Oliver Location: On top of the shelf in the upper left corner, right next to the daily shift clock.
Treat Mr. Heart and talk with little Allison. When the “!” bubble pops up over the two, the doctor will move over to perform treatment and talk with Allison. Any other patient tasks you currently have lined up will be paused until the cutscene that starts is complete. Do this 4 times before the end of the day to complete your goal.
Tip! You can skip the dialogue and cutscenes by clicking the “Skip” button in the lower right corner.
Heart’s Medicine – Time to Heal Level 25
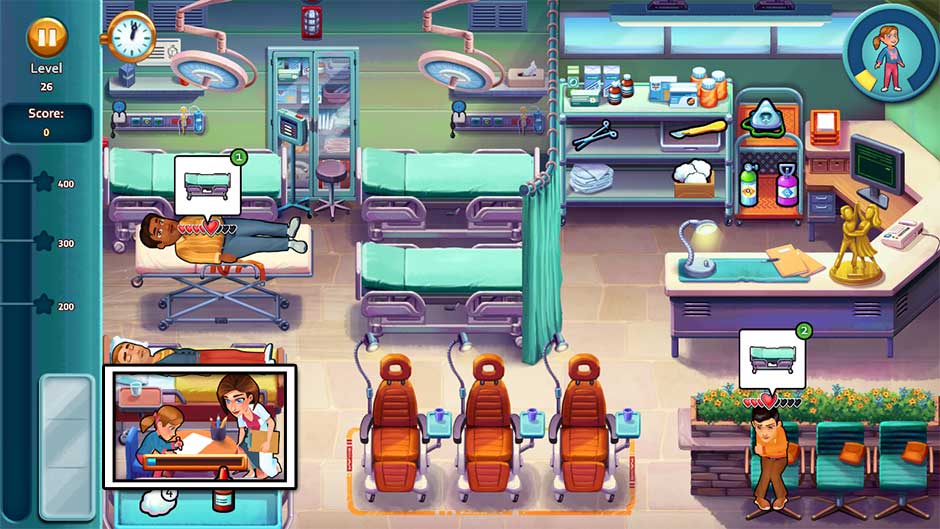
Day 26 – Little Lisa –
Cheer Lisa up, she needs it!
Oliver Location: In the upper right corner of the counter, just below the dial showing the day’s objective.
Click on the “!” bubble over Lisa in the lower left corner. Allison will help Lisa with her drawing. A meter will appear showing your progress. Complete the drawing with her and completely fill the meter before the end of the day to complete your goal. Help Lisa as often as you can between waves of patients.
Tip! Make sure the drawing is at least half complete by the time the day is halfway done. If you haven’t completed the picture with Lisa before the end of the day, don’t panic! As long as at least 1 patient is still waiting at the register, you still have time to complete the drawing.
Heart’s Medicine – Time to Heal Level 26
Day 27 – It’s an Emergency! –
Help each patient within 15 seconds of each other.
Oliver Location: On the center shelf containing the scissors and scalpel.
Feel free to take a little more time with your patients today. Instead of checking out patients as quickly as possible, you can wait a second or two longer per patient in order to create a smoother rhythm. Serving patients in this more relaxed manner guarantees you will not have periods longer than 13 seconds between patients at any time during the day. You can keep track of your timing via the circular meter in the upper right corner.
Day 28 – A Cure! –
Administer the treatment!
Oliver Location: Behind the checkout counter, just above the file folders.
Mr. Asher will require treatment throughout your shift. A meter will appear over his stretcher in the lower left corner keeping track of how long you have to administer his next dose. You can also keep track of this time remaining via the meter in the upper right corner. Try to administer treatment between helping other patients. Never wait longer than the halfway point on the meter to treat him, or it’s very likely you won’t make it in time! Prevent his meter from emptying completely when the day ends to achieve your goal.
Tip! Selecting Mr. Asher, even if you have other tasks already lined up, will prevent his bar from sinking down further. Use this to your advantage when the meter’s getting low!
Heart’s Medicine – Time to Heal Level 28
Day 29 – Marathon Shift –
Walk 800 steps during this shift.
Oliver Location: On the left side of bed on the lower right of the arrivals section.
The trick to this objective is knowing what to do when you’re not helping patients. Every spare moment you have, have Allison keep moving between two stations in order to keep racking up steps. The best places to click to do this are the register (but only if completely full or completely empty!), one of the examination chairs, and one of the stretchers.
Cutscene – The Crash –
Follow the touch prompts that appear. They work similarly to the minigames you’ve played in previous levels. When prompted to retrieve the bag of supplies, click on the nearby stick (pictured below), then follow the new touch prompts that appear. You will need to perform multiple gestures before completing the cutscene.
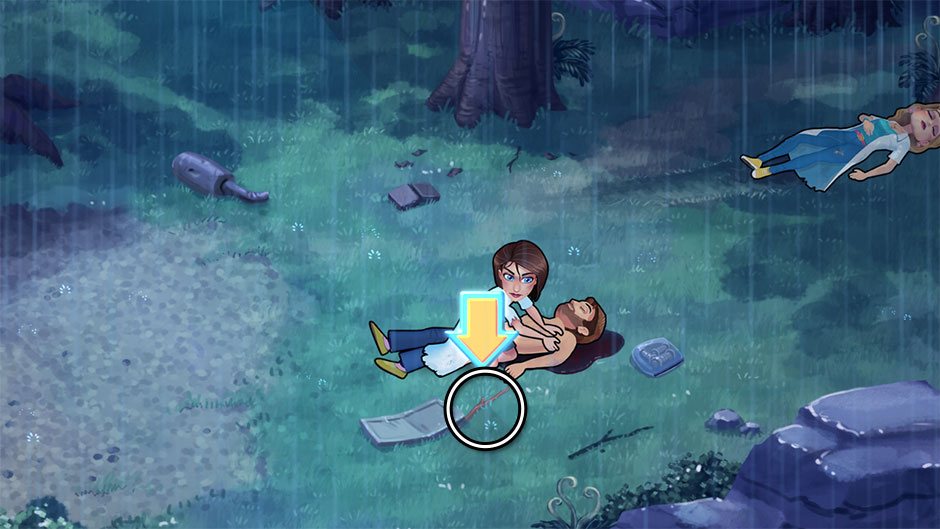
Heart’s Medicine – Time to Heal Cutscene – The Crash
Day 30 – Beside Manners –
Don’t let any patients leave with less than 3 hearts!
Oliver Location: Underneath the bed in the upper right corner of the arrivals section.
All you need to do to complete today is stay attentive to your patients. If a patient comes in with a particularly low number of hearts, place priority on helping them first. Don’t let patients with low amounts of hearts idle at the register too long, or else they will continue to deplete. Pay attention to your patients as per normal, and you should get through today just fine.
Physiotherapy: Level 31 – 40
One month later, friendships and relationships alike still lie shattered. Allison is back at work, but can she find the time to heal more than just her patients?
Day 31 – Bad Manners –
Have exactly two patients served with three hearts or less.
Oliver Location: In the middle of the floor, beneath the weight mat.
The best trick to use to complete this objective is to wait until the day has ended and you’re at your final two customers. When they go to their needed stations, leave them be! Wait until they’re at approximately 2 hearts each. Now you can help them, fulfilling your goal without worrying about upsetting other customers in the process.
Day 32 – Watch Your Step! –
Don’t walk more than 500 steps during this shift.
Oliver Location: At the base of the exercise stairs, next to the table with the vitamin bottles.
Today you want Allison to do as little back-and-forth as possible. Keep a bottle of vitamins and a purple arm brace on your tray from the start of the day to minimize Allison’s need to move back and forth. Keep Allison at the stations that patients move to, and don’t go to the register until you have a group of 5 to check out. Follow these rules, and you should be well on your way to success.
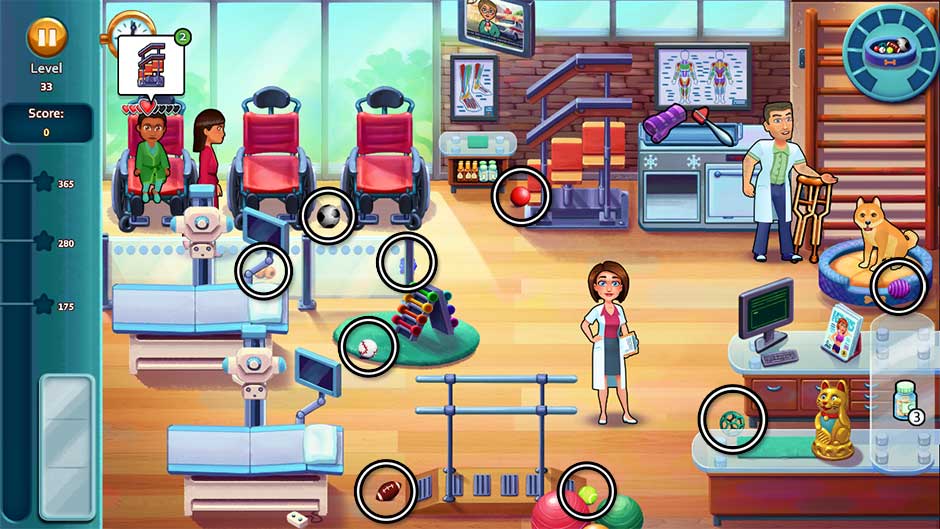
Day 33 – Princess’s Ball! –
Gather Princess’s toys!
Oliver Location: Behind the glass partition, between the feet of the second and third waiting chairs.
Princess’s toys are scattered throughout the area. Find all 9 of them before the day is done. Their locations are shown in the screenshot below.
Heart’s Medicine – Time to Heal Level 33
Day 34 – Clean-up Duty! –
Clean-up the mess in the room!
Oliver Location: Behind the checkout counter, between the monitor and the magazines.
There are three mess piles in the room, all marked with a “!” bubble. Click on each pile to clean it. Once you start, a meter will appear showing your progress. Clean all 3 before the end of the day to complete your goal. Focus on one at a time to stay organized, and remember the objective won’t be completed until the very last patient leaves.
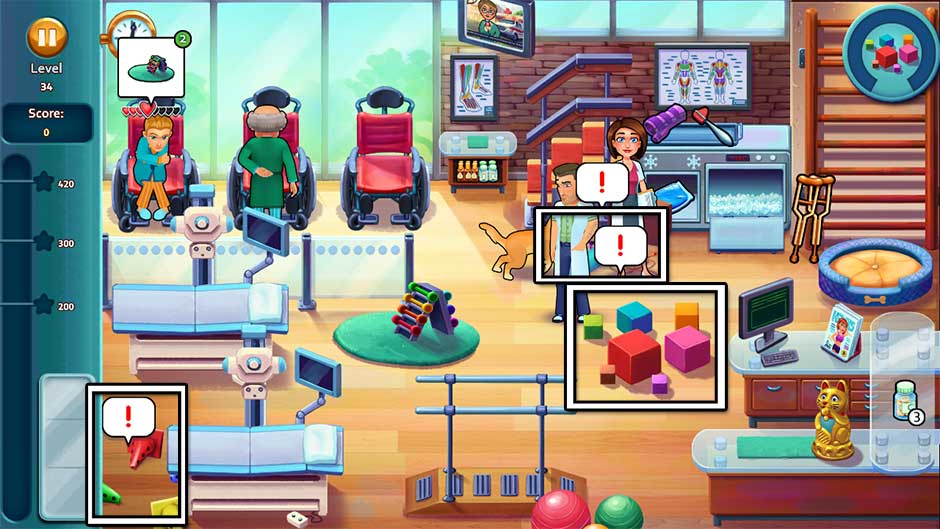
Heart’s Medicine – Time to Heal Level 34
Day 35 – Rushing is Dangerous! –
Don’t help more than 15 patients per minute.
Oliver Location: Behind the green yoga ball at the bottom of the screen.
Work with patients as per normal today, only take a little extra time for each. The meter in the upper right corner of the screen will help you keep track of how many patients you’ve helped. If you feel strapped for time, leave patients with a lot of hearts in the waiting chairs until you feel comfortable helping them without jeopardizing your goal.
Day 36 – Sophia is Looking for You! –
Hide from Sophia!
Oliver Location: Behind the center of the bottommost bed in the lower left corner.
Sophia will turn up suddenly three times today. When she’s about to appear, a “!” bubble will appear in the room. Quickly click on it in order to hide from her. Place emphasis on hiding Allison as quickly as possible. Sophia will show up quickly, so put patients on hold for a moment when the bubble appears.
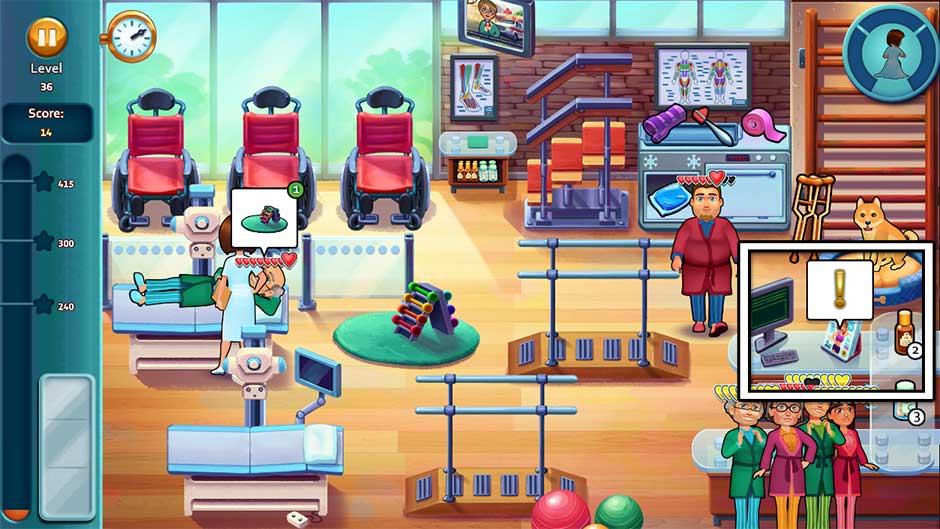
Heart’s Medicine – Time to Heal Level 36
Day 37 – One for All! –
Score at least one golden heart patient of each type!
Oliver Location: Behind the dog bed, next to the crutches.
Help patients as per normal today. Keep practicing your quick skills and use the above tips to ensure they’re as happy as possible. Do this, and your objective will easily be completed before the end of the day.
Day 38 – Girls’ Night! –
Prepare the food for tonight!
Oliver Location: Between the first and second waiting chairs.
Allison needs to help prepare the food for girls’ night. A table, as well as a pie dish will appear near the register with a “!” bubble over them. Click on these to prepare the food. A meter will show your progress. Finish preparing these before the end of the day to complete your goal. Try to make sure that at least one of these is finished by the time the day reaches the halfway mark. Focus on working on these between helping patients and after checking groups out at the register.
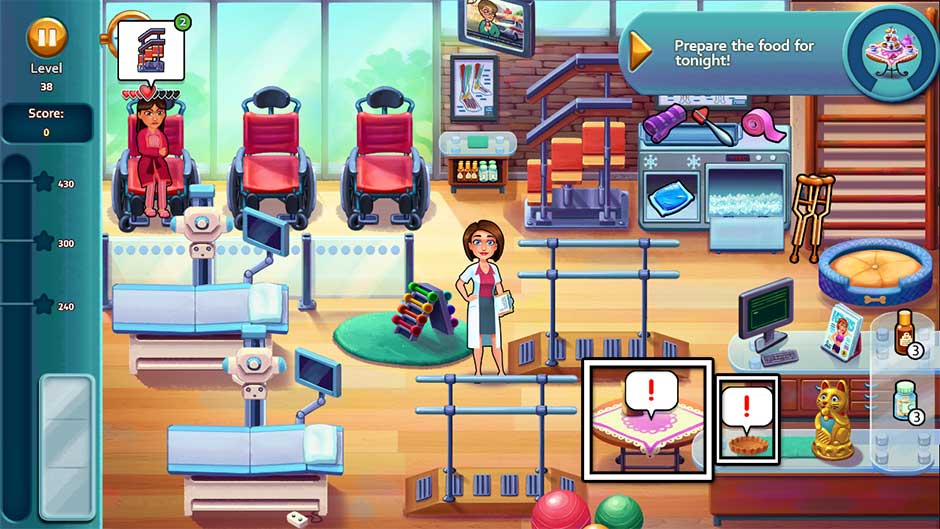
Heart’s Medicine – Time to Heal Level 38
Day 39 – Freeze! –
Prepare 6 ice packs.
Oliver Location: Between the staircase and the ice cooler.
There’s a very easy trick to today’s objective. Go to the ice cooler and click on an ice pack to prepare it. As soon as it’s finished being prepared, add another to the ice cooler and put the finished one on your tray. When it’s on your tray, click on it to remove it. You can immediately prepare 6 ice packs at the start of your day and finish your objective before large waves of patients start to come in.
Day 40 – Puppy Power! –
Cheer up the kids!
Oliver Location: Behind the weights stand, at the end of the glass partition.
When a sad or grumpy child asks to go to a station, immediately click on Princess the dog, followed by the station the child is at. This way, Princess will be ready to cheer up the child while they’re there. Do this 3 times before the end of the day to complete your goal.
Tip! Princess the dog cannot cheer up patients waiting at the register.
Radiology: Level 41 – 50
With one tragic chapter closed, Allison works hard on a new beginning. One life may have been lost, but there’s still a chance she can save another.
Day 41 – Check ‘em Out! –
Check out patients within 20 seconds after their treatment!
Oliver Location: On the floor to the right of the last waiting chair, in the lower left corner.
Today you will need to check out patients within 20 seconds of completing their treatment. The 20 second countdown will start as soon as the patient reaches the register. Be careful! Clicking on the register will not stop or pause the countdown! Make sure you leave at least 5 seconds for Allison to reach the register from anywhere in the room, and be careful not to get stuck helping a patient when the countdown gets low. The meter in the upper right corner of your screen will help you keep track of the time.
Day 42 – Quick Counts! –
Score 28 quick treatment bonuses!
Oliver Location: In the center of the checkout counter.
Assign patients to their stations quickly and help them before the colors deplete from their popup bubbles in order to receive quick treatment bonuses. The meter in the upper right corner of the screen will help you keep track of your progress. Be careful, there’s very little room for error! A total of 30 patients will come in today, and you will need to successfully get 28 quick treatment bonuses to complete today’s challenge.
Day 43 – Toner Time! –
Pick up all the toner!
Oliver Location: Behind the glass partition, to the upper right of the last waiting room chair from the left.
Six toner cartridges are scattered throughout the department. Find them all before your shift is finished! Their locations are shown below.
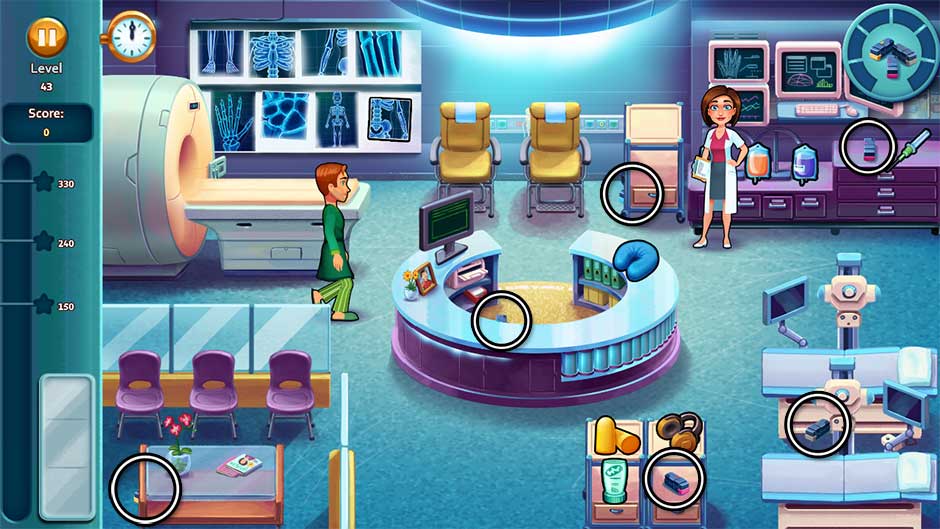
Heart’s Medicine – Time to Heal Level 43
Day 44 – Management Issues! –
Only use one bed at a time!
Oliver Location: Behind the foot of the MRI scanner.
The beds are located in the lower right corner of the room. Make sure only one patient at a time is using them. When a patient is moved to a bed, treat them right away, and don’t assign any more patients to beds until that patient has finished their treatment.
Tip! Try using one specific bed to help yourself keep track.
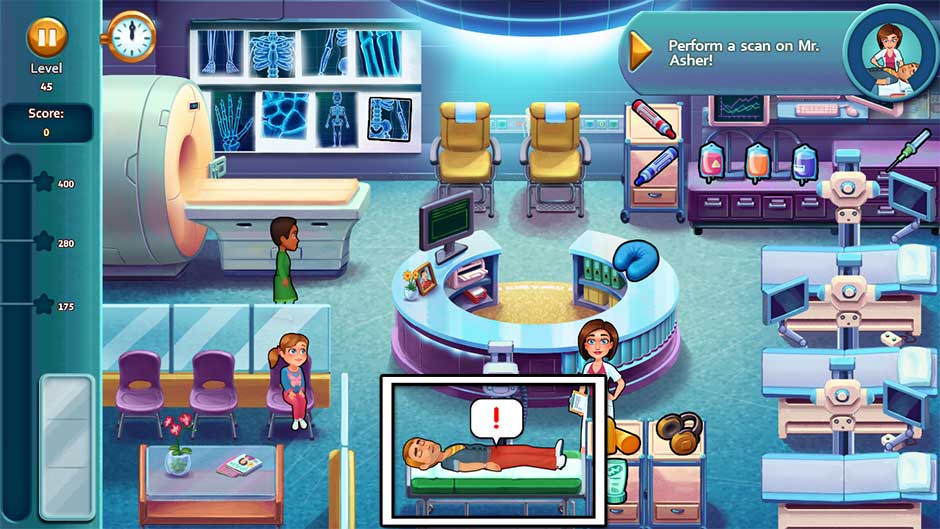
Day 45 – Guess Who’s Back? –
Perform a scan.
Oliver Location: Hanging from the center of the ceiling. Oliver, that’s dangerous!
Click on Mr. Asher at the bottom of the screen, indicated by the “!” bubble, to help prepare him for a scan. A meter will appear showing your progress. Work on preparing Mr. Asher whenever you’re done treating patients, and after checking out groups. As soon as the meter’s been filled, the day’s objective will be complete.
Heart’s Medicine – Time to Heal Level 45
Day 46 – Variety! –
Don’t get the same item twice in a row!
Oliver Location: Behind the glass partition above the first waiting room chair in the lower left corner.
Be careful not to pick up the same item twice in a row! If, for example, a patient needs a neck pillow, you cannot pick up a neck pillow again until you’ve picked up at least one other item. Try to keep track of what patients are asking for, and when in doubt, pick up an extra item to prevent accidentally doubling-up.
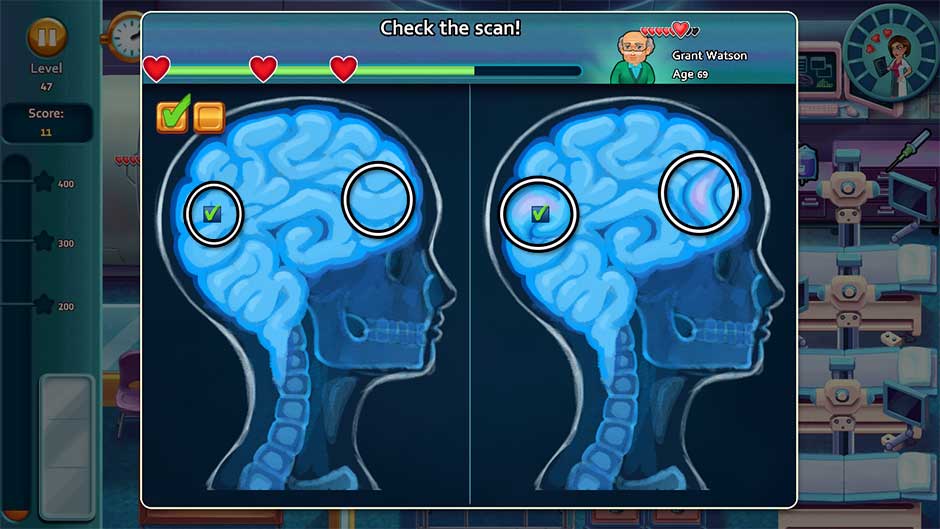
Day 47 – Check the X-rays! –
Score at least 12 hearts with the x-ray minigame.
Oliver Location: Behind the tray to the right of the injection chairs.
Patients who are moved to the MRI scanner often require x-rays. A blue bubble will pop up over these patients, indicating Allison needs to play an x-ray minigame. Find the differences on a patient’s x-rays. The quicker you do this, the more hearts you’ll score. You can score a maximum of 3 hearts per patient per minigame. Score 12 hearts before the end of the day to achieve your goal. This can be done with as little as 4 patients, though you will need 5 if you get less than 3 hearts for any of them.
Tip! Quickly look between the two x-rays. Differences between the two x-rays almost always show up as either pink spots, or dark gaps. Immediately click on these on either x-ray to single out the differences.
Heart’s Medicine – Time to Heal Level 47
Day 48 – Only One Item! –
Don’t have more than one item on your tray at the same time!
Oliver Location: At the foot of the bottommost bed in the lower right corner.
Pick up only one item at a time. The best way to keep on top of this is to only serve one patient at a time. As soon as the patient receives the item they need, you can move on to the next patient. Continue this pattern throughout the day to complete the challenge. If you make a mistake, simply remove the wrong item, pick up the right one, and continue the pattern.
Day 49 – Perfection! –
Only check out golden heart patients!
Oliver Location: Behind the table in the waiting section on the lower left.
Today’s challenge is one of the most difficult in the game. You will need to be on top of all patients coming and going as quickly as possible in order to complete this challenge. Pay extra close attention to patients on the other end of the room, and be prepared to pick up the items they need as quickly as possible.
Tip! Purchase all the upgrades you can! It’s very likely you will need all upgrades available in order to complete this challenge. Complete levels to earn coins you can spend on upgrades prior to starting your day.
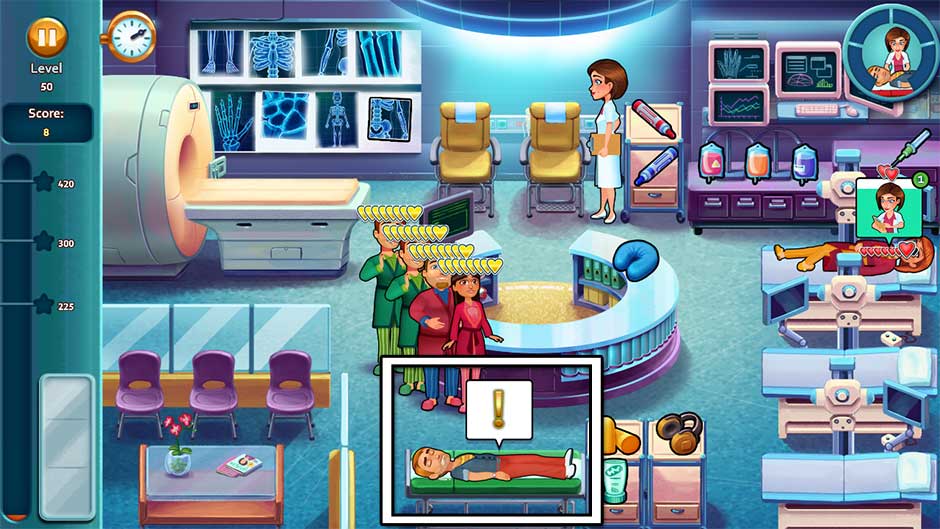
Day 50 – We’re Out of Time! –
Prepare Mr. Asher for surgery!
Oliver Location: Hiding behind the interior of the center counter, toward the right.
The trick to today is to be both attentive and patient. At 4 points during the day, a “!” bubble will pop up over Mr. Asher at the bottom of the screen. When this happens, quickly click on the bubble to help prepare Mr. Asher for surgery. Perform the touch gestures as shown to complete preparations.
Heart’s Medicine – Time to Heal Level 50
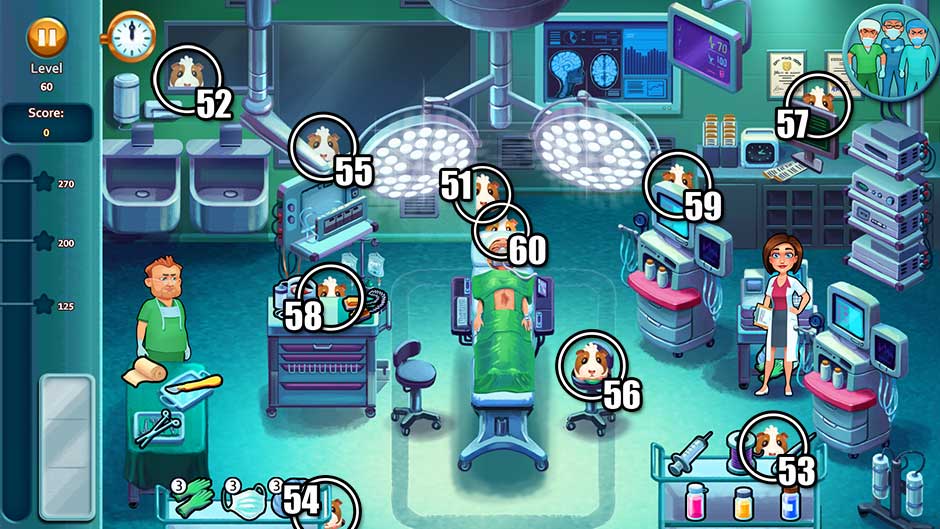
Surgery: Level 51 – 60
Finally, the moment of truth! Allison tries her hand at the demanding shifts of the Surgery department. It’s anything but easy. Can she face her fears and earn the respect of Quinn while trying to save Mr. Asher?
Day 51 – Efficient Worker –
Finish your shift with an empty tray and don’t discard items!
Oliver Location: Above the top of the operating table.
Pay close attention to the surgeons’ needs, and only pick up items when they ask for them. Repeat this pattern throughout the day and you’ll finish the challenge with flying colors.
Day 52 – HeartBeats –
Score 12 hearts with the HeartBeat minigame!
Oliver Location: In the observation window in the upper left corner.
The HeartBeat minigame happens at the machines on the right. When Allison appears next to a heartrate monitor in one of the surgeons’ bubbles, the HeartBeat minigame will begin as soon as you select it and reach them. Click on the matching patterns at the bottom of the popup which match the green highlighted sections. You will not have many opportunities to do this minigame – in fact you may not even get your first chance until the day is nearly halfway complete – so make sure you get the 3 heart maximum for each time in order to complete today’s goal!
Heart’s Medicine – Time to Heal Level 52
Day 53 – No Late Deliveries! –
Surgeons need their items quickly!
Oliver Location: Behind the tray table on the lower right, between the needle and thread.
Don’t miss a single quick bonus at the surgery stations. Surgeons will need their items quicker than usual today. Be prepared by keeping a syringe with pink liquid and a needle and thread handy in your inventory at all times, since these take the longest to prepare. Surgeons just entering the suite will always require items from the tray on the lower left, so click on this tray to have Allison move there so she’s ready to give them the item they need by the time they finish washing at the sink.
Tip! All surgeons have a small timer which appears next to them. When this timer completes, the surgeon will either finish what they’re doing, or require another item or action before they can continue. Keep a sharp eye on these timers in order to stay on top of your quick bonuses!
Day 54 – Sterile Items –
Use an item within 7 seconds of picking it up!
Oliver Location: Behind the right side of the tray table in the lower left corner.
Today you will need to pick up items on request and will not be able to use the trick of keeping spare items on your tray. Only pick up items as surgeons request them, and don’t risk delivering multiple items for bonuses. A meter in the upper right corner of the screen will help you keep track of how long you’ve held on to an item.
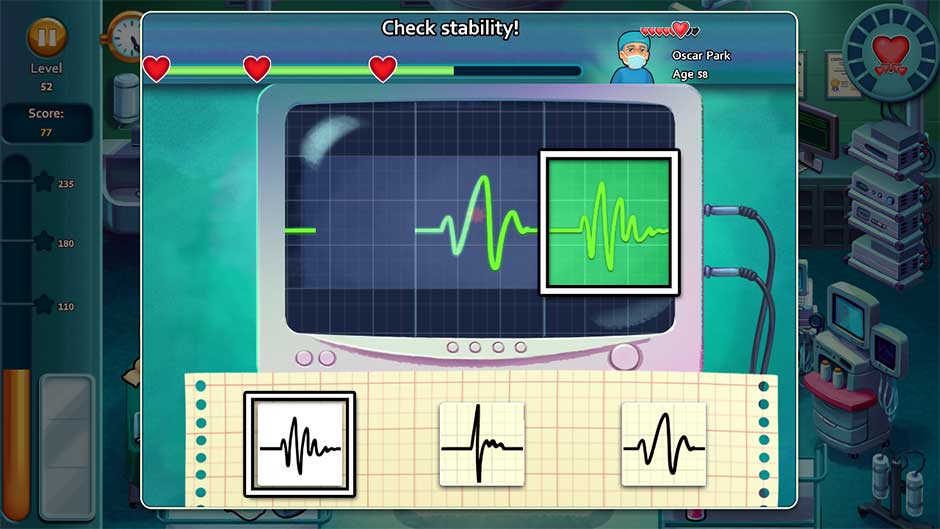
Day 55 – Toxin Checkup! –
Keep the toxins in check!
Oliver Location: In the observation window toward the upper left corner, to the right of the sinks.
Today a special monitor will appear on the right. A meter over this new station will deplete over time. You will need to click on this station to check the patient’s toxin levels before the bar is fully depleted. The meter in the upper right corner will also help you keep track of time. Try to swing by this station by the time the bar is half depleted. Clicking on this station will temporarily stop the bar and keep it from depleting further, even if you’re currently working on other tasks. Continue to check the monitor between helping doctors and checking others out of the surgery suite. Prevent the bar from emptying completely by the end of the day to complete today’s goal.
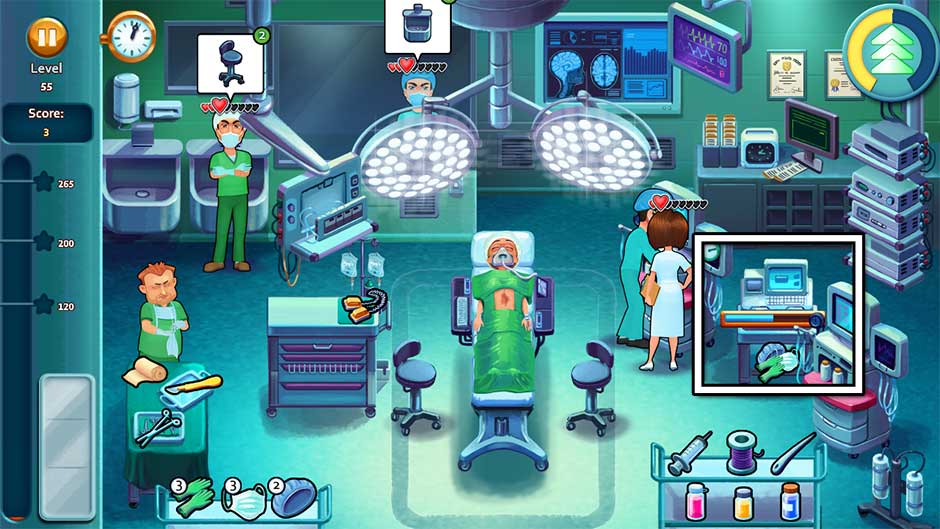
Heart’s Medicine – Time to Heal Level 55
Day 56 – Variety Bonus! –
Use a different item every time!
Oliver Location: On the right surgeon’s stool next to the operating table.
Today’s challenge is very similar to the challenge you faced in Level 46. For example – if you pick up a pair of gloves to give to a surgeon, the next item you pick up and give to a surgeon cannot be gloves. You will need to first pick up and give another item first, such as a scalpel. Deliver items to surgeons on a case-by-case basis, being diligent not to pick up the same item twice in a row. Do this successfully and by the end of the day, you’ll reach your goal.
Day 57 – Management Expert! –
Score at least two Treatment Chains of three or more treatments!
Oliver Location: Behind the checkout monitor.
You will get a Treatment Chain every time you help a surgeon, then immediately help another surgeon back-to-back. You will need to help 3 surgeons back-to-back in order to fulfill the requirements of today’s challenge. You will need to do this a total of two times before the day is done. If you’re setting up a chain with surgeons that require items, you will need to have all the items those surgeons need on your tray before you start the chain, or else it will be broken. An example of a Treatment Chain is shown in the screenshot below, and involves the first 3 surgeons that enter today.
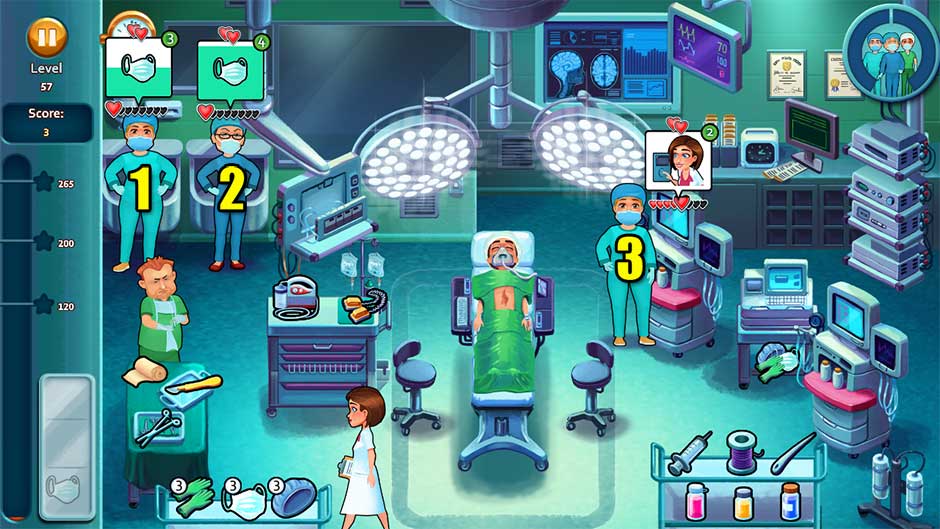
Heart’s Medicine – Time to Heal Level 57
Day 58 – Ruth’s in Surgery! –
Does Ruth have the results?
Oliver Location: Behind the table with the chest paddles, to the left of the operating table.
Ruth is in the surgery suite today, working in the lower right corner. Three times today, a “!” bubble will pop up over her head. As soon as this happens, click on Ruth to have Allison question her about the results.

Heart’s Medicine – Time to Heal Level 58
Day 59 – Mason Steps In! –
But he lacks a certain hospitality…
Oliver Location: Behind the screen of the first monitoring station on the right.
Today you will be playing as Mason! However, unlike Allison, Mason cannot acquire any treatment bonuses of any kind. Play through today normally, keeping close tabs on helping all the surgeons. Since you won’t have any bonuses to help you, it’s more important than ever to keep on top of things and make them happy. Complete the day to fulfill the goal.
Tip! It’s easy to forget about the surgeons at the register on the upper right. Make sure you check them out before they lose hearts! It’s recommended you check them out in groups of 4 instead of groups of 5 today.
Cutscene – Mr. Asher’s Surgery –
The time has come for Allison to try and save Mr. Asher by performing surgery. It’s complicated, and it requires several steps, but with your help, she can make it! Referring to the screenshot below as reference, perform the following steps:
- Apply disinfectant – Click and hold, moving your cursor around to apply disinfectant to the area marked in blue.
- Make the cut – Click and hold, tracing the line shown from top to bottom to make the incision.
- Vacuum the fluids – Click and hold to use the pump and remove the fluid from Mr. Asher’s lungs. Move the pump back and forth over the fluid to remove it faster.
- Move the lungs – Click and hold, moving each of the lungs toward the outer frame to reveal the heart.
- Remove the fat – Click on the globs of fat to remove them from the heart.
- Scan for parasites – Click and hold the handle of the scanner to scan for parasites. There are none to be found. Keep looking until Allison starts talking again, prompting the next step.
- Destroy the parasites – Click and hold to use the scanner again. Focus on the parasites within the scope to destroy them. Continue to do this until all parasites have been removed. Tip! Parasites can show up in the same places they did before, so you will need to check the entirety of the heart multiple times.
- Stitch up the heart – Using the highlighted dots as guidance, stitch up the heart.
- Restart the heart – Click within the dotted circles that show up over the heart. Do this over and over again until the screen eventually blacks out.

Heart’s Medicine – Time to Heal Cutscene – The Surgery
Day 60 – Attention Everyone! –
Never assist the same surgeon twice in a row!
Oliver Location: Behind the head of the operating table.
Today’s goal is fairly straight-forward: only assist one surgeon at a time. Make sure to never help the same surgeon twice in a row. Giving a surgeon an item, or helping with a task counts as assisting. If you face the scenario of helping a surgeon twice, wait until a new or different surgeon needs help before aiding the original.
Tip! Clicking on a surgeon, followed by the station they want to move to does not count as assisting a surgeon.
Challenges
In addition to the 60 regular Challenge levels of the game, there are 30 Bonus Challenge levels: 5 per department. This section covers each of those challenges, as well as strategies for completing each without skipping a beat.
The Ward
Challenge 1 – Emily’s Hospital Food –
Help Emily in the hospital canteen.
Help Emily run the hospital canteen. There are two types of customers who will come in: customers who want to be seated at a table, and customers who want to order at a tray at the counter. Select the incoming customers, then assign them a tray or a seat according to their preference. Customers sitting at the tables will make multiple orders. Keep in mind customers at a tray may wish to be seated and customers sitting at tables may wish to order again at one of the counter trays. Serve customers as per normal and check them out at the register once 5 of them have gathered for the maximum score!
Challenge 2 – Don’t Steal My Medicine! –
Other departments are out of supplies!
Each time a member of hospital staff enters from the lower left, they will walk over to the supplies on the shelf on the right and clear one of them out completely. As soon as these staff members enter and go to the cabinet, click on the supplies in the bottom of the center cabinet at the top of the screen to immediately restock them all.
Challenge 3 – Combo Time! –
Only combos and bonuses give hearts.
Assign patients to their stations as soon as they walk in, and treat them before the color drains from their bubbles. If you find yourself falling behind, focus on the newer patients which have more time for bonuses. It’s better to keep combos going with new patients than to try catching up with old ones. Make sure you keep the supplies on the right shelf in stock and check patients out in groups, stringing together Treatment Chains by helping patients back-to-back where possible.
Challenge 4 – Oliver Brought Friends! –
Oliver brought friends, and they’re everywhere!
Find 30 of Oliver’s friends and family throughout the course of the day. Listen for the tell-tale squeak and click on the guinea pigs as soon as they show up. Guinea pigs can show up anywhere, however they tend to gravitate toward locations where Allison would find them in the normal Challenge levels. Refer to the Oliver the Guinea Pig Locations Section to view these areas!
Challenge 5 – Keep Moving! –
Don’t stand still for 8 seconds!
Keep Allison moving by clicking between the bed and one of the chairs when she’s idling. Treating a patient in a single location counts as standing still, so get moving again as soon as you’re done treating them! Be especially careful of leaving her standing still after aiding customers with touch sequences, minigames, and checking them out at the register.
Pharmacy
Challenge 6 – The Blues –
Only patients with 3 or less hearts enter today!
You will not be able to get any golden heart bonuses today. Instead, focus on serving patients as quickly as possible. Continue to check patients out in groups of 5 and line up Treatment Chains as much as possible. Your priority should be treating customers as quickly as possible, but don’t let quick treatment force you into checking people out in groups of less than 3!
Challenge 7 – Extra Help –
Jenny lends a hand!
Jenny will pick up all the items you need today. Jenny moves very quickly, so you will be able to focus on moving Allison to the stations patients are at while Jenny places items on the tray. Focus on completing the day as per normal and the rest should be smooth-sailing!
Tip! Try to allow for a moment’s delay when Jenny is picking up items. It takes a moment for the actual item to be transferred to your tray.
Challenge 8 – Minigame Madness! –
Minigames earn an extra heart!
Extra minigames will pop up today, and each one will reward an extra heart! Remember that bubbles with a blue filling indicate that clicking on that patient will trigger a minigame. Refer to our Minigames section for additional tips and tricks.
Challenge 9 – Emily’s Hospital Food II –
Help Emily in the hospital canteen.
Extra items have been added to the menu today. Pay close attention to when customers order sandwiches, since not all toppings will always be used! Try to keep a cup of pre-prepared coffee on your tray at all times.
Tip! Hospital staff regulars tend to enjoy the same orders. For example, Connor always orders coffee, so as soon as you see him, make sure you have a cup prepared! Similarly, Ruth loves sandwiches and Allison loves pastries, so when you see these staff regulars, you’ll know what to expect. This strategy can be applied to all Hospital Food days.
Challenge 10 – Small Tray! –
You can only carry one item at a time!
For today’s strategy you’ll need to focus on one customer at a time, especially if they require items. If a patient is going to the green blood donation chair, you can move there before they arrive. That way, as soon as they sit down, Allison will immediately hook them up and you’ll be guaranteed a Quick Bonus. Continue to check out customers in groups of 5 as per normal.
Tip! Three-pill combinations count as a single item.
E.R.
Challenge 11 – Emily’s Hospital Food III –
Help Emily in the hospital canteen.
There’s a new variety of chips, soup, and tea available today! To save time, immediately prepare a cup of coffee and a cup of tea and keep these on your tray. About ¾ of the way through the day, one of the tray customers will order both coffee and tea, so make sure you’re prepared so you don’t fall behind! Remember – hospital staff are also regulars with predictable orders, so use this to your advantage.
Challenge 12 – It’s Serious! –
Patients can’t gain golden hearts!
Patients can’t gain golden hearts, but they can still gain full hearts otherwise. Treat patients quickly as per normal and continue to try checking them out in groups of 5. If a patient’s hearts are draining too quickly at the register, check them out in groups of 4 instead.
Challenge 13 – Strep Throat Patients! –
Memorize the treatments, so patients don’t have to ask twice!
Today, focus on treating patients as quickly as possible. After a moment, a patient’s need within their bubble will turn into a “?”. A useful trick to use when dealing with multiple patients is to place priority on the patients which require items – such as the scalpel. Patients which only require treatment or an action will automatically be treated without penalty when you click on them, even if you forgot what they needed.
Challenge 14 – Combos Only! –
Only patients that check out with at least 2 other patients count towards the score total!
In order to maintain high scores, you’ll always want to try and check out patients in groups of 5. However, if this isn’t possible, try checking them out in groups of 4 instead. You need to check out a minimum of 3 patients at once in order for their hearts to count toward your score.
Challenge 15 – Oliver’s Back! –
Oliver’s back and so are his friends!
Find Oliver and his friends 30 times before the end of the day. The guinea pigs’ locations are randomized, however they tend to show up in the same locations as Oliver pops up during the daily challenge levels. To view these locations, see the Oliver the Guinea Pig Locations section of our guide.
Physiology
Challenge 16 – No Time to Wait –
There’s only 1 spot to wait. Don’t lose 3 or more patients!
Place priority on moving patients to stations as quickly as possible. The moment a patient comes in, immediately hover your cursor over them and place them in their proper location as soon as they sit down. It’s better to focus on incoming patients and leave the others waiting a moment than to risk losing patients.
Challenge 17 – At Their Own Pace! –
Every patient has their own tempo!
A wider variety of patients are available today, and each one is unique. You never know what the heart level of an incoming patient will be. Therefore, pay close attention to the number of hearts on a patient and place priority on helping the ones with the lowest happiness levels first. Remember to check out patients in groups of 5 as much as possible.
Challenge 18 – Emily’s Hospital Food IV –
Help Emily in the hospital canteen.
The canteen shelves are now full of food and drink items, and the sandwich bar is full of options! More customers will be making multiple orders today. Be especially careful making sandwiches and pay close attention to what a customer wants on them. Have a cup of coffee and tea prepared on your tray at all times to prevent yourself from falling behind, and remember to restock the chips beneath the register!
Challenge 19 – Man’s Best Friend! –
Cheer up Allison by sending Princess to a station she’s at!
The best way to align today’s goal is to look at where a patient wants to go. For example, if a patient is moving to a bed, this is a location where Allison needs to go to treat them. As soon as you see a patient wants to be moved to a bed, select Princess, then click on the bed. Immediately following, click on the bed so Allison will treat the patient there. In this way, Princess will have time to cheer up Allison, even if she treats a patient especially quickly. Successfully complete this 4 times before the end of the day to achieve your goal.
Challenge 20 – Healthy Lifestyle –
Treatments per patient are increased!
More patients will need to visit multiple stations today. Make sure you always have ice packs prepared and keep your vitamins fully stocked. The number displayed in the upper right corner of a patient’s bubble will indicate how many more stops they need to make before they’re finished with treatment. Similarly, you can look at the happiness levels of a patient coming in for a clue on how much treatment they will need. Generally speaking, the lower the number of hearts, the more stations they will need to stop at.
Radiology
Challenge 21 – Take It Easy! –
Allison is very tired!
Allison’s energy levels are very sensitive today. Keep an eye on the meter in the upper right corner of the screen. Let this meter deplete completely before moving Allison to another location. If Allison exceeds the meter, she will move especially slow, resulting in patients who are less than happy. You can use the yellow chairs at the top of the screen as a check point between the beds and the MRI scanner.
Challenge 22 – Rush Hour! –
Patients enter in groups!
Patients will enter the Radiology department in waves today. Keep an eye on the color levels within patients’ bubbles and use this as reference to decide which patients need treatment priority. Once you’ve finished treating a group, you can check them all out together at the register for bonus points.
Challenge 23 – Emily’s Hospital Food V –
Help Emily in the hospital canteen.
There’s a new item on the menu today: waffles! Click on the waffle to the left of the waffle maker to place it inside. As soon as the waffle is cooked, click on it within the cooker to add it to the plate immediately to the right. You can keep a stack of up to 4 waffles at a time, so prepare extra waffles whenever you have a free moment. Remember to keep a pre-prepared cup of coffee and tea on your tray to prevent customer backup.
Challenge 24 – Guess Who’s Also Back?! –
Oliver is back again with friends and family!
Oliver and friends are back again! Find 30 guinea pigs before the day is done. These little guys can pop up anywhere, but tend to show up in the same locations as Oliver can be found during normal days. To view these locations, see our Oliver the Guinea Pig Locations section.
Challenge 25 – Extra Help! –
Jenny cares about you!
Jenny will help by retrieving items today. Jenny is especially fast, so you can focus on moving Allison to patients’ stations and locations. Remember to allow a moment for Jenny to actually pick up an item and transfer it to your tray and don’t get too far ahead of yourself!
Surgery
Challenge 26 – Doctors Can’t Wait! –
Doctors lose hearts faster while waiting outside the room!
Keep an eye out for new surgeons entering the suite from the upper left corner. As soon as they ask to be taken to a sink or machine, click on them and move them to these stations immediately. If you wait more than a few seconds, the surgeons will leave, depriving you of essential points you need to complete today’s goal.
Tip! Make sure to always address surgeons standing outside the room and waiting for the sink first and foremost!
Challenge 27 – The Specialist! –
Keep the Specialist happy!
The Specialist can be identified by his blue cap and mask, blue-colored scrubs, and black hair. If you forget which surgeon is the Specialist, just refer to the portrait in the upper right corner of your screen. The Specialist loses an average of 1 heart per second, so place complete priority on helping him above all else.
Tip! Always have a needle and thread handy on your tray to save crucial time!
Challenge 28 – Super Allison! –
Allison walks a lot faster!
Today’s quite easy as far as challenges go. Allison is super-fast, so you’ll be able to help surgeons faster than ever before! Take your time and don’t get too far ahead of yourself. Remember to restock surgical items by clicking on the items beneath the monitor on the right.
Challenge 29 – Intricate Operation! –
Minigames are harder, and treatments take more time!
Minigames today have extra steps, but otherwise work the same as usual. Take a deep breath and don’t get too flustered. Remember to keep an eye on new incoming surgeons, and keep your supplies stocked. The most crucial element of today is to remember the doctors at the checkout – it’s easy to forget them when you’re busy with more intricate treatments and minigames. Check them out in smaller groups if necessary, but try to make sure there’s at least 4 doctors at the checkout monitor before you do.
Challenge 30 – Emily’s Hospital Food VI –
Help Emily in the hospital canteen.
Prepare a cup of coffee and tea to keep on your tray as soon as the day begins, and as soon as you have a spare moment afterward, start stocking up on waffles. Customers will want to be moved from chairs to trays and vice versa more than ever. You can help keep this managed by placing customers in the chairs closest to you to cut down on serving time. Similarly, if you need to buy time, send them to a chair further away. Keep your chips stocked and the favorite dishes of your regulars in mind (Connor likes coffee, Allison likes pastries, and Ruth likes sandwiches).
Congratulations! You’ve completed Heart’s Medicine – Time to Heal! Click on the heart icon that’s appeared in the upper right corner of the level select screen for an exclusive sneak-peak at the next title in the series!
Next Time on Heart’s Medicine…
Oliver the Guinea Pig Locations
Oliver is quite an adventurous guinea pig, and turns up in each of the game’s 60 challenge levels! Find Oliver in each location to unlock the Oliver trophy. The following list outlines his locations per level, and is divided by hospital department.
The Ward
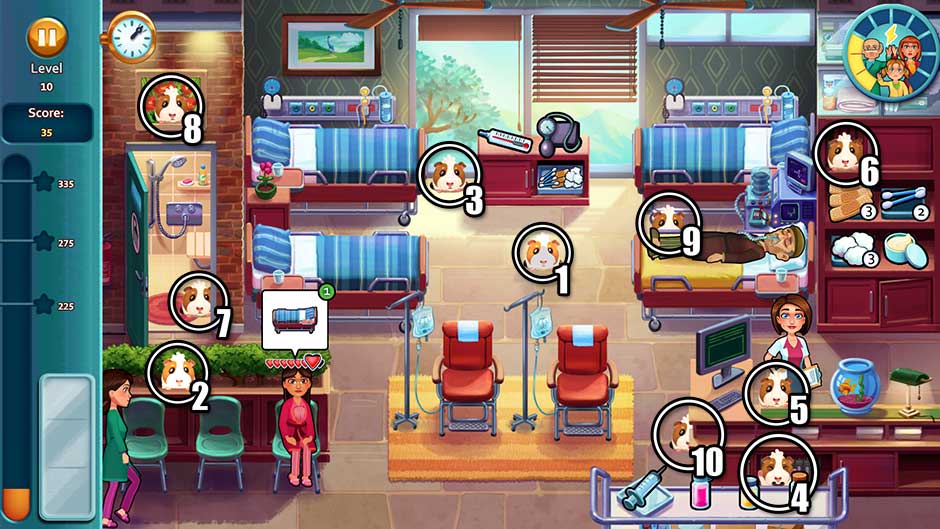
Heart’s Medicine – Time to Heal – Oliver Ward Locations
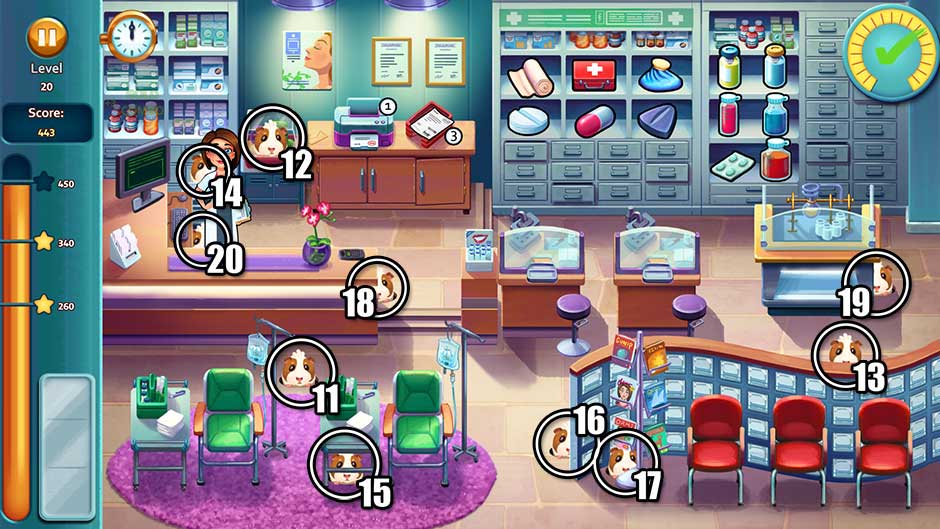
Level 1: In the middle of the floor, below the counter with the thermometer.
Level 2: In the planter hedge in the lower left corner, between the first two waiting chairs.
Level 3: In front of the window, between the upper left gurney and the counter with supplies.
Level 4: Just above the tray table in the bottom right corner of the screen, in front of the binders beneath the checkout.
Level 5: At the checkout, in the same location behind the counter as Allison stands.
Level 6: In the top left corner of the cabinet that contains the adhesive bandages, cotton swabs, and cream.
Level 7: In the shower room on the left, over the red rug.
Level 8: In the picture frame above the shower on the left.
Level 9: Behind the foot of Earl’s bed, peeking over the side.
Level 10: Around the left corner of the counter with the checkout monitor.
The Pharmacy
Heart’s Medicine – Time to Heal – Oliver Pharmacy Locations
Level 11: Just above the pink carpet on the floor in the lower left corner.
Level 12: In his cage habitat near the register, behind the checkout.
Level 13: Behind the glass divider wall, between the second and third waiting chairs in the lower right corner.
Level 14: Behind the small stepping stool to the immediate right of the checkout monitor.
Level 15: Under the table at the second blood donor station.
Level 16: To the left and just behind the glass wall divider next to the magazine rack.
Level 17: Behind the base of the magazine rack.
Level 18: Just behind the right end of the checkout counter.
Level 19: On the right side of the mixing station in the upper right corner.
Level 20: Hiding behind the bottom left corner of Allison’s coat when she’s standing at the checkout monitor.
Emergency Room
Heart’s Medicine – Time to Heal – Oliver ER Locations
Level 21: On the top of the orange tray to the left of the checkout monitor.
Level 22: On the left side and just behind the first examination chair from the right.
Level 23: In the flower hedge in the lower right corner of the screen, between the first two waiting chairs.
Level 24: In the center of the blue mat on top of the counter with the checkout monitor, next to the desk lamp.
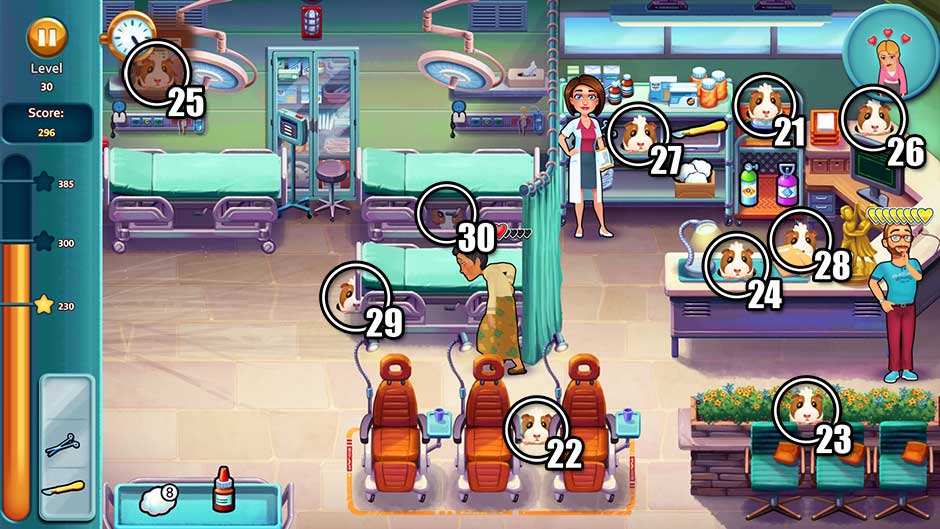
Level 25: On top of the shelf in the upper left corner, right next to the daily shift clock.
Level 26: In the upper right corner of the counter, just below the dial showing the day’s objective.
Level 27: On the center shelf containing the scissors and scalpel.
Level 28: Behind the checkout counter, just above the file folders.
Level 29: On the left side of bed on the lower right of the arrivals section.
Level 30: Underneath the bed in the upper right corner of the arrivals section.
Physiology/Physiotherapy
Heart’s Medicine – Time to Heal – Oliver Physiotherapy Locations
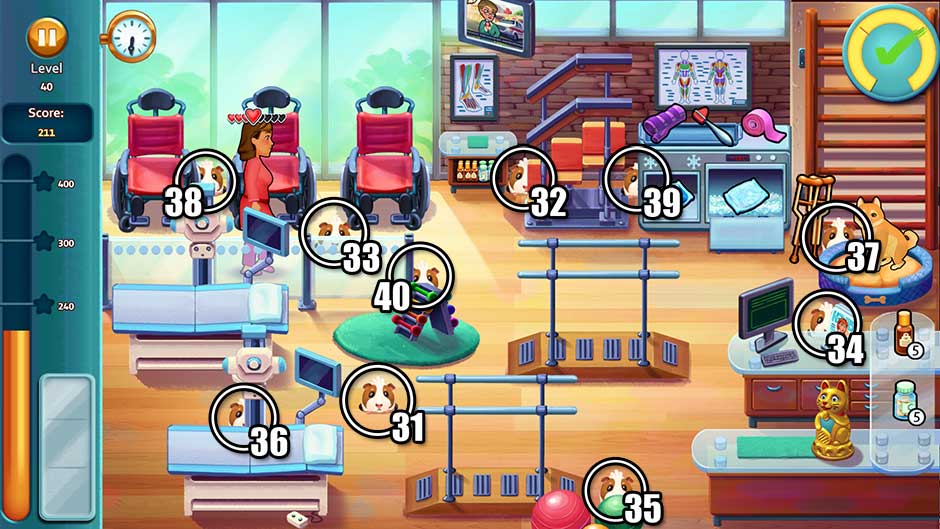
Level 31: In the middle of the floor, beneath the weight mat.
Level 32: At the base of the exercise stairs, next to the table with the vitamin bottles.
Level 33: Behind the glass partition, between the feet of the second and third waiting chairs.
Level 34: Behind the checkout counter, between the monitor and the magazines.
Level 35: Behind the green yoga ball at the bottom of the screen.
Level 36: Behind the center of the bottommost bed in the lower left corner.
Level 37: Behind the dog bed, next to the crutches.
Level 38: Between the first and second waiting chairs.
Level 39: Between the staircase and the ice cooler.
Level 40: Behind the weights stand, at the end of the glass partition.
Radiology
Heart’s Medicine – Time to Heal – Oliver Radiology Locations
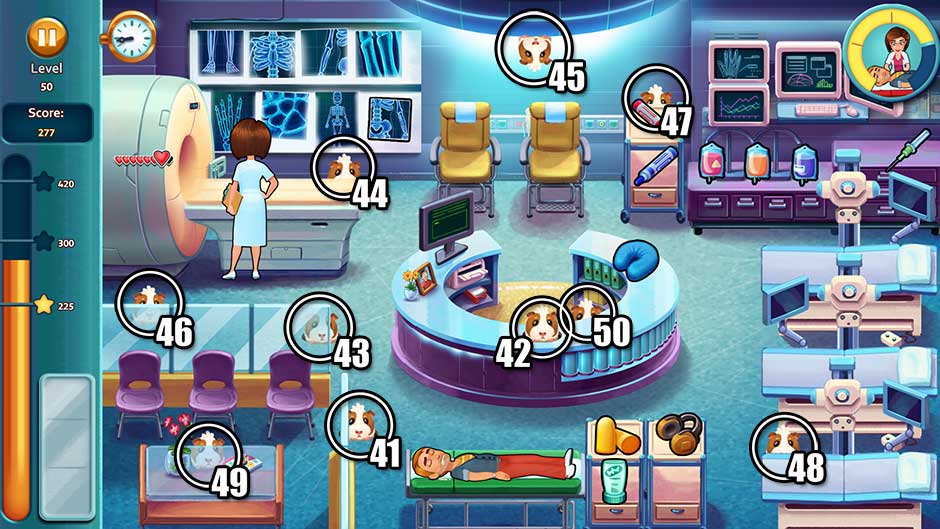
Level 41: On the floor to the right of the last waiting chair, in the lower left corner.
Level 42: In the center of the checkout counter.
Level 43: Behind the glass partition, to the upper right of the last waiting room chair from the left.
Level 44: Behind the foot of the MRI scanner.
Level 45: Hanging from the center of the ceiling. Oliver, that’s dangerous!
Level 46: Behind the glass partition above the first waiting room chair in the lower left corner.
Level 47: Behind the tray to the right of the injection chairs.
Level 48: At the foot of the bottommost bed in the lower right corner.
Level 49: Behind the table in the waiting section on the lower left.
Level 50: Hiding behind the interior of the center counter, toward the right.
Surgery
Heart’s Medicine – Time to Heal – Oliver Surgery Locations
Level 51: Above the top of the operating table.
Level 52: In the observation window in the upper left corner.
Level 53: Behind the tray table on the lower right, between the needle and thread.
Level 54: Behind the right side of the tray table in the lower left corner.
Level 55: In the observation window toward the upper left corner, to the right of the sinks.
Level 56: On the right surgeon’s stool next to the operating table.
Level 57: Behind the checkout monitor.
Level 58: Behind the table with the chest paddles, to the left of the operating table.
Level 59: Behind the screen of the first monitoring station on the right.
Level 60: Behind the head of the operating table.
Minigames
Throughout each of the game’s levels, a number of minigames are available to play. Three different types of minigames are available per hospital department. This section outlines each of the minigames available and how to play them.
The Ward
- Apply cream! – Click and hold to rub cream onto the burned spots. A green checkmark will appear once the cream has been fully applied successfully.
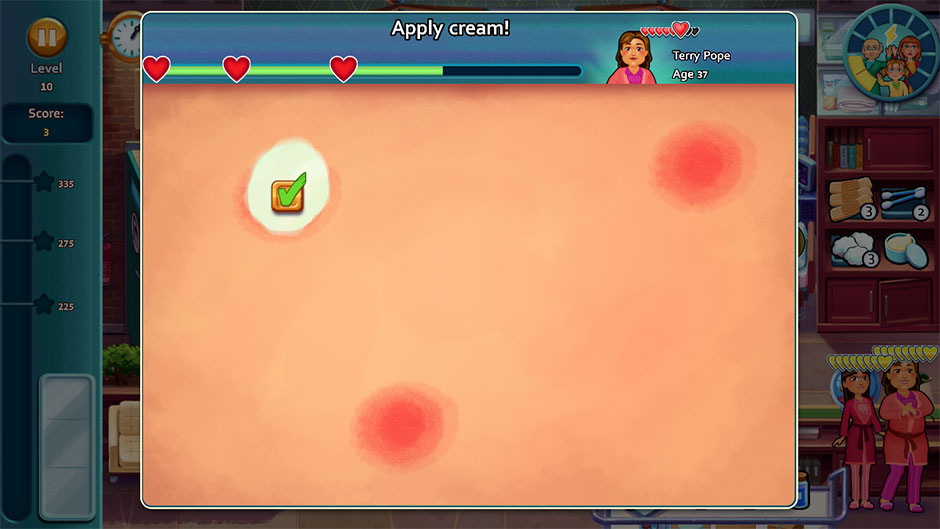
Heart’s Medicine – Time to Heal Minigame – Apply Cream
- Click away the bubbles! – Click on the bubbles in the syringe until all of them are gone. Click on the center bubbles in clusters to clear them away faster.
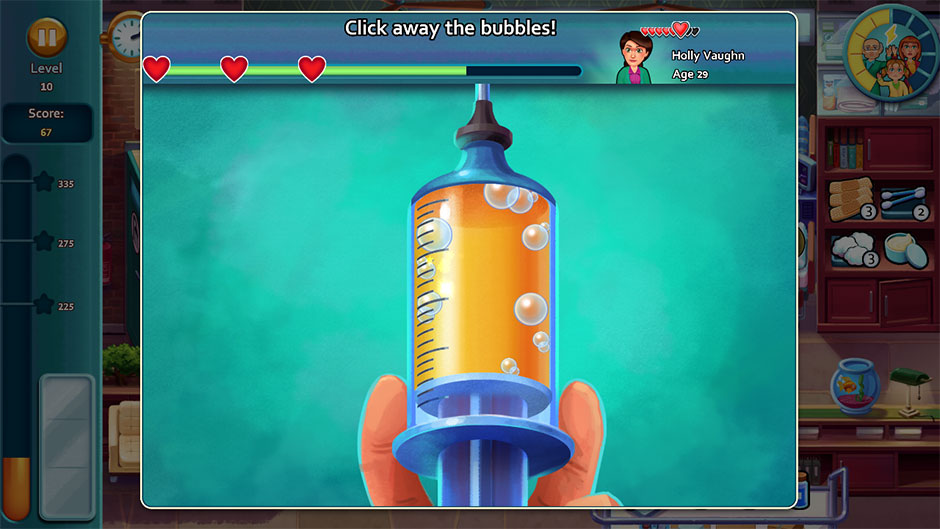
Heart’s Medicine – Time to Heal Minigame – Clear Bubbles
- Adjust the IV drip! – Click and hold the knob on the right to adjust the IV drip levels. Move the dial up and down until the patient is smiling, then click “Set”.
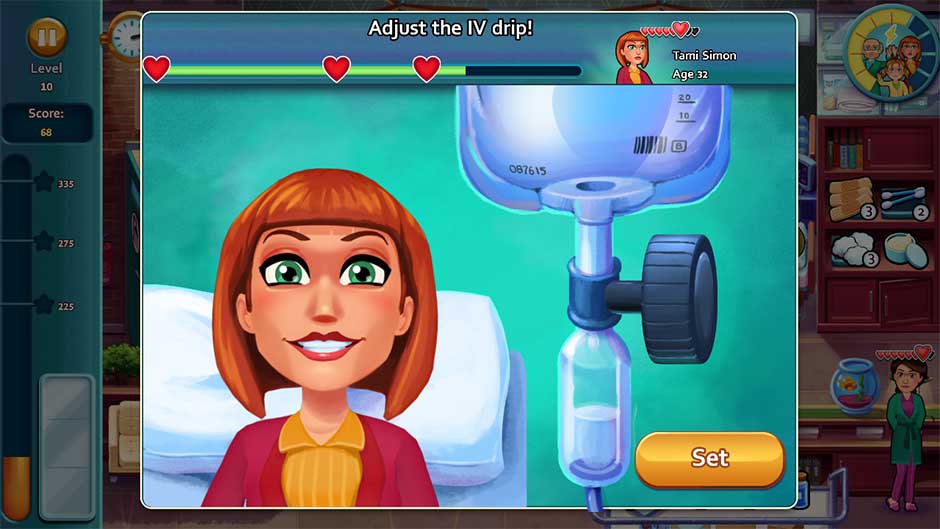
Heart’s Medicine – Time to Heal Minigame – Adjust IV Drip
The Pharmacy
- Find the medication! – Look at the medication shown on the clipboard in the lower left corner. Find the identical medication on the shelf and click on it to complete the minigame.
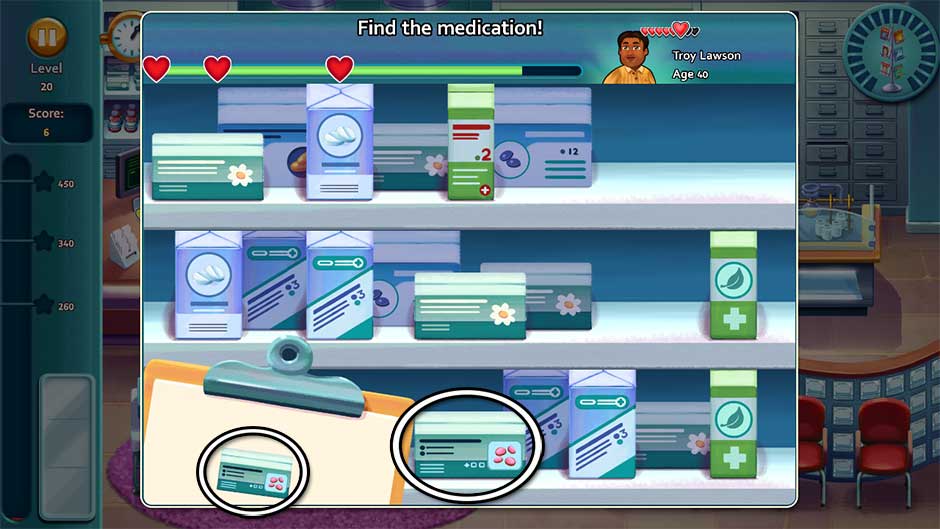
Heart’s Medicine – Time to Heal Minigame – Find the Medication
- Make pills! – Click on the grooves in the capsule machine until all of them are filled, then click on the red button to make the medication.
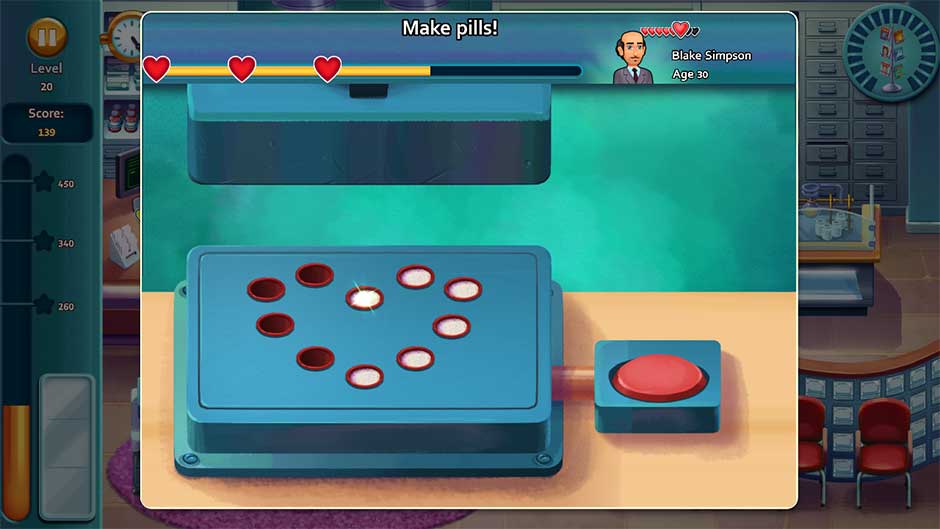
Heart’s Medicine – Time to Heal Minigame – Make Pills
- Fill the Bottle! – Liquid medication will pour into the bottle shown. Click on the bottle when the liquid reaches the green line. Do this until each of the bottles are filled.
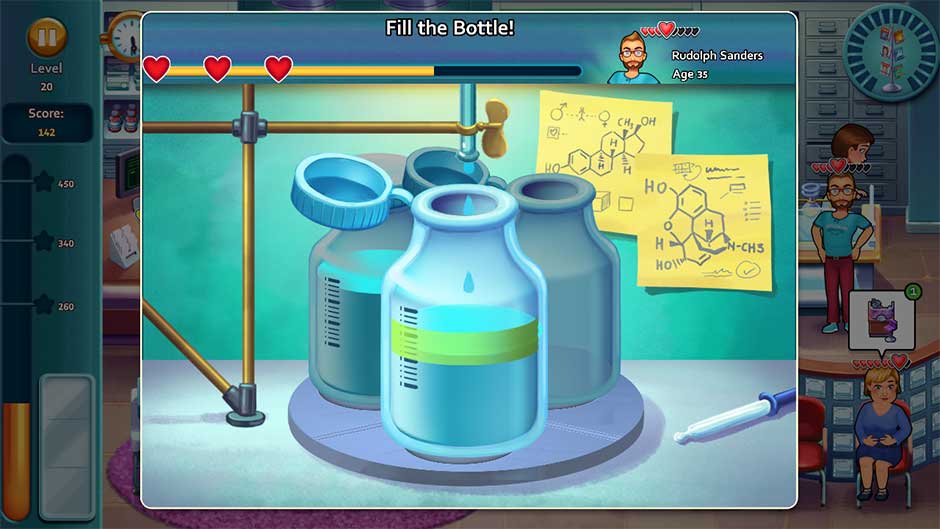
Heart’s Medicine – Time to Heal Minigame – Fill the Bottle
Emergency Room
- Remove the glass! – Click on a glass shard and hold, moving the shard out of the wound until it disappears. Do this for each of the shards until all of them are removed.
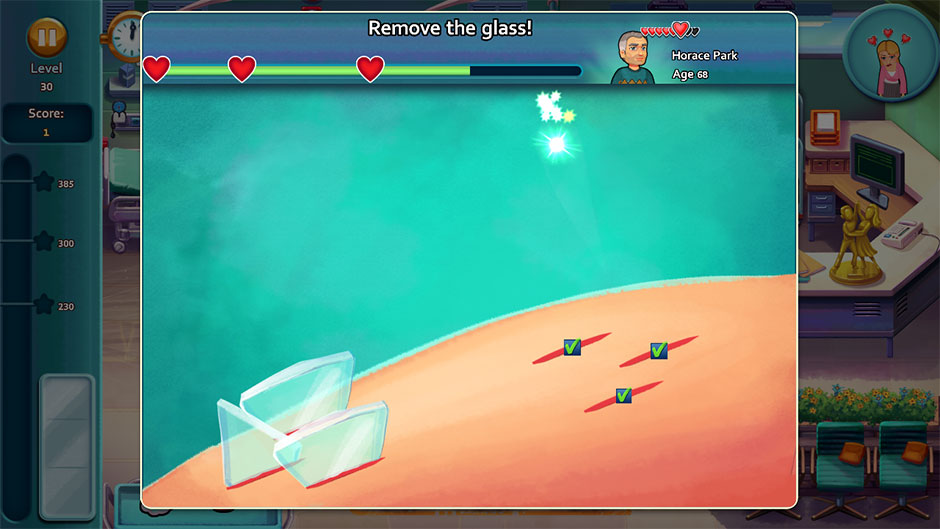
Heart’s Medicine – Time to Heal Minigame – Remove the Glass
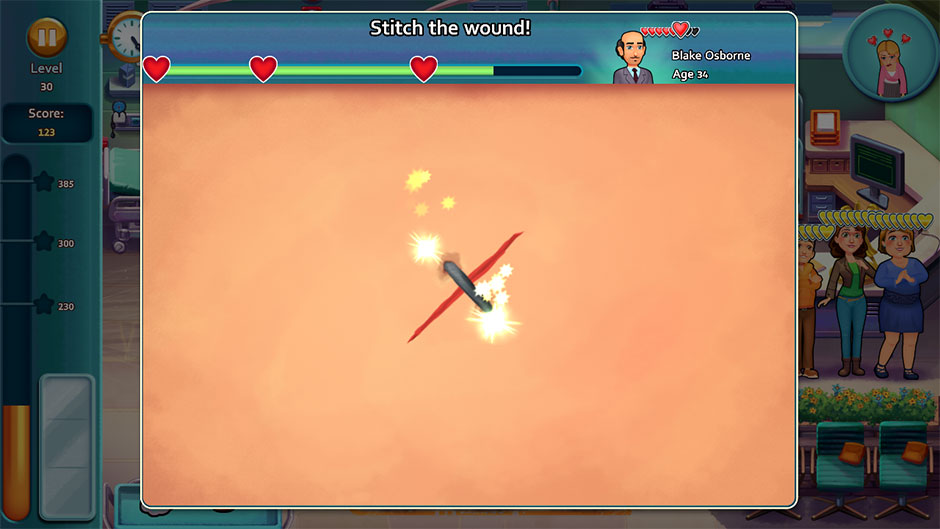
- Stitch the wound! – Click on the flashing white dot and hold as you move the stitch from the starting point to the next white dot. Repeat until the wound is stitched completely.
Heart’s Medicine – Time to Heal Minigame – Stitch the Wound
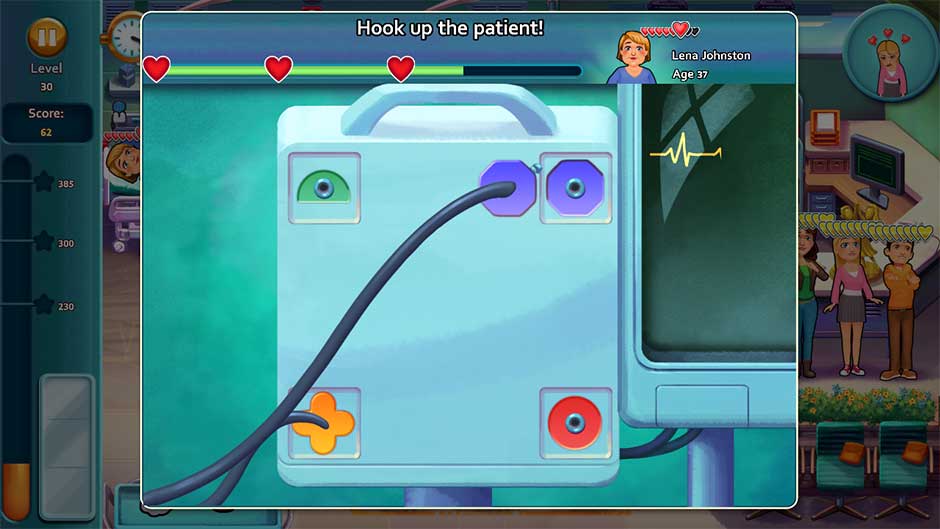
- Hook up the patient! – Click on a plug on the left and hold, moving it to the matching jack on the machine before releasing. Do this for each of the plugs until the patient is fully hooked up.
Heart’s Medicine – Time to Heal Minigame – Hook Up the Patient
Physiology/Physiotherapy
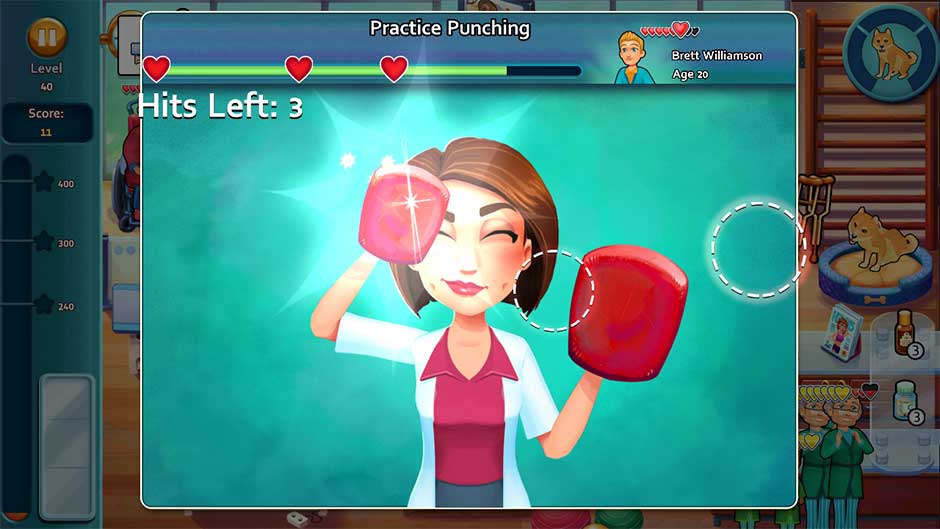
- Practice Punching! – Click within the dotted circles that appear to catch a patient’s punches. Do this until the number of hits left in the upper left corner is reduced to 0.
Heart’s Medicine – Time to Heal Minigame – Practice Punching
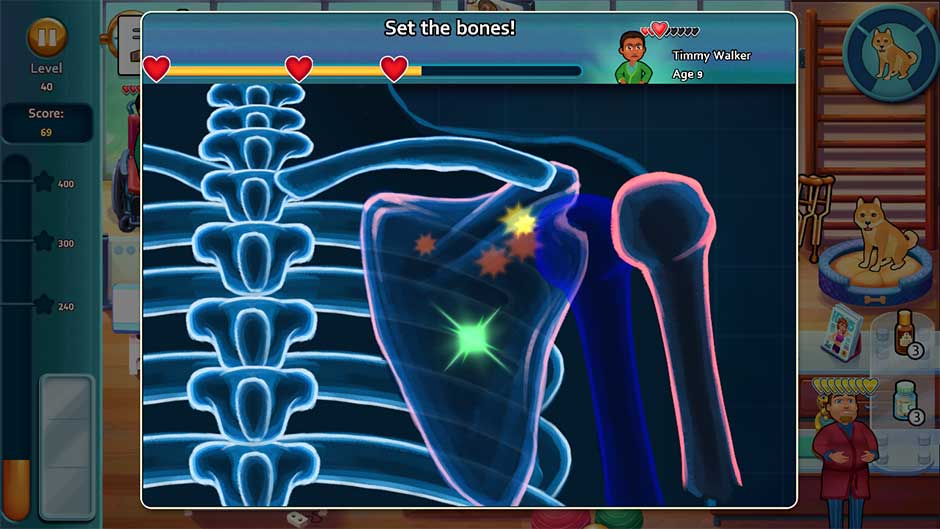
- Set the bones! – Click and hold the bones shown in red, moving them to the correct locations outlined in dark blue. Set all bones correctly to complete the minigame.
Heart’s Medicine – Time to Heal Minigame – Set the Bones
- Massage the patient! – Click and hold at the start of the line pattern, following along it in the direction of the arrows until you reach the end. If you accidentally let go, don’t worry – just click and hold again where the line cut off.
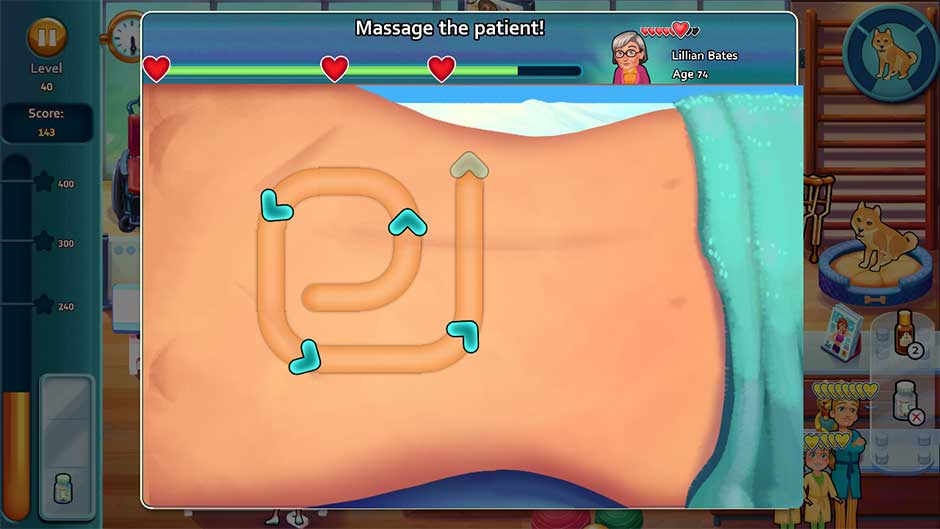
Heart’s Medicine – Time to Heal Minigame – Massage the Patient
Radiology
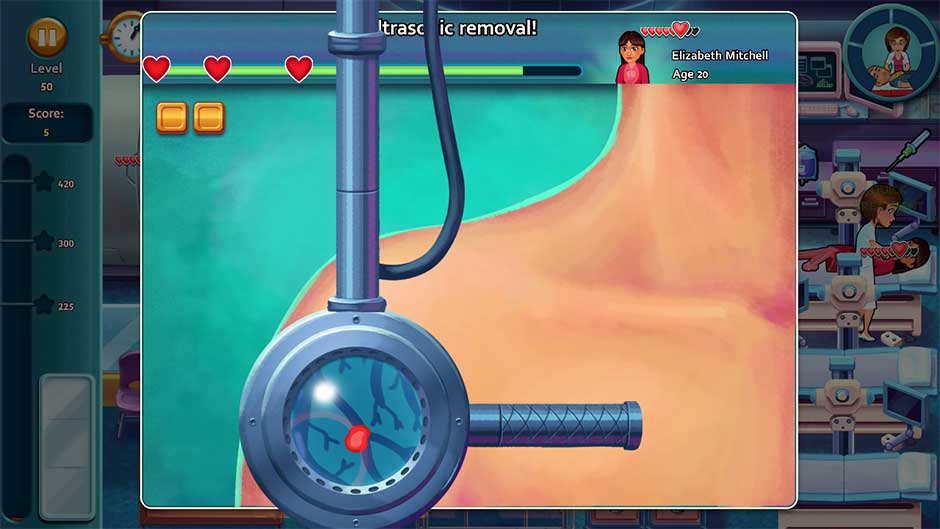
- Ultrasonic removal! – Click and hold the handle on the right side of the lens, moving it around the patient’s body to look for clots. When you find one, you will see a red dot and an alarm will go off. Hold the lens over the clot to remove it. Repeat this process until all the clots are removed.
Heart’s Medicine – Time to Heal Minigame – Ultrasonic Removal
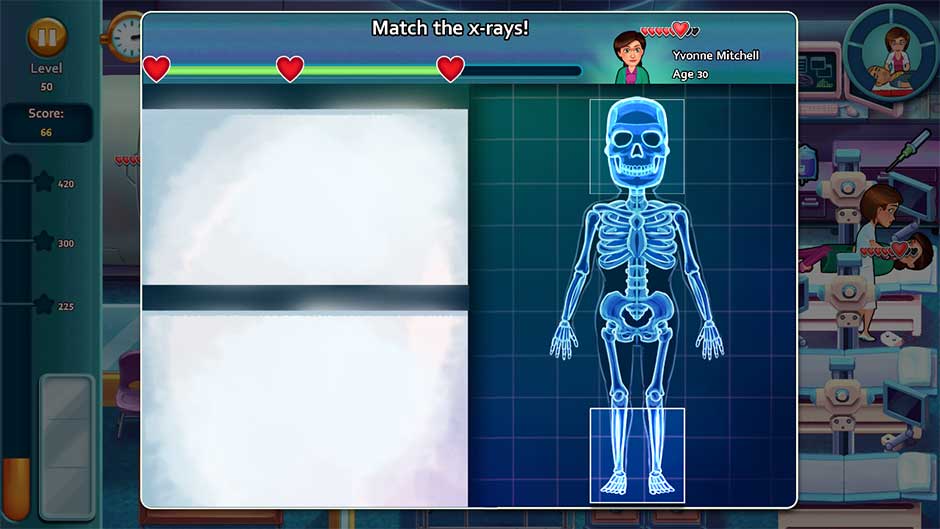
- Match the x-rays! – Click on the x-rays on the left, holding as you move it to the matching location on the body on the right. X-rays may rotate as you move them. Match all the x-rays correctly to complete the minigame.
Heart’s Medicine – Time to Heal Minigame – Match the X-rays
- Check the scan! – Click on the differences between the two x-rays shown. Look for pink spots and black spots. You can click on either x-ray. Once you’ve found all the differences, the minigame will be complete.

Heart’s Medicine – Time to Heal Minigame – Check the Scan
Surgery
- Suction, please! – Click and hold the nozzle, moving it to the puddles of green liquid to suck it up. Move the nozzle back and forth over the liquid to remove it faster. The minigame will end once all the liquid has been removed.

Heart’s Medicine – Time to Heal Minigame – Suction Please
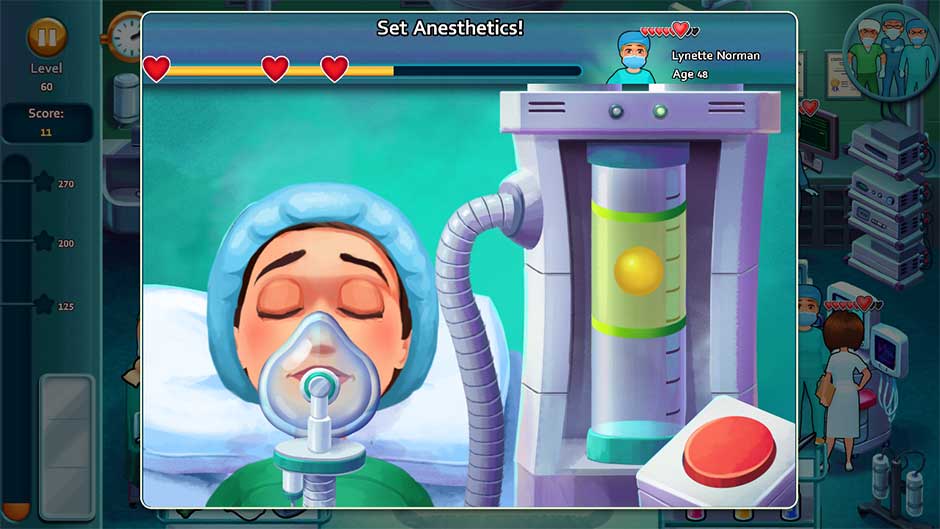
- Set Anesthetics! – Click on the red button on the lower right to pump air into the tube, causing the ball inside to rise. The goal is to pump anesthetic into the tube so that the ball hovers in the green zone. The best way to do this is to press the button quickly to send the ball near the top, then click as needed when the ball falls to keep it hovering in the green zone.
Heart’s Medicine – Time to Heal Minigame – Set Anesthetics
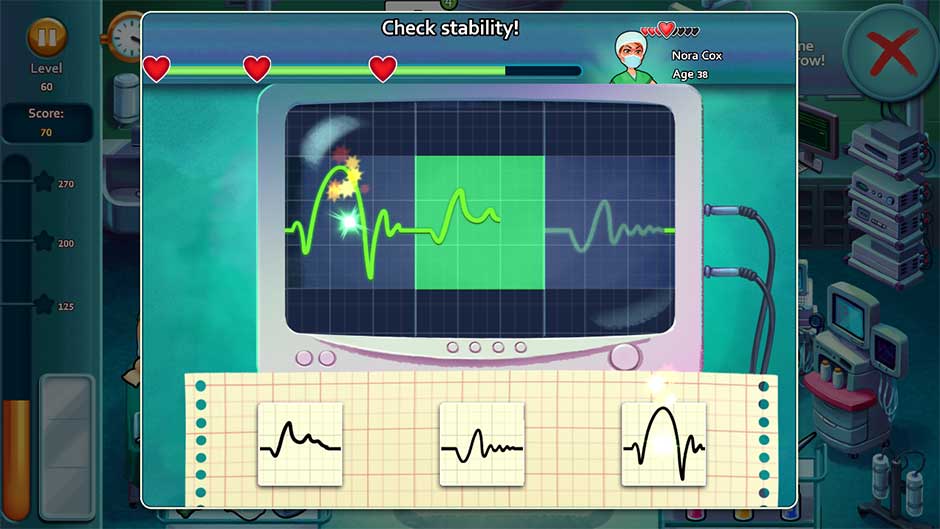
- Check stability! – Click on the section of heart rate on the paper at the bottom that matches the section highlighted in green on the monitor. Match each section correctly to complete the minigame.
Heart’s Medicine – Time to Heal Minigame – Check Stability
Trophies
Challenge yourself by unlocking the 18 hidden trophies in Heart’s Medicine – Time to Heal! Access the game’s trophies by clicking on the trophy icon in the upper right corner of the level select screen. Each trophy features an iconic character from the game. Below you will find a description of each of the trophies and how to unlock them.
| Trophy Name | Description | How to Unlock |
| The Patients | Complete all Challenges and Bonus Challenges! | Complete every level of the game. There are 90 total. |
| Oliver | Found all Olivers! | Find all Olivers in the game! There are 60 total. See the Oliver the Guinea Pig Locations section of our guide above. |
| Ruth | Complete your shift at the Pharmacy! | Complete Levels 11 – 20 |
| Quinn | Complete your shift at the O.R.! | Complete Levels 51 – 60 |
| Connor | Achieve 3 stars on each day! | Score 3 stars on each day for Levels 1 – 60. Does not include Bonus Challenges. Refer to the walkthrough above for more detailed information and strategies per day. |
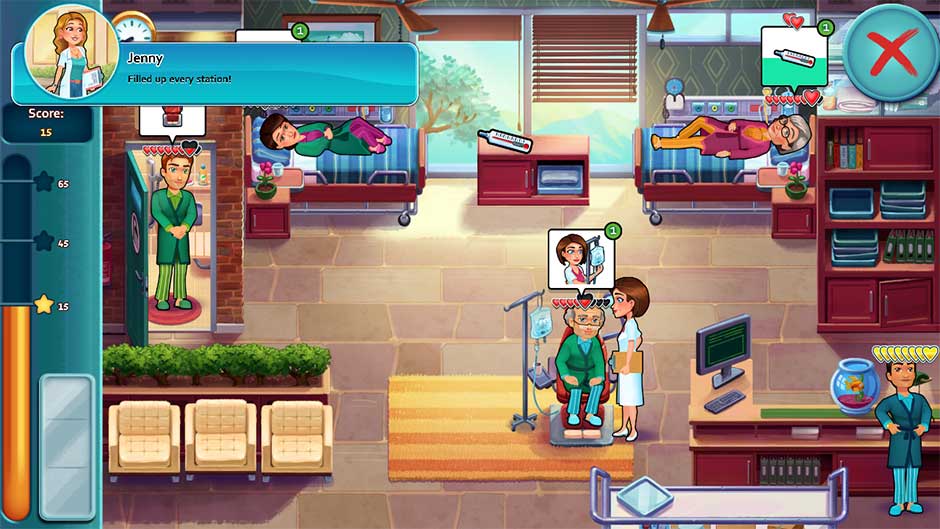
| Jenny | Fill up every station, and have at least one patient at the checkout desk! | The easiest place to unlock this achievement is Level 1. Help the first patient that walks in and send them to the register. Do not check them out yet! Send the second patient that arrives to the bed, but do not help them yet. The third patient that arrives will need to sit in the chair. Send them to the chair, but do not help them yet. The fourth patient that arrives will need to use the shower. Send them to the shower. During this time, the fifth patient will arrive. Send them to the bed to unlock the achievement! Tip! Only help the first patient that walks in. Let the others wait to be treated until the achievement unlocks. |
Heart’s Medicine – Time to Heal Jenny Trophy
| Earl | Have the item on your tray before a patient asks for it. | The best time to complete this achievement is during your shift in the E.R. Keep a scalpel and a pair of scissors on your tray most days to save time. The achievement will unlock as soon as you deliver the item to the patient in need. |
| John | Buy all items for the new wing. | There are 13 items total. Complete the Challenges for each level to earn diamonds. These diamonds can be used to purchase upgrades for the new wing by clicking on the diamond icon in the upper right corner of the level select screen. |
| Allison | Get all other trophies! | Unlock all other trophies. Refer to the descriptions in this column for tips and tricks! |
| Michael | Complete your shift at the Ward! | Complete Levels 1 – 10 |
| Chance | Complete your shift at the Physiotherapy Department! | Complete Levels 31 – 40 |
| Daniel | Buy all the upgrades! | There are 62 total upgrades which span all hospital departments. Earn coins by completing day shifts in each department. Playing through all 60 Challenge levels once isn’t enough – You will need to play through levels multiple times in order to amass the number of coins needed. Coins are universal and can be used in any department, so upgrade whatever you feel like! Tip! Radiology is one of the most difficult Challenge departments. Try saving coins to upgrade this department sooner rather than later. |
| Sophia | Complete your shift at the E.R.! | Complete Levels 21 – 30 |
| Robin | Complete your shift at the Radiology Department! | Complete Levels 41 – 50 |
| Princess | Cheer up 50 people with Princess! | Princess the Dog first appears in the Physiotherapy Department in Level 33 and is available through Level 40. Click on Princess, followed by a station in the department to have her move to that station and cheer up patients. Do this a total of 50 times to unlock the achievement! |
| Joe | Score 750 Quick Bonuses! | Score Quick Bonuses by quickly moving patients to their stations, and/or fulfilling their needs before the color drains from their bubbles. It’s possible to unlock this achievement in a single playthrough of Levels 1 – 60. |
| Lisa | Walk 40 miles! | Move Allison until she’s walked a total of 40 miles! Work on playing through Levels 1 – 60 normally: this achievement will usually unlock during the course of your playthrough. If not, continue playing through the Bonus Challenges, moving Allison back and forth between two points or stations to rack up extra steps. |
| Mason | Score 3 or more hearts in all minigames! | Complete each minigame available with a score of 3 or more hearts. Refer to the Minigames section of our guide above for more detailed explanations on how to complete these quickly! |
Video Walkthrough
Welcome to the video walkthrough portion of our guide! For those of you who are more visual, our video walkthrough features a 100% playthrough – all completed challenges and 3-stars, and all Oliver the guinea pig locations. Watch as GameHouse plays through each and every level, providing you with visual tips and tricks along the way. Click “Play” below to get started!
Congratulations! You’ve completed the Heart’s Medicine – Time to Heal Walkthrough! Be sure to visit our blog for more great tips and tricks!
The Heart’s Medicine – Time to Heal Walkthrough is meant as a guide and does not contain cheats, hacks, or serials.

