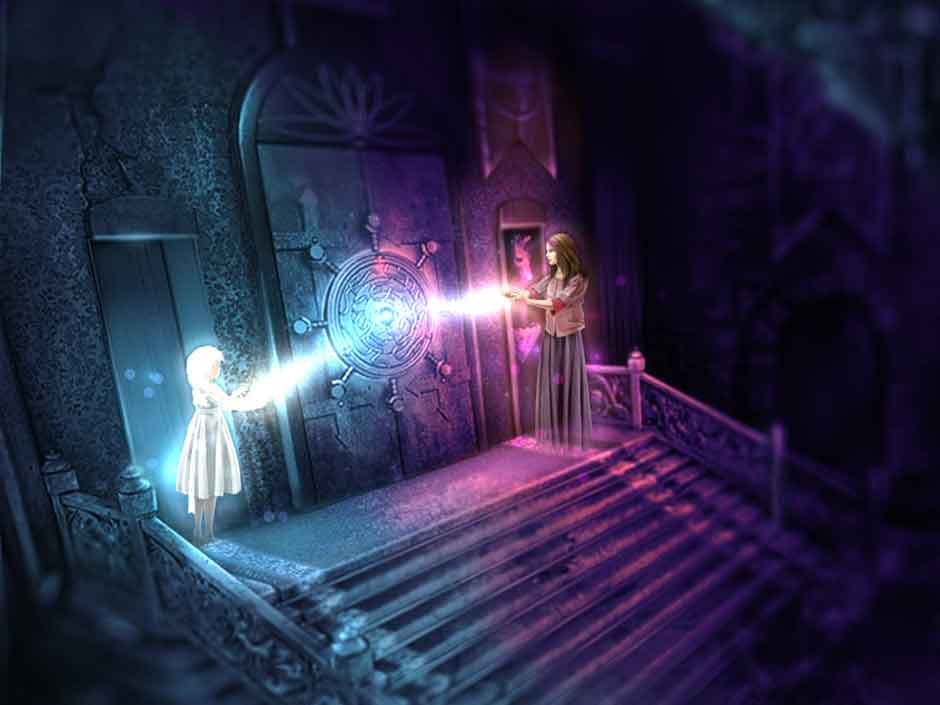
Welcome to the Timeless – The Lost Castle walkthrough. Timeless – The Lost Castle by Bootlat Games is a hidden object adventure game. Feeling called by fate, your encounter with a mysteriously red-robed stranger sets you off on a journey of magic and mystery. Use this walkthrough for hints, tips and tricks as you work your way through the game.
Contents
Tips and Tricks
Opening Screen: Here you’ll find your main options.
- Play: Starts a new game or continues where you last left off.
- Options: Go here to change your visual and sound settings, as well as the difficulty of the game. There are three modes: Casual, Normal, and Expert.
- Credits: Use this to see the hardworking people who worked on the game.
- The “Welcome” Tab: Use this to create a player profile for your game to be saved. Your progress is saved automatically.
The Hint Button: Feeling stuck in-game? Use this to get a hint for what to do next. It can be used an unlimited amount of uses, but takes time to recharge.
The Combination Box: Some items you collect can be used together to create a new one. Place both objects in this box to combine them.
- TIP: In causal mode, and sometimes in normal mode, they will have a green “+” by them.
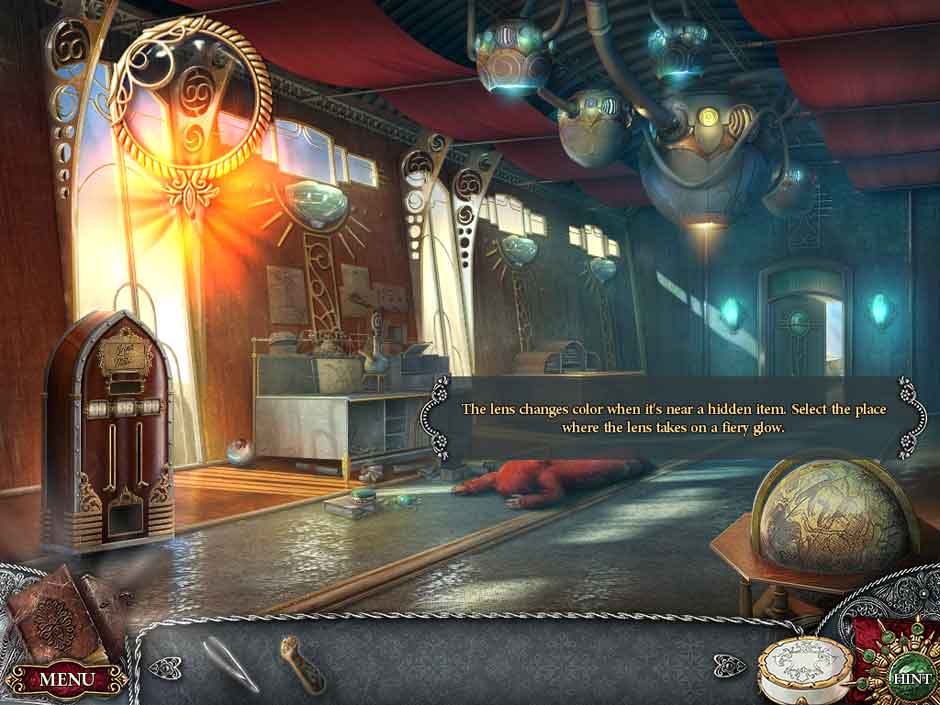
Lens of Seeking: During your game you will obtain an object called the Lens of Seeking, which will be kept in the lower right of your screen above your Hint button. Click it and move it across the screen to find hidden objects you wouldn’t see otherwise! Click the screen with the lens when it goes from blue to bright orange to locate hidden objects.
Timeless – The Lost Castle Walkthrough
Chapter One: Navigating the Airship
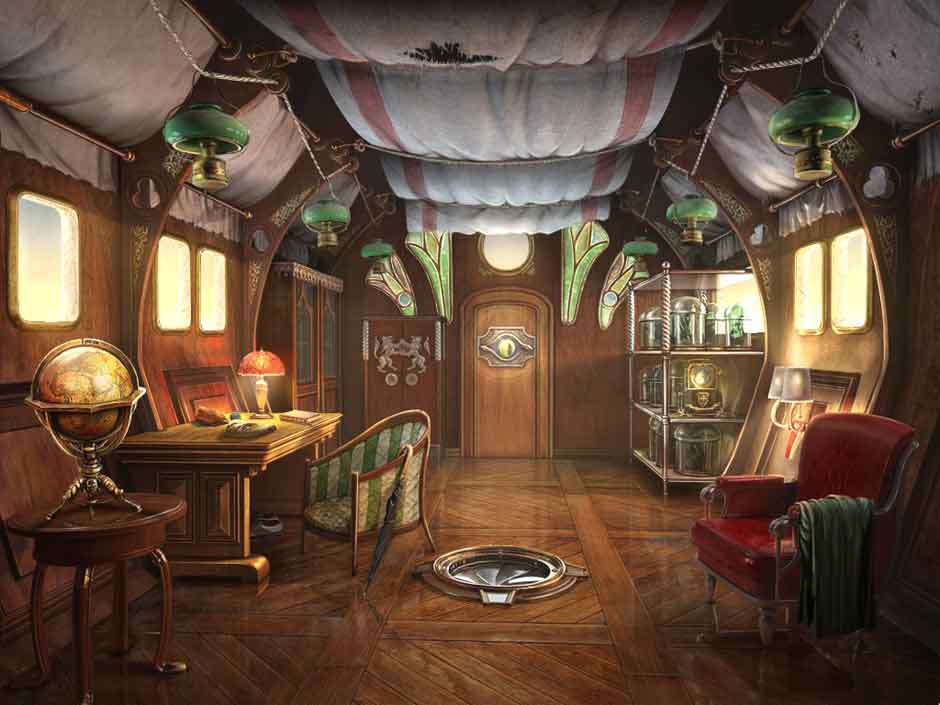
Timeless The Lost Castle Chapter 1
Airship Cabin
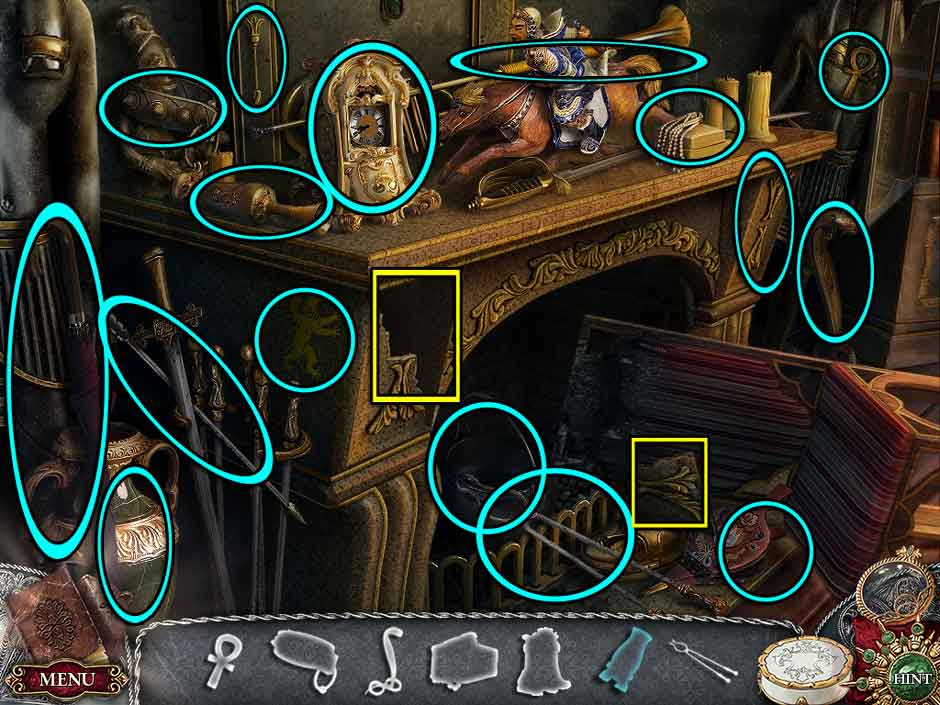
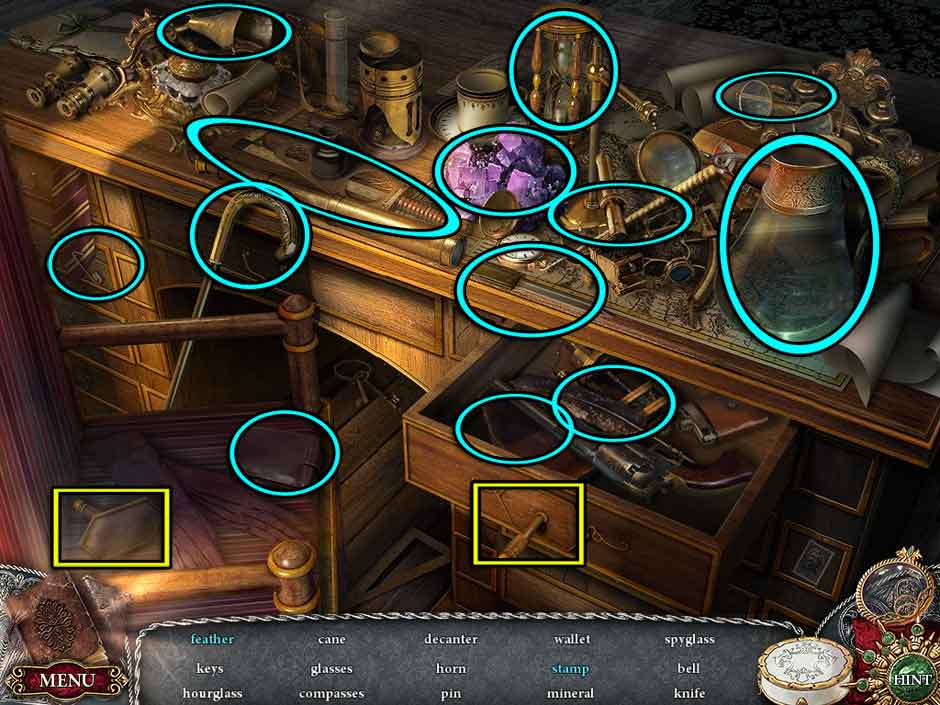
- After talking to the mysterious girl, you find yourself no longer on a plane, but on an airship! Take a look at the desk on the left and read the note there. Collect the Six-Pointed Star and the Left Mask Half from the desk. On the floor is a hatch. Take a closer look there to find an Eight-Pointed Star.
- At the back of the room is a cabinet. Take a look at it and use the Six-Pointed Star and Eight-Pointed Star in the holes under the lions. The doors will open for you and reveal a Hidden Object Scene. Collect everything on the list and inside the box you will find half a mask. Once you are done you will collect the Right Mask Half and Pliers.
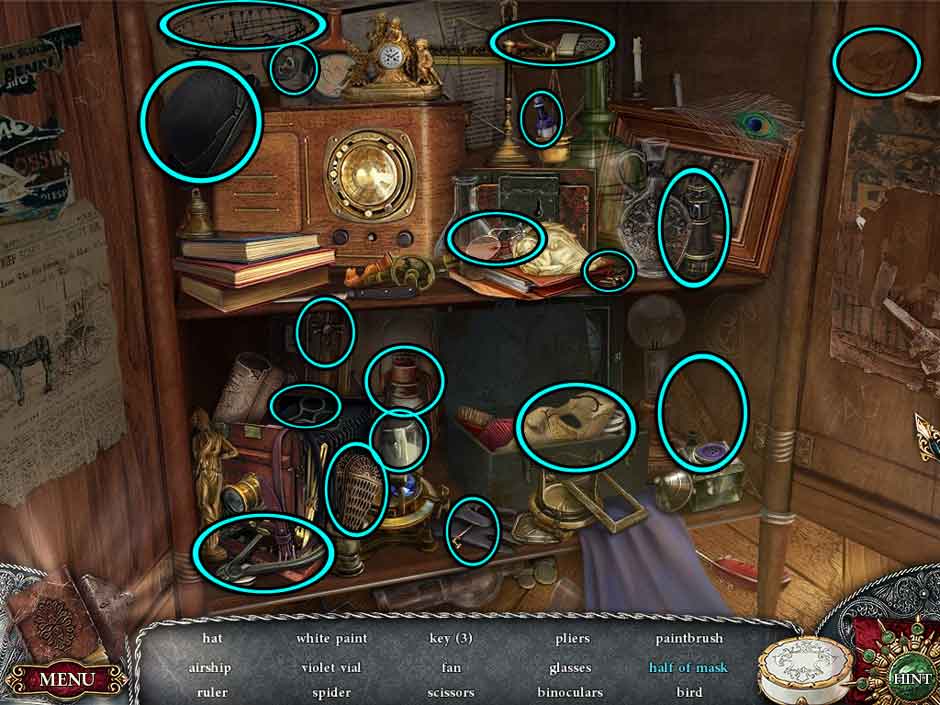
Timeless The Lost Castle 00 Hidden Object Scene
- This is the first time the combination box becomes useful. Place the Right Mask Half and Left Mask Half into the box to create the Mask.
- Now take a look at the creepy eye in the door in the back. Use the Mask on the eye and the door will open. Go through to the outside.
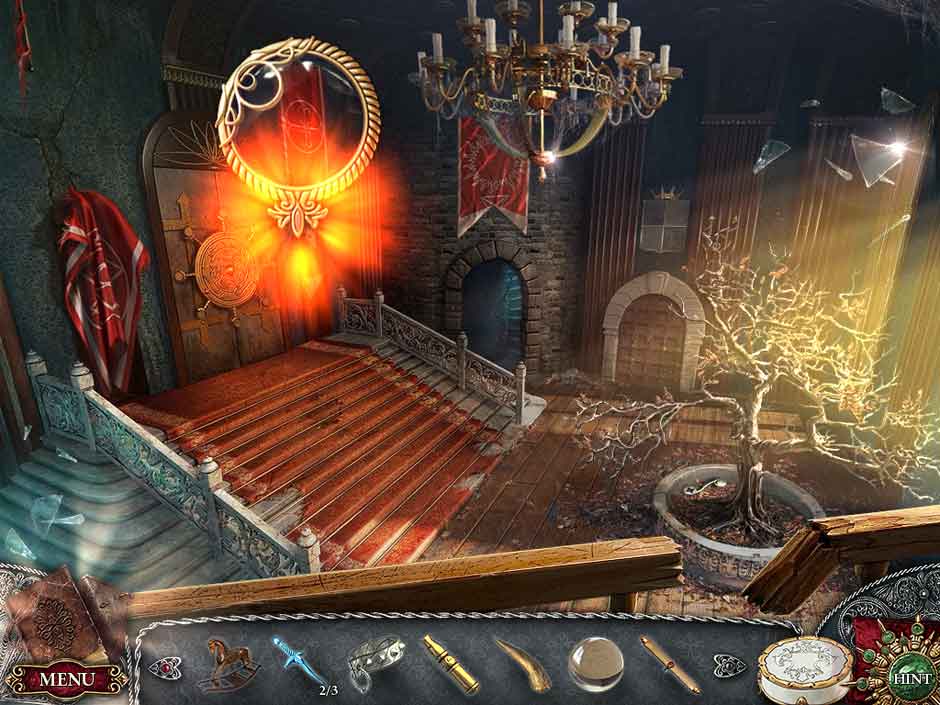
Airship Deck
- You can collect the Triangle 1/3 from the statue. Towards the back there is a trunk to look at, with a Spiral 1/3 in front of it to pick up. Go forward.
Airship Balcony
- Focus in on the stand towards the back. Lift the cover and then collect the Handle and the Screwdriver from inside before heading back to the cabin.
- Take another look at the floor hatch. You can use the Handle here to open the shutter, revealing a Spiral 2/3 to collect. Move back to the room and take a look at the clock on the shelves. The Screwdriver is used to remove the screws from the crest plate. Underneath you’ll find the Triangle 2/3. Collect the Diamond from beside the clock before going back outside.
Airship Deck
- Take a look the plane hanging below. On the top left of the cockpit you’ll find a Diamond 2/9 to collect. In the lower right you’ll find a locked compartment. Open it using the code you found earlier. TIP: It is in your notes! Now read the note and collect the Triangle 3/3, Insulating Tape, and Tweezers before leaving.
- Go forward.
Airship Balcony
- Take a look at the door and use the three Triangles you collected to start a puzzle. Rotate the pieces until all the lines are connected and the door will open.
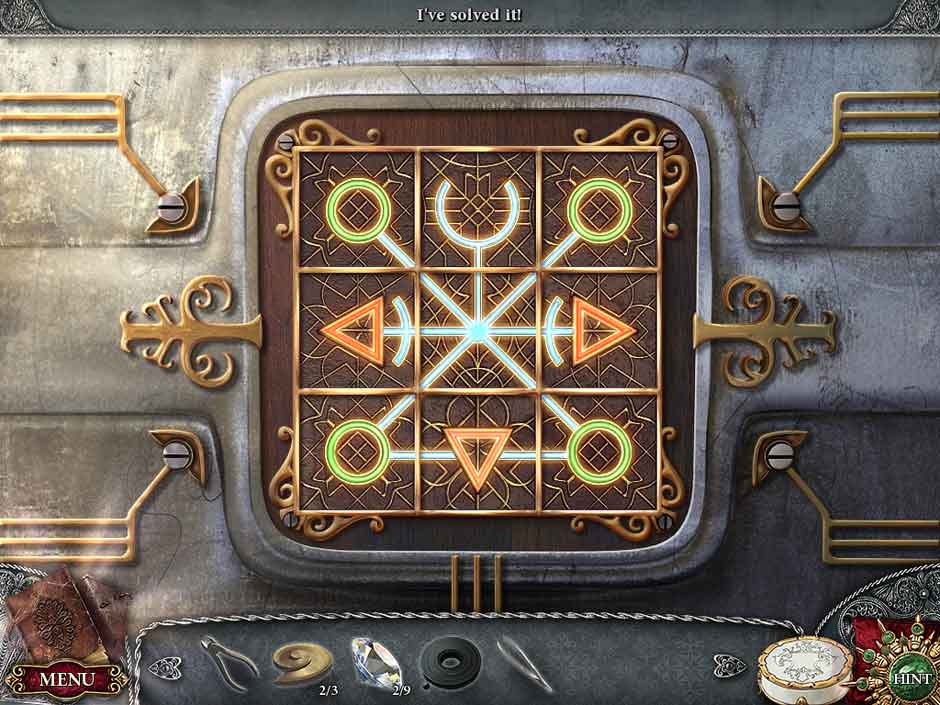
Timeless The Lost Castle 01 Slide Puzzle
- Head through the door.
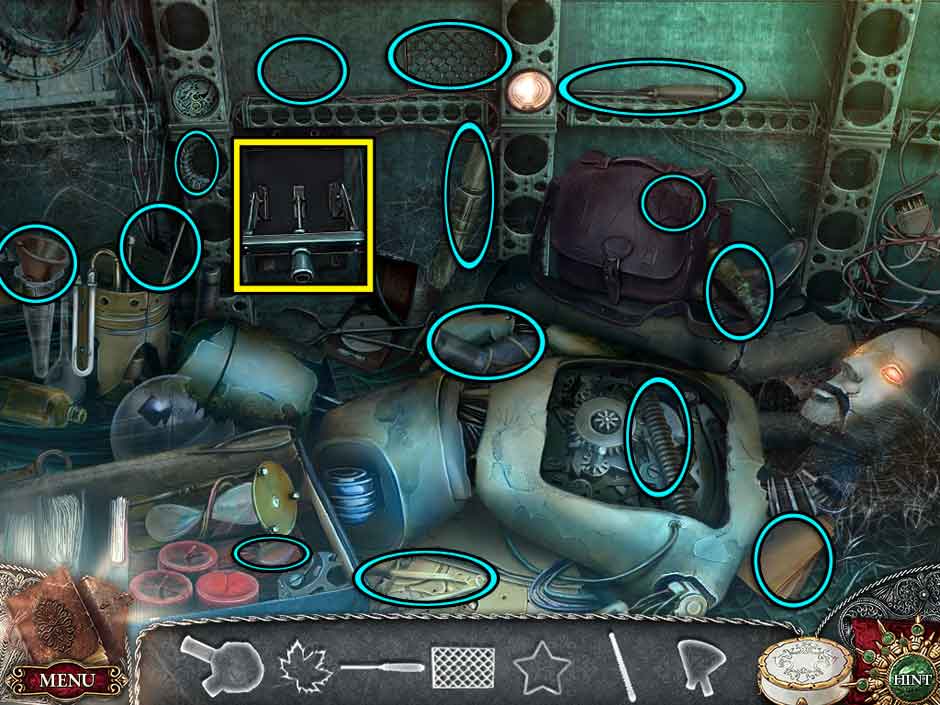
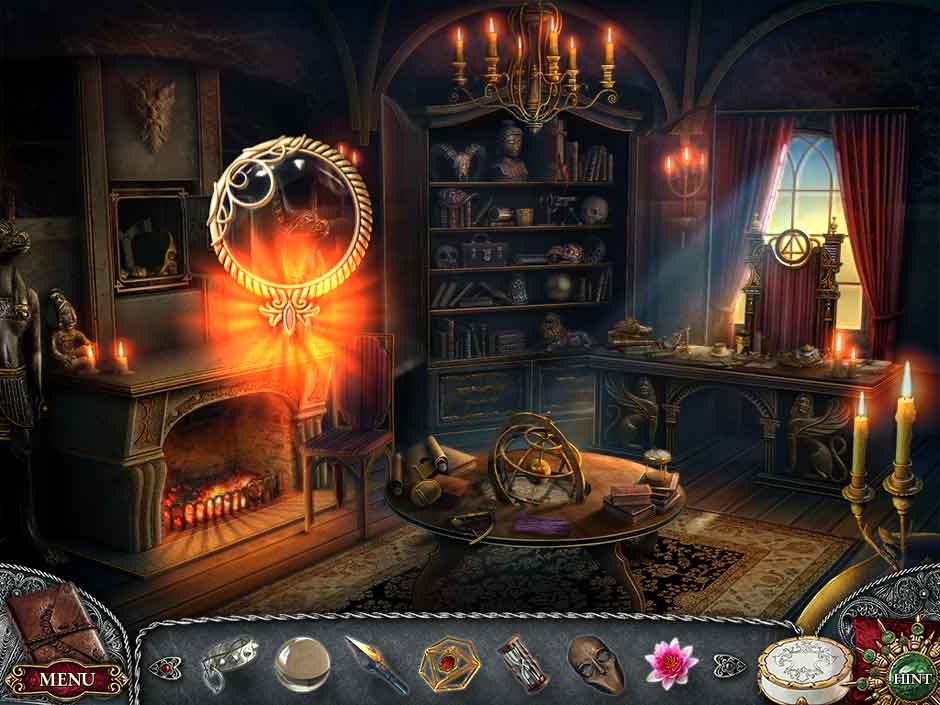
Lab
- Things keep getting stranger! Take a look at the body on the floor. There is a Hook under the man’s right arm. Collect the Diamond 3/9 from beside his left hand. Pull back and take a look at the machine on the left after removing the cloth. There is a Spiral 3/3 to collect from the bottom.
- Read the note sitting here.
- Now look at the workbench in the center. On the right there are three shelf doors to open. Collect the Pattern Fragment, Matches, and the Diamond 4/9 from there.
- Head out of the lab.
Airship Deck
- Take a look at the door in the back. You can use the Spirals and the Pattern Fragment When the chain is revealed, pull it and the door will open. Go inside.
Mannequin Room
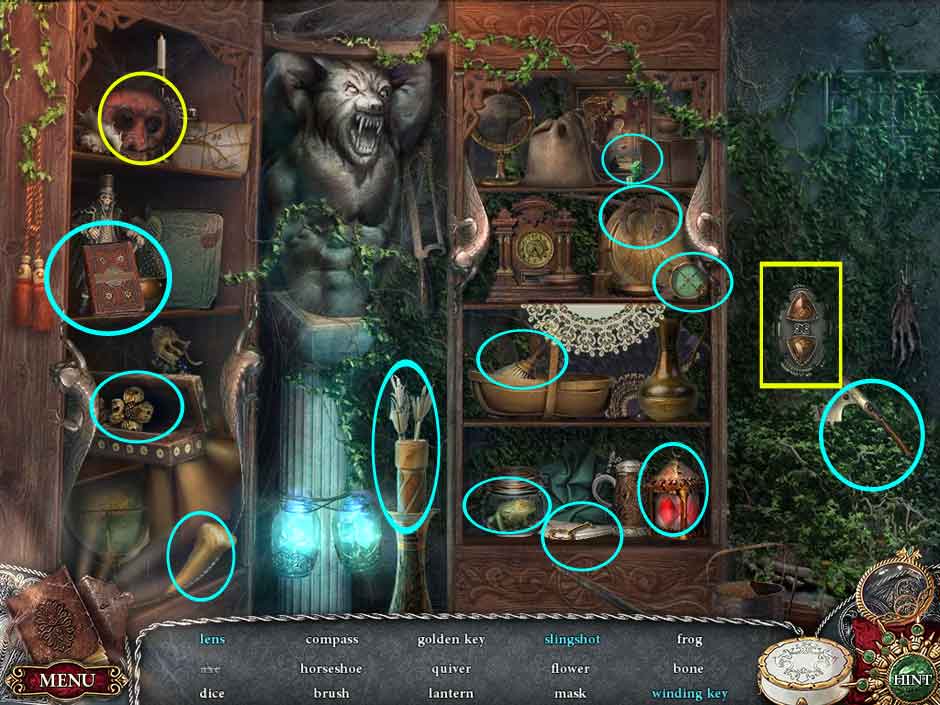
- There is a Hidden Object Scene in the pile of stuff on the floor to the left. Use the lever switch towards the center left to pop the chest of the mannequin open. Collect all the objects in the scene to receive the Metal Paw, Bulb Flask, and Worm Screw. Leave the room and go back to the Airship Balcony.
Timeless The Lost Castle 02 Hidden Object Scene 01
Airship Balcony
- Look to the engine on the left. You’ll find a closed compartment. You can switch the latches here to open it and collect the Coil of Wire, which you can place into your combination box along with the Pliers. This will give you Lock Picks.
- Go back to the stand and use the Worm Screw in the slot. Turning the crank will make the bridge extend out. Go back into the lab.
Lab
- There is a door at the back of the lab. Look closely at it and use the Lock Picks on the locks. This triggers a puzzle.
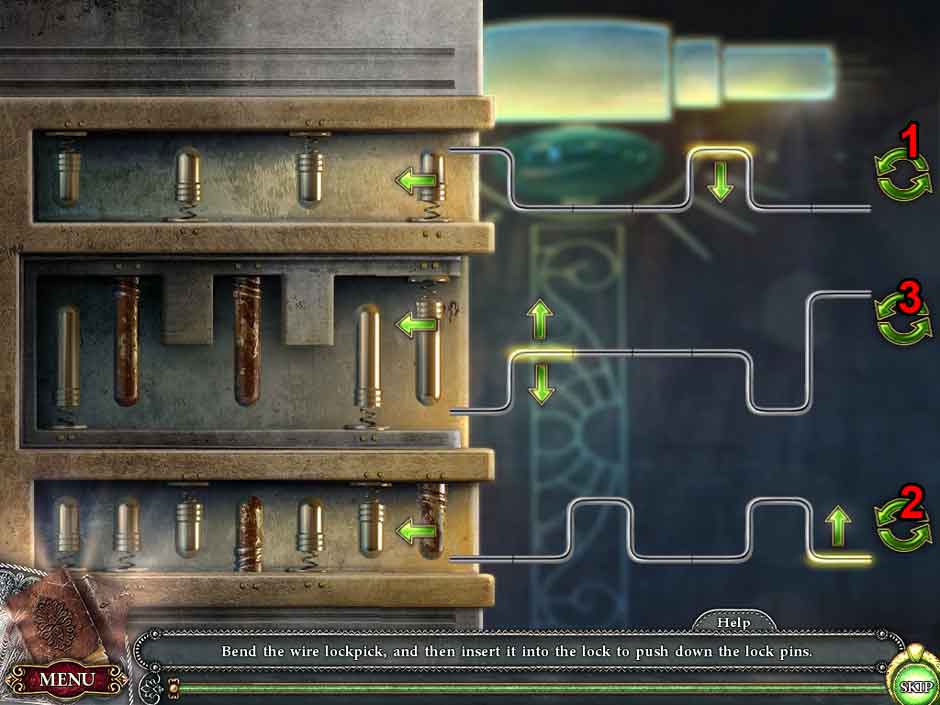
Timeless The Lost Castle 03 Lock Puzzle
- First lock: Bend the wire as shown. Then insert the wire, spin, insert, insert, spin, insert, insert, spin, insert, insert, spin.
- Second lock: Bend the wire as shown. Then insert the wire, spin, spin, insert, spin, insert, insert, spin, insert, spin, insert, insert, spin.
- Third lock: Bend the wire as shown. Then insert, spin, insert, spin, insert, insert, spin, spin, insert, insert, spin, insert, spin. This will open the door. Head through it.
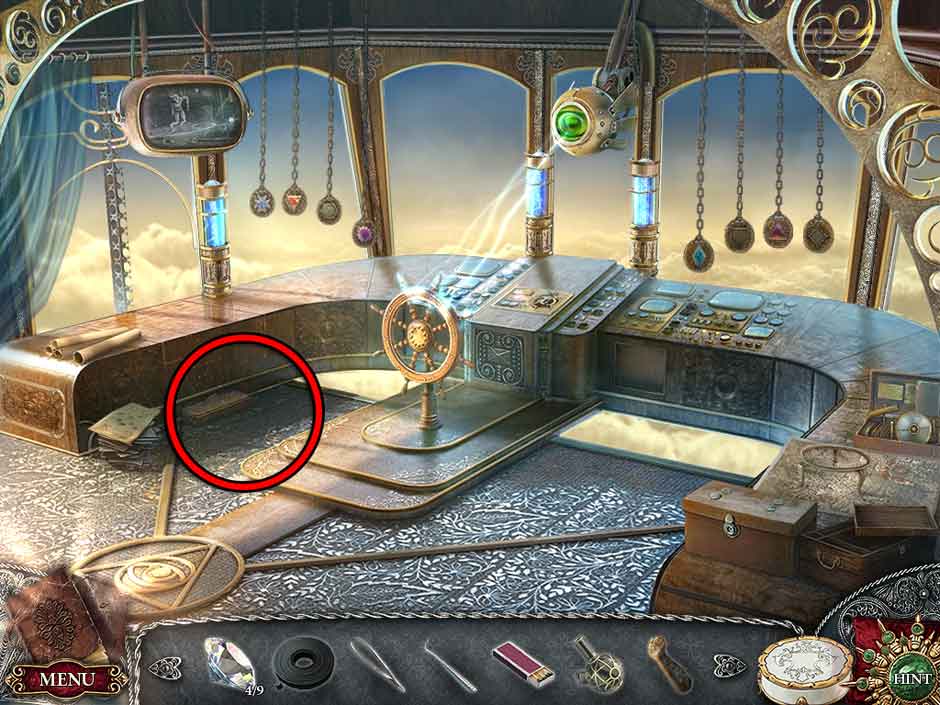
Bridge
- On the right there is a table with navigation tools. Look at it closely and collect the Clock Holding Pin and Diamond 5/9. Return to the Airship Cabin.
Airship Cabin
- Go back and look at the cabinet for another Hidden Object Scene. Find all the objects in the list to collect the Glass Flask and the Valve.
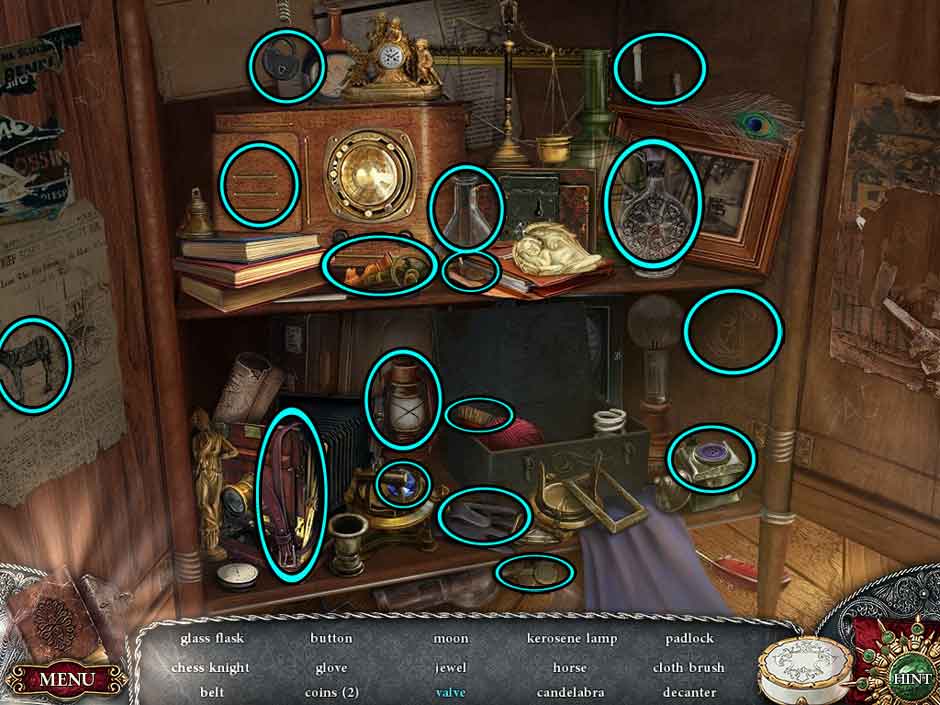
Timeless The Lost Castle 04 Hidden Object Scene 02
- Look at the clock again. First, use the key on the top right of the clock four times. This will bring the clock parts together. Use the Clock Holding Pin on these parts to find a secret drawer. Take the Lens from it. Now go back to the bridge.
Bridge
- Go back to the table with the navigation tools. By using the Lens on the round frame, you create a magnifying glass. Move it over the castle drawn on the map.
Airship Balcony
- Take another look inside the engine compartment. Using the Valve, you can turn off the steam and collect the Rubber Gloves.
Mannequin Room
- On the right there is a sparking, broken cable. Take a look at it and collect the Diamond 6/9 and the Funnel. Now place the Insulating Tape down and use the Rubber Gloves to fix the wire.
- Look at the control case at the center back of the room. Use the rotary dial to enter the code you found on the bridge: 3-2-5-8. The mannequin’s head will pop open!
- From inside the head, collect the Hexagon and open the little box with a lightning bolt on it to find and collect the Diamond 7/9.
- Now you can use the Hook to pluck the three strings marked with red dots. Collect the Drawing Scrap and Dummy Hand that fall off.
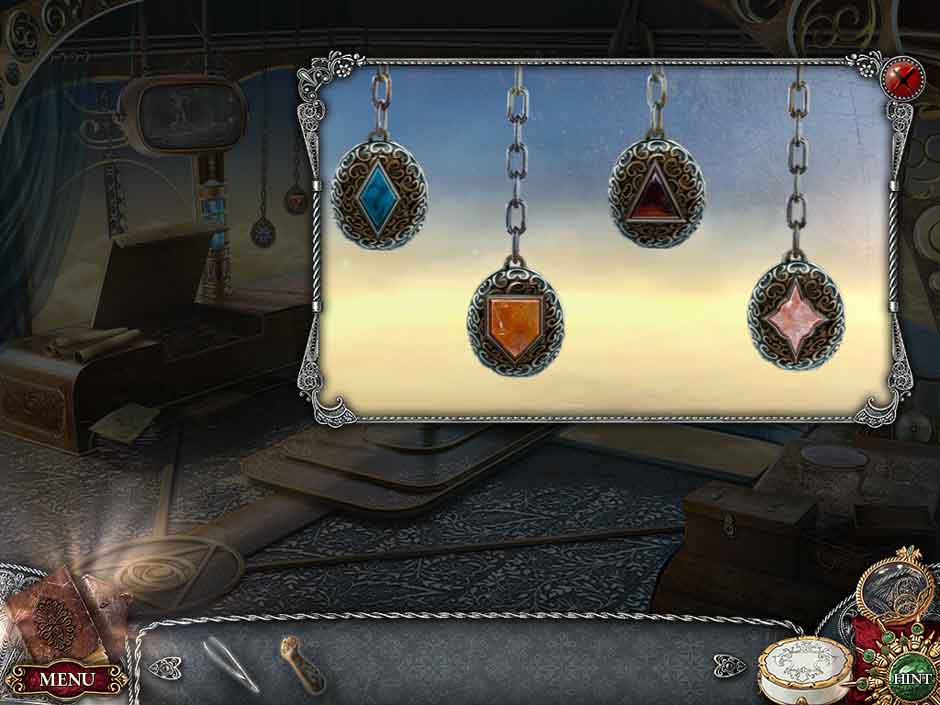
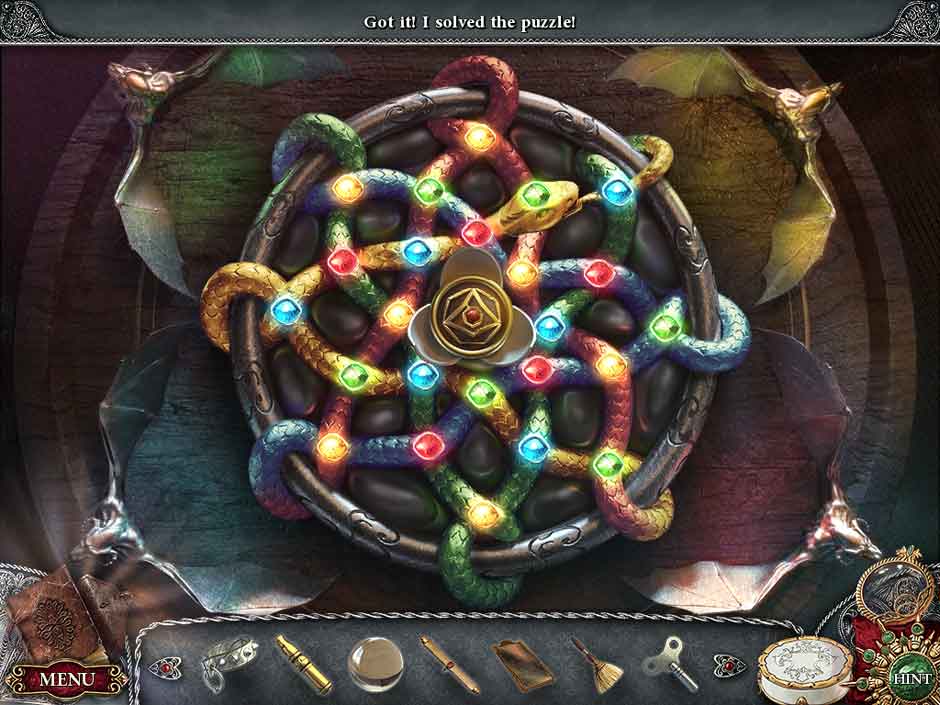
Bridge
- There is a scrap of paper on the left side of the room with instructions for this puzzle. Look at the chains hanging on the left. You can place the Hexagon into the empty slot. Then pull the chains to arrange them as so:
Timeless The Lost Castle 05 Chain Puzzle
- The storage box will open. Collect the Runic Glove and open the little box to collect the Diamond 8/9. You can combine the Dummy Hand with the Runic Glove to create A Hand in Glove.
Airship Deck
- Look at the chest in the right upper corner. Use the Hand In Glove on the empty slot. The trunk lid will pop open, letting you collect the Fire Crystal, Ring Tube and Diamond 9/9.
Lab
- Look at the Grind-O-Matic on the left side of the room. Use the Glass Flask on the bottom opening and set the first lever to “5”, then the second lever to “8”. The Diamonds can now be used in the opened slot. This will fill the flask and you will be able to collect Diamond Dust.
- Look to the table in the back. Add your Drawing Scrap to the pile of papers and piece them together to look like this:
Timeless The Lost Castle 06 Drawing Puzzle
- Collect the Magic Lens Diagram and move back the middle worktable.
- First, set the Magic Lens Diagram on the stand, then set the Bulb Flask onto the burner stand. Add the Funnel to the flask, then pour the Diamond Dust The Ring Tube is added to the top and the Fire Crystal should be placed underneath. Then use the Matches to light the crystal and start the process.
- Collect the now finished Lens of Seeking.
- Use the Lens of Seeking to find the hidden object in the upper left corner of the screen. The Lens will glow bright orange when you are over the correct object. Click and the Pentagon will appear so you can collect it.
Timeless The Lost Castle 07 Lens 01
Bridge
- First, find the next hidden item with the Lens of Seeking. Collect the Star.
Timeless The Lost Castle 08 Lens 02
- Look at the chains hanging on the right. Insert the Pentagon and the Star into the correct slots and then move them to match these positions:
Timeless The Lost Castle 09 Chain Puzzle 02
- A panel will open. Looking at it will trigger a puzzle. Power needs to be transported around in the tubes. Starting from the red power point on the right, use the switches to transport the power to the next correct station. When you reach a node with a “+” symbol on it, press it to continue moving the power. The solution is as shown:

Timeless The Lost Castle 10 Power Grid Puzzle
- BOOM! No more eye! Take a closer look at it and use the Tweezers to collect the Bulb.
- Now take a look at the shutdown panel that is blinking in the center of the ship’s controls to start a puzzle. Follow these movements to shift the pieces and allow the red piece to move to the center. (1) Now shift the pieces again to move the red piece to the bottom and finish the puzzle. Collect the Ignition Key that appears. Now it’s time to get out of here! (2)
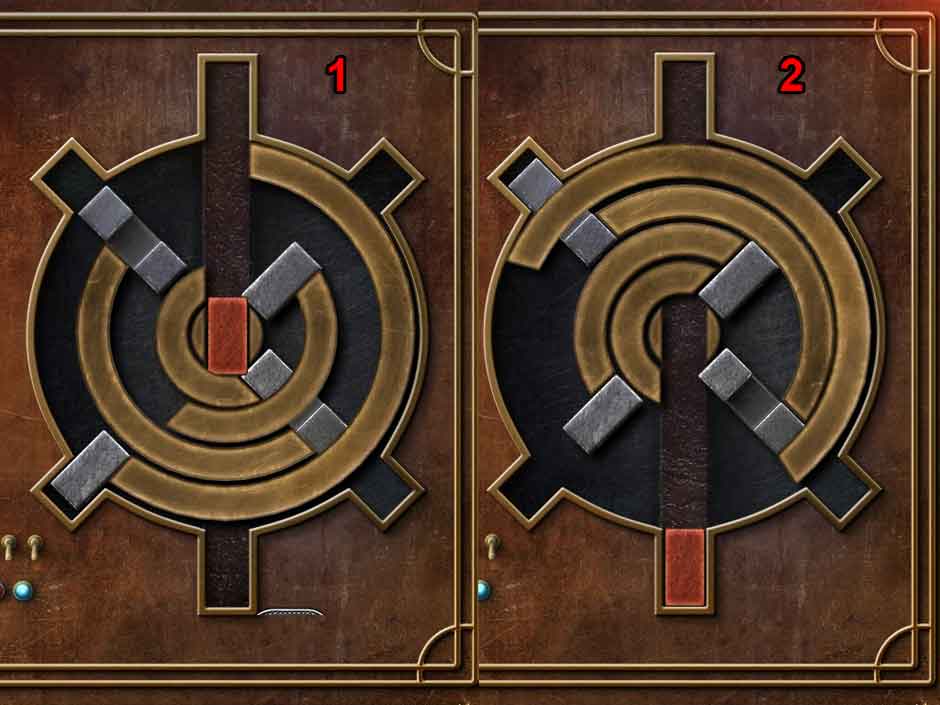
Timeless The Lost Castle 11 Shutdown Puzzle
Airship Deck
- Add the Bulb to the statue on the left, then the Metal Paw. Use the paw to start fueling the plane.
Plane Cockpit
- Using the instructions found in your notebook, set up the plane for launch. Then pull the lever and you’re free!
Chapter Two: Getting Out of the Cold
Timeless The Lost Castle Chapter 2
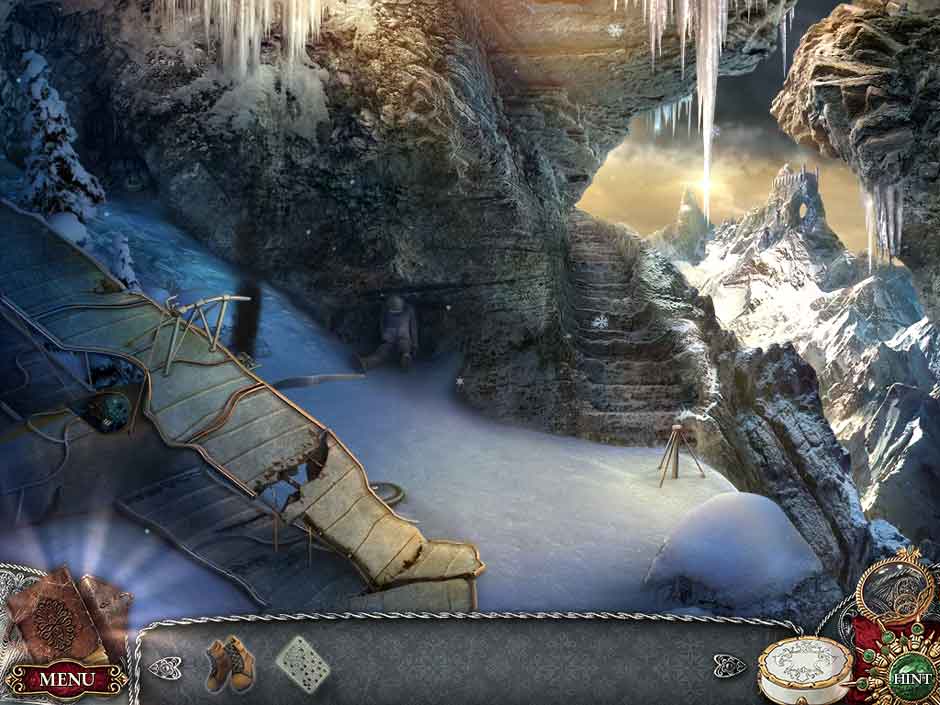
Crash Site
- Examine the cockpit of your crashed plane. Inside you’ll find a pair of Boots and inside the leather book, a Strange Plate.
- Now examine the person sitting in the snow. Collect the Iron Wedge 1/5, Rune 1/6, and Ice Pick. Now go up the stairs ahead of you.
Frozen Waterfall
- It’s the little girl again! She’s lost all hope. Use your Lens of Seeking here to collect the Rune 2/6.
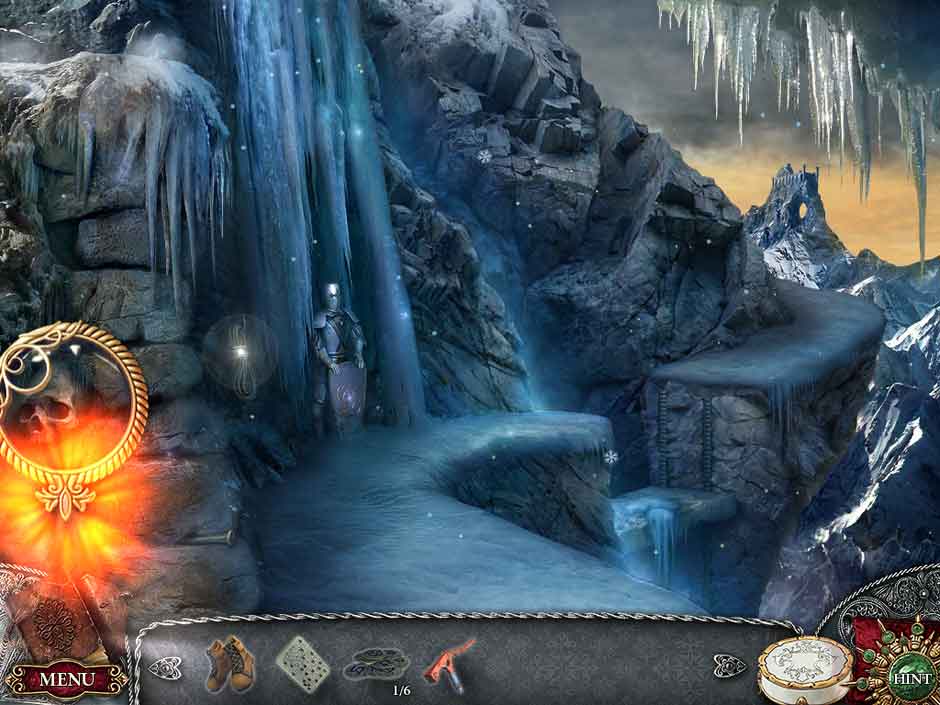
Timeless The Lost Castle 12 Lens 03
- Collect the rope and head back one screen.
Crash Site
- Use your Rope on the post here. Now you can climb down.
Frozen Ledge
- Here you will want to collect the Iron Wedge 2/5 from the cart and the Empty Pot from the cooking pit. There is a collection of boxes on the right. Look there and open the chest on the left to find the Spikes and Crowbar. Take the Iron Wedge 3/5 from the top of the right chest.
- Combine the Spikes with your Boots. This will give you Spiked Boots.
- Climb back up the rope.
Crash Site
- Use the Empty Pot to collect snow towards the center of the screen. This will give you A Pot of Snow. Take a look inside the cockpit again. You can use your Crowbar to open up the case and collect the Empty Flask and Lighter.
Frozen Ledge
- Look at the pile of supplies again. Use the Empty Flask on the barrel to collect a Flask of Kerosene. Now climb back up to the Crash Site and go to the right.
Cave
- It’s so dark! On your left is a lantern. Fill it from the Flask of Kerosene and light it with the Lighter. This will start a Hidden Object Scene. Collect all the listed objects to obtain the Axe and the Chain. Tip: Find the keys and use them on the chest in the lower right to open it.
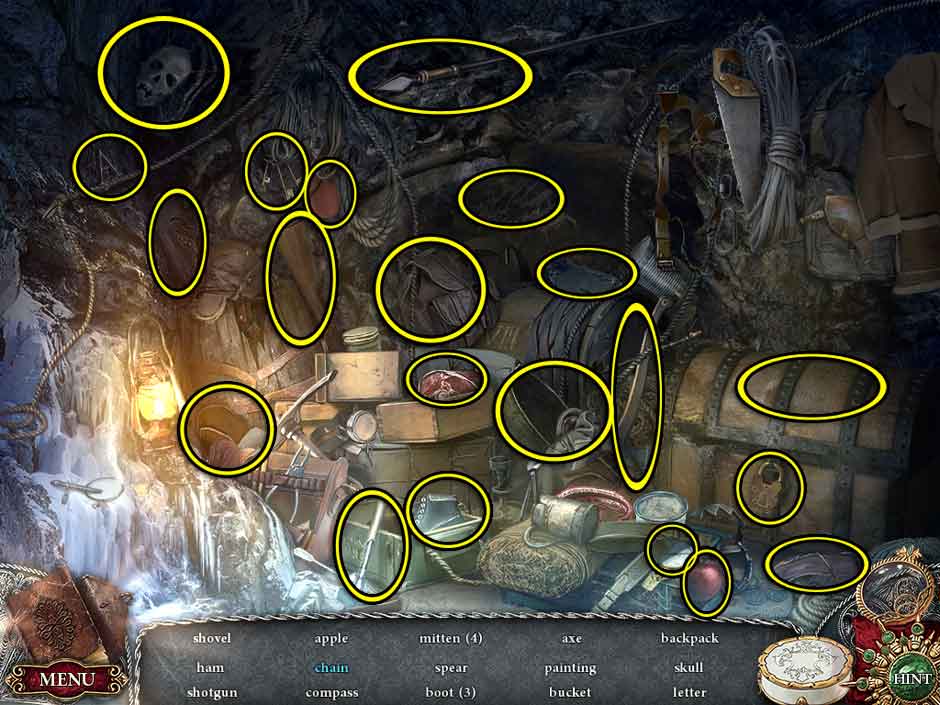
Timeless The Lost Castle 13 Hidden Object Scene 03
Frozen Ledge
- Go back to the cooking pit. Use the Axe to chop the wood, then place that in the fire pit before lighting it with the Lighter. You can melt the Pot of Snow here, turning it into the Pot of Boiling Water.
- Take this to the cart in the back and pour the Pot of Boiling Water over the ice holding the lever down. Now you can use the lever and climb back onto the crashed Airship.
Inside the Airship
- Use your Lens of Seeking on the left side of the screen to find the Rune 3/6. Now collect the Piece of Glass from the broken workbench.
Timeless The Lost Castle 14 Lens 04
Frozen Ledge
- Go back to the cooking pit. Pour the jar of tar onto the fire to create smoke, then hold the Piece of Glass in the smoke to create Smoked Glass.
Inside the Airship
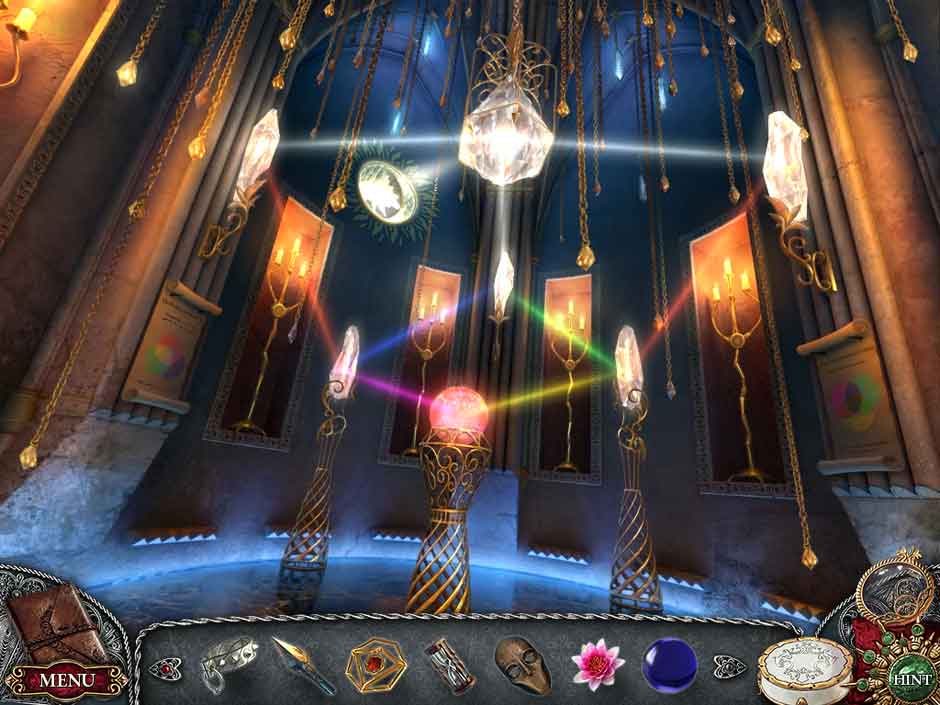
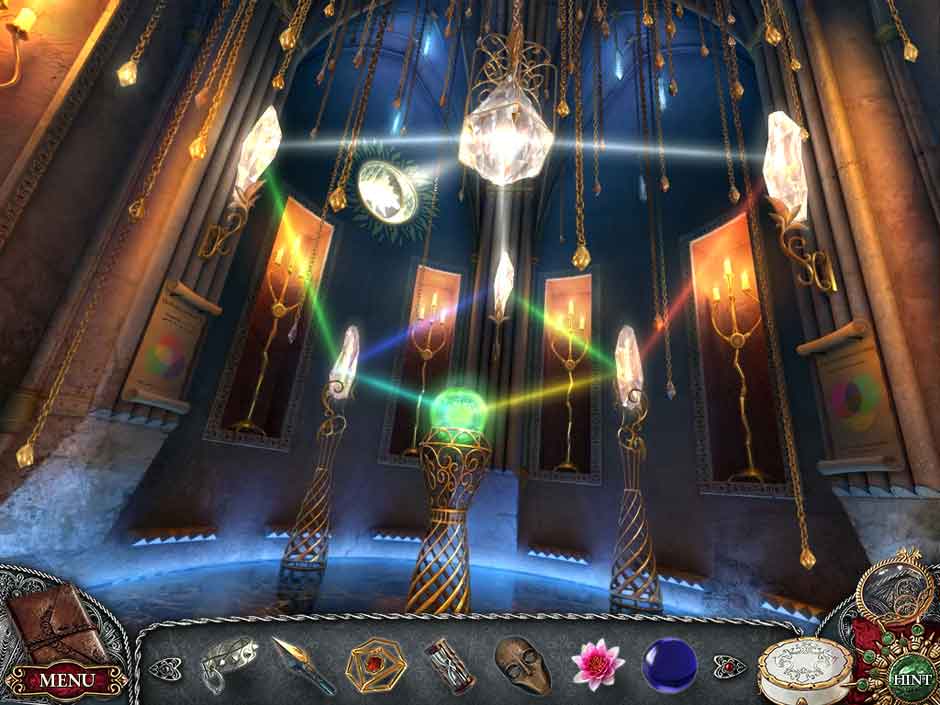
- Look at the power box attached to the wall. By using the Smoked Glass, you can look at the bright lights and start a puzzle. You have to move the little crystals to reflect the beams of energy away from the big crystal in the center. This is the solution:
Timeless The Lost Castle 15 Airship Light Puzzle
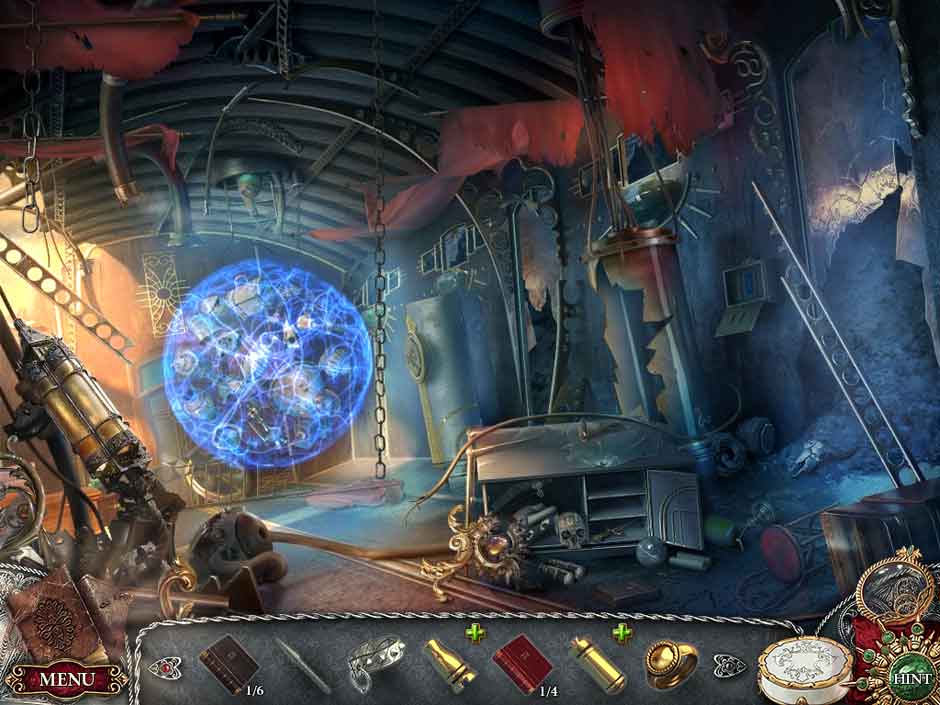
- Now you can look at the big, blue circle and start a Hidden Object Screen. Simply move the objects around in the orb to uncover the hidden object outlined in the bottom of the screen. When you are done, the Rune 4/6, Hook, and Scoop will be collected. Combine the Hook with the Chain to create a Hook On Chain.
Frozen Ledge
- On the far left there is a small gully to look into. Use your new Hook On Chain to collect the Bunch of Keys 3/6. You can use these keys in the storage area. Lay them on the ground before placing them into the drawers. The first key goes to the bottom left drawer, the second key goes to the top left drawer, and the third key goes to the middle right drawer.
- Collect the Iron Wedge 4/5, Iron Wedge 5/5, and the Rune 5/6 from the drawers.
Frozen Waterfall
- After heading back up the crash site and up the stairs, you’ll find yourself at the Frozen Waterfall again. On the left there are cracks in the stone. Starting at the bottom, place the five Iron Wedges into the rock and then use the Ice Pick to hammer them all in.
- Climb up the wedges. There’s an ice sheet here you can break with your Ice Pick. Now you can collect the Rune 6/6.
- Go to the knight and look at his shield. Place the Runes on it to start a puzzle. Shuffle the runes around until they line up like this:
Timeless The Lost Castle 16 Rune Slide Puzzle
- Oh my! An avalanche! Don’t let it stop you. Start forward across the bridge.
Castle Wall
- What is going on here? Take a look at the floating stones and collect the Sun Symbol and the Bunch of Keys 1/3. Now look at the ballista and collect the Fire Opal.
Crash Site
- Take a look at the frozen person again. Use the Fire Opal in the ring on his finger to collect his journal.
Frozen Ledge
- Go back to where you used the key before. Set the Key you collected on the snow and then open the lower right side drawer. Collect the Corkscrew.
Castle Wall
- Take a look at the barrel of gunpowder sitting here. Using the Corkscrew, pull the cork out. Then use the Scoop to make a line of powder before lighting it with the Lighter. Now stand back and… KA-BOOM!
- Take a look at the cleared stones to start a puzzle. This is a math based puzzle where you have to make pairs that equal 10, 11, 12, 13, 14, 15, and 16. This is a possible answer:
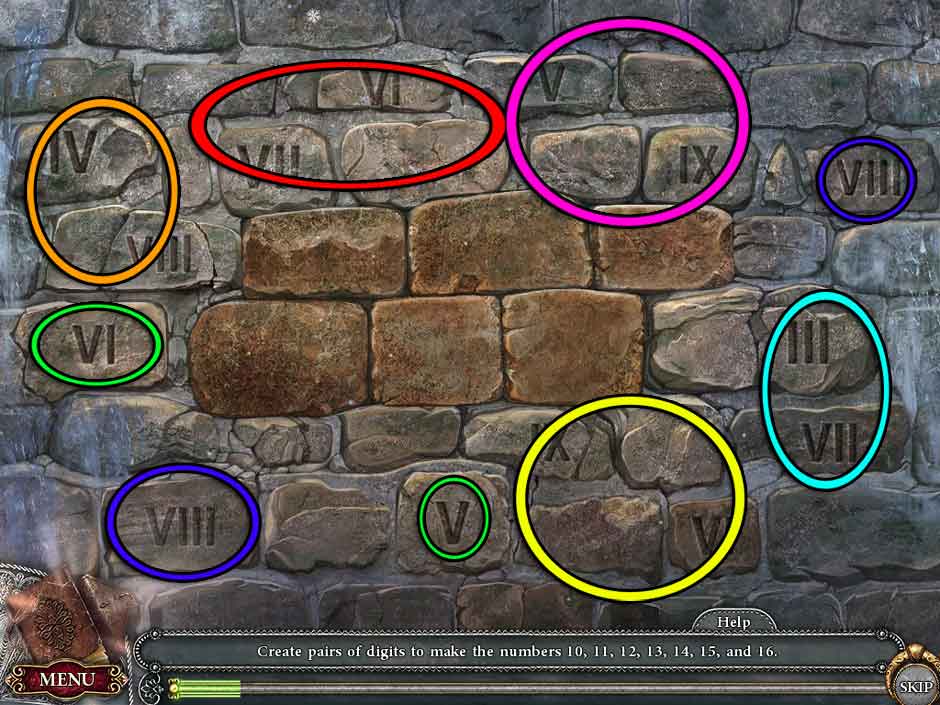
Timeless The Lost Castle 17 Stones Lock
- Slip the Strange Plate into the blue slot to open a door. Go inside the castle!
Chapter Three: Exploring the Castle
Timeless The Lost Castle Chapter 3
Entrance
- Take a look in the shelf on the left of the room. Collect the Hexagon 1/7, then press these two switches to make the skull pop open. Collect the Orb.
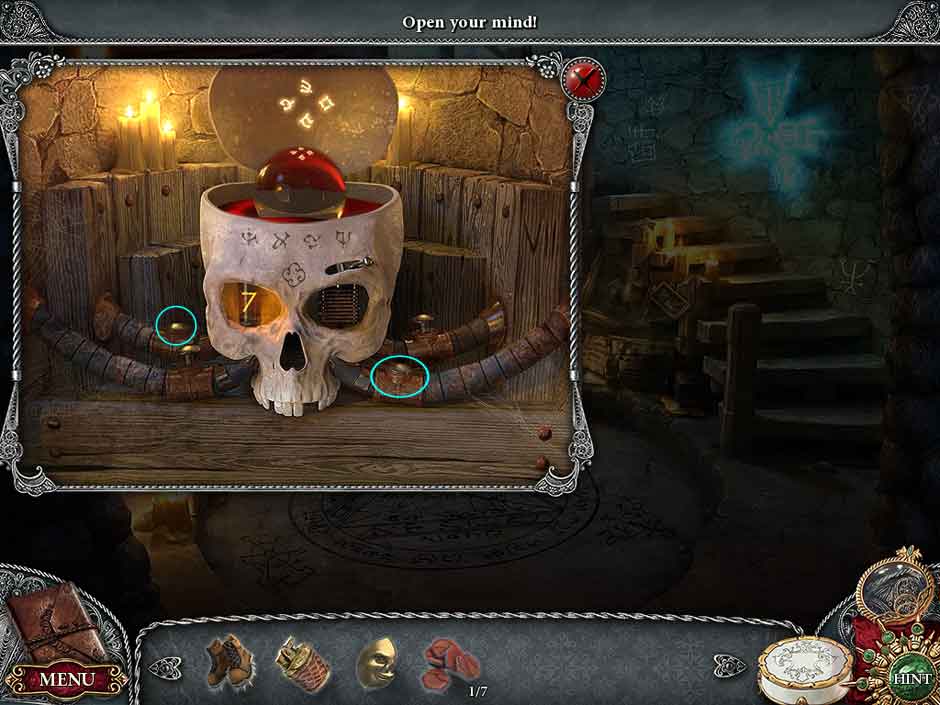
Timeless The Lost Castle 18 Skull
- Collect the Bunch of Keys 1/2 from the floor before looking at the glowing writing on the right wall. Collect the Hexagon 2/7 from the wall. Walk up the stairs to the next area.
Tower Roof
- Use your Lens of Seeking to find another hidden object: Hexagon 3/7. While you’re here you should also collect the Stand for Musket and the Tube.
Timeless The Lost Castle 19 Lens 05
Entrance
- Give the chain a pull and collect the Wooden Handle 1/4 before trying to go through the door. Your “Friend” shows up and causes a little havoc. Take a look at the gate wheel he destroyed and collect the Wooden Handle 2/4. Now look at the mess under the staircase to start a Hidden Object Scene. Make sure you open the various containers to find objects. You’ll collect the Hexagon 4/7 and Wooden Handle 3/4.
Timeless The Lost Castle 20 Hidden Object Scene 05
Cave
- Return to the Cave and play another Hidden Object Scene. You’ll need to collect the Pick Axe from the pile and use it on the rocks to free the crossbow and the elephant for collection. You’ll collect the Pliers and the Wooden Wheel when you’re done.
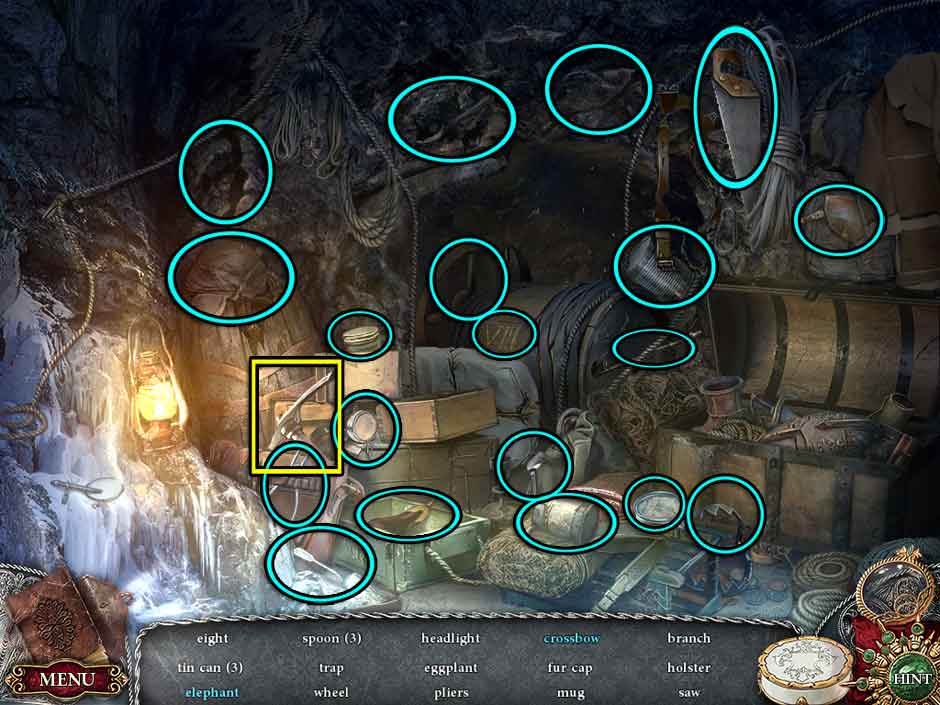
Timeless The Lost Castle 21 Hidden Object Scene 06
Frozen Ledge
- Back to the storage piles again! Lay the Key down and use it on the middle left drawer this time so you can collect the Wooden Handle 4/4.
Entrance
- Back in the castle, you’ll want to combine the Wooden Wheel with all four Wooden Handles. This will make a Wheel with Handles for you. Use this on the wheel post and turn it four times. The gate will rise. Make sure you use the Stand for Musket on the wheel to keep the gate from falling back down. Go through the gate.
Courtyard
- Towards the center of the screen you’ll find another eye guarding something. Take a look at it, noting the name written on the wall and making sure to click the eye itself. Then go through the door on the right.
Great Hall
- Look at the door in the middle of the room and collect the Metal Plate from the statue’s hands. Then look at the banner above the door to note the symbols. Look at the leftmost door and collect the Hammer. There is also a Bunch of Keys 1/1. This means another trip to…
Frozen Ledge
- Look at the storage again and use the Key on the snow before opening up the top right drawer. Collect the Moon Symbol from inside.
Tower Roof
- Combine both the Moon Symbol with the Sun Symbol. The resulting Celestial Symbol goes into the box on the upper left. Collect the Hexagon 5/7, the Small Hook, a Cross-Shaped Key and an Acid
- Now take a better look at the cannon. Attach the Metal Plate to the side and then look at the lever. Move the lever in the order of the numbers on the plate: II, I, III, IV, VI, V, VII
- Ah ha! A Cannonball! Click on it and roll it towards the trapdoor.
Entrance
- Pull the chain. The cannonball will come crashing down from the ceiling and create a passage for you in the floor. Go inside.
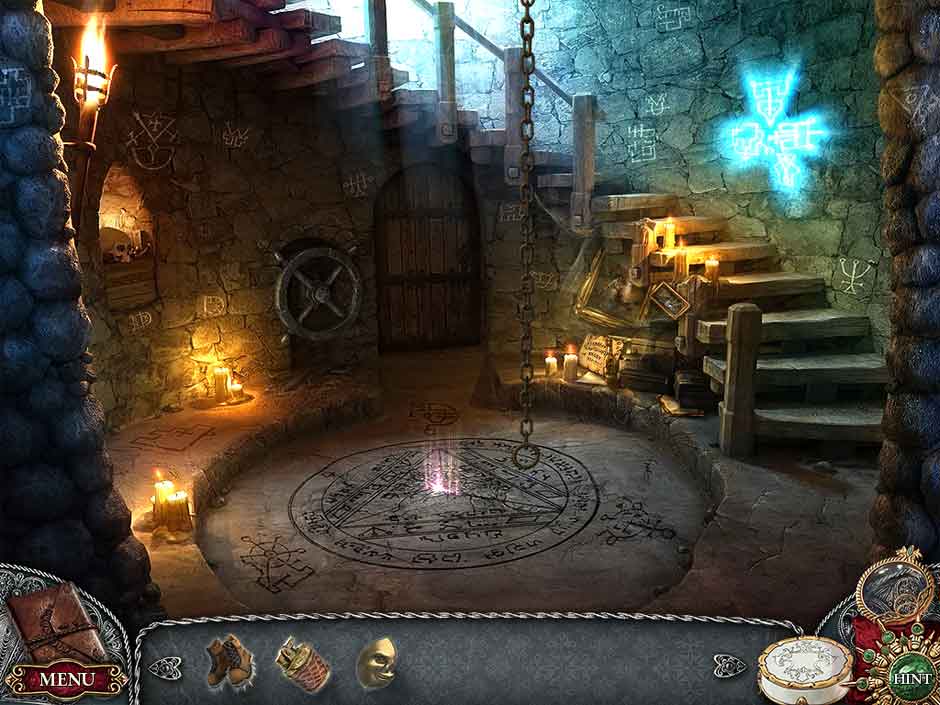
Stairwell
- After you watch the purple figure vanish, use the Lighter to light the three torches on the upper left, upper center, and right. Now go take a look at the stone archway and use the Hammer to knock away the bricks. Go inside.
Pod Room
- Watch the cut scene, then use your Lens of Seeking to find the hidden Hexagon 6/7. Then take a closer look at the sink. There’s something in there, but you’re not going to reach in until the gross water is drained. Use the bottle of Acid to remove the rust on the pipe under the sink, then use the Pliers on the same spot to drain the sink. Collect the Simple Key.

Timeless The Lost Castle 22 Lens 06
- On the table towards the front, you can collect Wax, Fishing Line, and a Lens. Combine the Fishing Line with the Small Hook. You’ll collect A Fishing Hook. Go out through the door in the back of the room.
Nursery Room
- After the figure in red vanishes, use your Lens of Seeking to find and collect some Chalk. Look at the crib to find a Hidden Object Scene. Once you finish it, you’ll collect Lucy’s Toy, a Mitten, and a Toy Hand.
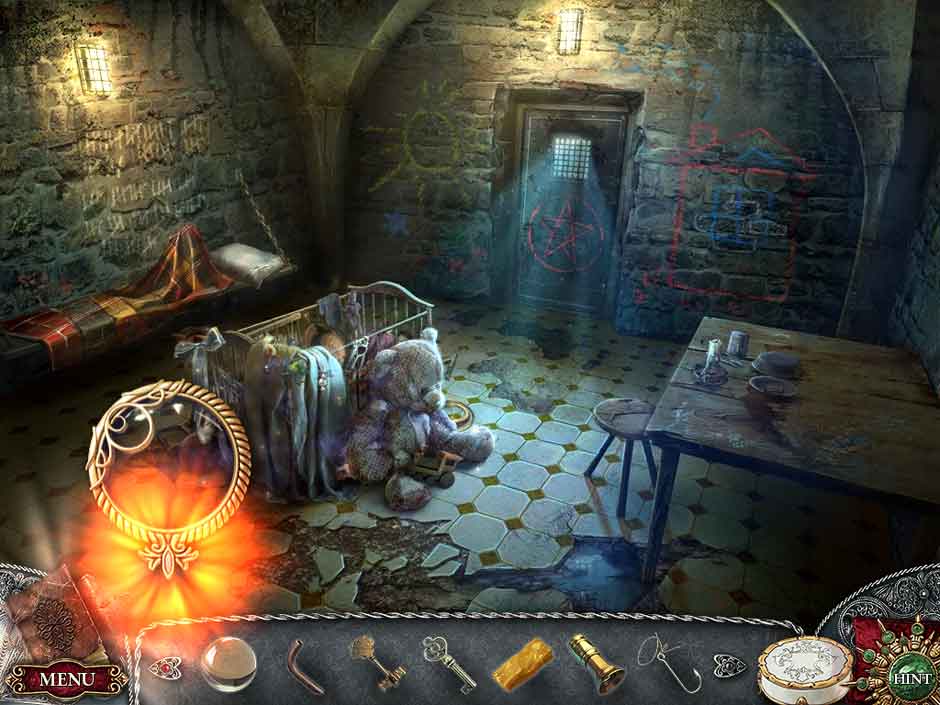
Timeless The Lost Castle 23 Lens 07
- Peek through the window of the door to see a scene play out. You’ll be given the Chalk 2/5. On the cot in the back of the room there is a blanket. Move it to uncover the doll. Attach the Toy Hand to the doll and use it to unlock the head. Remove the head and collect the Cobbler’s Knife and the Chalk 3/5 from the doll’s hand.
- Look at the table on the right. Under the bowl and cup is Chalk 4/5 and a box of matches. Take a match and light it against the side of the box before lighting the candle. Now you can collect the Burning Candle.
- Look at the chalk drawings on the wall and cut the bricks out with the Cobbler’s Knife. Light the area with the Burning Candle and collect the Chalk 5/5. Read the diary before going back to the room.
- Take a better look at the red circle on the door. Use the Chalk on the door to start a puzzle. Color in each of the symbols with the correct color.
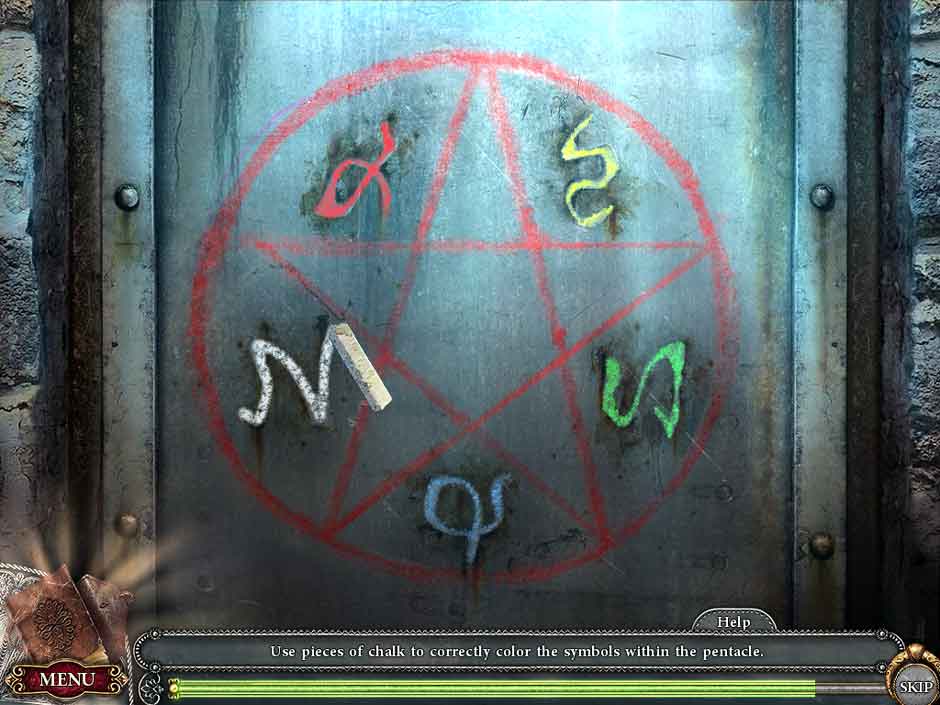
Timeless The Lost Castle 24 Chalk Puzzle
- Now you’re free! Get out of the cell!
Great Hall
- Use the machine in the corner by inserting the Cross Shaped Key in to the keyhole and turning it. Now type the name FULMINUS into the machine via its keyboard. Collect Fulminus’s Mask and leave.
Courtyard
- Examine the power box again and use Fulminus’s Mask here to get past the eye security. This will start a puzzle. Reroute the power by placing the green and red tokens in the slots. Follow this guide for the solution:
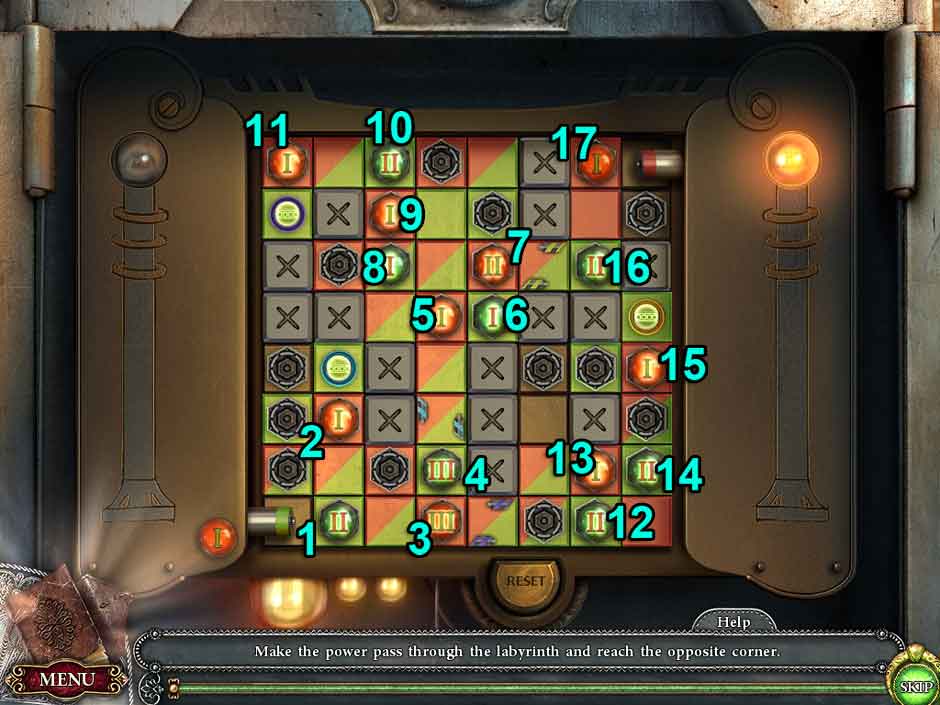
Timeless The Lost Castle 25 Power Puzzle
- Collect the Ice Dagger and the Scepter from the pile of rubble that is created.
Great Hall
- Go through the archway on the right side of the screen.
Orb Hall
- On the left, look at the clock and collect the Hexagon 6/7. There is a note to read here, too. Then look at the clock on the right side of the wall and collect the Blue Book 1/5 from the bottom. Move forward into the next room.
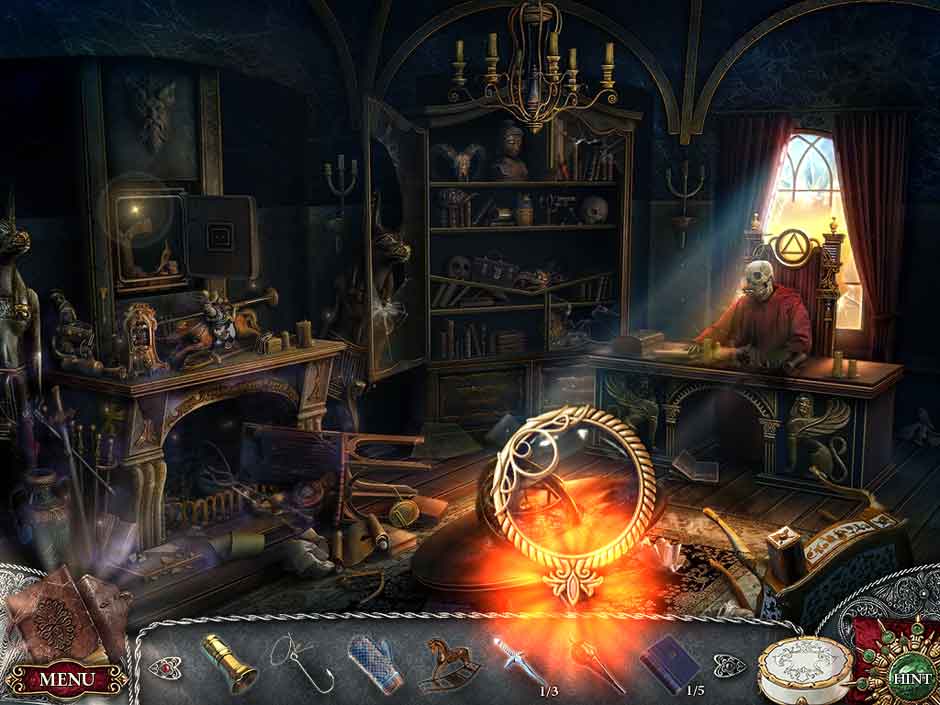
Study
- Use your Lens of Seeking here to find and collect the Black Book 1/6. In the safe on the left you’ll find Red Book 1/4 and a Part of Plummet.
Timeless The Lost Castle 26 Lens 08
- There is a Hidden Object Screen near the fireplace. Make sure you pick the piece of the broken mantle off the floor and place it in the hole in the mantle. This will open a secret compartment with one of the collectables in it. When you are done, you will collect a Steel Collar, Part of Plummet, and an Iron Arrow.
Timeless The Lost Castle 27 Hidden Object Scene 07
- Combine the two Parts of Plummet with each other to collect a Plummet.
- Now look at the skeleton at the desk. You can read his note and collect the Grandmaster’s Seal Ring from his finger. Now get ready to backtrack, because we’re going all the way back to the crashed Airship.
Chapter Four: Finding More Secrets
Timeless The Lost Castle Chapter 4
Inside the Airship
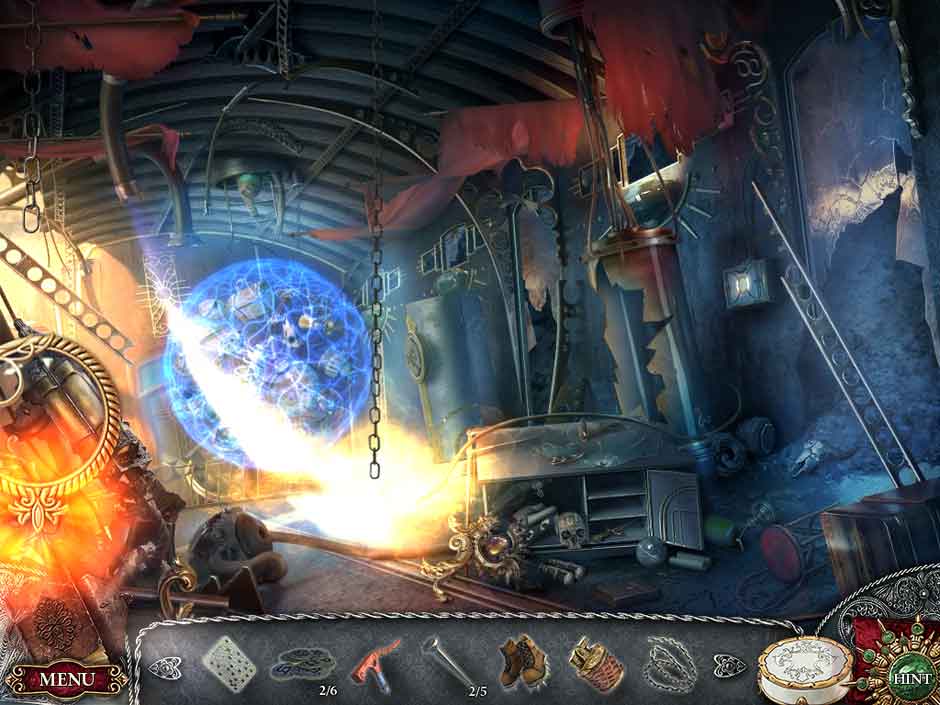
- There is a large container on the right of the orb. Look at it and use the Hexagon 7/7 to start a puzzle. You can move the puzzle around by clicking on one hexagon and then clicking the hexagon you want to switch it with. Move them until you have a rose image like this:
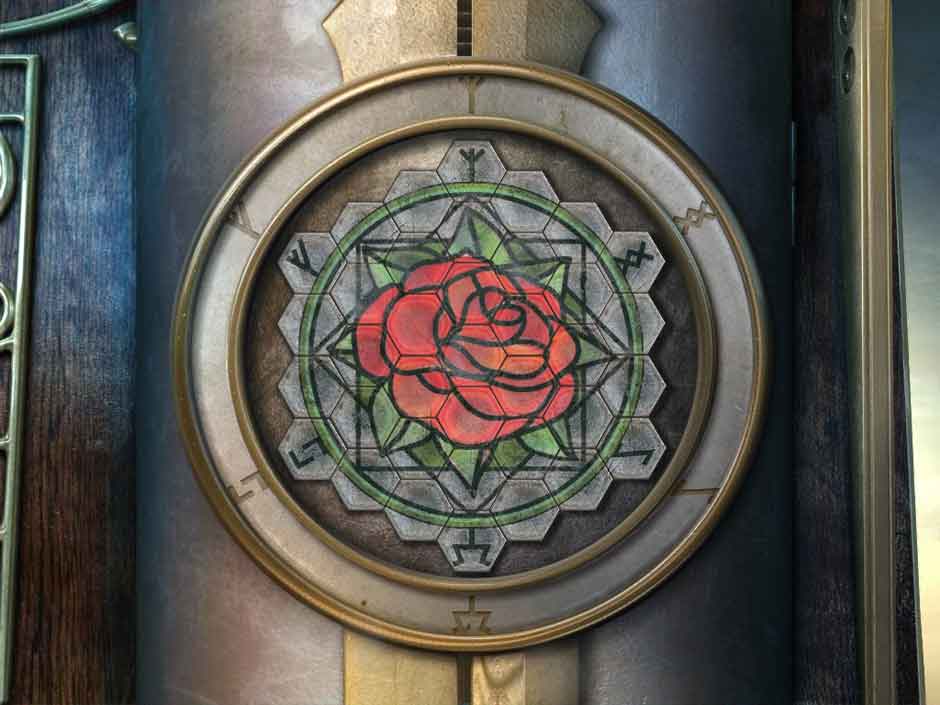
Timeless The Lost Castle 28 Rose Puzzle
- I found the easiest way to put the puzzle together is to work from the outside. Move all the runes to the correct places first, then build the green circle. Once that is done, you can use the remaining hexagons to build the flower.
- Use the Mitten to collect the Rose that is revealed.
Castle Wall
- Look at the ballista in the lower center of the screen. Use the Pipe on the hole on the lower right side to create a handle. Pull it three times, then place the Iron Arrow in the middle shaft. Now pull the lever on the left to send it flying. Go through the door it creates in the second tower.
Second Tower
- Collect the Ladder before looking at the chest on the stairs. Click on the stone fragments to clear them away, then use the Wax on the keyhole. You will collect a Key Imprint. Note the name on the stairs. Now go back into the first tower and down through the hole in the floor again.
Stairwell
- Take a closer look at the knight’s coffin on the left. Remove the Shield and read the note before giving him the Rose. You’ll be able to collect the Sword.
Great Hall
- Go back to the machine in the left corner. Type in the name NIHLUS and press the enter key on the keyboard. Collect Nihilus’s Mask. Then look to the right doorway. Give the Shield to the right night and the Sword to the knight on the left. The eye will open, allowing you to use Nihilus’s Mask on it, opening the door. Go through.
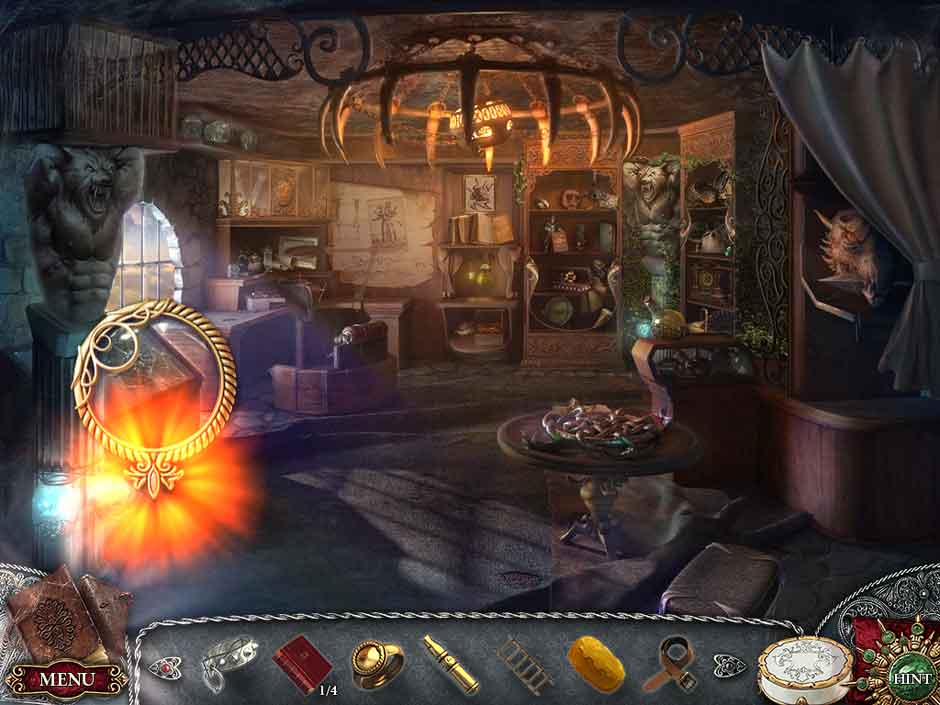
Crafting Room
Timeless The Lost Castle 29 Lens 09
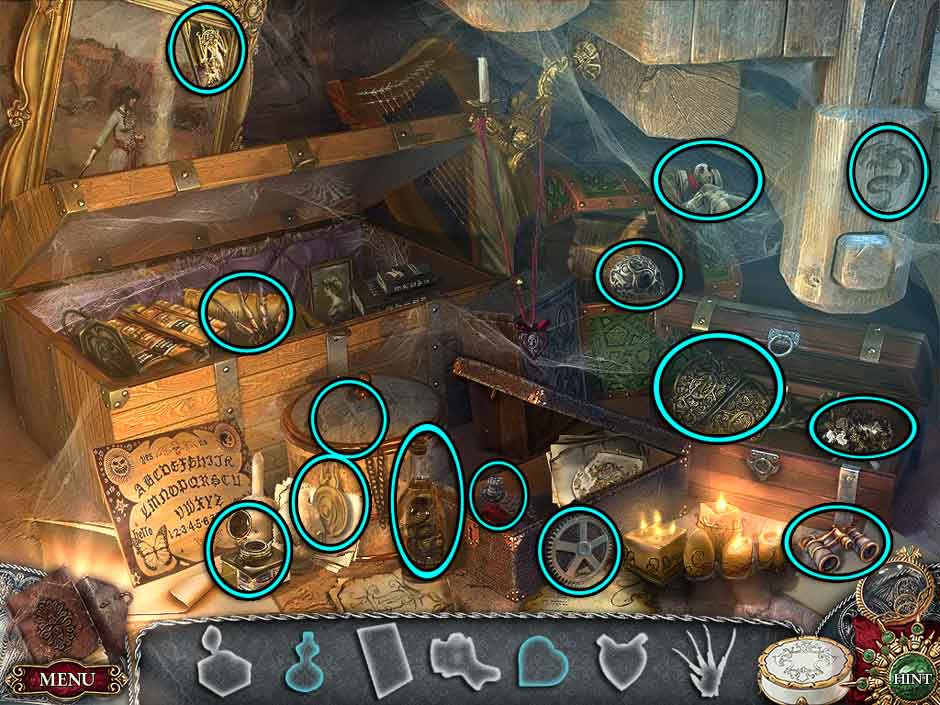
- Use your Lens of Seeking to find the Black Book 2/6 before starting the Hidden Object Scene on the shelves in the back of the room. The shelves can be moved with the two arrows on the left. You will need to move the shelf up to collect the bell hidden there and down to collect the oil lamp and mineral. When you are done, you will collect the Black Book 3/6 and the Leather Belt.
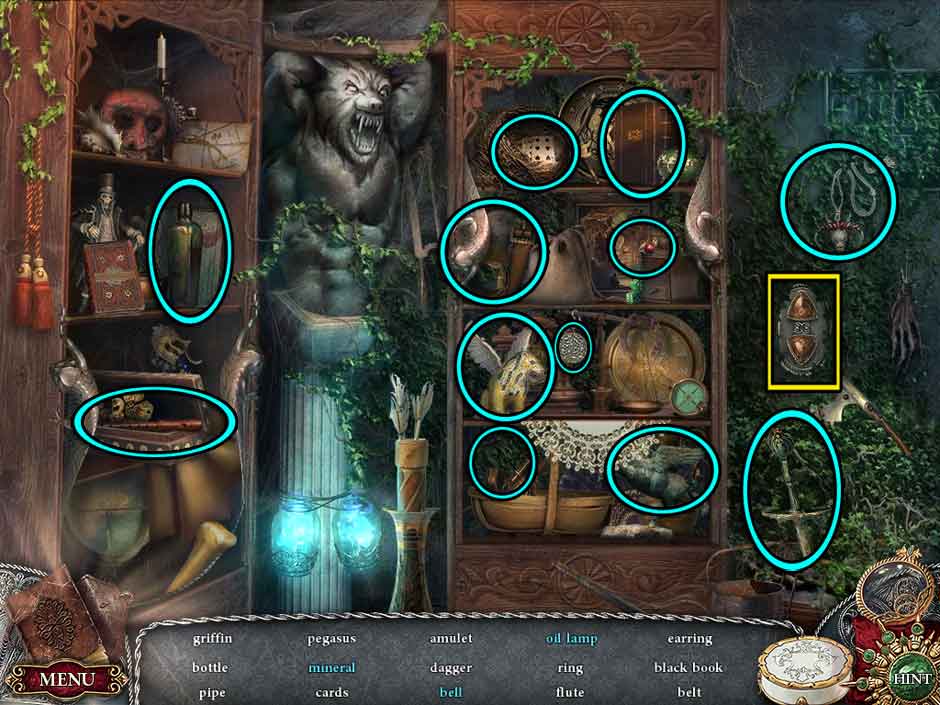
Timeless The Lost Castle 30 Hidden Object Scene 08
- Go to the work desk in the upper left corner. Use the Key Impression on the device, then use a blank key from the box on the device. Use the magnifying lens to look down and create the correct key shape. Collect the Copied Key.
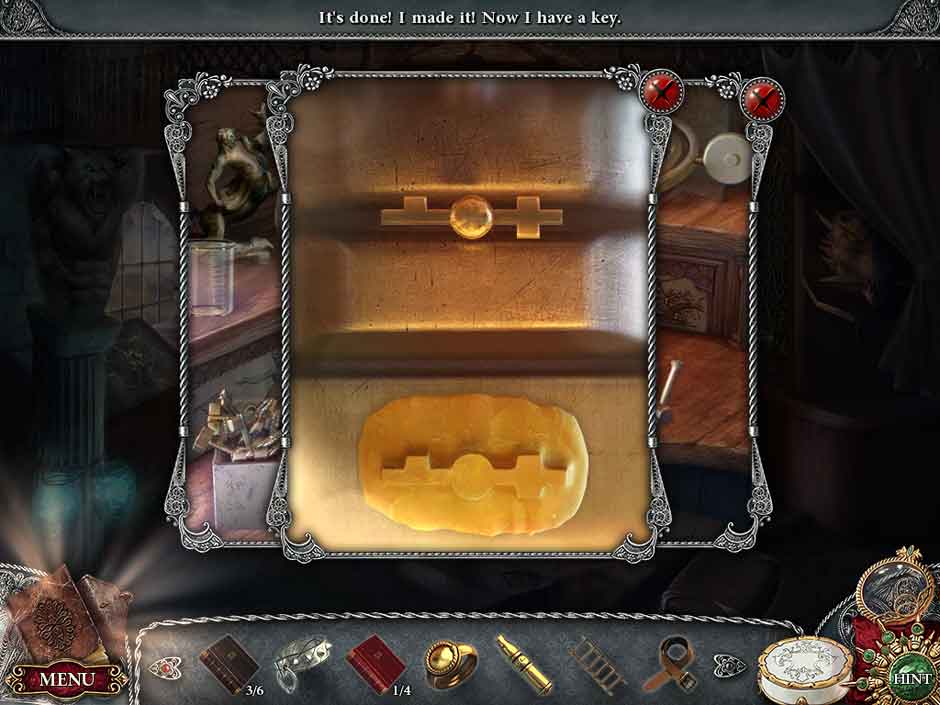
Timeless The Lost Castle 31 Key Copy Puzzle
Second Tower
- Use the Copied Key to open the chest on the steps. Collect the Dragon Horn, Blue Book 2/5 and the Brush. Read the journal to collect the instructions for your notes.
Stairwell
- Focus in on the shelf on the center right. Move the cobwebs out of the way with the Brush. You can now move the helmet and collect the Icy Dagger 2/3 and the Cup.
Great Hall
- Use the machine on the left. Enter the name TABELLUS and press enter to collect Tabellus’s Mask when it appears.
- Go to the lower center door. Place the Cup in the left statue’s hands and the Scepter in the right statue’s hands. The eye will open so you can use Tabellus’s Mask on it and open the door. Go through.
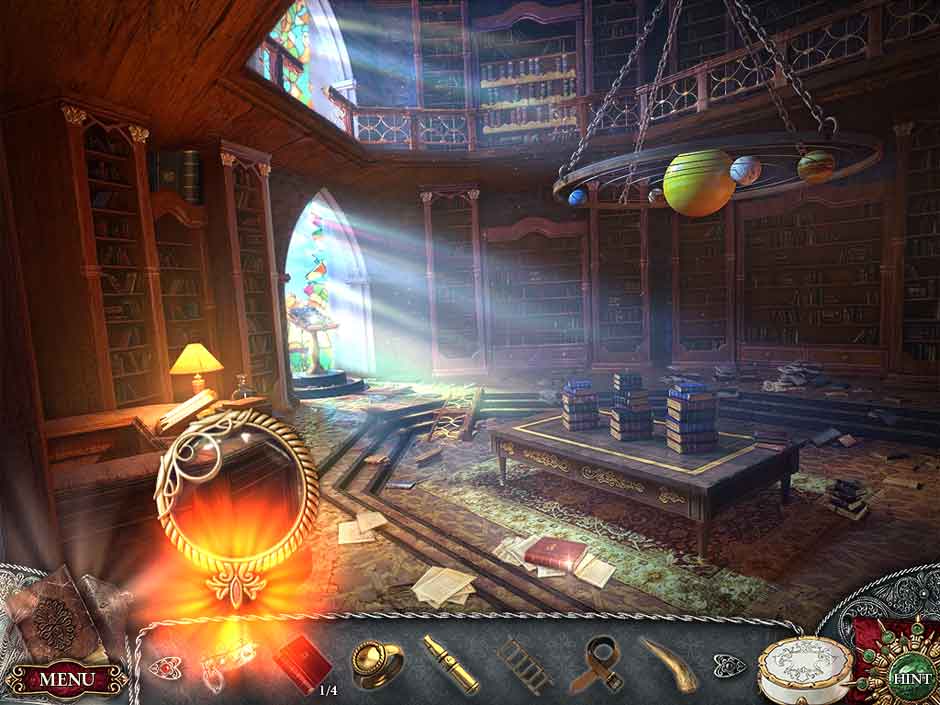
Library
- First, use your Lens of Seeking to find the Blue Book 3/5. Collect the Black Book 4/6 from the left shelves and the Red Book 2/4 off the floor.
Timeless The Lost Castle 32 Lens 10
- Examine the desk on the left. Here you’ll want to collect the Snake Eye from the left of the book then click on the pile of books on the right until you get to and collect the Blue Book 4/5. Then use the Fishing Hook to collect the Mistletoe from the bottle.
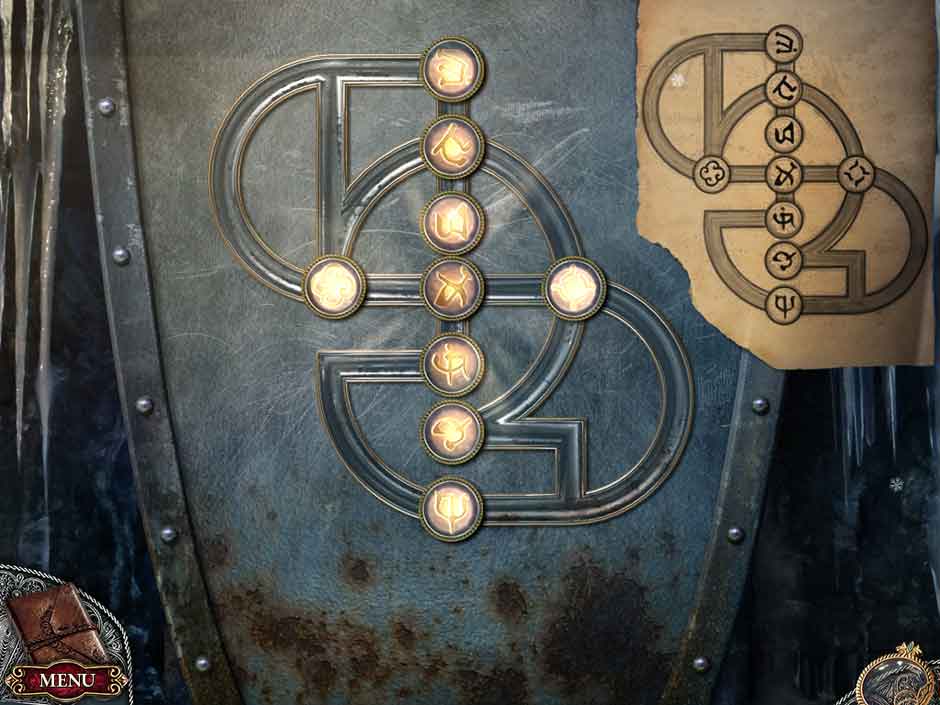
- Take a look at the chained down book on the left. Using the Grandmaster’s Seal Ring to touch the symbols in this order:
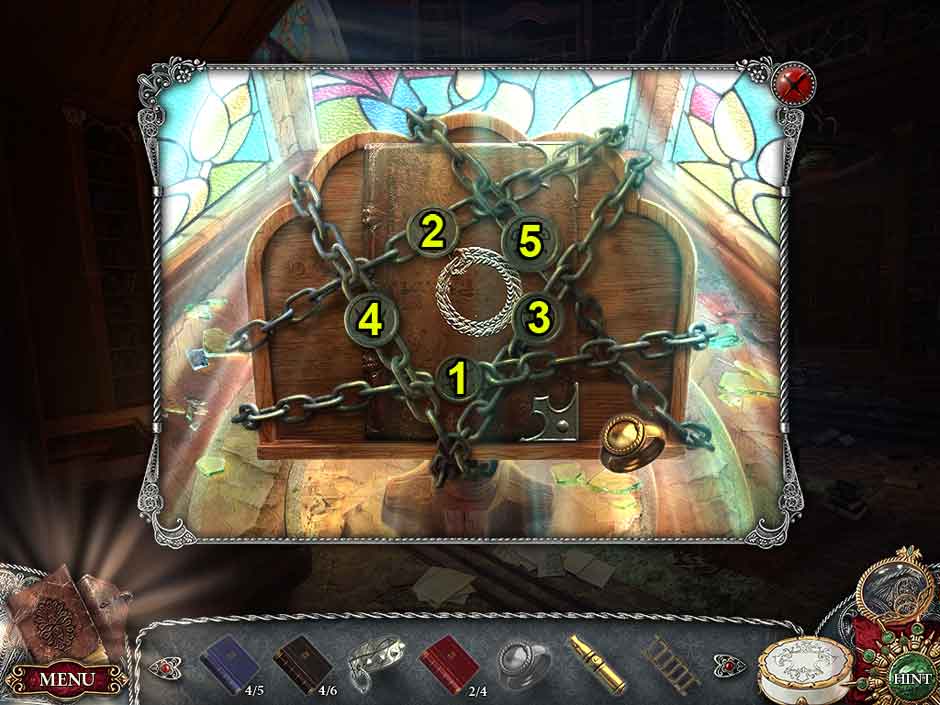
Timeless The Lost Castle 33 Ring Box
- Collect the Pentacle from the right page of the book.
- Look at the desk with the piles of books to start another puzzle. You need to move the books around to get to the books you need to collect. Follow these solutions:
Timeless The Lost Castle 34 Book Piles
Stairwell
- Click on the tomb in the wall on the upper left. Place the Pentacle into the slot with the gears, then by clicking on the upper and lower arms of the figures, light these symbols:
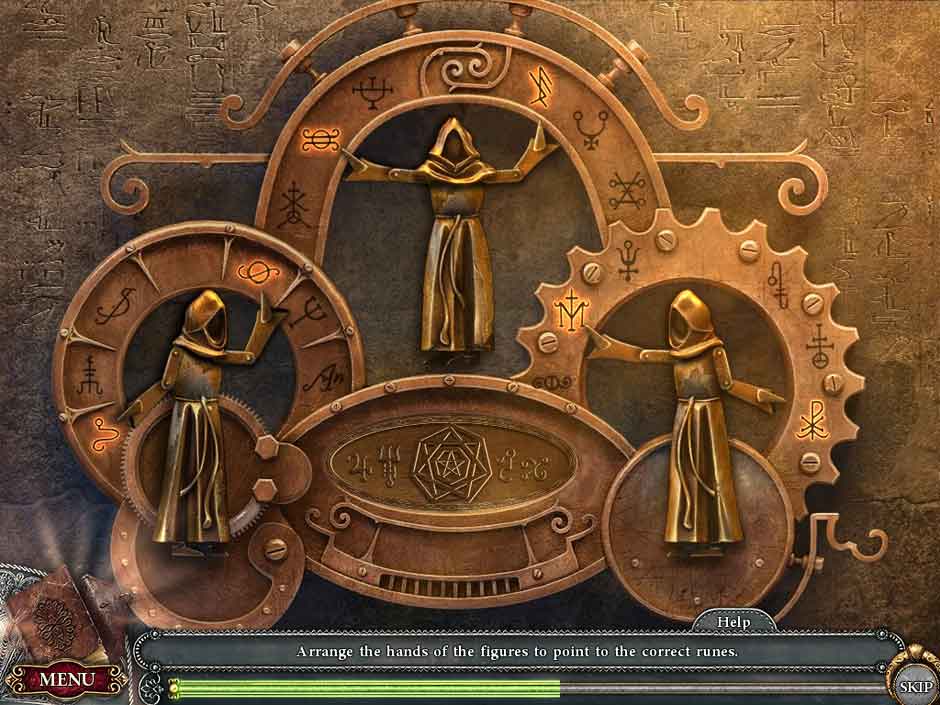
Timeless The Lost Castle 35 Hand Puzzle
- Collect the Orb, Wand, and Red Book 4/4 from the tomb.
Library
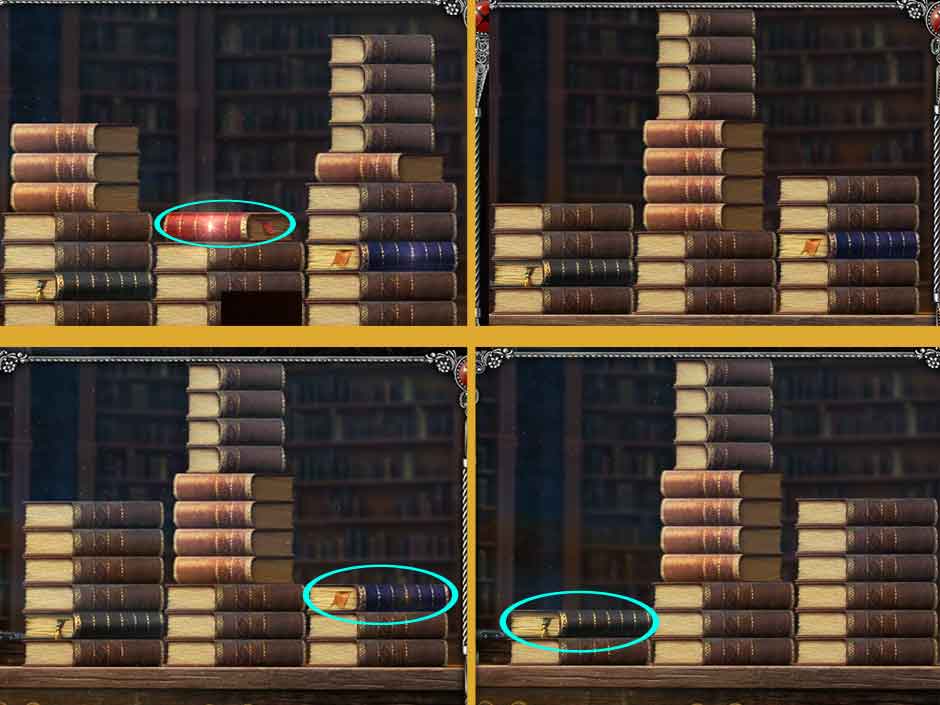
- Place the Ladder against the wall and climb. Place all of your Red, Black and Blue Books on the shelves up to start another puzzle. You need to arrange the books so that the sum of the volume number matches the roman numeral below. Here is a solution:
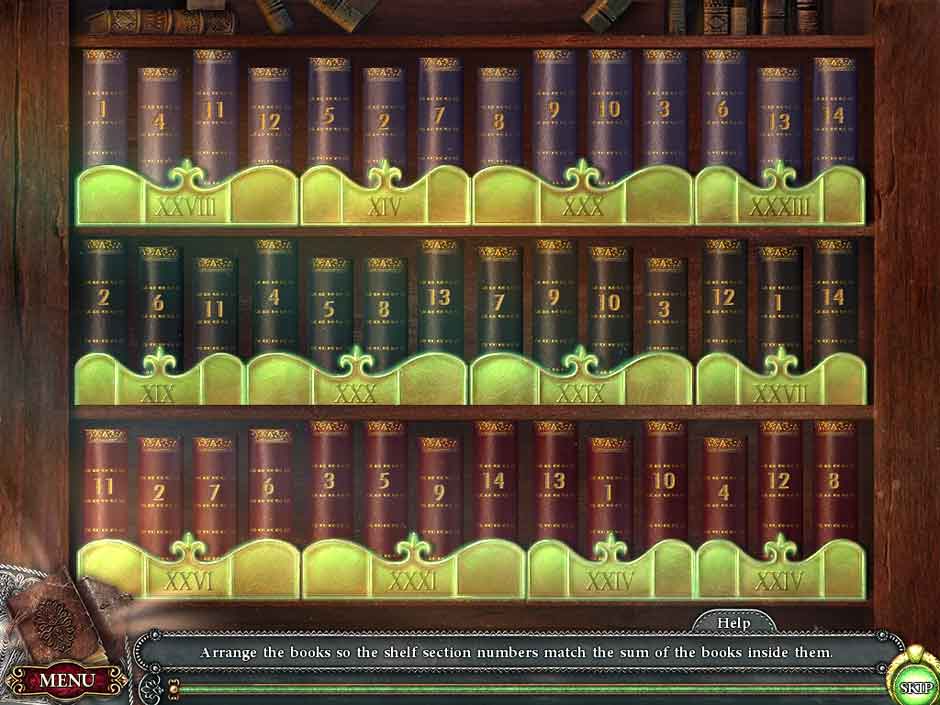
Timeless The Lost Castle 36 Book Numbers Puzzle
- Collect the Time Warp Scroll.
Study
- Examine the box on the desk as use the Snake Eye in the groove to start a puzzle. Press the eyes in the order shown below and collect the Crystal.
Timeless The Lost Castle 37 Snake Eyes Puzzle
Tower Roof
- Use the Lens on the telescope and examine it. Adjust the lens until everything comes into crisp focus, then click up and left until you can see the weather vane.
Pod Room
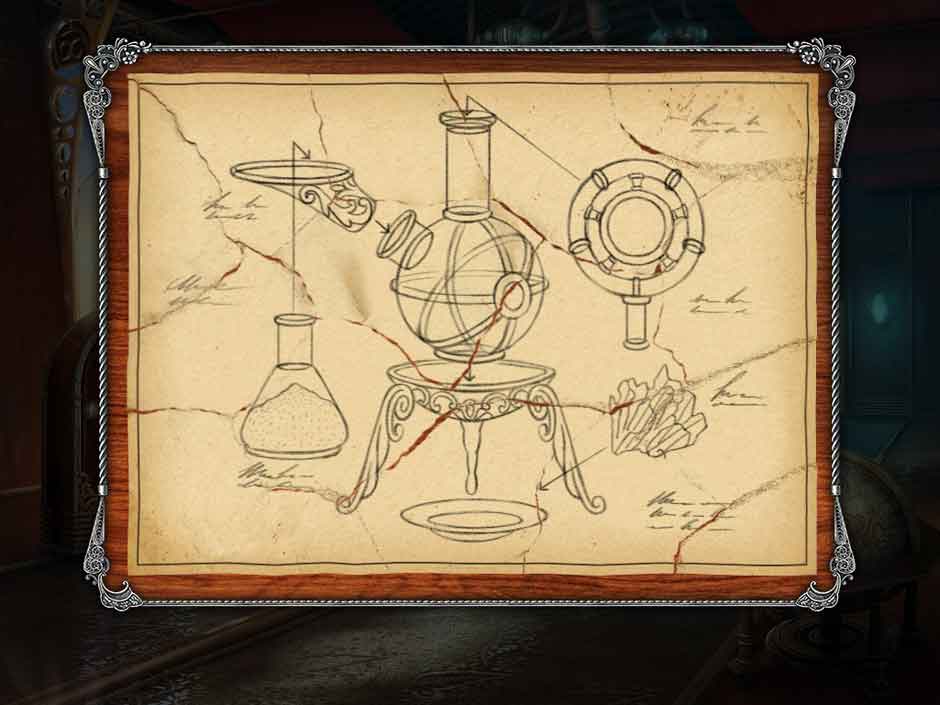
- Look at the workstation towards the back and use the Simple Key to open it. Follow these instructions to create and collect the bottle of Restoring Ink: Pour the center beaker into the retort, add the blue test tube powder to the retort, turn the knob on the retort to heat the mixture, use the red test tube powder with the tube attached to the retort, use the Mistletoe in the mortar and grind it before adding it to the tube as well.
- Look at the metal table and use the Restoring Ink on the paper here. The information will be added to your notes.
Second Tower
- Combine the Crystal and Wand to make the Magic Wand. Use this on each of the runes to make yourself a ladder underneath the window.

Timeless The Lost Castle 38 Wall Runes
- Examine the window. Collect the Wheel and combine it with the Leather Belt. Use the Belt with Wheel on the rope to make your way into the castle again.
Sealed Away Hall
- Using your Lens of Seeking, find the Runic Mount 1/4. Find the Runic Mount 2/4 at the base of the tree. Now remove the red cover on the left of the door to talk to Lucy. Give her Lucy’s Toy. Now, examine the fountain on the other side of the door. Collect the Runic Mount 3/4 and the Snake’s Head. Go forward through the arch to the next room.
Timeless The Lost Castle 39 Lens 11
Crystal Room
- Collect the mirror from the right before looking at the poster there. Collect the Runic Mount 4/4.
Sealed Away Hall
- Take a look at the wooden door. Use the four Runic Mounts to start a puzzle. Match up the symbols on the ends of each mount with the proper symbol on the door. The door will open, allowing you back into the Great Hall.
Crafting Room
- Play the Hidden Object Scene in the back of the room. Once again, scroll up and down to find the extra items. You will collect the Brush and Winding Key.
Timeless The Lost Castle 40 Hidden Object Scene 09
- Now examine the dragon’s head on the wall. Insert the Dragon Horn to have the dragon open its mouth so you can collect the Spearhead. Now look at the table in the center of the room. Insert the Snake’s Head to start a puzzle. Gems must be placed into the slots so that none of the same color are touching. Collect the Magic Stamp from the center of the puzzle when you are done:
Timeless The Lost Castle 41 Snake Jewel Puzzle
Entrance
- Play the Hidden Object Scene here. Open lids to find items inside. You will collect a Gear and a Pendulum when you are done.
Timeless The Lost Castle 42 Hidden Object Scene 10
Pod Room
- Talk to the ghost, then use the six small power boxes around the room to power the metal pod. Then take a look at the center of the pod, adding the Gears to it to start a puzzle. Using the buttons, align the gears. Press the buttons in this order: Second from the left, leftmost, third from the right, rightmost. Collect the Ruby Heart.
Sealed Away Hall
- First, use the brush on the shield above the door to see the colors. Then, give the Ruby Heart to Lucy. Watch the cut scene.
Chapter Five: The Final Stand
Timeless The Lost Castle Chapter 5
Orb Hall
- Examine the clock on the left and use the Plummet on the chain. Set the time to 7:00 by clicking the chains, then use the pendulum to start the clock. Then look at the mechanism in the ceiling. Insert the Winding Key into the keyhole and turn it three times, then click on the right hand button until the moon is set as so:
Timeless The Lost Castle 43 Moon Puzzle
- Now press the purple eye button.
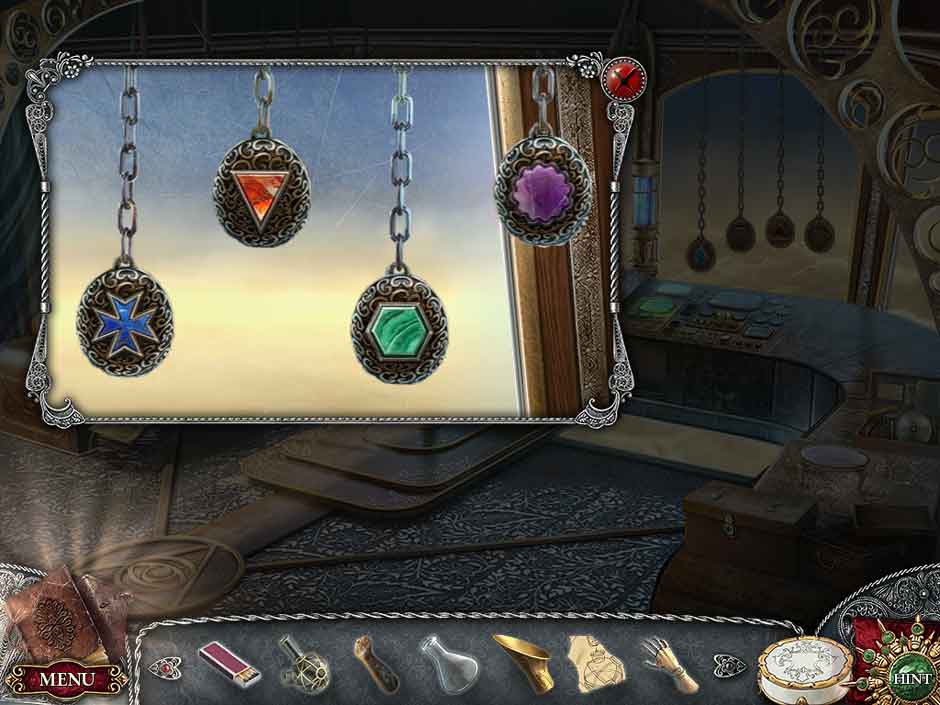
- Go to the clock on the right. Add the Pendulum to the clock chain. Use the plummets to place the moon on Aquarius and the Sun on Gemini, then click the pendulum to start the clock. Once the three beams have connected, use the Time Warp Scroll at the point where they all meet. Starting from the outside, click on each symbol following along the spiral. This will create a portal. Walk through.
- You will come to a coat of arm puzzle. Use the ribbons to change the color and the scroll buttons to change the pattern. Match this solution, then step through the door:
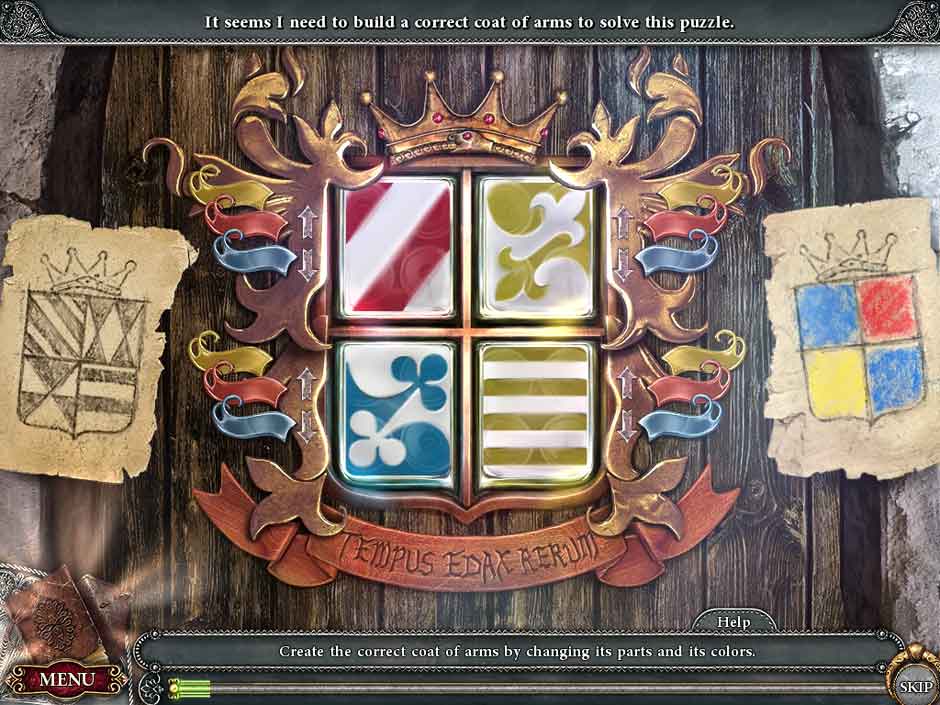
Timeless The Lost Castle 44 Crest Puzzle
Study (in the past)
- First, use your Lens of Seeking and find and collect the There is a Hidden Object Scene on the desk. Use the handle on the stool to open the desk drawer. When you have finished, you will collect the Unicorn Horn, Decanter, and Hourglass.
Timeless The Lost Castle 45 Lens 12
- Go to the mirror on the wall and use the Mirror you’ve collected to find and collect the Safe Key. Now examine the puzzle. Click on any piece of the puzzle in this color order: Pink, Orange, Blue, Green, Orange, Green, Orange, Green, then Gold. Use the Safe Key to open the safe, then collect the Ice Dagger 3/3 and the Grandmaster’s Mask.
Timeless The Lost Castle 46 Hidden Object Scene 11
- Take a look at the wardrobe, and collect the Mandrake Root from the bottle in the middle of the shelves. Read the book on the upper right for instructions for later.
Courtyard
- Take a look at the rock pile. Using the Ice Daggers, cool the stones so you can collect the Orb.
Pod Room
- Go back to the work table. Mix together the potion by pouring the beaker with the white liquid into the retort, followed by the yellow powder. Turn the knob at the bottom to heat the mixture, then add the blue powder to the tube. Use the Mandrake Root in the mortar and grind it. Add this to the tube as well. Collect the Elixir of Life.
Sealed Away Hall
- Look at the fountain on the right of the door. Place the Unicorn Horn into the forehead slot. Water will begin to pour. Use the Decanter to collect water, creating the Decanter with Water. Mix this with the Elixir of Life potion to collect the Decanter with Elixir.
- Use the Decanter with Elixir on the dead tree to bring it back to life. Collect the Flower of Life from its branches.
Crystal Room
- Place one of the Orbs in the center stand and the Prism in the empty stand on the right. Now, throw your Spiked Boots through the moon window in the upper left. This will let light into the room. Click on the top center prism until beams of light enter both crystals.
- The left, center, and right prisms will send colors to the orb in the center. Clicking them will change the light reflected, changing the color of the orb in the center.
- We need to make three orbs: Red, Blue, and Green. Match the colors shining out of the prisms to the screenshots below for each color. Remember to switch out each colored Orb with a fresh, clear one.
- Red:
Timeless The Lost Castle 47 Red Orb
- Blue:

Timeless The Lost Castle 48 Blue Orb
- Green:
Timeless The Lost Castle 49 Green Orb
Locked Away Hall
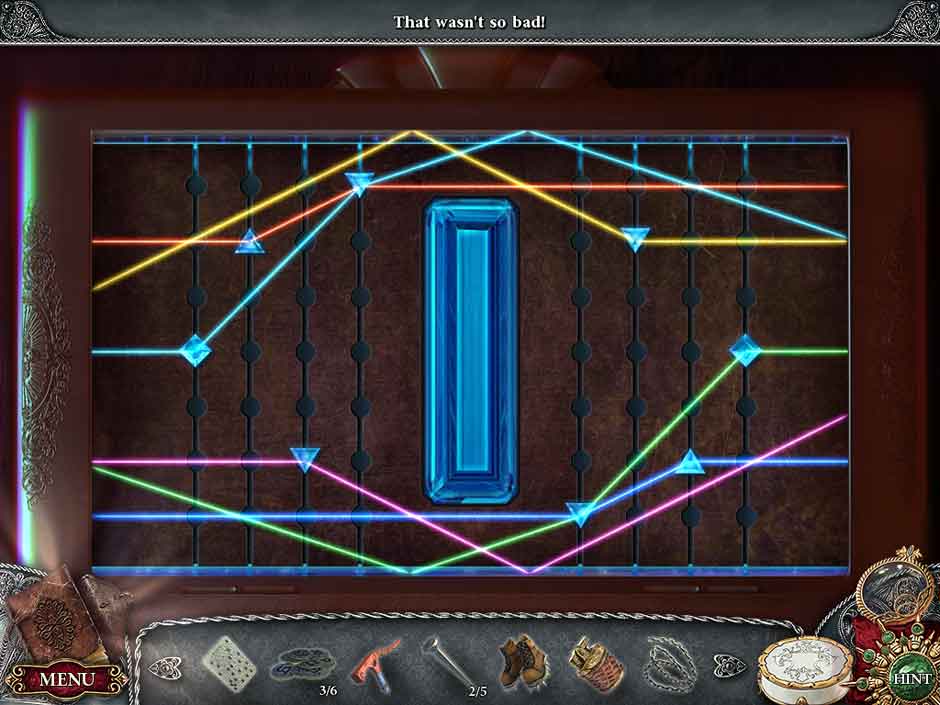
- Click on the giant lock on the doors on the left. To solve this puzzle, you have to spin the disks so an unbroken line leads from each point to the center. The solution is below. An eye will open, allowing you to use Grandmaster’s Mask to undo the lock. Go inside.
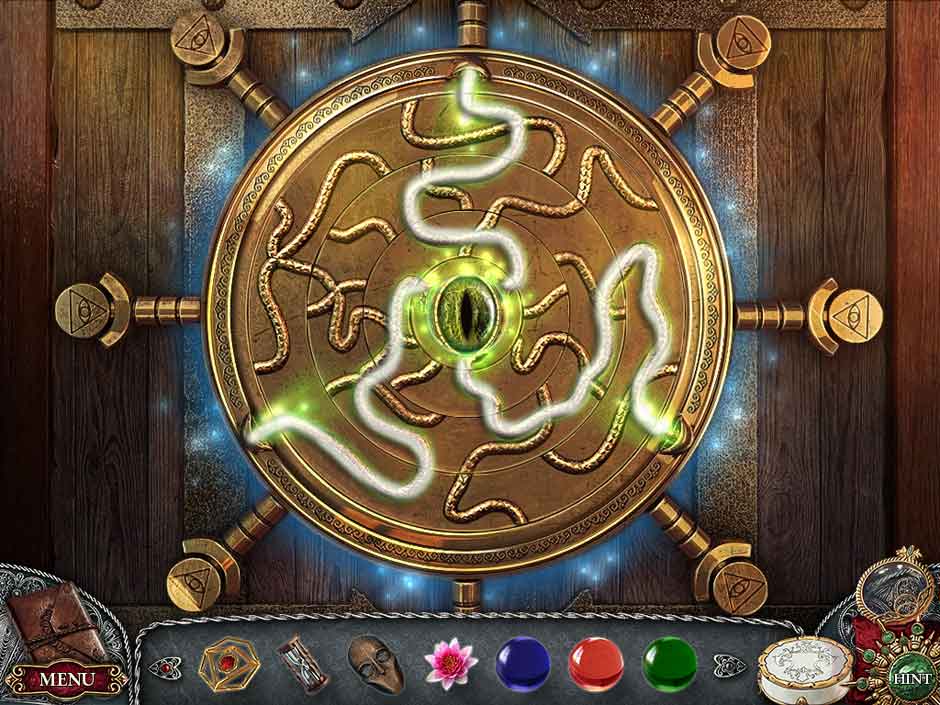
Timeless The Lost Castle 50 Connection Puzzle
Final Showdown
- This is it! First, take a look at the writing on the wall to the right. It will describe how to disable Corvus’s protective shield. Take a look at each stand and use the corresponding item, listed from left to right: The Spearhead on the Dragon, the Steel Collar on the Griffin, the Hourglass on the Snake, the Magic Stamp on the Demon, and the Flower of Life on Death.
- With his shield down, the lady can finally talk to Corvus. Though he realizes his mistake, a greater enemy appears! Help the three defeat it! Give the Red Orb to Corvus, the Green Orb to the Lady, and the Blue Orb to Lucy.
Timeless The Lost Castle Chapter END
Congratulations! You’ve reclaimed your life from fate and beaten Timeless: The Lost Castle.
This Timeless – The Lost Castle Walkthrough is meant as a guide and does not contain cheats, hacks, or serials.