In this sequel, you will be able to solve all new mysteries. Follow the storyline and the clues to make your way to the end of the game and find out the final mystery of the PuppetShow – Souls of the Innocent.
Contents
- General Tips & Tricks
- PuppetShow – Souls of the Innocent Walkthrough
- Chapter 1: Girl’s Bedroom
- Chapter 2: Marionette Shop
- Chapter 3: The Workshop
- Chapter 4: Fortune Teller’s House
- Chapter 5: Castle Gates
- Chapter 6: First Tower
- Chapter 7: Factory
- Chapter 8: Second Tower
- Chapter 9: Arsenal
- Chapter 10: Marionette Storage
- Chapter 11: Third Tower
- Chapter 12: Laboratory
- Extra Levels
General Tips & Tricks
Tip #1 – In each area, you will find at least one area that sparkles.
Tip #2 – In hidden object scenes, you might have to click on different parts in the scene to open things up in order to find all of the objects. For example: You might have to click on a drawer to find an item on the list.
Tip #3 – At any time during a mini-game or puzzle, you can click the “Skip” button in order to continue on in the story.
Tip #4 – During the hidden object scenes, you have infinite amount of hints. However, after clicking hint, you will have to wait a certain amount of time before using another one.
PuppetShow – Souls of the Innocent Walkthrough
Chapter 1: Girl’s Bedroom
On the lower left of the screen, click on the newspaper in order to collect the planet. After this, click on the right side door to zoom in. Then, get the pin from the lower right side of the house. Use the pin to open the window after taking a closer look.
After opening it, climb into the window. Once inside, click on the large portrait that is located on the back wall. Collect the lizard ornament that is located in the lower right side of the frame. The pattern on the wallpaper will be needed in a future puzzle solution. So, remember it.
Once you click on the bed, click on the little girl. Here you will get the mechanical doll part that is on the headless doll. Then, collect the bird ornament that is on the dresser. Remember to click on the jester marionette. It is missing and eye, and you will need to remember this later. After remembering it, click the pop-up window. Click on the wardrobe to open it and find a hidden object scene.
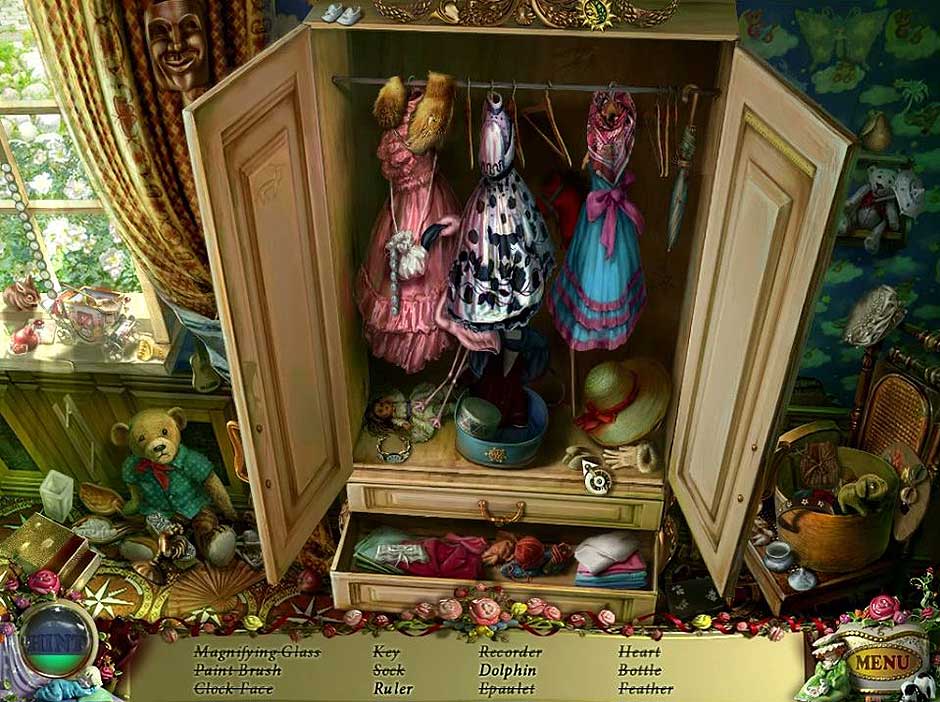
PuppetShow – Souls of the Innocent – Girl’s Bedroom
In the scene, you will need to click on the middle drawer to find some objects. The key is important. It will be put into your storage after completing the scene. After finishing the scene, look on the top of the wardrobe and use the key on the music box there. You will need to turn the key 3 times to open it. Get the fish ornament from inside the music box before clicking on the dresser. Use the bird ornament, the fish ornament, and the lizard ornament on the dresser to unlock its drawer to get the powder compact.
Chapter 2: Marionette Shop
Once entering into this chapter, you will move down twice, then forward, and then right, which will take you towards the Guard’s Hut. Once there, you will need to click on the door twice in order to unlock the next hidden object scene.
After completing the scene, you will receive the crowbar. Make a mental note about the oil-dripping lamp that is found on the side of the hut. Afterwards, you will head down and then forward. Once there, click on the dripping pipe that can be found on the side of the shop in order to collect the red button.
Using the crowbar, you will start removing boards on the top of the door in order to get a closer look inside. Click on the buttons that are on the door. Use the red button to put it on the panel. Next, you will need the compact powder to be able to see which buttons should be pressed. Then, click the buttons in order to open the door.
Once inside, you will use the crowbar to loosen the floor board that is on the lower left side of the room, and it is there you will find the handle. Click on the sketch that is on the ground. After clicking on the papers a few times, you will be able to collect the mechanical wing. The next hidden object scene can be found on the left.
After completing the scene, you will get the parrot head. Then on the right, you will see shelves. There you will find the glass shard to collect it on the lower left. Use the doll part onto the mechanical bird, where it has a head socket.. Next finish the mechanical bird by using the parrot head and the mechanical wing.
After completing the bird, it will put a film up on the wall. Remember the numbers there “749261” because it will be needed later. Then, exit the window. After this, you will click on the cash register that is on the counter to collect the marionette eye. Use the handle on the side of the cash register, and then use the numbers from earlier on the cash register keys.
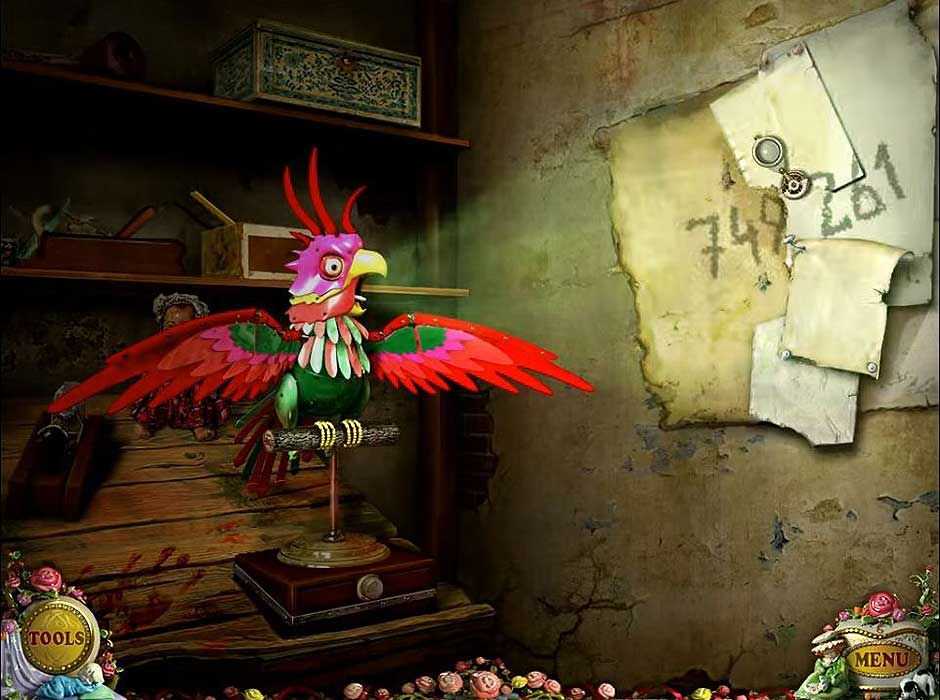
PuppetShow – Souls of the Innocent – Parrot
Use the key on the inside of the cash register, and then put the key in the lock on the back door. The lock needs oil before it can be unlocked. After this, go back to the Girl’s bedroom. This is where you will click on the wardrobe to unlock another hidden object scene.
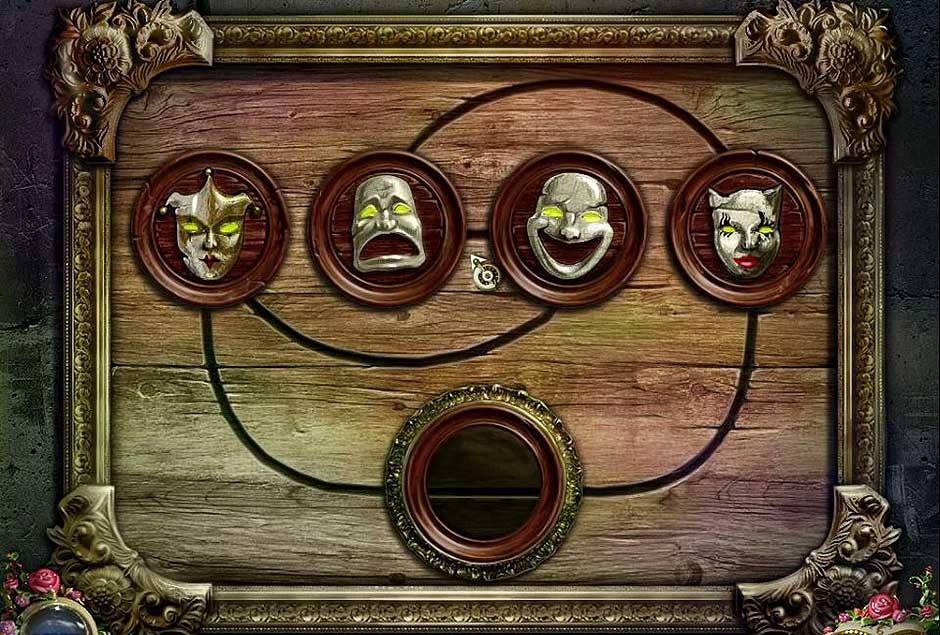
Collect the sun. Click on the jester doll that is on the left side of the bed. Put the marionette eye in the socket. Then place the planet in its mouth. Head back towards the Guard’s Hut. Here you will see the next hidden object scene.
Receive the empty oil can from completing it. Fill the oil can by clicking on the oil dripping lamp. Head back to the marionette shop. This will unlock the final Chapter 2 hidden object scene.
Here you will collect the broom. Use the full oil can on the lock in order to turn the key to unlock the door. Finally, go through the door to get to the Workshop.
Chapter 3: The Workshop
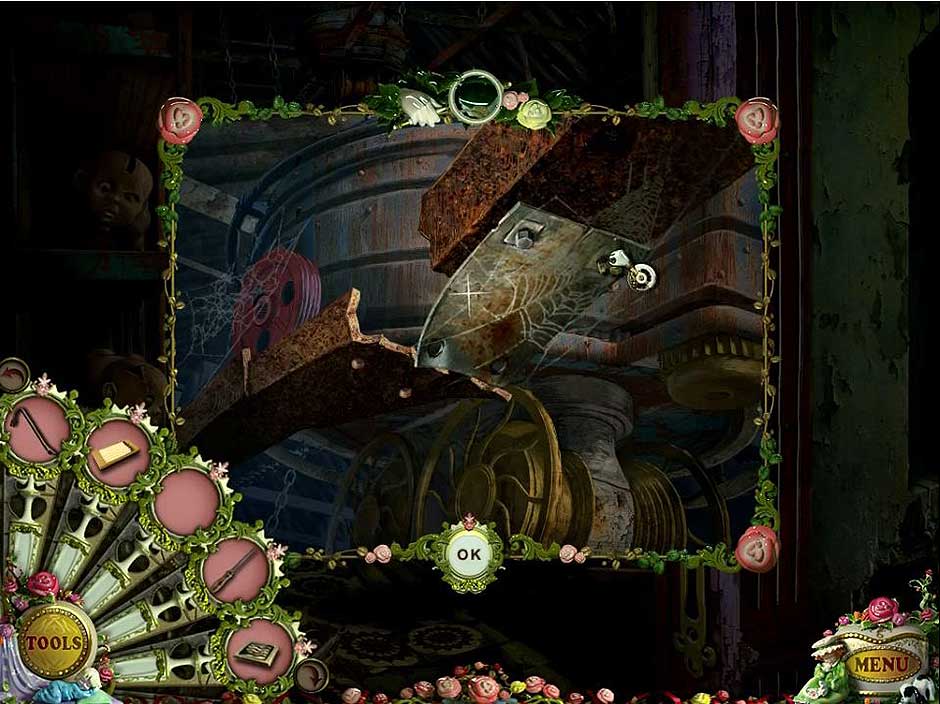
Upon entering the workshop, you will be attacked by the mechanical crab. Use the crowbar to defend yourself. Afterwards, click on the mechanical crab to get a closer look. Use the screwdriver to loosen the valve to pick it up. There will be a hidden object scene on the left.
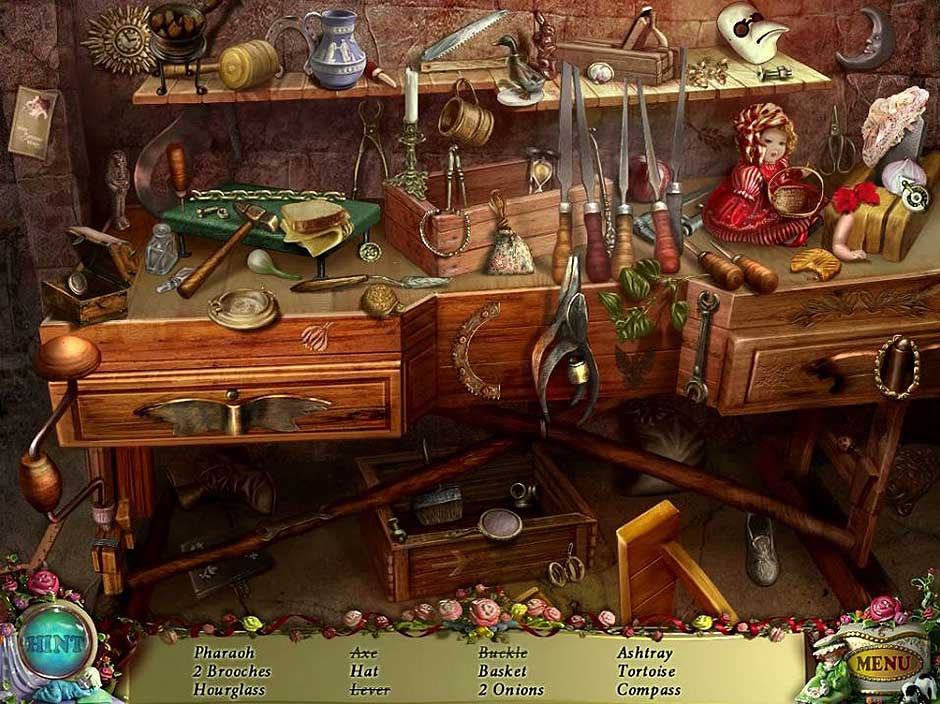
PuppetShow – Souls of the Innocent – The Workshop
In this scene, you will need to open the left drawer to find some items. After this, you will get the vice handle. Click on the workbench and use the vice handle on the vice. This will allow you to pick up the planet #3. Finally, head outside and go towards the left side of the house.
Chapter 4: Fortune Teller’s House
Look at the poster on the right. Click on it twice in order to tear it. Then, use the broom to clear the cobwebs three times. Use the sun and the 3 planets on the galaxy. By clicking on the galaxy, you will trigger a puzzle. Put the Large blue planet on its track, followed by the green and small blue planets. Once completed, head through the door. This will reveal a hidden object scene on the left.
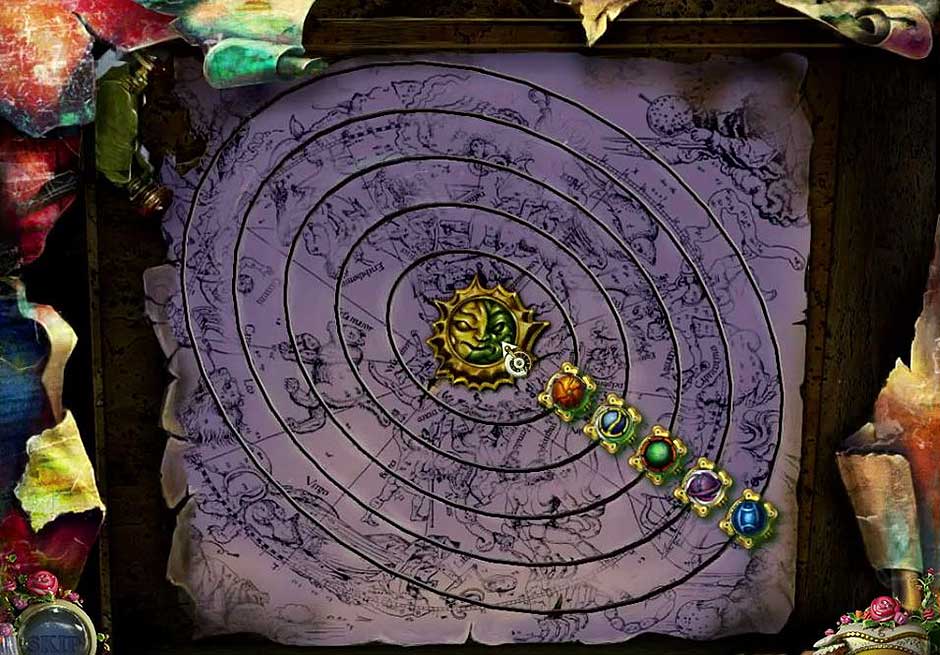
PuppetShow – Souls of the Innocent – Galaxy
Completing this scene will give you the leather belt. Head back into the workshop that is found in the Marionette Shop. Once inside the Workshop, there is another hidden object scene there.
This will let you get the burner of dried pitch that will be needed later on. After receiving it, head back to the Fortune Teller’s House, where you will find the final hidden object scene for Chapter 4.
Completing this scene will give you matches. Afterwards, head to the Marionette Shop. Click on the pipe that’s dripping. To get the pitch mixter, put the burner of dried pitch under the pipe. Head inside the Fortune Teller’s House. Click on the fortune teller, and click on the candle in the center. Use the pitch mixture to make glue.
Once you get the glu, head back to the workshop in the Marionette Shop. Use the leather belt on the glass shard, after clicking the workbench. Retrieve the glass knife.

PuppetShow – Souls of the Innocent – Glass Knife
Go to the right after leaving the shop. Click on the upper part of the hot air balloon. Use the glue on the broken hose. Then, use the valve on the burner. Switch on the valve to let the gas flow. After this, use the matches on the burner. Cut the rope three times with the glass knife at the edge of the basket.
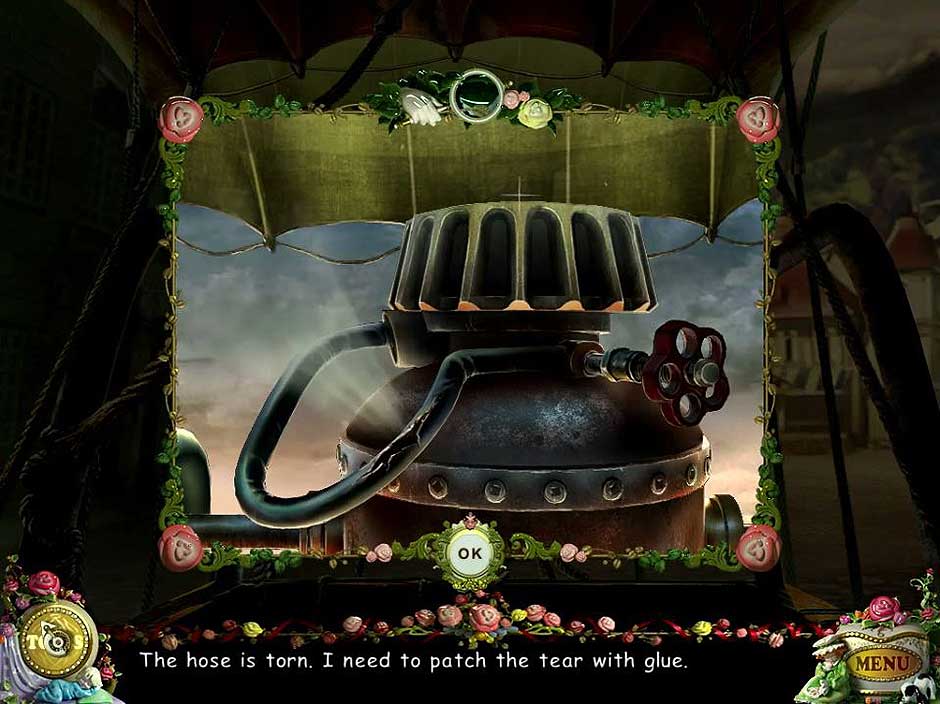
PuppetShow – Souls of the Innocent – Hose
Chapter 5: Castle Gates
When starting Chapter 5, you will notice you still have the matches and the crowbar. Click on the lower right side of the screen. Retrieve the spider puppet’s badge and the sandbag before going forward. The giant marionette will be blocking the door. Use the crowbar on the pole. It takes three times to loosen it. Get the pole, and head back to the crash site. Take the large stone using the pole to open a hidden object scene.
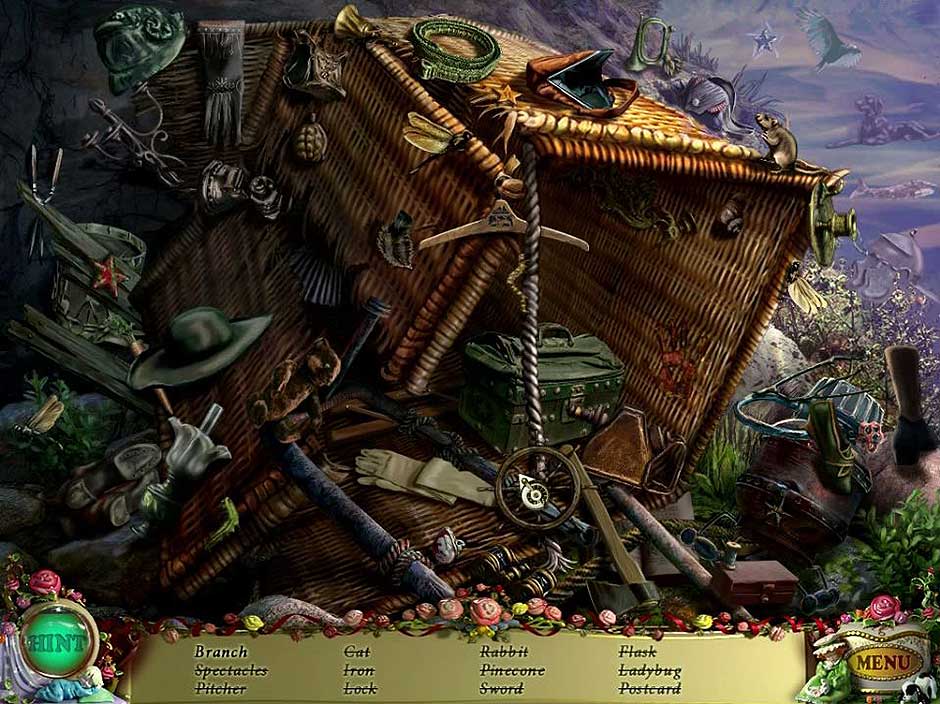
PuppetShow – Souls of the Innocent – Castles Gates
Completing this scene will give you kindling. Head to the gate. Give the giant marionette the spider puppet’s badge, which will get him to let you open the gate. Put the matches and kindling into the back of the giant marionette on the coal there. This will make him finish opening the gate. Click on the note to pick up the rune. Then, back at the crash side, you will find another hidden object scene.
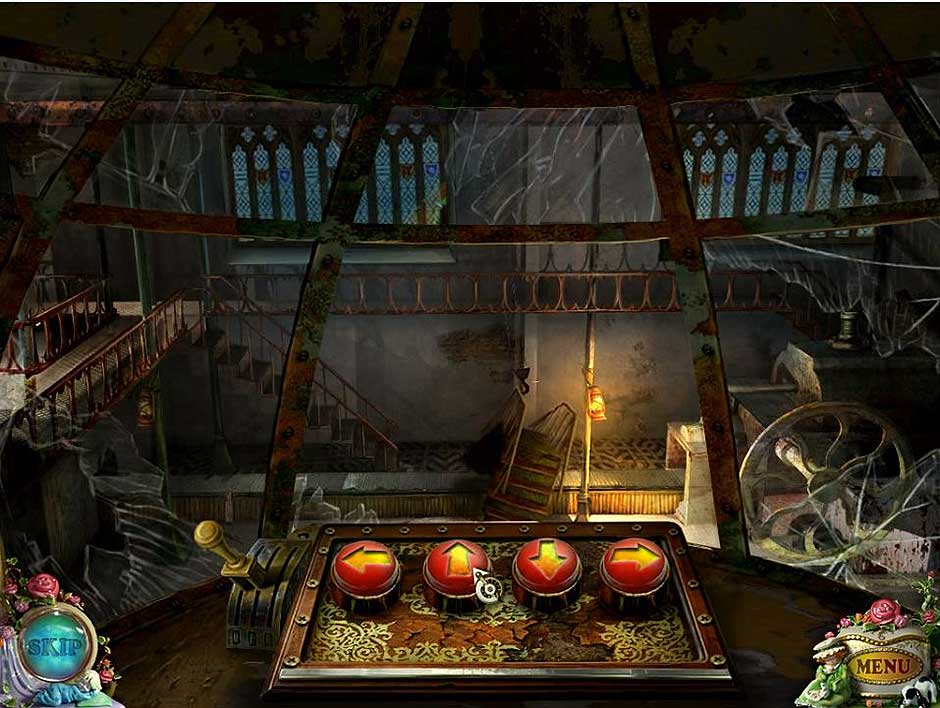
This will give you the axe. Head to the elevator and click on the lower right. Using the axe, you will cut at the roots three times which will unlock the next hidden object scene.
After this, hit the switch to turn the lights on and then off. Then, you’ll retrieve the level. On the back wall, click on the mechanism there. Use the lever in the upper left. Then, pull the lever down to activate the mechanism. Use the belt to connect the gears. After completing this, you will be able to enter into the elevator to go upstairs.
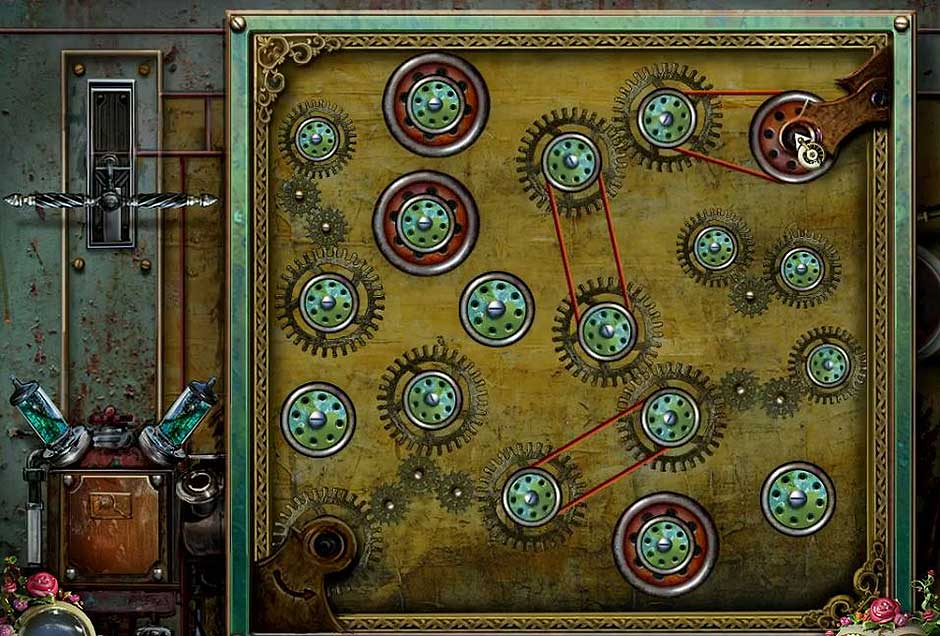
PuppetShow – Souls of the Innocent – Gears
Chapter 6: First Tower
Story: The spider-dolls bring strange flasks here. It is necessary to think out how to stop them otherwise I won’t be able to move further. Put the sandbag down into the hole on the left side. Follow the marionette on the bicycle. Click on the glass and retrieve the clay tablet. When exiting, head through the steps on the right.
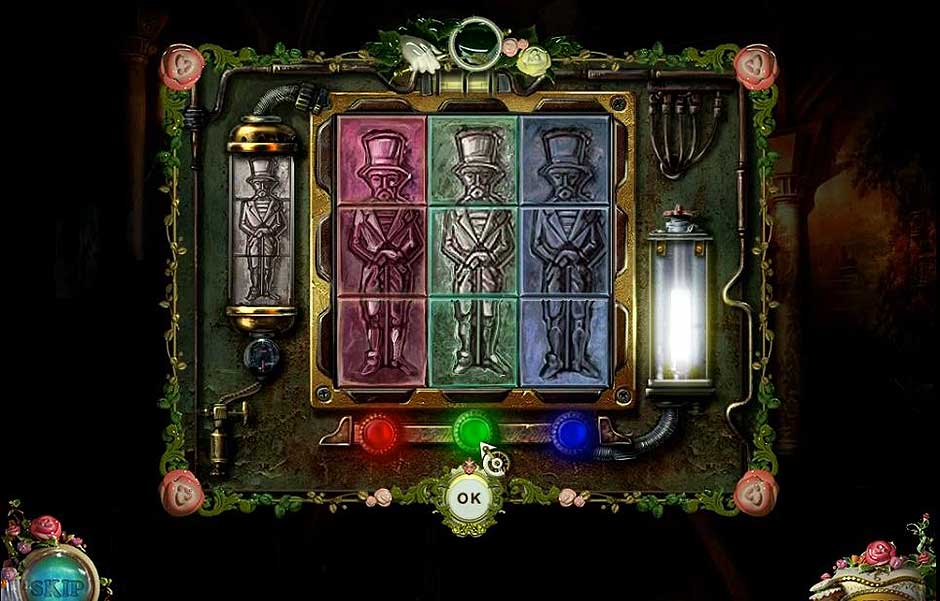
PuppetShow – Souls of the Innocent – Figures Puzzle Solution
Use the clay tablet on the door. On the puzzle, drag bars left to right, or up and down. By doing this, you will reveal three figures of different colors. If it is in the right spot, a light will show up. Head in the door to get to the Gallery. The next hidden object scene will be on the right.
Collect the dominoes, before going forward. To activate the next puzzle, click the left door. After completing this puzzle, you will go through the door to access the factory area.
Chapter 7: Factory
Click on the right door. Then, use the dominoes on the board. The sum of the rows or coloums should add up to the total in the center of the box. Use the vertical and horizontal ones to get them in the right spot, cause the dominoes can’t be rotated. When they are correct, the boxes will be green. Head left to get to the Conveyor Area. Here, you will find the next hidden object scene.
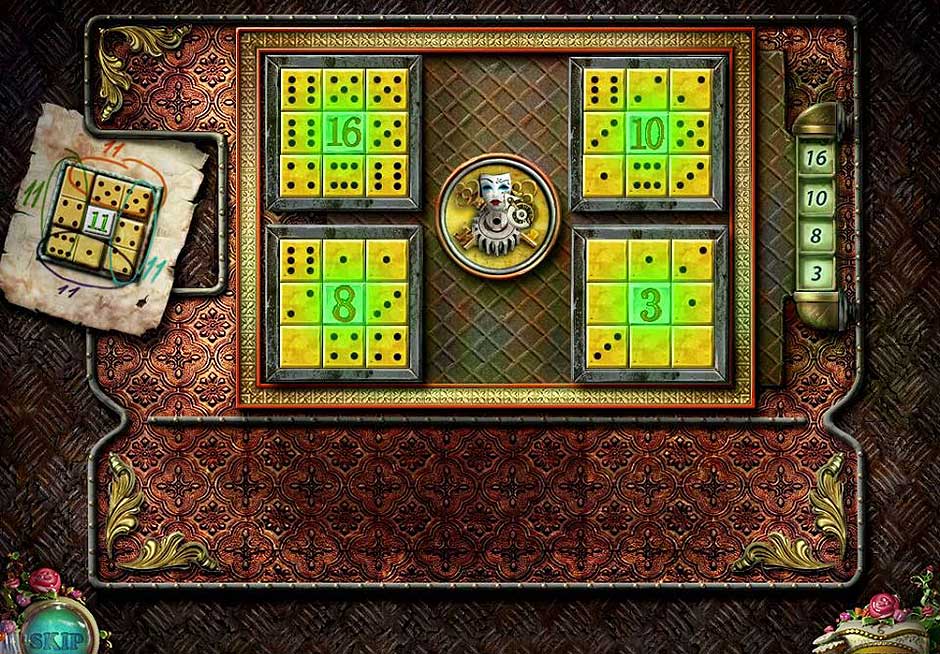
PuppetShow – Souls of the Innocent – Dominoes
Collect the handle. To exit, click the lower right of the screen. Then, click down to exit. Place the handle on the right door’s lock and turn it to open the door. Retrieve the crane hook from the ground near the bicycle. The diagram on the left wall is important. Use the wrench on the drawing’s upper right side. Head back to the Conveyor Area and go down. Once you go through the door, turn left to find the next hidden object scene.
You will receive the bicycle chain. Head to the Balcony near the bicycle. Use the bicycle chain on the bicycle. This is make the bridge appear when the marionette pedals. Head over the bridge by clicking on the Second Tower.
Chapter 8: Second Tower
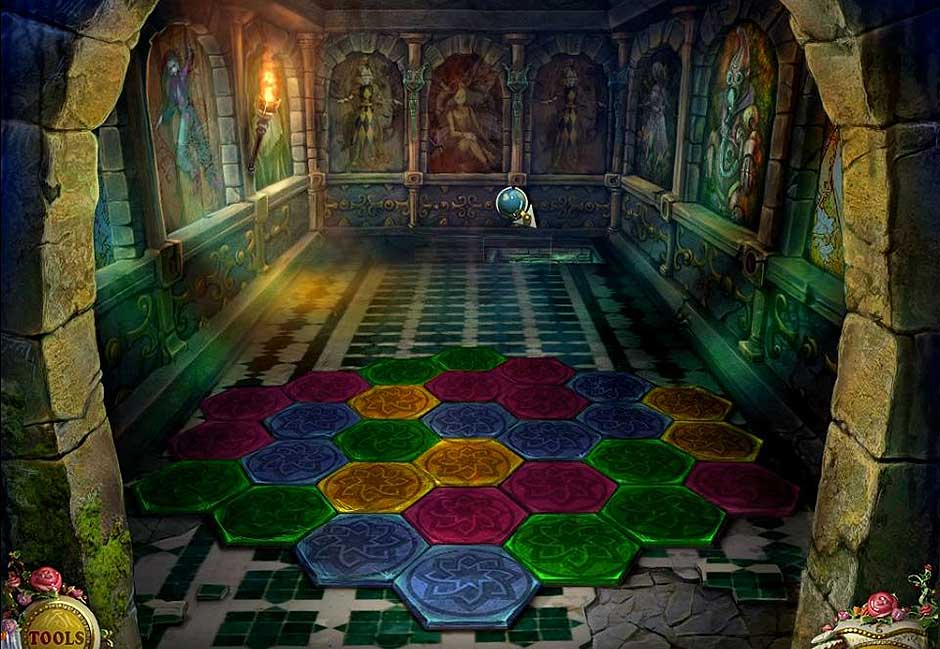
On the floor, position the colors so that none of them are touching the same color to unlock the grid. Then to swap positions, you will select two sets of tiles. To reach the stairway, click on the right corner. Pick up the arrow button in the middle of the left window. Remove the planks on the smaller door with the crowbar. This will unlock another hidden object scene.
PuppetShow – Souls of the Innocent – Tiles
Collect the AWL. Next, head down three times before going to the left down, and then, turn left again to get to the Conveyor Area. Next, put the crane hook onto the crane. Head to the Control Room to the right. Use the arrow button on the panel. Next, lift the bridge using the crane. After this, head back to the Converyor Area and click on the lower left on the mechanism. Next, use the wrench to remove the nuts.
PuppetShow – Souls of the Innocent – Bridge
Then, head back to the Gallery, which is where the large fish tank is located. Click on the fish tank. There is a slot on the lower left. Use the nuts there. Click on the red button when you hear the bell ring. The pipe is in the upper center of the tank, and the fish will catch the nuts as the fall down from it. For each nut eaten, the balloon will rise on the right.
Use the AWL to pop the balloon when it reaches the opening. This will let you collect a key. Move forward three times to find the trapdoor in the right corner. Use the key to unlock the door at the bottom of the steps. Head through the door to get to the Arsenal.
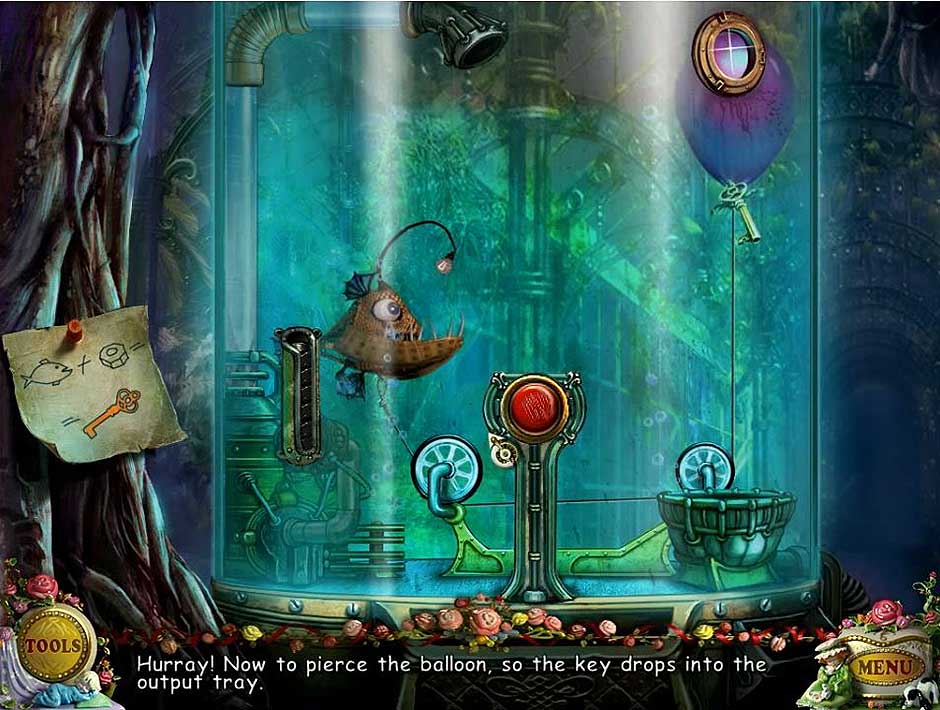
PuppetShow – Souls of the Innocent – Balloon
Chapter 9: Arsenal
On the right, you will find the first hidden object scene that is available in the Arsenal.
You will receive the mask. Next, click on the board on the ground. Put the mask on it to unlock a puzzle. After completing the mask puzzle, you will retrieve the sign that is in the lower right of the screen. Exit the view. Head to the Candle Room to get to the Library. Here, you will find the next hidden object scene on the right.
PuppetShow – Souls of the Innocent – Mask Puzzle
This will give you paper. Next, click down to exit. With the matches, burn the cobwebs that are found on the back wall near the spider marionette. Make note of the symbols on the printed paper. Leave and click on the desk. Here, you will find a puzzle in the drawer.
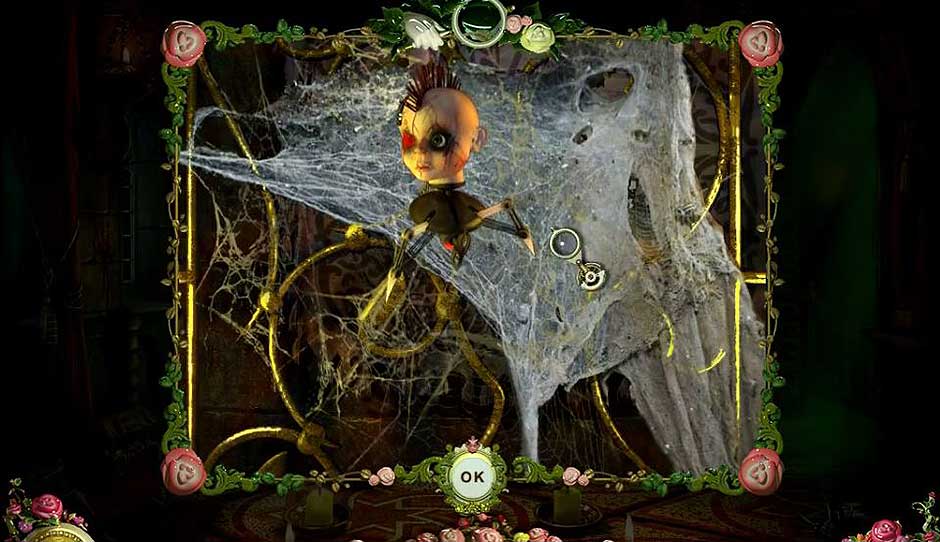
PuppetShow – Souls of the Innocent – Spider
To find the order of the symbols for the puzzle, look to the scratches on the wood. Click the book twice, in order to open it. On the last page, pick up the Rune #2. You need to find two missing pages to complete the book. Go to the Arsenal by heading down three times. This will open the next hidden object scene.
This will give you a file. Head down. Here you will find the final hidden object scene in Chapter 9.
Collect the bolts from completing this hidden object scene. After exiting the scene, go down three times. Go to the left twice, and then click on the door on the left.
Chapter 10: Marionette Storage
In order to enter the Marionette Storage, put the sign on its door. Use the bolts to fix the mechanism in the upper center of the room. This will unlock a hidden object scene.
This will give you a marionette key. At this time, you will go to the lobby for a cut scene. Cut the chains in the lower right by using the file three times. Get the scrap iron from the bucket. Then, on the stairs, get the torn page. At the elevator, you will find the next hidden object scene.
PuppetShow – Souls of the Innocent – Mechanism
This will give you the beam. Head back to the Arsenal in the Second Tower. Put the scrap iron into the bucket in the back of the scene. Use the Marionette key to animate the marionette there. Click the key three times. After the animation stops, collect the cannon. Head to the Gallery for the next hidden object scene.
Collect the scissors. Next, head to the Conveyor Area in order to get back to the Marionette Storage. Use the scissors to cut a piece of rope to get a wick after clicking on the third shelf. This will unlock the last hidden object scene in Chapter 10 that will give you a door handle after completion.
Chapter 11: Third Tower
Head to the Lobby before going forward. Repair the stairs with the beam before heading up the stairs. Put the cannon and wick on the gun carriage found on the bridge. Use the matches to light the wick. Check out the door in the far back right to collect the rune there. Head through the door. Put the door handle on the bottom door to unlock it. Then, go through that door. Take the torn page from the painting in the upper left. This is where you will find the next hidden object scene.
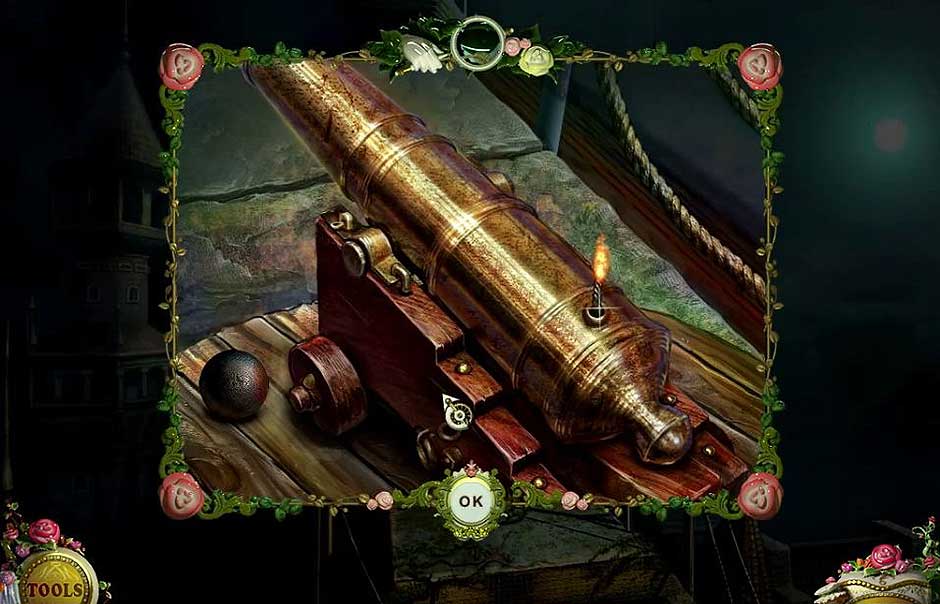
PuppetShow – Souls of the Innocent – Cannon
Retrieve the owl head. Next go to the Library found in the Second Tower before turning right to go to the Candle Room. Here you will be able to find the last hidden object scene in Chapter 11.
Collect the combination lock. Open the book on the desk. Replace the pages in the book to see the picture of a crystal needed. Click on the bookcase on the left side. At the center of the bookcase, use the owl head to trigger a puzzle. After completing the puzzle, collect the rune at the bottom of the statue.
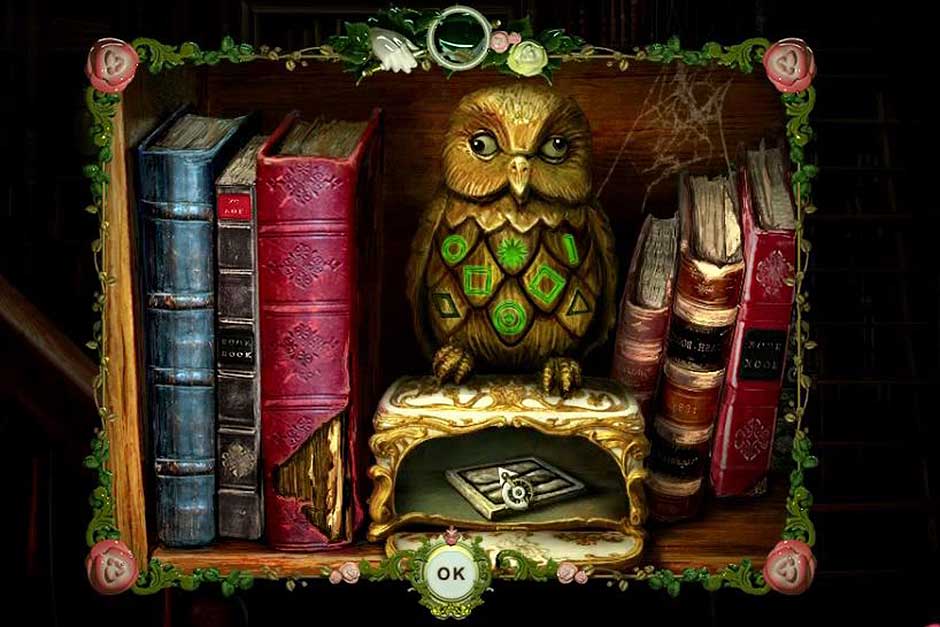
PuppetShow – Souls of the Innocent – Owl
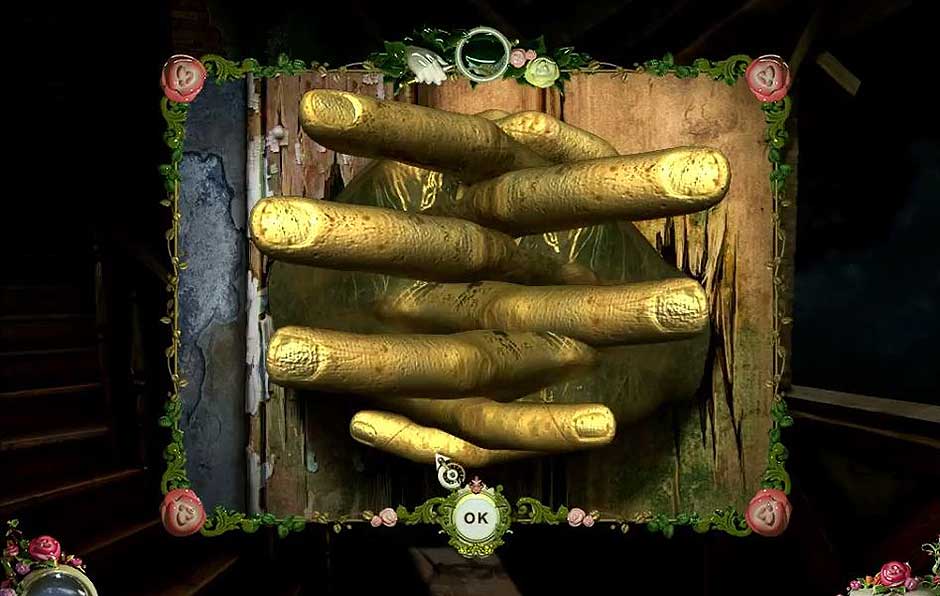
This will reveal a door that leads to the Lobby. Once there, go up the stairs and then forward three times. Click on the safe in the lower corner. Use the combination lock to open the safe and retrieve the finger inside of the safe. This will reveal the last hidden object scene in Chapter 11 and allow you to collect the pickaxe.
Chapter 12: Laboratory
Head downwards until you get to the balloon crash site. Use the runes on the small door in the upper left. Collect the crystal using the pickaxe. From here, you will head forward seven times. Head up to the Observatory. Use the finger to start a puzzle. After completing the puzzle, enter the Laboratory. Using the crowbar, kill the spider marionette. Then, place the crystal there. This will conclude the actual game, and it will unlock the extra levels. You can access these levels at the Main Menu.
PuppetShow – Souls of the Innocent – Finger
Extra Levels
After completing the extra levels, you will be able to access other extra content. All you have to do is go back to the Main Menu, and then, press play. On the steps, there is a little girl playing, click her. Go in the left door. After completing the puzzle there, head to the Historic House through the door.
Grab the Logo Part near the edge of the carpet. The markets on the wood will allow you know how to fix the marionette that is on the desk. To the left, you will find the first hidden objects scene.
Collect the telescope. At this point, you will head to the Fortune Teller’s House, which can be found on the left. Once entering, you will play another hidden object scene.
You will receive the trowel. Outside the Teller’s House, you will use the trowel on the potted plant to get the lever. Then, head to the Marionette Shop. Next, you’ll retrieve the chisel from the small window on the outside of the shop. Head inside the shop to play the next hidden object scene.
Get the hammer and head back to town. At the chimney, you will break the glass with the hammer to retrieve the corkscrew. This will open a new location. Between the Marionette Shop and the Teller’s House, there will be a dead end street. Get the button from the left window, and then go back inside the Marionette Shop. Use the corkscrew to get the cork from the train in the lower right. Then, complete the next hidden object scene.
Retrieve the marionette head, and then, go to the Historic House. In the Historic House, you will play another hidden object scene upon entering.
Collect the spool of thread. Then, take a right after exiting the Marionette Shop. Use the chisel and the hammer to remove the stone on the ground. Connect the fishing hook to the spool of thread, before returning to Town. Go back to the dead end street. Use the key at the back door to unlock the next puzzle. After completing the puzzle, go into the Observatory. Put the level into the slot near the gate, and then click it to gain entrance. Collect the rag from the left picture, before playing the next hidden object scene.
You will get a logo part for completing it, and then, go back to the Fortune Teller’s House. Wipe the crystal ball with the rag in the back until the #13 appears. This will unlock the next hidden object puzzle, on the left.
Retrieve the marionette arm, and then, go back to the Historic House. Click on the desk, and then fix the marionette with the arm and head. At this time, the marionette will open the door after putting the button on the desk. Gain access to the Vault. Pick up the empty bottle that is behind the pipe. Use the logo parts on the back door.
To start a puzzle, change the number on the door to “13”. After completing this puzzle, head through the door. Here, you will find the next hidden object scene, and after completing it collect the Tap.

PuppetShow – Souls of the Innocent – Bonus Level 13
Click on the barrel found on the lower left. Put the empty bottle into the crate, and then put the tap onto the bottle. Use the tap to fill up the bottle. Cork to bottle to make it full. Leave the Marionette Shop, and head to the Town Square. Click on the lamppost to see the candle. Extinguish the candle with the full bottle, and collect the file behind it. After this, go to the vault at the Historic House. There is a grid in the upper left. To collect the lens saw through the grid with the file. Here, you will find the final hidden object scene.
This will give the a disk. Head back to the observatory. Use the disk and telescope to put it on the stand. Then, use the lens on the telescope. Upon clicking on the telescope, you will see the end of the game!
All in all, we hope that you have enjoyed this walkthrough of Puppet Show – Souls of the Innocent. You will be able to make it through all the different areas by following the information above. You can even complete the extra levels to gain access to popular wall papers and extras that can only be unlocked after completing these levels. Enjoy!
For more great tips and tricks, visit our blog!
The Puppet Show – Souls of the Innocent Walkthrough is meant as a guide and does not contain cheats, hacks or serials.