When a sudden roadblock diverts your journey, your son suddenly goes missing! Explore the grounds of Westerfeld Manor in search of Jake. Our Parallels Cross walkthrough is a step by step guide which contains tips, tricks, and puzzle solutions.
Contents
General Tips & Tricks
Just getting started? Need a refresher? This section covers the general tips and tricks you’ll need while playing Parallels Cross.
- When starting the game for the first time, you’ll be able to select from three difficulties:
- Relaxed – Active zones are highlighted. Skip and Hint buttons recharge quickly. The Map contains marks on where you’ve been and which locations have been completed.
- Normal – Active zones are not highlighted. Skip and Hint buttons recharge slowly. The Map contains marks on where you’ve been and which locations have been completed.
- Expert – Active zones are not highlighted. There are no Skip or Hint buttons available. The Map does not contain marks.
- The Hint button is located in the bottom left corner of your screen. Once all the lights have been lit, you can click on this button to receive a hint as to your next location, or what you should do next.
- The Skip button will take the place of the Hint button during puzzles. Once the button has been fully charged, you may opt to skip the puzzle.
- The Map is located in the lower left corner of your screen. Click on the Map to view locations you’ve been to. Depending on your difficulty selected, you can also view which areas you’ve completed. Click on an area you’ve visited before to instantly travel to that location.
- Inventory Items are outlined in bold in the guide below. Hover your cursor over the bottom of your screen to bring up the inventory at any time.
- Locations are italicized in the walkthrough below.
Parallels Cross Walkthrough
When a mysterious road block prevents you from travelling further and your son goes missing, it’s up to you to find out where he’s gone. Your journey will lead you through the mysterious and abandoned Westerfeld Manor, a complex shrouded in secrecy. Can you solve the mystery and locate your lost boy?
Chapter 1: The Mansion
A long drive is interrupted by a sudden roadblock. When your son disappears, it’s up to you to follow him onto Manor grounds.
Road
- Take a closer look at the fence on the left. Click on the stick toward the bottom right to add the Tree Branch to your inventory.
- Click on the car trunk to open it, then take a closer look inside. Click on the items within the trunk to move them to the right. Click on the Tow-rope on the left side of the trunk to add it to your inventory.
- Combine the Tree Branch and the Tow-rope to acquire the Tow-rope with Branch.
- Use the Tow-rope with Branch on the tree branch over the fence on the upper left.
- Click on the rope to proceed over the fence into the next area.
Park
- Proceed forward into the next area.
Fountain
- Zoom in on the illuminated map. Click on it to add the Map to the lower left corner of your screen. Now you can view all locations you’ve been to, and even fast-travel between them.
- Examine the fountain beneath the billboard where the Map was posted. Move all the books aside (Tip: It’s easiest if you move them to the left) and click on the purple Leaflet Page to add it to your inventory.
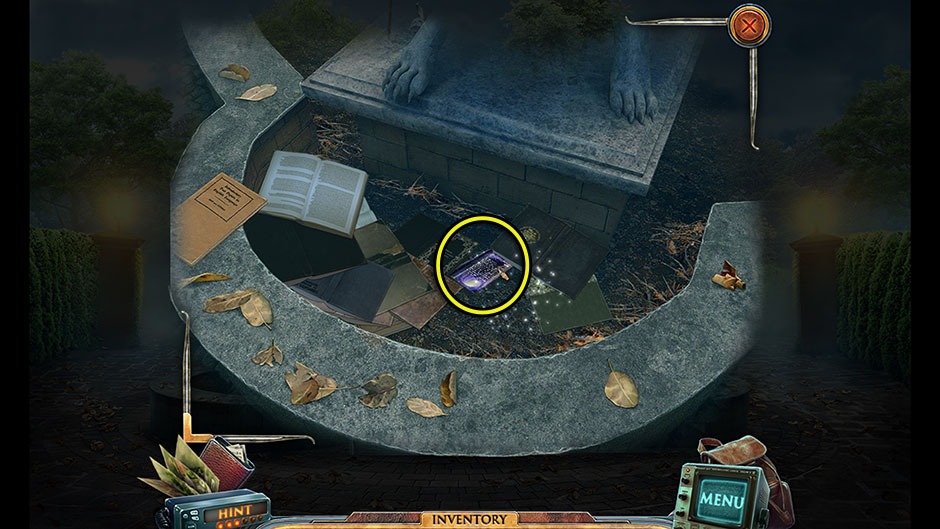
Parallels Cross Leaflet Page Location
- Proceed through the first entrance on the right to the next location.
Passage
- Note the broken umbrella on the right.
- Continue forward to the next location.
Courtyard
- Examine the tag lying at the base of the statue. Click and hold to pull out the Part of Note.
- Continue to the right.
Alley
- Take a closer look at the doorway to the building ahead in the distance. Click on the Leaflet Cover in the top right corner of the steps to add it to your inventory.
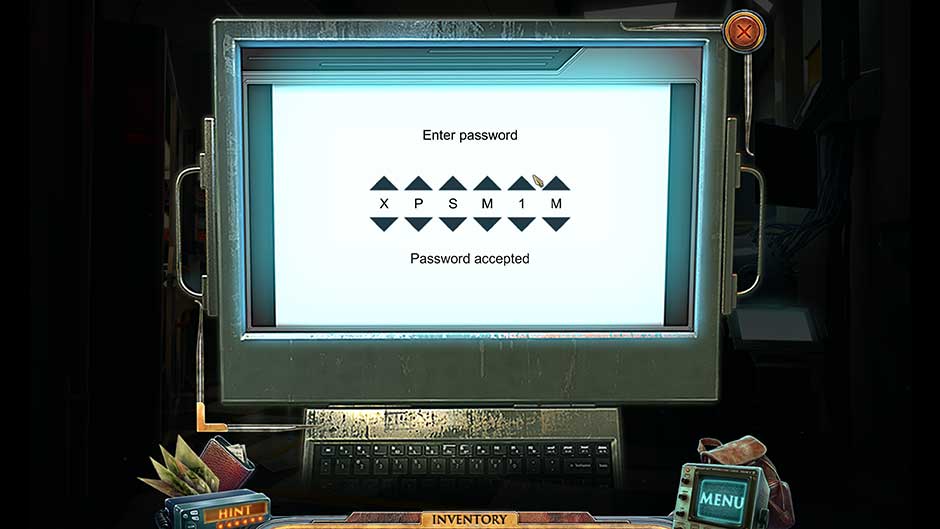
- Combine the Leaflet Page and the Leaflet Cover to trigger a puzzle.
- Move the leaflet cover so that it reveals a hidden code. Once you’ve solved the puzzle, the solution XPSM1M will be added to your journal. The solution is pictured here.

Parallels Cross Leaflet Cover Puzzle Solution
- Continue forward toward the small building on the right.
Gate
- Enter through the door and into the small building.
Booth
- Zoom in on the monitor displaying static in the corner. Click on the Part of Note (2) hanging from the bottom right corner to add it to your inventory.
- Combine the Part of Note x2 with each other to obtain a clue, which will be added to your journal. The clue is 59813556.
- Open the top drawer on the right side of the desk. Move the objects within the drawer to the left until you uncover the black and yellow Nippers. Click on them to add them to your inventory.
- Click to open the upper left drawer of the desk. Move aside the objects inside until you uncover the yellow Flashlight Without Batteries.
- Return to the Courtyard.
Courtyard
- Take a closer look at the door. Input the code 59813556 into the keypad.
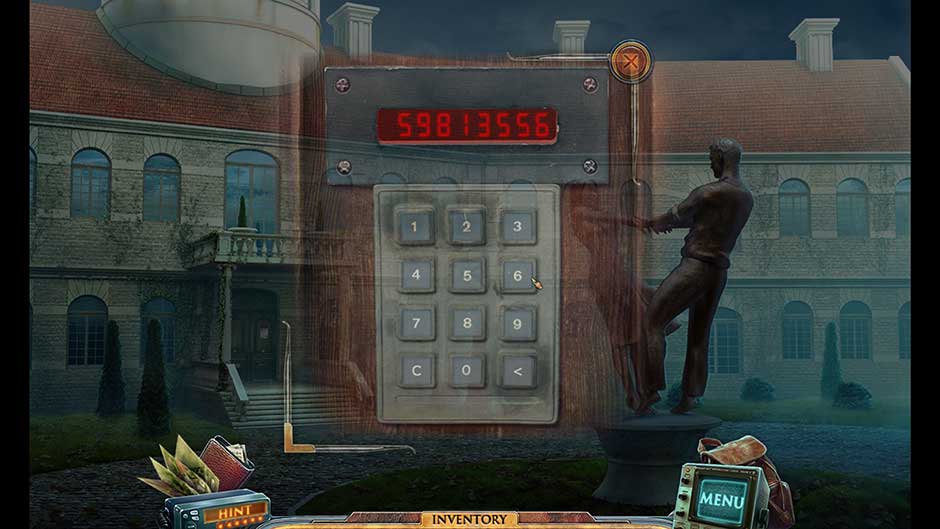
Parallels Cross Mansion Entrance Keypad Code
- Enter the mansion.
Hall
- Upon entering the mansion, you’ll find it’s too dark to see. Return to the Passage.
Passage
- Take a closer look at the mangled umbrella on the right. Use the Nippers to clip the wire and obtain the Picklock.
- Return to the Courtyard.
Courtyard
- Examine the locked electrical box to the right of the mansion doors. Use the Picklock to remove the lock and open the panel, revealing a puzzle.
- Flip the switches in the correct order to restore power. The solution is shown below.
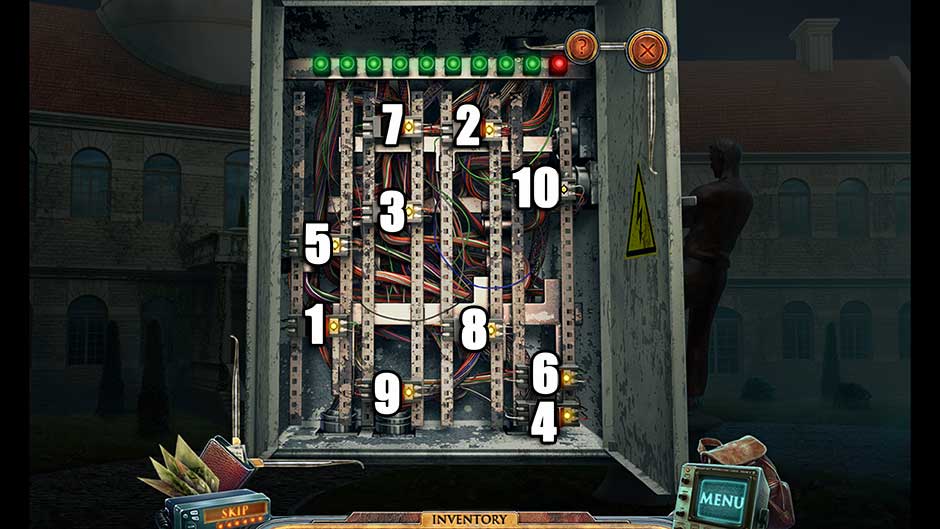
Parallels Cross Electrical Box Switch Flip Solution
- Upon completing the puzzle, power will be restored to the building. Enter it once more.
Hall
- Examine the tipped-over toolbox at the base of the tree. Pick up the Screwdriver, the Chisel, and the Hose to add them to your inventory.
- Proceed through the doors on the left.
Lab
- Take a closer look at the red computer screen on the left. Click on the Office Key on the left side of the desk to add it to your inventory.
- Examine the cabinet on the far left side of the screen, against the wall. A puzzle will be triggered.
- Arrange the dots in such a way that no lines cross or intersect in order to open the cabinet. The solution is pictured below.
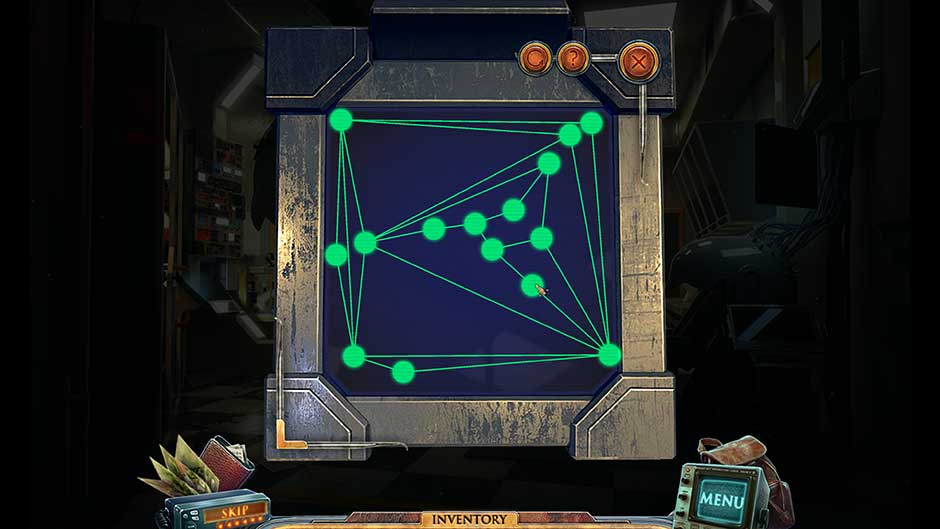
Parallels Cross Lab Cabinet Puzzle Solution
- Upon completing the puzzle, click on the L15 Substance sitting on the top shelf to add it to your inventory.
- Return to the previous room.
Hall
- Take a closer look at the door on the right. Use the Office Key on the lock to open it, then proceed inside.
Office
- Examine the pillar covered in notes straight ahead. Click on the bottommost full-page note entitled “Logos!!!” to add it to your journal.
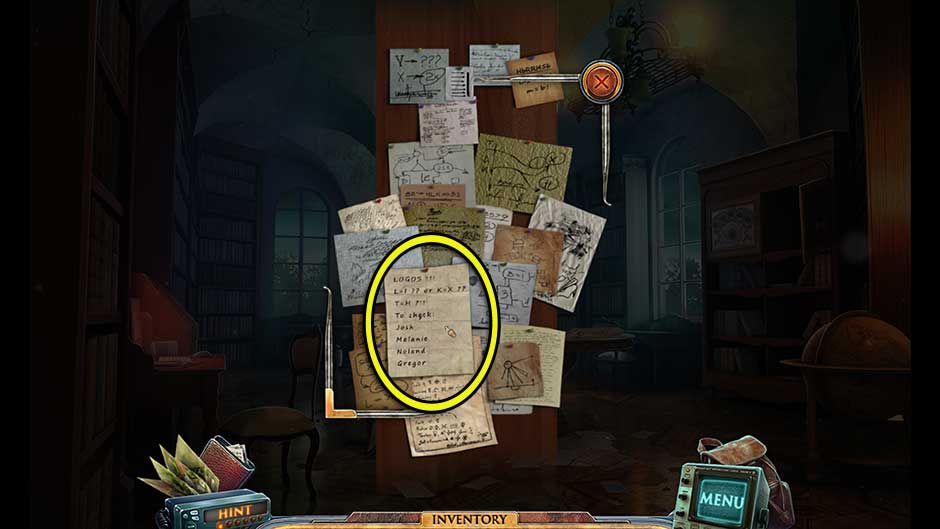
Parallels Cross Office Note Page
- Take a closer look at the desk on the left. Open the desk drawer and move all the postcards within to the left, revealing the Glass Cutter in the bottom of the drawer. Click on it to add it to your inventory.
- Examine the clock radio toward the upper right. Use the Screwdriver to remove the backing, then click to add the Batteries to your inventory.
- Combine the Batteries and the Flashlight Without Batteries in your inventory to obtain the Flashlight.
- Back in the main area, zoom in on the safe near the top of the cabinet on the right to trigger a puzzle.
- Set the code encryption using the dial below, then use the dials above to input the correct code. The encryption code is such that I in the golden ring should line up with J in the inner ring. Set the dials to I, F, N, F, and B respectively to spell “LOGOS”, as depicted in the note clue. The solution is shown below.
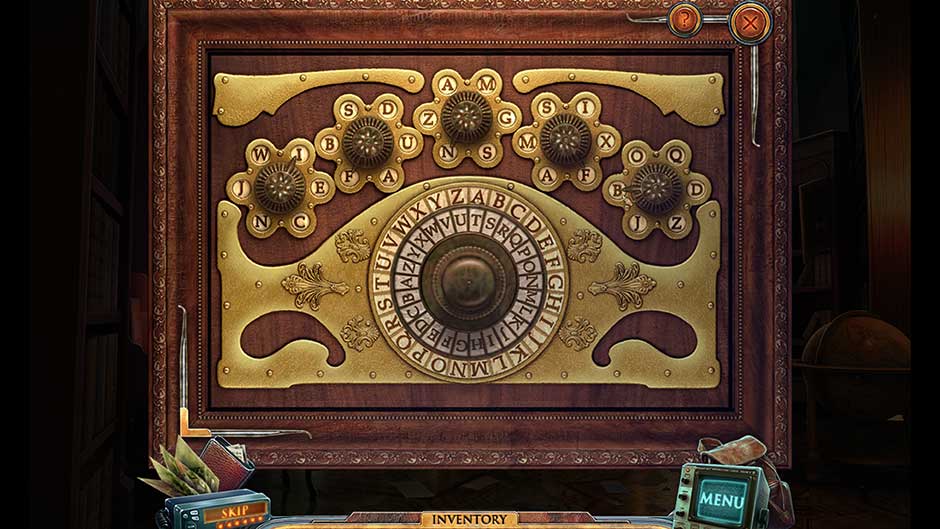
Parallels Cross Office Safe Puzzle Solution
- Once the safe is open, read through the folder inside. Note the stamp – you’ll be returning here later.
- Exit outside to the Alley.
Alley
- Notice the window extending below ground level toward the left in the distance. Use the Glass Cutter to remove the glass pane, then proceed inside.
Chapter 2: The Campus Girls’ Wing
Finally, a way in! Explore the abandoned campus for traces of your lost son.
Basement
- Take a closer look at the table on the left. Move the objects on the desk to the left until you uncover the Pencil in the lower right corner. Click to add it to your inventory.
- Proceed forward into the next location.
Boilers
- The room is dark upon entering. Use the Flashlight to illuminate the area.
- Click on the door on the right for a closer view. Use the Pliers on the door handle to open it and proceed through to the next location.
Staircase
- Zoom in on the switches beneath the light ahead. Click on the green button of the switch marked “Boiler Room” to flip on the lights in the previous location.
- Proceed up the stairs on the left.
1st Floor Hall
- Take a closer look at the stand marked “Lost and Found” on the left. Click on the Stethoscope at the bottom to add it to your inventory.
- Head up the second set of stairs to the left part of the next floor.
Girls’ Wing
- Enter the second door on the left.
Girls’ Room II
- Pick up the Volatium Book (1) sitting on the chair on the right.
Parallels Cross Volatium Book 1 of 5
- Take a closer look at the inside of the cabinet straight ahead. Read the diary entry at the bottom of the cabinet and collect the Engraved Plate propped up on the right.
- Exit back out to the Girls’ Wing.
Girls’ Wing
- Enter the through the fourth door from the left.
Girls’ Room I
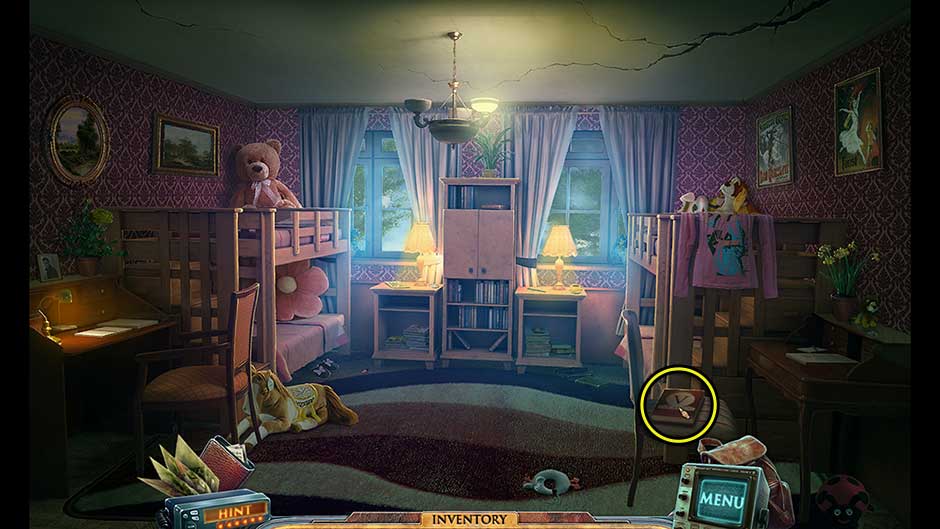
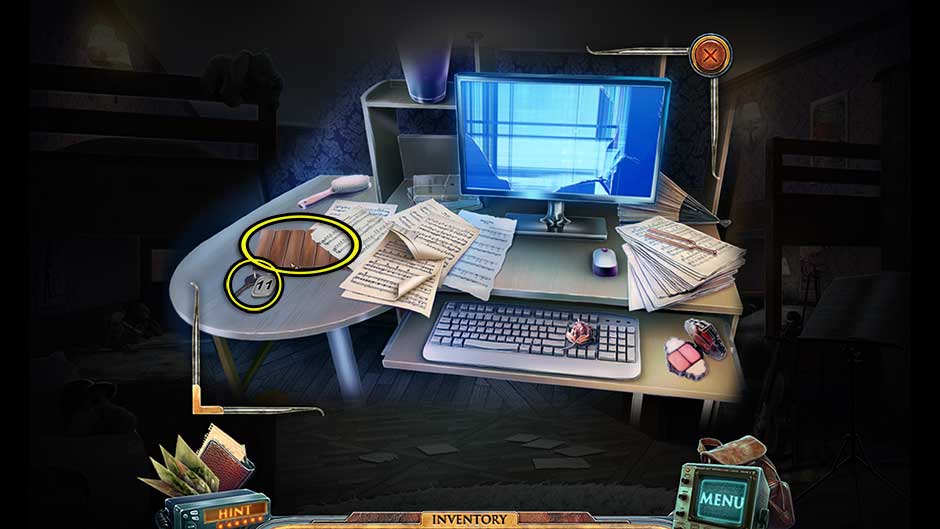
- Examine the desk sitting in the back right corner. Move the sheet music on the left over onto the center of the desk, revealing the Xylophone Planks and the Key #11.
Parallels Cross Girls Room I Items
- Take a closer look at the desk sitting in the back left corner. Click on the page of the notepad to lift it, then place the Engraved Plate on the notepad. Click on the page to move it over top of the Engraved Plate, then use the Pencil to outline the design etched on it. The Pencil will remain on the desk, and ¼ of a design will remain on the page.
- Return to the Girls’ Wing.
Girls’ Wing
- Enter the first door on the left.
Bathroom
- Zoom in on the lockers on the right wall. Use Key #11 to open Locker #11. Click on the Liquid Soap stored inside to add it to your inventory.
- Head back down to the 1st Floor Hall.
1st Floor Hall
- Proceed through the door on the left.
Practice Class
- Collect the Volatium Book (2) in front of the skeleton to add it to your inventory.
Parallels Cross Volatium Book 2 of 5
- Take a closer look at the white cabinet beneath the clock on the other side of the room. Click on the LN2 Liquid Nitrogen in the lower right corner to collect it.
- Examine the chemistry table in the rear left corner. Click on the Magnifying Glass lying on the table to add it to your inventory.
- Move your cursor to the left side of your screen and click when the arrow appears to move to the next location.
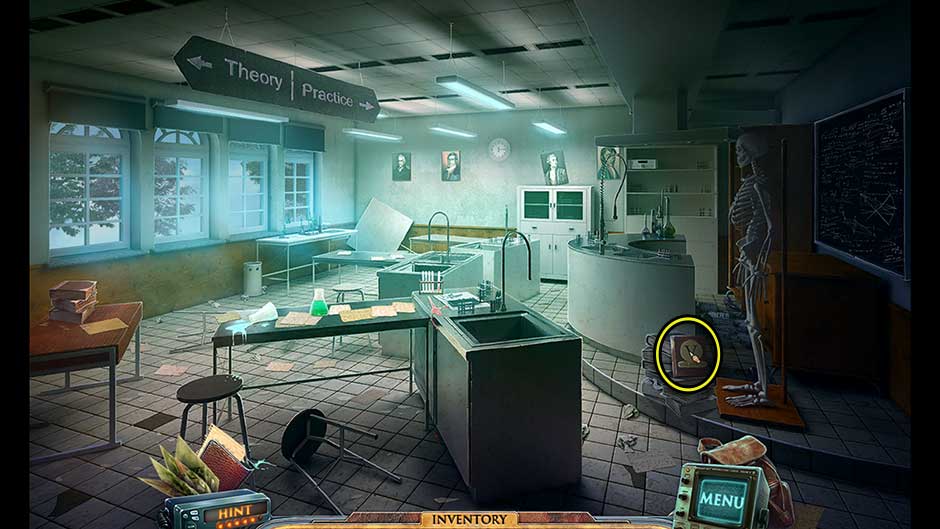
Theory Class
- Examine the top of the nearby desk on which the projector is sitting. Collect the Slide sitting on the surface at the bottom left corner of the notes.
- Click on the switch on the left to unfurl the screen at the front of the classroom. Don’t worry about the projector just yet, as you will be revisiting this location later.
- Return to the 1st Floor Hall.
1st Floor Hall
- Proceed through the door on the right.
Library
- Collect the Volatium Book (3) sitting on the chair on the left to add it to your inventory.
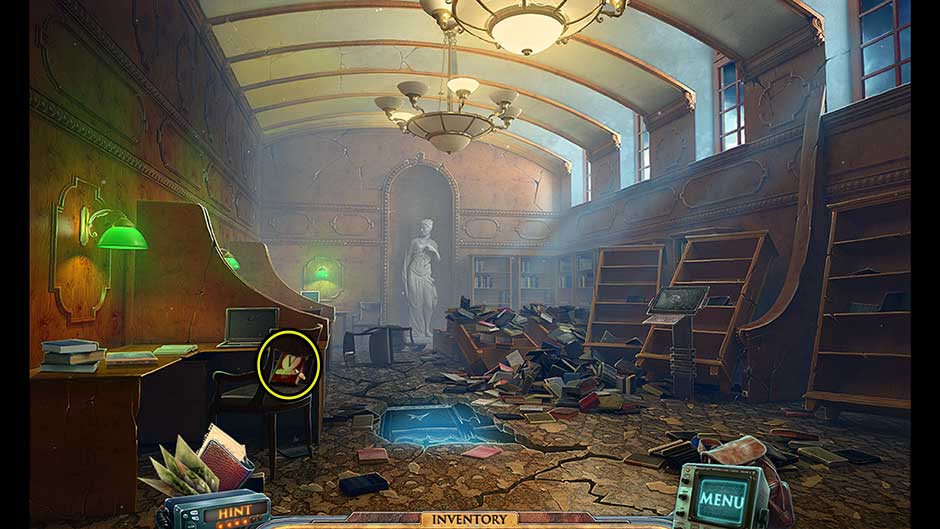
Parallels Cross Volatium Book 3 of 5
- Take a closer look at the pedestal on the right. Click on the Power Cable and the Slide (2) to add it to your inventory.
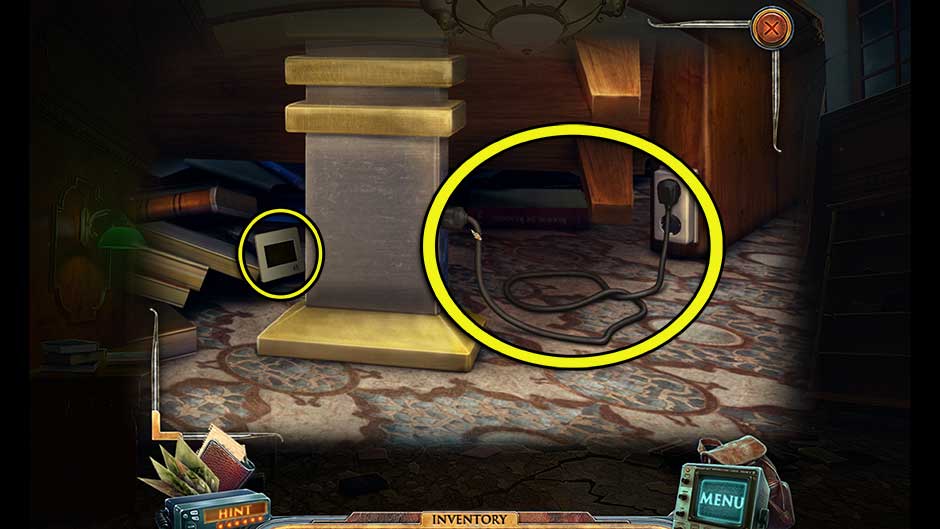
Parallels Cross Library Items
- Exit back out to the 1st Floor Hall.
1st Floor Hall
- Proceed through the doors straight ahead.
Dining Hall
- Click on the Salver sitting on the table right in front of you to add it to your inventory.
- Take a closer look at the fireplace. Click on the Tongs on the right to collect them, then use the Tongs to retrieve the Engraved Plate from the fireplace.
- Continue through the doors at the back of the Dining Hall.
Kitchen
- Examine the inside of the fridge in the back corner. Click on the Slide In Ice to add it to your inventory.
- Zoom in on the stove right in front of you. Place the Slide In Ice on the stove to melt it. Collect the resulting Slide (3).
- Head out the door at the back of the Kitchen.
Sports Court
- Click on the Basketball behind the bush on the left to add it to your inventory.
- Take a closer look at the basketball hoop straight ahead. Use the Basketball to knock down the Blinds Handle. Aim for the center of the hoop in order to knock it down. Each time you don’t succeed, the Basketball will be re-added to your inventory. Once you succeed, you will acquire the Blinds Handle.
- Continue down the path on the right.
Park Alley
- Note the pile of leaves to the left of the path. You’ll be returning here later. For now, continue down the path to the next area.
Quay
- Click on the Rope tied to the beam on the upper right to add it to your inventory.
- Continue across the bridge to the next location.
Arbor
- Click on the Slide (4) beneath the bench on the right to collect it.
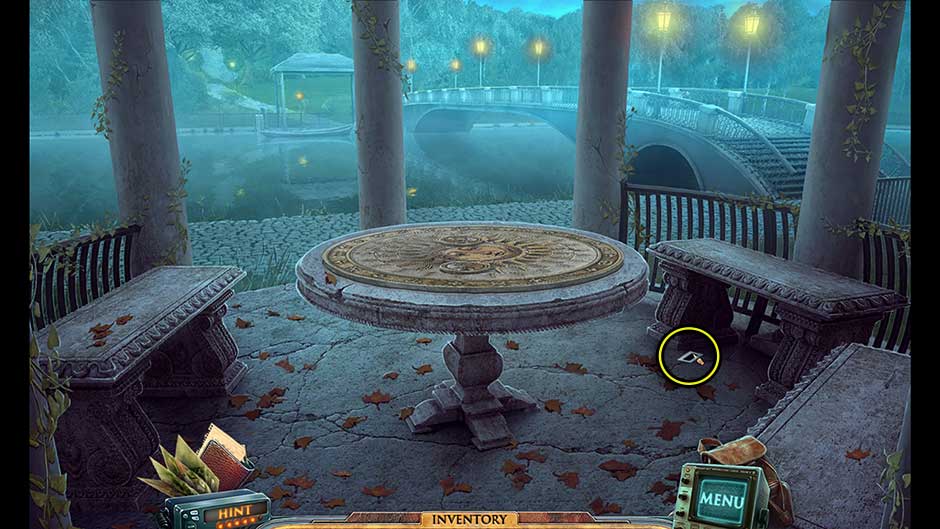
Parallels Cross Arbor Slide Location
- Return to the Lab inside the Mansion.
Chapter 3: The Campus Boys’ Wing
With new locations uncovered, answers start to surface. But will it be enough to help you locate your son and solve the mysteries of the Campus?
Lab
- Examine the base of the machine on the right. Replace the broken chord with the Power Cable from your inventory.
- Take a closer look at the blue screen that appears on the right.
- Input the password necessary to access the machine. The password is XPSM1M.
Parallels Cross Lab Machine Password
- Read through all the notes on the screen by clicking on the arrow on the lower right, until you reach Note #0043. Keep the information “Experiment #270” in mind. It will come in handy later!
- Go to the Office.
Office
- Zoom in on the safe you opened in the upper right corner. Use the Magnifying Glass to take a closer look at the stamp in the frame. Note the number sequence “21285063”, which will be added to your journal.
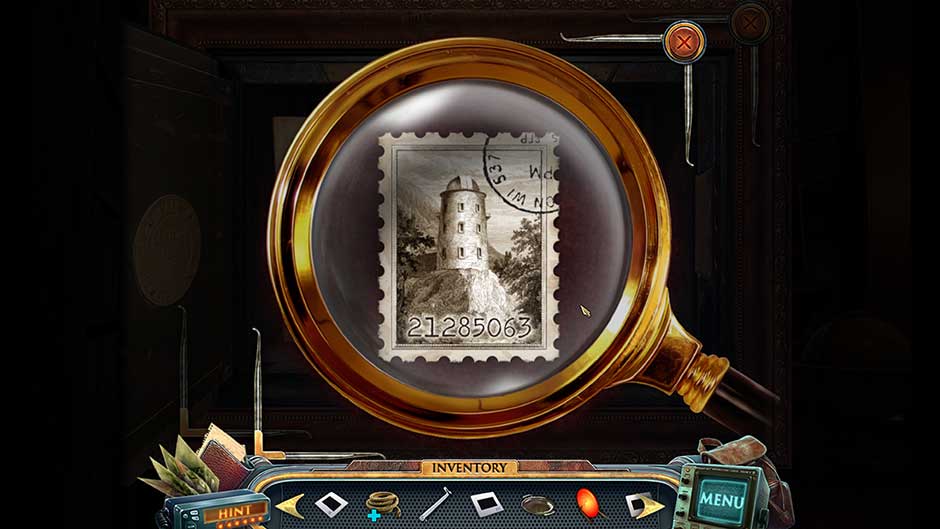
Parallels Cross Stamp Code
- Make your way back to the Theory Class.
Theory Class
- Attach the Blinds Handle to the circular mechanism on the right. Click on it to close the blinds.
- Examine the projector sitting on the desk. Make sure the screen is open, then turn the projector On.
- Click on the grey handle extending out to the left of the projector to open the slide compartment. One by one, insert the Slides, then take a closer look at the projector screen. Each screen’s clues will be added to your journal.
- Once you’ve inserted all the slides and viewed all the clues, return to the Library.
Library
- Examine the pedestal with the screen on the right. Tie the Rope around the base of the pedestal.
- Proceed down through the hole in the floor to the next area.
Laundry
- Click on the beam propped up against the door on the right to remove it.
- Click on the blue Rack On Wheels beneath the white desk in the back right corner to add it to your inventory.
- Continue through the doors on the right.
Staircase
- You’ll find yourself back in the Staircase area. Head back up the stairs to the 1st Floor Hall.
1st Floor Hall
- Continue up the stairs to the upper right wing.
Boys’ Wing
- Enter the second door from the left.
Boys’ Room I
- Pick up the Earth Sign Plate propped up amidst the pillows on the left.
- Examine the desk in the back left corner. Click on the box in the close-up to trigger a puzzle.
- Set the numbers in such a way as that the sums of all numbers vertically, horizontally, and diagonally are the same. The sum of all the numbers should add up to 15. The solution is shown below.
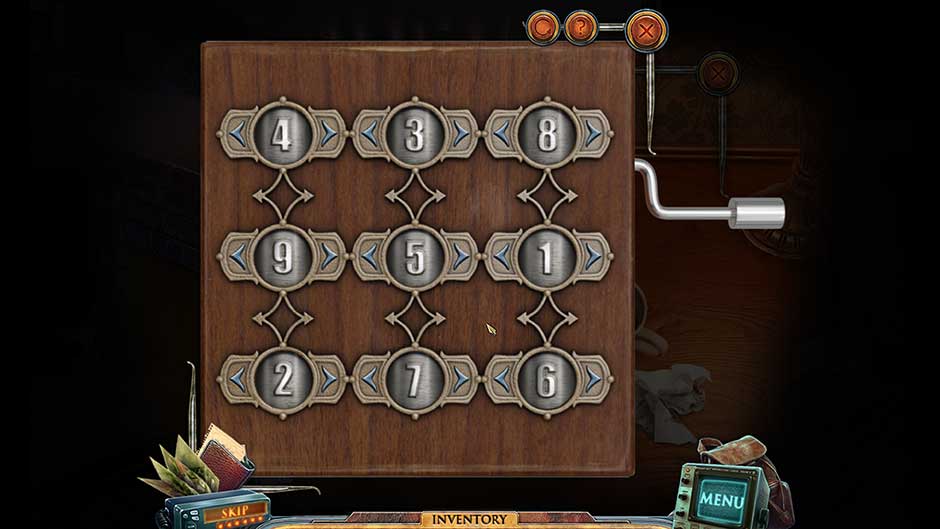
Parallels Cross Music Box Puzzle Solution
- Exit the close-up of the inside of the box for now.
- Examine the note written on lined paper tucked underneath the top of the open book.
- Exit the room.
Boys’ Wing
- Enter the second door from the right.
Boys’ Room II
- Click on the Hammer lying in the center of the floor to add it to your inventory.
- Examine the fish tank ahead. Click on the Duct Tape and the Submarine Toy on the upper right to add it to your inventory.
- Click on the framed painting hanging on the right wall to reveal a safe hidden beneath it.
- Take a closer look at the safe in the wall. Use the Stethoscope to trigger a puzzle.
- Rotate the dial left and right until you hear a click to open the safe. The combination is as follows: Left 20, Right 60, Left 30, Right 45.
- Once the safe is open, read the note inside and collect the Lighter.
- Exit the room and backtrack to the Park.
Park
- Take a closer look at the statue on the left. Use the Chisel, followed by the Hammer on the statue to free the Faucet. Click on it to add it to your inventory.
- Proceed to the Stones area.
Stones
- Examine the fountain straight ahead. Place the Faucet behind the frog at the top of the fountain.
- Click on the frog at the top, the leftmost, rightmost, and bottommost fish to solve the fountain puzzle.
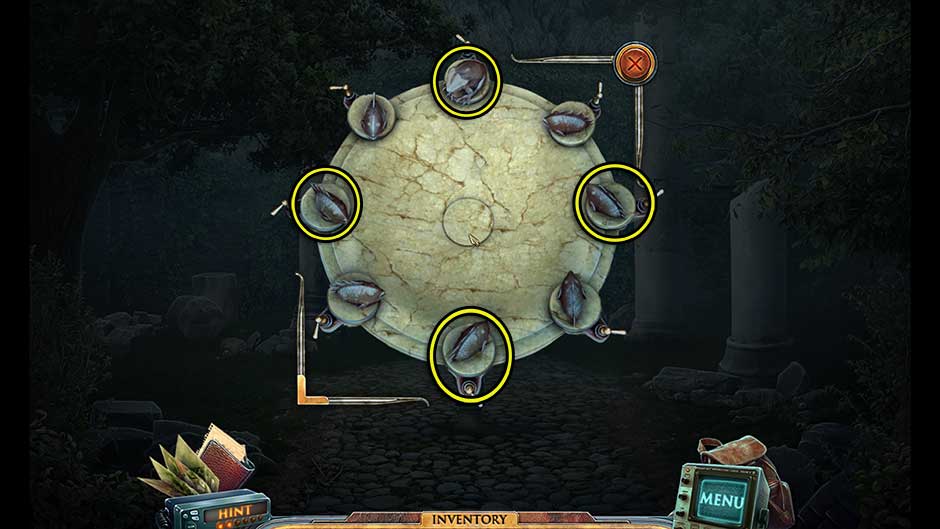
Parallels Cross Fountain Puzzle Solution
- Go to the Sculptures.
Sculptures
- Take a closer look at the bushes behind the fawn in the center, and a little to the right. Click on the Chainsaw Without Fuel to add it to your inventory.
- Head to the Road.
Road
- Look inside the car’s trunk. Use the Hose on the gas canister, followed by the Chainsaw Without Fuel in order to acquire the Working Chainsaw.
- Make your way to the Arbor.
Arbor
- Take a closer look at the top of the table. Place the Earth Sign Plate into the small hole on the lower right to trigger a puzzle.
- Align the sun and symbols according to the sketch in your journal by rotating the rings. The solution is shown below.
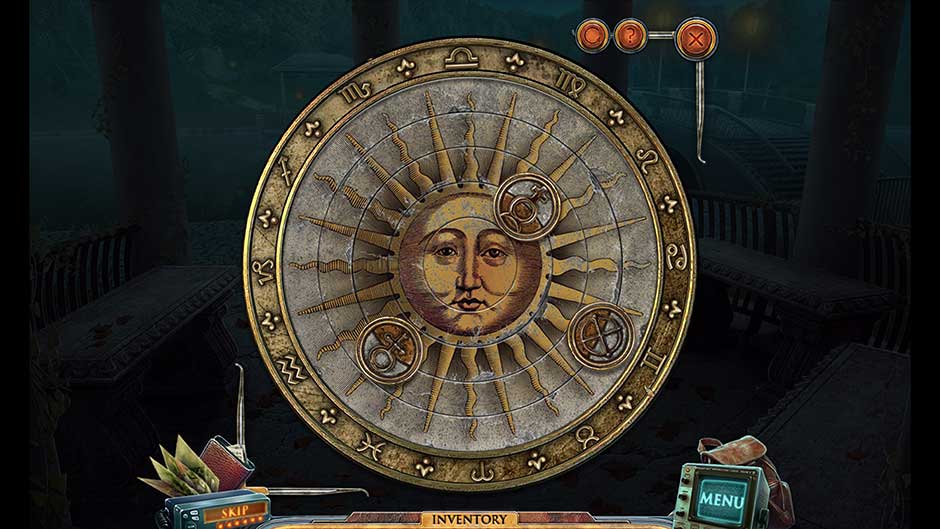
Parallels Cross Sun Puzzle Solution
- Upon completing the puzzle, the center compartment will open, revealing the Music Box Cylinder.
- Return to Boys’ Room I.
Boys’ Room I
- Take a closer look at the music box you opened earlier sitting on the desk in the rear left corner. Place the Music Box Cylinder into the box and click on the handle. A tune will play, the sequence of which (12, 2, 17, 5, 8) will be added to your journal.
- Make your way back to the Mansion Hall.
Hall
- Take a closer look at the broken door behind the right side of the tree. Use the Working Chainsaw to remove the branches blocking the door, then proceed through to the next area.
Greenhouse
- Zoom in on the planters on the right and collect the Agent Purple.
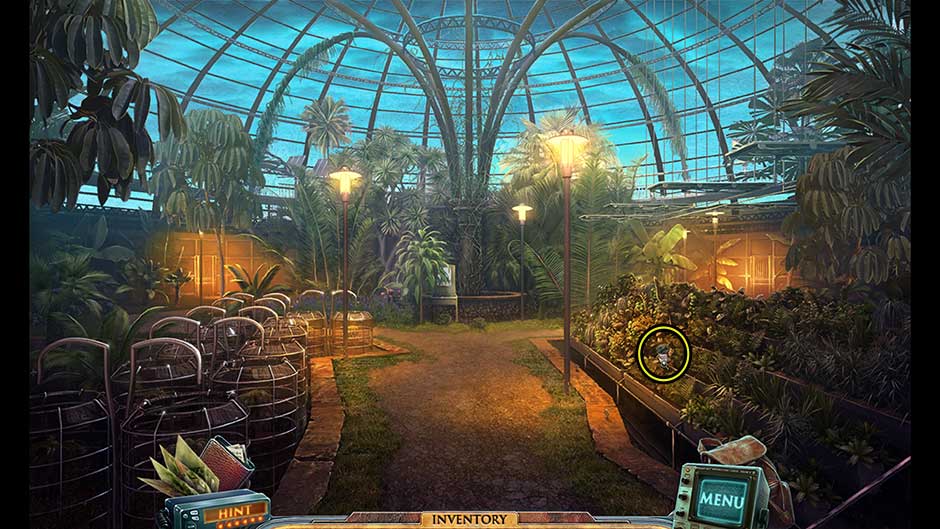
Parallels Cross Agent Purple Location
- Examine the white wash cabinet straight ahead. Collect the Dirty Chemical Glass in the sink and the Mirror hanging above.
- Exit through the door on the right.
Chapter 4: The Farm
As you make your way through the mysterious campus and mansion, you find yourself in an outdoor farm area.
Farm Road
- Click on the Shovel propped up against the fence on the right to add it to your inventory.
- Enter the Barn down the path on the left.
Barn
- Click on the Hook sitting on the table on the right to add it to your inventory.
- Head down through the basement doors straight ahead.
Barn Basement
- Click on the light switch at the top of the steps on the upper right.
- Examine the left foot of the desk straight ahead. Collect the Match and the Bootlace.
- Take a closer look inside the fridge on the left. Open it, then collect the Can
- Zoom in on the toolbox on the left next to the fridge. Collect the Crowbar and the Large Battery.
- Examine the crate beneath the steps on the right. Use the Crowbar to pry it open, then click on the Compactor inside to add it to your inventory.
- Zoom in on the bottom corner of the red carpet. Click on the Slide to add it to your inventory. Lift the corner of the rug to further uncover the Key.
- Zoom in on the desk drawer and use the Key to open it. Collect the Volatium Book (4) and the Can Opener A note inside the top portion of the drawer will offer a vital clue as to what you should do next. Fortunately, we cover those steps, too!
- Combine the Can Opener and the Can in your inventory to acquire the Empty Can.
- Examine the metal drum beneath the table on the left. Place the Empty Can beneath the faucet, then click on the faucet to acquire the Can Filled With Oil.
- Combine the Can Filled With Oil with the Bootlace in your inventory to receive the Can With Fuse.
- Combine the Can With Fuse with the Compactor in your inventory to acquire the Explosion Can.
- Place the Explosion Can at the top of the basement steps. Light the fuse with the Match to make your escape!
- Head back to the Farm Road.
Farm Road
- Head down the path on the right to the Stables.
Stables
- Examine the rear stall. It has a special latch. Move the latch gradually to the right. Alter the pin on the left so that the latch can continue being moved to the right. The path and way in which the latch must be moved is shown below.
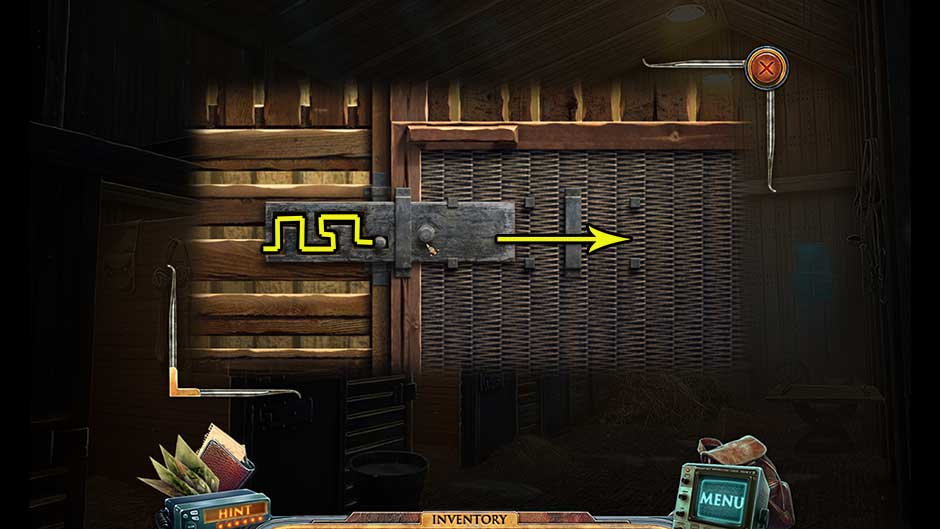
Parallels Cross Stable Latch
- Once complete, take a closer look inside the stall. Click on the Engraved Plate (2) on the shelf on the left and the Hoe at the back of the stall to add them to your inventory.
- Combine the Hoe and the Mirror in your inventory to acquire the Hoe and Mirror.
- Combine the Hoe and Mirror with the Duct Tape to acquire the Hoe With Mirror Attached.
- Return to the Library.
Library
- Examine the pedestal on the right and collect the Rope
- Combine the Rope and the Hook in your inventory to order to obtain the Rope With Hook.
- Make your way back to the Park Alley.
Park Alley
- Examine the pile of leaves on the left and click to clear them away. Use the Shovel on the dirt here – you will need to do this twice – in order to uncover the Rune Plate.
- Go to the Quay.
Quay
- Use the Rope With Hook on the boat to pull it in. Take a closer look inside and collect the Control Panel.
- Click on the Rope With Hook again to add it back to your inventory.
- Head back to the Theory Class.
Theory Class
- Take a closer look at the projector again. Insert the latest Slide from your inventory into the projector. Note the recipe for the Levitation Potion that appears.
- Head to the Bathroom.
Bathroom
- Take a closer look at the sink on the left. Turn on the faucet, then put the red-hot Engraved Plate beneath the water to cool it. The Engraved Plate will be returned to your inventory.
- Place the Dirty Chemical Glass beneath the running water in the sink. Add the Liquid Soap, then collect the cleaned Chemical Glass.
- Return to the Practice Class.
Practice Class
- Take a closer look at the lab table in the rear left corner of the room. Place the Chemical Glass onto the stand on the right. Place Agent Purple beneath the spiral tube on the far left. Add the L15 Substance to the left of the Chemical Glass, and the LN2 Liquid Nitrogen to the stand just right of Agent Purple.
- There’s one more step to complete here, but for now, head to the Boilers.
Boilers
- Examine the box containing the pressure gauges toward the left. Use the Crowbar to pry off the lower right compartment panel, revealing the Engraved Plate (3).
- Return to Girls’ Room I.
Girls’ Room I
- Examine the desk in the rear left corner. Place each Engraved Plate x3 onto the pad of paper. Click on the pad to fold the paper over top, then use the Pencil to etch out the design.
- Once finished, examine the finished design. The result will be added to your journal.
- Head back to the Stones area.
Stones
- Examine the tree design etched in the stone ahead. Insert the Rune Plate on the lower right.
- Click on the runes to change their designs so that they match the pattern shown in your journal. The solution is shown below.
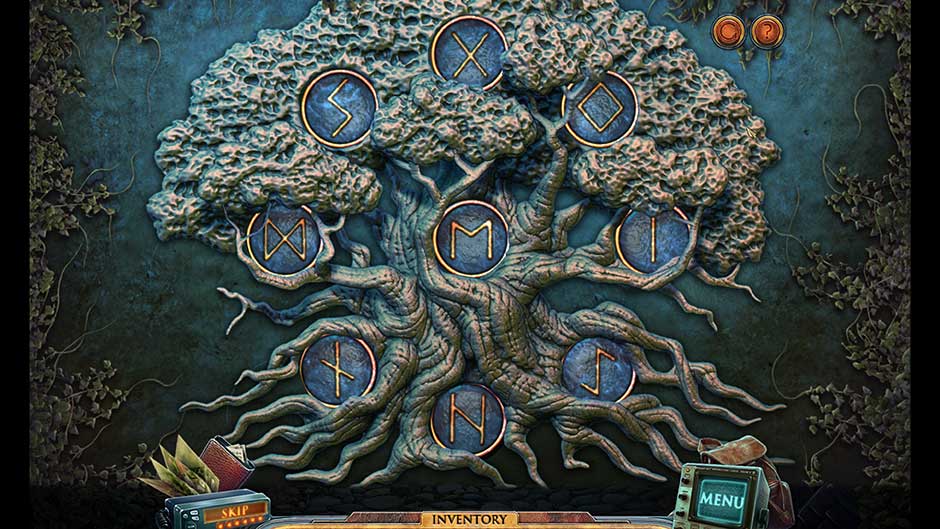
Parallels Cross Tree Rune Puzzle Solution
- Once finished, a secret door will open in the rock face. Enter through to the next area.
Chapter 5: The Observatory
With a new hidden passage uncovered, the mystery only seems to deepen. What secrets lie hidden in the Cave Chambers?
Chamber I
- Collect the final Volatium Book (5) sitting on top of the console on the right.
- Examine the gap in the glass floor near the bottom of the screen. Insert the Submarine Toy into the hole.
- Zoom in on the console screen on the right. Place the Control Panel into the slot on the left to trigger a puzzle.
- Navigate each submarine through their respective maze. The control arrow buttons you click on the left will control both submarines at once. In order to successfully navigate the maze, press the following buttons in the following sequence: Right x4, Up x2, Left, Up x2, Right, Up, Left, Up, Left x3, Up x2, Right x2, Up x2, Left, Up x2, Left, Down x4, Right, Down, Left, Down, Right, Down, Left, Down, Left, Up x8, Left, Up x2, Right, Down, Right, Up.
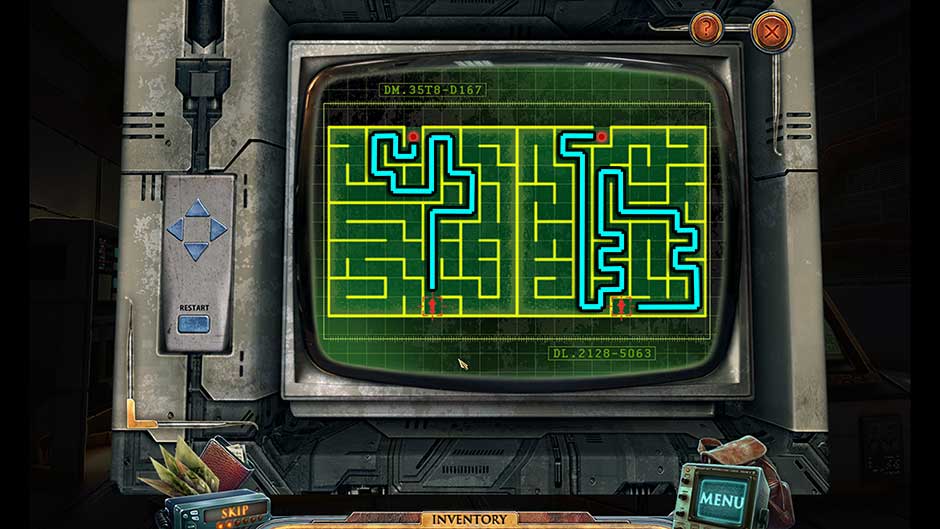
Parallels Cross Submarine Maze
- Upon completing the puzzle, the next set of doors will open. Proceed through to the next area.
Chamber II
- You’ll need the Levitation Potion before you can continue further.
- Return to the Dining Hall.
Dining Hall
- Examine the fireplace at the back of the room. Place the Salver over the coals, then add all five volumes of Volatium Books x5.
- Set the books ablaze with the Lighter and collect the resulting Volatium to add it to your inventory.
- Return to the Practice Class.
Practice Class
- Examine the chemistry table in the back corner of the room again. Place the Volatium into the Glass Cylinder on the right. Then, click on each of the red nozzles holding in their respective mixtures so that the colored mixtures move into the center tubes, initiating a puzzle.
- Mix the four components in the correct proportions. Click on a red nozzle at the bottom of a tube and hold in order to drain the colored liquid. The solution is shown below.
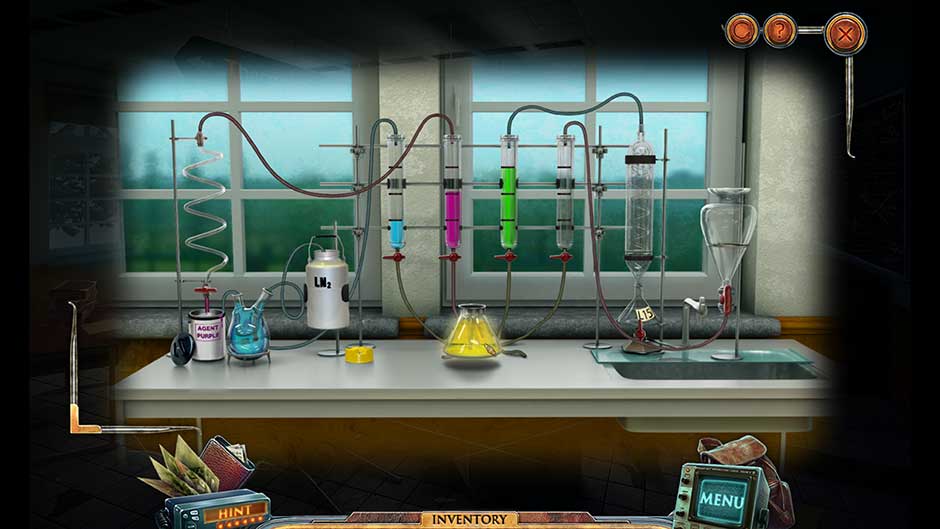
Parallels Cross Levitation Potion Solution
- Upon completing the puzzle, click on the Levitation Potion to add it to your inventory.
- Return to Chamber II.
Chamber II
- Use the Levitation Potion on the center mechanism.
- The door to the next chamber will open. Before you proceed through, return to the Lab.
Lab
- Examine the machine at the rear left corner of the room. Place the Large Battery into the slot and click on the lever so that the power displays as Battery and the generator displays as Off.
- Back in the main portion of the room, use the Rack On Wheels on the console to acquire the Field Transformer.
- Return to the Greenhouse.
Greenhouse
- Exit through the door on the left.
Forest
- Continue forward down the path.
Observatory Entrance
- Notice the green rift blocking your path. Place the Field Transformer in front of the rift.
- Take a closer look at the transformer console. Click on the lever to turn the generator Off.
- The green rift will disappear. Continue up the steps to the Observatory door.
- Examine the keypad to the right of the doors. Input the code 21285063 to gain access.
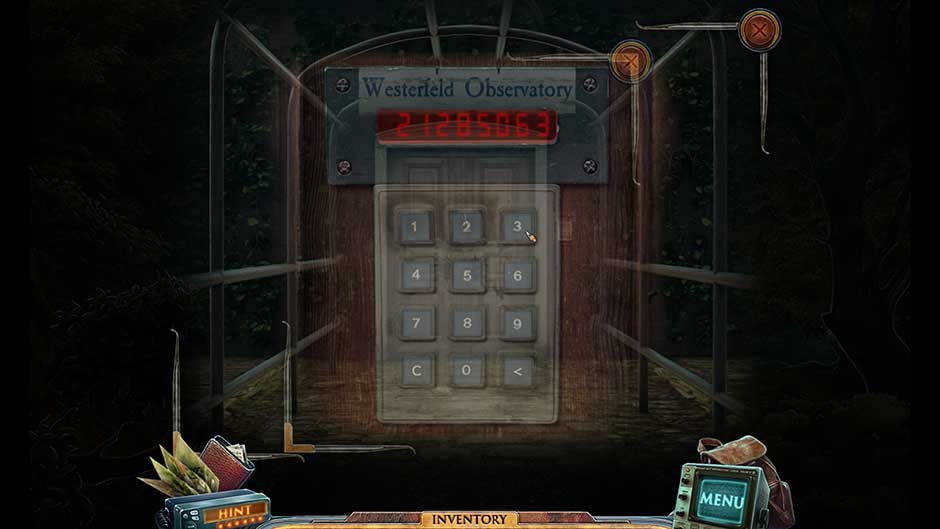
Parallels Cross Observatory Door Code
- Enter the Observatory.
Observatory
- Take a closer look at the control cabin on the upper right – it’s Jake! But he can’t seem to hear you.
- Collect the Xylophone Planks (2) tucked into the guardrail of the steps on the right.
- Head back to Chamber III.
Chamber III
- Examine the xylophone. Place the Xylophone Planks x2 into their slots on either side of the xylophone.
- Click on the xylophone keys in the correct order to solve the puzzle. The keys you need to click on are 12, 2, 17, 5, and 8. Click on them in the number sequence shown below to complete the task.
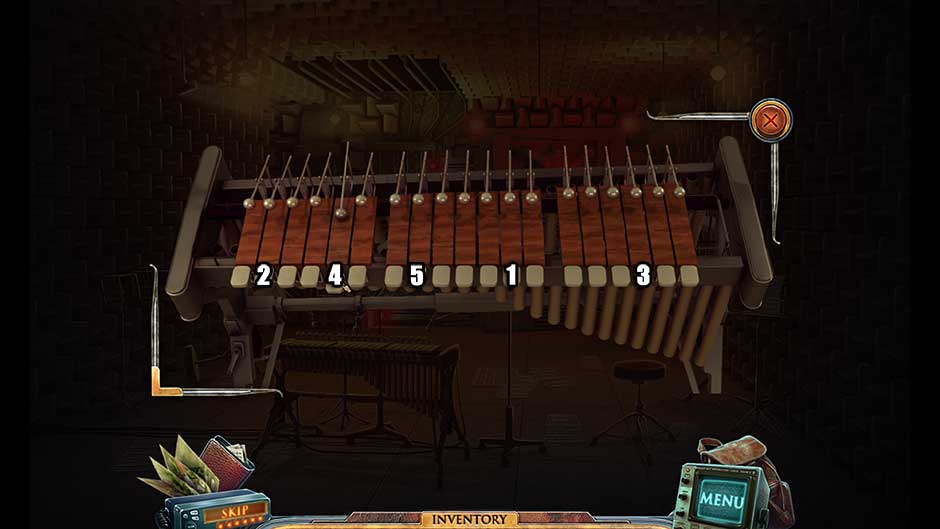
Parallels Cross Xylophone Puzzle Sequence
- Upon completing the puzzle, the next door will open. Proceed through to the next chamber.
Chamber IV
- Take a closer look at the number console straight ahead. Clicking on a number will make the statue on the other side of the bars reveal the number of fingers they were hiding behind their back. In order to solve the puzzle and guess the correct number, use the Hoe With Mirror Attached on the statue to reveal the number of fingers it’s hiding behind its back. Press the corresponding number to solve the puzzle.
- Continue to the right and into the next chamber.
Final Chamber
- Examine the blue screen ahead. Click and hold the arrow on the bar and slide it to the right to unlock the console.
- Read the directions and select “Go for it”.
- The first puzzle requires you to light all the hexagons. Each time you select a hexagon, you will need to select a space next to it to fill it in. The goal is to fill in all the hexagons. The hexagons you should select, and the paths you should click to solve the puzzle are shown below.

Parallels Cross Chamber 5 Hexagon Puzzle
- Once the puzzle is shown, you will be invited to participate in another puzzle. Click “Go for it”.
- The goal of this puzzle is to move the red polygon figure to the target location by clicking the buttons on the lower right to manipulate the 3D puzzle. Using the screenshot below as reference, click on the target icons to move the polygon to the next location. Press the buttons in the following order as necessary, when it’s necessary for you to rotate the puzzle or change its orientation: C x2, B, A, C x3.
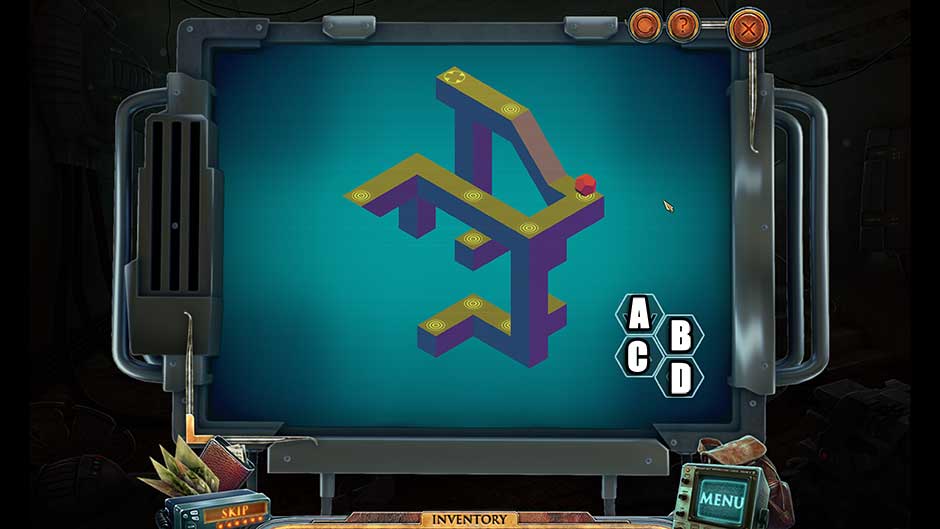
Parallels Cross 3D Figure Puzzle Solution
- Upon completing the puzzle, follow the prompts on screen until you reach the button “Open it”.
- Input the correct code to open the machine. The code is 270, in reference to Experiment #270 as mentioned in the Lab.
- Speak with the boy that appears.
- Proceed through the door on the right.
Observatory
- Talk to Jake, then watch the cutscene that follows…
Congratulations! You’ve completed the Parallels Cross walkthrough!
Be sure to visit our blog for more great tips and tricks!
The Parallels Cross walkthrough is meant as a guide and does not contain cheats, hacks, or serials.

