The most powerful artifact in the world, the Spear of Destiny, has fallen into the wrong hands. Traverse a world torn by war to get it back! Our Spear of Destiny – The Final Journey walkthrough will guide you through all the tips and tricks you need as you embark on this hidden object adventure.
Contents
General Tips & Tricks
Looking to get a head-start on the competition? These tips and tricks for Spear of Destiny – The Final Journey will guide you through the game’s essentials, as well as any bonus pointers you may need.
- When starting a new game, you will be able to choose from one of four difficulty levels: Casual, Advanced, Expert, or Custom. Casual, Advanced, and Expert have preset values, whereas Custom will allow you to customize your gameplay experience to be as easy or difficult as you like.
- Your mouse cursor is an important indicator of what you should do next, or what you can interact with and how within an area. The cursor will turn into the following objects:
- Magnifying Lens- Take a closer look at a given item or area.
- Gears- When the cursor takes this form, you can directly interact with or manipulate an object.
- Hand- You will be able to pick up this item or object.
- Lips- Talk with other characters.
- Question Mark- You can learn something interesting by clicking here. Small hints on what to do next may present themselves.
- Navigation Arrow- Clicking here will allow you to move to a different location in the displayed arrow direction.
- Inventory items are items which you can pick up and hold onto for use at a later time. They will be stored at the bottom of your screen. These objects are displayed in bold in the guide below.
- You can lock your inventory bar into place by clicking on the lock icon in the upper left corner of your inventory.
- If you get stuck at any time, you can use a Hint. The Hint Button is shown in the lower right corner of the screen. Hints are unlimited, but require time to recharge after use.
- If you use a Hint and it directs you to close a close-up window, or proceed to another location, that Hint will not be used up.
- As you play through the game, you will encounter Hidden Object scenes. Find all the objects on the list to complete the scene and move forward. Objects highlighted in blue will require an additional action before you will be able to find them.
- If you don’t want to complete a hidden object scene by finding objects listed at the bottom of the screen, you can click on the colored tiles in the lower left corner to start a game of Match Many.
- To play Match Many, find groups of three or more tokens. Once you’ve made enough matches, a gold “?” token will appear. Make a match next to this token to collect it, removing a Hidden Object from your list. Unleash Radar tokens to clear whole rows! Tokens covered with bars need to have their cages destroyed first. Press the blue plane icon to shuffle as needed.
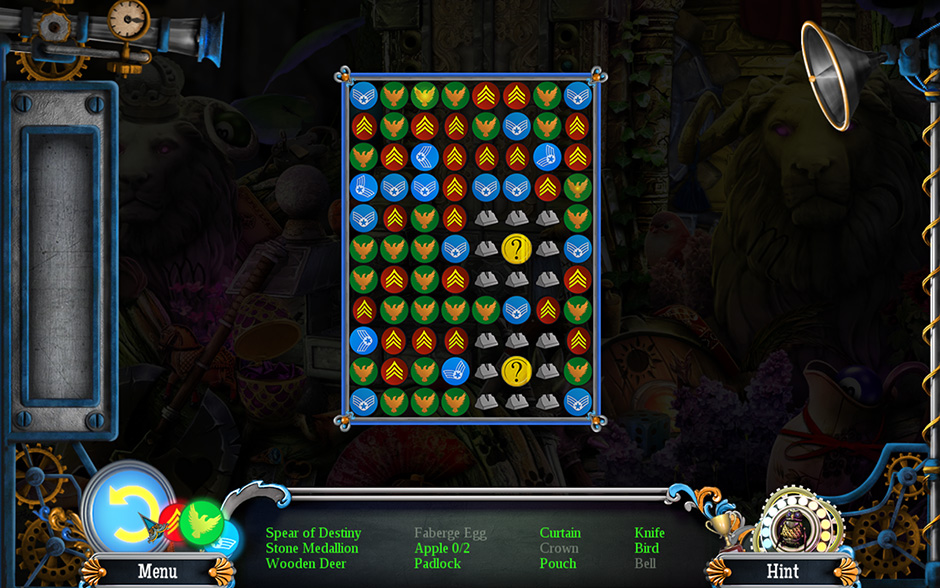
Spear of Destiny – The Final Journey Match Many
- When you encounter a puzzle or minigame, the instructions needed to solve it will be provided. Minigames often require an item in order to be activated.
- You may skip minigames once the Skip button has been charged. The Skip button is located in the lower right corner of your screen where the Hint button usually is.
- You can quick-navigate your way around an area by clicking on the globe to the left of your inventory. A map will be displayed with location icons. You may click any of these icons to fast-travel to that location. The following symbols will appear next to these icons on the map:
- Question Mark- This indicates a location which has tasks which you still need to complete.
- Exclamation Mark- This is a new location that’s been unlocked, but you haven’t visited yet.
- Arrow- This is your current location.
- Any important Notes you find during your journey will be displayed in your Diary. The Diary is located to the left of the inventory. Objectives and notes of interest are stored here.
- Some items in your inventory will need to be combined with other items before they’ll be complete. Items which may be combined will have a small + icon in the upper left corner.
- Having trouble finding an object within a Hidden Object Scene, or notice the name keeps changing color? That’s because sometimes objects will shift forms! Keep an eye out for similar shapes that shape-shift into other ones. Chances are one of these forms are one of the objects you need to find.
Spear of Destiny – The Final Journey Walkthrough
The most powerful artifact in the world, the Spear of Destiny, has fallen into the wrong hands. In the midst of a war-torn world, it’s up to you to recover the Spear and destroy it before it can be used for evil! Our Spear of Destiny – The Final Journey walkthrough will serve as a guide, providing you with key insight, Achievement collectibles locations, and useful tips and tricks to help you on your journey.
Chapter 1: The Hidden Temple
With the help of your companion, you will receive your first objective: to find the entrance. A nearby hidden cave houses a secret passage which will serve as the starting point of your mission to recover and destroy the Spear of Destiny.
In this Chapter, you will explore the Starting Point, the Hidden Temple, the Spiked Tomb, and the Old Mine Shaft. This level has two hidden object scenes and four minigames. The Hidden Object Scenes can be found by completing the control panel puzzle in the Hidden Temple, and at the forge by the Old Mine Shaft. The minigames can be found by inspecting the stone cliff to the right at the Starting Point, by taking a closer look at the mechanism panel in the Hidden Temple, by climbing back up to the Hidden Temple from the Spiked Tomb, and by examining the gear panel on the mine cart at the Old Mine Shaft (you will need to use the Gear here first in order to trigger it).
In order to progress through this area, you will first need to complete the minigame over the control panel mechanism in the Hidden Temple. Successful completion of this puzzle will trigger the Hidden Object Scene to appear over the throne. Finding all the items here will reward you with the Spear of Destiny.

Spear of Destiny – The Final Journey Puzzle Solution and Finding the Spear of Destiny
To proceed to the next Chapter, you will need to replace the wheel of the mine cart at the Old Mine Shaft. Complete the Hidden Object Scene at the forge to receive the Cart Wheel. Use this on the mine cart on the left. The Gear you will need to activate the minigame needed to restore the mine cart to working order is located in the Spiked Tomb. Successfully completing the mine cart minigame will allow you to progress to the next area.
There are collectible Achievement items located in this area:
- An Army Collection Hat (1 of 5) is sitting on top of the spikes on the left side of the Spiked Tomb.
Chapter 2: The Town
In this Chapter, you will explore the Town Entrance, the Town Gate, the Town Square, the Apothecary, the House, and the Harbor. This level has four Hidden Object Scenes and five minigames. The Hidden Object Scenes are found at the left of the Town Gate, in the Apothecary, on the left side of the House, and in the car in the Town Square. The minigames can be found by giving a Coin to the man at the Town Gate, by examining the rightmost door in the Town Square and using the Door Knocker, and at the passport-making machine at the back of the House, over the painting on the left side of the House, and on the boat.
In order to progress in this Chapter, you will need to create a False Passport and present it to the guard in the Town Square. But first, you must restore the passport-making machine. To do this, you will need Gears 3/3, the Blank Passport, and the Ink Bottle. Retrieve the Ink Bottle by examining the desk on the right side of the House. The Blank Passport is lying on the table, also within the House. Use the Can of Tuna to distract the cat at the table and obtain Gear 1/3. The second Gear 2/3 is rewarded upon completing the Hidden Object Scene within the car in the Town Square. The final Gear 3/3 is hidden inside a box next to the fountain at the Town Gate. Use the Blue Brooch on the indentation in the side of the box to open it and retrieve it, then return to the House and complete the minigame to obtain the False Passport.
Spear of Destiny – The Final Journey Creating the False Passport
To proceed to the next Chapter upon reaching the Harbor, you will need the Document with a Seal. To obtain this, speak with the customs officer on the left side of the Harbor, then return to the House. Speak with the woman there and place the Listening Device within the painting. Give the Hidden Listening Device to the officer. Once he’s given you the Document with a Seal, present it to the boat captain and board the vessel.
There are collectible Achievement items within this Chapter. Their types and locations are listed here:
Town Entrance
- A Navy Collection Hat (1 of 5) sitting on top of the rock behind the bench on the left.
- A Tank Collection Tank (1 of 4) inside the crashed mine cart on the right.
Town Gate
- A Tank Collection Tank (2 of 4) to the right of the man.
Town Square
- A Bombardier Plane (1 of 4) to the left of the old man, in front of the crate.
Apothecary
- An Army Collection Hat (2 of 5) on top of the shelves on the left.
- A Figurine Collection Figure (1 of 7) on the left edge of the counter.
House
- An Army Collection Hat (3 of 5) on the head of the statue behind the woman.
Harbor
- A Tank Collection Tank (3 of 4) sitting on top of the barrels on the right.
- A Hunter Collection Plane (1 of 4) sitting on top of the crate on the left.
Chapter 3: The Secret Cell
In this Chapter, you will explore the Dock, the Uprooted Tree, the Tunnel, the Secret Room, the Cliff, the Demolished Hallway, and the Cell. This level has three Hidden Object Scenes and four minigames.
The Hidden Object Locations can be found over the fallen tree trunk near the Uprooted Tree (you will need to chop it with the Axe), within the cabinet in the Secret Room after rescuing the boy, and at the back of the Demolished Hallway (you will need to illuminate the area with the Glowing Mushrooms). The minigames are located in the mine field across from the Dock, over the door down in the Tunnel, on the generator down by the Cliff, and over the door at the back of the Cell.
To rescue the boy and reunite him with his mother, use the Long Pole found behind the painting in the Secret Room to lift the beam off of him. Return to the Secret Room. Use the Perfume, which is rewarded after completing the Hidden Object Scene in the Secret Room, to revive him. Speak with his mother in the Cell, then offer him the Teddy Bear. The boy will then follow you back to the Cell, where upon reuniting with his mother, she’ll give you the Hook.
In order to progress to the next Chapter, you will need to open the door at the back of the Cell. To do this, you will need the Sun and the Moon. The Sun is hidden behind the bars within the alcove on the right side of the Demolished Hallway. The Moon is being held by the little girl in the left part of the Cell. Use the Sun and the Moon on the door to trigger a minigame. Once you’ve completed it, you can progress forward into the Secret Passage
Spear of Destiny – The Final Journey Sun and Moon Cell Door Puzzle Solution
Collectible Achievement items can be found in this Chapter. Their types and locations are as follows:
Dock
- An Army Collection Hat (4 of 5) is hanging on the post at the start of the railing on the right.
- A Figurine Collection Figure (2 of 7) is on the left, behind the leaves close-by.
Uprooted Tree
- A Bomb Collection Bomb (1 of 4) at the base of the tree, on the roots.
Tunnel
- A Figurine Collection Figure (3 of 7) beneath the ivy on the right.
- A Cannon Collection Cannon (1 of 4) in the upper right corner, above the red cloth.
Secret Room
- A Navy Collection Hat (2 of 5) hanging off the edge of the cabinet door on the upper right.
- A Cannon Collection Cannon (2 of 4) on top of the book shelf above the desk.
Demolished Hallway
- A Bombardier Collection Plane (2 of 4) in the furthest rafter on the right.
Chapter 4: The Underground Ruins
In this Chapter you will explore the Secret Passage, the Throne Room, the Ceremonial Chamber, the Sanctuary, the Lakeside, the Cockpit, and backtrack to the Cell. This level has three Hidden Object Scenes and two minigames. The Hidden Object Scenes are located in the Ceremonial Chamber behind the left wall, in the alcove of the Secret Passage (after adding the Weight to the scales), and in the Cockpit. The minigames can be found in the Sanctuary after using the Handgun, and after completing the Hidden Object Scene in the Cockpit.
To defeat the Colossus and retrieve the Spear of Destiny, you will need the Lever (rewarded upon completing the Hidden Object Scene in the Secret Passage) to lower the drawbridge and gain access to the Sanctuary. Once inside, use the Handgun on the Colossus, shooting the colored orbs around in the room in a specific order to defeat him. The order is Green (upper right), Orange (upper left), Pink (lower right), Blue (lower left), and finally the orb in the center of its chest. Once defeated, you may collect the Purple Gems from the altar and combine them with the Incomplete Spear to obtain the Spear of Destiny.

Spear of Destiny – The Final Journey Defeating the Colossus
In order to progress to the next Chapter, you will need to gain access to the radio. Open the Lakeside door via the Secret Passage by using the Golden Medallions 3/3. The Golden Medallion 1/3 is located in a hidden compartment beneath the cat statues in the Secret Passage. The Golden Medallion 2/3 is on the right side of the altar between the candles in the Sanctuary. The Golden Medallion 3/3 is hidden beneath the Wolf panel of the wheel compartment to the left of the Ceremonial Chamber. Once outside, use the Spear of Destiny to incapacitate the guard, then retrieve the Handle in the box on the left and use it to lower the crank on the right. Open the crate containing the radio with the Army Knife.
Once in the Cockpit, use the various types of screwdrivers to open the compartment behind the pilot. When you complete the Hidden Object Scene, you will receive the Key. Use it to open the box, triggering a minigame in which you must guess the right combination of arrows to operate your parachute and land safely at your destination in the next Chapter.
You will be able to find more collectible Achievement items in this Chapter, too. Their types and locations are listed below:
Secret Passage
- A Bomb Collection Bomb (2 of 4) propped up in the stone corner by the roses toward the mid-upper-right of your screen.
- A Marines Collection Hat (1 of 5) propped up in the opposite corner from the Bomb.
Throne Room
- A Hunter Collection Plane (2 of 4) up in the tree on the left.
Ceremonial Chamber
- A Bomb Collection Bomb (3 of 4) in the upper left corner near the stone dragon.
- A Marines Collection Hat (2 of 5) on top of the first pillar of the three-pinnacle rock formation.
Sanctuary
- A Figurine Collection Figure (4 of 7) to the left of the altar; right of the curtain.
Lakeside
- A Navy Collection Hat (3 of 5) on the first left dock post.
Chapter 5: The Frozen Fortress
In this Chapter, you will explore the Stone Steps, the Icy Bridge, the Castle Gates, and Beneath the Bridge. This level has three Hidden Object Scenes and three minigames. The Hidden Object Scenes are located in the frozen bush on the Stone Steps (twice, the second time after you retrieve the Arrows from Beneath the Bridge), and in front of the obelisk at the Castle Gates. The minigames can be found in the circular well alcove on the Icy Bridge, beneath the rightmost horse statue on the Stone Steps (after correctly placing all the Purple Shards), and behind the stone lion head Beneath the Bridge.
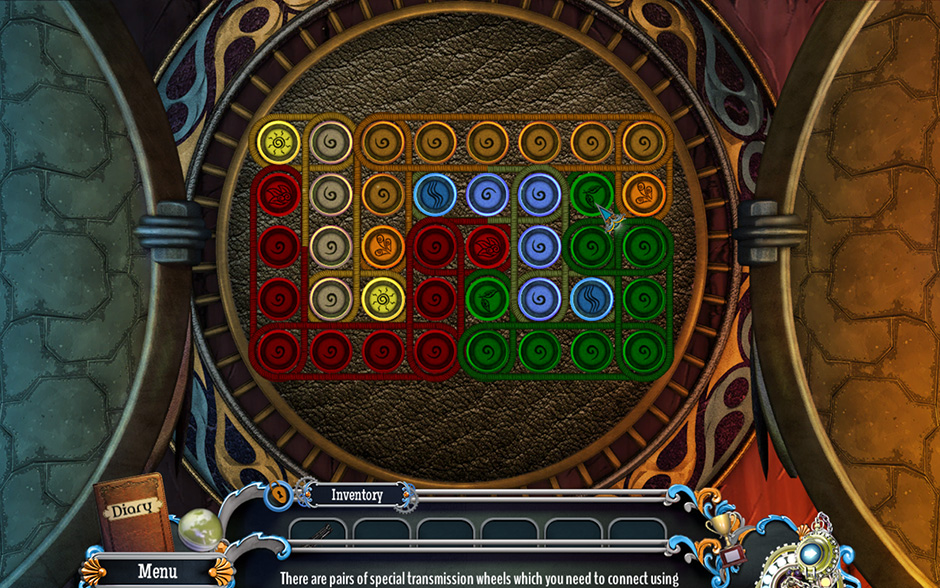
In order to access the area Beneath the Bridge, you will need the Rope. The Rope can be obtained after completing the puzzle beneath the rightmost horse statue on the Stone Steps. You will need the Purple Shards 3/3 to trigger the puzzle. Purple Shard 1/3 is located at the foot of the horse statue on the right on the Stone Steps. Purple Shard 2/3 will be rewarded to you upon completing the puzzle in the well alcove on the Icy Bridge (the solution to this puzzle is shown below). Purple Shard 3/3 is attached to the fire basin between the stone horses on the Stone Steps.
Spear of Destiny – The Final Journey Icy Bridge Puzzle Solution
In order to complete the Chapter, you will need to get rid of the guard patrolling the front of the Castle Gates. You will need the Bazooka. However, it’s in pieces. The first Incomplete Bazooka piece can be found sitting in the middle of the Icy Bridge. Take a closer look at the ice crystal on the right and collect another Bazooka Part 1/2. The Bazooka Part 2/2 will be rewarded to you after completing the Hidden Object Scene beneath the obelisk at the Castle Gates. The final piece, the Bazooka Grenade, is inside the wooden crate on the left side of the Stone Steps. Combine all the components, then use the Bazooka on the guard to proceed forward through the Ruined Castle Gate.
There are Achievement collectibles which can be found here as well. Their types and locations are:
Stone Steps
- A Marines Collection Hat (3 of 5) on top of the short stone pillar, to the left of the frozen bush.
- A Hunter Collection Plane (3 of 4) in the stone swirl design on the left.
Icy Bridge
- A Figurine Collection Figure (5 of 7) on the railing in front of the bare branches at the center of the screen.
Castle Gates
- A Navy Collection Hat (4 of 5) on top of the stone obelisk on the left.
- A Cannon Collection Cannon (3 of 4) on top of the wall toward the upper left.
Chapter 6: Inside the Mansion
It’s the final Chapter of the game, and here you will explore the Mansion Front, the Foyer, the Library, the Conservatory, the Sitting Room, the Pantry, the Dungeon, the Mechanism Room, and the Workshop.
This level has eight Hidden Object Scenes and five minigames. The Hidden Object Scenes can be found over the chest at the Mansion Front, on the left side of the Library (after examining the desk on the right), over the flowers in the Foyer (after visiting the Conservatory), beneath the pillars in the Conservatory (after completing the box puzzle), on the right side of the Pantry, over the barred cell in the Dungeon (twice- the second time after retrieving the Red Diamond), and after lighting the forge in the Workshop. The minigames are located over the door of the Mansion Front, on the chest in the Conservatory, beneath the statue of the woman in the Sitting Room, within the panel above the barred door in the Dungeon, and at the back of the Mechanism Room.
To assemble the Dynamite and gain access to the Sitting Room, you will have to find all the components, all of which are in the Conservatory. The Dynamite Sticks 3/3 are located in the pile of sacks on the left side of the Conservatory. The Clock is next to the squirrel sitting in front of the bookcase. You will obtain the Wire after completing the Hidden Object Scene beneath the pillars. The Rope is inside the chest near the pillars, and the Bullet is in here as well. Combine all these components in the Library to obtain the Dynamite, then use it on the door on the far end of the Foyer to gain access to the Sitting Room.
To complete the final Chapter of the game, first you will need to defeat the guards in the Mechanism Room using the Spear of Destiny. Use the Spiral Key found in the Dungeon to open the chest of drawers on the right, then collect the Mechanism Lever inside. Use it on the mechanism at the back of the room to trigger a minigame. Once you complete it successfully, the Spear will be destroyed! The solution for the final minigame is pictured here:
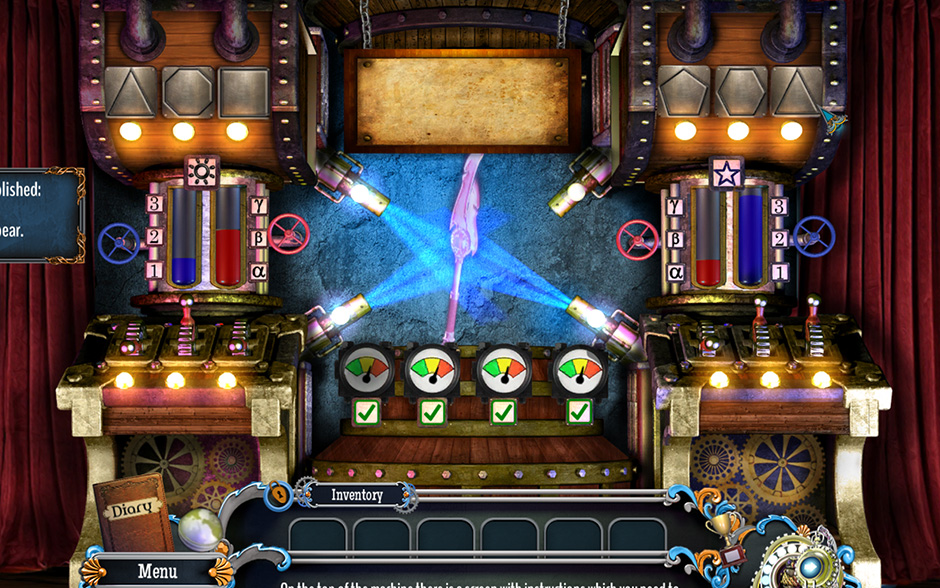
Spear of Destiny – The Final Journey Destroying the Spear of Destiny Puzzle Solution
More Achievement collectibles can be found in this Chapter, too. They are:
Mansion Front
- A Navy Collection Hat (5 of 5) by the merlon to the left of the large window above the entrance.
Library
- A Cannon Collection Cannon (4 of 4) on the chair in the center of the room.
Conservatory
- A Bombardier Collection Plane (3 of 4) on top of the circle of pillars at the back of the room.
- A Marines Collection Hat (4 of 5) on the floor beneath the steps at the far end of the room.
Sitting Room
- A Figurine Collection Figure (6 of 7) on top of the harp.
Pantry
- A Bombardier Collection Plane (4 of 4) on the bottom shelf amongst the loaves of bread.
Dungeon
- A Ship Collection Boat (1 of 4) above the door on the left.
Mechanism Room
- A Bomb Collection Bomb (4 of 4) to the right of the second mirror.
- A Marines Collection Hat (5 of 5) above the goat bust on the left wall.
Workshop
- A Hunter Collection Plane (4 of 4) on the beam at the top of the room.
Congratulations! You’ve completed our Spear of Destiny – The Final Journey walkthrough! Were you able to find the rest of the Achievement collectibles? Let us know in the comments!
Go to GameHouse to play this game!
The Spear of Destiny – The Final Journey walkthrough is meant as a guide and does not contain cheats, hacks, or serials.