The goal of this Nemo Secret Vulcania walkthrough is to take you step-by-step through each scene to help you 100% complete the game. Hidden object games can be tricky and sometimes it’s better to have a second set of eyes to help you past certain screens. As always, we want to help our gamers get through their games with the latest tips, tricks and cheats! Are you ready for an in-depth Nemo Secret Vulcania walkthrough? Let’s get started right away in helping Alice save Captain Nemo from Dardell!
Contents Nemo Secret Vulcania Walkthrough
Chapter 1: Emerald
Right on the first screen you’ll want to grab the wire sitting just right of the room’s center. Just a bit further right from the wire is a small black cylinder – snatch it up for later. From there we need to zoom in on broken handle in the middle of the room. Repair it with the wire and pull it. When you pull it, you’ll enter the next screen.

Cabin Adventure – Nemo Secret Vulkania
After going down the hatch, you’ll see a crowbar that you’ll need in front of the rocking chair. On the opposite side of the room, hanging by the stairs, is a hook. Take it to finish up the room so you can head into the pool area.
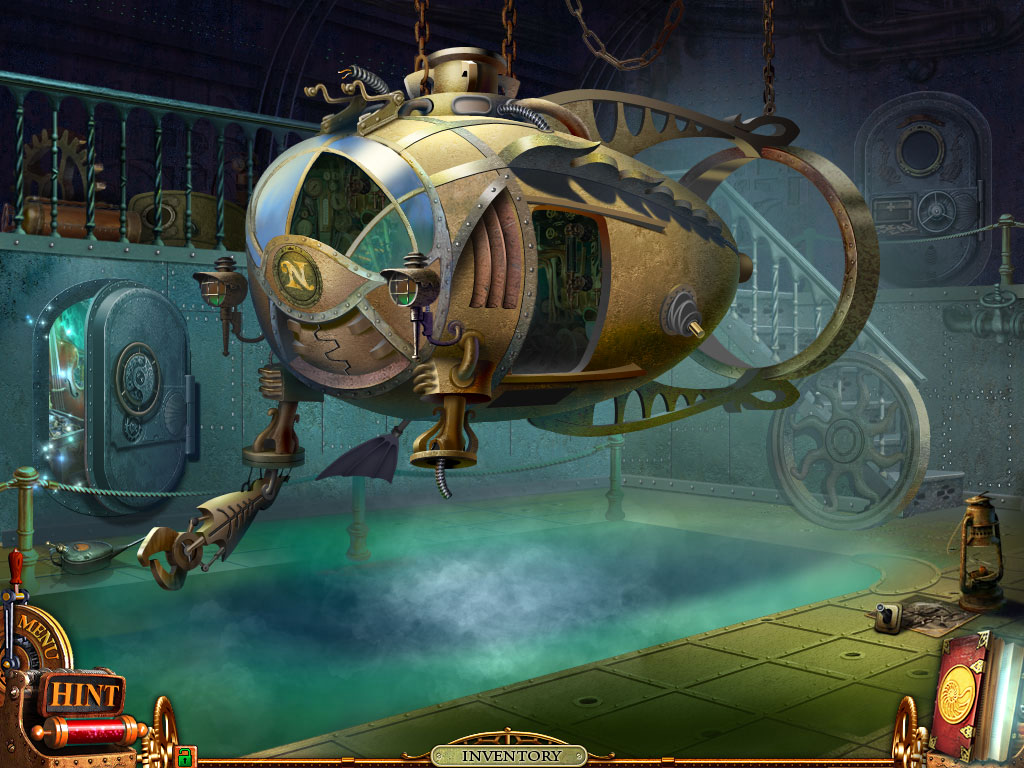
Submarine in the Adventure room
First thing’s first in the pool area – zoom onto the photograph sitting by the lantern in front of the stairs. Get the switch along with the photo. Across the pool, by the submarine’s claw, is an oil can and right above it by the railing is a door. What’s the door for? The submarine! Attach it and then head up stairs.
Use your oil can on the door to the far right of the room and open it. Before you leave, talk to the little flying robot to the left of the steering wheel and he’ll give you a message. Now you can go through the newly opened door where you’ll find a bridge. On the bridge is a crate – zoom into the crate and use your crowbar to pry it open. Pick up the flipper and then zoom into the tree on the right. Yes, it really is a tree. In a cave. Once you’ve zoomed in, use the hook to pull down the cable inside the tree’s crack.
Move across the bridge and open the door. Before entering, make sure you grab the propeller lying on the ground in the left corner.

First Hidden Object Scene – Nemo Secret Vulkania Walkthrough
Here’s your first HOS, or hidden object scene, just zoom into the sparkling light to activate it. First you’ll move the poster at the top of the room next to the boar’s head to reveal a card. Subtracting the card, there is a total of 15 hidden objects in the room. Scan carefully for the remainder. Afterward, take the wrench sitting underneath the boar’s head and remove the valve in the front center of the room.
Attach the valve to the door to reveal the elevator room. Interact with the man in the top hat standing behind his creepy spider robots. In the center of the room is a map, zoom onto it and collect the Voltmeter along with the map. Leaning up against the barrel to the right of the room is an old ladder. Across the room on the chair is a lever. Collect both of these items. At the far back left of the room is cable spool, zoom in so you can replace it with the cable in your inventory.
Right next to the man in the elevator is a panel. Zoom in to wire up the elevator.
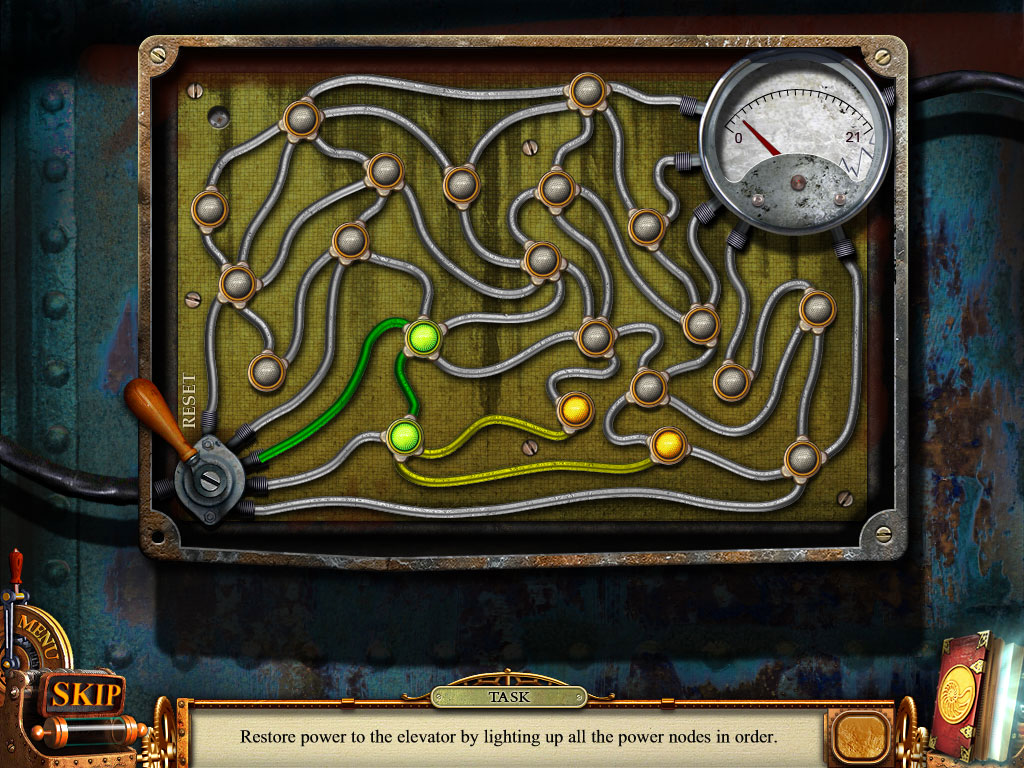
Controlbox minigame – Can you solve the puzzle?
Place the Voltmeter in the upper right corner of the panel and start connecting nodes to restore power. It’s simple when you look at it: from the reset switch at the bottom right, just follow the green wire in order. The gray wires make it easy as they push you in the right direction if you get lost.
Once you’ve returned power to the elevator, get inside it. On the left of the elevator is a small table, zoom in so you can open the drawer. Move the picture and grab the knob. When you see the spider, hit it with the crowbar. Next to the spider is a panel, zoom in so you can place your lever under the “3.” Pull the lever so you can move up to the third floor.
At the edge of the cliff by the telescope is a robot arm. Zoom in and pick up the button and electron tube. From there, zoom in on the telescope and place the knob so you can adjust the image. Play with the knobs until the image is clear, which will cause the green light to glow. Once it’s lit, pull the lever. You’ll have to repeat the process two more times and then click on the flying robot.
Go back through the elevator and return to the first floor. Zoom into the desk to start your next hidden object scene. Open the two small drawers to pick up the knife and the watch. After collecting those two, there will be 14 more objects to scan for. Once you’re done, take the rope cord hanging just beneath the key on the right of the screen and attach it to the lamp on the left. Grab the “part 1” from the lampshade and zoom out.

Hidden Object Scene – collect the 14 items of Nemo Secret Vulkania
Zoom in on the panel above the desk and set the button into it. From here you have to solve a slider puzzle. There’s no set way to solve it, it’s just between you and your brain. Once you’ve completed the slider puzzle, pick up the code key for your prize.
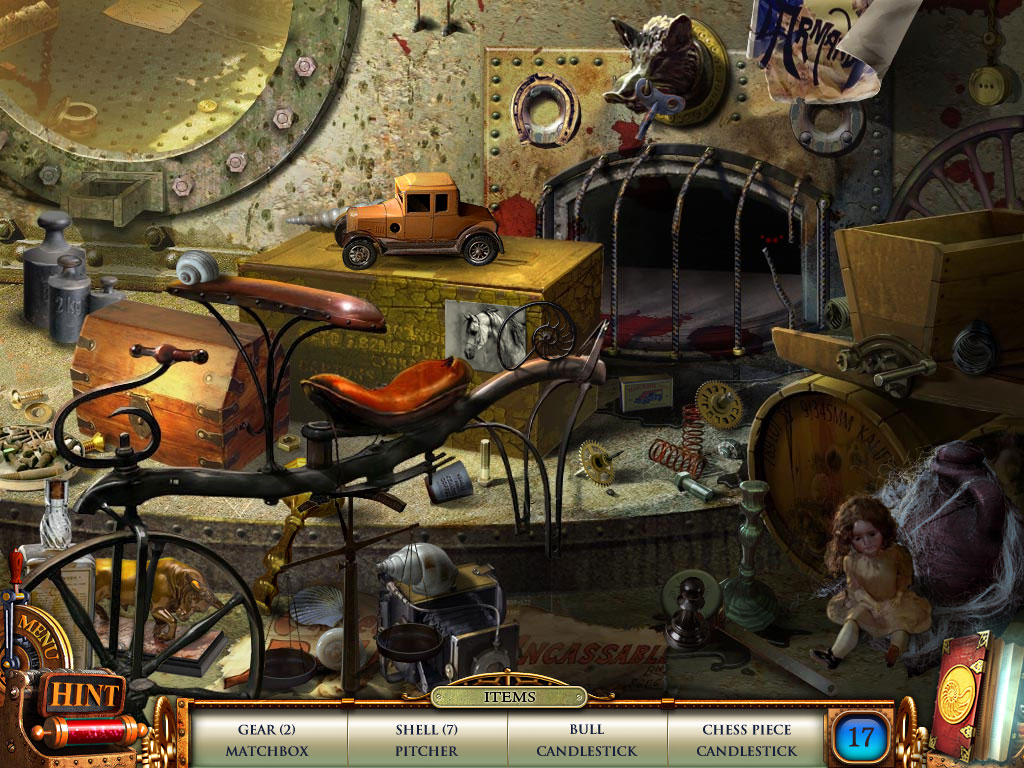
Back track to the pool room with the submarine and go down the hatch. You’ll find yourself at another HOS. Move the rag hanging out of the chest to reveal a IX. There’s 17 items on the screen so go over everything carefully. Once you’re done, grab the fan blades to the right of the room and attach them to the fan on the far left and pick up the lantern next to it.
Start backing up and stop at the fourth scene. On the far left of this room will be a barred door, zoom in on the gate lock and insert your code key. Use the arrows to match the picture on the lock and go through the gate. Against the shelf unit on the right of the room is a saw and just in front of the saw is a note – collect both. Right next to the ominous skeleton is a switch panel, zoom in for a switch board. Insert the switch from your inventory and pull the switches like so: 8, 5, 2, 9, 6, 3, 1, 7, 4.
VIDEO
A flying robot will crash and once he’s down, scavenge the robot eye and propeller. Zoom in and replace the electron tube, robot eye and robot’s propeller to help the little guy. Afterward, pick up the windshield where the green light is shining. Back up a scene and click on the flying robot.
From there, go back to the elevator and head to the telescope. Zoom in on the robot arm and remove his claw with the saw and take it with you. Go back down the elevator and head back four scenes. Go down the hatch toward the pool room once more and zoom in on the sparkles for another HOS. Open the door to reveal three extra items for a total of 17 that you need to collect. Once you’re done there, grab the hammer on the shelf under the top shelf and break the glass to reveal the knight. Grab the knight and go.
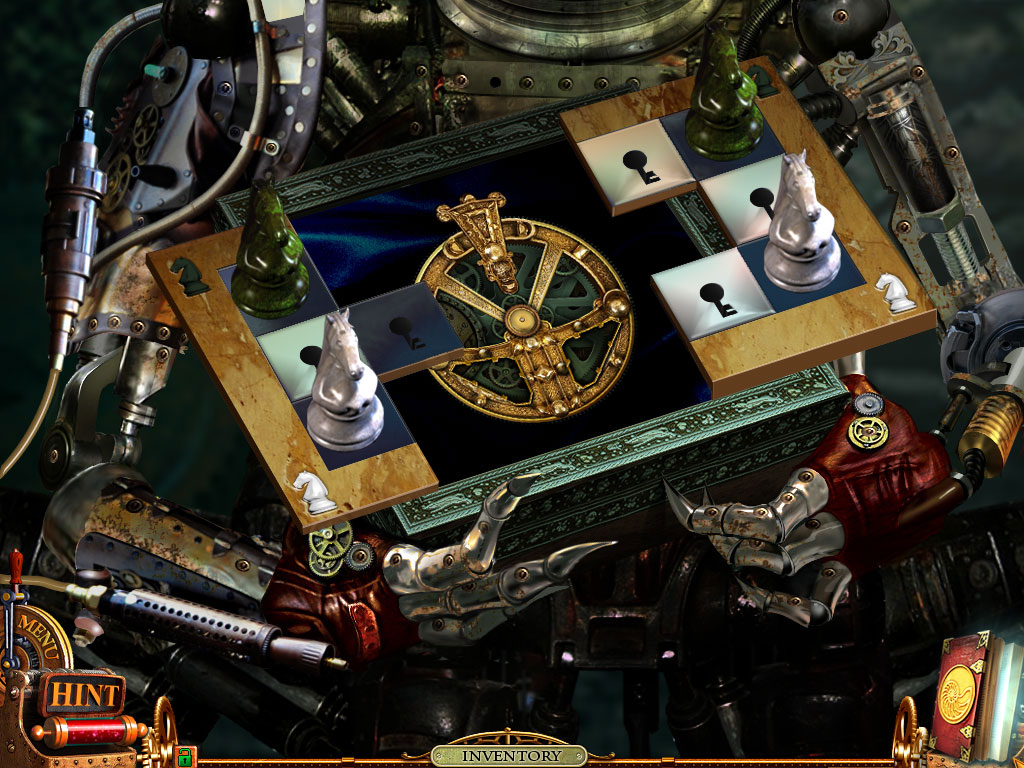
Head back three more scenes and enter through the gate. In the left corner of the room is a chess table, zoom in so you can set the knight piece on it. The goal for this puzzle is to move the white knight pieces where the black knight pieces are stationed and vice versa for the black pieces. It’ll take some thinking, but it’s a fun puzzle to work out.

Chest minigame – place the Knight
Once you’ve outsmarted the puzzle, it’ll open up to reveal the time wheel! Pick it up and click on the hovering robot. Return to the pool room to repair the submarine. Work your magic to place the claw, flipper, ladder, lantern screw propeller and windshield. Now you’ll be able to enter the submarine/bathysphere.
Chest minigame – Nemo Secret Vulkania
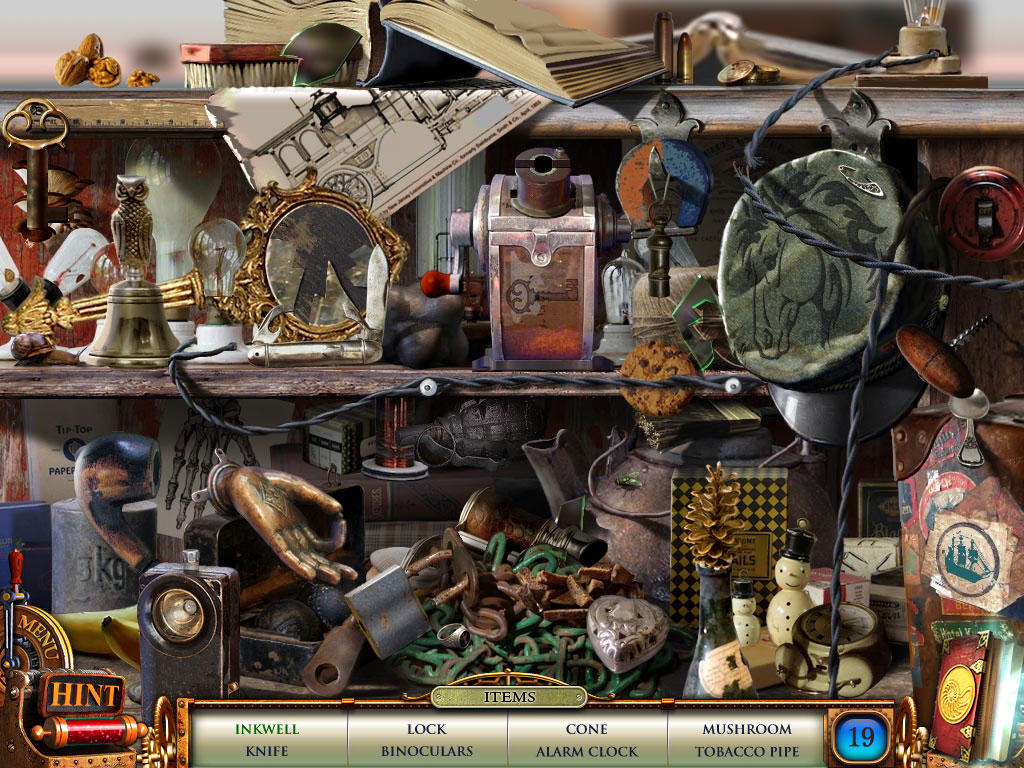
Click on the flying robot and zoom in to play another HOS. To the right of the screen’s center will be a crab. Click on the crab to reveal a piece of candy, giving you 19 total objects to seek out. Once you’ve finished the HOS, grab the match just under the ax in the front of the screen and light the smoker next to the starfish on the left. Directly above the smoker on the umbrella is insulating tape, you’re gonna need it.
In the next area, pick up the cylinder in the skeleton’s hand and the rod just left of it. Above the cylinder will be an empty oil can and across the area by the awning will be a connector for you to take. Zoom in on the giant stone in the center. Afterward, zoom in on the gate lock under the awning. You’ll see two panels with three buttons. Press the left button on the left panel, the top button the right panel and the bottom button on the left panel to gain access.
After you get through the gate, pick up the postcard on the floor, the sledgehammer in front of the stairs and the ladder sitting on the second set of stairs. On the right wall, zoom in on the phone and set the cylinder inside it. Get a board from the door right next to the phone and exit the room through the gate. Once you’re back outside, use your sledgehammer to smash the stone to pieces. You’ll find a screwdriver in the rubble. Somehow. Magically.
Return to the hallway and head downstairs. Place the insulating tape on the exposed wire on the top right of the room and flip the switch. Once you’ve accomplished that, grab the hammer and machete. Search the left side of the desk for a wrench and then pick up the newspaper. Zoom in on the radio on the desk and pull off the cover with the screwdriver. Grab the battery and pick lock. Before you leave, open the drawer to desk and pick up the handle.

Hidden Object Scene Fireplace in Nemo Secret Vulcania
Head back to the hallway and put the handle on the door on the left side of the room. Once you’re in, zoom in on the sparkly bits for another HOS. Open the screen for a bat so you can find all 18 objects in the room. Once you’ve grabbed your hoard, cut the upholstery on the chair with the knife on the wall above the seahorse. Under the chair’s upholstery is an emerald. End chapter 1! Whew!
Chapter 2: Amethyst
Pick up the nippers lying on the middle of the floor. Zoom in on the drawer to open it with pick lock so you can grab the cable and handwheel. Head back down the stairs so you can cut the chain with the nippers to open the cabinet. Put the handwheel on the tank inside and set your empty oil can under the valve. Turn the valve and pick up your new oil can. Head back to the hallway and zoom in on the door. You can use your oil can on the handle to enter the door.
Zoom in the sparkles to enter another HOS. Move the sheet and towel in the center of the room to reveal a sock for a total of 17 items you need to collect. Afterward, move the sheet and towel to the left. Grab the broom behind the ironing board to sweep away the cobwebs, which will reveal a tile for you to grab.
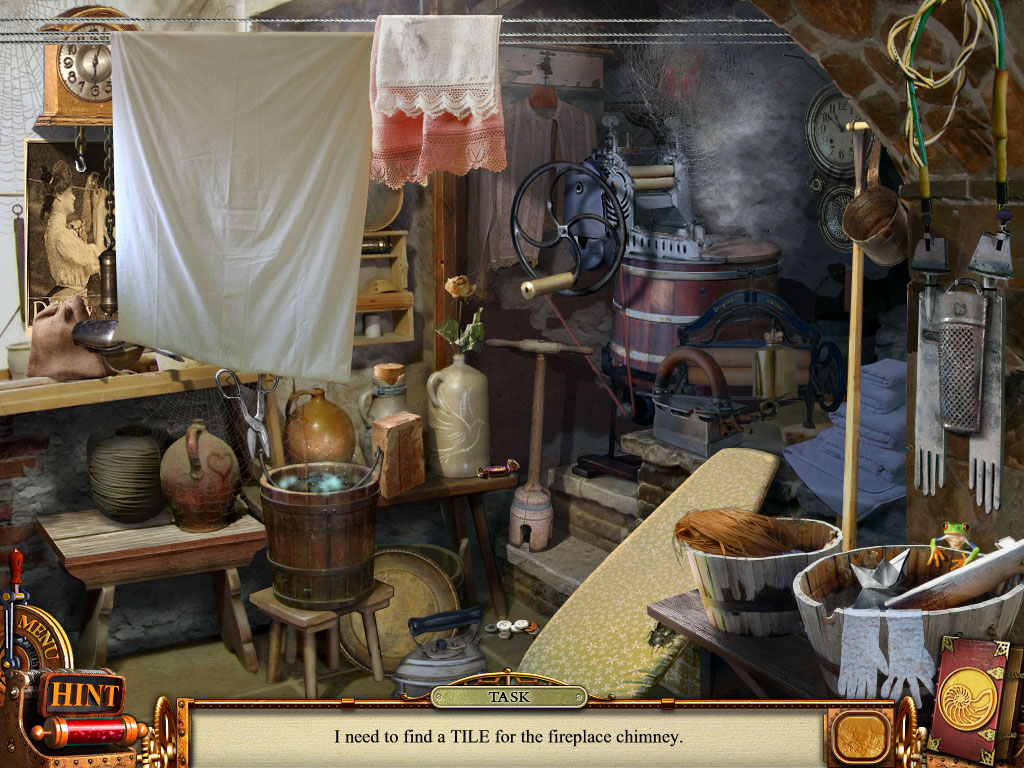
Hidden Object Scene First laundry minigame
Return outdoors where you’ll zoom in on the wall at the far end of the screen. Cut the vines with your machete to gain a wagon wheel.
Return to the beach for another HOS. On the far right is a leaf, move it to reveal a butterfly. This time you have only 11 items to collect. Grab the shovel in the middle of the screen when you’re done to dig up the lantern right next to it.
Return to the room where you found the emerald to play another hidden object scene. Open the screen to reveal the apple, which gives you 18 items in this room. When you’re done, grab the hammer off from the mantle to pull up the nails on the ground.
Zoom into the tiles above the fireplace for a tile sliding puzzle after you set your tile piece into it.
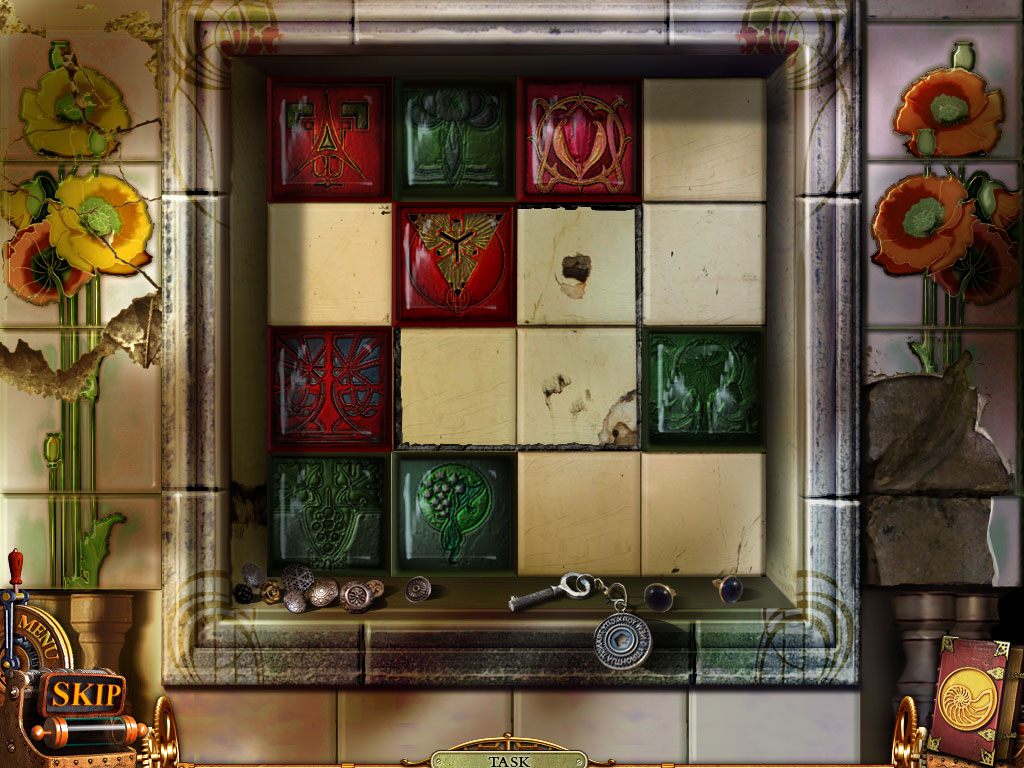
Tiles minigame – move red and green correctly
The solution revolves around getting the red and green tiles to alternate without two of the same colors touching. Easy, right? When you’ve completed the puzzle, grab the ball that’s revealed to you.
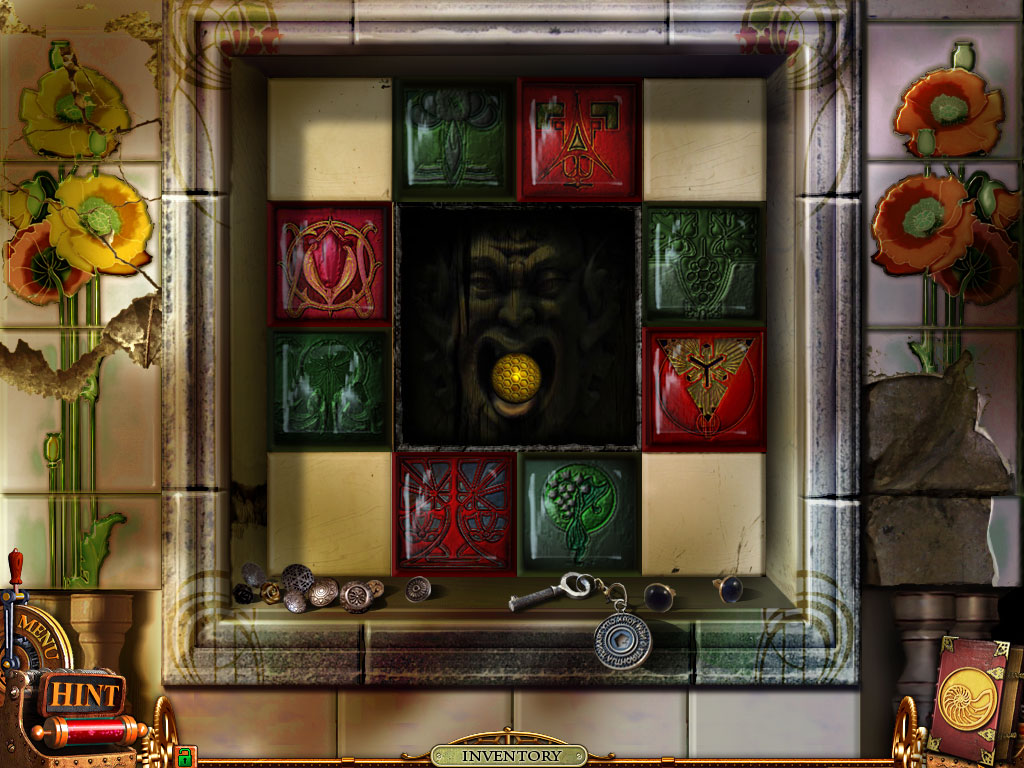
Tiles minigame finished
By the chair is a lantern base, zoom into it to place your lantern on it and grab the carbide lamp.
Head back to the room where you swept the cobwebs and get ready for another HOS. This one is big. Move the sheet to reveal a cup that will give you a total of 21 objects to search for. Once you’ve grabbed everything, pick up the weight on the shelf to place it on the clock. Grab the chain under the clock and head back downstairs.
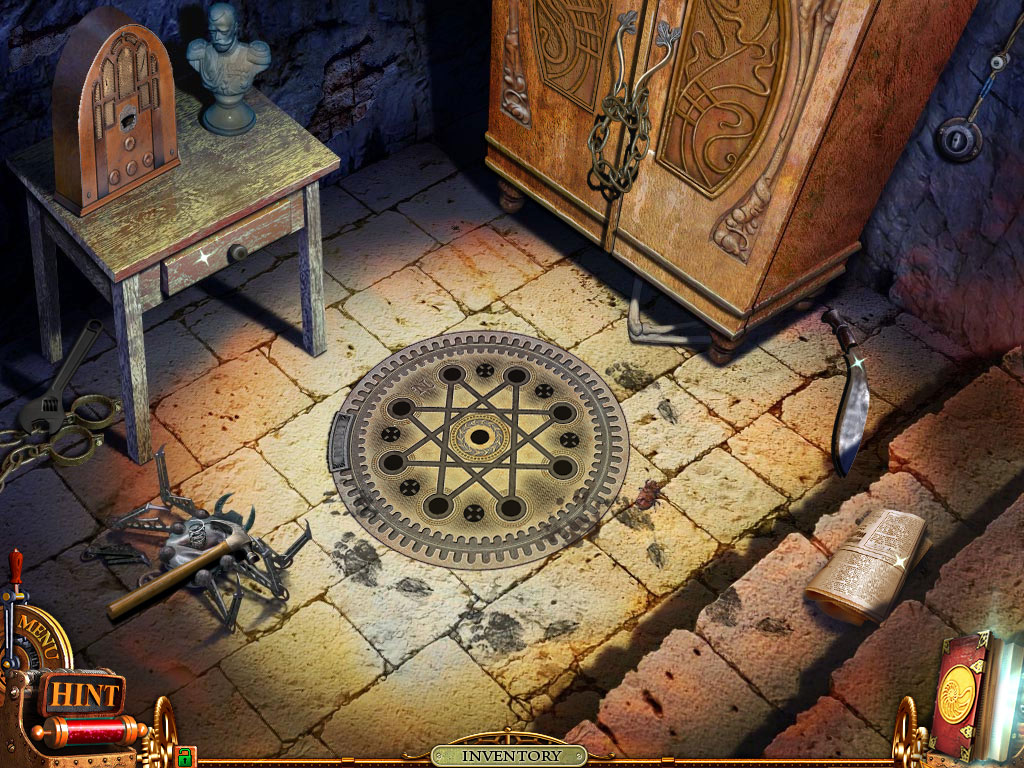
Cellar adventure start in chapter 2 Nemo Secret Vulcania
Zoom in on the manhole cover and place your ball in it. This puzzle is a little difficult, but the goal is to place all of the balls in the hole. Follow the lines from hole to hole – this corresponds to which hole a ball will go when you move it. There’s no set pattern, but understanding how you can move your pieces makes it way easier to complete.

Hatch Finished so it opens
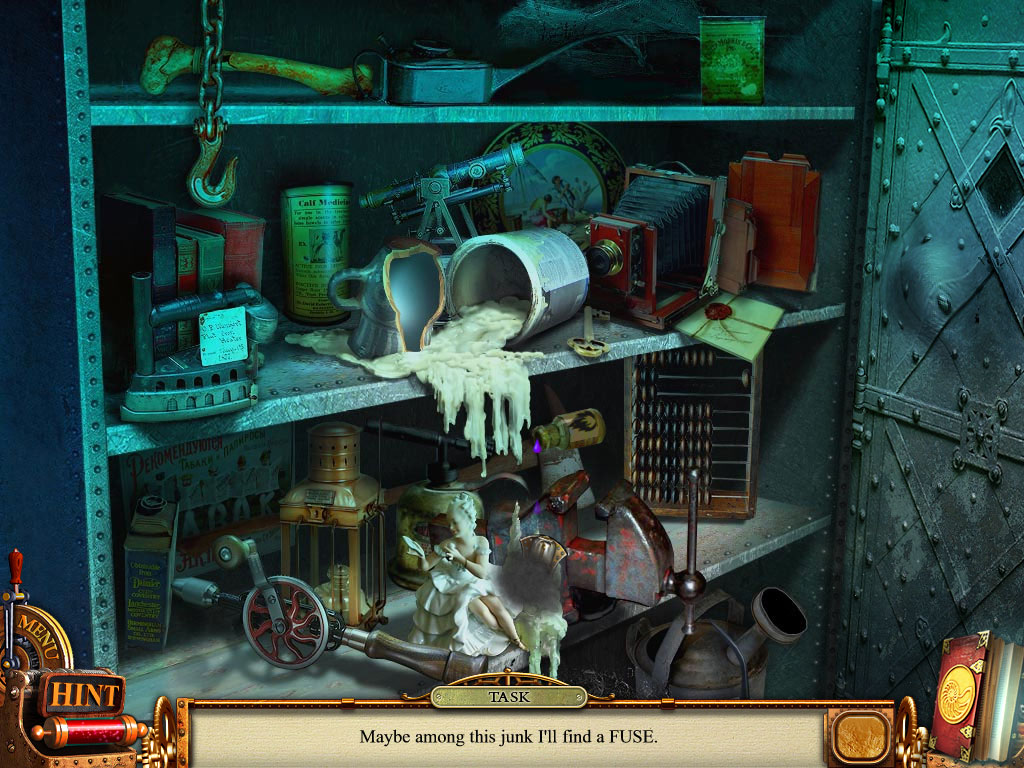
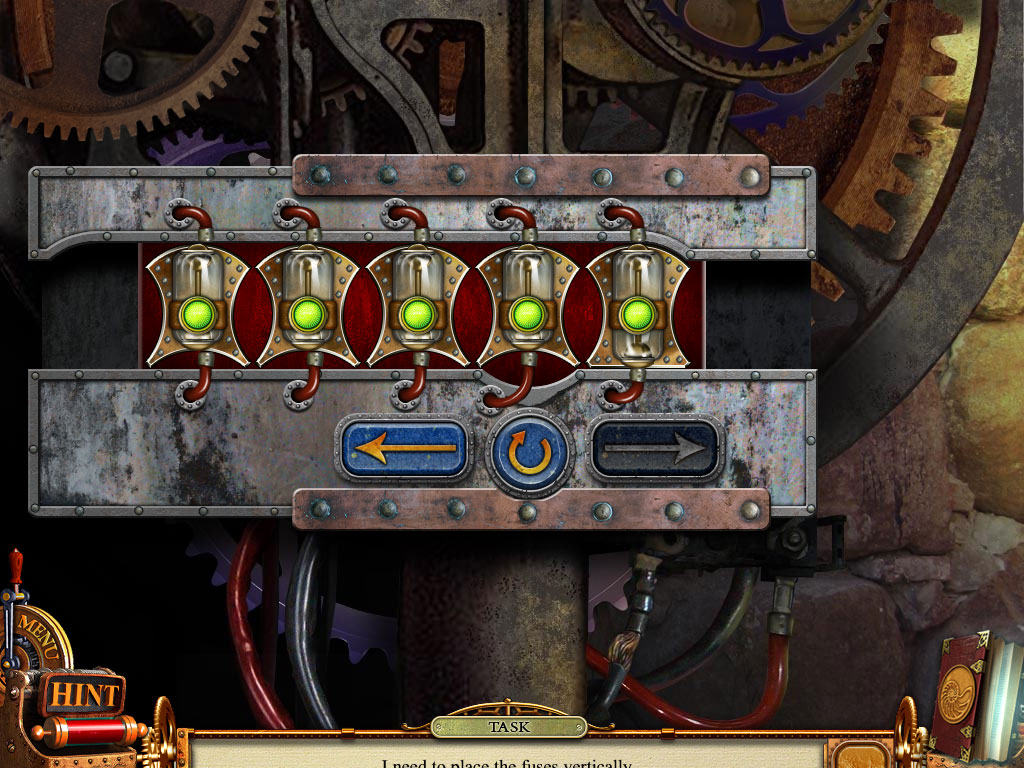
When you’ve beaten the puzzle, head down the manhole where you’ll zoom in on the panel at the end of the room on the far left. Set your carbide lamp on the bottom left corner and connect the fuses. The red and green on the top need to connect to the red and green on the bottom. To do this, follow the wires and see where they connect on each wire splitter. It’s really simple and you should spot the method in no time. After you power the bottom most fuses, figure out the path for the second set and finish up with the top most fuses. It gets tricky, but just pay attention to wire’s pathways.
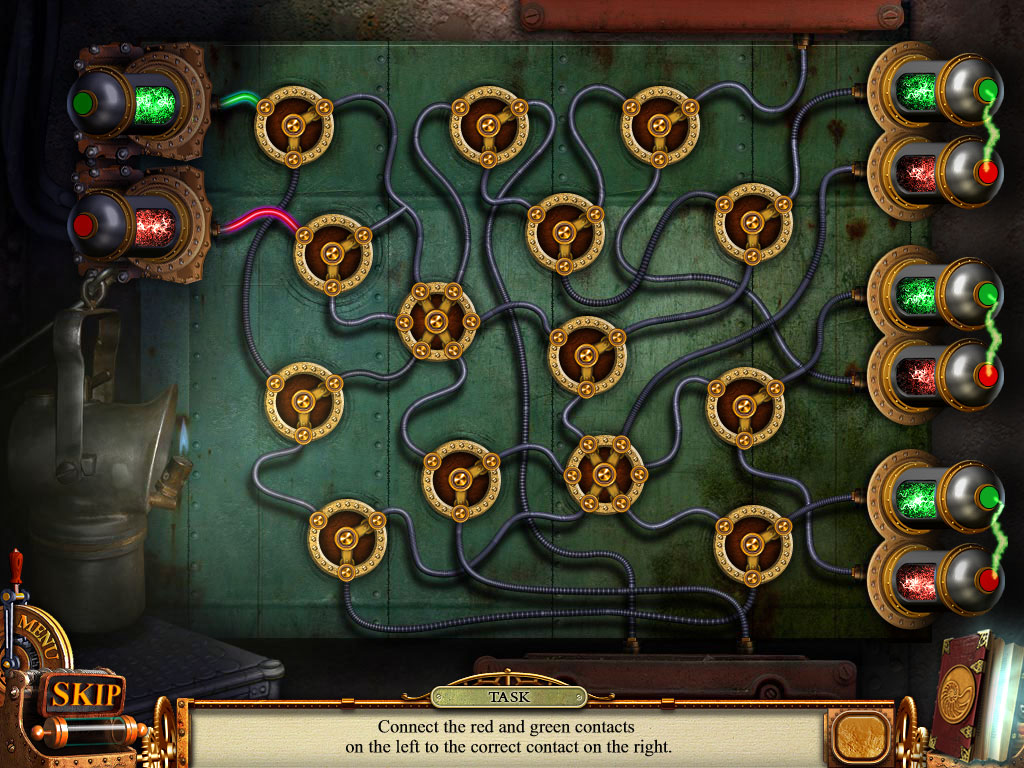
Pathways wires – look closely to see the right way
When everything is powered up, head down the hall and zoom in on the rails. Grab the lever and use your wrench to remove the bolts so you cans steal to the rail piece. At the top of the room you need to place your wire. Place your rail piece in front of the train and fix up the vehicle with the wagon wheel and the rod. Zoom in on the front of the train and place the lever and battery on it. Spin the lever and ride the track.
Once you’ve arrived at your destination, click the flying robot. Grab the lever down the hall and place your ladder by the rungs on the right side of the room to go up top. Click on the man when you reach the top. Place the chain above the wheel and grab the robot hand hanging on the right. On the edge of the pathway is a horn you’ll need. Zoom in on the wood next to the horn and lay down your board and nails and finish it off with the hammer. Pick up your fancy gangway.
Go back down the ladder where you came from and zoom in for another HOS. Open up the crate front and center to reveal a bottle. This HOS has 20 objects for you to snatch. On the left side of the room is a martini glass, grab the dropper and squeeze it into the jar in the center of the room for an amethyst. Woo hoo, chapter 2 is done!
Chapter 3: Diamond
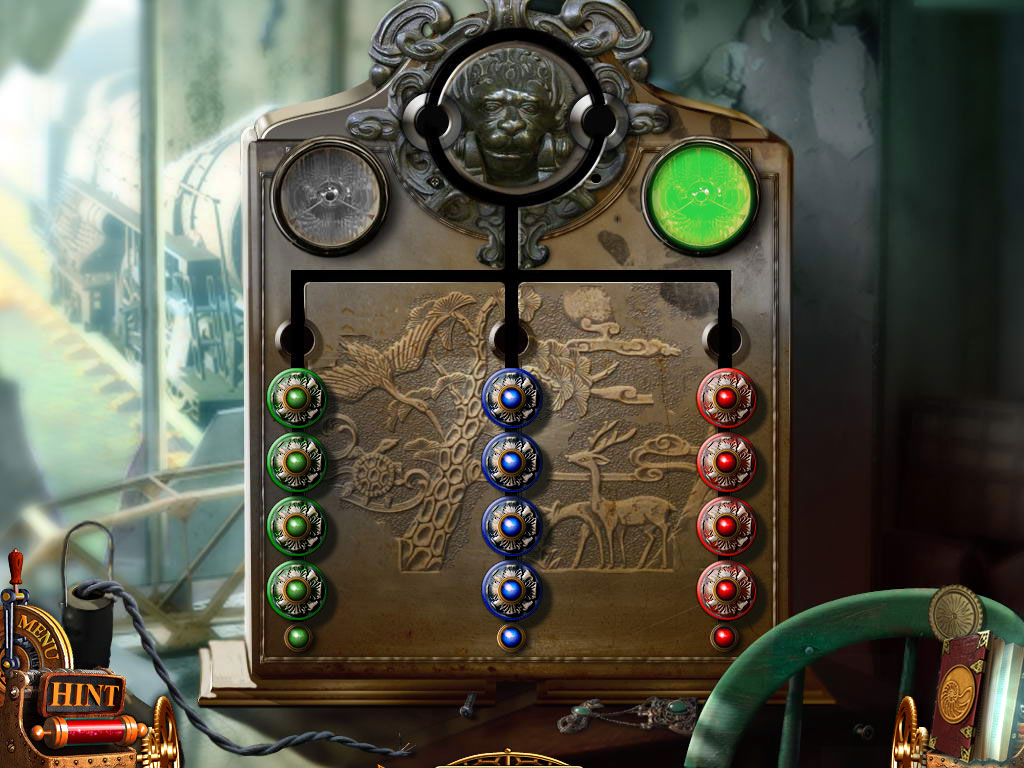
Use your horn on the bats in the upper left corner of the room. As soon as the flying robot appears, attach the horn to him. At the top center of the room is a black sheet, grab it. At the mouth of the cave is an arm, zoom in on it. Place the robot hand and align the red and blues.
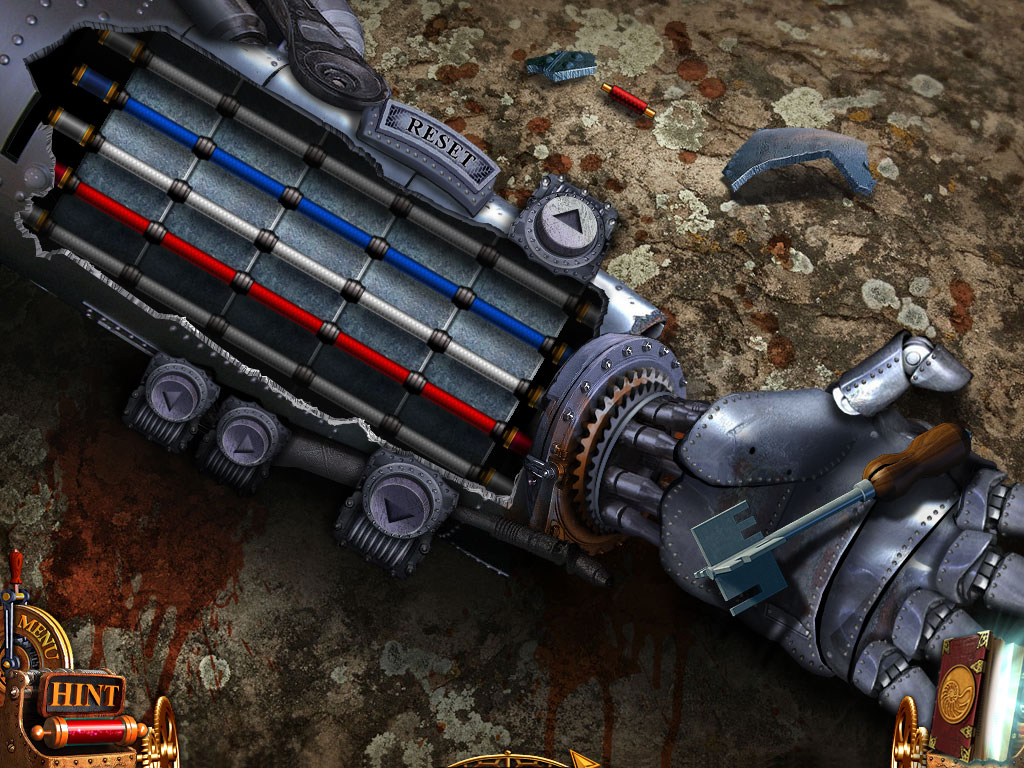
Repaired robot arm – connect red and blue and white
Press the left button three times. Up button once. Right button three times. Up button once. Left once. Up once. Left, up, left and up to finish the puzzle. Grab the key and head back up the ladder.
Place the black sheet on the pathway and zoom in on the control panel in front of it. Place your lever in with the others and let’s get to work on solving this puzzle.
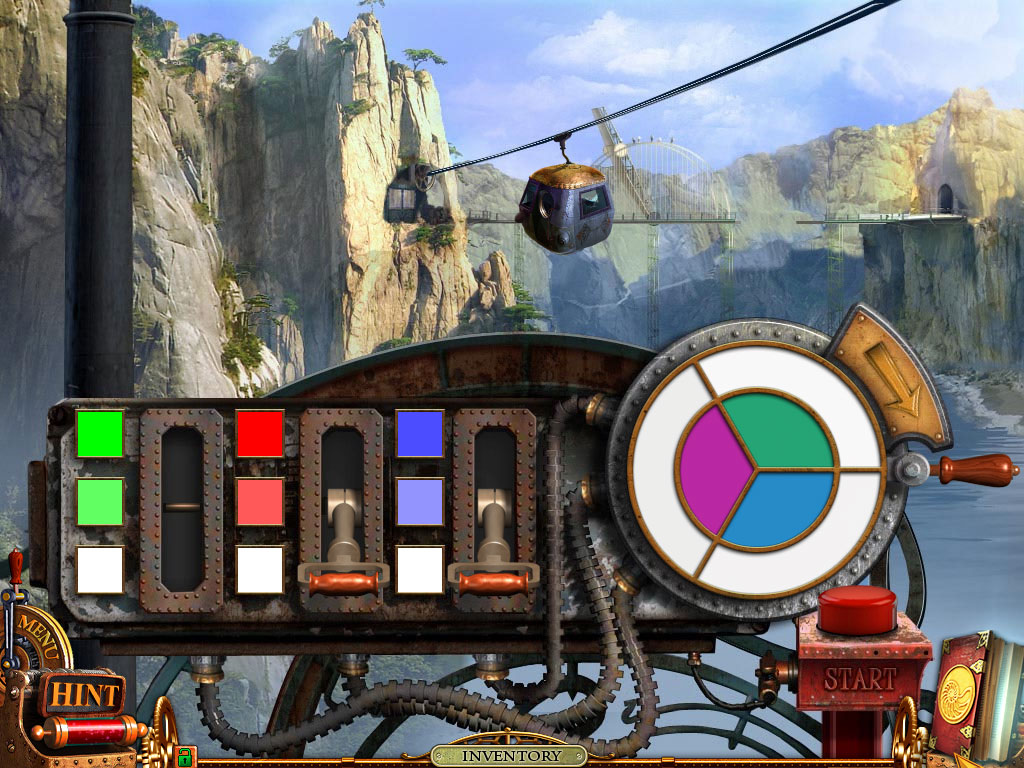
Funicular minigame – Start organize you control panel
The first sequence will be:
- Green lever to bottom
- Red lever to middle
- Blue lever to middle
- Pull the handle
Second sequence:
- Green lever middle
- Red lever bottom
- Blue lever top
- Pull the handle
Third sequence:
- Green lever top
- Red lever bottom
- Blue lever middle
- Push the start button

Funicular minigame – Finished control panel
Place the gangway to reach the sky train. Grab the brush on the left and clean up the controls. Pull the lever with arrow indicator. When you arrive click on the flying robot. Push the button on the wall to enter the elevator and pull the lever to go down to level one. Click on the ominous looking guy!
Exit the elevator and back up a scene. Zoom in for an HOS. You have 17 objects to grab up and once you’re done, take the key from the boar’s head, place it in the car and take the knob. After that, click on the flying robot yet again and head back two scenes so you can move down the hatch.
Hidden Object Scene – can you find all 17 items
You’ll have another HOS to accomplish with 22 items to collect. Once you’re done, grab the acid with the little fire symbol, pour it on the wax close to the center of the shelf and grab a fuse.
Hidden Object Scene – Closet Minigame 22 items
Head back into the pool room and grab the cane at the base of the stairs. Place your knob in the door in the center wall so you can grab the razor and respirator. Use the razor on the hat’s lining to pick up the code.
Head backwards three scenes and head through the gate once more. Zoom in on the robot’s head, insert the key into it’s head and grab the hidden diamond. We’re almost done!
Chapter 4: Ruby
Put the respirator in front of you so you can enter the back room. Pull the lever on the wall in front of you to get some air going and pick up the rope sitting at the feet of the robot to the left.
Return to the pool area and attach the rope to the magnet by the stairs and pull it down. Drop the magnet over the pool and pick up the flanec.
In the next area will be another HOS for you to play with. Move the picture frame in the chest to reveal a stamp and strum the cello to make a clef note appear. That brings you to a total of 19 items you’ll need to find. When you’re done, grab a leaf from the chest and feed to the tortoise and pick up the wrench.
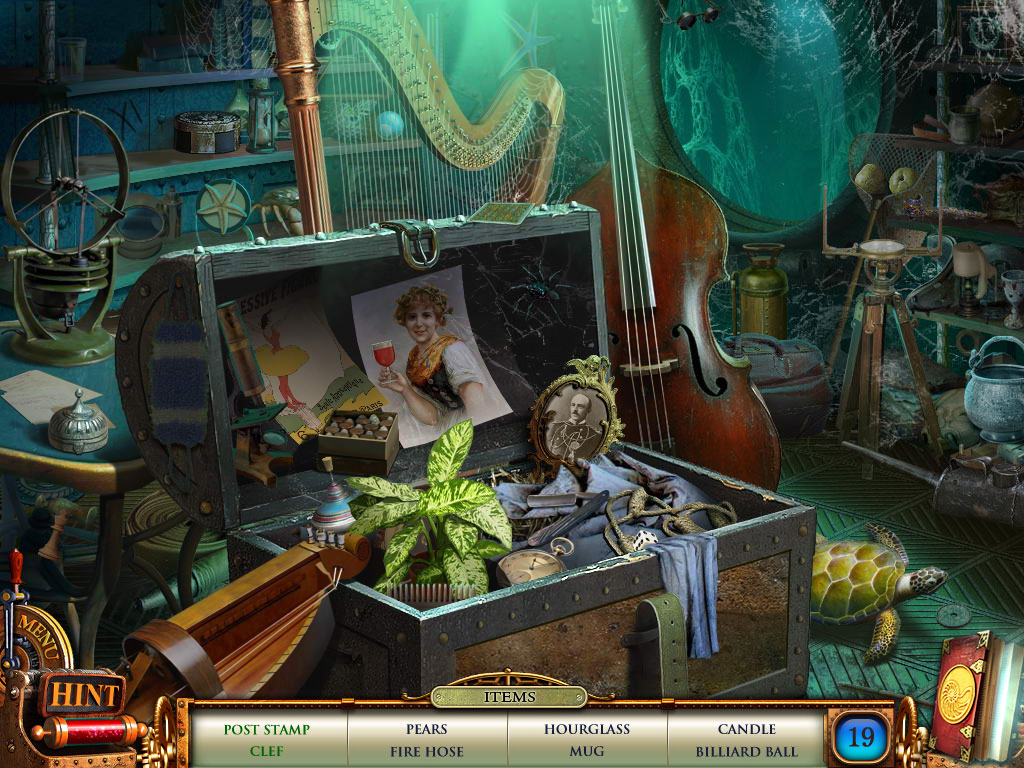
Hidden Object Scene – don’t forget the tortoise
Back up four scenes to where you found the diamond and zoom in the rocks just left of the robot’s head. Place the flanec inside the pipe followed by the handle. Grab the nail puller and open the hatch to the right of the robot’s head. Grab the “Part 2.”
Head to the elevator room and investigate the HOS at the desk. Open up the right drawer to reveal a compass, totaling up your items to 20. When you’re done snooping around, grab the key on top of the horn in the chair and open up the door on the desk to collect the staff.
Get in the elevator and head up to level three once again. Zoom in on the telescope and place the code into the slot. Adjust the dials to bring each image into focus, grab the code again and head down the elevator and back to the pool room. Zoom in on the door on the far right at the top of the stairs and place Part 1 and Part 2 on the puzzle. Arrange the pieces so the puzzle fits perfectly.
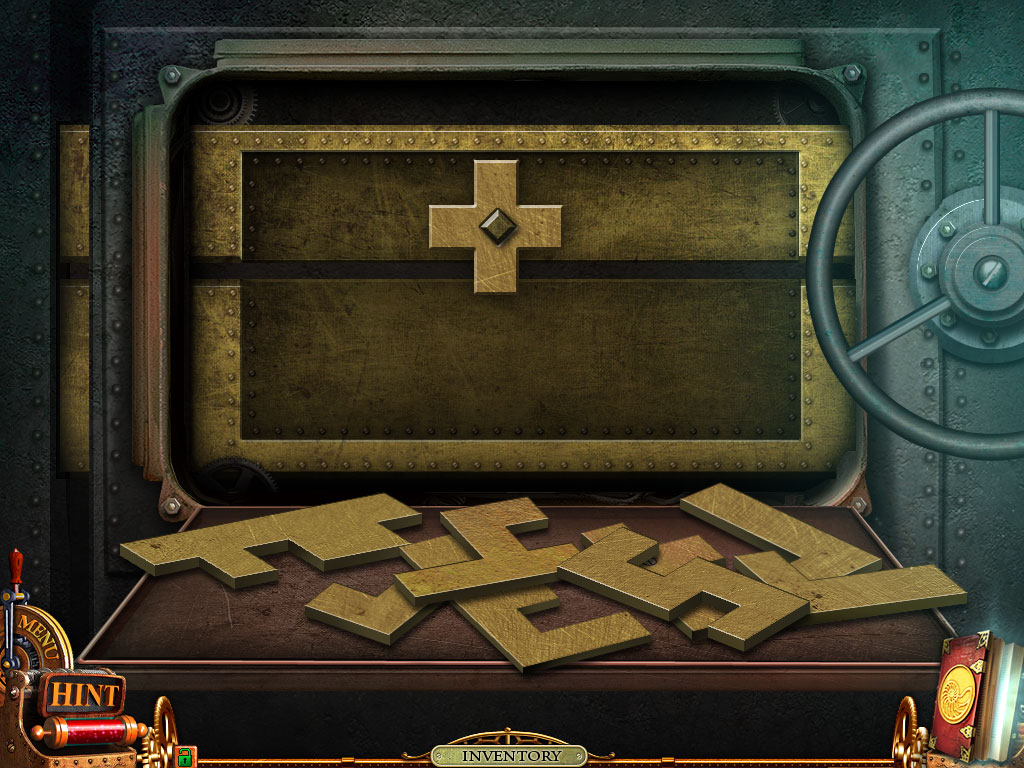
Empty puzzle from Nemo Secret Vulcania
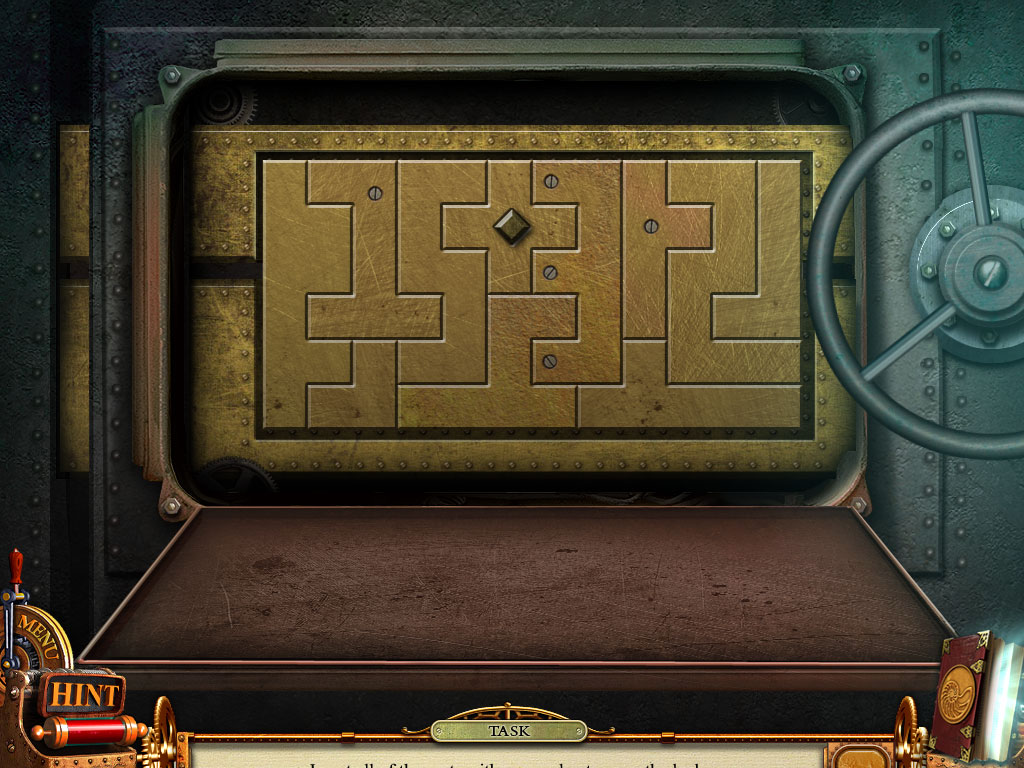
Finished puzzle from Nemo Secret Vulcania
Head through the door and you’ll find yourself in the time device room. On the floor by the wires will be a note and just left to it will be the oven lever. Just a bit more left will be a safe, zoom in on it and place the code on the upper left corner of the safe. Enter the code in and grab the cylinder, tip and lever.
Head back five more scenes and zoom in on the telephone there. Place the cylinder in the phone and head to the elevator room. Use the lever so you can access level two. When you exit the elevator, grab the handle by the busted sky train and place the fuse in the control panel up ahead. You’ll need to flip the fuses using the arrows below.
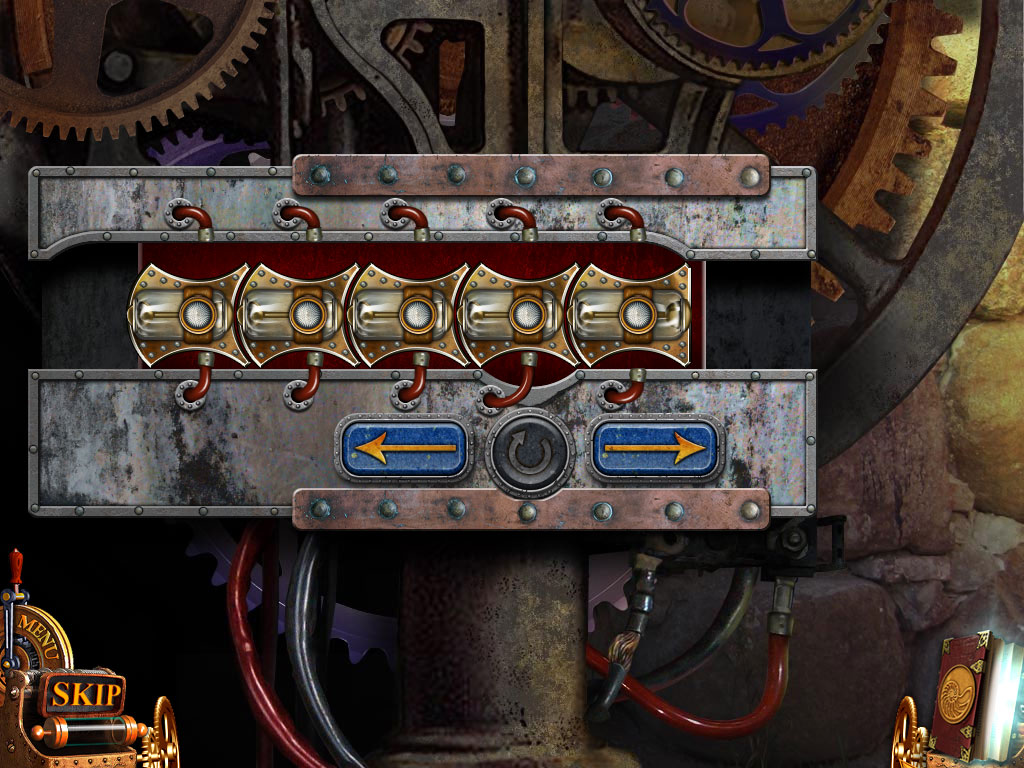
Control Panel minigame in Nemo Secret Vulcania – Start position
The first sequence:Left,rotate and right.Rotate, left, rotate and right two times. Rotate, left two times, rotate three times, right, rotate three times, left, rotate and right three times.
The second sequence: Rotate, left three times, rotate three times, right, rotate and left. Rotate, right two times, rotate three times, left two times, rotate three times, right and then left.
The third sequence: Rotate twice, left, rotate and right four times. Rotate, left four times, rotate three times, right, rotate, left and rotate. Right two times, rotate, left two times, rotate three times and right.
Control Panel minigame in Nemo Secret Vulcania – Solution
When you finish up that headache, cross the bridge and click on our flying robot friend. Left of the train is a bucket and a cable. Behind the train in front of the giant doors is a handle bar that you’ll be needing. Zoom in between the two train cars and grab the rag.
Zoom into the back of the train and grab the vial to the left of the center screen. Place the oven lever and give it a pull. Zoom in on the pile of small odds and ends and grab the lighter along with the note. Place the handle bar to the right of the pile and clean the train’s window with the rag.
Head back down to level one, go through the pool room and reenter the time device room. Zoom in on the table to the left of the room and place the vial on the container and set the lighter underneath the vial. Grab the light once it’s full and jump back five scenes and head through the gate. Go forward one more scene and zoom in on the toolbox right in front of you. Take the newspaper clipping and place the tip on the jackhammer before grabbing it. Place the bucket right behind the toolbox and then zoom in on the robot. Place your sledgehammer and cable on the robot and pull the lever. Once the bucket is full of coal, pick it up and zoom in on the coal car. Remove the coupler with the wrench and head forward.
Zoom in for another HOS and move the rock to the left of the jar to reveal a turtle. Collect 20 items before taking the pick ax and breaking open the wall in the center to reveal a ruby. Now all that’s left is collecting the amber!
Chapter 5: Amber
Head back to the elevator and get to level two so you can return to the trains. Zoom in between the two cars once more and place the coupler. Zoom into the back of the train again and put the bucket of coal in the oven and get the train going by lighting the coal with your lighter. Spin the handle bar and move forward toward the newly unblocked path.
Get ready for another HOS! Close the book on the top shelf to reveal an inkwell, giving you 19 items to sift through. When you’re finished, place the key sitting on the far left in the key maker, which sits in the center shelf.
Hidden Object Scene – find all 19 items and get the key
In the next area you’ll need to zoom into the chair to pick up the note and another cylinder. On the left of the desk is a circle cutter that you’ll need to take. Zoom in on the panel to the right of the desk and insert your staff. The object of this puzzle to get each staff to match their color at the bottom of the panel. It’s a little tough, but we’ve come this far, right?
Minigame Control Panal – Fished with all right colors together
Return to level one, leave the elevator and head back one more scene. Zoom in on the telephone and place the cylinder inside it. Head back to the time device room. On the glass case, to the right of the room, use your circle cutter so you can grab the starter crank.
Return to the trains and zoom in on the control panel by the back end of the black train. Place the handle and starter crank in it and turn the handle. Zoom in on the back of the train, spin the handle bar and you’ll find yourself on a new path.
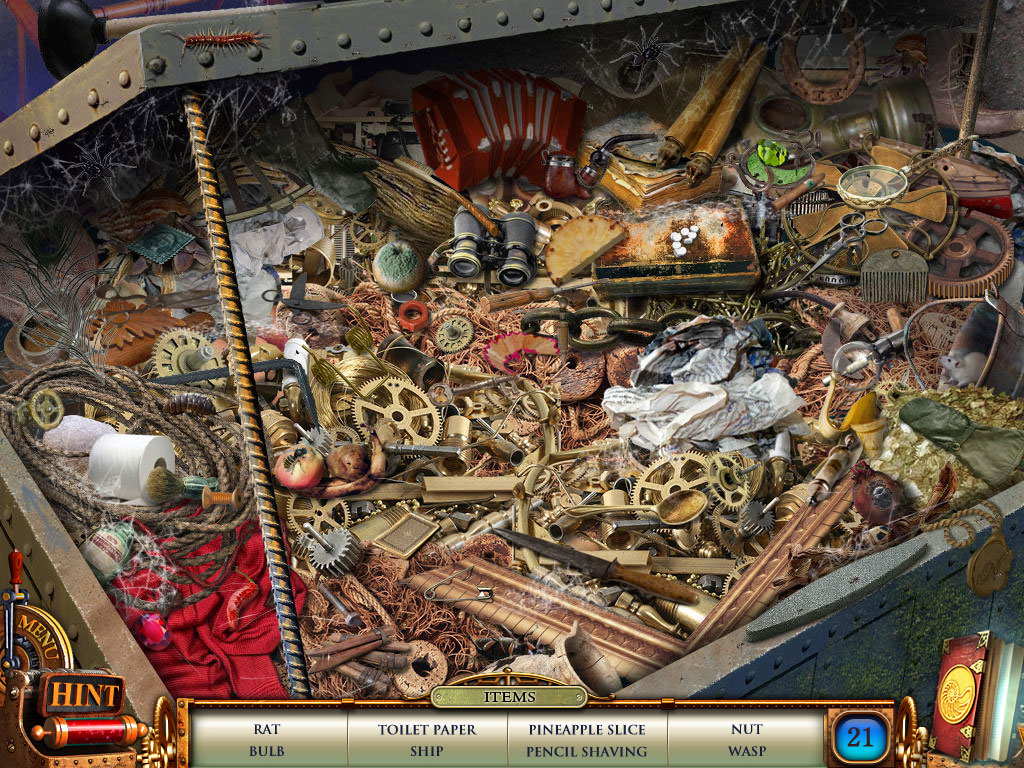
Hidden Object Scene – advanced scene – can you detect all 21 items
Start up the next HOS and find all 21 objects. When you succeed, take the knife at the front of the box and drag it over the file on the edge of the chest. Now that you’re at the factory, zoom in on the motorcycle parked out front and open the box with your key. Take the bearing and go back to the elevator. Zoom in on the toolbox and cut the ropes with the knife you picked up. Pick up the weight on the top shelf and the tweezers on the middle shelf.
Go back to the station office and zoom in on the coat. Use your tweezers to remove the x-ray key. You’ll be able to zoom in for an HOS. Open the box at the front of the screen to reveal snuff, which brings your item count to 18. On the second shelf, squeeze the glue onto the mirror and examine the rest of the scene to place the shards back on the mirror.
Move back to the factory for another HOS with 19 objects to find. When you’re done, pick up the magnifying glass sitting on top the fan blades on the right and place it over on the papers in the chest. Grab the dial after doing so.
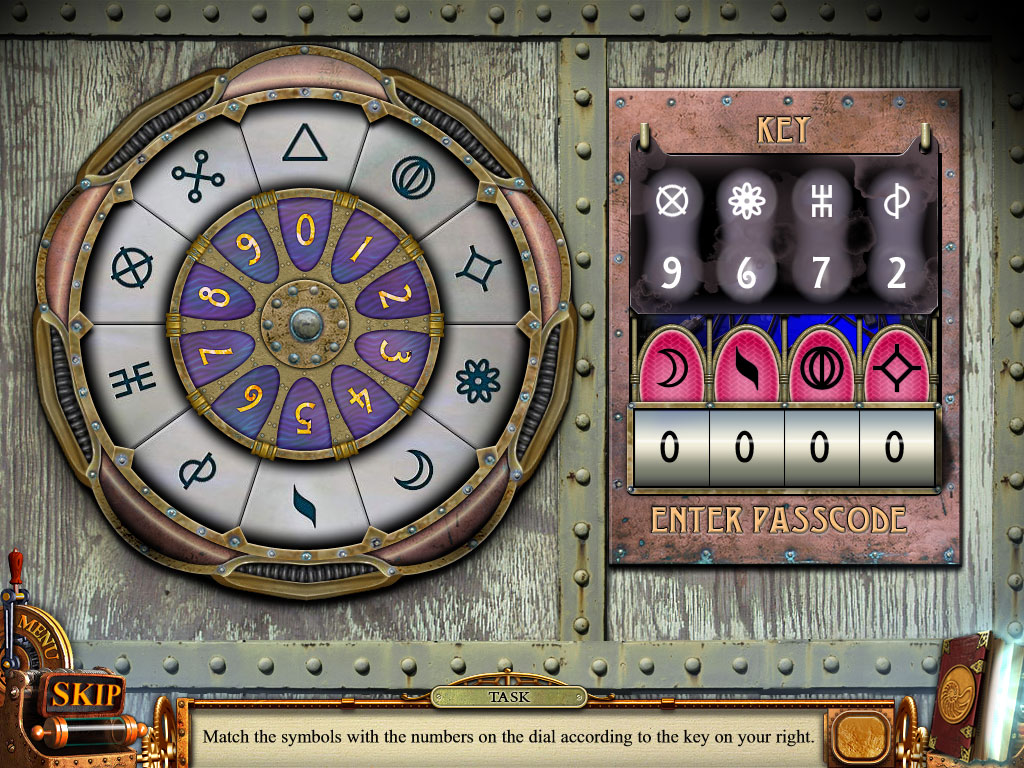
Match the symbols and numbers and finally enter the pass code
Zoom into the door at the factory and place the x-ray key where it belongs. Match up the symbols and numbers until you can successfully enter the pass code. Now you can finally enter the factory! Zoom in on the control panel behind the robot and place the dial on it – turn it to the left. Place the bearing in the vice and smash it with the weight to receive balls. Throw the balls at the robot’s feet!
Head upstairs and click on our top hat fiend. Use the mirror to reflect his beam and zoom in on the bracelet once it settles. Zoom in on the flying robot and grab the paper knife. Zoom in on the bracelet once more and pry out the amber with your knife. Now zoom in on your journal.
Go to tasks, place the amber, amethyst, diamond, emerald and ruby into the time wheel and click on Captain Nemo.
Rush back to the time device room and zoom in on the stand. Get the time wheel onto the stand and finish your final puzzle. It’s a different kind of sliding tile puzzle, but the idea is to get each gem to make a diamond shape. Blue on the left, purple up top, green to the right, yellow on bottom and red in the center. Once you’re done, you’ve saved Captain Nemo! Congratulations!

Time Wheel puzzle – finished
I hope you enjoyed our Nemo Secret Vulcania walkthrough! Check out walkthroughs to our other games after you beat this one! We can help you with all the tricks and cheats you need to keep gaming fun and casual! Try out this neat walkthrough of I know a Tale