Imagine you’re living it up, skiing, having an amazing time when all of a sudden you’re caught in a freak avalanche. You dig your way out of what could have been your icy grave only to find yourself at the entrance to a mountain resort with creepy inhabitants who just really, really don’t want you to leave… ever. In Phantasmat – Crucible Peak it’s your job to find out what exactly is going on, uncover the resort’s dark secrets, and escape if you can!
In this guide, we provide tips and tricks that are perfect for those moments when you find yourself frustratingly stuck, or if you want to be taken by the hand through the game step-by-step!
Contents
General Tips & Tricks
All right, let’s get started. Shall we?
Difficulty: When you begin the game, you’ll discover that there are at least three (3) difficulty settings. As with many other games, you’ll see that there’s casual (easy), advanced (medium difficulty), and hard. During gameplay, you can easily change these settings from the options menu.
Objectives and Tasks: In the lower left-hand corner of your screen you can click on “tasks.” This will reveal a list of goals that you must achieve in order to move forward in the game. You can also see which objective is current “right now.”
Navigation Arrows: As you unlock new areas and find yourself able to move forward to new and exciting areas, navigation arrows will appear. You should click on them to move to the next screen.
Your Trusty Magnifying Glass: If and when your cursor changes into a magnifying glass icon, it means there is something at which you should take a closer look. Here’s a hint … zoom in on the area when you see this icon!
Your Inventory: This can be found at the bottom of the screen. You can also reach it through a quick keyboard shortcut. Just tap (B). You may not see your inventory initially, so you can hover your mouse over the bottom of the screen to bring it up. If that annoys you, locking it in place is always an option. You can easily do this by clicking on the padlock, which you will see to the left of the inventory bar. You can also make the things in your inventory easier to see by clicking on the magnifying glass, which is also to the right of the inventory bar.
Hand Cursor: You can pick up items in this game when your cursor turns into a hand. Once you pick something up, you can add it to your inventory or interact with that item in one way or another.
Skip Button: If you find yourself having too much trouble during a mini-game, and you feel like moving forward without working through it, you can simply click the skip button. Hint: To make the game more fun to replay, these mini-games are puzzles are often randomized.
Get Hints: These are found in the right hand corner of your screen near the bottom. If you find yourself stuck, you can click here to get a hint. However, once you use one the game forces you to wait a while before you are able to use another.
Scenes with Hidden Objects: When you encounter these scenes, any areas with a hidden object will sparkle. Blue objects are right there in plain sight. White objects are actually hidden, and you must do something “more” in order for you to find them.
These general tips should get you started. Read on for a walkthrough of each level’s gameplay!
Phantasmat – Crucible Peak Walkthrough
Chapter 1: The Resort
Welcome to the resort! First thing’s first. You need to get the flare pistol. There’s a rodent in this area, and you need to scare it off. Do that by clicking on it. Then go get the ski part. You should see a bunch of equipment here. You need to zoom in and check everything out. You’ll need the rope with the safety fastener, so grab that and add it to your inventory. Then go look over the edge of the cliff.
Phantasmat – Crucible Peak – Chapter 1
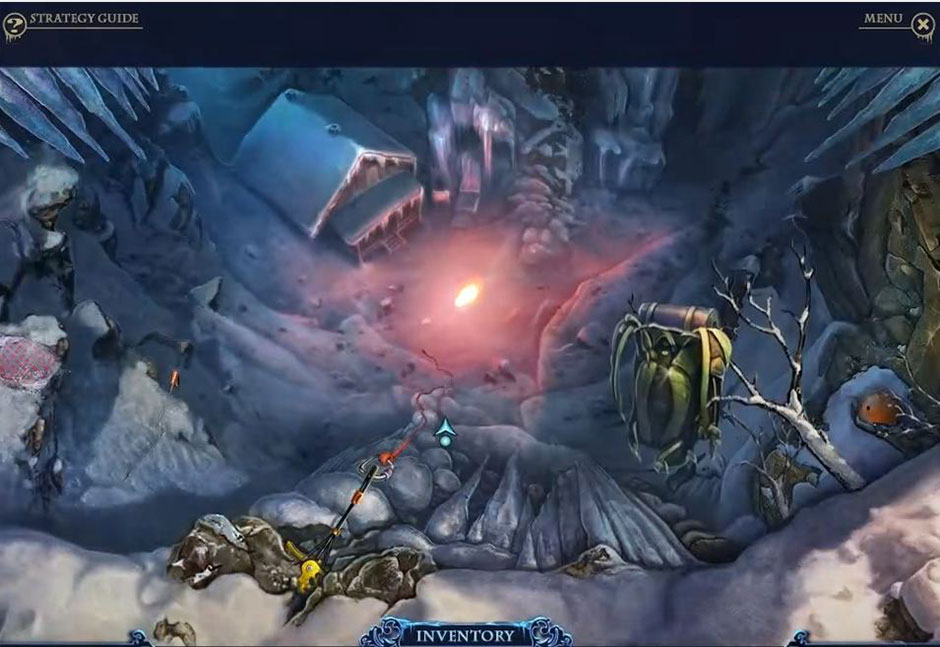
Ok, now that you are looking over the edge of the cliff, you’ll notice you can’t see anything. Time to get rid of the darkness! Here’s where you use the flare pistol. Now that you can see, use your rope with the safety fastener and climb down the cliff.
You hit the ground at the bottom of the cliff. Now what? You’ll see a bottle with water lying in the snow. Go grab it and add it to your inventory. Grab the ski pole. Add it to your inventory too. Next, take a good look at the sign standing next to the ramshackle cabin. Don’t forget to grab the ski glove, and then head back up the cliff by climbing the rope.
Right, now you find yourself back at the top. You’ll see a backpack hanging on a tree. Use your ski pole to snag it. Go back down the rope, and then select the backpack to access a hidden object scene!
Inside the hidden object scene, you need to locate all items on the list you’ll see at the bottom of the screen. (Interestingly, you can switch from the hidden object scene here to the Match 3 Mode. You can see this option at the top of your screen.) Anyway! On with the hidden object scene. Open the backpack’s pouch to discover a whistle. Take it and then open the thermos. Pour the coffee. Don’t forget to open the flap of the backpack to find the sock and flashlight. Take them and add them to your inventory. Once you have these you will earn a cup! Take it, and then exit this area by climbing up the rope, and then walk down.
Next you’ll see a bunch of equipment. Take a look at it, and then put the cup you just earned onto the burner. Pour the water from the bottle with water into the cup. Light the stove by pressing the ignite button. Let the water boil. Once it’s boiling, take the cup. You won’t be able to do this unless you take the ski glove from your inventory and use it. Now go look back down the cliff, and climb down the rope.
All right. You are back at the cabin. Check out the door and try to open it. You can’t! It’s frozen shut. You need to use the boiling water in your cup! Use it on the doorknob. Now you can turn the doorknob and head into the cabin.
Once inside the cabin, you’ll notice that there is a mini-game on the table. You can play it if you want! But, what’s important here is the trapdoor. You need to get it open somehow. Use your ski pole to snag it and open it up. Once it’s open, you’ll see a butane torch. Grab it and add it to your inventory.
Next, look around. What do you see? What can you use the butane torch on? Well, there’s an ice flow. Use the torch on the ice. Just hold down the left mouse button to use it. Trace the outer edge of the boot you’ll see. Grab the crampons (the spiky things attached to the bottom of the boot.) Now walk down.
Back outside, you’ll see another rodent. This time you don’t want to scare it off. You want to try and capture it. You’ll see a path off to the right. You’ll need to use your crampons to walk it.
You’ll come to an area where you’ll see a dead dude (frozen stiff, ha!) You’ll also see the rodent again. Try one more time to capture it. Then take the maze map you’ll find on the corpse. Walk back down and go back into the cabin. The maze map is part of the mini-game you saw before on the table.
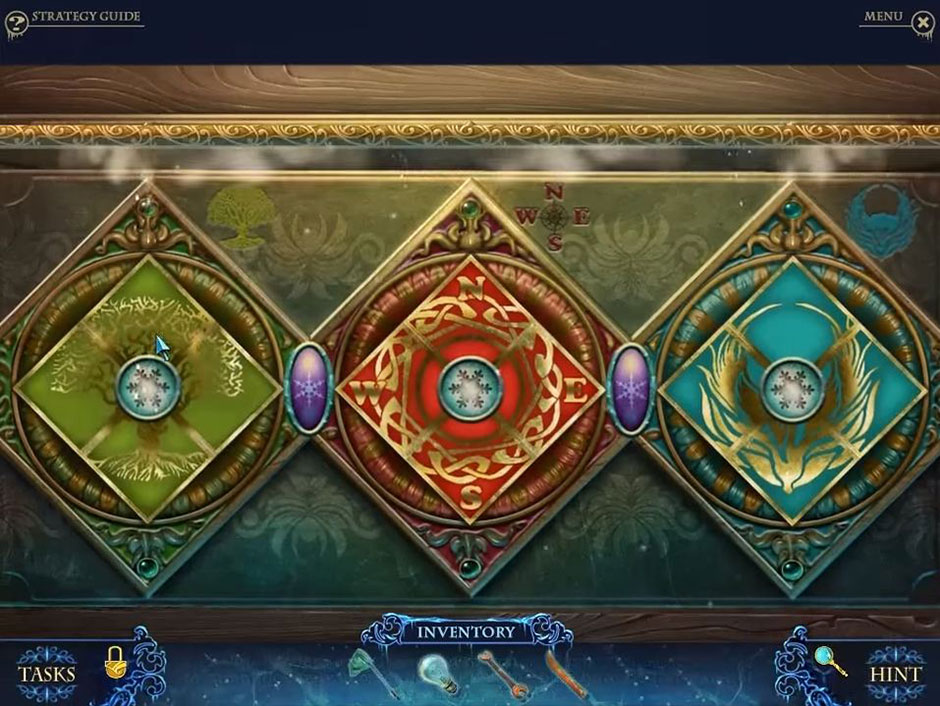
You’ll need to place the maze map into the frame you see on the table to trigger the mini-game. In this game, there are four (4) symbols, which you will need to drag so that the lens is over a matching symbol. All four symbols are color coded. You’ll notice a background in each symbol. Pay attention to the background in order to determine the correct location. Once you get everything correct, the thermometer will fill up. Poof! Like magic, directions will appear on the map. Note them, and then exit the map. Walk down, and then walk to the right.
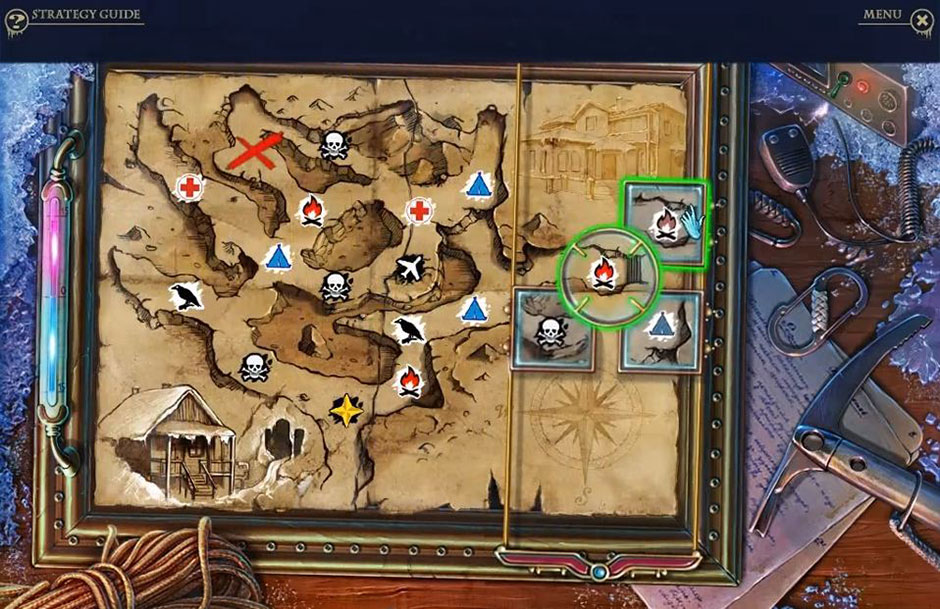
Phantasmat – Crucible Peak – Map
Here you will see a map in the lower left corner of the screen. You need to select it. Now walk right, up, left, right, up right, and up one last time.
Once you get to the next screen, you’ll notice a break in the power lines. Zoom in, and notice that there are downed power lines here. Again, there’s another rodent to try to catch. You’ll also see a lock pick. Go grab it and add it to your inventory. In this screen you should also note the fishing shack, the house, and the resort. Now walk forward.
Here, you see two barriers blocking the road. Click on them to move them aside. You’ll also see a yellow traffic cone. Knock it over, and zoom in. You’ll discover a trowel. Grab it and add it to your inventory. Look at the map, and then walk down and go right to the resort.
At the front of the resort, you see a fence. There’s a brick in it that you need to take out. Use the trowel to do so. Once you have the brick, use the brick to break one of the windows of the resort. You’ll then notice broken glass. Grab a glass shard, and add it to your inventory.
You’ll also notice a butterfly net. Take it and add it to your inventory. You can’t get into the resort through the window, so you’ll want to look at the door. It’s locked and you don’t have a key. You also can’t use the lock pick yet. Instead, pull the doorknob and then use the glass shard to completely remove it. There will be a triangular hole where the doorknob used to be. Now you can use the lock pick! Open the door and go inside.
Once inside, take a look around. You’ll see a map on the table. You should also select the door next to the staircase to discover a hidden object scene!
Inside the hidden objects scene, again you’ll need to locate all the items on the list at the bottom of the screen. In particular, you need the garlic and the corkscrew. Turn on the light switch to find them. You will need to move the coat, which is hanging on the coat rack. Behind it, you’ll discover a tail. Grab the tail and add it to your inventory. There’s a green case along the wall. You need to open it. Inside, you will discover a mouse. Grab it! Add it to your inventory. Once you do, you’ll earn a wrench! You’re all done here, so exit and walk up the stairs.
At the top of the stairs, there’s a landing. Here, you’ll see a ladder to the right. Grab it and add it to your inventory. You’ll also see a shelf. There’s a fuse bulb on it that you will also need to add to your inventory. You’ll also see a book, which you need to open. Inside is a piece to a puzzle. Take it! At the back of the landing there’s a cabinet. Look at it to discover a mini-game.
When you look at the cabinet, you’ll see a puzzle. To trigger the mini-game, put the puzzle part into the left position. Note the symbols, and then move the squares to correct positions based on those symbols. To spin the blocks, you need to press the snowflake buttons, and to swap squares, you need to press the purple buttons. There’s a particular order that you need to press these buttons. Here it is: : L, Kx2, Mx3, Ox3, N, Mx2, K, L, Kx3, Ox2, Mx3, N, O, M, N, M, L, Mx2, N, Mx3, and N.
Phantasmat – Crucible Peak – Symbols
Now, you’ll also notice a letter opener. Grab it and add it to your inventory. Go back downstairs and look closely at the map that you saw on the table.
At the top of the map, you will see a letter. Open it with the letter opener. Inside the letter is a roll of electrical tape. You need to grab this and add it to your inventory. Now, examine the photos that are pinned to the map. Exit the close-up, and then walk down twice.
Here you are back outside the resort on the road with the downed power lines. You need to use your ladder here, and place it against the pole. Examine the power box. There are four (4) bolts. Use the wrench in your inventory on the bolts. Open the power box. Inside there’s an area with bulbs. When you select it, you will discover another mini-game.
In this mini-game, you need to put the fuse bulb into the lower right socket. The lights in the center will light up in a particular sequence. Now, all you have to do is select the colored bulbs in the same order. The sequences are randomly generated, and you must do a series of three of them. The meter on the left will show your progress.
Now, exit the close-up and take a good look at the downed power lines. You should be able to fix them using the electrical tape in your inventory. Once you’ve done this, simply look at the power box and flip the switch. The power is back on! Now walk to the far house.
You’ve just finished chapter one!
Chapter 2: Inside Peter’s House
Here we start off outside Peter’s house. You’ll notice a bunch of broken boards. Grab them and add them to your inventory. Next to the house, you’ll notice a cellar door. Zoom in to discover a butterfly. Use the butterfly net in your inventory to trap the insect. Add the bug to your inventory. Now walk down, and go left to the boathouse.
At the boathouse, you’ll see some cattails to the left of a broken dock. Zoom in. There’s a frog hiding there. Give the butterfly to the frog. You’ll also see a wooden handle floating in the water. Grab it and add it to your inventory. Now, you can use the boards you took earlier and use them to fix the broken dock in front of you. Now look at the pole holder on the dock, and take the hammer. Finally, walk down, go right, and go back inside the resort.
Inside the resort, at the top of the stairs, you’ll see a phone. Zoom in on it. Select the dial. Below it you’ll see a pair of pliers. Grab them and add them to your inventory. Now exit the close-up and walk down twice. Go forward to the mountain pass. You’ll see a road sign, which you can zoom in on. Use the pliers here to grab the bent nails. Add those nails to your inventory. Now walk down, and go toward Peter’s house.
Outside Peter’s house again, you’ll notice a rock. Put the bent nails you took from the sign onto the rock. Now use the hammer to straighten out the nails. Next you need to examine the cellar door. Take the wooden handle from your inventory, place it on the cellar door, then place the straitened nails, and finally use the hammer to attach the wooden handle to the door. Pull the handle, and then select the cellar for a hidden object scene!
As with all hidden object scenes, you need to locate all the items on the list at the bottom of the screen. Now, move all the boards you see on the left to reveal a locomotive. Grab it and add it to your inventory. Tip the green bucket over to reveal a sneaker. Take the sneaker and add it to your inventory too. Once you’ve done this, you will earn the wooden hand. Now, exit the cellar and look at the front door to Peter’s house to discover another mini-game.
To trigger the mini-game here, you’ll need to place the wooden hand into the device. Use the 2nd and third fingers to move the thumb and light all the numbers. The fingers need to be pressed in the following order: 3, 2, 3, 2, 3, 3, 2, and 3.
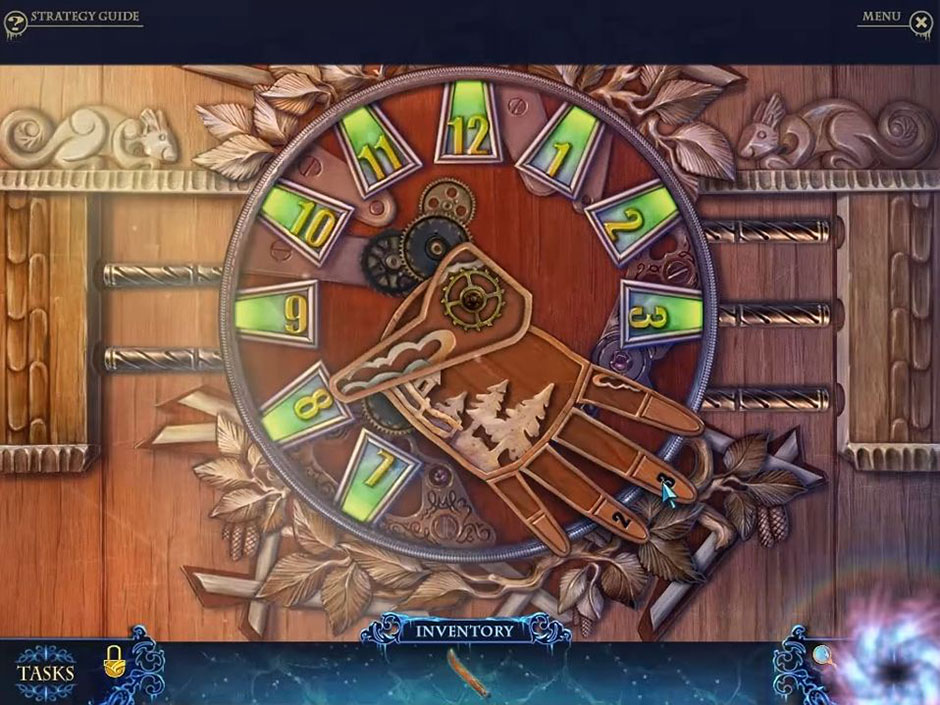
Phantasmat – Crucible Peak – Wooden Hand
Now go inside the house.
Inside Peter’s house, you meet none other than … Peter! You need to get the snowmobile key from him. On the counter you will see another butane torch. Take it and add it to your inventory. Finally, open the refrigerator and look inside.
Inside Peter’s fridge, there’s a ton of ice. You need to use the butane torch to melt some of it. As you use the torch, you’ll discover an object. Trace its outline to reveal a metal leaf. Grab the leaf and add it to your inventory. Now walk down one time.
Outside Peter’s house you’ll notice a shed to the right. Look at the door to access another mini-game. Here’s a small hint, use the metal leaf you just took to trigger the game. You’ll see colored numbers written on the wood. You’ll also see three colored leaves. Select the leaves in the following order: U, V, W.
Now go inside the shed.
Inside the shed, take a look around. You’ll notice a workbench. Zoom in real quick and you’ll see a propeller. You need to grab that and add it to your inventory. Exit the close-up and continue looking around until you find a fishing rod that doesn’t have a fishing line. Take that too and add it to your inventory. In the back of the room, you should see some shelves. Select the shelves to access a hidden object scene!
All right. Here are with another hidden object scene. As with all the rest, you need to locate all the items listed at the bottom of the screen. In the lower left-hand corner, you’ll see a crate. Open its lid and you’ll find a magnet. Grab the magnet and add it to your inventory. Next, you’ll notice that there is a paint bucket with a paint brush sitting on one of the shelves. You need to use the paint brush to paint the sailboat that you’ll see sitting nearby. Once you do this, you’ll earn a saw blade!
Still inside the boathouse, you’ll notice a snowmobile sitting off to the right. Take a look at the handlebars and zoom in. You’ll see a saw frame. Grab that and add it to your inventory. Exit the close-up, and then zoom in to the base of the snowmobile. You’ll see a vise lever. Grab that too and add it to your inventory. Finally, place the ski part from your inventory onto the front bracket of the snowmobile.
Now it’s time to get to work! Exit the close-up of the snowmobile. To the left of the room, you’ll see a workbench. Zoom in to use the vise. Place the vise lever you took from the snowmobile on it. Now place the saw frame in the vise, and then take the saw blade and put it into the frame. Next, grab the hacksaw you see sitting on the workbench. Walk down and you’ll see a latch in the door. Use the hacksaw on the latch. Finally, walk down, and go back inside Peter’s house.
Back inside Peter’s house, you need to talk to Peter again. On the coffee table in the living room, you can zoom in. Grab the fishing line you’ll see sitting on the crossword puzzle. Notice that there’s a divorce decree sitting nearby under a wooden duck. Take a look at that. Exit the close-up and then check out the photograph hanging on the back wall. Finally walk down twice and go left toward the fishing shack.
Outside the fishing shack, you’ll see a rod holder on the dock. Zoom in, and then place the rod without a fishing line into it. Next, take the fishing line you got from Peter’s house and put it on the fishing rod. Spin the handle. Now, you should also see a dummy floating in the water. You’ll see a zipper on its suit. Grab the zipper pull and put it in your inventory. Finally, walk down, go right, and go back into the resort.
Back inside the resort, you’ll notice that there is a suitcase underneath the stairs. Zoom in, and you’ll notice that you can’t open it because it’s zipped up. You need to take the zipper pull you took from the dummy and use it to open the suitcase. Inside, you’ll find a pump. Grab that and add it to your inventory. Now walk down twice, and go left to the boathouse.
Outside the boathouse you’ll meet Otto. You’ll need to get a wooden fish from him. Next, look at the boathouse door to access another mini-game.
Phantasmat – Crucible Peak – WoodenFish
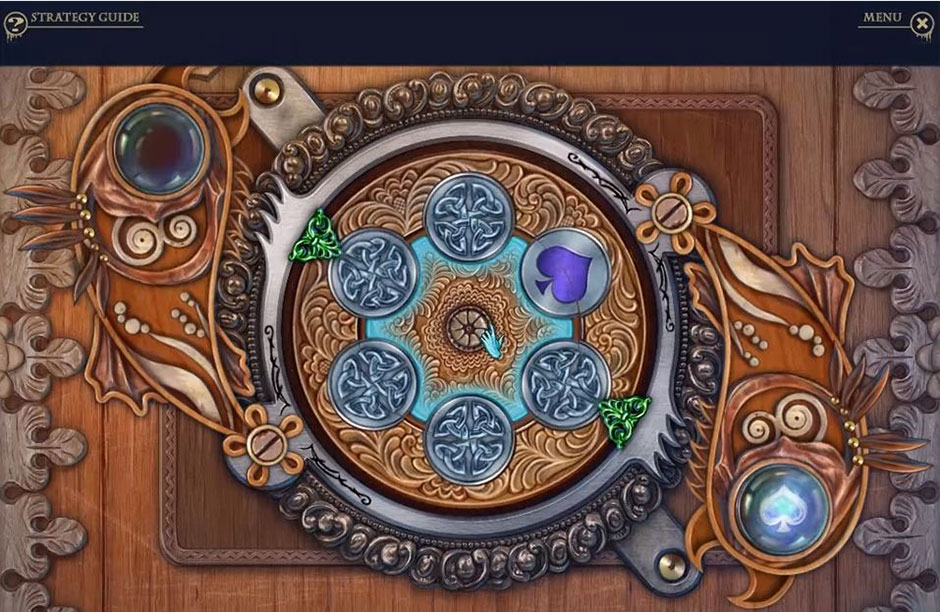
All right! Time for another mini-game. Take the wooden fish you got from Otto and place it on the mechanism to activate the mini-game. Next, you’ll notice a symbol shown in the eye. Rotate the two discs until they form a symbol that matches the one in the eye. Another symbol will form in the other eye. In all, there are six symbols. Move the center disc first. As it moves, the outer disc will rotate in the opposite direction. Finally, go inside the boathouse.
Inside the boathouse, you’ll see yet another mini-game on the left wall. Here, you need to rotate the center piece, and align it with the outer pieces. Once they are aligned, attach the outer pieces to the center.

Phantasmat – Crucible Peak – Boat
Now you’ll notice a boat floating in the water. You’ll need to use the pump beside it to inflate the boat. Now look at the boat and zoom in. Inside the boat you’ll discover a rope with a hook. Take the rope and add it to your inventory. Now walk down.
Outside the boathouse, you’ll notice a rowboat floating in the water. Use the rope with the hook to grab the boat. Next, look at the boat and zoom in for a hidden object scene!
In the hidden object scene, examine everything and locate all the items on the list located at the bottom of your screen. Look until you find the first aid case. Open it to find the bandage. Grab the bandage and add it to your inventory. Now notice the vest hanging over one of the boat’s seats. Open the vest pocket to find the wallet. Take the wallet and add it to your inventory. Next you need to move a board to reveal a pair of binoculars. Add these to your inventory too. Once you’ve done all this, you’ll earn the engine! Now exit the close-up and go inside the boathouse.
Back inside the boathouse you need to look at the boat and zoom in. Place the engine on the mount, and then place the propeller on the engine. On the engine, you’ll see a starter cord. Pull it. Finally, push the boat into the water.
Chapter 3: The Ski Lift
Here at the beginning of Chapter 3, you should find yourself standing outside a ski lodge. You’ll see some sandbags sitting in the snow next to a work sign. Look at the sandbags and zoom in. Inside, you’ll see a carrot. Grab it and add it to your inventory. Now exit the close-up and look at the vending machine next to the ski lodge. Zoom in and grab the cutting pliers you’ll discover there. Exit the close-up and then walk right to go to the ski lift.
Outside the ski lift, you’ll notice the pass gates. Look at them and zoom in. Grab the fuse you’ll find there and add it to your inventory. Exit the close-up and then take a look at the tower door on the upper right-hand side of your screen. Zoom in, and use the cutting pliers on the chains. Now enter the tower.
Inside the tower, you’ll see a map on the far wall with a big number written on it. Pay attention to that number. Next, you’ll see a control panel with a toy alligator sitting on it. Look at the controls and zoom in. Grab the butane torch and add it to your inventory. You’ll also see a slot to the left. Place the fuse in the slot. Exit the close-up and then exit the tower.
Back outside, next to the ski lift entrance you’ll see The Market. Check out the door grate and zoom in. There’s a keypad covered in ice. You need to use the butane torch to remove the ice. Once you’ve done that, select the following numbers in this order: 5, 7, 9. Now head into the market.
Inside the market you’ll see a shopping cart. Look at it and zoom in. Grab the toy’s eye you’ll see there and add it to your inventory. Exit the close-up and then look at the counter and zoom in. Grab the oil sitting next to the cash register. Exit the close-up, and then walk down and go back inside the tower.
Inside the tower again, you need to zoom into the control panel. Use the toy eye you just got from the market on the toy alligator. You’ll see a key inside the alligator’s mouth. Grab that and add it to your inventory. Exit the close-up, and then notice a boat hook lying propped up on the red chair against the wall. Grab the boat hook and add it to your inventory. Now walk down twice.
Back outside the ski lodge, you’ll notice a mailbox. Zoom in. The key you took from the toy alligator’s mouth is a postal key. Use it in the lock. Now, open the mailbox for a hidden object scene!
First thing’s first. Locate all the items listed at the bottom of your screen. Next, find the flag and move it to find the dress. Take the dress and add it to your inventory. Now scare away the butterfly to reveal some flowers. Grab the flowers and add them to your inventory. Once you’ve done this, you will earn the cart wheel! Now walk to the right and go back to the market.
Back inside the market, look at the shopping cart again. Zoom in and attach the cart wheel. Exit the close-up and then pull the cart back. Through a hole in the ceiling, you should be able to see a cable car. Look at it and zoom in. Grab the scissors you see there. Also, on the underside of the cable car you’ll see a circuit chip. Use the boat hook to snag it. Add the circuit chip to your inventory. Now exit the close-up and walk down. Go back inside the tower.
Back inside the tower again, you need to take a look at the control panel and zoom in. Take the circuit chip you got from the cable car, and place it in the control panel. This will trigger a mini-game.
Phantasmat – Crucible Peak – Car
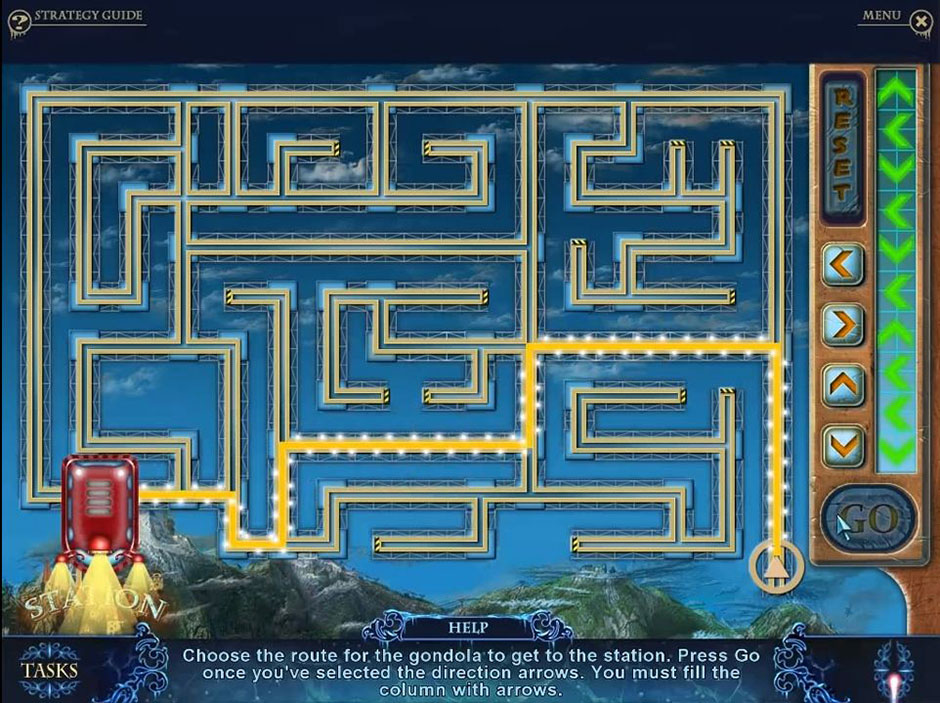
In this mini-game, you need to select arrows to form a sequence, which will move the car to the end. Now select the “go” button to start the car. You can select the reset button to start over. Now walk down twice.
Back outside the ski lodge, you need to look at the sandbags again. Zoom in, and then use the scissors on the knot. Once the sandbag is open, grab the button and add it to your inventory. Walk forward. Now check out the ice covered fountain. Zoom in and take the ½ coin you find there. Add it to your inventory. Now walk down, go to the right and go back inside the market. Look at the register on the counter and zoom in.
All right! Time for another mini-game on the cash register. Use the button and place it on the register. In the top window, take a look at the shape. Now select any button below to recreate the shape and change its color. Keep pressing a button until you find whatever color you want. Now continue fitting shapes on the board until it’s full. Don’t worry about making the board perfect. The board can actually have some empty squares. If you need to erase a shape, use the undo button. Remember that you can’t use the undo button if you’ve completed a shape. Now, select the next button to see another shape. Once you’ve done all that you should be able to take the 2/2 coin from the drawer on the register. Now walk down twice!

Phantasmat – Crucible Peak – Drawer
Outside the ski lodge, take a look at the vending machine again. Zoom in and use the 2 coins in the vending machine slot. Take the pass card from the vending machine. Exit the close-up and then, walk to the right.
You need to get into the cable car. But, to do so, you’ve got to use the pass card you just took from the vending machine. Zoom in on the scanner, and use the pass card on it. Now enter the cable car.
Inside the cable car, you should look out the roof and zoom in. You’ll see the wheels on the cable. Use the oil from your inventory on the wheel. Exit the close-up and then take the snowboard boots you see lying to the right, and add them to your inventory.
Now look around the cable car. You will see a control panel. Look at it and zoom in. To the right you’ll see a mask and goggles. Grab these and add them to your inventory. You’ll also see a cup. Knock it over, and then move the lever you’ll see on the left-hand side. Exit the close-up, and then open the cable car door and push down the ladder. Then exit the car.
You’ll find yourself outside with the snow falling. Visibility is bad, so you need to use the mask and goggles you took from the cable car so that you can see. Now take the branch you’ll see lying in the snow and add it to your inventory. Next, look at the door to the building in the background and zoom in. Take the winch you’ll see there and add it to your inventory too. You should also see a snowboard propped against the wall next to the door. Use the snowboard boots on the board to get the snowboard. Add it to your inventory, and then walk to the right.
Here you are at the ski lift. Look at the chair and zoom in. Attach the winch. You’ll notice a scarf and an avalanche beeper on what looks like a dangling corpse. Grab these off the corpse and add them to your inventory. Exit the close-up and place the snowboard on the snow.
Next, you need to use the avalanche beeper on the packed snow. Next, notice that there’s a snowman off to the right. You need to give him a nose. Use the carrot. He needs another arm. Use the branch. Finally, he’s cold. Use the scarf. The snowman is good to go! Now, look for the snow shovel. Once you’ve found it, grab it and add it to your inventory.
Now use the snow shovel to dig in the packed snow. You’ll uncover another corpse. Look at him and zoom in. Grab the flat camera and Schultz’s keys that you discover. Exit the close-up and walk down twice. Now check out the door to the store. Zoom in and use Shultz’s keys in the lock. Then go inside.
Inside Schultz’s store, you get to meet none other than … Schultz! Talk to him and pay attention to the directions he gives. Now examine the radio. Zoom in and grab the USB cable and add it to your inventory. Then look at the back wall for another hidden object scene!
In this hidden object scene, you need to locate all the items on the list at the bottom of your screen. Now look around until you see a sign. Move it to reveal a skier. Add it to your inventory. Then use the remote on the television to find the satellite. Add it to your inventory too. You should see a pouch on the shelf. Open it to find a compass. Grab the compass and add it to your inventory. Once all this is done, you will earn the power strip. Now walk down and go to your left.
Remember that Schultz gave you directions? Here’s where you use them. If you don’t remember what he said, it’s ok. We remember, and here’s what he told you: “walk right (S), left, straight, right, and left.”
Here you find yourself in a new area. You should see a box standing in the snow. Zoom in and open the box. Grab the antenna and the roll of paper that you find inside. Add them to you inventory. Now, walk to your left.
Again you are in a new area here. Use the snow shovel you’ve got on the pile of ashes you see. You’ll discover another butane torch. Grab that and add it to your inventory. Now walk down. You’ll see a building in front of you. Look at the door. You’ll see that it is frozen shut. You need to use the butane torch to melt the ice. Run the torch around the outline of the door. Then go inside.
Inside the building you’ll see a desk chair. Move it. Then examine the cabinet and zoom in. Place the power strip from your inventory in the outlet. Now move the plug to the power strip.
Exit the close-up and look at the far wall. You should see a speaker sitting on another desk. Grab the speaker and add it to your inventory. There’s a seismograph sitting on the first desk. Zoom in to examine it. You’ll see a roll of paper. Grab it and add it to your inventory. You’ll also see a series of numbers. Press 2007. Now you need to grab the radio frequency. Exit the close-up and walk down 3 times. Then go inside the ski shop.
Inside the ski shop, you need to locate the radio. Once you have found it, zoom in and attach the antenna. Also plug in the speaker. Now use the radio frequency on the radio. Exit the close-up and walk down. Go to your left, right, and then go inside the station.
Inside the station you should see a computer. Take a look at it and zoom in. Attach the USB cable to the computer. Then attach the flat camera to the cable. Turn the computer on by pressing the power button on the CPU. Tap the keyboard, and then look at the monitor. Photos will appear. Scroll through them and then take the camera. Exit the close-up and walk down, and then go to your left.
Here you should see a crater. Use the camera to take a snapshot. Add the snapshot to your inventory. Walk down three times and go back inside the ski shop. Here you’ll see Schultz again. Talk to him and give him the snapshot of the crater. Then select the back wall for another hidden object scene.
Okay! Here we go. Another hidden object scene! First, locate all the items on the list at the bottom of your screen. Next use the fist on the ice to find the knife. Add the knife to your inventory. Next, move the snowboard to find the traffic rod and the exclamation mark. Now remove the hat to find the whistle. Add it to your inventory too. You’ll earn the snowmobile parts. Now, walk down, right, forward twice, and then down 4 times. You’ll meet Greta. Talk to her and then walk toward Peter’s house, and then enter the shed.
Chapter 4: The Church
Inside the shed, you need to look at the snowmobile again. Zoom in, and then use the snowmobile parts you were just awarded on the battery cover. Then grab the dead battery and add it to your inventory. Exit the close-up and then select the shelves for another hidden object scene!
As always, locate all the items on the list at the bottom of your screen. Now grab the feather and the greaser you’ll find by moving the red cloth. Add them to your inventory. Next, move the the jug to find the glue and the insulating tape and add them to your inventory too. You’ll earn the glue. Walk down twice, go left, go inside the boathouse, go forward, right, then enter the cable car.
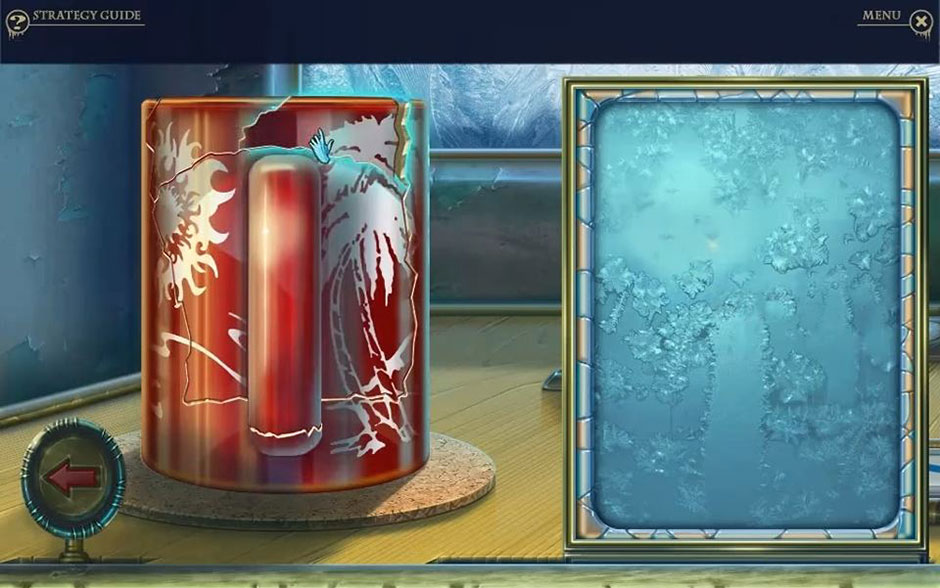
Inside the cable car you need to locate the controls and look at them. You’ll notice that there is a broken cup on the floor. Use the glue to fix the cup. This will trigger a mini-game.
In this mini-game, you have to restore the cup. You have to place all of its pieces on the base. You do this by selecting the arrow to spin the base. You should use the shadow outlines as a guide. Once the cup is repaired, grab it and add it to your inventory. Now exit the cable car and walk down.
Phantasmat – Crucible Peak – Broken Cup
Back outside the ski lodge, you need to examine the sandbags again. Zoom in and then use the cup on the opening to get a cup of salt. Exit the close-up and then select the mailbox for another hidden object scene.
Okay! Easy one here. Locate all the items on the list at the bottom of your screen. Now open the box to reveal a wine glass. Add the wine glass to your inventory. You’ll earn the club symbol. Now walk forward.
You’ll now find yourself in a new area outside of a church. Look at the church steps and use the cup of salt on the ice to melt it. Then go inside the church.
Once inside the church, you need to look at the confessional. Zoom in and then look at the chair. There’s a huge lock surrounding a book on the chair. You need to use the club symbol on the lock. This will allow you to open up the book. Look at the book, zoom in, and turn the page. Grab the corkscrew you’ll find embedded in the book. Add it to your inventory. Now walk to your right.
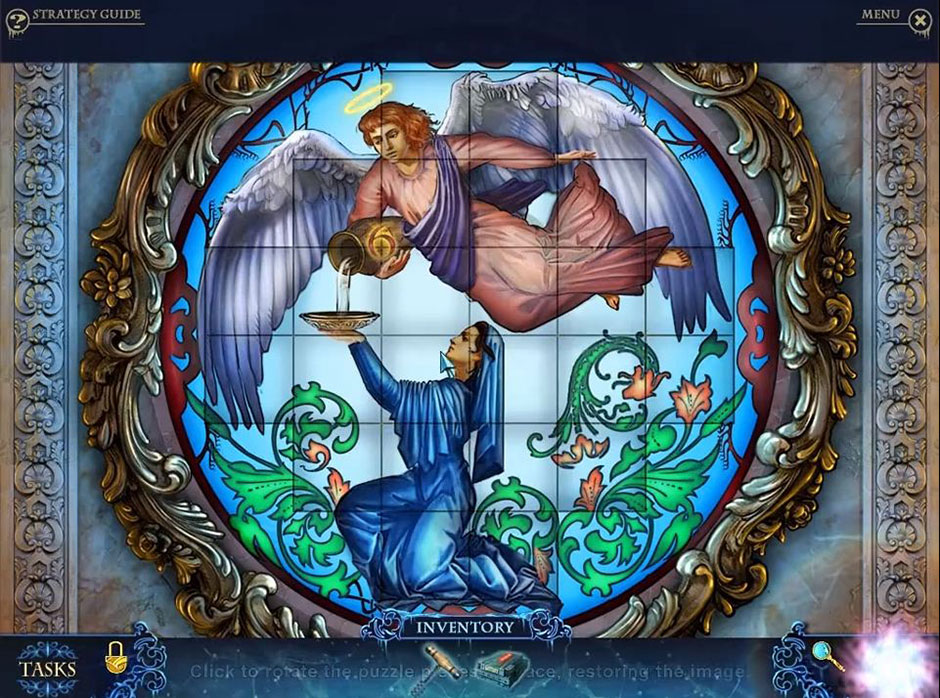
You’ll find yourself in front of a stained glass window. Select the window to start a mini-game. Rotate the pieces to restore the image. Once the window breaks, grab the stone hand that is revealed and add it to your inventory.
Phantasmat – Crucible Peak – Image
You should also see a bottle. Use the corkscrew on the cork in the bottle to open it. Take the torch, which is inside the bottle. Add it to your inventory. Walk up the stairs, then down. You should see a pole propped against the church steps. Zoom in on it. Place the torch into the pole’s fittings. You should then take the lamplighter pole and put it in your inventory. Then go into the church. Inside, you’ll need to use the lamplighter pole on the chandelier to get the lighted torch. Finally walk to your right.
All right. Inside the church, you should see a statue along the back wall. Take a look at the base of the statue and zoom in. You’ll see some candles there. You need to use the lighted torch on the candles. In front of the candles, you will some boards. Pay attention to them. Now take a look at the head of the statue. Zoom in here and place the stone hand in the slot to the left. On the right-hand side (the left hand of the statue) you will see some tongs. Take the tongs for coal and add them to your inventory. Finally, look at the shelves to for a hidden object scene!
Here we need to locate all the items on the list at the bottom of the screen (as in all the hidden object scenes). Now, you’ll see a cabinet near the top of the screen. Open it to find the scissors. Take the scissors and add them to your inventory. Next, you’ll see a drawer on the right-hand side of the screen. Open it to find the devil. Grab the devil and add it to your inventory too. You’ll earn the axe once you’ve done all of this. Now, go back to the base of the statue. Zoom in and use the axe on the boards.
Now, to the left of your screen, you should see a plate. Grab it and add it to your inventory. Next, look at the fireplace to the right of the center of the screen. Zoom in and use the tongs for coal to grab the hot coal you’ll see there. Add the hot coal to your inventory. Now grab the screwdriver you’ll see lying at the bottom of the fireplace. Exit the close-up and take a look at the bulletin board above the fireplace. Zoom in and take the 1st village picture. Add it to your inventory. Finally, go up through the hole, go up the stairs, and then you need to walk down.
Back outside, you’ll see the frozen fountain again. Zoom in, and grab the plate with water. Add it to your inventory. Okay, now you need to head back into the church and walk right. You’re now back in the room with the statue. Look at it, and zoom in. Put the plate with water into the statue’s hands. In the center of the statue, you’ll see a small statuette. Grab it and add it to your inventory. Finally, exit the close-up and walk up the stairs.
Here you find yourself in the church sanctuary. Slightly to the right of center you will see a cabinet. Zoom in, and place the statuette on the right. Slightly to the left of this, you will see some incense. Take the incense and add it to your inventory. Exit the close-up and leave the sanctuary. Go to your right, and then enter the hole.
You’ll find yourself in a new area. Look to the bottom right of your screen. You’ll see a golden cup and a censer. Place the hot coal from your inventory into the cup. Next you should also place the incense into the cup. Then, take the censer. Exit the close-up, look at the statue and zoom in. Now you need to place the censer in the statue’s hands. There should also be a series of arrows directly to the left of the statue. These are directions, and you should pay attention to them. Now exit the close-up and look for the cave entrance. Time to head into the cave!
Here, you need to follow the directions you took from the statue. These are as follows: walk left, right, forward, left, left, forward, and right.
By following the directions from the statue, you find yourself in a new area. Here, you need to look at the sign, which you will see against the far wall, against a stalagmite. Zoom in, and take the 2nd village picture. Add it to your inventory. Scroll up to take the notes and these to your inventory too. Exit to close the close-up and then look at the bench near the center of your screen. Zoom in and take the paw symbol you’ll see there. Also, use the screwdriver on the train car, and then grab the magnet and add it to your inventory. Exit the close-up, and then walk down twice and go up the hole.
Here it’s time for another hidden object scene. To access it, select the shelves. Locate all the items on the list at the bottom of your screen. You’ll need to open the donations box located on the left-hand side of your screen. Inside, you’ll find a coin. Grab it and add it to your inventory. Next, open the suitcase located in the center of your screen and grab the rope you’ll find inside. Add it to your inventory as well. Once you have completed these things, you will earn the 3rd village picture. Finally, walk up the stairs and look at the organ to access another mini-game.
To activate this mini-game, you need to place the notes onto the organ. Now, move the metal slider so that green smoke ends up coming from all the pipes. Note that the color of the smoke actually means something here. Red smoke means you are way off and you are doing something wrong. Yellow smoke means you are only one place off. Whenever you want to see where you are in the mini-game and if you are on the right track, you just need to select the music book.
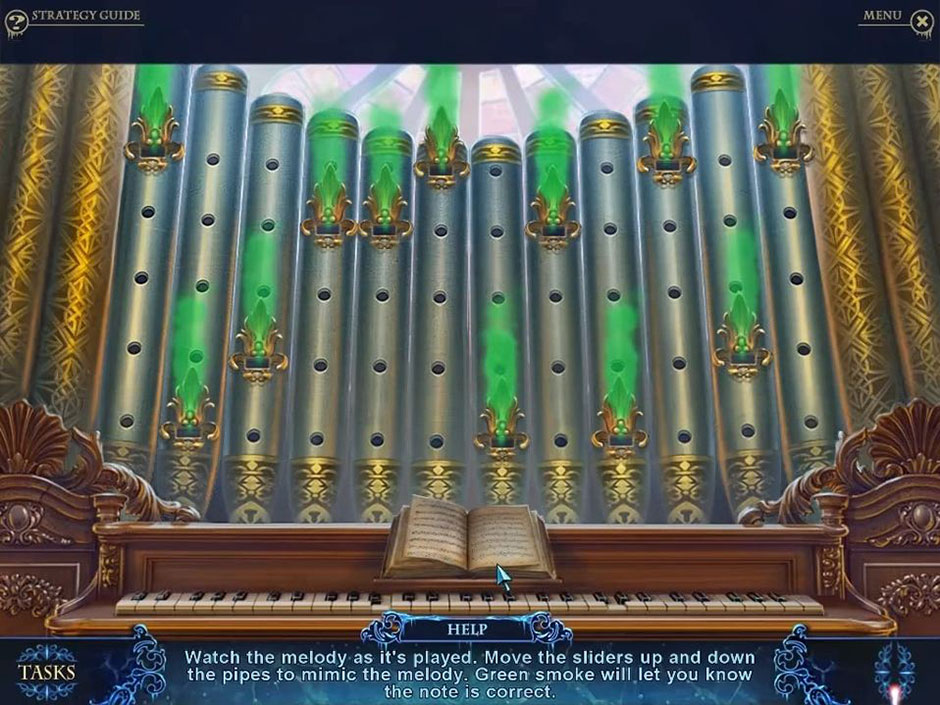
Phantasmat – Crucible Peak – Melody
Once you are done with the mini-game, you should walk forward. You’ll find yourself in a new area outside. You’ll see what looks like an oil or gas tank. Select it and zoom in. Grab the butane torch you’ll find there. Exit the close-up. Now, to the right you’ll see a toolbox covered in ice. Use the butane torch to melt the ice and free the funnel. Grab the funnel and add it to your inventory. Now take a look at the chimney on the cabin in the background. Zoom in and take the valve you find there. Exit the close-up and enter the tent you see near the center of your screen.
Inside the tent, you need to turn on the lantern. Then you should take a look at the chest you’ll see next to the table with the med kits on it. Zoom in and take the hook with the handle and add it to your inventory. Exit the close-up, and then take a look at the table with the med kits. Zoom in and take the lattice part you’ll find there. Then exit the close-up, and go out of the tent. Walk down.
Outside, you should see a manhole in the pavement. Here you need to use the hook with a handle to remove the lid from it. Look down the manhole. Inside (when zoomed in) you will need to place the valve on the pipe, and then turn it on. Exit the close-up, and then look at the ice covered fountain again. Zoom in and grab the tumbler and add it to your inventory. Exit the close-up and go back inside the church.
Okay, you are back inside the church’s sanctuary. Here you need to look at the confessional. Examine the grate. You need to put the lattice part here. You’ll also need to take the 4th village picture. Exit the close-up and walk down, go forward, then go back inside the tent. Inside, you need to look at the table for another mini-game.
Here inside the tent, you begin a new mini-game. Here’s what you need to do. Put all the village pictures you’ve got (there should be four) on the scrapbook. But, you need to put them into the correct holders for each one. Pay attention to the huge number scrawled across everything: 302. Now exit the close-up.
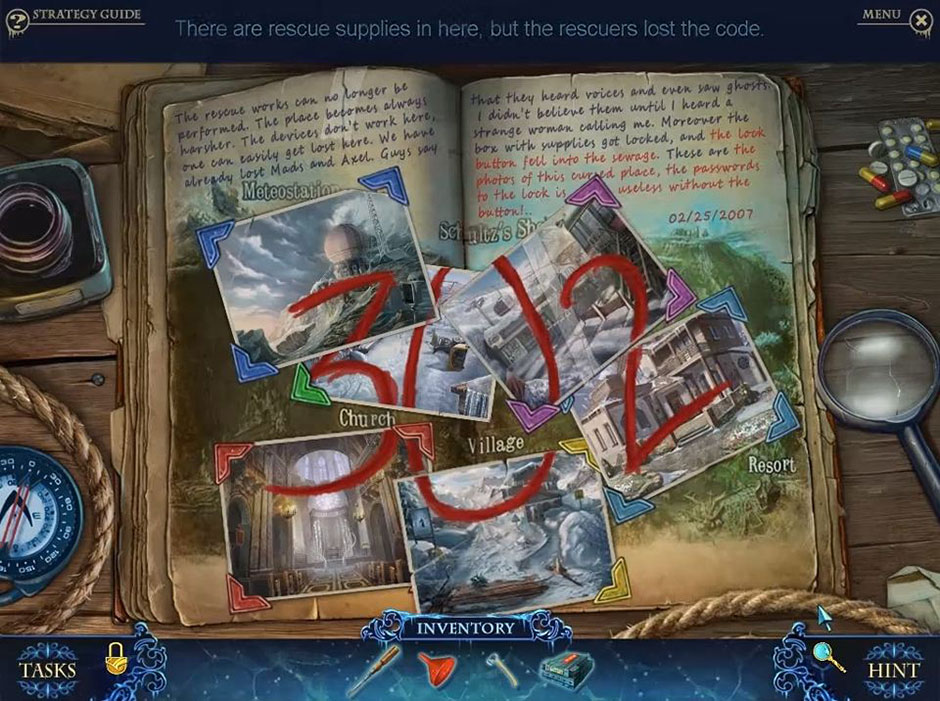
Phantasmat – Crucible Peak – Scrapbook
Still inside the tent, take a look at the chest and put the tumbler in the lock. But! You need a code. Here it is: turn the wheels to 3-0-2.
Now grab the rope, add it to your inventory, and head down.
Okay, you are back outside the tent. Take a look at the chimney on the cabin in the background again. Zoom in and place the rope on the right. Then take the magnet and attach it. Pull the rope and pull up the bucket. Grab it and add it to your inventory. Exit the close-up and then look at the tank again. Place the tap on the pipe, and put the bucket you just took underneath it. You’re going to fill it up with fuel. Once it’s full, grab the bucket full of fuel and add it to your inventory. Exit the close-up and walk down. Go back inside the church, and then go right, enter the hole in the floor, and walk left twice.
Here you will have reached a new area. You should see a generator sitting on the floor near the left edge of your screen. Look at it and zoom in. You need to place the funnel in the tank and then pour the bucket of fuel. In the same close-up, you need to select the panel to play a mini-game.
In this mini-game, you have to move the lightning piece to the power connection. Basically, you have to slide the pieces in a particular direction, which is indicated by numerical order.
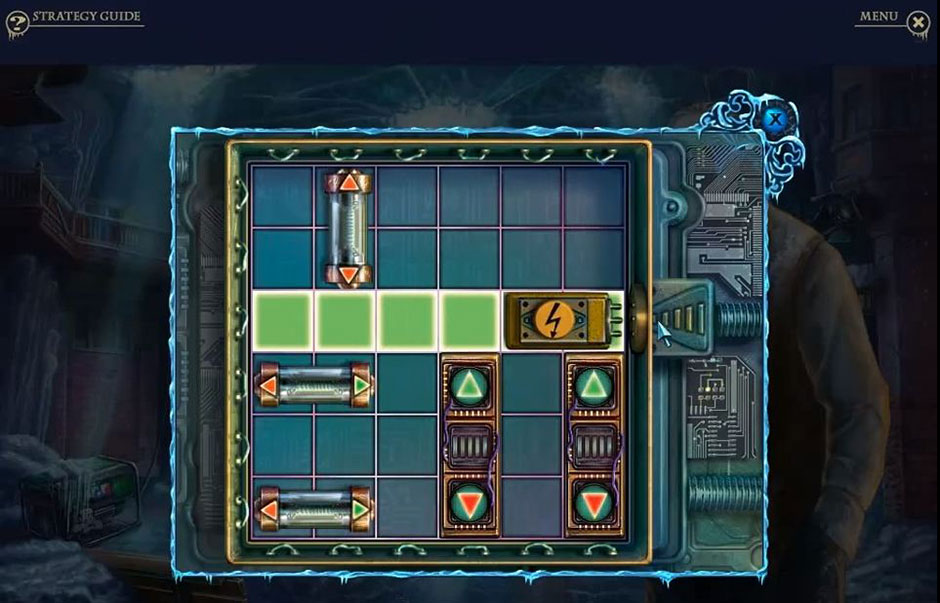
Phantasmat – Crucible Peak – Power Connection
Once you’ve solved this mini-game, that’s it! It’s the end of Chapter 4!
Chapter 5: The Museum
Okay, time to for some achievements in “Chapter 5: The Museum.” Don’t you agree? So, to get things started with a bang, let’s take a look at the post office door and then use the axe in your inventory on it. Cut the thing down! Now enter the post office.
Here, we are inside the post office. Let’s take a look at the base of the fan. Zoom in and grab the key you’ll find there. Next, on the right side of the room, you’ll need to open up the cabinet. Use the key you just took on the drawer. Now, grab the wife’s letter and add it to your inventory. Walk down.
In this area, you will see Peter again. Talk to him and give the wife’s letter to him. Now take a look at the museum door and access another mini-game.
To play this mini-game, you need to slide the four animal chips over to the correct treat. Here’s what you do: Move the pink bunny right, then move the blue dog up. Slide the orange bear down, left, then up. Move the blue dog right, then down. Slide the green cat left, up, left, down, then right. Good job! Now go inside the museum.
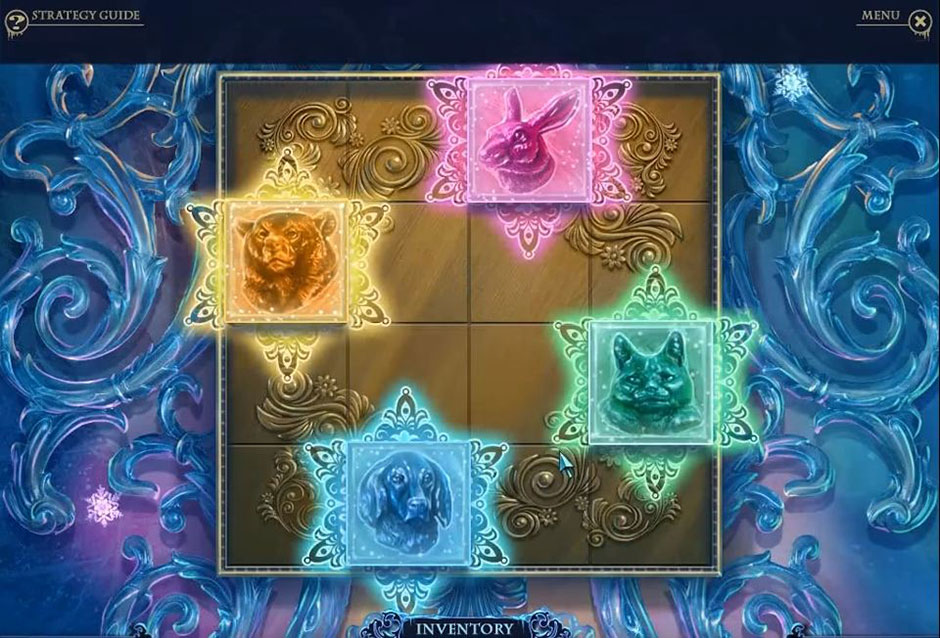
Phantasmat – Crucible Peak – Animal Chips
Directly inside the museum, you should take a look at the table, which is up against the wall next to the ice bear. Zoom in and take the fan button. Exit the close-up and then select the sculpture in the center of the room to access a hidden object scene!
Next, as always, locate all the items on the list you’ll see at the bottom of your screen. Now, move the chainsaw you’ll see at the upper left-hand side of your screen in order to find the bat. Grab the bat and add it to your inventory. You’ll earn the electrical plug. Now walk down and go inside the post office.
Inside the post office you need to look at the base of the standing fan, which you see near the wall in the center of your screen. Attach the electrical plug on the wire and then plug it in. Now take a look at the top of the fan. Here’s where you’ll use the fan button. Turn the fan on. Then, select the fan so that it turns. On the counter to your left, you should take a look at the scale. Zoom in and take the phoenix you’ll find there. Exit the close-up and then go out of the post office. You then need to go back inside the museum.
Inside the museum, you should pay attention to where the stairs OUGHT to be. It’s on the back wall on the left-hand side. Now, take a look at the base of the ice wolf on the right-hand side and take note of a phoenix shaped indentation at its base. Yes, here you need to use the phoenix you just took and place it in the indentation. When you do, you’ll access a mini-game.
In this mini-game, you need to trace the diagram completely without duplicating any lines. First of all, select any point to begin, then click on a connecting point (green arrow). There are 3 patterns to complete (P, Q, R). Finally, walk forward up the stairs.
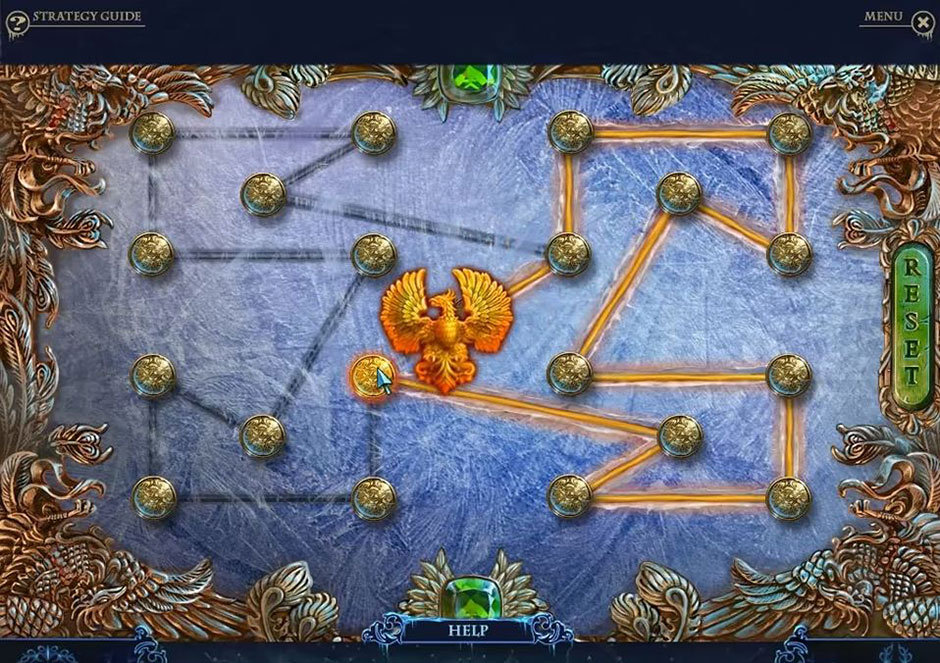
Phantasmat – Crucible Peak – Diagram
Now take a look at the ice bear. Zoom in and note that there is a place for you to put the paw symbol. Do that, and then take the pencil that you will see protruding from the bear’s mouth. Then walk forward.
Here you’ll find yourself in another new area of the museum. You should see a generator standing next to an ice statue on the left-hand side of the screen. Zoom in on the generator, and pay attention to the number 3.14. Now, take the bulb and add it to your inventory. Exit the close-up and then note the fallen head on the floor near the center of your screen. Then walk down twice.
Back in the main hall of the museum, you should now look at the table on the right-hand side of the room. (The one next to the ice bear) Zoom in and look at the sharpener. Place the pencil in it and turn the handle to sharpen it. Then take the graphite powder that falls from the sharpener. Exit the close-up and walk down twice. Go back inside the post office, and look at the scale on the left.
Inside the post office you need to use the graphite powder on the scale. Then, remove powder from the scale until it reads 3.14. You’ll have to do this three times to get the correct reading. Then you need to use the bulb on the powder. Once you do, you’ll get the graphite conductor. Once you’ve got it, walk down, go back into the museum and go forward twice.
Here you are back in the room with the generator. Take a look at it again and zoom in. Place the graphite conductor in the slot you’ll see there. Then pull the switch. You’ll see a chess piece lying here too. Take the chessman and put it in your inventory. Now, exit the close-up and walk down twice.
Here you should see a chess board to the left. Zoom in on it, and then place the chessman on the symbol. Move the piece, and then take the face part. Exit the close-up and then walk forward twice.
It’s time for another mini-game. Look at the fallen face in the back for a mini-game. Place the face part on the face to trigger the mini-game. Place the pieces on the button (I) to rotate them, then place the piece into the face (J). Now you need to walk forward.
Phantasmat – Crucible Peak – Fallen Face
Here you find yourself in a new area. Note the locked car. On the left side of your screen, you will see a glass sphere. Take it and add it to your inventory. Then, walk down.
Okay, back in the generator room. Look at the generator and zoom in. Place the glass sphere over the bulb. You’ll talk to Greta here. After doing so, you need to look at the torso and then take the miniature face you see and add it to your inventory. Then walk down twice.
You’re back in the main room of the museum. Here, you need to look at the table to the right. Zoom in, and then place the miniature face into the indentation. Then, take the fangs symbol and add it to your inventory. Finally, select the statue in the center of the room for another hidden object scene!
In this hidden object seen you need to locate all the items on the list located at the bottom of the screen. On the right-hand side of the screen open the bag to locate the hammer. Add it to your inventory. You’ll earn the butane torch! Now, walk forward.
In this room, you need to look at the wolf and zoom in. Then place the fangs symbol onto the appropriate place on its head. Grab the heart that you’ll see in the wolf’s mouth. Then exit the close-up and walk forward..
Here you need to look at the torso on the right-hand side of the screen. Use the butane torch to melt open a hole, and then you need to put the heart inside. Now, grab the car key, which is hanging inside the rib cage of the torso, and add it to your inventory. Exit the close-up and walk forward.
Here you need to look at the car. Zoom in and use the car key in the lock. Look inside the car and note that there is a locket on the corpse. Grab the locket and add it to your inventory. Then, walk down.
Here you’ll meet Greta again. Give the locket to her. Then, take Otto’s room key from her and add it to your inventory.
Back in the generator room, you need to zoom in on it. Then place the dead battery on the shelf. Grab the charged battery you’ll see there. Then you’ll need to walk down 5 times, go up the hole, up the stairs, walk down 5 times, go right, enter the resort, and walk up the stairs.
Here you find yourself in a new area. Take a look at the door and zoom in. Use Otto’s room key on the lock and go inside. On the floor you’ll see an RGB amplifier. Grab it and add it to your inventory. Note the dolls on the floor on the right side of the room. Then look at the dresser, zoom in, and grab the red eye you’ll see there. Add it to your inventory. Finally, select the wardrobe to access a hidden object scene!
In this hidden object scene, you need to locate all the items on the list, which you’ll see at the bottom of your screen. Next, remove the poster on the wall above the nightstand, to reveal a broken mirror. Add the mirror to your inventory. Then, note a dart board on the upper left-hand side of your screen. Use a dart to make a bull’s eye. Once you do so, you will earn the green eye. Now take a look at the dolls you saw before.
Now, time for something creepy! Turn on the TV. You’ll need to place the RGB amplifier under the TV dial. Next, put the red eye in the doll to the left, and the green eye in the doll to the right.
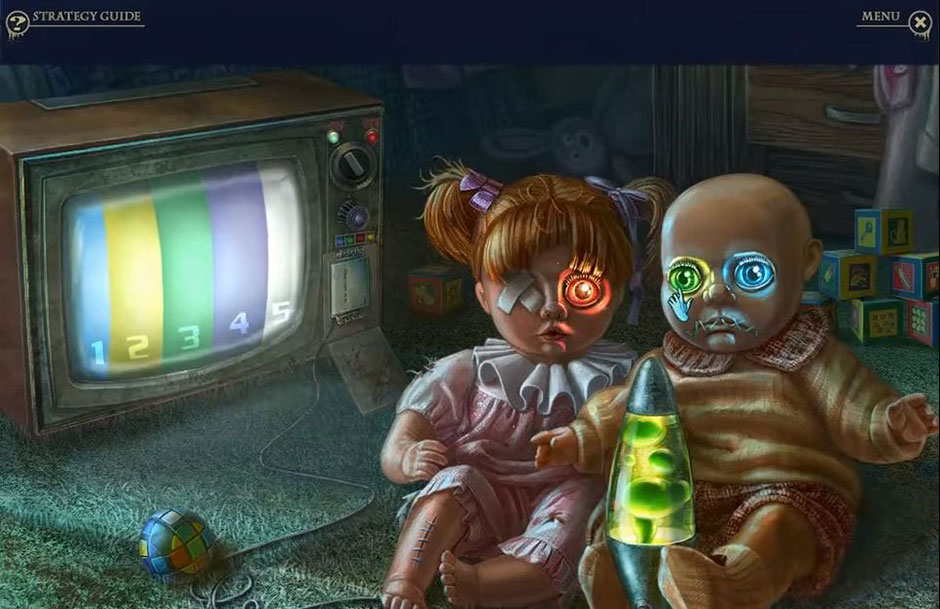
Phantasmat – Crucible Peak – Eyes
Here, you’ll need to change the color of the lava lamp. You do this by opening and closing the eyes of the dolls to match the pattern you’ll see on the TV. Here’s the pattern: Close, then open the blue eye. Close the red and green eyes, open the red, then the green. Close the red, blue, then the green eye. The TV screen will break, and then you should be able to take the ¼, 2/4, and ¾ medical pages. Finally, select the wardrobe for a hidden object scene!
Here, as with all the rest, you need to locate all the items on the list, which you see at the bottom of your screen. Now, open the drawer of the nightstand to find the medicine chest. Next, move the jacket in the closet to find the suspenders. Once you do this, you will earn the 4th and final medical assignment pages.
Now, take a look at the dresser and zoom in. Put the four medical assignment pages into the book you find there. Then, look at the book to get the medical card. Otto should be in the room now. Give the medical card to him. After you do that, take the can of gasoline from Otto. Now it’s time to go! Walk down 4 times, head towards Peter’s house, and then go inside the shed.
Once you are inside the shed, you need to look at the base of the snowmobile again. Zoom in and put the charged battery inside. Next, look at the handlebars, open up the gas tank and pour in the gasoline from the can that you took from Otto. Now, use the snowmobile keys in the ignition and turn the key.
Rock on! You’ve just completed the game! We hope these tips and tricks helped you get through difficult areas of gameplay.
For more great tips and tricks, visit our blog!
Delicious – Emily’s Hopes and Fears Walkthrough
Big City Adventure – Shanghai Walkthrough
Building the Great Wall of China 2 Walkthrough
The Phantasmat – Crucible Peak Walkthrough is meant as a guide and does not contain cheats, hacks or serials.


