A mountain lodge sees numerous disappearances after the rise of a spectral demon. Join Jane as she attempts to track down the missing Millers and solve the mystery surrounding the area once and for all! Our Mysteries of the Past – Shadow of the Daemon walkthrough will guide you through all the tips and tricks you need along the way.
Contents
General Tips & Tricks
The following is a handful of useful tips and tricks to help you get started. Whether you’re playing the game for the first time or simply need a little clarification, all the pointers you need can be found here.
-
When starting the game for the first time, you can choose between three difficulty modes:
-
Casual – This mode is intended for players who have never played Hidden Object games. Hint and Skip buttons are recharged more rapidly. All interactive zones and items are indicated with sparkles. There is also no penalty for rapid misclicks.
-
Normal – This mode is intended for fans of Hidden Object games. Hint and Skip buttons are slower to recharge. All interactive zones and items are indicated with sparkles. A penalty exists for rapid misclicking during hidden object scenes.
-
Expert – This mode is intended for players of Hidden Object games who do not wish to have any help or assistance while playing. Hint and Skip buttons are disabled. Sparkle zone and item indicators are off. Misclick penalties are on.
-
-
You may choose whether to enable or disable the main character in dialogues both when playing the game for the first time, or anytime via the Options menu.
-
Your Hint button takes the form of a light bulb in the lower right corner of your screen. Hints are unlimited, but require time to recharge.
-
Your Journal is located in the lower left corner of your screen and will keep track of any important clues or story bits you encounter while playing.
-
The Map is located in the lower right corner of the screen. A “!” indicates the current active area. You may fast travel between areas by opening your map and selecting the location where you would like to go.
-
When starting the game for the first time and after finishing it, you will be able to choose between playing the Main Story or the Bonus Chapter.
-
Our walkthrough covers both the Main Story and Bonus Chapters. See our table of contents for quick-jumps as necessary. Locations and Inventory Items appear like this in the guide below.
Mysteries of the Past – Shadow of the Daemon Walkthrough
A mysterious letter arrives in the mail from the manager of Big Pine Mountain Lodge. Two of the recent guests, a father and son, have gone missing. It’s up to you to locate the missing guests and solve the mystery behind their disappearance!
Chapter 1: The Mountain Lodge
The manager of the lodge is waiting for you outside and shares the tell of how a dark entity has been haunting the premises You’ll need to find a way inside.
Entrance
-
Speak with the hotel manager. He will give you the Map.
- Take a closer look inside the minivan. Collect the Battery lying on the seat, then use it on the Stun Gun lying on the seat to add it to your inventory.
- Examine the doors to the lodge straight ahead. Use the Stun Gun to remove the vines.
- Speak with the manager again. He will give you the Hotel Key.
- Take a closer look at the lodge doors again. Use the Hotel Key to open them, then proceed inside.
Reception
- Examine the small table ahead. Use the Stun Gun to remove the vines, then collect the Tape and the read the guest registry
- Click on the hidden object area over the desk ahead.
- Find all the pieces of the objects shown at the bottom of the screen. Once finished:
- Place the cash register over the wiring on the right.
- Place the hula girl on the legs to the right of the safe.
- Place the lock panel into the safe on the left.
- Place the hammer on top of the safe.
- Place the phone on the hook straight ahead.
- Find all the objects listed at the bottom of the screen. Their locations are shown below.
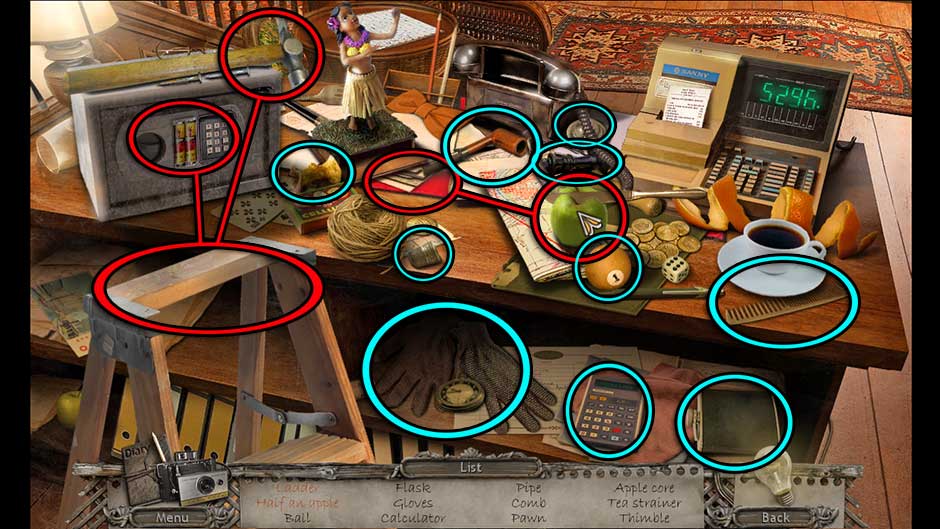
Mysteries of the Past – Shadow of the Daemon Reception Hidden Object Scene
- Upon completing the area, the Ladder will be added to your inventory.
- Examine the broken banister at the top of the stairs. Use the Ladder to reach it.
- Proceed up the steps to the next location.
Hallway
- Examine the waste basket just past the table on the left. Click on the Hydrant Wheel and the Newspaper inside to add them to your inventory.
- Take a closer look at the red panel on the right. Use the Hydrant Wheel on the center of it to trigger a puzzle.
- To complete the puzzle, you need to find the pair of each symbol. The solution is shown below.
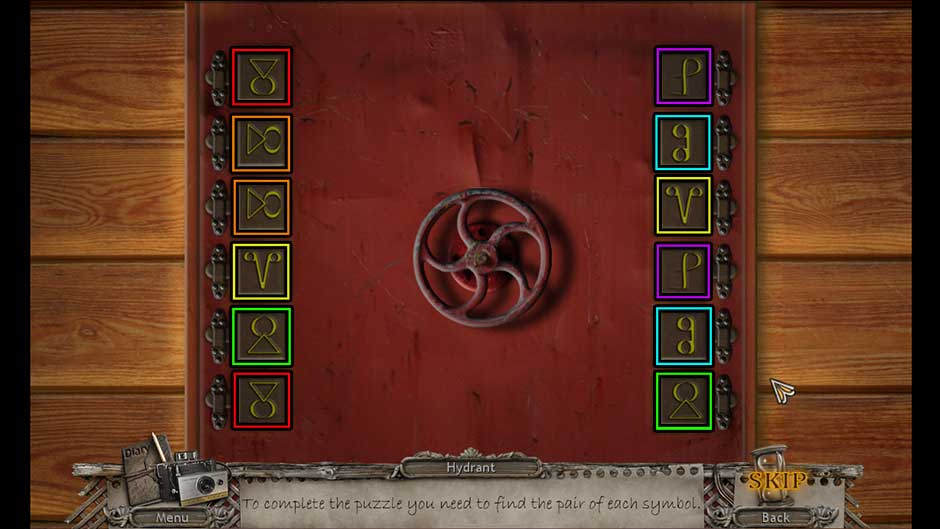
Mysteries of the Past – Shadow of the Daemon Hydrant Wheel Matching Puzzle Solution
- Upon completing the puzzle, collect the Letter for Clarkson.
- Return to the Entrance.
Entrance
- Give the Letter for Clarkson to the hotel manager, then collect the Pencil from him.
- Enter the Reception.
Reception
- Take a closer look at the door on the right. Place the Newspaper under the door, then use the Pencil on the lock to knock out the Lobby Key and add it to your inventory.
- Use the Lobby Key on the door to open it and proceed into the next area.
Lobby
- Examine the chair straight ahead and on the other side of the room. Click on the Matches to add them to your inventory, then click on the pillow to move it aside and collect the Note and Crank Handle beneath.
- Take a closer look at the wire lying on the floor. Click on the wires to tie them together, then use the Tape to insulate them.
- Return to the Reception.
Reception
- Examine the phone sitting on the desk. Pick up the receiver to answer the call, then once the phone falls apart, collect the Spring which was under the dial wheel to add it to your inventory.
- Enter the Hallway.
Hallway
- Zoom in on the far end of the hallway. Attach the Crank Handle to the hole in the wall and proceed up the steps that appear.
Attic
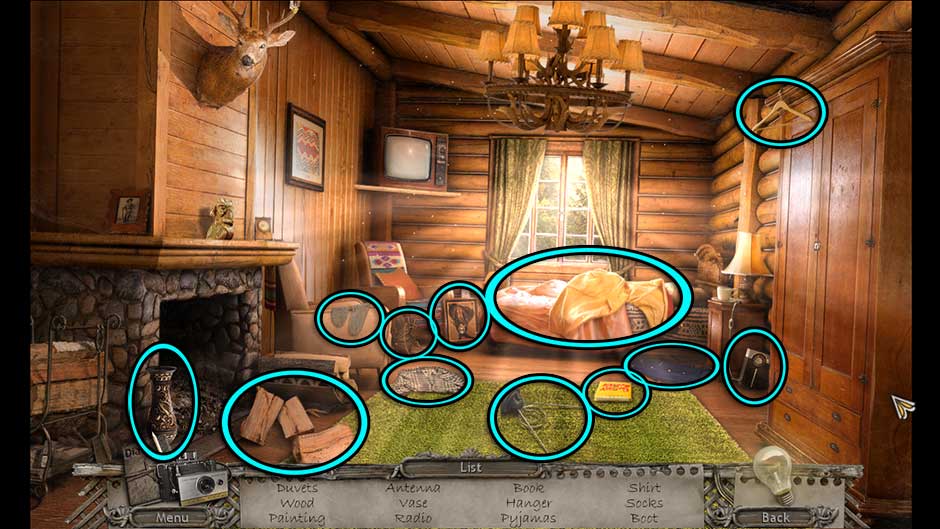
- You will immediately encounter a hidden object area. Find the objects listed at the bottom of the screen. Their locations are shown below.
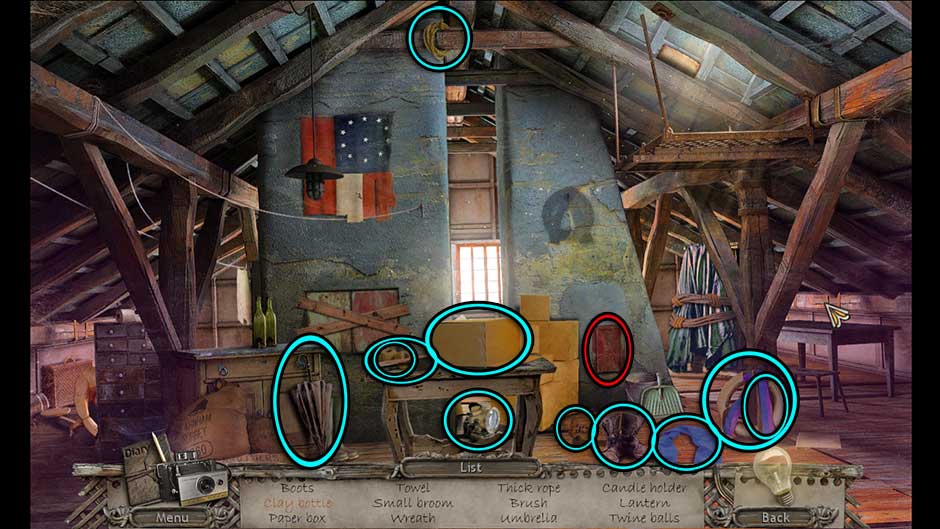
Mysteries of the Past – Shadow of the Daemon Attic Hidden Object Scene
- Place the remaining items into their proper locations. The solution is shown below.
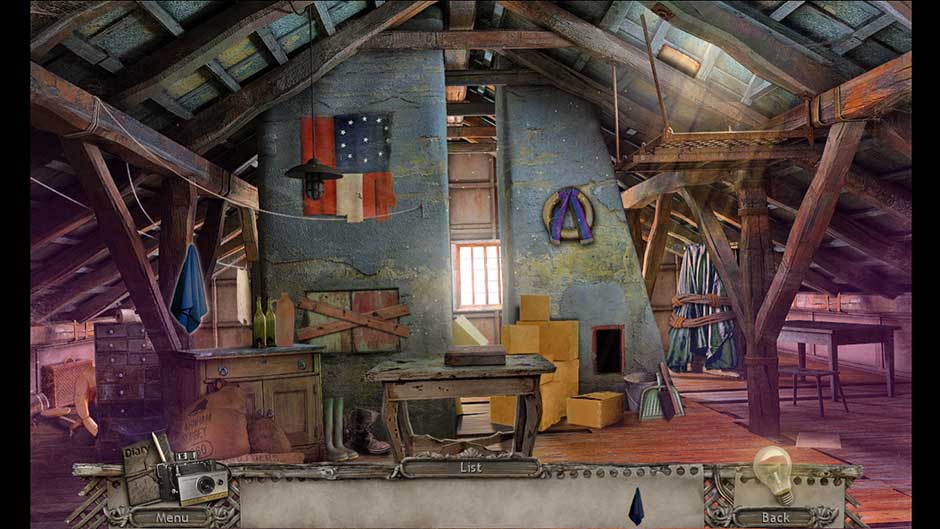
Mysteries of the Past – Shadow of the Daemon Attic Object Placement Solution
- Upon completing the area, the Umbrella will be added to your inventory.
- Zoom in on the upper right corner of the screen and use the Umbrella to pull down the ladder.
- Examine the area straight ahead. Find four keys and insert them into their locks according to their colors. Their locations are shown below.
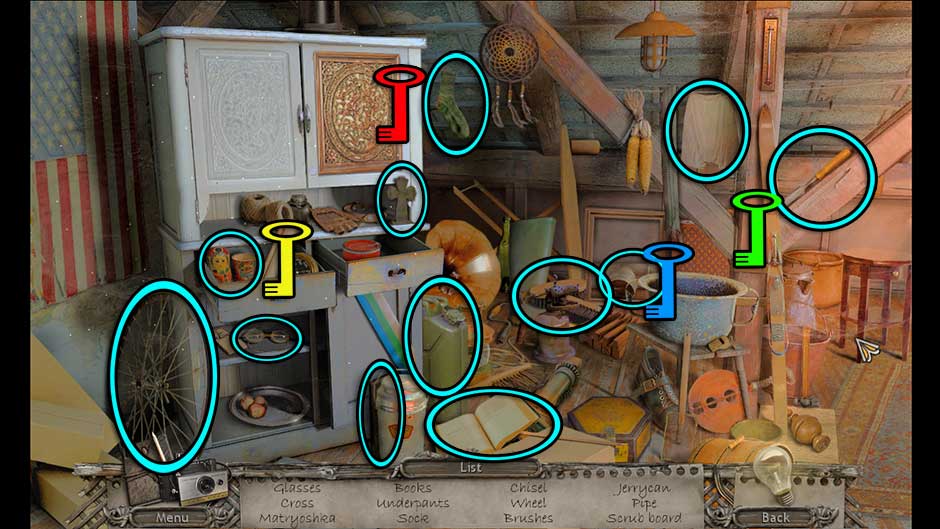
Mysteries of the Past – Shadow of the Daemon Attic Keys and HOS
- Place the four panels into the left door of the cabinet to open it, then collect the Penetrating Spray inside.
- Take a closer look at the area on the upper right again. Use the Penetrating Spray to obtain the Paper.
- Return to the Entrance.
Entrance
- Examine the rack on top of the van. Use the Penetrating Spray to remove the Shovel and add it to your inventory.
- Go back to the Hallway.
Hallway
- Examine the vase on the right side of the hallway. Use the Shovel to acquire the Hand Saw inside.
- Proceed up the steps again and into the Attic.
Attic
- Look at the area on the upper right again. Use the Hand Saw to acquire the Metal Bar.
- Examine the area crossed off with boards ahead and a little to the left. Use the Metal Bar to pry them loose. Take a closer look at the letter inside, then collect the Spatula in the bucket.
- Go down to Reception.
Reception
- Take a closer look at the glass case on the left. Use the Spatula to open the cabinet, then collect the Poison and the Room 11 Key inside.
- Enter the Hallway.
Hallway
- Take a closer look at the door on the right. Use the Poison to remove the vines, then use the Room 11 Key to enter the room (Tip: You will need to click the key to turn it and open the door).
Room 11
- Upon entering the room, you will immediately find yourself in a hidden object scene. Find the objects listed at the bottom of the screen. Their locations are shown below.
Mysteries of the Past – Shadow of the Daemon Room 11 Hidden Object Scene
- Once you’ve found all the objects, place the remaining ones into their correct locations. The solution is shown below.
Mysteries of the Past – Shadow of the Daemon Room 11 Object Placement Locations
- Upon completing the area, the Rope will be added to your inventory.
- Examine the fireplace on the left. Collect the Note, then click on the Nail to add it to your inventory. Use the Paper and Pencil in your inventory on the etchings in the stone to receive the Rosette Combination.
- Take a closer look at the mantle on the left. Click on the Green Gem in the eye socket of the figurine to add it to your inventory.
- Exit to the Hallway.
Hallway
- Take a closer look at the window on the left. Use the Rope to retrieve the Gardening Knife and add it to your inventory.
- Head up to the Attic.
Attic
- Examine the box sitting on the table straight ahead. Place the Green Gem into the empty slot to trigger a puzzle.
- Try to create a triangle by correctly putting the green gems into the intersections of the circles of the mechanism. The solution is shown below.
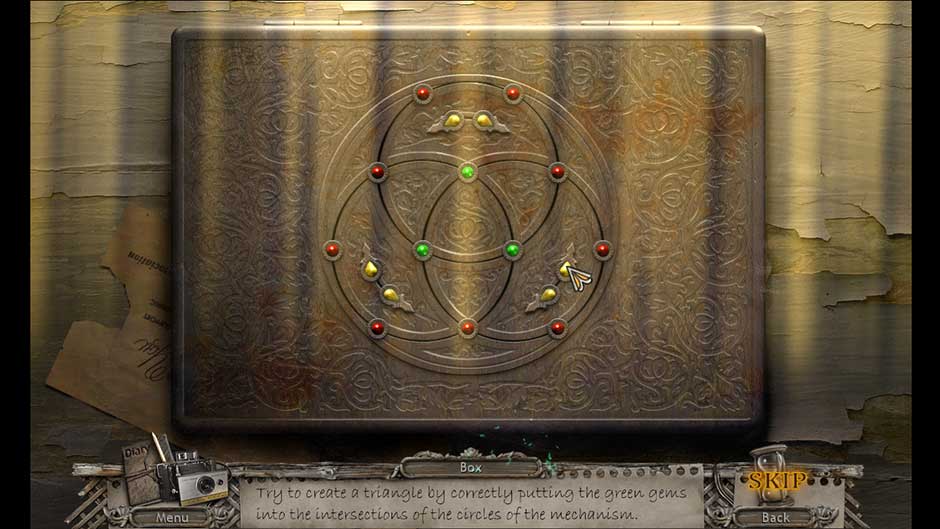
Mysteries of the Past – Shadow of the Daemon Gem Rotation Puzzle Solution
- Upon completing the puzzle, the box will open. Collect the Wooden Rosette inside to add it to your inventory.
- Return to Room 11.
Room 11
- Examine the side table next to the bed. Place the Wooden Rosette into the slot, then add the Rosette Combination.
- Try to position the rosettes according to the layout. The solution is shown below.
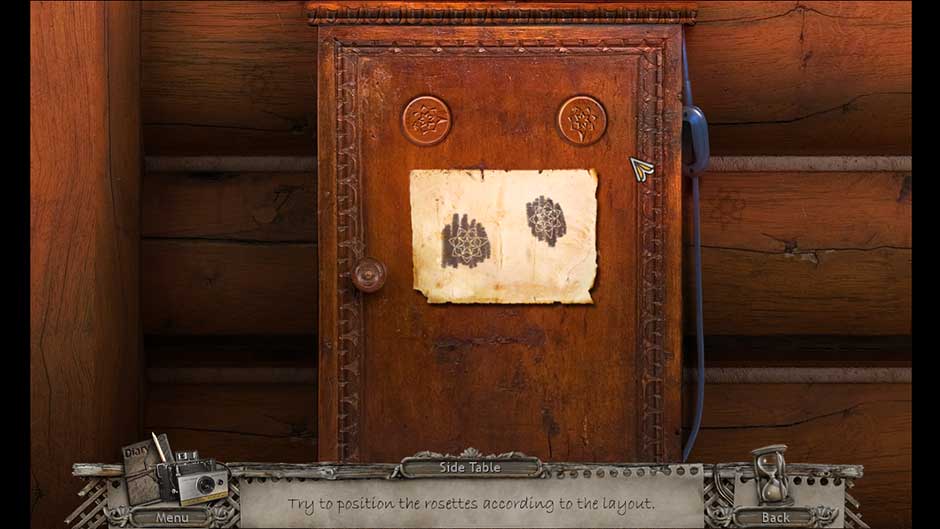
Mysteries of the Past – Shadow of the Daemon Rosette Puzzle Solution
- Collect the Sleeping Drops and the Corkscrew from inside the cabinet.
- Exit to the Hallway.
Hallway
- Take a closer look at the table on the left. Use the Corkscrew to open the drawer, then collect the Door Knob inside to add it to your inventory.
- Enter the Lobby.
Lobby
- Examine the door at the back of the room. Use the Door Knob to open the door and proceed inside to the next area.
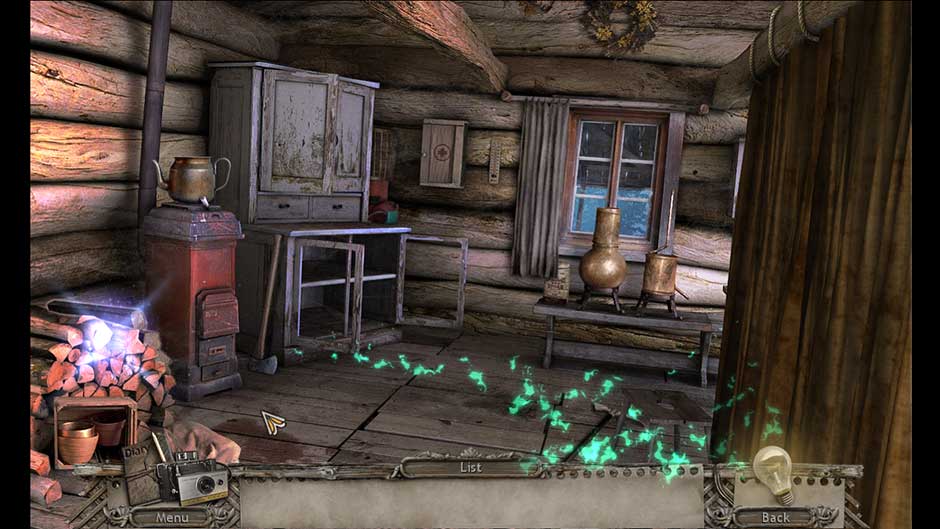
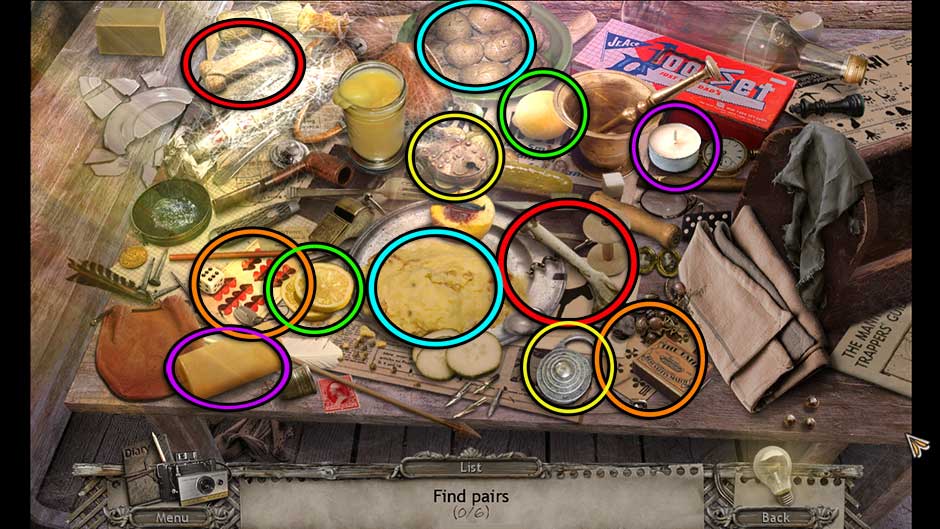
Kitchen
- Click on the hidden object area in the back left corner.
- Find the pairs of items in the scene. Their locations are shown below. Locate the Green Book afterward to add it to your inventory.
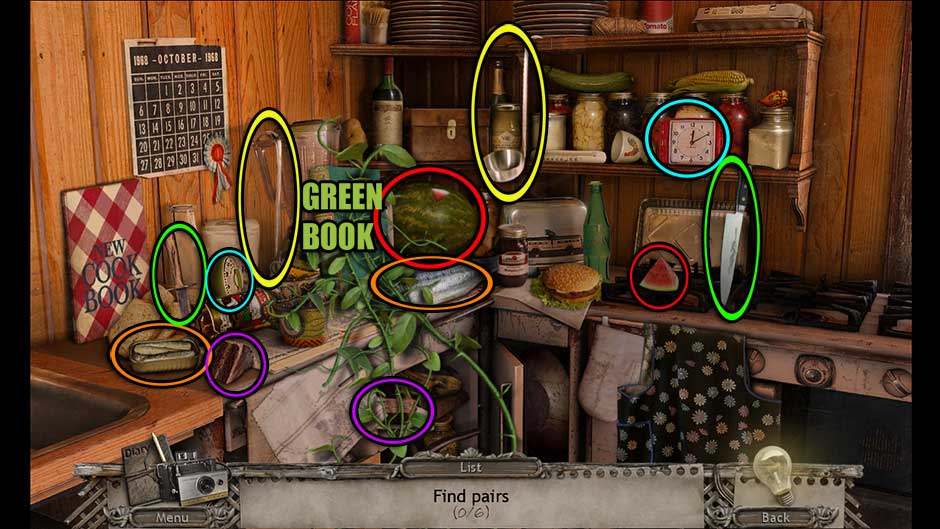
Mysteries of the Past – Shadow of the Daemon Kitchen Item Pairs
- Take a closer look at the fridge on the right. Collect the Frozen Meat and the Screwdriver.
- Examine the fan in the back right corner. Use the Screwdriver to remove the bottom panel and collect the Gear.
- Go to the Reception.
Reception
- Take a closer look at the file cabinet on the left. Place the Green Book in the empty slot to trigger a puzzle.
- Place the files in a way that ensures that they are linked together by their colors. The solution is shown below.
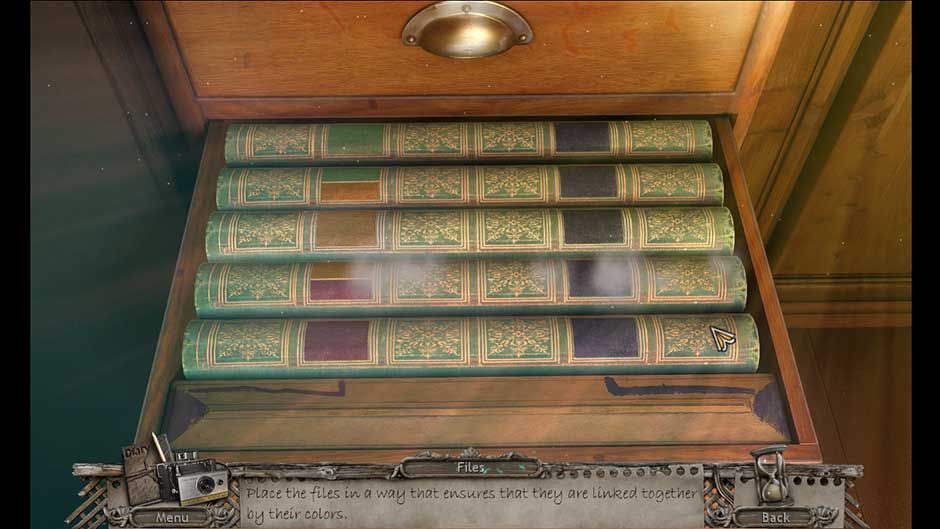
Mysteries of the Past – Shadow of the Daemon File Cabinet Puzzle Solution
- Upon completing the puzzle, the Gate Lock 1/2 will be added to your inventory.
- Take a closer look at the fallen chandelier. Use the Screwdriver to open it up, then collect the Medalion inside.
- Enter the Lobby.
Lobby
- Examine the table in the lower right corner. Use the Gear and Spring in the slot to open the case. Collect the second part to complete the Gate Lock.
- Go to the Entrance.
Entrance
- Examine the wooden gate on the left. Use the Hand Saw to cut away the branches. Use the Gate Lock on the groove in the gate to open it, then proceed through to the next location.
Garage
- Take a closer look at the toolbox lying on the ground. Collect the Bandage, the Hex Key, and the Pipe inside.
- Return to the Kitchen.
Kitchen
- Examine the boiler on the left wall. Use the Hex Key to open the panel, then place the missing Pipe inside to trigger a puzzle.
- Rotate the individual tube sections to connect them and form one pipe running from the valve to the circular water-outlet. The solution is shown below.
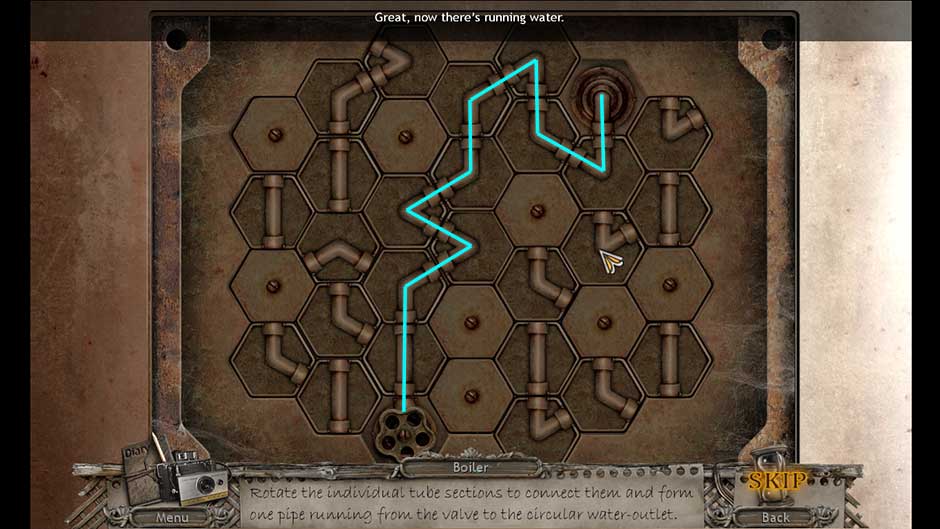
Mysteries of the Past – Shadow of the Daemon Tube Pipe Puzzle Solution
- Collect the Pot sitting on the center island, then examine the sink beneath the boiler. Place the Pot in the sink and click on the faucets to turn the water on. The Full Pot will be added to your inventory.
- Take a closer look at the stove at the far end of the room. Place the Full Pot on the stove and the Frozen Meat inside the pot. Add the Sleeping Drops and use the Matches to light the stove. The Boiled Meat will be added to your inventory.
- Make your way back to the Garage.
Garage
- Give the Boiled Meat to the dog, then take a closer look at the trap around its foot. Open the trap by clicking on it, then use the Bandage to wrap the wound.
- Back in view of the main area, use the Shovel to dig just in front of the trap. Take a closer look into the hole and use the Medalion on the center of the box to trigger a puzzle.
- By rotating the circular segments, create the symbol of a bird of prey. The solution is shown below.
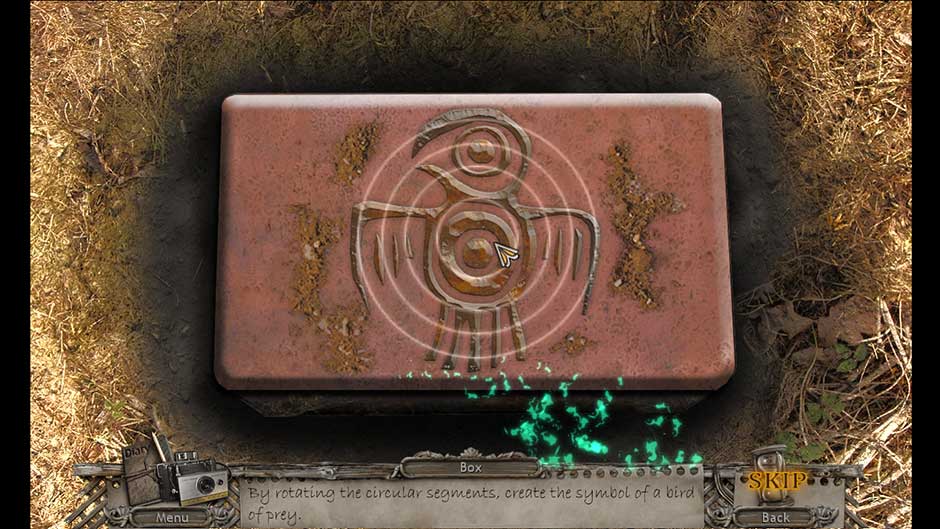
Mysteries of the Past – Shadow of the Daemon Medallion Rotation Puzzle
- Examine the parchment inside the box once open, then collect the Necklace, the Wire Cutters, and the Piece of Map inside.
- Take a closer look at the hanging box up and behind the dog. Use the Wire Cutters to open it, then collect the Showcase Key inside.
- Return to the Lobby.
Lobby
- Take a closer look at the showcase on the left. Use the Showcase Key to open the display, then take a closer look inside. Add the Piece of Map to trigger a puzzle.
- Assemble the pieces together to form a complete map. You can rotate the map fragments. The solution is shown below.
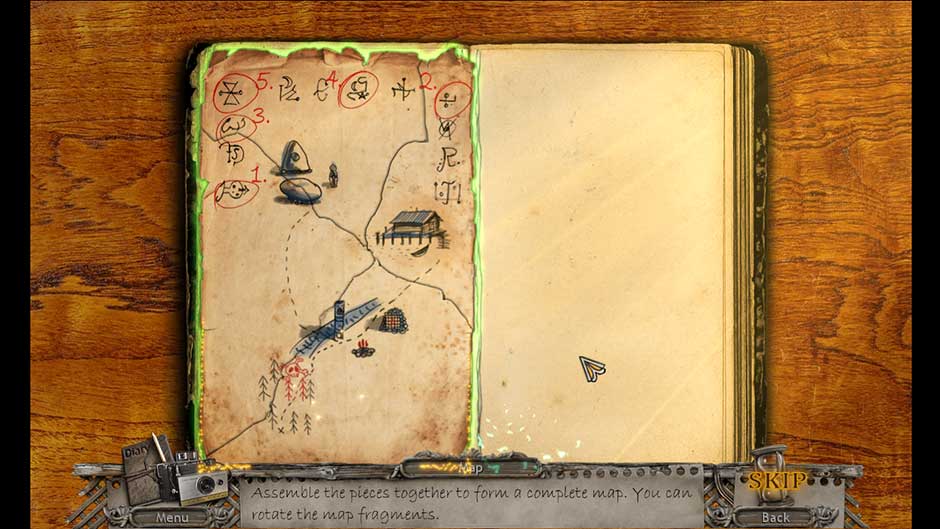
Mysteries of the Past – Shadow of the Daemon Lobby Map Fragment Puzzle
- Upon completing the puzzle, click on the Amulet of Gravetalk that appears to add it to your inventory. Collect the Map and the Clamp beneath.
- Return to the Kitchen.
Kitchen
- Take a closer look at the center island. Use the Clamp to secure the sharpener, then select the Gardening Knife in your inventory to sharpen it into the Sharp Gardening Knife.
- Go to the Attic.
Attic
- Examine the curtains with rope in the rear right corner of the room. Use the Sharp Gardening Knife to cut the rope, then examine the wardrobe beneath. Place the Necklace in the groove around the figure to unlock the wardrobe, then proceed inside.
Chapter 2: The Forest
A mysterious portal within the Attic cabinet has led you into a dark forest, just like what happened to Clarkson. Can you make sense of this new area?
Forest
- Take a closer look at the ferns on the lower left. Click to clear the ferns away, then click on the Rope to add it to your inventory.
- Examine the end of the pathway on the left. Click to remove the broad leaf, then select the Glass Part 1/2 and the Stump to add them to your inventory.
- Place the Stump in front of the large tree on the left, then take a closer look inside the hollow. Click on the Wire inside the nest to add it to your inventory.
- Examine the end of the pathway on the left again. Use the Wire to add the Antlers to your inventory.
- Use the Rope on the large tree to the right of the forward path. Attach the Antlers to the end of it and click on it to trigger the trap.
-
Examine the hidden object scene which appears inside the hole on the right.
-
Find the objects listed at the bottom of the screen. Their locations are shown below.
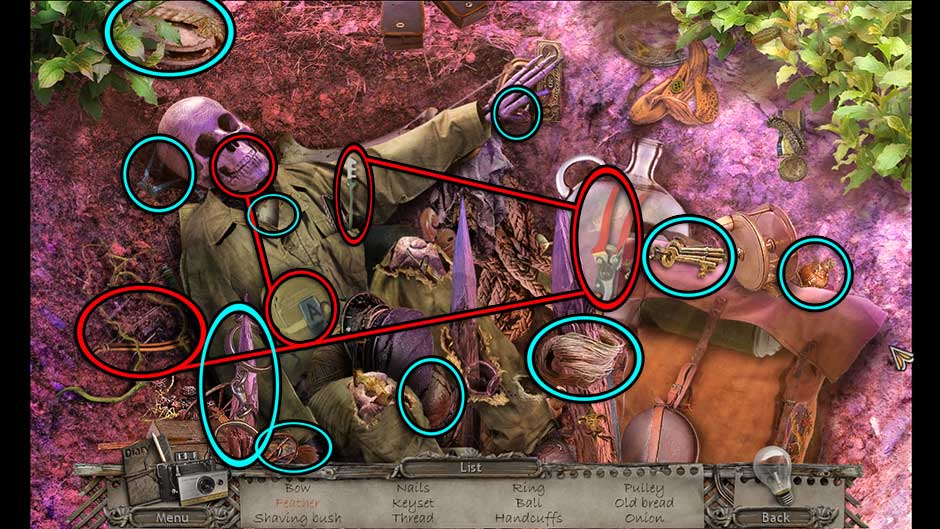
Mysteries of the Past – Shadow of the Daemon Forest Pit Hidden Object Scene
- Upon completing the area, the Bow and the Feather will be added to your inventory.
- Examine the hollow in the left tree again. Use the Feather on the arrow to acquire the Bow and Arrow for your inventory.
- Use the Bow and Arrow on the path directly ahead to trigger the trap, allowing safe passage.
-
Proceed forward to the next area.
Clearing
- Examine the bottom left portion of the path. Click on the Stick and the Circle Lock 1/2 to add them to your inventory.
- Take a closer look at the stones to the right of the pathway. Click to clear the stones, then read the parchment left behind. Collect the remaining piece of the Circle Lock to add it to your inventory.
- Examine the tree on the left. Use the Circle Lock on the suspended box, then click on the rings until they match the code etched into the box: 2-6-8 (Tip! It may appear as “2-8-8” instead). Collect the Carpenter’s Square and the Axe Handle to add them to your inventory.
-
Go back to the Forest.
Forest
- Examine the ferns on the lower left again. Use the Axe Handle on the blade here to acquire the Axe for your inventory.
-
Enter the Clearing again.
Clearing
- Take a closer look at the fallen tree branch straight ahead. Use the Axe to chop it and clear it away, then proceed forward to the next area.
Outside Hut
- Examine the left side of the hut. Click on the Pliers and the Rope to add them to your inventory.
- Take a closer look at the pelt hanging to the left of the cabin door. Use the Pliers to remove the Chisel and add it to your inventory.
- Examine the left side of the cabin again. Use the Chisel to pry off the bottom of the left barrel, then click on the Totem Mask and the Cairn Stone 1/2 to add them to your inventory.
-
Go back to the Clearing.
Clearing
- Place the Totem Mask at the top of the center tree on the left. Collect the Empty Glass from the totem pole.
-
Go back to the Outside Hut.
Outside Hut
- Zoom in on the front door. Use the Empty Glass to capture the spider and add the Spider in Glass to your inventory.
- Use the Carpenter’s Square to pry open the door, then proceed inside.
Inside Hut
-
Find the objects listed at the bottom of the screen. Their locations are shown below.
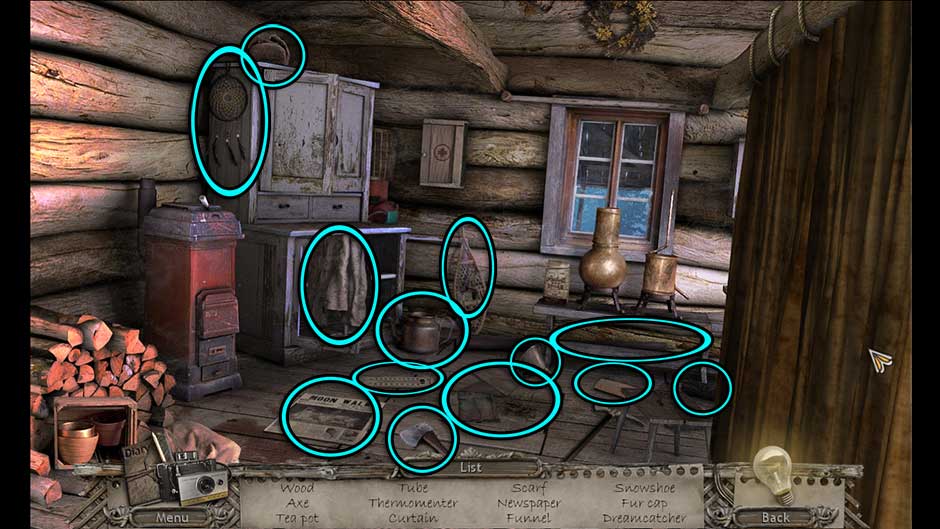
Mysteries of the Past – Shadow of the Daemon Inside Hut Hidden Object Scene
-
Place the objects back into their correct locations. The solution is shown below.
Mysteries of the Past – Shadow of the Daemon Inside Hut Item Placement
- Upon completing the area, the second piece of the Cairn Stones will be added to your inventory.
-
Return to the Clearing.
Clearing
- Examine the cairn stones on the right. Place the Cairn Stones into the wall to trigger a puzzle.
-
You can freely exchange the stone segments with each other so that they form a complete and correctly arranged painting. The solution is shown below.

Mysteries of the Past – Shadow of the Daemon Cairn Stone Puzzle Solution
-
The totem pole to the left will fall, creating a bridge over into the next area.
Sacrificial Place
- Show the Amulet of Gravetalk to the Guardian. This will trigger a minigame. Mark all the symbols in the right order. Use the notebook for a clue. The solution is shown below.

Mysteries of the Past – Shadow of the Daemon Guardian Puzzle Solution
- Examine the alcove in the wall toward the right. Click on the Chain to add it to your inventory.
-
Head to the Inside Hut.
Inside Hut
- Take a closer look at the hatch in the floor. Attach the Chain.
- Click on the chain again to rig it up, then click on the hatch to open it and zoom in. Collect the Pry Bar to add it to your inventory.
-
Return to the Sacrificial Place.
Sacrificial Place
- Use the Pry Bar on the large boulder directly in front of you. Take a closer look beneath it to trigger a puzzle.
-
Place all the parts of the skeleton in their correct positions. The solution is shown below.
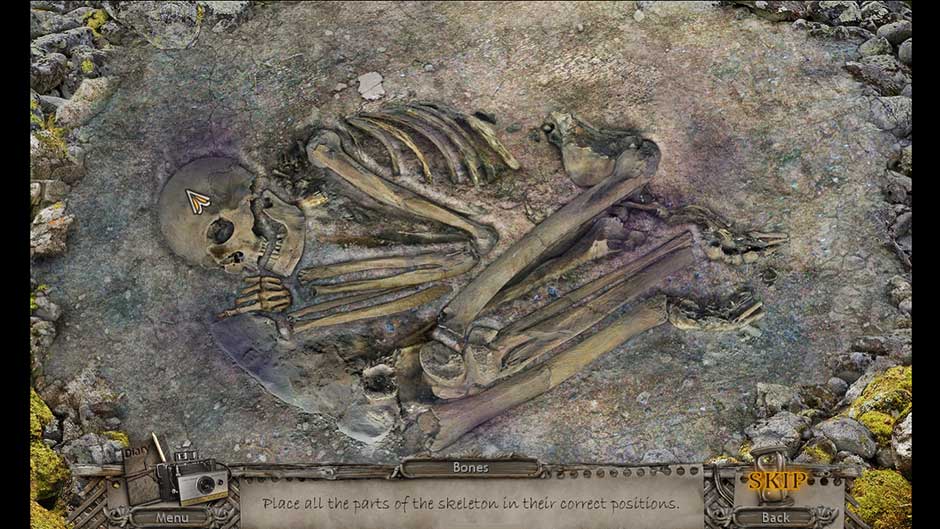
Mysteries of the Past – Shadow of the Daemon Skeleton Assembly Puzzle
- Upon completing the puzzle, you will receive the First Aid Box Key.
- Continue speaking with the Guardian to receive the Magical Wind Chimes.
-
Return to Inside Hut.
Inside Hut
- Take a closer look at the back wall. Use the First Aid Box Key to open the cabinet, then collect the Tweezers inside to add them to your inventory.
-
Return to the Sacrificial Place.
Sacrificial Place
- Examine the pot to the left of the large stone. Use the Tweezers to retrieve the Razor inside.
-
Go to the Outside Hut.
Outside Hut
- Examine the pelt to the left of the door. Use the Razor to cut it, obtaining the Leather Stripe.
-
Go back to the Sacrificial Place.
Sacrificial Place
- Examine the alcove in the right portion of the rock face. Use the Leather Stripe in combination with the Stick to bend the bar, then click on the Statue Head to add it to your inventory.
- Take a closer look at the statue body on the right. Place the Statue Head on the body and collect the Bone Knife.
-
Go to the Inside Hut.
Inside Hut
- Use the Bone Knife to cut the curtain hanging in the upper right corner. Click on the hidden object area that appears.
-
Find 6 pairs of objects. Their locations are shown below.
Mysteries of the Past – Shadow of the Daemon Inside Hut Pairs Puzzle
- Once you’ve found all the pairs, locate the Bell, which is in the upper left corner. Upon finishing the area, it will be added to your inventory.
-
Go to the Forest.
Forest
- Examine the stone to the left of the path. Insert the Bell to trigger a puzzle.
-
Play the right melody on the bells by the numbers on them. The numbers are in Roman numerals and go to 16. If you’re unfamiliar with Roman numerals, they are as follows: 1 = I, 2 = II, 3 = III, 4 = IV, 5 = V, 6 = VI, 7 = VII, 8 = VIII, 9 = IX, 10 = X, 11 = XI, 12 = XII, 13 = XIII, 14 = XIV, 15 = XV, 16 = XVI.
- Upon completing the puzzle, the Stone Puzzle will be added to your inventory.
-
Return to the Sacrificial Place.
Sacrificial Place
- Examine the hollow in the left boulder. Place the Stone Puzzle into the hollow to trigger a puzzle.
-
Set circles correctly, so they link to the surrounding relief and create a complete image on the face of this rock by turning them. The solution is shown below.
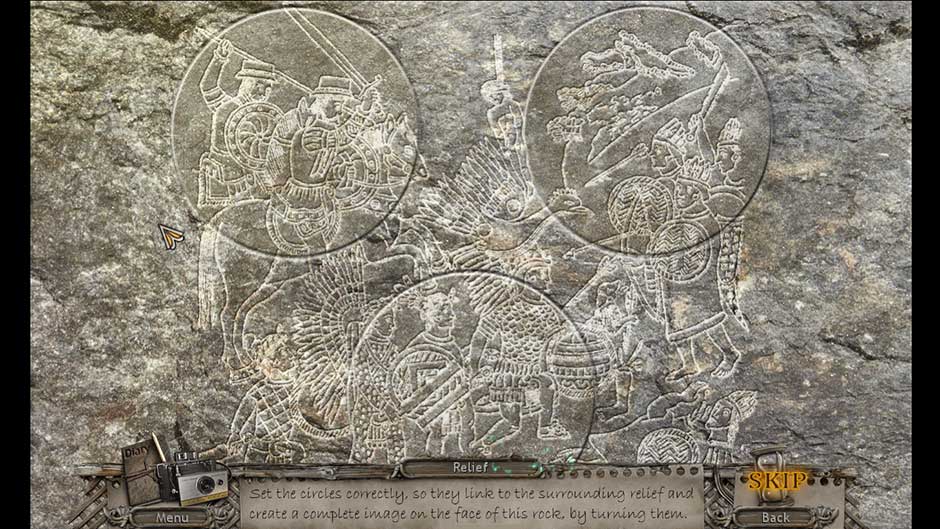
Mysteries of the Past – Shadow of the Daemon Stone Puzzle Solution
-
Take a closer look inside the new passageway.
Chapter 3: The Cure
Moving aside the rock blocking a secret passageway, you discover the missing father and son. But not all is right with the unwilling prisoners..
Cave
- Speak with the boy, William. He will give you the Medallion, which will be kept next to your Hint button and Map.
- Examine the base of the cell. Click on the Sharp Stone in the upper left of the closeup to add it to your inventory.
- Take a closer look at the shelf above the door on the right. Click on the Door Handle and the Oil Can to add them to your inventory.
- Zoom in on the metal lunchbox sitting on the floor. Use the Oil Can to open it, then read the Note inside. Click on the Tongs to add them to your inventory.
- Examine the door on the right again. Use the Sharp Stone to pry off the boards, then use the Door Handle on the hole that appears.
-
Proceed through the door to the next location.
Hideout
- Click on the Medallion to clear away the demon’s wall.
-
Click on the hidden object area straight ahead.
-
Find all the objects shown at the bottom of the screen. Once you’ve located the components:
-
The bear goes over the teddy bear body on the left.
-
The globe sits on the flat stand toward the right.
-
The phonograph sits on the box straight ahead.
-
The clock components go into the clock on the upper left.
-
The wheel goes on the right, beneath the monkey and behind the globe.
-
-
Once everything has been set, locate the objects listed at the bottom of the screen. Their locations are shown below.
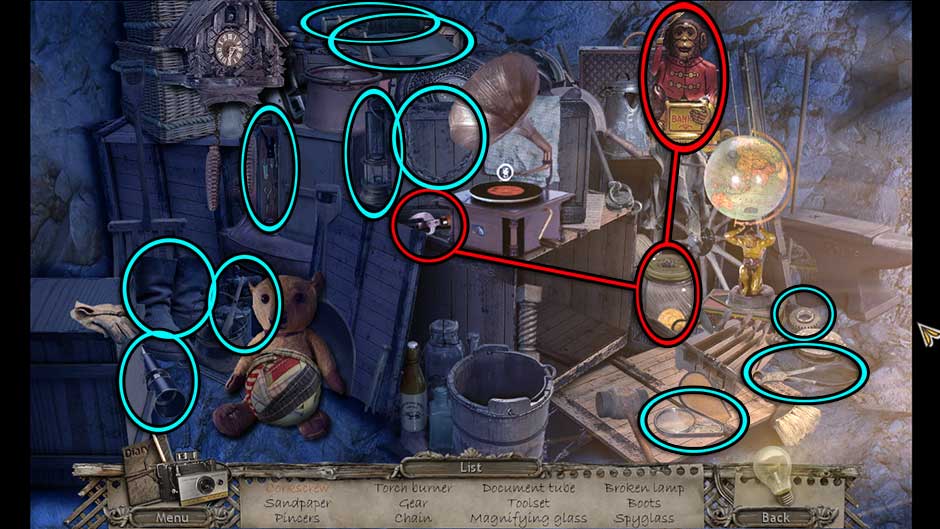
Mysteries of the Past – Shadow of the Daemon Hideout Hidden Object Scene
- Upon completing the area, the Corkscrew will be added to your inventory.
- Examine the fire pit in the lower right corner. Collect the Puzzle Piece 1/3, the Ember, and the Ring to add them to your inventory.
- Examine the metal cabin on the right. Click on the Potato Peeler sitting on the console to add it to your inventory.
- Take a closer look at the bit of mossy stone clinging to the rock wall on the left. Use the Potato Peeler to acquire the Moss and add it to your inventory.
- Examine the fire pit on the lower right again. Place the Ember in the smoker, followed by the Moss. Click to obtain the Smoker.
- Back in the main area, use the Smoker on the wasp nest on the right. Once it’s gone, proceed forward to the next area.
Treehouse
- Examine the second tree from the left. Collect the Bone Saw in the lower right corner. Use the Bone Saw to cut the Wooden Handle and add that to your inventory as well.
-
Return to the Cave.
Cave
- Examine the metal lunchbox on the floor again. Use the Ring to open the box and obtain the Owl Symbol. Use the Corkscrew to open the bottle and the Wooden Handle to retrieve the Ice Pick.
-
Go back to the Hideout.
Hideout
- Take another look at the white crystal stuck to the wall. Use the Ice Pick to break off the Crystal and add it to your inventory.
-
Go to the Treehouse.
Treehouse
- Examine the second tree on the left again. Place the Crystal in the torch to obtain the Crystal Torch.
-
Return to the Hideout.
Hideout
-
Proceed through the doorway on the left into the next area.
Cellar
- Examine the stone above the wooden barrel. Place the Crystal Torch into the holding in the wall to light the area. Collect the Dynamite and the Code Table 1/2 to add them to your inventory.
- Take a closer look at the cages straight ahead. Click on the Knob to add it to your inventory.
-
Return to the Treehouse.
Treehouse
- Examine the base of the tree with the steps toward the right. Place the Knob in the door of the small wooden house to trigger a puzzle.
-
Place the wheels in their correct positions so that the pieces fit together and the device might work. The solution is shown below.

Mysteries of the Past – Shadow of the Daemon Gear Puzzle Solution
-
Upon completing the puzzle, you will be able to enter the treehouse. Proceed up the steps to the next location.
Inside Treehouse
- Take a look at the window with the yellow curtain on the right. Hang the Magical Wind Chimes in the window. (Tip! You will be returning here to complete it later.)
- Examine the table on the left. Click on the green Glass Shard to add it to your inventory. Use the Potato Peeler to remove the cover of the device and collect the remaining piece of the Code Table inside.
-
Exit back outside.
Treehouse
- Examine the base of the center tree. Place the Code Table into the top of the box and input the symbols so that they match those displayed. Done successfully, the box will open and you may collect the Bell.
-
Head back up into the treehouse.
Inside Treehouse
- Examine the window with the yellow curtain on the right again. Use the Bell on the wind chimes to restore them, awakening the Shaman.
- Take a closer look at the stove on the right. Collect the Pliers and the Tape to add them to your inventory.
- Zoom in on the device on the table again. Use the Pliers to remove the Fuse Middle Part and add it to your inventory.
-
Go back to the Hideout.
Hideout
- Take a closer look at the fire pit on the lower right. Use the Glass Shard to cut open the sack in the upper right corner and collect the Fuse Base inside.
-
Go back to the inside of the treehouse.
Inside Treehouse
- Take a look at the stove again. Use the Fuse Base and the Fuse Middle Part on the blueprints on the right to obtain the Complete Fuse.
-
Go back to the Hideout.
Hideout
- Examine the suspended carriage on the right again. Use the Complete Fuse on the end of the red wire to trigger a puzzle.
-
Find the correct position for each fuse so that the sum of the values for each connected pair matches the given value. The solution is shown below.

Mysteries of the Past – Shadow of the Daemon Fuse Value Puzzle Solution
-
Upon completing the puzzle, you will be taken to a new area.
Precipice
- Take a closer look at the weather station on the left. Collect the Cabinet Key hanging in the upper left corner to add it to your inventory.
-
Go back to the Cave.
Cave
- Examine the cabinet hanging on the back wall. Use the Cabinet Key on the lock and click to open it. Collect the Twine inside to add it to your inventory.
-
Return to the Precipice.
Precipice
- Examine the shelf at the base of the precipice. Click on the yellow tin of Wax to add it to your inventory.
- Take a closer look at the shack in the distance. Collect the Lever on top of the mailbox to add it to your inventory. Use the Wax to open the box and collect the Glass Ball inside. Finally, use the Twine and the Tape to repair the door and enter.
Shelter
- Take a closer look at the dividers on the right. Click on the Ski Pole to add it to your inventory.
- Examine the shelf on the back wall. Place the Owl Symbol into the owl carving and collect the Stove Handle inside.
-
Return to the Cellar.
Cellar
- Examine the device on the right. Use the Lever on the lower right and throw the switch. Insert the Glass Ball into the compartment that appears to trigger a puzzle.
-
Find correct positions for every ball. The solution is shown below.
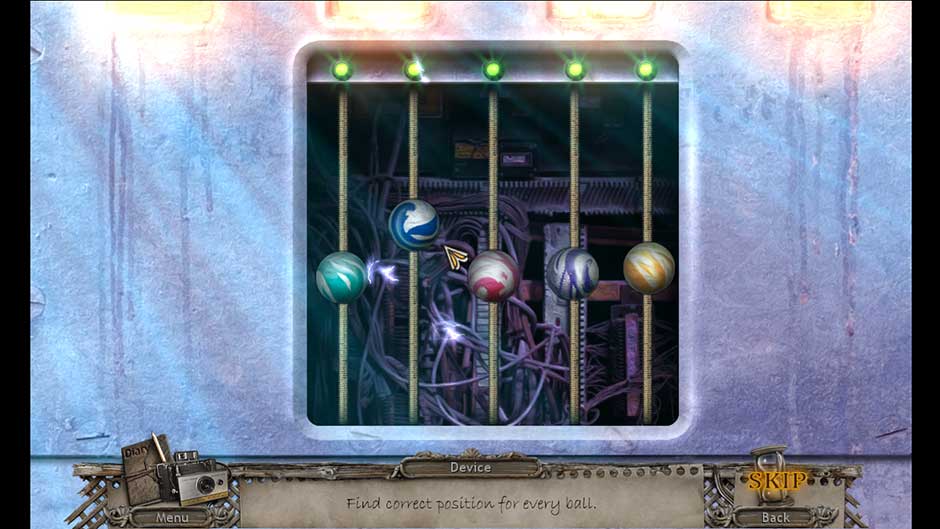
Mysteries of the Past – Shadow of the Daemon Glass Ball Puzzle Solution
- Upon completing the puzzle, click on the gold Puzzle Piece 2/3 that appears on the left to add it to your inventory.
-
Go back to the treehouse interior.
Inside Treehouse
- Take a closer look at the stove on the right. Use the Stove Handle on the upper left drawer, then collect the Wire Hook inside to add it to your inventory.
-
Go back to the Cellar.
Cellar
- Examine the cages at the far end of the room. Use the Wire Hook to retrieve the Zipper Slider from the top cage and add it to your inventory. Do the same to obtain the Weather Station Handle from the top cage.
-
Return to the Precipice.
Precipice
- Take a closer look at the weather station on the left. Place the Weather Station Handle into the hole on the left and click to open it. Collect the Wheel inside to add it to your inventory.
- Zoom in on the shelf at the bottom of the precipice again. Use the Ski Pole to retrieve the red bag, then use the Zipper Slider to open the bottom pocket and collect the Opening Knife.
-
Enter the Shelter again.
Shelter
- Zoom in on the top of the screens on the upper right. Use the Wheel to restore functionality here.
- Take a closer look at the rope binding the screens together. Use the Opening Knife to cut the rope, revealing a hidden object area behind the screens.
-
Find 6 pairs of objects hidden in the scene. Their locations are shown below.

Mysteries of the Past – Shadow of the Daemon Shelter Object Pairs
- Upon finding all the pairs, click on the Axe hanging on the wall to add it to your inventory.
-
Return to the Treehouse.
Treehouse
- Examine the base of the center tree again. Use the Axe to chop the log in the background and obtain the Wooden Step.
-
Backtrack to the Precipice.
Precipice
- Examine the stone wall with the steps on the left. Place the Wooden Step into the hole, then proceed up to the next area.
Mountain Peak
-
Take a closer look at the nest straight ahead. Click on the final one of the Puzzle Pieces to add it to your inventory.
-
Return to the Shelter.
Shelter
-
Examine the pull-down cot on the left. Place the Puzzle Pieces in the upper slots to trigger a puzzle.
-
By means of gradual rotation, using the buttons, change the color of all the segments of the minigame from red to green. The solution is shown below.
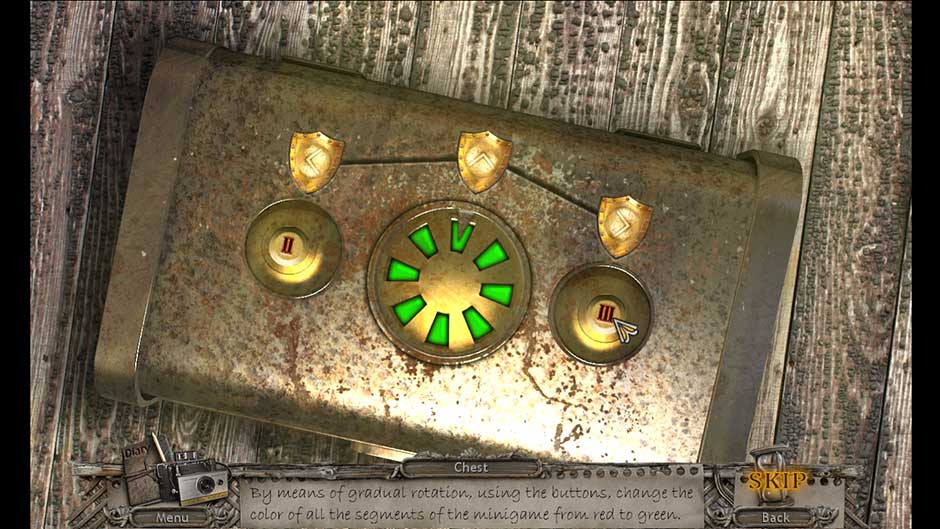
Mysteries of the Past – Shadow of the Daemon Puzzle Color Rotation
-
Upon completing the puzzle, click on the Nut and the Net to add them to your inventory.
-
Return to the Mountain Peak.
Mountain Peak
-
Examine the base of the bridge closest to you. Give the Nut to the rodent, then collect the Flint and Steel.
-
Take a closer look at the base of the tree on the right. Tuck the Dynamite between the roots, then use the Flint and Steel to light it.
-
A hidden object area will appear. Find the objects listed at the bottom of the screen. Upon completing the area, the Chisel will be added to your inventory.
-
Return to the Cellar.
Cellar
-
Examine the torch on the wall ahead. Use the Chisel to remove the stone block to the left of the torch and collect the Gardening Shears hidden within.
-
Make your way back to the Mountain Peak.
Mountain Peak
-
Take a closer look at the nest again. Use the Gardening Shears to clip away the twigs, allowing passage to the main portion of the nest.
Nest
-
Examine the pile of twigs on the right. Click on the Bread Crust nestled among them to add it to your inventory.
-
Zoom in on the raven. Give the raven the Bread Crust in exchange for the Safety Pin.
-
Go back to the Shelter.
Shelter
-
Examine the owl statue on the back shelf. Use the Safety Pin on the pouch next to it to open it and obtain the Lock Pick.
-
Head back to the Cellar.
Cellar
-
Take a closer look at the cages at the back of the area. Use the Lock Pick to open the bottom door, then click on the Falconry Glove to add it to your inventory.
-
Return to the Nest.
Nest
-
Zoom in on the bird and use the Falconry Glove to obtain the Raven.
-
Make your way back to the inside of the treehouse.
Inside Treehouse
-
Give the Raven to the Shaman. He will give you the Grappling Hook.
-
Go back to the Nest.
Nest
-
Use the Grappling Hook to cross the chasm. Take a closer look at the end of the rope toward the right and click to tighten it.
-
Proceed across to the next area.
Cliff
-
Zoom in on the area to the right of the rope. Attach the Net to the handle to obtain the Apple Picker.
-
Remove the rocks over the safe while still in the closeup. Click on the number pad and enter the correct code. The code is 6-2-5-0. Collect the Gem inside the safe to add it to your inventory.
-
Back in the main view of the area, examine the crevice to the left. Use the Apple Picker to retrieve the Moonlight Herb and add it to your inventory.
-
Return to the Shaman.
Inside Treehouse
-
Give the Moonlight Herb and the Spider in Glass to the Shaman. You will receive the Cure.
-
Return to the Cave.
Cave
-
Take a closer look at the bottom of the cell. Use the Gem on the lock to trigger a puzzle.
-
Arrange the ring sections so that when the parts of the symbols are correctly arranged in the center circle they create a complete symbol. The solution is shown below.
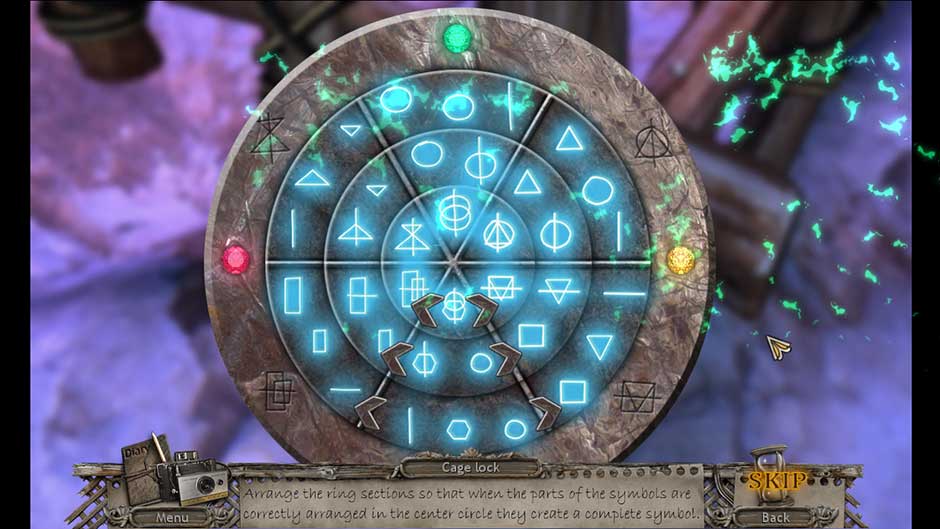
Mysteries of the Past – Shadow of the Daemon Cell Lock Puzzle Solution
-
Upon completing the puzzle, the cell door will open. Give the Cure to Mr. Miller.
Chapter 4: The Truth
Now that the Millers have been rescued, it’s time to uncover the truth behind the mysterious demon that plagues the area!
Cave
-
Examine the plate left inside the cell. Click on the Bread and the Token to add them to your inventory.
-
Continue to the next area via the door on the right.
Hideout
-
Proceed through the door on the left.
Cellar
-
Examine the left column of stone. Place the Token in the empty slot to trigger a puzzle.
-
Move the tokens to their correct position to match their color. The solution is shown below.
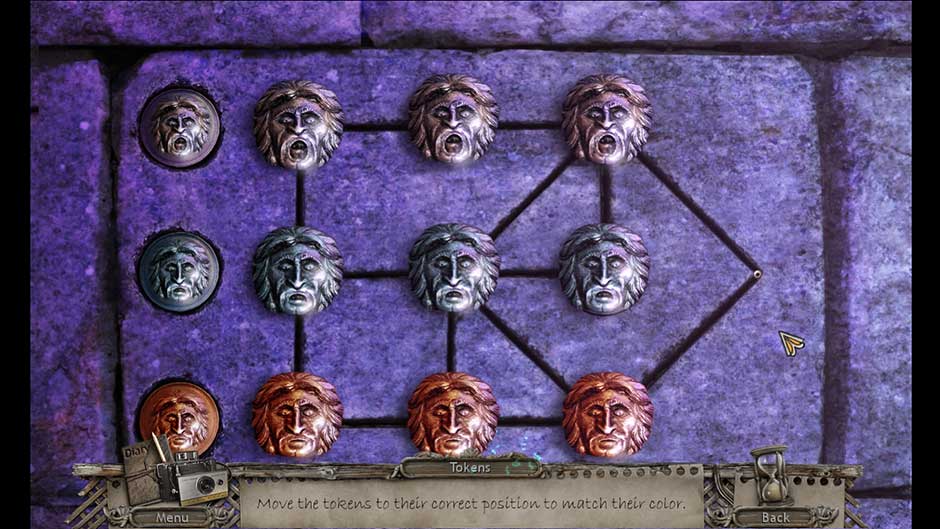
Mysteries of the Past – Shadow of the Daemon Token Puzzle Solution
-
Upon completing the puzzle, a ladder will lower. Proceed up the ladder to the next location.
Outside Pool
-
Examine the doors straight ahead. Click on the Oil Lamp to add it to your inventory.
-
Examine the glass doors on the left. Click on the Match to the immediate right of the door handle to collect it.
-
Return to the Hideout.
Hideout
-
Examine the stone wall straight ahead and to the left of the junk pile. Place the Oil Lamp on the hook, then use the Match to light it, illuminating the area.
-
Click on the hidden object area that appears over the pile of junk. Find the 6 matching pairs. Their locations are shown below.
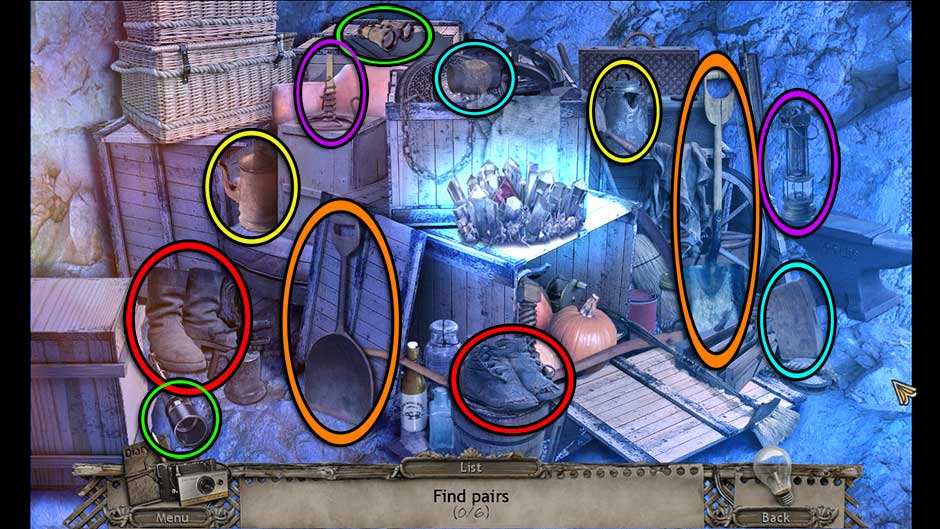
Mysteries of the Past – Shadow of the Daemon Hideout Matching Pairs Solution
-
Once you’ve found all the pairs, locate the Padlock Piece to add it to your inventory. Tip: It’s in the crystal directly in front of you.
-
Return to the outside of the pool.
Outside Pool
-
Examine the fence on the right. Place the Padlock Piece into the missing gap to trigger a puzzle.
-
Rotate the segments to assemble the image on the padlock. Tip: Click on a piece and follow it around the board to move it to the location you’d like. The solution is shown below.
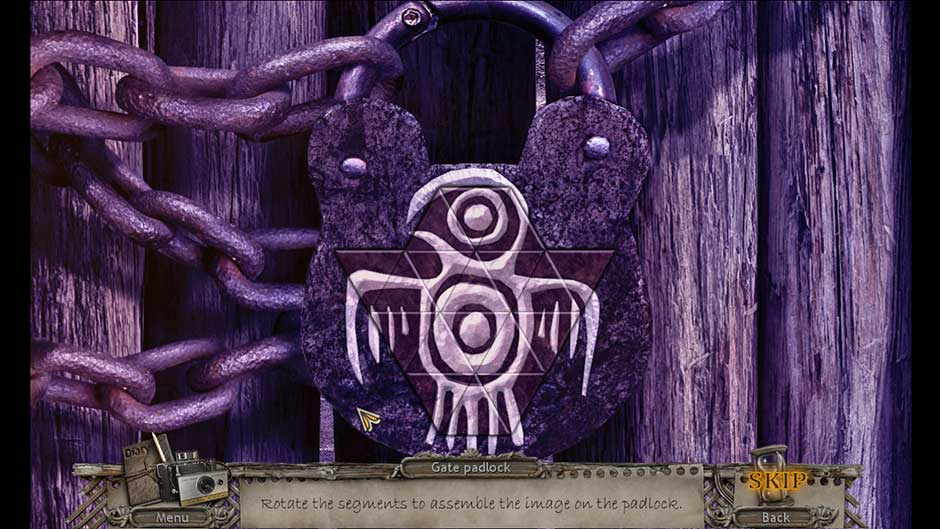
Mysteries of the Past – Shadow of the Daemon Bird Padlock Puzzle Solution
-
Upon completing the puzzle, the Ladder will be added to your inventory.
-
Proceed through the gate on the right.
Backyard
-
Take a closer look at the fuse box on the left. Click on the Twine (right) and Cutter Handle (bottom left) to add them to your inventory.
-
Go back to the outside of the pool.
Outside Pool
-
Examine the middle glass door again. Use the Twine on the nail to acquire the Nail on Twine.
-
Prop the ladder up against the left wall to reach the window, then take a closer look. Use the Nail on Twine on the open window to unlock the latch and proceed inside.
Room 13
-
Take a closer look at the bed directly beneath you. Click on the Screwdriver tucked under the covers to add it to your inventory.
-
Zoom in on the bed stand on the left. Click on the Code to add it to your inventory.
-
Return to the Cellar.
Cellar
-
Examine the machine on the right. Use the Screwdriver to obtain the Switch.
-
Return to Room 13.
Room 13
-
Examine the bedside table again. Place the Switch into the gap in the lamp cord, then click to turn it on, restoring light to the area.
-
Don’t be frightened! It’s only Sidney Brody, after all
-
Give the Bread to Brody. You will receive the Drill in return.
-
A hidden object area will be triggered. Find the items listed at the bottom of the screen. Their locations are shown below.
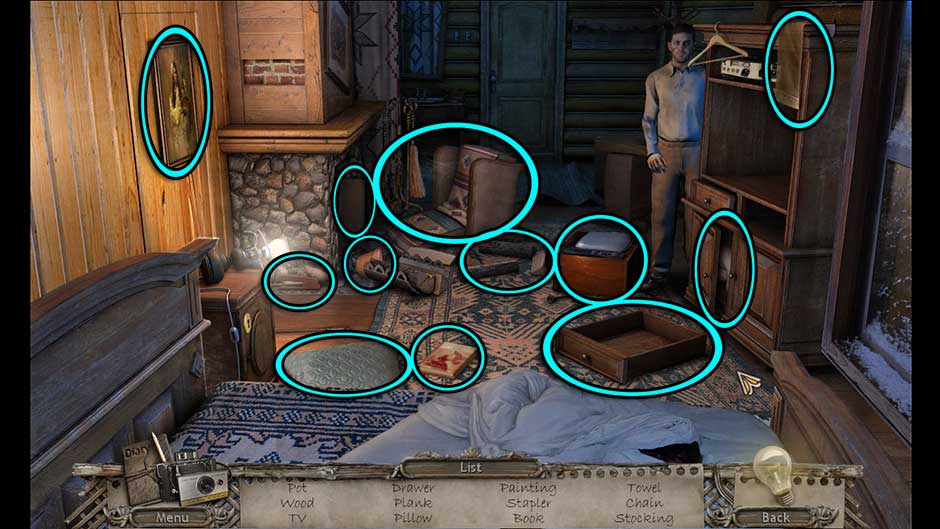
Mysteries of the Past – Shadow of the Daemon Room 13 Hidden Object Scene
-
Place the items back into their correct locations. The solution is shown below.
Mysteries of the Past – Shadow of the Daemon Room 13 Item Locations
-
Upon completing the area, the Cake Knife will be added to your inventory.
-
Return to the Cave.
Cave
-
Examine the dish on the floor of the cell. Use the Cutter Handle on the piece beneath the left side of the dish to add the Glass Cutter to your inventory.
-
Go back to the Cellar.
Cellar
-
Take a closer look at the torch on the wall. Use the Cake Knife to remove the Vacuum Hook from the water canister on the lower right.
-
Head up the ladder to the next area.
Outside Pool
-
Look at the glass doors on the left. Place the Vacuum Hook on the glass, then use the Glass Cutter to remove a portion and unlock the door.
-
Enter through the door and into the next location.
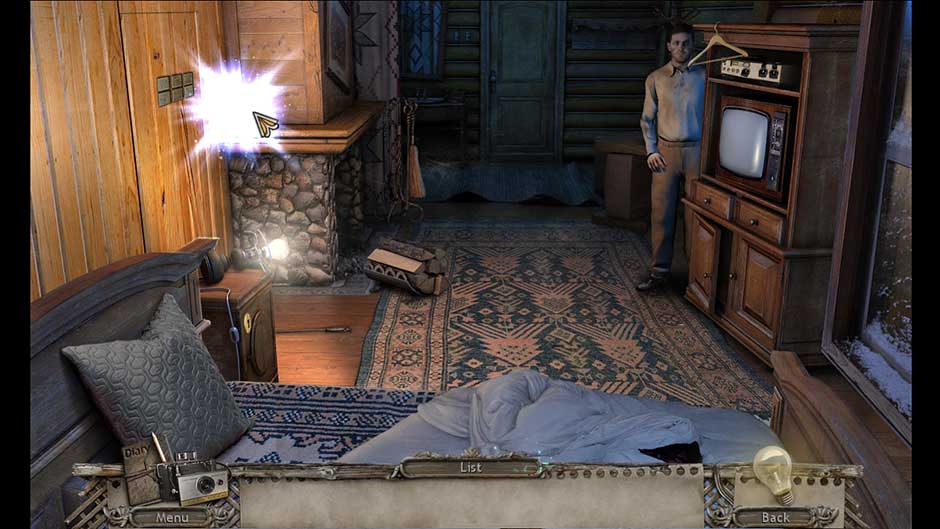
Pool
-
Take a closer look at the lockers on the right. Place the Code to the right side of the lock to trigger a puzzle.
-
Set the correct code by turning the circles. The solution is shown below.
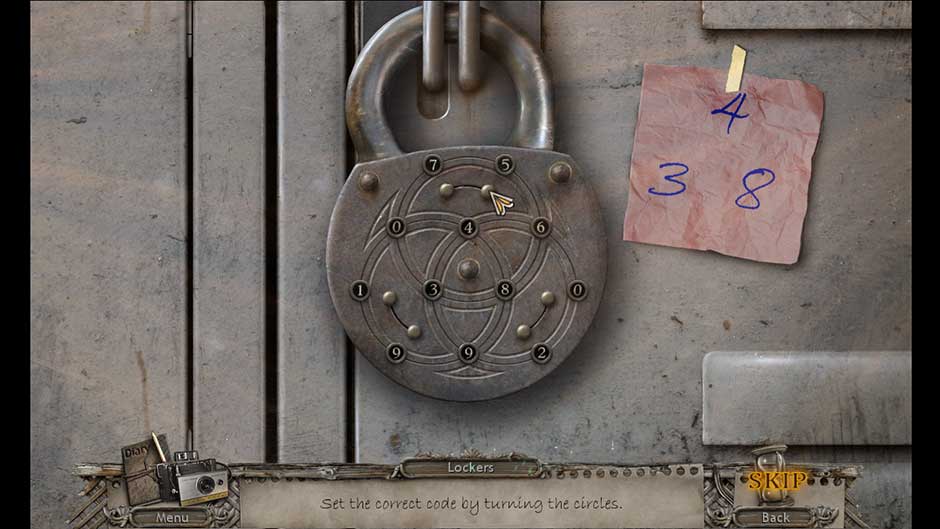
Mysteries of the Past – Shadow of the Daemon Locker Code Puzzle Solution
-
Upon completing the puzzle, click on the Battery inside the locker to add it to your inventory.
-
Zoom in on the interior of the pool. Use the Drill and the Battery on the Drill Machine on the left to add it to your inventory.
-
Go back to Room 13.
Room 13
-
Take a closer look at the side of the fireplace. Use the Drill Machine to remove the stone, then collect the Painkillers and the Safebox to add them to your inventory.
-
Give the Painkillers to Brody. He will give you the Access Card and the Pool Storage Key in return.
-
Go back to the Pool.
Pool
-
Take a closer look at the left door on the other end of the room. Use the Pool Storage Key on the lock to open the door, then look inside.
-
First, click on the light bulb on top of the basket on the lower right and screw it into the hanging socket on the upper left to restore light to the area. Then, find the objects listed at the bottom of the screen. Their locations are shown below.
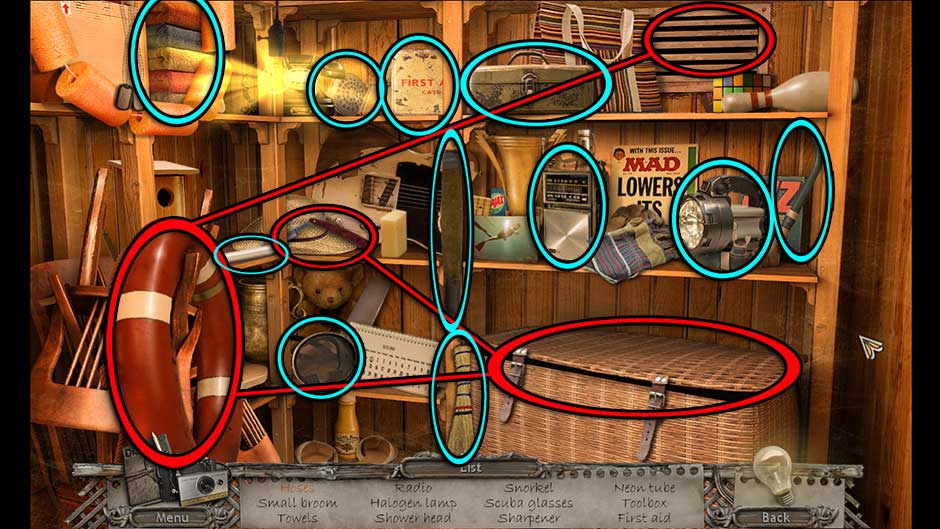
Mysteries of the Past – Shadow of the Daemon Pool Storage Hidden Object Scene
-
Upon completing the area, the Broom and the Hoses will be added to your inventory.
-
Backtrack to the Hideout.
Hideout
-
Take a closer look at the fire pit on the lower right. Use the Broom to sweep the dirt away, revealing the Crowbar and the Striker. Click on them to add them to your inventory.
-
Enter the door on the left.
Cellar
-
Examine the cages at the back of the room. Use the Crowbar to remove the wood paneling, then collect the Welding Torch hidden in the compartment between cages to add it to your inventory.
-
Go to the Pool.
Pool
-
Take a closer look inside the pool. Attach the Hoses to the cylinders on the right. Take out the Welding Torch and place the Safebox on the crate. Click on the blue knob of the gas cylinder until the pressure is correct, then use the Striker to light the torch. Once the box is open, click on the Card Reader and the Tooth inside to add them to your inventory.
-
Back in the main view of the area, examine the right door at the far end of the room. Place the Card Reader on the outline on the door, then swipe the Access Card.
-
With the door now open, enter the next room.
Generator Room
-
Examine the equipment at the bottom left of the curtain. Click on the Electrolyte to add it to your inventory.
-
Examine the upper left portion of the curtain frame and collect the Heating Coil.
-
Take a closer look at the mask on the left side of the back wall. Place the Tooth into the gap to trigger a puzzle.
-
By clicking on the mask’s teeth, repeat a correctly played sequence. The solution is shown below.
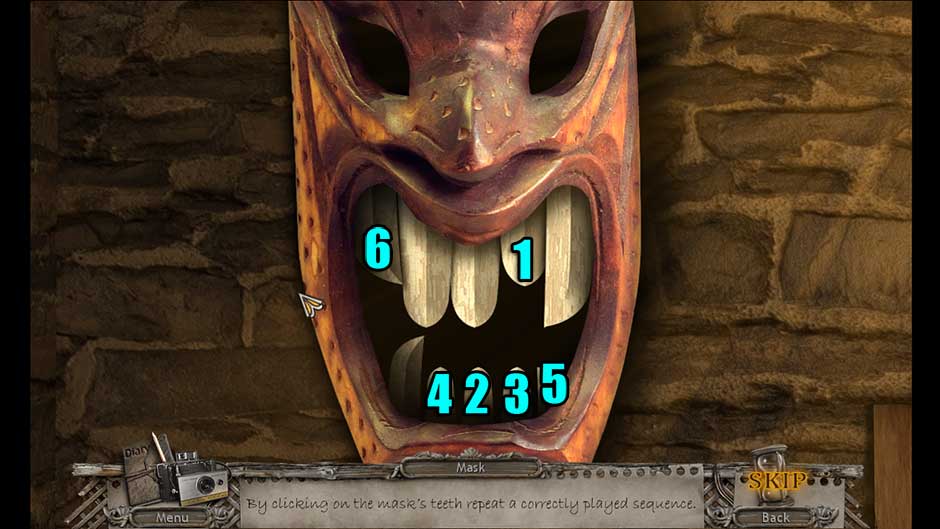
Mysteries of the Past – Shadow of the Daemon Tooth Sequence Puzzle Solution
-
Upon completing the puzzle, collect the Amulets 1/4 and the Night Table Key.
-
Exit back out to the Pool.
Pool
-
Take a closer look inside the pool again. Use the Electrolyte on the Car Battery between the cylinders and the open crate to add it to your inventory.
-
Return to Room 13.
Room 13
-
Examine the night stand. Use the Night Table Key to open the cabinet and acquire the Dry Torch and the Amulets 2/4.
-
Go back to the Generator Room.
Generator Room
-
Examine the tray at the base of the machine on the right. Use the Dry Torch on the oily and combine it with the Striker to obtain the lit Torch.
-
Head to the Backyard.
Backyard
-
Use the Torch against the large black wolf to ward it off.
-
Examine the snow where the wolf was standing and click on the Fuse to add it to your inventory.
-
Take a closer look at the fuse box on the left and place the Fuse in the empty slot to trigger a puzzle.
-
Switch on the fuses in the correct order so all the green lights go on. The solution is shown below.
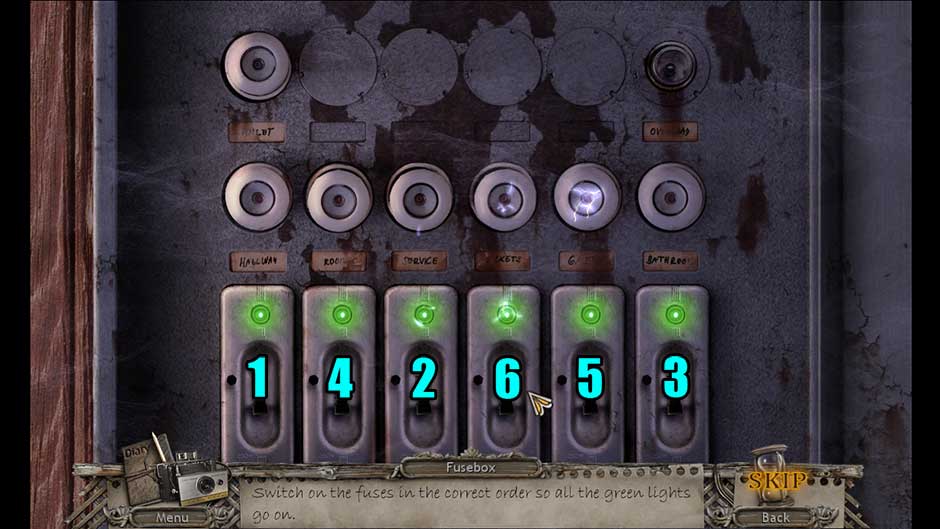
Mysteries of the Past – Shadow of the Daemon Fuse Order Puzzle Solution
-
Take a closer look at the wood pile at the far end of the shed. Click on the Letter Opener sticking out to add it to your inventory.
-
Examine the frozen pole beneath and a little to the left of the light. Place the Car Battery on the ground and combine it with the Heating Coil to melt the ice. Click on the Fireplace Handle to add it to your inventory.
-
Return to the Pool.
Pool
-
Take a closer look at the fireplace at the back of the room. Attach the Fireplace Handle and open the hatch to obtain the Magnet.
-
Return to the Backyard.
Backyard
-
Examine the grating above the wood on the left. Use the Magnet to remove the stubborn latch, then collect the Camera and the Amulets 3/4 inside to add them to your inventory.
-
The raven will reappear. Read the message it brings.
-
Return to the Hideout.
Hideout
-
Use the Medallion next to your Hint button.
-
Examine the floor beneath the junk pile. Remove the rocks, then collect the Tomahawk and the last of the Amulets.
-
Go to the Generator Room.
Generator Room
-
Examine the top let corner of the curtain frame. Use the Tomahawk to sever the line holding the curtain, revealing a hidden object area beneath.
-
Locate the colored wrenches and use them on the bolts shown in your inventory. Their locations are shown below. (Tip! Make sure you select a wrench, then use it on the bolt. Selecting multiple wrenches may result in a bug that will require you to restart your game.)
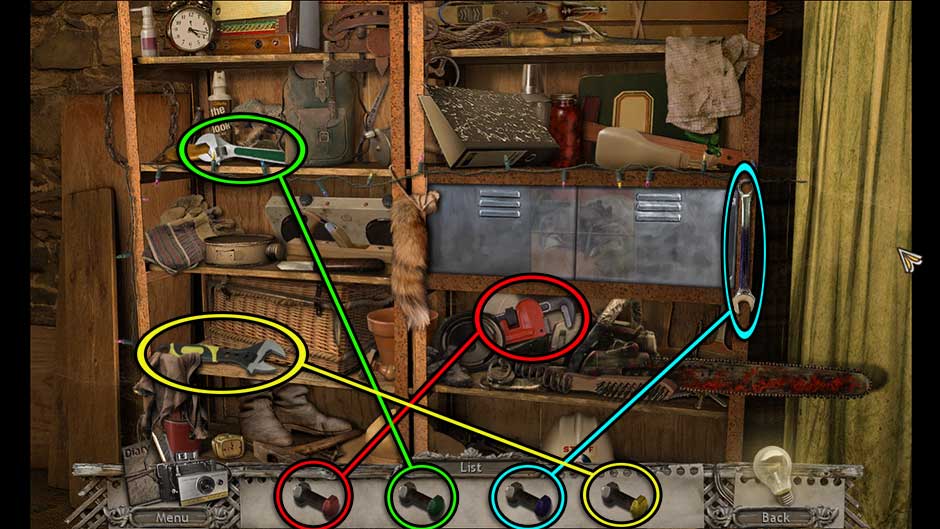
Mysteries of the Past – Shadow of the Daemon Generator Room Colored Wrenches Locations
-
Once you’ve disassembled all the screws, find the objects listed at the bottom of the screen. Their locations are shown below.
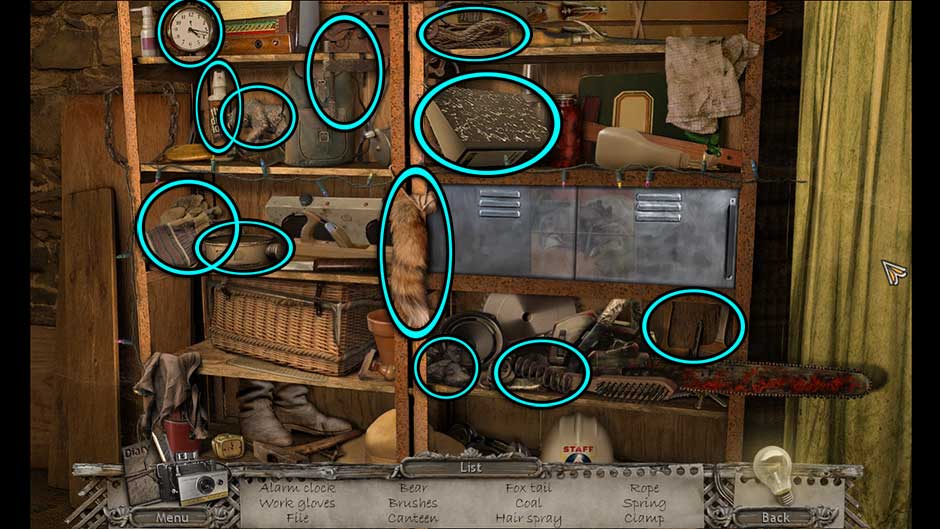
Mysteries of the Past – Shadow of the Daemon Generator Room Hidden Object Scene
-
Once you’ve located all the objects, place the tiles in their correct locations over the glass cabinet on the right. Finally, collect the Wire Cutters on that shelf (toward the right, behind another item) to add them to your inventory.
-
Back in the main area, examine the machinery at the bottom left of the shelves. Use the Wire Cutters on the device, then click on the UV Bulb to add it to your inventory.
-
Go to the Pool.
Pool
-
Examine the light stand on the left. Place the UV Bulb into the light, then click to turn it on.
-
Click on the lit symbols in the pool for a closer view and use the Camera to obtain the Note with Symbols.
-
Go to Room 13.
Room 13
-
Examine the door hidden in the paneling on the left. Place the Note with Symbols here to trigger a puzzle.
-
Re-position the tiles in a manner in which they correctly display the symbols on the photo. The solution is shown below.
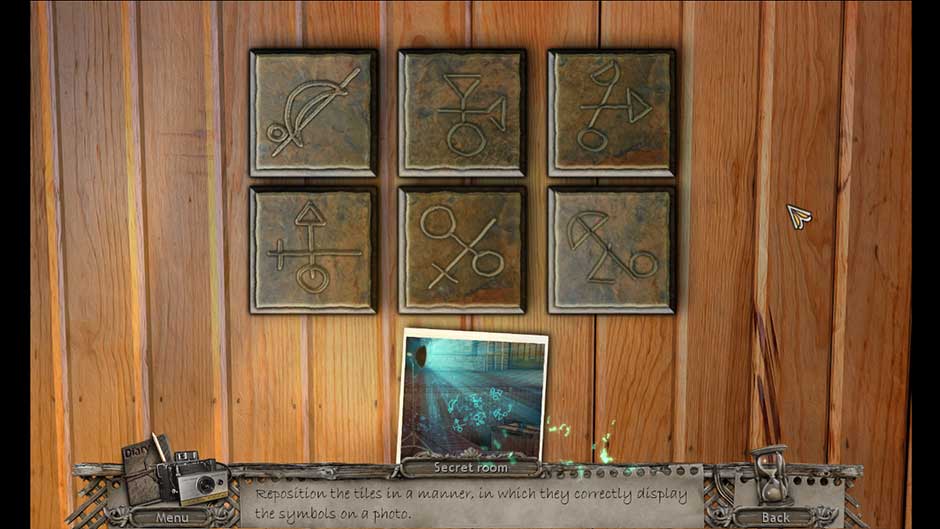
Mysteries of the Past – Shadow of the Daemon Room 13 Door Symbols Puzzle Solution
-
Upon completing the puzzle, the door will open. Follow Brody into the next room.
Secret Room
-
Speak with Brody, then collect the Fireplace Shovel he leaves on the right.
-
Head for the Backyard.
Backyard
-
Examine the snow where the wolf was standing before. Use the Fireplace Shovel to dig, revealing the Car Jack and the Empty Eyedropper.
-
Go down to the Outside Pool area.
Outside Pool
-
Take a closer look at the back fence at the corner of the building. Use the Car Jack between the wall and the post.
-
Tip: Before you can progress further here, you’ll need to return to the Generator Room.
Generator Room
-
Examine the pan beneath the generator on the bottom right. Use the Empty Eyedropper on the tray to obtain the Full Eyedropper.
-
Go back to the Outside Pool area.
Outside Pool
-
Examine the back post again and use the Full Eyedropper to free the car jack. Click on it until it snaps the post, revealing the location of the Saw Blade. Click on it and the Switch 1/2 beneath to add it to your inventory.
-
Head back to the Generator Room once again.
Generator Room
-
Take a closer look at the device at the bottom left corner of the shelves. Attach the Saw Blade, then click on the Electric Saw to add it to your inventory.
-
Go to the Secret Room.
Secret Room
-
Examine the right desk drawer straight ahead. Use the Letter Opener to pry it open, then click on the second part of the Switches, as well as the Safe Combination to add them to your inventory.
-
Take a closer look at the cabinet on the right. Use the Electric Saw to cut it open, then zoom in for a closer look. Place the Safe Combination here to trigger a puzzle.
-
Set the correct combination for the lock. The combination is as follows: Left 11, Right 17, Left 12, Right 17, Left 4, Right 12, Left 2, Right 8, Right 10, Left 4, Left 9.
-
Upon completing the puzzle, the safe will open. Click on the Chest inside to add it to your inventory.
-
Back in the main view of the area, zoom in on the desk. Place the Chest on the desk and place the Switches in the grooves to trigger a puzzle.
-
Turn the switches so that their sum corresponds to the number above the individual locks. The solution is as follows:
-
12 = Left 3, Right 9
-
9 = Left 4, Right 5
-
15 = Left 8, Right 7
-
-
Examine the book lying inside the chest to trigger a cutscene.
Congratulations! You’ve completed the Main Story of Mysteries of the Past – Shadow of the Daemon! You may now choose to play the Bonus Chapter from the game’s Main Menu.
Bonus Chapter
With revelations unveiled, only you can stop the demon now. But is it already too late?
Prison
-
Examine the floor at your feet. Read the note, then click on the Candle and the Amulets to add them to your inventory.
-
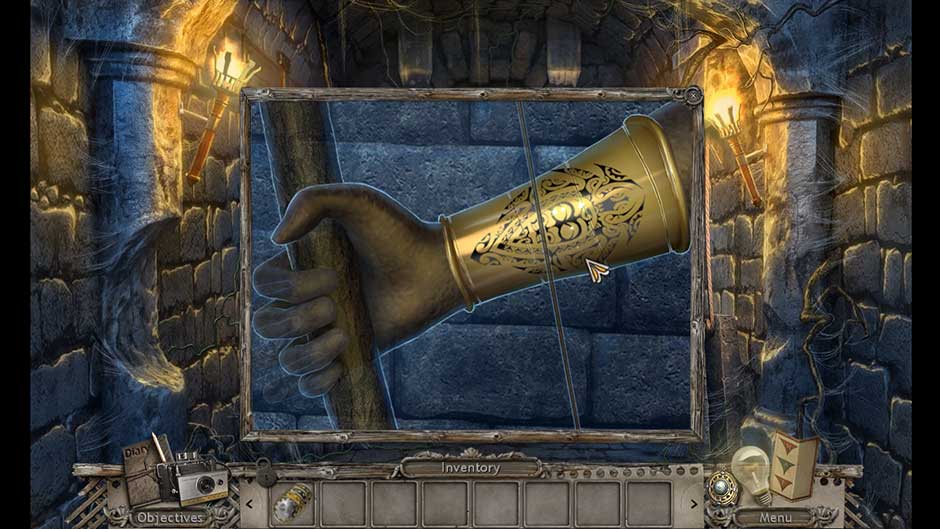
Take a closer look at the lamp on the wall. Click on the Broken Handle next to it and the Soap behind it to add them to your inventory. Before leaving, use the Candle on the lamp to obtain the Lit Candle.
-
Examine the corner of the door on the right. Use the Soap on the cobblestones, then click on the stump to slide it into position.
-
Zoom in on the alcove above the door. Click on the Rag to add it to your inventory.
-
Look at the floor again. Use the Rag on the puddle to acquire the Wet Rag.
-
Examine the alcove above the door again and use the Wet Rag and the Broken Handle on the bars. You will acquire the Bar.
-
Once again, look at the floor. Use the Bar on the sharpening stone to obtain the Sharpened Bar.
-
Take a closer look at the beam propped up against the wall on the left. Click on the Beam to add it to your inventory. Use the Sharpened Bar to outline the wall and scrape out the mortar, then use the Beam to break through. Place the Lit Candle in the shaft and proceed into the next area.
Crossroads
-
Examine the parchment hanging in the upper left corner.
-
Proceed down the path to the right.
Outside Garage
-
Zoom in on the wood pile on the right. Click on the Mitten and the Twine to add them to your inventory.
-
Examine the garage doors. Click on the Farm Jack Lever to collect it.
-
Return to the Crossroads.
Crossroads
-
Examine the base of the tree straight ahead. Use the Mitten to remove the snow from the Symbols 1/3, then click on it to add it to your inventory.
-
Look up into the next tree on the right. Use the Twine on the Snow Shoes, then click to add them to your inventory.
-
Place the Snow Shoes on the snow bank on the left to proceed to the next area.
Outside Hut
-
Take a closer look at the front door. Click on the Fishing Line to collect it.
-
Examine the base of the tree on the right and collect the Pan.
-
Zoom into the left side of the cabin and place the Farm Jack Lever beneath the barrel.
-
Tip: You’ll return here later. For now, go to the Outside Garage area.
Outside Garage
-
Examine the box on the left side of the doors. Use the Fishing Line on the Fishing Reel to add it to your inventory.
-
Return to the Outside Hut area.
Outside Hut
-
Zoom in on the front door and use the Fishing Reel on the pole to acquire the Fishing Rod.
-
Go back to the Crossroads.
Crossroads
-
Look up into the center tree again and use the Fishing Rod to pull down the Sledge Runner.
-
Go to the Outside Garage area.
Outside Garage
-
Examine the wood pile on the right. Use the Sledge Runner to fully restore the Sledge and add it to your inventory.
-
Return to the Outside Hut area.
Outside Hut
-
Examine the left side of the cabin again and combine the Sledge with the Farm Jack Lever to acquire the Farmjack on Sledge.
-
Head once again to the Outside Garage area.
Outside Garage
-
Take a closer look at the front doors. Use the Farmjack on Sledge to open them, then proceed inside.
Garage
-
Find the objects listed at the bottom of the screen. Their locations are shown below.
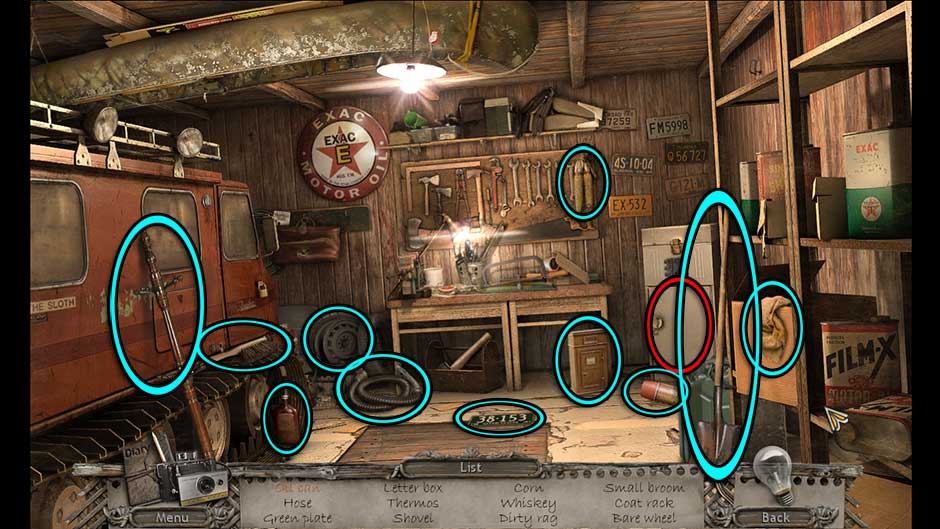
Mysteries of the Past – Shadow of the Daemon Garage Hidden Object Area
-
Once you’ve located all the objects, place the remaining ones into their correct locations. The solution is shown below.

Mysteries of the Past – Shadow of the Daemon Garage Item Locations
-
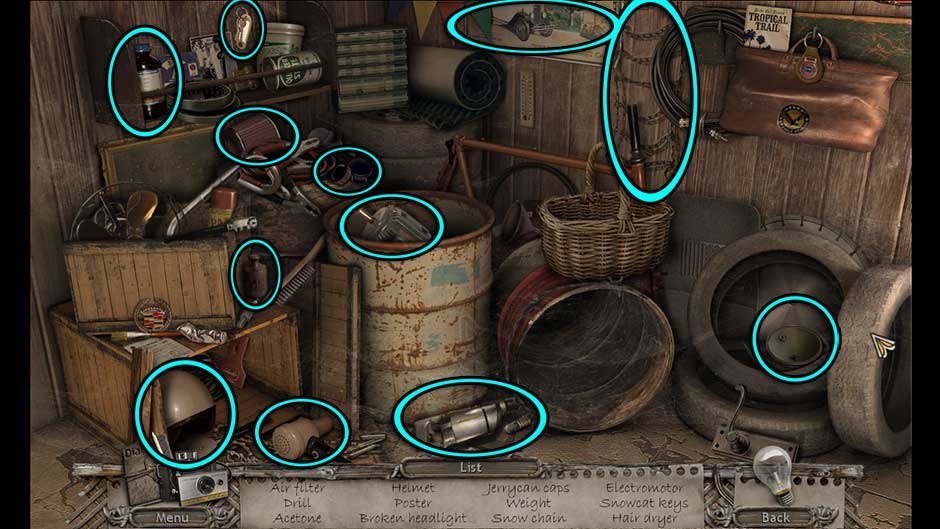
Examine the tires to the left of the work bench and find the 6 matching pairs. Their locations are shown below.
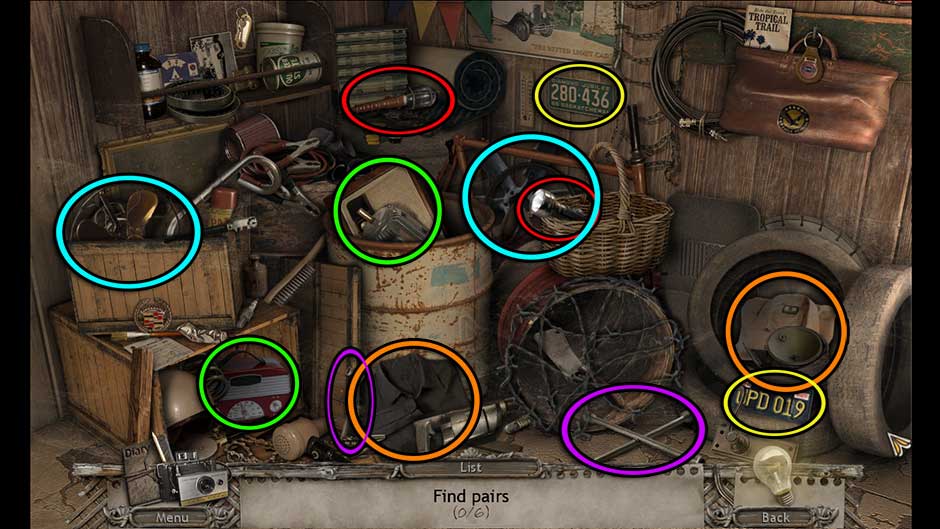
Mysteries of the Past – Shadow of the Daemon Garage Matching Item Locations
-
Once you’ve located all the pairs, click on the Cleaver in the barrel up front to add it to your inventory.
-
Return to the Outside Hut area.
Outside Hut
-
Examine the front door of the hut. Use the Cleaver to open the door, then proceed inside.
Inside Hut
-
Click on the hidden object area over the table on the right. Find the pairs of matching items. Their locations are shown below.
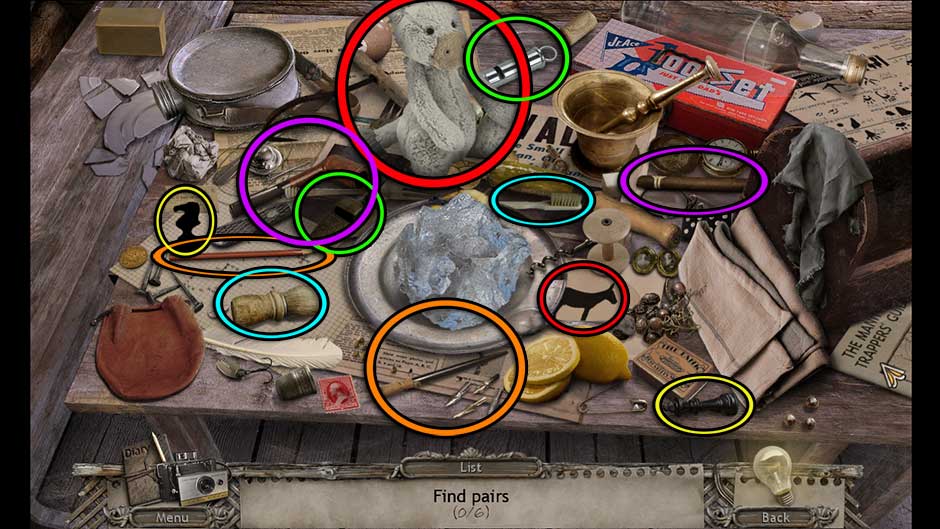
Mysteries of the Past – Shadow of the Daemon Inside Hut Item Pair Locations
-
Upon locating all the pairs, click on the Ornament in the center of the table to add it to your inventory.
-
Examine the cabinet in the left corner of the room. Place the Ornament into the groove to trigger a puzzle.
-
Find pairs of cups with identical pictures. The solution is shown below.

Mysteries of the Past – Shadow of the Daemon Matching Jam Jars Puzzle Solution
-
Upon completing the puzzle, the Puzzle Piece will be added to your inventory.
-
Go to the Garage.
Garage
-
Examine the chest above the cabinet in the rear right corner. Place the Puzzle Piece into the groove at the top to trigger a puzzle.
-
Arrange the numbers so that the sum of the rows, columns and diagonals is the same. The solution is shown below.
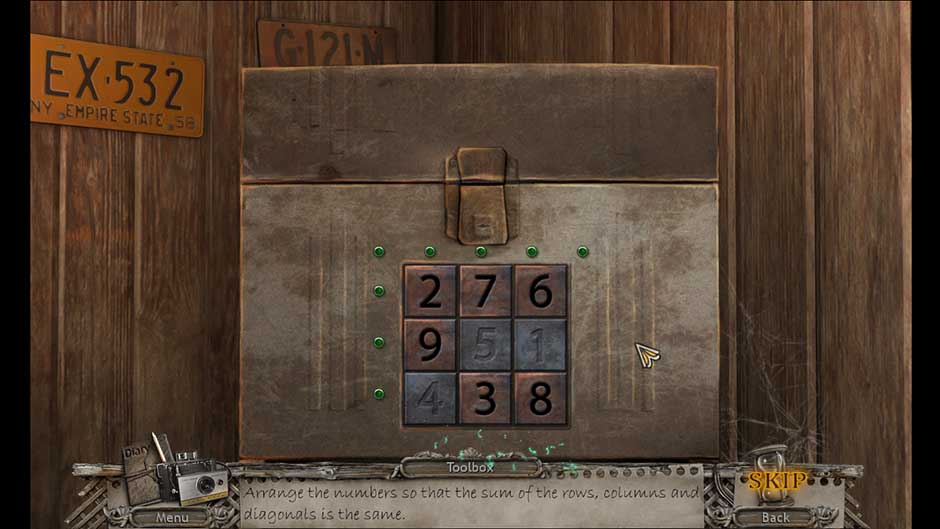
Mysteries of the Past – Shadow of the Daemon Garage Safe Combination Puzzle
-
Upon opening the safe, click on the Handle to add it to your inventory.
-
Take a closer look at the snowcat on the left. Place the Handle on the hatch to open it. Collect the Sickle inside.
-
Return to the Inside Hut area.
Inside Hut
-
Use the Sickle to cut the Rope in the upper left corner and add it to your inventory.
-
Head to the Crossroads.
Crossroads
-
Examine the cliff face straight ahead. Use the Rope to create a way up to the next area.
Magic Tree
-
Examine the mound at the base of the tree on the left. Use the Pan to scoop the snow away, then click on the Crowbar to add it to your inventory.
-
Go back to the Garage.
Garage
-
Take a closer look at the hatch in the floor. Use the Crowbar to pry up the boards, then collect the last of the Symbols inside.
-
Return to the Magic Tree.
Magic Tree
-
Examine the markings at the top of the tree. Insert the Symbols to trigger a puzzle.
-
Try and find the right positions for all three round symbols by turning them. The solution is shown below.

Mysteries of the Past – Shadow of the Daemon Magic Tree Symbols Solution
-
Enter the Magic Tree to the next location.
Corridor
-
Collect the Empty Water Bag slung over the statue’s shoulder.
-
Examine the fountain on the left. Use the Empty Water Bag here to obtain the Full Water Bag.
-
Head back to the Outside Hut area.
Outside Hut
-
Zoom in on the left side of the cabin. Use the Full Water Bag on the barrel to raise the water level, then collect the Cork inside to add it to your inventory.
-
Head back to the Corridor.
Corridor
-
Examine the fountain on the left again and use the Cork to stop the flow of water. Click on the Chisel to add it to your inventory.
-
Head to the Outside Hut area again.
Outside Hut
-
Take a closer look at the canoe on the left. Use the Chisel to remove the ice and flip the canoe, then use the Chisel once again to break open the ice and collect the Bracelet.
-
Return to the Corridor.
Corridor
-
Take a closer look at the statue on the right. Place the Bracelet on the arm, then click to rotate the center piece until the design is completed.
Mysteries of the Past – Shadow of the Daemon Bracelet Complete Design
-
Once you’ve done this successfully, click to add the Bow and Arrow to your inventory.
-
Return to the Outside Hut area once again.
Outside Hut
-
Use the Bow and Arrow on the upper portion of the tree on the right. Examine the base of the tree and click on the Stove Handle and Hairpin within the nest to add them to your inventory.
-
Enter the hut.
Inside Hut
-
Take a closer look at the stove on the left. Place the Stove Handle on the stove door, then open it and collect the Pliers inside.
-
Head back to the Garage.
Garage
-
Take a closer look at the workbench ahead. Place the Hairpin on the desk, then use the Pliers to bend it into the Improvised Lockpick.
-
Return to the Corridor.
Corridor
-
Examine the chest in the wall on the upper left. Use the Improvised Lockpick to trigger a puzzle.
-
Stick the lockpick through 5 flaps of the lock and move them. The trick is to click on each pin quickly multiple times to move it up to the top. Once all pins are locked into the top, the puzzle will be complete.
-
Once the puzzle is complete, click on the Mechanism Handle to add it to your inventory.
-
Examine the wheel on the right and use the Mechanism Handle on the empty slot. Click on the mechanism and proceed through the door that opens ahead.
The Final Room
-
After a brief cutscene, you will become locked in battle with the demon! Click on the Medallion to initiate your attack.
-
Each time you successfully initiate an attack with the Medallion, a puzzle will be triggered in which you must find and select the correct pairs of symbols. You can match symbols in any order, so long as they’re in pairs. Taking too long may cause additional symbols to spawn again. Each time you match all the pairs, you will need to use the Medallion to attack the demon again. The puzzles become progressively more difficult the closer you are to defeating the demon.
-
Tip: Sometimes symbols are obstructed. Hover your cursor over an obstructed symbol to reveal the symbol beneath.
-
Once you’ve done enough damage, the demon will retreat. Take a closer look at the pedestal straight ahead.
-
Place the Amulets into the pedestal, then turn the column elements to combine their energy by clicking on them. The solution is shown below.
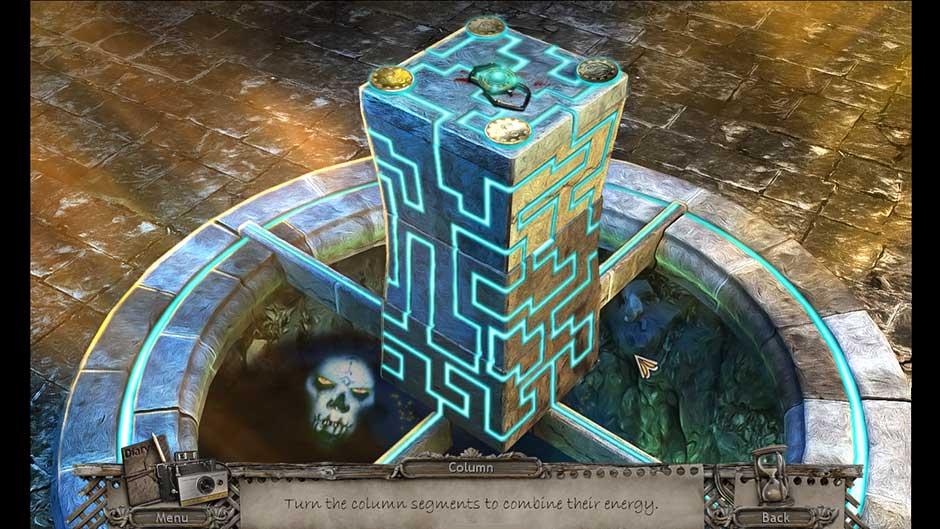
Mysteries of the Past – Shadow of the Daemon Demon Fight Column Segments
-
After a brief cutscene, you will find yourself transported back to the Garage.
Garage
-
Click on the hidden object area to the left of the people you rescued. Find the items listed at the bottom of the screen. Their locations are shown below.
Mysteries of the Past – Shadow of the Daemon Epilogue Hidden Object Scene
-
Upon completing the area, the Snowcat Keys and the Saw Blade will be added to your inventory.
-
Take a closer look at the workbench straight ahead. Use the Saw Blade on the handle here to obtain the Saw.
-
Zoom in on the gas canister on the lower right. Use the Saw to remove the chain, then click on the Jerrycan to add it to your inventory.
-
Examine the snowcat on the left. Use the Snowcat Keys to open the cabin, then take a closer look inside. Click on the Battery sitting on the right and the Funnel behind the steering levers to add them to your inventory.
-
Back on the outside, take a closer look at the snowcat again. Place the Battery into the lower compartment, then insert the Funnel into the top hole and fuel it with the Jerrycan.
-
Examine the inside of the snowcat again, specifically the cabin. Insert the Snowcat Keys into the ignition and click to turn it on.
Congratulations! You’ve completed our Mysteries of the Past – Shadow of the Daemon Walkthrough! For more great tips and tricks and a selection of other walkthroughs, visit our blog!
- Delicious – Emily’s Hopes and Fears Walkthrough
- Big City Adventure – Shanghai Walkthrough
- Building the Great Wall of China 2 Walkthrough
The Mysteries of the Past – Shadow of the Daemon Walkthrough is meant as a guide and does not contain cheats, hacks, or serials.