The people of Houndspoint love their dogs. A recent wave of violence has beset this snowy mountain town. The citizenry is in fear. Their well-being is threatened by a pack of strange dogs. Your beloved dog Pippa has been thrown into the fray. Pippa has been kidnapped by the strange dogs. You want her back and promise to discover the cause of the sudden attacks and figure out whom, or what is behind all the town mayhem. Step into Houndspoint and explore hidden object scenes in mysterious locations to uncover the truth and return Pippa home. Don’t forget to use your Fierce Tales – The Dog’s Heart Walkthrough as your trusted guide to lead you down the correct path.
This Fierce Tales – The Dogs Heart walkthrough guide will point out tips, hints, and gameplay achievements to help you clear scenes and move onto the next chapter of the hidden object game.
Contents
General Tips & Tricks
This section contains tips and tricks to help you walkthrough Fierce Tales – The Dog’s Heart hidden object game. Refer to the section as many times as you want. The hints contained here apply to all the game chapters. Keep in mind Inventory Items will appear in bold type with Initial Caps; Key Items will appear with Initial Caps. Make sure you collect all of these items!
- This guide will use the location names as they are written on the map.
- All puzzles may be skipped, unless you choose to not to skip them.
- The Map allows you to jump locations within the game. Use it!
- You can customize sound, music, custom cursor and full screen settings.
- There are three difficulty levels: casual, advanced and hardcore ranging from a relaxed game session with assistance to no assistance at all.
- You can store collected items in your Inventory.
- The cursor icon changes to a magnifying glass when you need to examine an item more closely and zoom in.
- When the cursor icon changes to a hand icon you can pick up item or interact with objects or area.
- When the cursor icon changes to a navigation icon you can go to another location.
- Sparkles indicate an area of interest, ripe for investigation. Zoom in and find hidden objects.
- Some items require additional action to collect it.
- The files in your briefcase contain the map and your journal.
Fierce Tales – The Dog’s Heart Walkthrough
Chapter 1: The Garage
The game begins with a gentleman walking down a snowy street on a sunny day. Suddenly a horn sounds. Dogs appear and chase the gentleman to his death. Later on you meet Pippa, who after a horn sound is taken and disappears from your house.
You will visit the following scenes in this section: room with fireplace, yard, garage, bridge, city kennel, the sewers, the kennel’s interior, and the town square.
There are five hidden object puzzles in this section. You will be provided with a list. As you find the items on the list, the item disappears and the entry is removed from your search list. All of the hidden object puzzles in this chapter are triggered by an action or when you enter or try to first access a location. Keep in mind, some items require additional action to collect it. At the conclusion of the chapter, you should have the following inventory items: Can Opener, Torch, Net, Gunpowder, and Buckshot.
Hidden Object Puzzle 1
Triggering action: Slide the latch and open the window in fireplace room.
Hints: (1) Cut the cloth with the knife and take the coin. (2) Wipe the wood with a rag and take the train.
Inventory item gained: Can Opener
Hidden Object Puzzle 2
Triggering action: Opening door and entering garage
Hint: Open the suitcase by sliding the two latches. Once open, take the feather and book.
Inventory item gained: Torch
Hidden Object Puzzle 3
Triggering action: Cutting wires with Nippers on the left gate of the city kennel.
Hint: Take the raccoon and dog.
Inventory item gained: Net
Hidden Object Puzzle 4
Triggering action: Place Dog Medallion in slot on desk in the sewer.
Hint: Take the squirrel, limestone and amber.
Inventory item gained: Gunpowder
Hidden Object Puzzle 5
Triggering action: Inspect the lock and place the Star Key in the lock in the kennel interior.
Hint: Take the cup of milk, mouse, and the ear of wheat.
Inventory item gained: Buckshot
There are three puzzles in this chapter. At the end of this section, you should have collected half of a Snow Shoe and Morphine and added it to your inventory list.
Puzzle 1
Triggering action: Examining net in suitcase located in garage.
Task: Untangle rope.
Hint: The rope color will change from red to green when untangled.
Inventory item gained: Half of a Snow Shoe
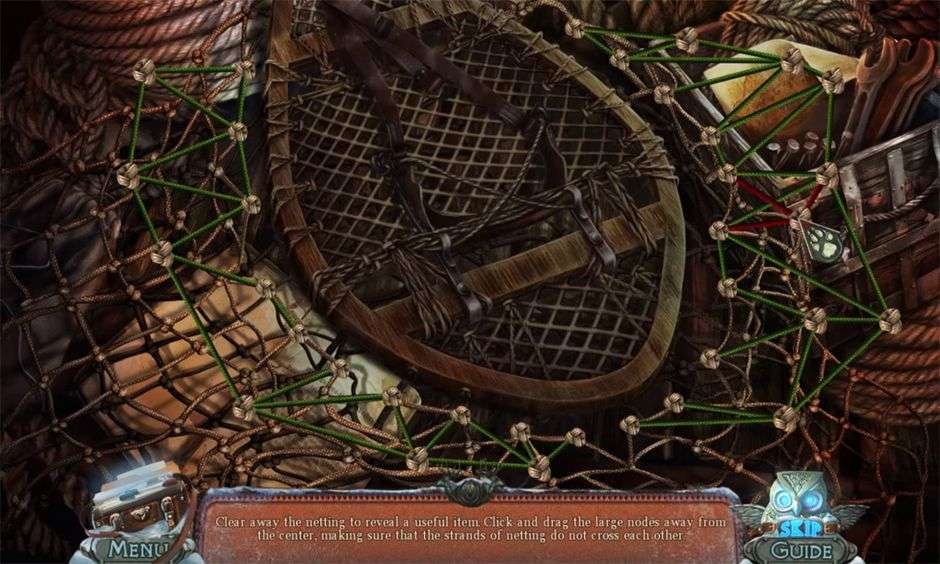
Fierce Tales – The Dogs Heart Chapter 1 Puzzle 1
Puzzle 2
Triggering action: Placing Dog Head on statute in town square.
Task: Remove bars around door by pushing buttons in correct order.
Inventory item gained: None
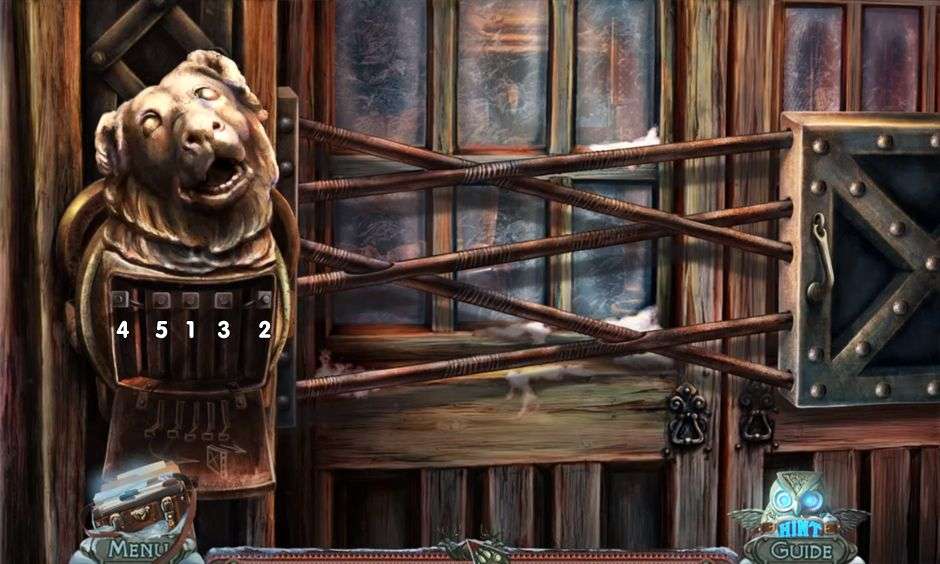
Fierce Tales – The Dogs Heart Chapter 1 Puzzle 2
Puzzle 3
Triggering action: Placing Bottle on shelf in sewer.
Task: Place bottles in proper spot by weighing them on the scale
Hint: Organize by weight – lightest to heaviest.
Inventory item gained: Morphine
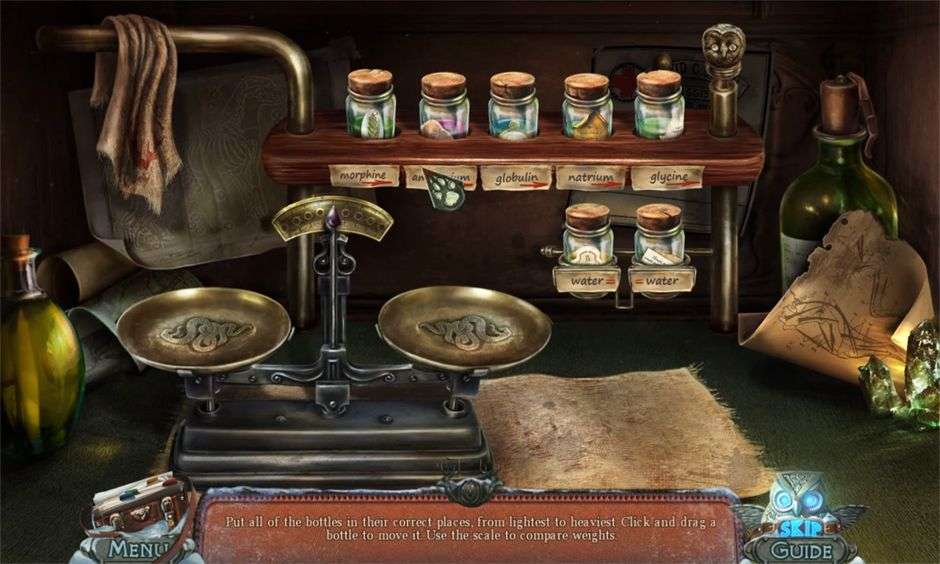
Fierce Tales – The Dogs Heart Chapter 1 Puzzle 3
Key items to spot and take in the first section are: Broom, Dog Food, Snow Shoes (you will find each half separately), Matches, Ice Pick, Saw Handle, Hat, Shell, Dog Head, Strange Collar, Instructions Piece, Kerosene, Bottle, Empty cup, Cup of Warm Water, Drill, Drill with Bit, Nippers, Veterinarian’s Key, Dog Medallion, Bandage, Symbol, and Syringe.
Chapter 2: The Detective’s House
At this point, you have just gone through the gate. As you follow the dog, you come upon the Detective’s House. Before you can enter, you are tasked with solving a puzzle.
You will visit the following scenes in this section: Detective’s House, Sewers, The Pharmacy, the City Kennel, and the Detective’s Cabinet.
There are three hidden object puzzles in this section. The inventory items you collect in this section are: Purple Solution, Box of Tobacco, and Pipe.
Hidden Object Puzzle 1
Triggering action: After solving puzzle and gaining entry to detective’s house.
Hints: Take the clean boot butterfly.
Inventory item gained: Purple Solution.
Hidden Object Puzzle 2
Triggering action: Take the Acid in the pharmacy.
Hint: Take the tobacco and scales.
Inventory item gained: Box of Tobacco.
Hidden Object Puzzle 3
Triggering action: After you look in the safe and retrieve items the puzzle appears.
Hint: Take the pencil and scratches.
Inventory item gained: Pipe.
Next, you have to solve puzzles. There are two puzzles in this section. There are no items to add to your inventory list from these puzzles.
Puzzle 1
Triggering action: Touch the top of the door at the detective’s house. Place Symbol 1 from chapter 1 and Symbol 2 from chapter 2 in the empty slots to activate the puzzle.
Task: Select matching items to eliminate them from the board (can be 2 or 3).
Inventory item gained: None. You do however, gain entry into Detective’s House.
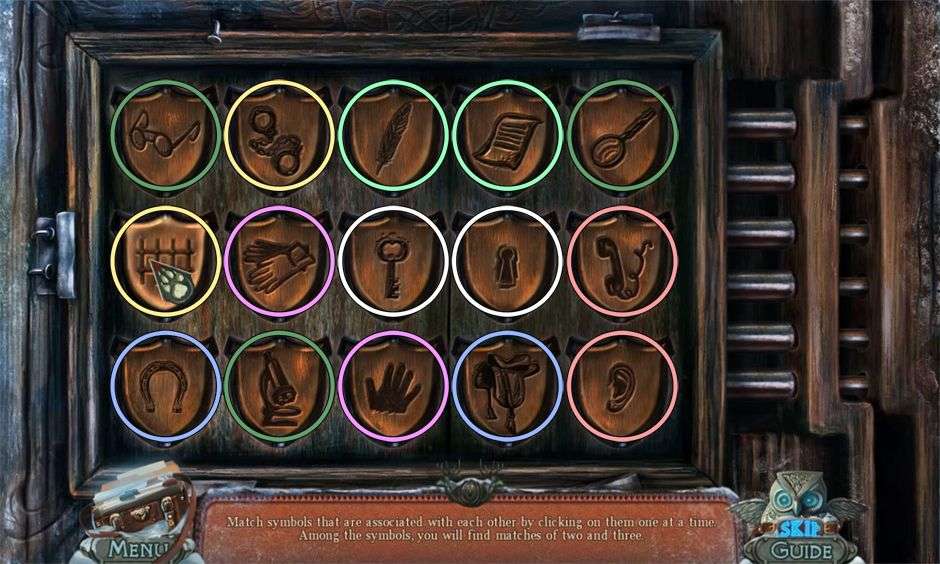
Fierce Tales – The Dogs Heart Chapter 2 Puzzle 1
Puzzle 2
Triggering action: Place two fingerprints on door in Detective’s cabinet.
Task: Place slides in order from thumb to pinky.
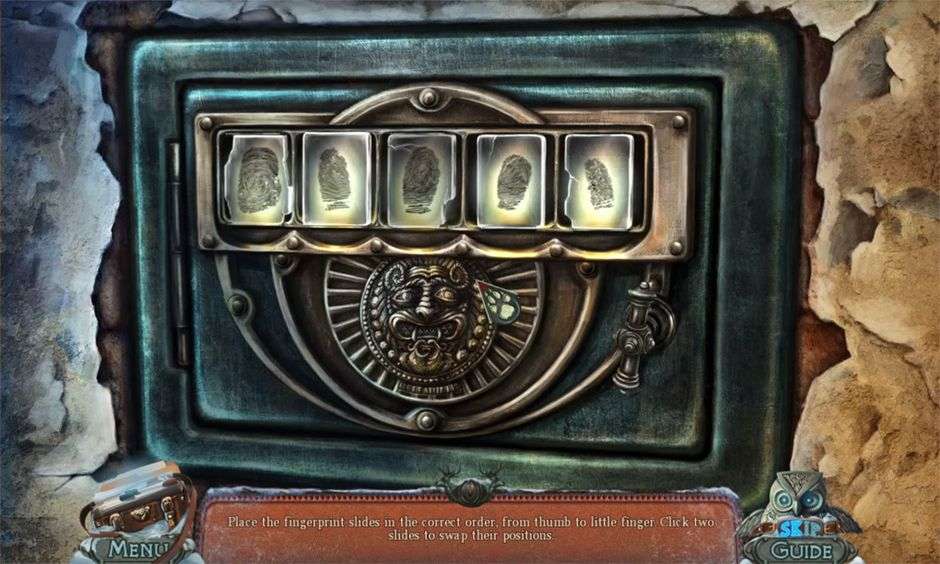
Fierce Tales – The Dogs Heart Chapter 2 Puzzle 2
Puzzle 3
Triggering action: Place Symbol of Maturity and Symbol of Birth on the lock to activate the puzzle.
Task: Arrange tiles correctly.
Hint: Correctly placed tiles, lock in place.
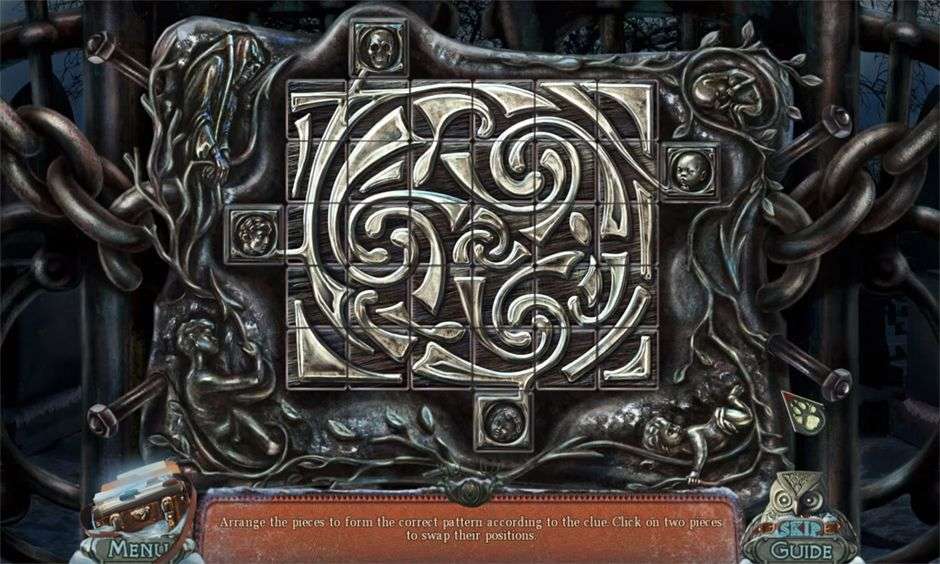
Fierce Tales – The Dogs Heart Chapter 2 Puzzle 3
In this section you should have collected the following Key Items: Symbol 2, Jar, Newspaper Piece, Key, Slingshot Band, Tweezers, Candle, Fingerprints (you will find 2 total and separately), Jar with Poison, Acid, Slingshot, Symbol of Maturity, Slide, Invisible Fingerprint (you will find 2 total and separately), Symbol of Birth, Scrap of Clothing, Strange Paper, Music Sheet.
To exit the section, go through the gate to access the graveyard.
Chapter 3: Jenny’s Room
The dog pack continues to terrorize the people of Houndspoint. Before any attack, a horn is blown and the dogs, all wearing a strange collar, attack people or other animals.
You will be asked to visit the following scenes in this section: graveyard, town square, the crossroad, the vehicle, the Cliff, and the farm house.
There are five hidden object puzzles in this section. The inventory items you have to collect are: Shovel Handle, Lasso, Candy Jar, Nut, and Pole.
Hidden Object Puzzle 1
Triggering action: Going through the graveyard gate.
Hints: Open casket and take the rag doll
Inventory item gained: Shovel Handle.
Hidden Object Puzzle 2
Triggering action: Using the shovel in the graveyard grounds.
Hints: Place the key in the lock, turn the key twice and take the hook.
Inventory item gained: Lasso.
Hidden Object Puzzle 3
Triggering Action: Placing Farm Key in the lock to open the gate at crossroad.
Hints: Take the doll and slingshot.
Inventory item gained: Candy Jar.
Hidden Object Puzzle 4
Location: At the cliff.
Hints: Take the nut and windmill.
Inventory item gained: Nut.
Hidden Object Puzzle 5
Location: At the farm house.
Hints: Make tea with lemon. Take the tea with lemon and the Pole.
Inventory item gained: Pole.
This section also includes two puzzles to solve. While no inventory items are gained, entry to new places like the farm house and lighthouse happen after you solve the puzzles.
Puzzle 1
Triggering action: Inspect vehicle door. Place Lock Part 1 and Lock Part 2 together to begin puzzle.
Task: Rotate symbols until they are in the correct position.
Hints: Lever 1 rotates itself and Lever 4. Lever 2 rotates itself. Lever 3 rotates itself and Lever 2 Lever 4 only rotates itself.
Inventory item gained: None. Entry into farmhouse gained.
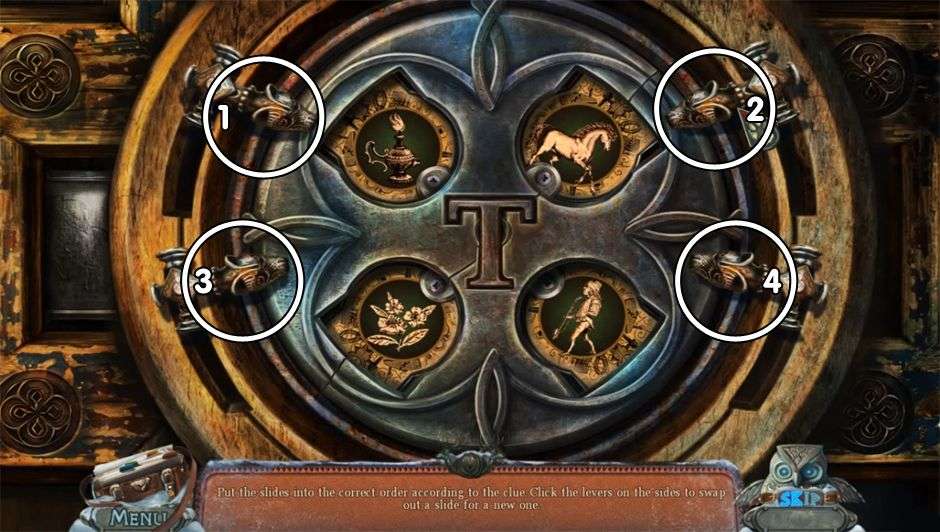
Fierce Tales – The Dogs Heart Chapter 3 Puzzle 1
Puzzle 2
Triggering action: In the vehicle, zoom in on the controls. Place the Small Valve on the lever to begin the puzzle.
Task: Flip the switches until they are in the correct position.
Hints: Move all the levers to the left first, then all to the middle, then all to the right. Press the levers in this order to solve the puzzle: 5, 6, 1, 5, 6, 4, 5, 6, 2, and 6.
Inventory item gained: None. Once the puzzle is solved, you are taken to the Lighthouse.
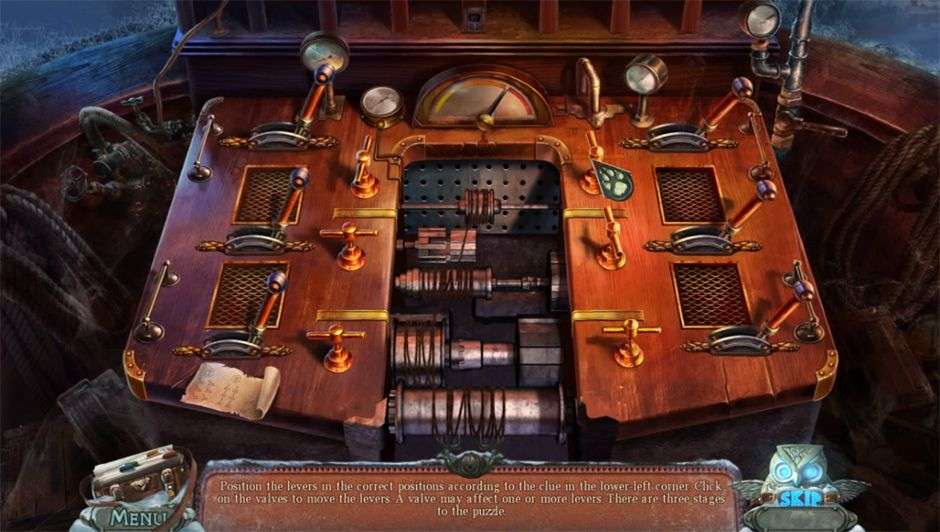
Fierce Tales – The Dogs Heart Chapter 3 Puzzle 2
Key items to spot and take as you explore this section are: Bag of Sand, Shovel, Piano Key, Stone, Farm Key, Lock Parts (2 total and found separately), Short Hose, Fishing Reel, Map Pieces (2 of 5 total in this chapter and found separately), Fishing Lure, 1/2 Mosaic Piece, Small Valve, Needle and Thread, and Fresh Fish.
Chapter 4: The Lighthouse
In The Lighthouse chapter you will explore the following scenes: the lighthouse (first and second floors), the farm, the farm house, Lily’s Room, the landing zone, and the Zeppelin.
In the previous section, you collected some items that were pieces of a larger item. They were the Map Pieces and the Mosaic Piece. So far we have two Map Pieces. In this section you will collect three other Map Pieces. You also have one Mosaic Piece and you will be collecting the other piece in this section for a total of two Mosaic Pieces.
By the end of this chapter you should have the following Key Items: Medal, Jar with Termites, Cane, Tarpaulin, Glove, Door Handle, Tongs, Small Key, Mosaic Piece (2/2), Nail Puller, Map Pieces (3/5), Board, Burning Coal, Tongs, Part of Key, Big Lever, Empty Sack, Girl Figurine, Empty Gas Tank, Empty Oiler, Full Gas Tank, Full Oiler, Lens, Zeppelin Key, Gears, Sack with Sand, and Gas Valve.
The Lighthouse scenes contain three hidden object puzzles and two puzzles. Your Inventory Items should include a Gear, Tap, and 4/5 Map Piece. Below are tips to help you solve these puzzles.
Hidden Object Puzzle 1
Location: At the lighthouse.
Hints: Place the antlers on the deer and take the stag.
Inventory item gained: Gear.
Hidden Object Puzzle 2
Location: At the lighthouse first floor.
Hints: Make tea with lemon. Take the fish skeleton and diving helmet.
Inventory item gained: Tap.
Hidden Object Puzzle 3
Location: In Lily’s Room
Hints: Take the skates and the mandolin
Inventory item gained: 4/5 Map Piece.
Puzzle 1
Triggering action: At the farm house place the two Mosaic Pieces on the floor to start challenge.
Task: Rotate pieces until they lock into place.
Hints: The pieces will continue to rotate if not in correct place.
Fierce Tales – The Dogs Heart Chapter 4 Puzzle 1
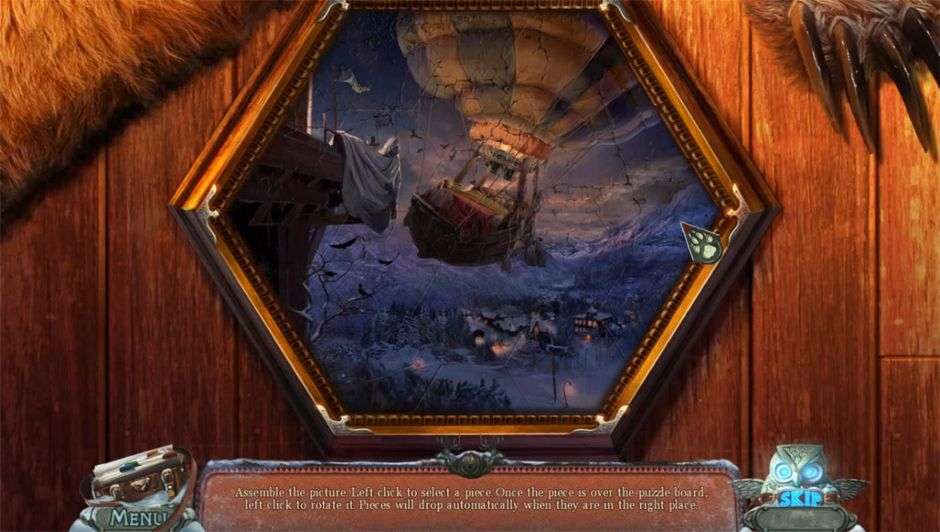
Puzzle 2
Triggering action: Place five map pieces on the controls in the Zeppelin to begin puzzle.
Task: Move the Zeppelin to the green point.
Hints: The marked path must be followed in this order: yellow, purple and green.
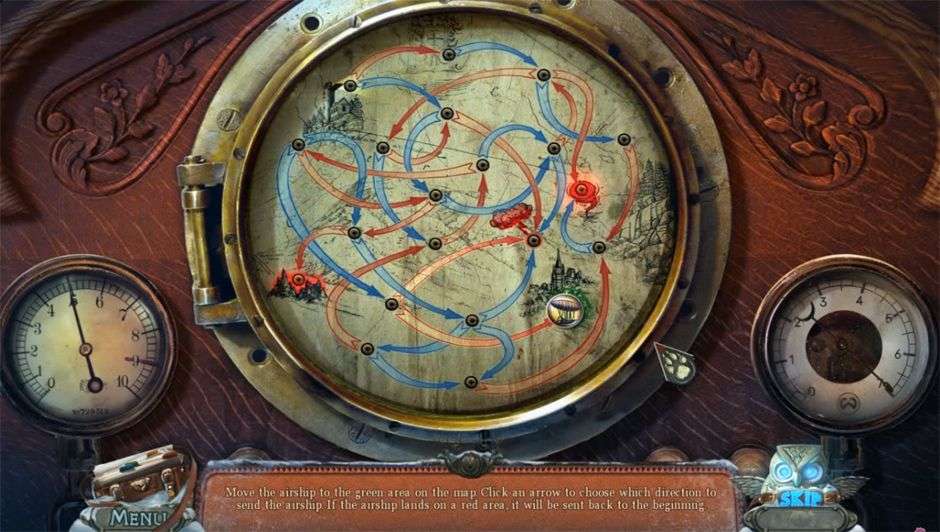
Fierce Tales – The Dogs Heart Chapter 4 Puzzle 2
Chapter 5: The Dean’s House
The Zeppelin takes you to the other side of Houndspoint to Dean’s House.
You will explore rooms in Dean’s House like the yard, mailbox, gate, and cellar and items in his home like cabinets, closets, doors, and safes. You continue to look for Key Items. They is a Hose, Saxophone Key, Swallow, Dean’s Key, Deer Figurine, Stone Heart, Pruner, Wooden Heart, Dog Puppet, Retractor, Web Cutter, Ruler, Small Hoop Net, Card File Key, Clip, Pattern, Cork Screw, Clip, and File.
You will complete three puzzles and three hidden object puzzles in this chapter. You can get through them by following this quick reference guide. Please note that you gain three new Inventory Items: the Baton, Collar Piece, and Bone only from playing the hidden object puzzles.
Hidden Object Puzzle 1
Triggering action: Extinguish the fire.
Hints: Take the full gear and notes.
Inventory item gained: Baton.
Hidden Object Puzzle 2
Triggering action: Inspecting gate by the mailbox.
Hints: Take the domino and compass
Inventory item gained: Collar Piece.
Hidden Object Puzzle 3
Location: Examine the wardrobe; Place the Pattern on the lock to begin puzzle.
Hints: Take the scroll. Open the cabinet door and take the sea salt, parrot, and accordion. Open the drawers and take the crystal and collar.
Inventory item gained: Bone.
Puzzle 1
Triggering action: Examining saxophone and providing conductor with the Baton.
Task: Move buttons to right spot so that musicians can play in sync.

Fierce Tales – The Dogs Heart Chapter 5 Puzzle 1
Puzzle 2
Triggering action: Touch the picture on top of the file cabinet.
Task: Find 4 correct combinations to problem whose sums of 3 numbers add up to 18 following the formula contained in the clue.
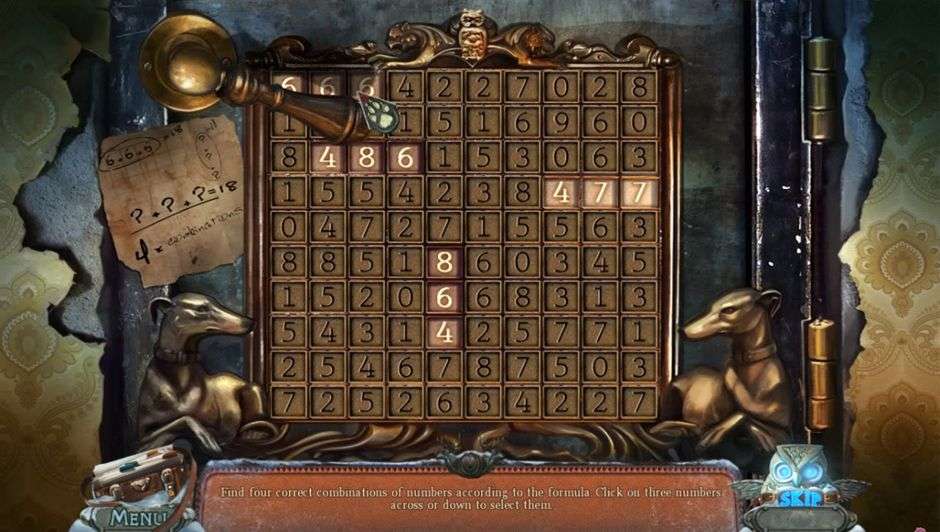
Fierce Tales – The Dogs Heart Chapter 5 Puzzle 2
Puzzle 3
Triggering action: At Dean’s House, inspect the top door. Place the Dog Puppet on the door to start sections last puzzle.
Task: Rotate the joints according to clue contained in your journal.
Inventory item gained: None. Gain entry to Ashton’s Room.
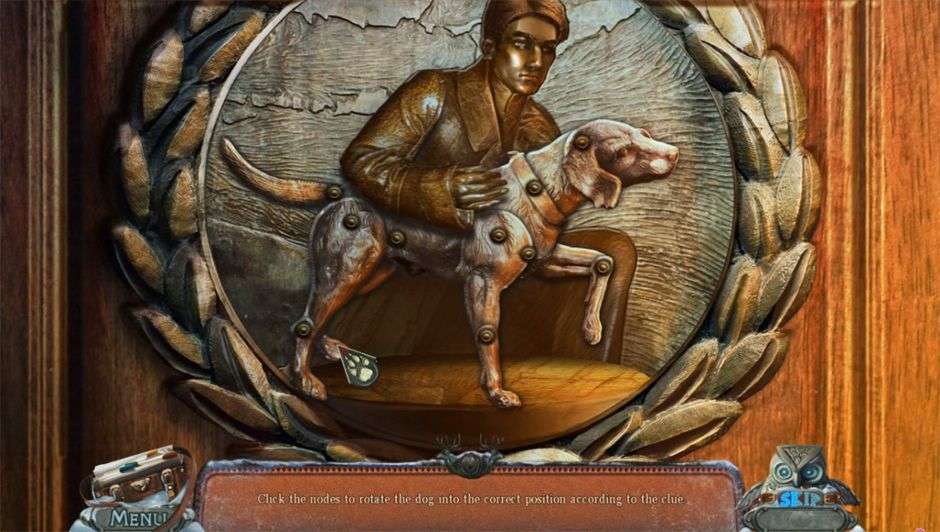
Fierce Tales – The Dogs Heart Chapter 5 Puzzle 3
Chapter 6: Ashton’s Room
The sixth and final chapter takes you to and keeps you in Ashton’s Room. You also visit the cave, the laboratory, dogs town, and the canyon. You gained entry to Ashton’s room by solving the last puzzle in the previous chapter. You find Pippa and discover how to make a horn and who is making the horn sounds that are triggering the dog attacks.
You will continue to explore the scenes you enter for Key Items, hidden object puzzles, puzzles, and Inventory Items. Look to collect the following Key Items: Dog Scent, Pieces of Letter, Puppy Statute, Bird Skull, Mammoth Tusk, Ashton’s Medal, Triangle, Smelling Salts, Smelling Salts Cotton, Pearls, Lever, Life Flower, Pick Axe, Diamond, and an Owl Symbol.
You will play three hidden object puzzles and receive three Inventory Items: Glue, the Leash, and the Screwdriver. The first two puzzles occur immediately after tearing the wallpaper. In the first game you will take the locomotive, the iron, the lit candle, the “R” on the mirror, and the crab on the door. Glue will be added to your Inventory Items. Immediately thereafter, the second game launches.
In the second game you will take the print and boot. You also collect the Leash and add it to your Inventory Items. The last hidden object puzzle game is back in Ashton’s Room. Here, you will take the screwdriver, one gnome, and the eagle spirit. You receive the .Screwdriver to add to your Inventory Items. Remember you work off lists when you complete hidden object puzzles. Not all items you search for are important. Some get added to your Key Items or become another items that you use for further play.
There are five puzzles in this last chapter. The puzzles need to be solved to move on to the next scene. There are no Inventory Items to gain from these puzzles. Below is a quick cheat sheet:
Puzzle 1
Triggering action: Place Ashton’s Medal on the door.
Task: Interchange numbers according to a puzzle.
Solution: Place numbers in the following order (3-9), (5-9), (4-0), (2-1), (7-3), (7-5), (8-1), (8-2) and (2-1).
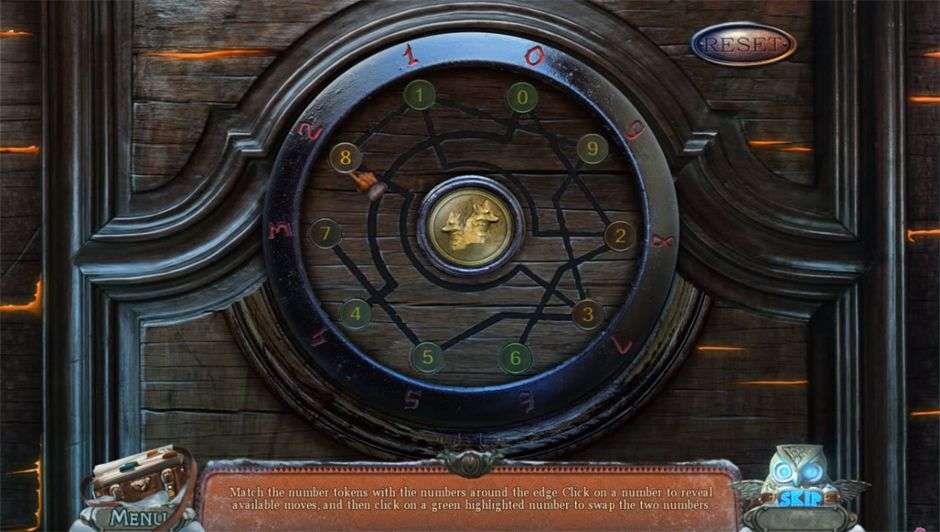
Fierce Tales – The Dogs Heart Chapter 6 Puzzle 1
Puzzle 2
Triggering action: Zoom in on Pippa’s Collar.
Task: Move the Triangle.
Solution: Place Triangle at center of labyrinth.
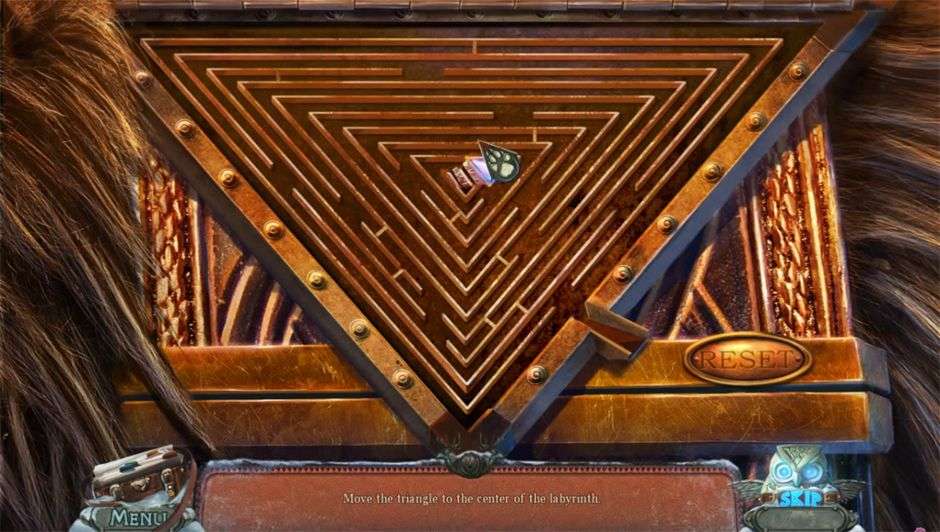
Fierce Tales – The Dogs Heart Chapter 6 Puzzle 2
Puzzle 3
Triggering action: Place Bird Skull on barrel in dining room.
Task: Move the Triangle.
Solution: Place Triangle at center of labyrinth.
Fierce Tales – The Dogs Heart Chapter 6 Puzzle 3
Puzzle 4
Triggering action: Place the File, Mammoth Tusk, Life Flower, and Pearls on the tree stump in the canyon.
Task: Make a horn.
Solution: Carve our horn following schematic in your clue. Remember to add the pearls and flowers at the end.
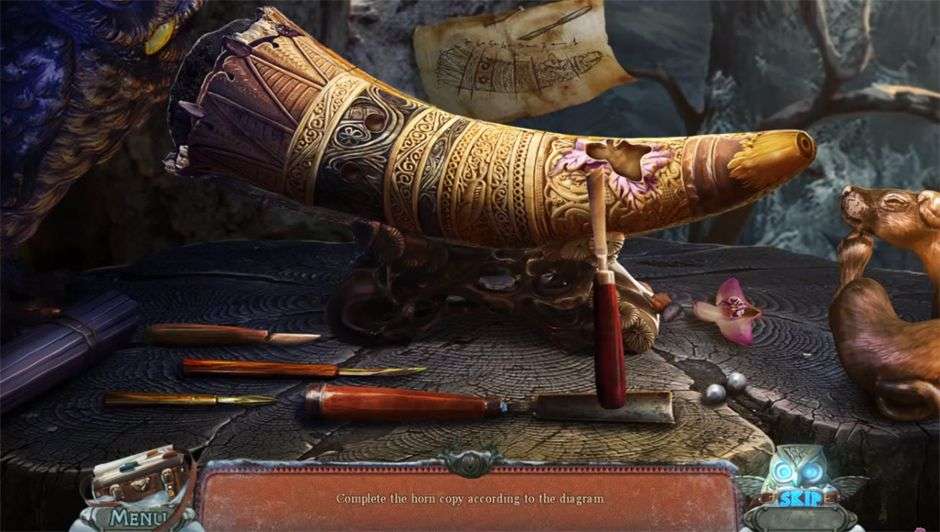
Fierce Tales – The Dogs Heart Chapter 6 Puzzle 4
Puzzle 5
Triggering action: Place Deer Figurine and Owl Symbol into slots to start puzzle.
Task: Move pieces to the upper right corner and then bring them down..
Solution: Place number 1 last to prevent jam.
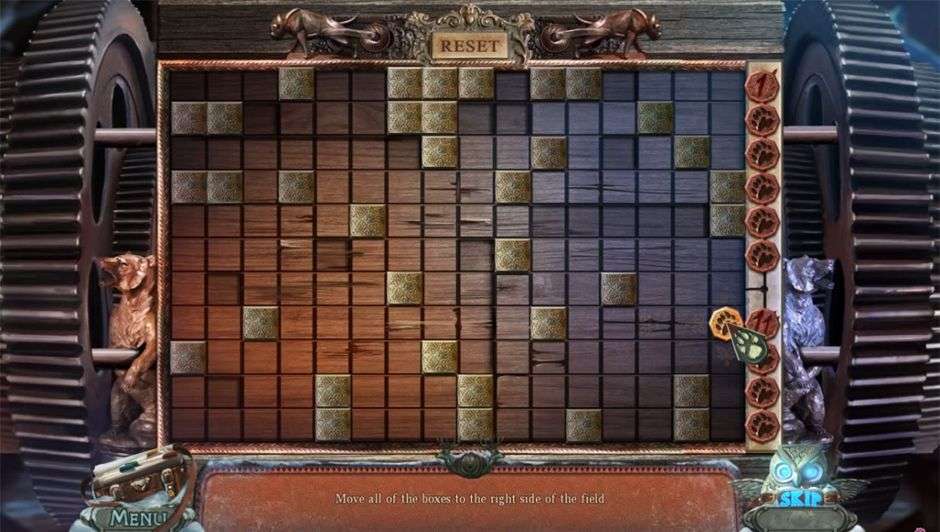
Fierce Tales – The Dogs Heart Chapter 6 Puzzle 5
Once you complete this fifth puzzle your adventure is complete. Order is restored to Houndspoint. The dogs are back to acting normal and Pippa is back home.
Congratulations! You’ve completed our Fierce Tales – The Dog’s Heart Platinum Edition Walkthrough! For more great tips and tricks and a selection of other walkthroughs, visit our blog!
Delicious – Emily’s Hopes and Fears Walkthrough
Big City Adventure – Shanghai Walkthrough
Building the Great Wall of China 2 Walkthrough
The Fierce Tales – The Dog’s Heart Walkthrough is meant as a guide and does not contain cheats, hacks or serials.