The Elven Kingdom is in trouble! Mortessa has poisoned the Tree of Life, and it’s up to Princess Aerin and her friends to save it! Our Elven Legend 2 – The Bewitched Tree walkthrough will guide you through each level and offers essential tips and tricks you’ll need to defeat Mortessa for good.
Contents
Basic Gameplay, Tips, and Tricks
Whether you’re new to Elven Legend 2 – The Bewitched Tree or simply need a refresher, this section covers all the essential tips and tricks you’ll need to know when playing.
Basic Gameplay
- There are three Modes available for you to choose from. Modes can be changed at any time from the Main Menu Options, the Map, or within a Level. However, if you change the Mode within a Level, you will need to restart it in order for the change to take effect. The available modes are:
- Relaxed Mode – Play for fun, gameplay time is irrelevant.
- Normal Mode – You have enough time, but don’t relax too soon, as time is not infinite.
- Professional Mode – For experienced and self-confident players. Go for it!
- Your Goals are always visible on the left side of the bar at the top of your screen. Look at this to view what your current Goals are, as well as what you’ve already accomplished.
- You can pause your game at any time by clicking the button at the top of the screen.
- The time remaining per level is displayed in a meter around the Pause button. Star markers on this meter will indicate your current rank should you finish the level within that time period.
- Resources are kept track of at the top of your screen and to the right. Resources include Food, Wood, Water, and Crystal. They may be obtained from one of four sources:
- Elven Altars – Resources lying on these altars will replenish after a period of time has passed. Workers must collect these resources.
- Buildings – Farms, Mines, etc. These produce resources you can move your mouse over to collect.
- Path Obstacles – Resources can be gathered directly from obstacles on the path. Sometimes you will need to spend resources to gain resources.
- Merchants – Trade resources for other resources as available per merchant.
- Various boosts are available per level and appear at the bottom of your screen. Once the meter is filled, you may activate your boost to take effect for a limited time. The boost types are:
- Reinforcement – One more worker will arrive to help out.
- Shock Work – Production increases.
- Acceleration – Workers become faster.
- Lucky Discovery – There is an abundance of resources on the altars again.
- Reinforcement – One more worker arrives to help you.
- Short Rest – We have a little time for a rest (the timer stops).
- Crystal and Water Basket – Increase amount of resources collected.
- Items may be collected during some levels. These items will be stored in the lower right corner of your screen until such time as they can be used.
- Golden Petals can be found in many levels. Collect these as currency to help you restore your Capital.
- You can access your Capital from the Main Menu. Help Aerin rebuild the city by collecting Golden Petals hidden throughout the game. Use these Golden Petals to purchase upgrades and return the capital to its former glory and more! You can even give your capital a custom name.
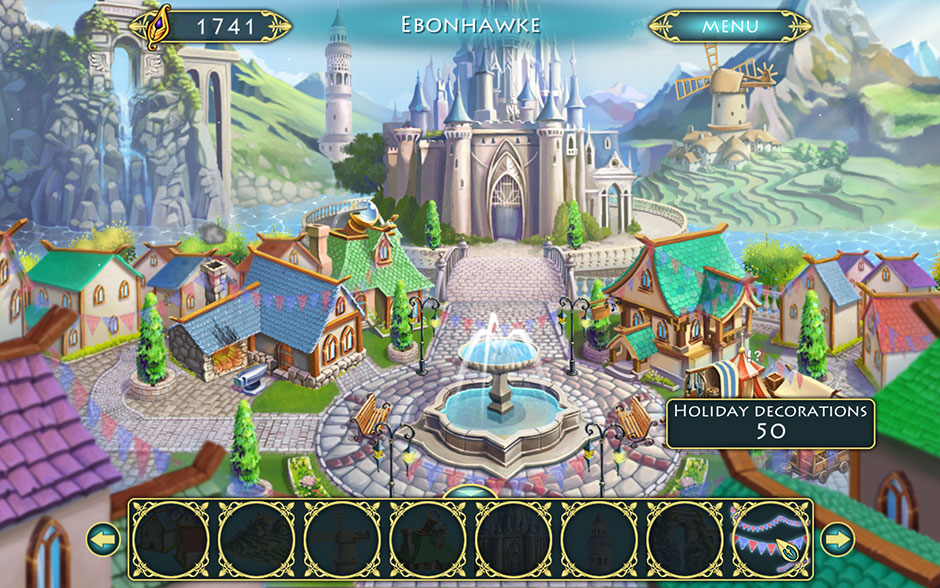
Elven Legend 2 – The Bewitched Tree Capital
Additional Tips and Tricks
- Locations such as the Water Tower or the Large Mine have a fixed number of resources they will provide. Each time you collect from them, you will receive 5 resources. Each location has a total of 25 resources which may be collected until it can no longer be used. It’s usually not a bad strategy to collect all these resources right away.
- Damaged buildings will need to be rebuilt before they will provide you with resources.
- Resources turned out by buildings will automatically be collected after a certain amount of time has passed, so don’t panic if you forget to move your cursor over them.
- Replay levels as often as you like to earn additional Golden Petals for your Capital.
- Using boosts will deplete the meter for all boosts. If you want to use a boost located earlier on in the bar, you will be able to replenish this sooner than a boost located further down. Take this into account and don’t let the bar fill up for too long if this is your goal, otherwise you’ve essentially missed a free boost period.
- Collection boosts will only give you the multiplier effects if your workers take them back to the Main Building before the timer runs out.
- You can improve your buildings by upgrading them once you have the resources needed to do so. Upgrade resource locations to earn additional resources and upgrade the Main Building to acquire more workers.
- Altars of Resources cannot be upgraded.
- Hover your cursor over an object or location in order to see whether or not it’s accessible. A green path indicates you can reach that location without incident. If you are unable to reach the location, the red portion of the path will show at what point your path is blocked. Use this to figure out how to get where you need to go!
Elven Legend 2 – The Bewitched Tree Path Indicators
Elven Legend 2 – The Bewitched Tree Walkthrough
The Towns of Selend and Bakerville: Level 1 – 8
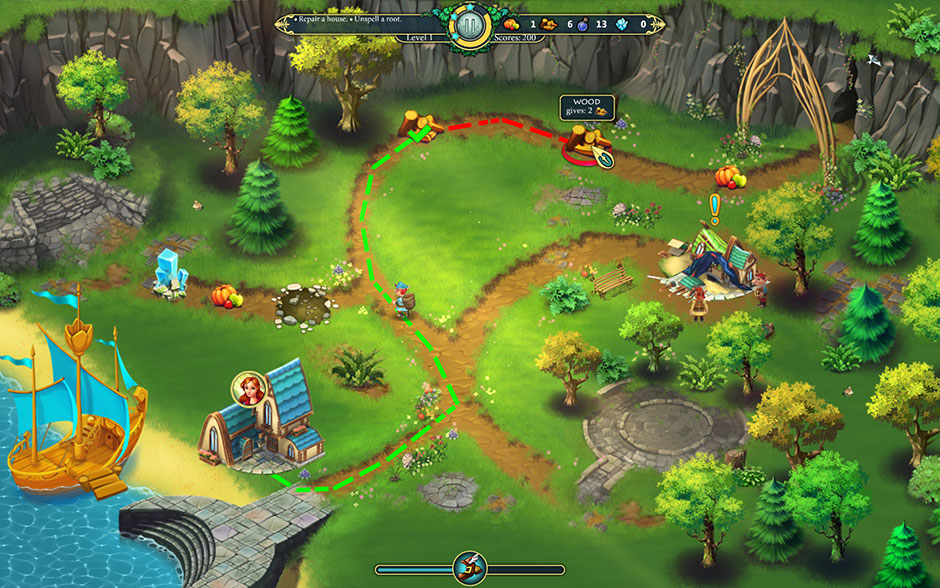
Level 1 – Arrival
Upon returning to the motherland, Aerin discovers unsettling roots, which have leveled a local home. The young princess sets out to find the cause of the sudden strange growth and how to aid the distraught locals.
Mission:
- Goal 1: Repair a house
- Goal 2: Unspell a root
- Clear the way to the house, then have Aerin perform a removal spell using 3 Crystal and 8 Water.
Level 2 – Field Work
Aerin discovers the root of the problem lies at the Tree of Life, the source of all life within the Elven Kingdom. Her journey will take her through the golden sea of wheat fields, however now they’re nothing more than wild grasslands.
Mission:
- Goal 1: Build a farm
- Clear the path to the Elven Altar on the right and build the Farm before removing the Wood Block along the fence.
- Goal 2: Shoo crows away
- Collect the pieces of the Scarecrow in order to shoo the crows away. Their locations are shown below.
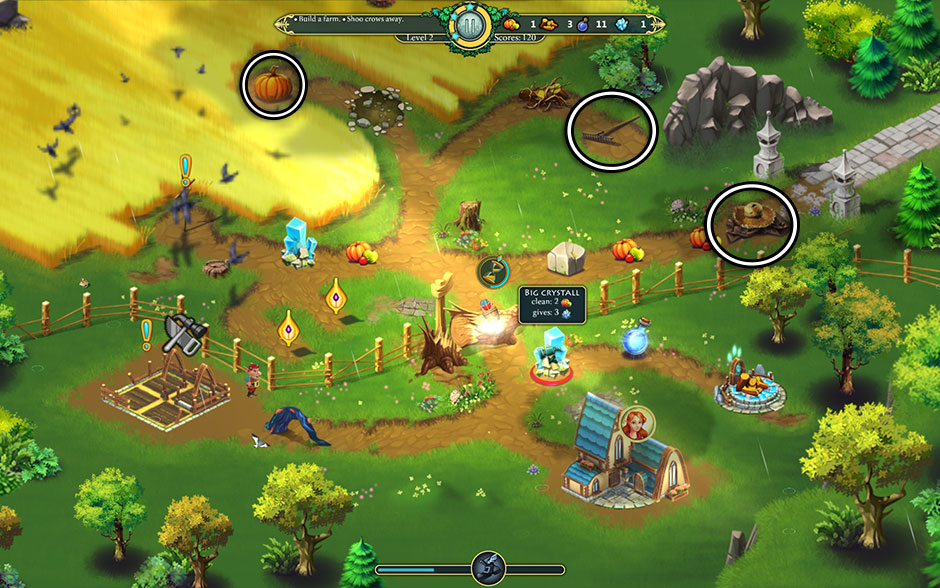
Elven Legend 2 – The Bewitched Tree Level 2 – Scarecrow Part Locations
Level 3 – Unexpected Encounter
Princess Aerin arrives in Selend, a town of fisherman and farmers. The town provides food for the entire kingdom. However, it seems the same misfortune which overtook the Elven Kingdom has befallen Selend, too.
Mission:
- Goal 1: Banish trolls
- Clear the path to the trolls, then use Griffin to scare them away.
- Goal 2: Restore buildings
Level 4 – Prisoner
The once busy countryside sawmill has since fallen silent. Where have all the woodcutters gone?
Mission:
- Goal 1: Repair a bridge
- Repairing the bridge costs 12 Wood and 8 Food resources.
- Goal 2: Banish a troll
- Rebuild Griffin’s House to gain the ability to banish the troll.
- Goal 3: Set the prisoner free
- Aerin can free the prisoner with magic. It will cost 10 Wood and 10 Food resources.
Level 5 – Animal Care
Once released, the Healer decides to aid Aerin on her quest. However, before he does, he has one last request to ask of her…
Mission:
- Goal 1: Cure animals
- Restore the Healer House on the right. You will need to collect 1 Tuft of Grass per wolf in need of healing. Their locations are shown below.
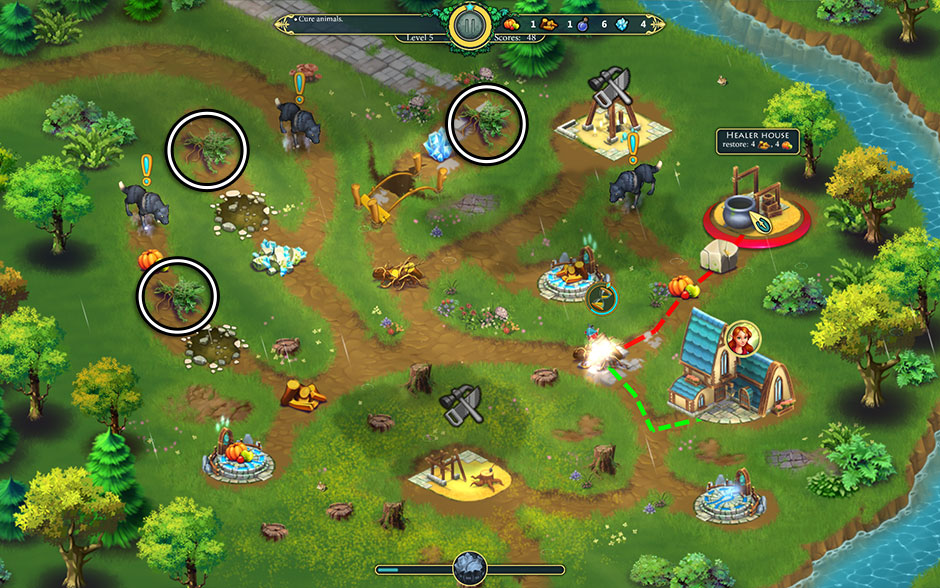
Elven Legend 2 – The Bewitched Tree Level 5 – Tuft of Grass Locations
Level 6 – Problems of the Town
Aerin and her friends arrive in the town of Bakerville. Known for its trade and pastries, trade has since ground to a halt as bewitched roots lay siege to the town. Residents feel helpless in wake of the onslaught, unsure what to do.
Mission:
- Goal 1: Repair the houses
Level 7 – Fire!
A warm glow radiates just outside of Bakerville. Could it really be a fire? It needs to be extinguished quickly, before more citizens are hurt!
Mission:
- Goal 1: Extinguish the fire
- Each fire requires 5 Water to put out. Gather the first Wood resource on the path and clear the Wood Block above that, then start extinguishing fires on the right. Make sure you have access to the Well, as repairing this is essential to your success in this level.
Level 8 – Old Acquaintance
The Tree of Life lies at the heart of the Forbidden Garden. Guarding the entrance to this garden are a large orc and numerous trolls. Aerin notes these fiends have never been sighted so close to the tree before.
Mission:
- Goal 1: Ambush an orc
- You will need to repair Griffin’s House and gather 8 Food and 12 Crystals to remove the Big Ogre.
- Goal 2: Reach the gates of the Forbidden Garden
The Kingdom of Dwarves: Level 9 – 16
Level 9 – After the Fall
Aerin, unable to resist the powers of Mortessa, falls deep into an underground chasm. It’s up to the Princess to find her own way out now.
Mission:
- Goal 1: Banish trolls
- You will need to rebuild Griffin’s House. Banishing trolls will require 4 Food and 8 Crystals each.
- Goal 2: Return the lute to a dwarf
- The lute is located behind the two purple trolls. Return it to the dwarf at the gate once collected.
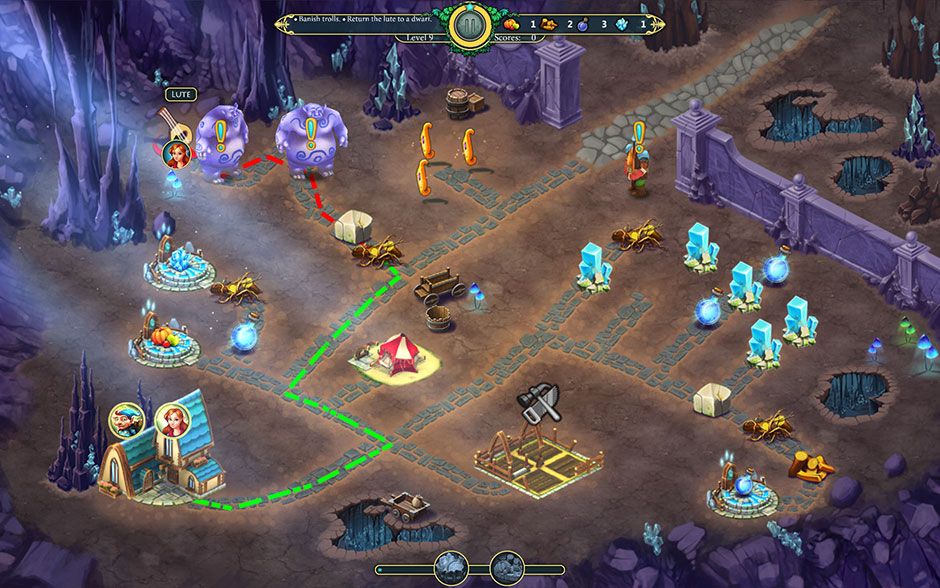
Elven Legend 2 – The Bewitched Tree Level 9 – Lute Location
Level 10 – Royal Audience
Aerin finds herself within the Kingdom of Dwarves. Once friends and allies of the elves long ago, the dwarves have since altogether vanished. An opportunity to discover the reason why presents itself.
Mission:
- Goal 1: Repair a bridge
- Speak with the King toward the upper left to learn of what happened. He will give you permission to carry on. You will need 20 Wood once you reach the bridge to repair it, so place emphasis on gathering Wood resources in this level.
Level 11 – Travel Arrangements
A dark place awaits Aerin. Within the dwarf’s storage lie the makings of siege wagons. However, she must first sort the rubbish from the useful components.
Mission:
- Goal 1: Prepare wagon
- Half the level is covered in darkness. Rebuild the Farm and Sawmill on the way down to the first Lamp. Aerin will use magic to light the Lamps. Lamps don’t require a resource cost, however you will need to clear obstacles to reach them.

Elven Legend 2 – The Bewitched Tree Level 11 – Lamp
Level 12 – Caravan Arrived
The journey is quiet as Aerin leads the wagon safely to the Town of Dwarfs. However, at the gates, an unpleasant surprise awaits them. Monsters block their path!
Mission:
- Goal 1: Take the wagon inside the town
- You can move the wagon in increments as long as the road is clear. Once cleared, select the Wagon Places highlighted on the map to move it along the path.
Level 13 – Siege
Trolls lay siege to the Town of Dwarfs. Not knowing what resources they lack, the dwarves focus on supporting defenders who guard the wall and laying siege to their enemies.
Mission:
- Goal 1: Stop catapults
- Each catapult requires 10 Wood and 10 Food to stop. You will need to use Griffin to remove orcs that block your path. There are three catapults total, each on the lower portion of the map.
Level 14 – Crystal
Upon bidding farewell to her dwarven friends and allies, Aerin continues to search for a way out. Travelers once left through a narrow opening which has since been blocked by boulders. However, rays of light still shine through the rocks. Is it still possible for Aerin to leave this way?
Mission:
- Goal 1: Remove the blockage
- You do not need extra resources to reach the crystal. You only need to clear the path to reach it. Much like the Lamps in Level 11, Aerin will take care of the rest with magic.
- Goal 2: Take the crystal
Level 15 – Who Took My Spectacles?
While searching for the way out, Aerin and company wander into one more citizen of the underground empire.
Mission:
- Goal 1: Help the mole
- The Glasses the mole requires have been split into three pieces. Once you acquire them, return them to the mole. Their locations are shown below.
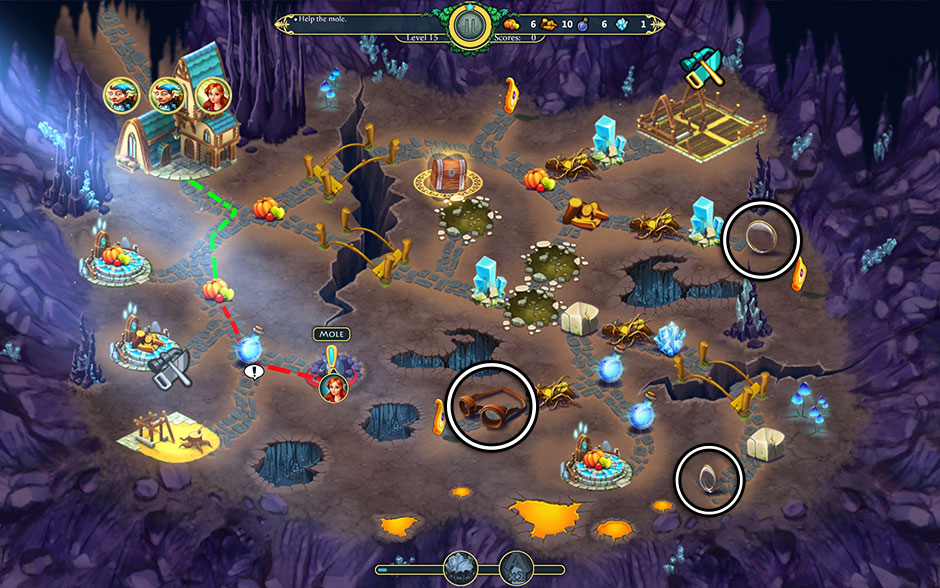
Elven Legend 2 – The Bewitched Tree Level 15 – Glasses Parts Locations
Level 16 – Way Out
The company finally finds a way out of the underground caverns. But where does this road lead? What lies above ground?
Mission:
- Goal 1: Banish the cave troll
- Banish the large red cave troll by using the Horn. You will need to clear a path to reach it.
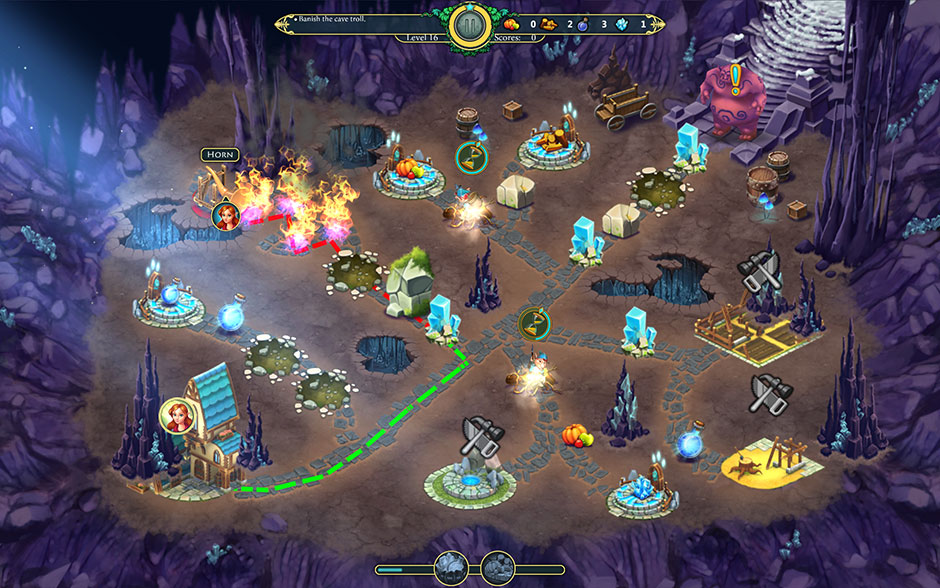
Elven Legend 2 – The Bewitched Tree Level 16 – Horn Location
The Northern Lands: Level 17 – 24
Level 17 – Cold Welcome
It’s cold outside. Was Aerin really underground for so long?
Mission:
- Goal 1: Find the passage
- As you clear Snowdrifts, you will either clear the path, or reveal an impassable Rock blocking it. Tip: Clearing Snowdrifts does not cost resources, and you can reach the Bridge at the far end without clearing the large boulder.
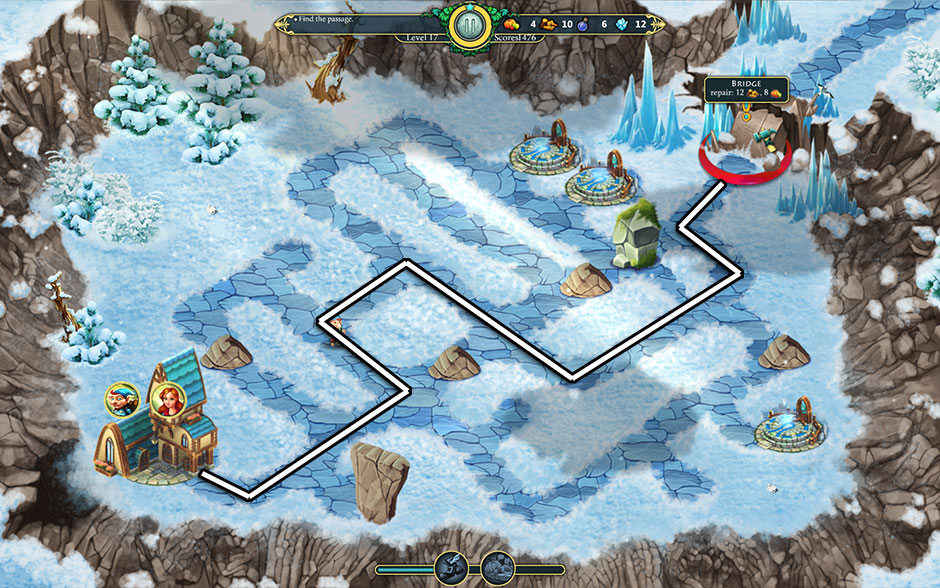
Elven Legend 2 – The Bewitched Tree Level 17 – Path to the Bridge
Level 18 – Northern Folk
Upon reading the riddle inscribed on the stone, Aerin finds herself within a village beneath the shelter of the snowy mountains. The citizens of this place have been isolated for a very long time.
Mission:
- Goal 1: Repair farms
- Goal 2: Make a dish for an ogre
- The Pot of Food is located north, not far from the ogre. You will need 20 Food and 20 Water resources to make the dish.
Level 19 – Struggle of Elements
Mortessa had tried to take control of the northern citizens, and having been denied that control, unleashed her minions upon them. The villages of the north are now filled with monsters which Aerin must face.
Mission:
- Goal 1: Banish the ice giant
- Clear the path to the Tavern and the Brazier to reveal important clues. Aerin will collect the Torch from the Tavern the first time she visits. When you gather enough Wood (20) to build bonfires, before you light them, Aerin will need to visit the Tavern again to collect Cup of Tea. Only when she has this (available for a limited time) will she be able to withstand the cold and light the fires.
- Tip! Build up all the Sawmills, then build the Mine. When the Mine has turned out enough resources, upgrade your Sawmills.
- Tip! Your x2 Production boost is extremely useful here.
Level 20 – Eternal Defender
The village is overwhelmed by monsters. It’s up to Aerin to come up with a plan that will rid the village of monsters for good.
Mission:
- Goal 1: Banish all the monsters
- Rebuild Griffin’s House. Griffin is essential for banishing all monsters.
- Goal 2: Build Griffin statue
- The statue is located in the center of the village and costs 10 Wood, 15 Food, and 10 Crystal to repair.
Level 21 – Noble Monster
Along the path Aerin encounters a formidable boulder blocking her way. Beside it sits a giant Yeti – the origin of the barrier.
Mission:
- Goal 1: Build hut for Yeti
- Repairing Yeti’s House will cost 15 Wood, 20 Food, 20 Crystal, and 10 Water resources. Once the House has been finished, Yeti will be able to move the large boulder blocking your path.
Level 22 – Mystery of the Peak
Atop the mountain shines a mysterious light. Perhaps it’s part of a larger magic crystal, pieces of which Aerin has already obtained.
Mission:
- Goal 1: Take part of the crystal from the top
- The goal for this level is quite simple. Clear the path until you make it to the top.
Level 23 – Witch’s Accomplices
Upon descending the mountain, Aerin and her party fall victim to a trap. Mortessa’s minions surround the camp, preventing anyone from escaping.
Mission:
- Goal 1: Banish all monsters
- Rebuild Griffin’s House. Griffin is the only one who can banish the Winter Beast and the Yetis.
- Goal 2: Get out of the Northern lands
- The Gate Key is located to the south, but you will need to get past the Winter Beast using Griffin first. Once you acquire the Gate Key, you can open the Gate in the rock to the left.
Level 24 – Sea Lane
Aerin and her company find themselves along the sea coast after escaping the Northern lands. There’s only one way to leave now: by water.
Mission:
- Goal 1: Sail on the ice floe
- You will need to clear the Ice Rock (20 Food, 20 Crystal) to access the Ice Floe. Tip: This level features a Large Mine. Once rebuilt, it will give 5 Crystal at a time for a grand total of 25.
The Temple of Purity: Level 25 – 32
Level 25 – Rest in the Tropics
Their voyage ends just in the nick of time as the ice floe melts to liquid. Griffin nearly got his wings wet! The travelers find themselves in a warm jungle – a pleasant contrast from the cold mountains from before.
Mission:
- Goal 1: Save up 80 food
- The goal here is quite simple. Rebuild the Farms as quickly as possible and use the resource multiplier to complete this goal quickly.
Level 26 – Mysterious Return
Aerin makes her way deep into the jungle to aid the natives. However, another surprise awaits her…
Mission:
- Goal 1: Find the passage to the Temple of Purity
- The trick here is to repair the Healer House. The Healer is necessary to banish the Venuses. Each one has a cost of 2 Food and 4 Crystal resources.
Level 27 – Tribute
The road to the Temple of Purity is long and arduous. In order to reach the temple, Aerin needs to pay homage to the spirits of the jungle.
Mission:
- Goal 1: Make a tribute on all the altars
- There are four altars located along the path, and each has a different requirement. They are as follows:
- Jungle Altar 1: 5 Crystals
- Jungle Altar 2: 5 Food, 5 Crystals
- Jungle Altar 3: 5 Wood, 5 Food, 5 Crystals
- Jungle Altar 4: 5 Wood, 5 Food, 5 Crystals, 5 Water
Level 28 – Riddle
The Temple of Purity is an ancient structure containing its own aura and secrets. Those who wish to enter must have a reason, and only the bravest will be able to solve the riddle guarding the entrance.
Mission:
- Goal 1: Read the jungle riddle
- Have Aerin examine the totem Sign near the beginning of the area first. Each Totem contains a portion of the jungle riddle and must be read by a different person before you can proceed into the Temple.
- The Totem of Diligence must be read by a Worker.
- The Totem of Health must be read by the Healer.
- The Totem of Brave must be read by the Griffin.
- The Totem of Volition must be read by Aerin.
Level 29 – Destroyed Altar
Upon entering the temple, Aerin discovers the source of all the jungle’s pollution.
Mission:
- Goal 1: Weed out
- You will need the Healer in order to get rid of the Venuses and the Big Weed. It will cost 10 Food, 20 Crystals, and 20 Water.
- Goal 2: Restore the Altar of Purity
- You can do this once you clear the Big Weed. It will cost 10 Wood and 10 Food resources.
Level 30 – Mysteries of the Crystal are Cleared Up
The weeds won’t give in so easily. The aggressive vines ensnare the village and threaten the native residents. If Aerin can rescue the citizens, the Shaman promises to share his hidden knowledge.
Mission:
- Goal 1: Come to the village
- Goal 2: Remove vine
- Each Ravenous Vine requires Princess Aerin and 10 Water to remove.
Level 31 – Lazy Bar
After bidding farewell to the natives and the Shaman, Aerin traverses on further, only to discover a large, lazy obstacle blocks her path.
Mission:
- Goal 1: Push snail from the passage
- You will need to clear Lianas in order to gain access to both the Leaves and their placement locations. The location of each Leaf needed is shown below.
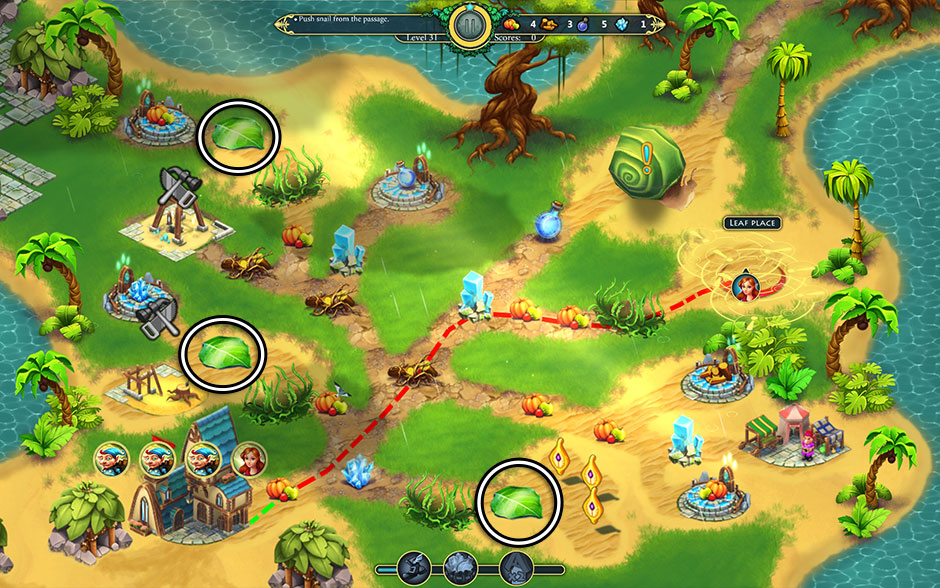
Elven Legend 2 – The Bewitched Tree Level 31 – Leaf Locations
Level 32 – Way Home
At last the long voyage has come to an end, and Aerin finds herself within the Forbidden Garden. But what awaits her? Only fate knows.
Mission:
- Goal 1: Restore promenade
- Repair the Bridge for 12 Wood and 8 Food in order to gain access to the promenade. Each Ladder Part section requires 20 Wood to fix.
The Forbidden Garden: Level 33 – 40
Level 33 – Treants
Upon reaching the gates of the Forbidden Garden, Aerin discovers the fate of the Treants. They have since been transformed into terrible creatures, with no memory of their past lives.
Mission:
- Goal: Open the Gates
- Clear the Treants blocking the gate with Aerin. Each requires 8 Food and 12 Crystals. Once you reach the Gates, they will require 10 Crystals and 10 Water to open.
Level 34 – Drooped Bouquet
A great deal of the Forbidden Garden was destroyed by Mortessa, to the frustration of a certain order which guarded it. Aerin will need to overcome many trials in order to bring the garden back to life.
Mission:
- Goal 1: Water flowers
- Place emphasis on rebuilding the Wells. Each Flower requires 20 Water to restore.
Level 35 – Cleaning the Garden
The bewitched Treants no longer tend to the garden, resulting in numerous weeds taking hold over its entirety.
Mission:
- Goal 1: Remove all mushrooms
- Clear each of the mushrooms with Princess Aerin using 10 Crystals and 12 Water.
Level 36 – A Friend in Need is a Friend Indeed
It’s in the garden that Aerin meets her old friend, the Guardian of the Forest. However, he’s imprisoned, and unable to escape on his own.
Mission:
- Goal 1: Water flowers
- Each flower requires 20 Water.
- Goal 2: Save the Ancient Treant
- Clear the Big Stone (10 Food, 10 Crystals) and the Liana Cage (20 Food) to free the Ancient Treant.
Level 37 – Help From the Garden
The opening to the Tree of Life is destroyed by a traitor. Aerin will need to find another way to reach the top.
Mission:
- Goal 1: Water flowers
- Each flower requires 20 Water.
- Goal 2: Water leaves
- Each Leaf requires 10 Water. Place emphasis on repairing the Wells and collecting from the Water Tower.
Level 38 – Monsters in the Garden
An entire horde of Mortessa’s monsters inhabit the Forbidden Garden. Aerin, along with her trusty friend the Griffin, must stop the creatures.
Mission:
- Goal 1: Banish all the trolls
- Cave Trolls require the help of Griffin and cost 4 Food and 8 Crystals to banish.
- Goal 2: Banish all monsters
- The remaining monsters are Yetis and Winter Beasts. Each requires Griffin and 4 Food and 8 Crystals to banish.
Level 39 – Punishment
At the entrance to the Tree of Life, Aerin encounters a hollow. Within lies the Pool of Life. Princess Aerin must take the good with the bad; the unknown lies within.
Mission:
- Goal 1: Banish the evil Treant
- The Giant Treant can only be attacked via its large hands. Each Treant Hand requires Princess Aerin, as well as 10 Food, 20 Crystals, and 20 Water.
- Goal 2: Unspell Treants
- The lesser Treants require Aerin and 8 Food and 12 Crystals to dispel.
- Goal 3: Banish all monsters
- The remaining monsters require the help of Griffin. You will need 2 Food and 4 Crystal each to banish them.
Level 40 – Final Battle
A busy hum emanates from the Tree of Life. The dreadful witch Mortessa is attempting to poison the Life Spring. It’s just as she’s finishing this spell that Aerin arrives. The fate of the Elven Kingdom rests on her shoulders!
Mission:
- Goal 1: Beat Mortessa and save the Tree of Life
- Focus on building up all your resources. Collect from all the limited pools’ resources. Resource multipliers are very important here!
- Phase 1: Have Aerin light the pylons using 15 Wood, 20 Food, 20 Crystals, and 10 Water. Once all the pylons have been lit, Phase 2 will begin.
- Phase 2: Disable the pylons using 10 Food, 20 Crystals, and 20 Water each.
- Phase 3: Have Princess Aerin confront and defeat Mortessa using 10 Food, 20 Crystals, and 20 Water resources.
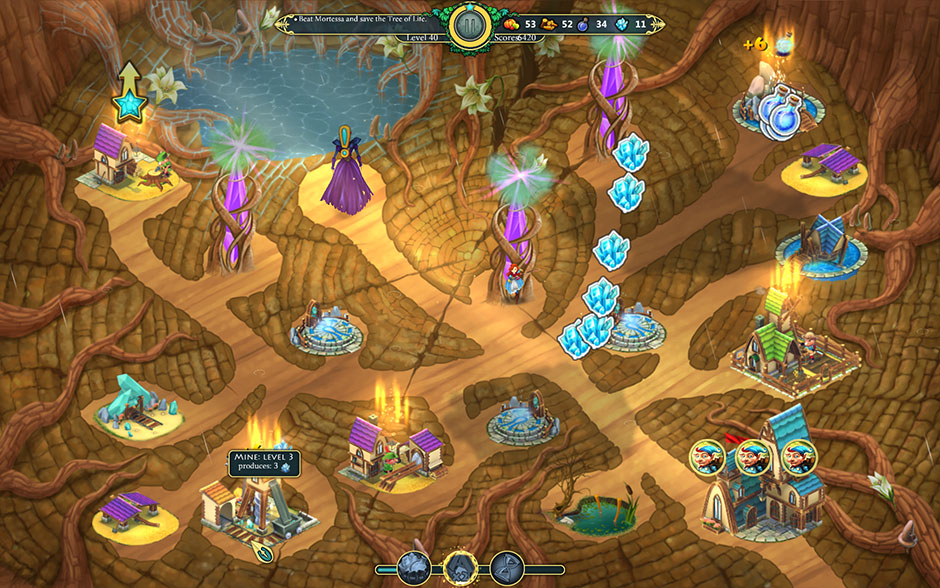
Elven Legend 2 – The Bewitched Tree Level 40 – Fighting Mortessa
Congratulations! You’ve completed our Elven Legend 2 – The Bewitched Tree Walkthrough! For more great tips and tricks, visit our blog!
- Delicious – Emily’s Hopes and Fears Walkthrough
- Big City Adventure – Shanghai Walkthrough
- Building the Great Wall of China 2 Walkthrough
The Elven Legend 2 – The Bewitched Tree Walkthrough is meant as a guide and does not contain cheats, hacks, or serials.


