Love Story – The Beach Cottage is a tale about memories and lost love. The game is a point-and-click adventure. You will travel along a beach as Sandra, and our walkthrough will make her journey a touch easier. It has moments of difficulty, but the story is definitely worth it! Our “Love Story – The Beach Cottage” walkthrough will help guide you through Sandra’s journey as she rebuilds her father’s cottage. Her story welcomes exploration and curiosity. Along the way, we will provide you with a few tips and tricks to make her journey, and yours, a little easier. If you find yourself needing help, refer to this walkthrough for a helping hand and a few quick cheats.
Contents Love Story – The Beach Cottage Walkthrough
- Tips, Tricks and Cheats!
- Chapter 1: The Beach House
- Chapter 2: The Beach
- Chapter 3: The Magic Cave
- Chapter 4: The Boat
- Chapter 5: The Lighthouse
- Chapter 6: Charlie’s House
Tips, Tricks, and Cheats!
There are a few tips that are essential for the game. The in-game tutorial will provide you with the commands and most useful tricks. However, if you forget a tip, you can probably find it here!
- An object can be grasped when your cursor turns into a hand.
- Items in your inventory can be used on an object when the gears icon appears.
- If you need a hint, then use the lantern.
- A magnifying glass will appear when you can examine an object closely.
- The memory chest holds important notes and clues.
- The messages in a bottle can be found next to hints.
- An arrow will materialize when you can move to a new area.
- If an item is sparkling, then that item requires an item from your inventory.
Chapter 1: The Beach House
To begin, you will need to find several hidden items in the first scene.
- Grab the wooden plank, stone, four plates, and screwdriver.
- Click on the mailbox and grab the plate
- Break the right lamp with the stone and grab the plate.
- Zoom in on the gate and use your screwdriver on the lock.
- Drop the plates on the lock.
Arrange the plates so that the patterns on the plates fit those that are on the lock.
Travel through the gate.
- Grab the board and take a look at the ladder.
Travel straight.
- Zoom in on the porch railing.
- Grab the rail.
- Zoom in on the pile of dirt.
- Grab the thin piece of wood.
- Zoom in on the steps.
- Grab the door knocker.
Travel to the left.
- Zoom in on on the work table near the left side of the house.
- Grab the hammer, birdseed, wrench, and rope.
- Grab the shovel against the wall.
- Leave the work table.
- Grab the board. The board is directly beneath the work table and to the left of the water pump.
- Zoom in on the bag near the right corner of the home.
- Grab the wooden peg.
Travel right twice.

Check the message in the bottle
- Grab the wooden peg.
- Grab on the bottle. Remove the letter from the bottle.
Travel down twice.
- Zoom in on the ladder.
- Drop your wooden pegs and rope onto the ladder.
Travel straight once. Travel left once.
- Drop the ladder beside the birdhouse.
- Climb the ladder.
- Drop the birdseed in the birdfeeder.
- Grab the key.
Leave the ladder and travel to the left.
- Select the door.
- Set the handle on the door.
- The shovel will clear the sand from your path.
- The key will allow you to go inside.
Travel inside.
- Grab the piece of glass beneath the cabinet on the left.
- To the right and below the first piece of glass is another piece of glass.
- Above the first piece of glass is a cabinet door. Open the door.
- Inside the door are a piece of glass and a nail.
- Zoom in on the table with the lamp.
- Grab the glass and photograph.
- On the table’s lower shelf is the final piece of glass.
- Pick up the picture frame in the center of the floor.
- Zoom in on the wall to the right of the archway.
- Place the nail on the wall.
- Hammer the nail.
- Hang the picture frame and photograph.
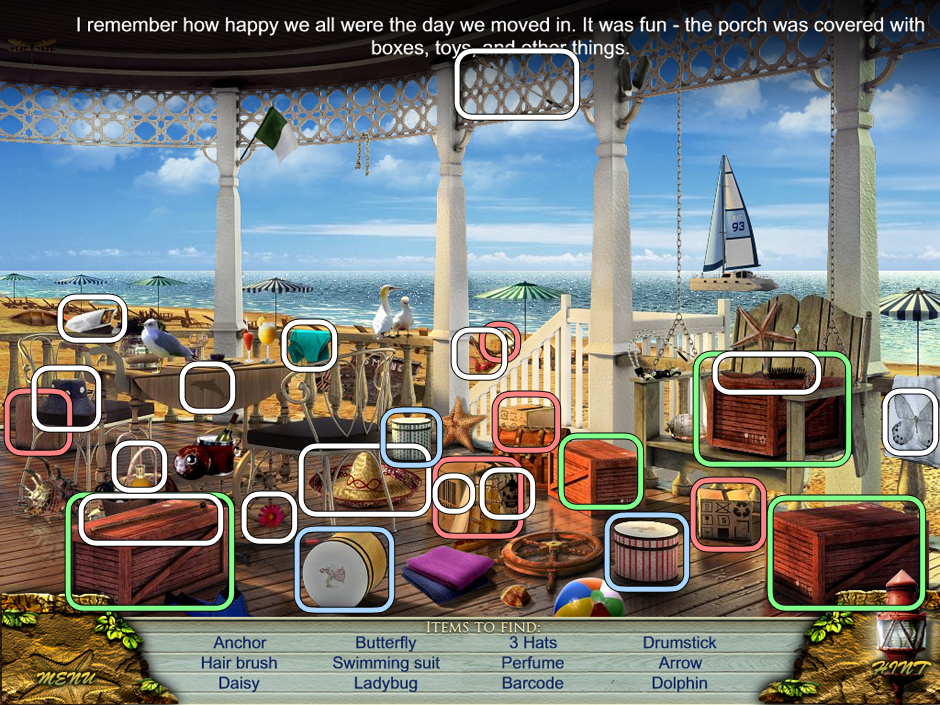
Hidden Object location Love Story – the Beach House. Can you find all items
Congratulations! You will be rewarded with a hidden objects puzzle. See the picture for the solution.
Chapter 2: The Beach
This chapter begins with a treasure hunt to find hidden shells. Some of them are in the open, but other shells must be uncovered using objects in the room.
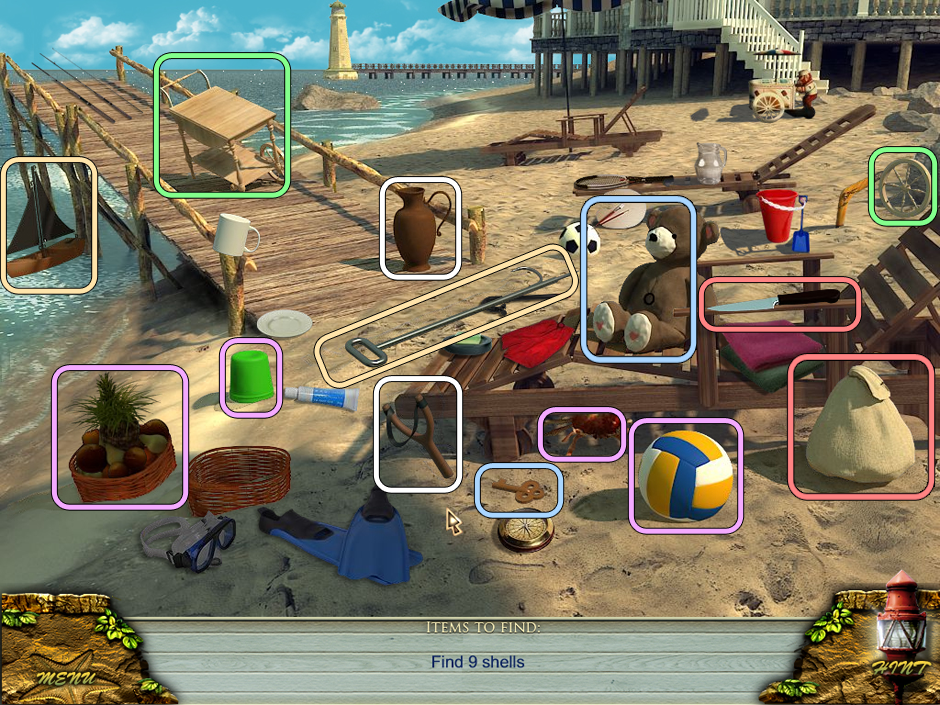
Hidden Object Scene – find the Shells. Did you find them without help?
- Place the wheel, on the far right side, on the cart.
- Break the vase with the slingshot.
- Use the fishing hook on the sailboat.
- Grab the key and drop it on the teddy bear.
- Cut the bag with the knife.
- Grab the green bucket, fruit basket, crab, and beachball and find the shells underneath them.
Open the treasure chest for a new puzzle!
The shells must be matched by color to the lights. The solution is never the same. Good luck!

Love Story – the Boat Shells minigame
- Grab the scroll.
The 12 matching items in the campground can be difficult to find. Refer to the guide if you need help!
Once you acquire the necklace, hand it to Charlie.
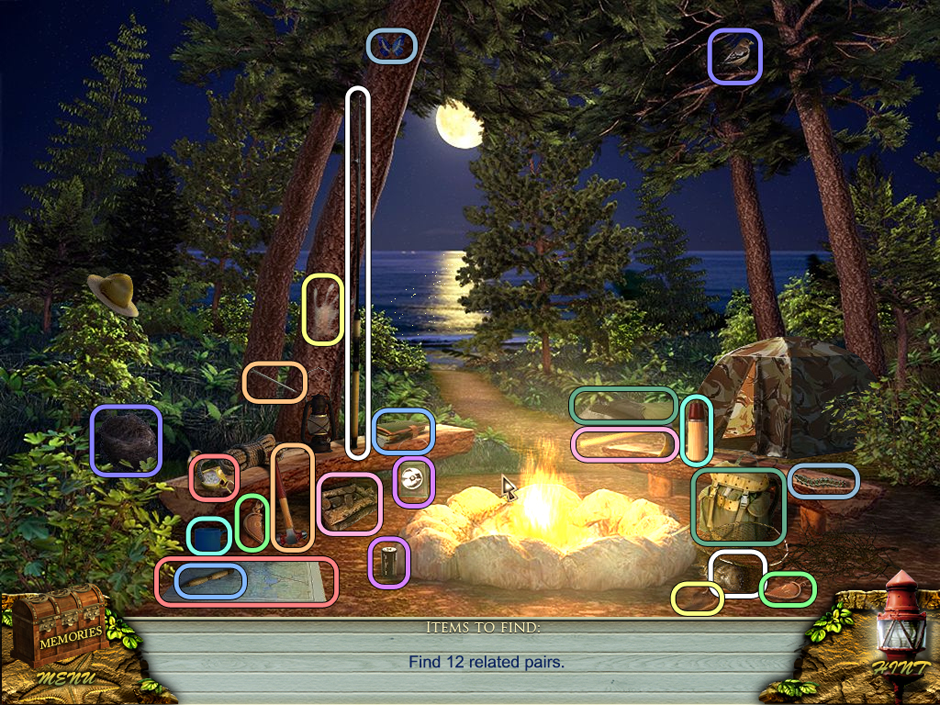
Hidden Object Scene – find the 12 items and recover the necklace
A panel, containing the next puzzle, will appear on the right wall.
- The combination sequence is: 4, 7, 8, 9, 1, 2, 5, 3, 6.
Travel straight once.
- Zoom in on the glass shelf.
- Grab the duct tape.
- Look at the book.
- Zoom in on the carpet and grab the screw.
- In the doorway, use the duct tape on the wire.
Travel right once.
- Zoom in on the sink.
- Grab the scissors and pump nut.
Travel down once.
- Zoom in on the doors. The scissors will cut the string.
Travel outside.
- Grap the pump handle and chain near the swing.
- Zoom in on the broken chair and grab the screw.
- Zoom in on the porch.
Travel down once and travel right once.
- Zoom in on the shutter.
- Place the two screws in the holes. Screw them tight with the screwdriver.
- Open the upper cupboard.
- Grab the knife and funnel.
- Next to the sink, grab the washrag on the counter.
Travel down three times. Travel left once.
- Grab the pump.
- Drop the handle and pump nut onto the pump.
- The wrench will tighten both items.
- Grab the pump to pump water.
- Drop the washrag beneath the pump to make it a wet washrag.
Travel to the right twice.
- Grab the bottle and take the note.
Travel down once.
- Open the door.
Travel up once.
- Travel into the kitchen.
- Wipe off the chest with the wet washrag.
- Find the two locks on the left. Use the knife on the two locks.
- Grab the right lock to open the chest.
- Take the note.
The note will prompt the next puzzle! Refer to the solution image to find all of the hidden items.
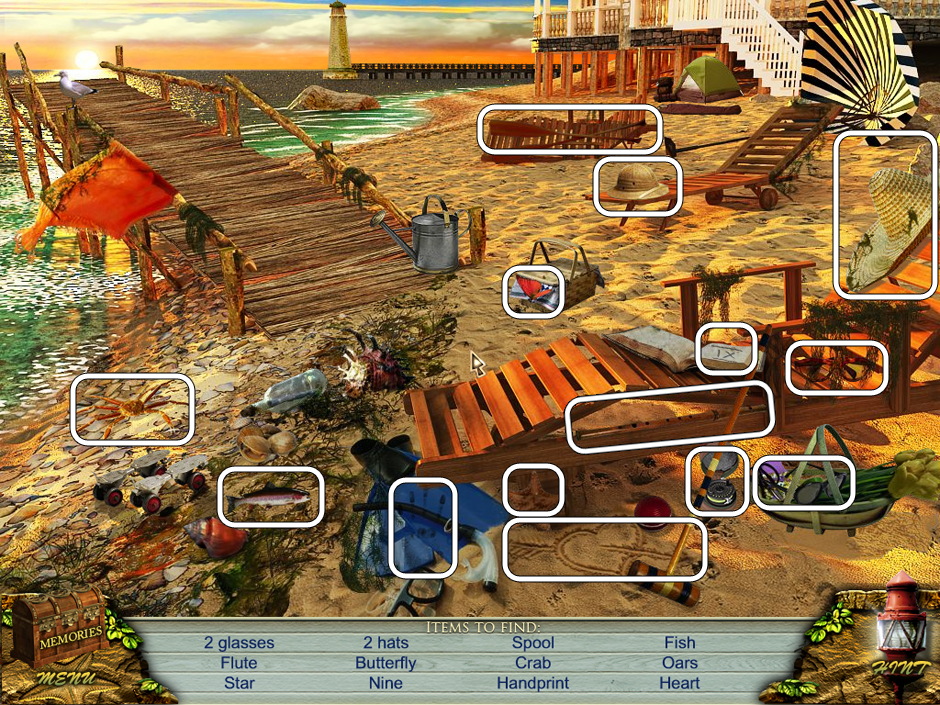
Hidden Object Scene at the beach – find all items
- To open the bottle, grab the nail and pry the cork off.
- Grab the message.
Chapter 3: The Magic Cave
It is time to find the magic cave! First, we need to discover its exact location. Travel straight in the direction of the lighthouse.
The 12 map pieces are all beneath the tide pool that leads to the cave.
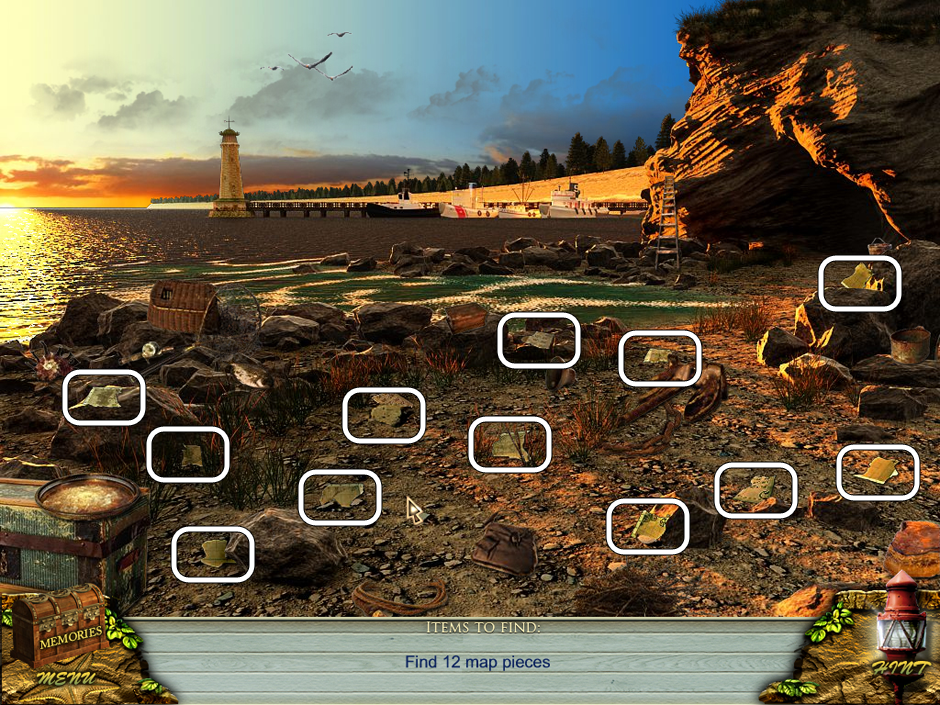
Hidden Object Scene – Collect the 12 puzzle pieces
Once the pieces are collected, another puzzle appears!
- Move the stones so that the picture on the stone is the opposite of the one on the map piece.
- A completed map will manifest. Well done!
- Move the cursor over the map coordinates that correspond to the coordinates on the right.
The map will designate the location of the magic cave.
Travel into the cave.
- There are 16 stones inside the cave.
- After collecting the stones, use the magnifying glass to reveal the storage compartment.
- Assemble the mosaic with the stones.
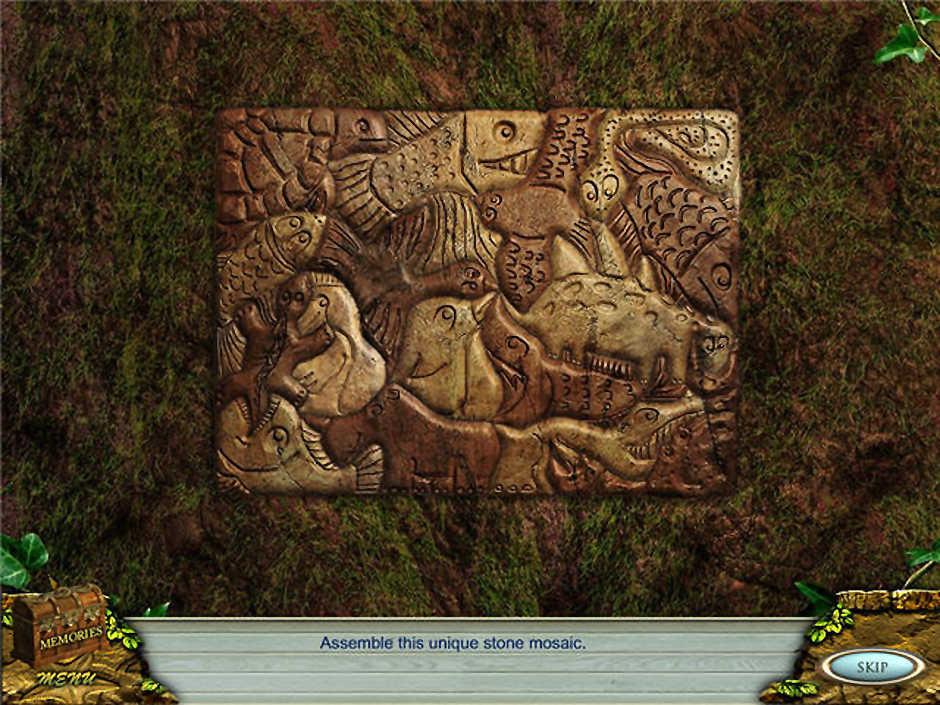
Unique Stone Mosaic puzzle solutions
- Leave the map in the storage compartment.
- Select the trunk and grab the crowbar.

Hidden Object Scene – Find the 16 unique stones
Travel down three times.
- Grab the stone on the left side of the house.
- The crowbar can lift the stone.
- Grab the wooden board.
- Drop the chain on the head of the axe.
- Grab the winch and spin the crank.
- Grab the axe head.
Travel up twice. Travel through the doors onto the porch.
- Place the boards onto the porch.
Travel to the beach.
- Zoom in on the green bottle on the left side.
- Grab the bottle. Break the bottle on the stone.
- Grab the note and half the necklace.
Travel up once.
- Grab the crabs to begin a new puzzle.
This puzzle requires you to move the stones out of the way of the crab. Stones with four arrows can move in any direction. Stones with vertical lines can only move up, and stones with horizontal lines can only move side-to-side.
There are 16 fishing supplies that you need to collect. Refer to the guide if you need help!
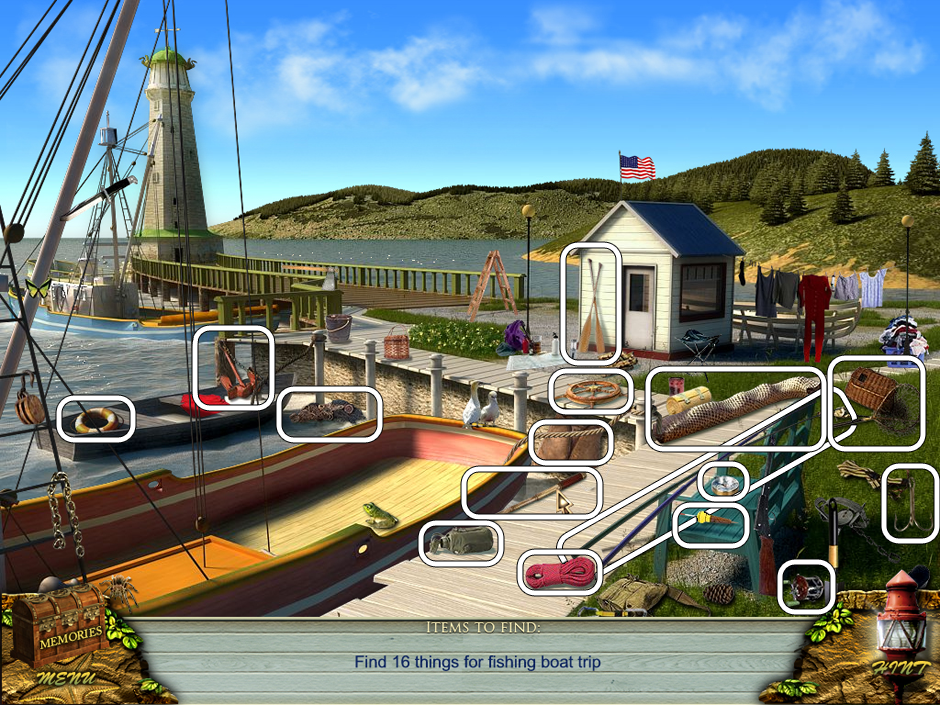
Hidden Object Scene – Can you find all fishing supplies?
Chapter 4: The Boat
After finding all of the supplies, the small house on the dock will become unlocked. Travel to the boat house.
- Find the fourteen hidden items.
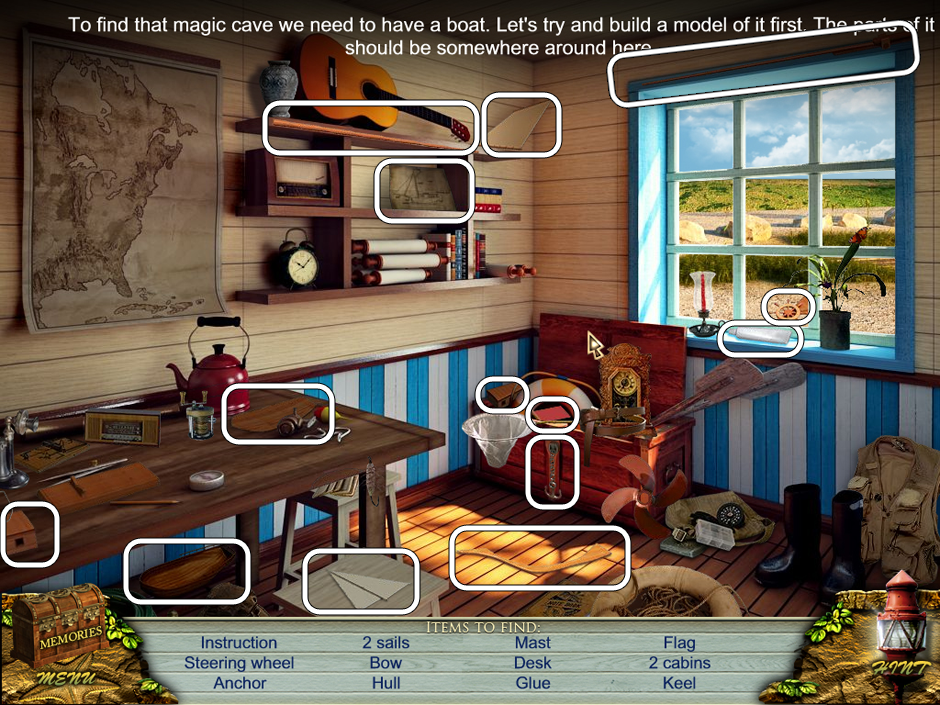
Hidden Object Scene – Find the 14 Boat pieces
- With the pieces, put the boat together. First few we already combined together, just follow the numbers for adding the other pieces.
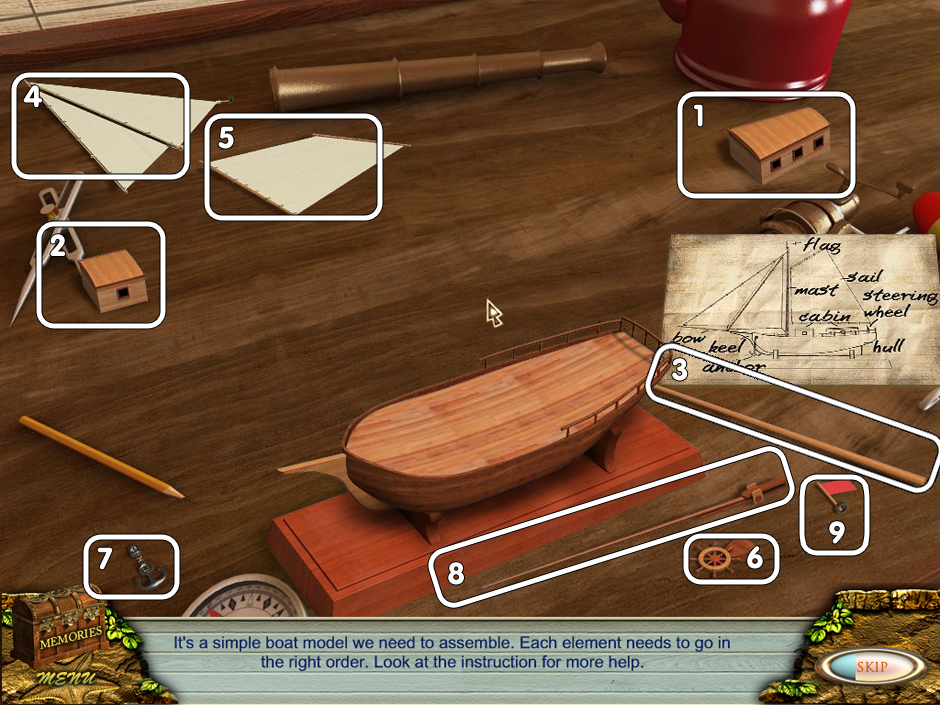
Love Story – The Beach minigame Ship
- Hand the ship to Charlie.
- Grab the fishing rod near the bench.
- Zoom in on the boat.
- Grab the wire cutters and fuel canister.
Travel down once.
- Grab the net.
- Grab the matches inside the vest pocket.
- Cut the net with the wire cutters.
- Grab the telescope piece.
Travel up once and into the boat house.
- Zoom in on the table beneath the window.
- Remove the lid from the oil can.
- Drop the funnel and fuel canister onto the oil can.
- Grab the oil can.
- Grab the boat from the top shelf and the telescope piece.
Travel down once. Travel right once.
- Zoom in on the steps.
- Using the crowbar, pry up the board.
- Grab the number eight.
- Grab the rope lying on the bench seat.
Travel down four times.
- Zoom in on the distant steps.
- Drop the axe head and rope on the pole.
- Grab the axe.
- Chop the hull of the ship.
- Pick up the net.
Chapter 5: The Lighthouse
It’s time to go to the lighthouse. Somehow, we need to get it working once more.
Travel up twice and travel left once towards the lighthouse.
- Zoom in on the hole in the pier.
- Grab the key with the net.
- Cut the key free with the knife.
- Zoom in on the water.
- Drop the net on the bottle.
- Grab the note.
- Fish with the rod. You will catch a fish!
Travel up once.
- Grab the lantern off of the wall of the lighthouse.
- Using the oil can, fix the hinges on the door.
- The key will open the door.
- Grab the door to start a puzzle!
This puzzle is different for every playthrough. The trick is to line the middle circle with the other four circles so that the numbers match.
- You will receive a set of instructions.
- Hit the balloons following the instructions.
- The key will unlock the door.
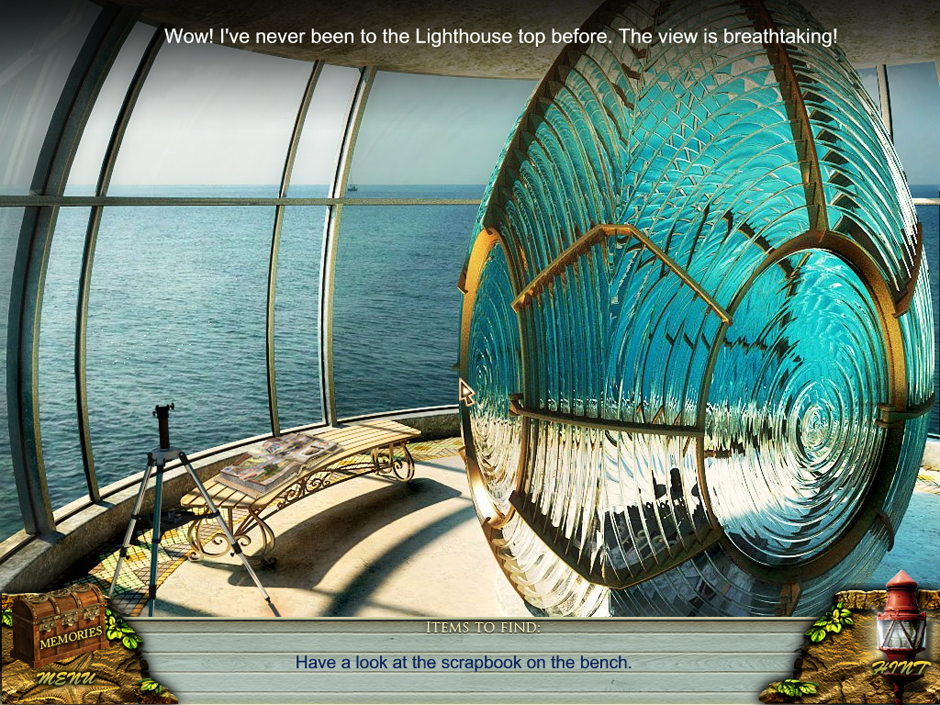
Look at that beautiful view – Love Story – the Beach Cottage
Zoom in on the scrapbook on the bench.
- Uncover the hidden items.
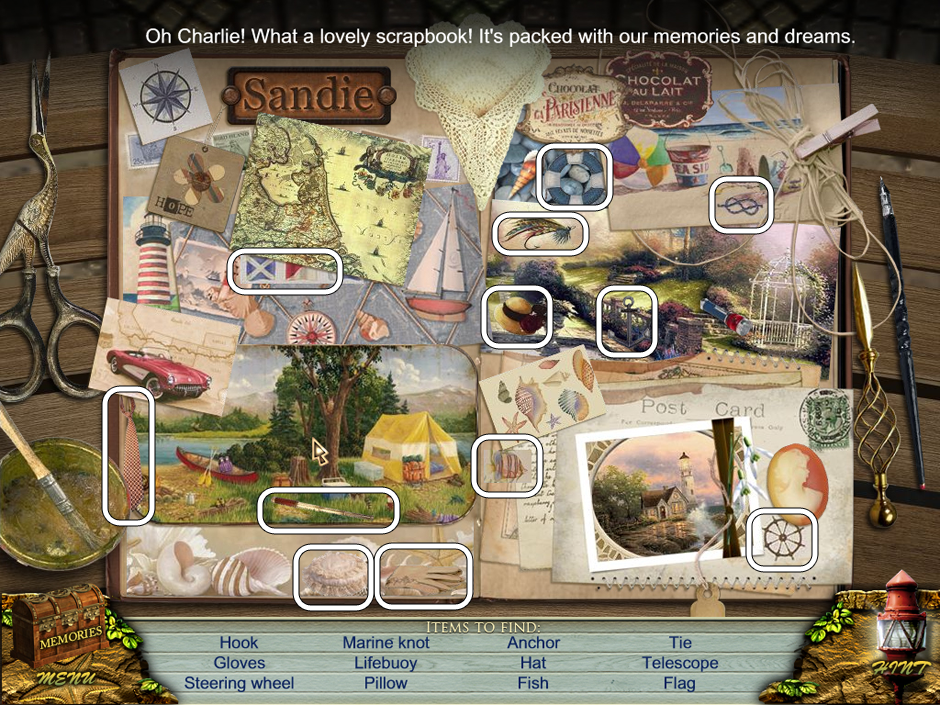
Find the 12 Scrapbook pieces
Place the telescope to open a new puzzle!
- Simply rotate the pieces of the puzzle to complete it. The finished puzzle is a sail ship.

Minigame telescope – a Sail ship
Travel inside the lighthouse.
- Zoom in on the box.
- Grab the brush.
Travel up the stairs.
- Grab the spatula on the floor near the vine.
Travel down four times. Travel right once. Travel up twice into the cave.
- Zoom in on the left side of the wall.
- Drop the lantern onto the hook towards the right.
- The matches will light the lantern.
- Zoom in on the secret hiding place to the left of the lantern.
- Remove the debris with the brush.
- The spatula can open the hiding place.
- Grab the letters.
Chapter 6: Charlie’s House
Charlie’s house holds something important for Sandra. The home may unlock important memories, but we are sure to find useful equipment, too!
Travel down twice and left once.
- The rod and fish will attract the cat if used on the tree.
- Zoom in on the steps.
- Grab the telescope piece beside the largest step.
Travel through the door.
- Zoom in on the distant wall.
Travel through the doorway.
- Grab the dumbbell between the bed covers and the nightstand.
Zoom in on the bookshelf for your next puzzle! You need to move books away from the doorway to reveal it.
It has more solutions – this is a winning option.
- On the top, place the books in the following order:
- longer brown and gold book,
- shorter gold and brown book,
- exposed-pages book,
- red book,
- green book,
- and the blue book beneath the previous four.
- On the bottom, place the books in the following order:
- red book,
- thick black and red book,
- pink book,
- brown and gold book on top,
- thick book on the bottom.
Travel down four times. Travel into the boat house.
Grab the kettle to begin a new puzzle! The kettle should be filled to the red line.
- Grab the pot.
- Grab the pitcher and fill kettle.
- Grab the cup and fill pitcher.
- Grab the kettle and fill cup.

Minigame Water Transfusion
Zoom in on the map. Grab number two.
Travel down once. Travel right once into Charlie’s house.
- Zoom in on the vase.
- The kettle will fill the vase.
- Grab the telescope piece.
Travel down three times. Travel left once. Travel up once. Travel into the lighthouse.
- Zoom in on the window.
- The dumbbell can prop the window open.
- Grab the valve.
Travel down three times. Travel right once. Travel down the stairs.
- Zoom in on the grate above the park bench.
- Take off the clamps.
- Grab the grate.
- Use the valve to turn off the water.
- Zoom in on the fountain.
- Grab the clock hand from the fish’s mouth.
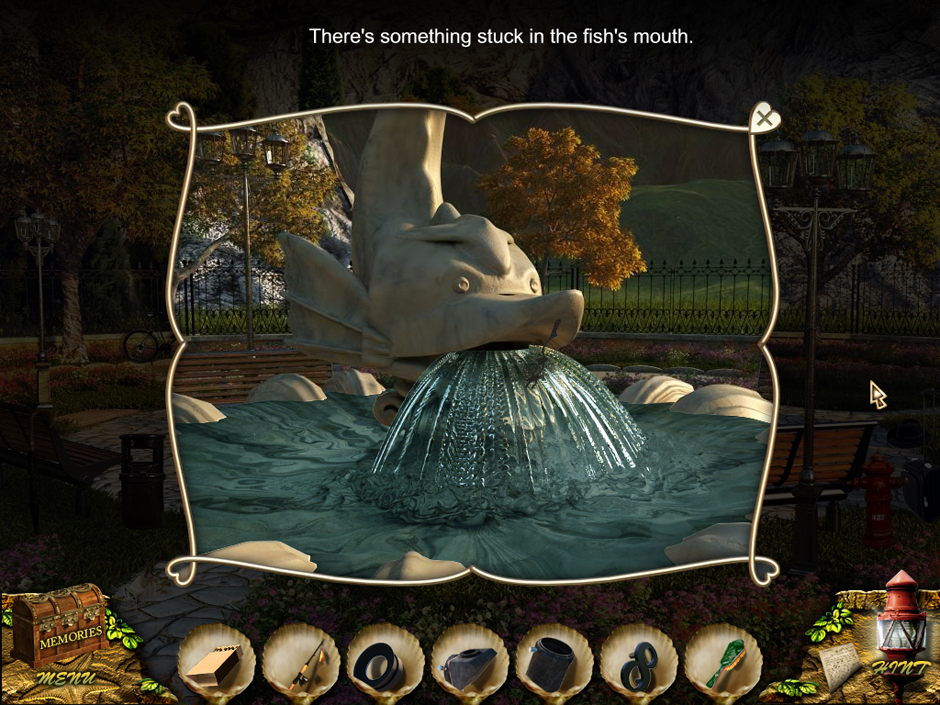
Hidden object item – did you watch the fish mouth?
- Zoom in on the clock.
- Drop the number two, number eight, and the clock hand.
Grab the gears to start a new puzzle
Remove the stone by dragging it across the tubes. The gears will move into place.
- Set the clock to 7:35.
- Grab the telescope piece.
Travel down twice. Travel left once. Travel up once. Travel inside the lighthouse. Travel up the stairs to the top.
- Zoom in on the telescope.
- Drop the telescope pieces onto the telescope.
- Zoom in on the telescope. You will see Charlie.
- Grab the telescope.
Travel down once.
- Zoom in on the window.
- Grab the key.
Travel down three times. Travel right once. Travel left once into Charlie’s house. Travel into Charlie’s room.
- Zoom in on the desk.
- The key will open the desk.
- Grab the switch.
Travel down four times. Travel left once. Travel up once. Travel inside the lighthouse. Travel up the stairs.
- Zoom in on the glass.
- Drop the lamp and the switch into their proper places.
- Grab the clamps to open the device.
- Grab the wires to begin a new puzzle!
First some written help with your puzzle
- The topmost plug on the left is five.
- Beneath five is eight.
- Beneath eight is one.
- The lowest plug is seven.
- The topmost plug on the right is four.
- Beneath four is two.
- Beneath two is six.
- Beneath six is three.

Minigame wires – can you connect the wires?
If you enjoyed this walkthrough, consider one of our other guides! Delicious Emily’s Honeymoon Cruise walkthrough is full of rumors, intrigue, and is a blast to play.
Go to GameHouse to play this game!