Long live the cog! A world run by gears and the steam of progress awaits you in The Dreamatorium of Dr. Magnus 2. But not all is as it seems! Abductions, strange apparitions, and unsolved mysteries plague the air around the curious Dr. Magnus. Answers lie hidden away in the secrets of the Dreamatorium. Feel like there’s a wrench in your cogs keeping you from advancing? Let The Dreamatorium of Dr. Magnus 2 walkthrough oil your joints and guide you back to the path of progress!
Contents
General Tips & Tricks
In this section you’ll find various general tips, hints, and tricks to help guide you on your journey through The Dreamatorium of Dr. Magnus 2.
Four difficulty modes are available via the Options menu of the game: Regular, Advanced, Expert, and Custom. Regular mode features an included tutorial, quick hint and skip button recharges, active areas having a “glimmer” effect, as well as no missclick penalties within these areas, and examination items being indicated by a gold star in your inventory. Advanced mode also includes these features, however the hint and skip recharges are slower, and active zones are not indicated. In Expert mode, all of these features are disabled, with the exception of examination items still being indicated by a gold star. Custom mode will allow you to create your own difficulty mode!
The Extras button in the Main Menu will allow you to access Achievements, Concept Art, and Wallpapers.
- Items you pick up are stored in your inventory at the bottom of your screen. Your inventory bar can be locked into place by clicking the lock button in the upper left corner, otherwise it will minimize when you move your cursor away. Inventory items are marked in bold in the guide below.
- Unless you’re playing on Expert difficult mode, you will be able to use the Hint button when you become stuck. Hints take time to recharge after each use, but not to worry: The button will remain charged if you need to change locations.
- When you encounter a hidden object scene, you will need to find all the hidden objects indicated in the bar where your inventory is normally located to complete it. You may have to find objects by name, or even silhouette, depending on the scene’s goal. Items listed in orange often require an additional action or item combination to uncover. Hidden object areas are indicated with shining crystals.
- To the left of your inventory is your Journal. The Journal automatically keeps track of any clues or pieces of story you encounter as you progress through the game. The Objectives tab will highlight your current tasks. The Notes tab will keep track of any important clues you may uncover.
- Next to the Journal is your Map. This indicates your current position, and depending on your difficulty settings, also shows any active scenes you can access next. You can select any location on the map, so long as it’s not blocked, to fast travel to that location.
- Minigames you encounter will show their objective listed at the bottom of the screen. Depending on difficulty settings, minigames may be skipped after a certain amount of time has passed.
- The Amulet is located next to your Hint button. Use this over any glowing areas of similar outline to view scenes from the past.
- When your cursor changes into a magnifying lens, it indicates you can take a closer look at an area. Similarly, if your cursor changes into a hand, it indicates you can directly interact with an object, or add it to your inventory. The cursor changing into lips indicates you can talk with someone.
- Inventory items marked with a gold star indicates you can select them to take a closer look. Some items may simply need to be opened or examined to reveal a new inventory item. Others may require you to combine them with other inventory items to achieve a new item you’ll need. Depending on your difficulty, you may also see a gray star next to inventory items that can be combined later, but require additional components.
- Once acquired, the Multitool will be ever-present in your inventory. This item has a Knife, Screwdriver, and Scissors function. Not sure how to interact with an item? Try giving the Multitool a spin. It can be used for numerous purposes, and not always how you would expect.
- Hidden throughout the game are various collectibles, taking the shape of the Eye of Horus. These collectibles are circled in blue in the guide below.
The Dreamatorium of Dr. Magnus 2 Walkthrough
Chapter 1: House Lobby
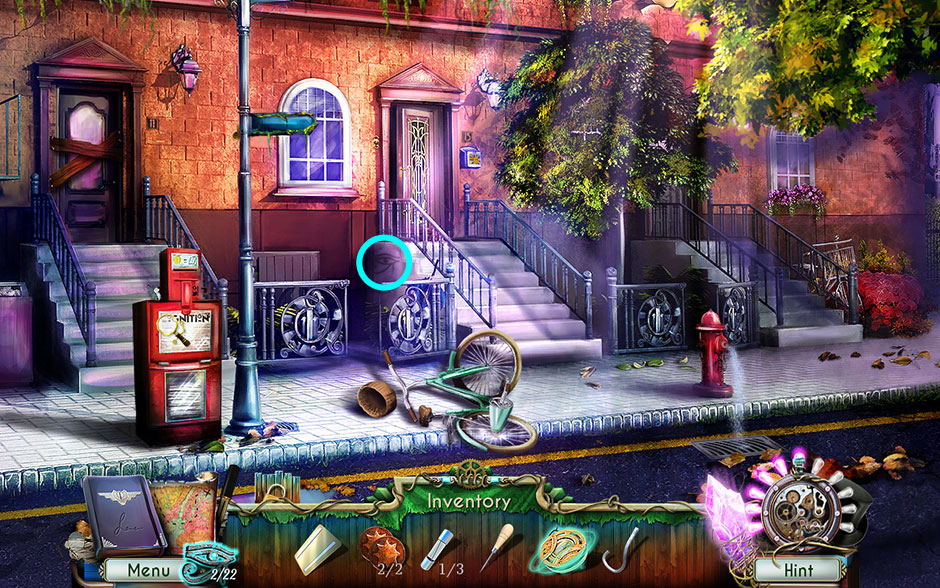
Front
- Click on the Amulet held out in your hand. The Amulet will be added to the lower right corner of your screen. The Amulet can sense supernatural traces and be used to view past events.
- Use the Amulet on the glowing outline that appears in the center of your screen, then watching the cutscene that follows.
- Take a closer look at the newspaper vending machine on the left.
- Examine the bicycle lying on the sidewalk straight ahead. Click on the teal back to open it, then click on the Map to collect it. The Map will appear in the lower left corner of your screen and help you to navigate between areas.
- Click on the Wallet to add it to your inventory.
- Select the Wallet and click to open it. Collect the Note inside to add it to your Journal, then click on the ID Card to add it to your inventory.
- Proceed forward to the Door.
Door
- Collect the Eye of Horus 1/22 next to the number placard.
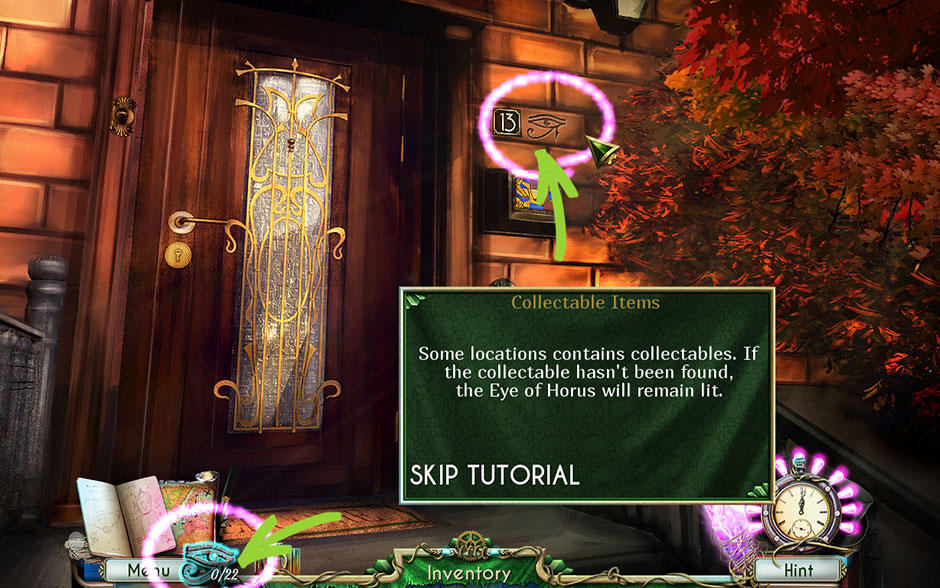
Dreamatorium Dr Magnus 2 Eye of Horus 1 of 22
- Ring the doorbell on the left of the doorframe.
- Speak with Dr. Magnus. Show him the ID Card.
- Finish your conversation with Dr. Magnus, then proceed forward into the Lobby.
Lobby
- Speak with Dr. Magnus again. You will receive the new objective “Make Mint Tea”.
- Collect the Eye of Horus 2/22 at the foot of the balcony.
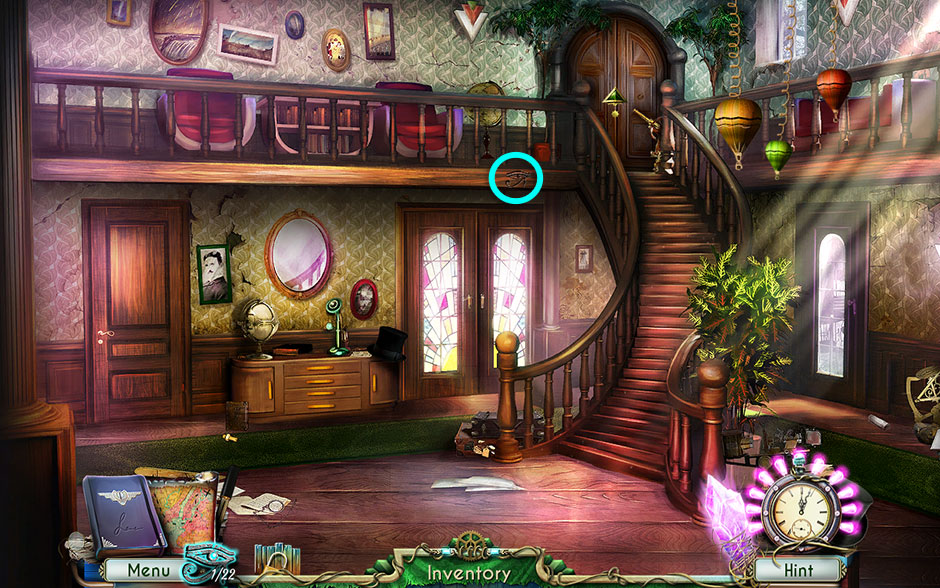
Dreamatorium Dr Magnus 2 Eye of Horus 2 of 22
- Enter the Kitchen on the left.
Kitchen
- Click on the hidden object area over the kitchen table.
- Find and place each item and collect all tiles. For example: use the flowers on the vase.
- Upon placing each item in its correct location, take a closer look at the bread box on the upper left.
- Switch the positions of the adjacent triangles to solve the minigame. The solution is shown below.
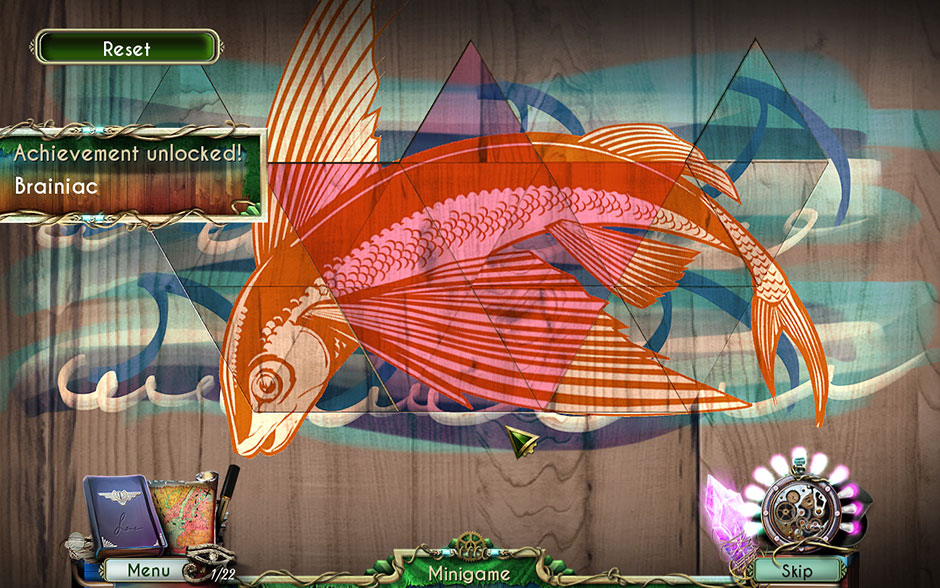
Dreamatorium Dr Magnus 2 koi fish puzzle solution
- Click on the bread box to open it once you’ve completed the puzzle. Click on the Dessert Set to add it to your inventory.
- Select the Dessert Set and open the case. Click on the Spoon to add it to your inventory.
- Take a closer look at the kitchen cabinets above the sink. Click to open the cabinet, then select the Focusing Knob and the Tea Box to add them to your inventory.
- Select the Tea Box and open the case. Select the Instructions inside, as well as the Tea Bag.
- Examine the stove on the left. Use the Spoon, the Tea Bag, and the Instructions on the stove to trigger a puzzle.
- To make the perfect cup of tea, follow the steps on the drawing. First, place the pot on the stove and click the knob to apply heat. Next, place the Tea Bag inside the teacup and use the Spoon to add sugar. Finally, select the teapot and pour the hot water in the tea cup, then top it off with a slice of lemon. Select the perfectly prepared Mint Tea to add it to your inventory.
- The “Make Mint Tea” objective is now complete. Exit the Kitchen back to the Lobby.
Lobby
- Enter through the double doors ahead to proceed into the Library.
Library
- Give the Mint Tea to Dr. Magnus, then speak with him regarding Lara. Once the conversation is complete, Dr. Magnus will give you the Lab Key and the objective “Laboratory Investigation” will become active.
- Collect the Eye of Horus 3/22 on the front of the desk.
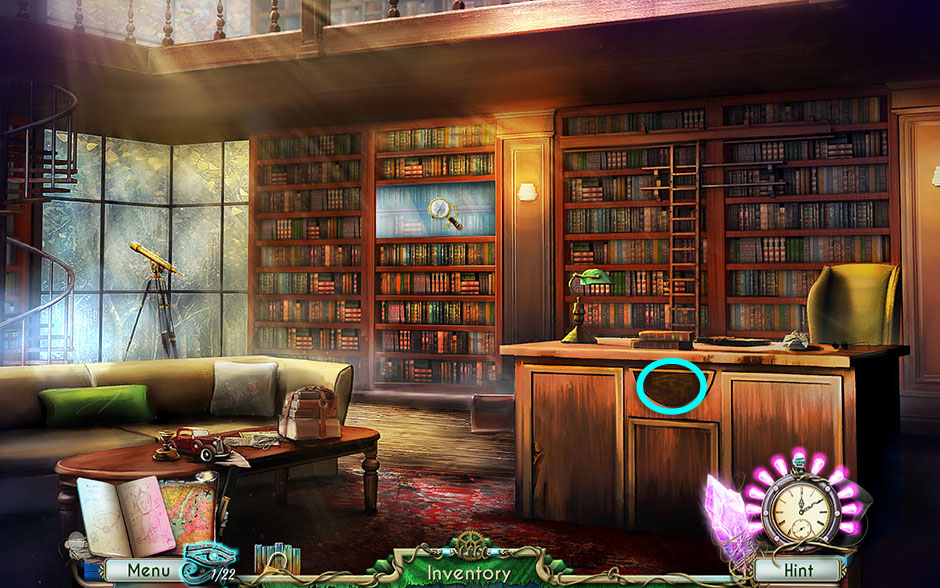
Dreamatorium Dr Magnus 2 Eye of Horus 3 of 22
- Examine the glass case over the bookshelf ahead. Click on the Lens nestled into the lower right corner to add it to your inventory.
- Take a closer look at the telescope on the left. Use the Lens and the Focusing Knob on their applicable slots to restore the telescope and trigger a minigame.
- Use the telescope to find the objects in the drawings. Use the slider on the right to adjust the focus. Upon completing the minigame, you will be rewarded with a code: 8-1-3.
- Examine the desk on the right. Click on the desk drawer to open it, then take a closer look at the green box inside. Input the code 813 on the sliders to unlock the box.
- Collect the Token 1/2 and the Lobby Cabinet Key inside the box to add them to your inventory.
- Before exiting the desk view, click on the Paper Pieces on top of the desk to add them to your inventory.
- Select the Paper Pieces from your inventory and click on them until a message is arranged. The message will be added to your Journal.
- Exit the Library back to the Lobby.
Lobby
- Use the Amulet on the glowing outline that appears over the mirror.
- Proceed through the door on the right to the Backyard.
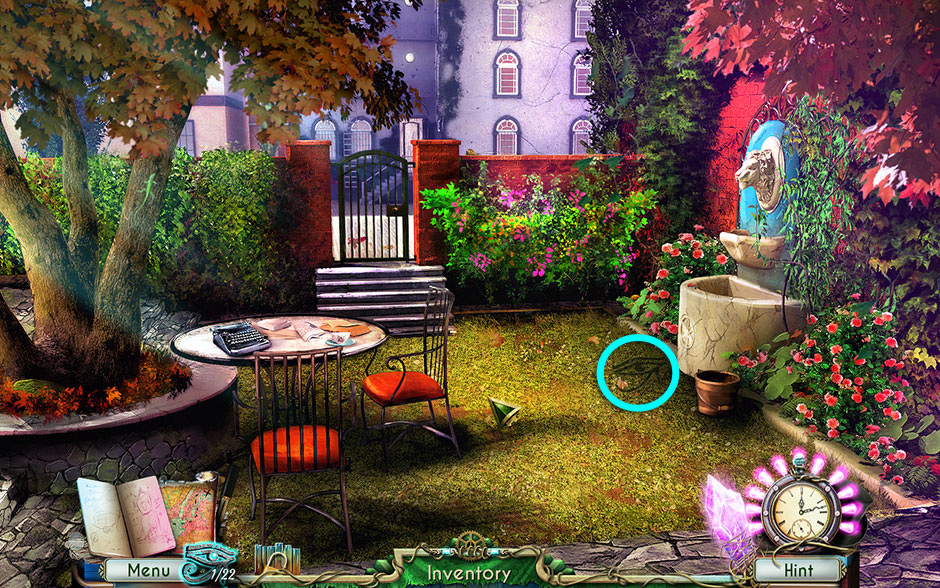
Backyard
- Collect the Eye of Horus 4/22 on the grass in front of the fountain.
Dreamatorium Dr Magnus 2 Eye of Horus 4 of 22
- Examine the table on the left. Click on the papers strewn about the table to move them aside, then collect the Golden Sun lying beneath to add it to your inventory.
- Take a closer look at the lion fountain on the right. Read the note to the right of the fountain, then use the Golden Sun on the indentation to reveal the Fuse 1/3 within the lion’s mouth. Click on it to add it to your inventory.
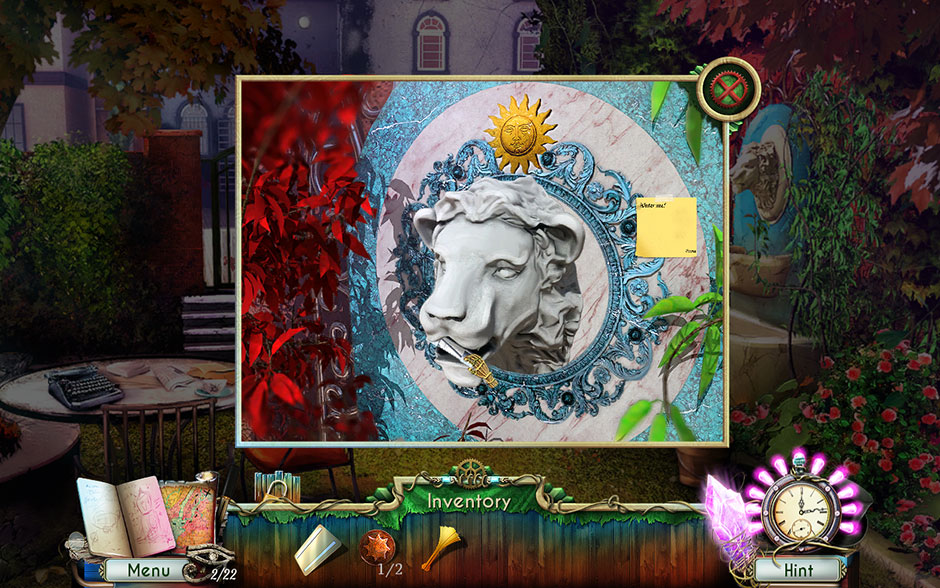
Dreamatorium Dr Magnus 2 Golden Sun in Fountain Gives Fuse
- Examine the bucket at the base of the fountain. Click on the Awl inside to add it to your inventory.
- Return to the Lobby.
Lobby
- Examine the cabinet on the left between the Kitchen and the Library. Use the Lobby Cabinet Key on the lock to reveal a hidden object area.
- Find the pieces shown at the bottom of the screen. Upon locating all the pieces, you will receive the Multitool. This item has a Knife, Scissors, and Screwdriver function that will be useful for various tasks throughout the game.
- Take a closer look at the plant on the right side of the staircase. Use the Multitool from your inventory on the planter, then select the Knife function to dig up the soil.
- Click on Puzzle Tile 1/2 to add it to your inventory.
- Examine the broken mirror on the wall above the cabinet. Click on Puzzle Tile 2/2 wedged beneath the glass to add it to your inventory.
- Exit the Lobby back to the Door.
Door
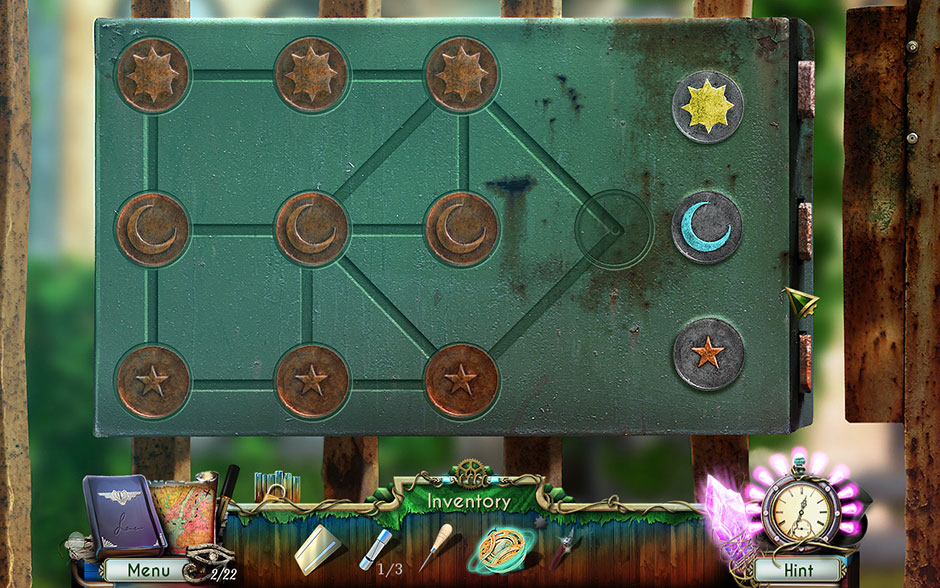
- Take a closer look at the box beneath the number placard. Use the Puzzle Tiles on the box to trigger a minigame.
- Assemble the puzzle by finding the right place for each tile. The solution is shown below.
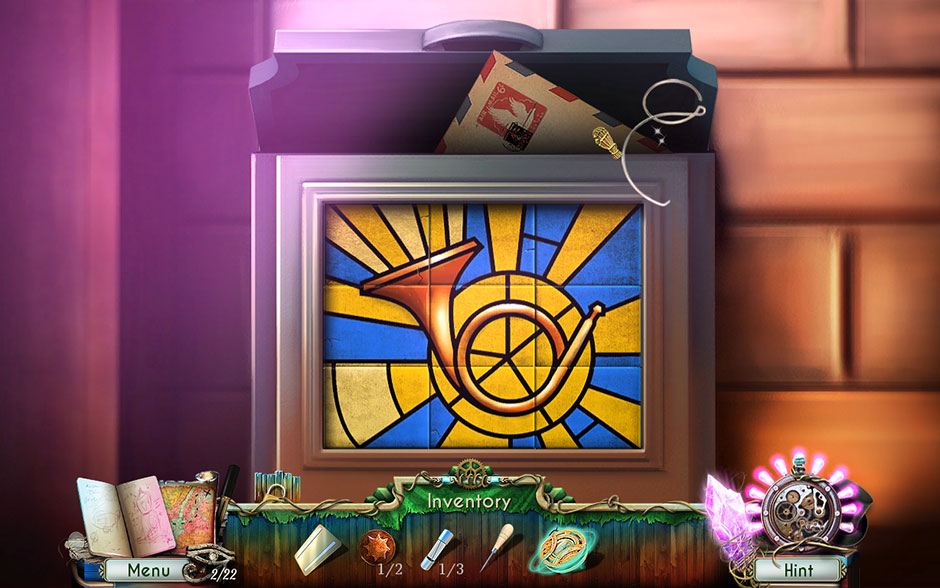
Dreamatorium Dr Magnus 2 Horn Puzzle Solution
- Upon completing the puzzle, the box will open. Click on the Letter and the Wire to add them to your inventory.
- Select the Letter in your inventory to open it, then click on the Token 2/2 to add it to your inventory. The objective “Who is Graves?” will become active.
- Select the Wire in your inventory, then click on it to bend it until you obtain the newly formed Wire Hook.
- Proceed to the Front.
Front
- Collect the Eye of Horus 5/22 on the side of the middle set of steps.
Dreamatorium Dr Magnus 2 Eye of Horus 5 of 22
- Take a closer look at the drainage grate at the foot of the lamppost on the left. Use the Wire Hook to fish out the Shears Part and add it to your inventory.
- Return to the Backyard.
Backyard
- Take a closer look at the gate on the far end of the yard. Use the Tokens on the steel lock to trigger a minigame.
- Keeping one spot empty, move the tokens to their proper places to open the gate lock. The solution is shown below.
Dreamatorium Dr Magnus 2 Backyard Gate Lock Solution
- Proceed through the now open gate to the Laboratory Building.
Laboratory Building
- Collect the Eye of Horus 6/22 in the middle of the sky on the left.

Dreamatorium Dr Magnus 2 Eye of Horus 6 of 22
- Examine the green brick base of the building straight ahead. Use the Awl to remove the loose brick, then click on the Fuses 2/3 to add them to your inventory.
- Take a closer look at the clothesline on the left. Click on the green Cloth to add it to your inventory.
- Examine the large wooden box beneath the steps on the right. Click on the Rotten Apple on top of the box to add it to your inventory.
- Take a closer look at the trash can on the left, beneath the laundry line. Open the trash can and place the Rotten Apple inside, then click on the Crumpled Paper to add it to your inventory.
- Select the Crumpled Paper from your inventory and click to unfold it until you receive the Threatening Note.
- Proceed through the door at the top of the steps to enter the Laboratory Hall.
Laboratory Hall
- Take a closer look at the wooden box hanging on the wall on the left. Select your Multitool, then use the Scissors function to clip the wire holding the box shut.
- Collect the final Fuses 3/3 located in the bottom left corner of the box to add them to your inventory.
- Back in the main view of the Hall, remove the sheet from the panel on the right, then take a closer look. Use the Fuses on the panel to trigger a minigame.
- Place the fuses in the right slots so the sum of the connected fuses matches the values given. The solution is shown below.
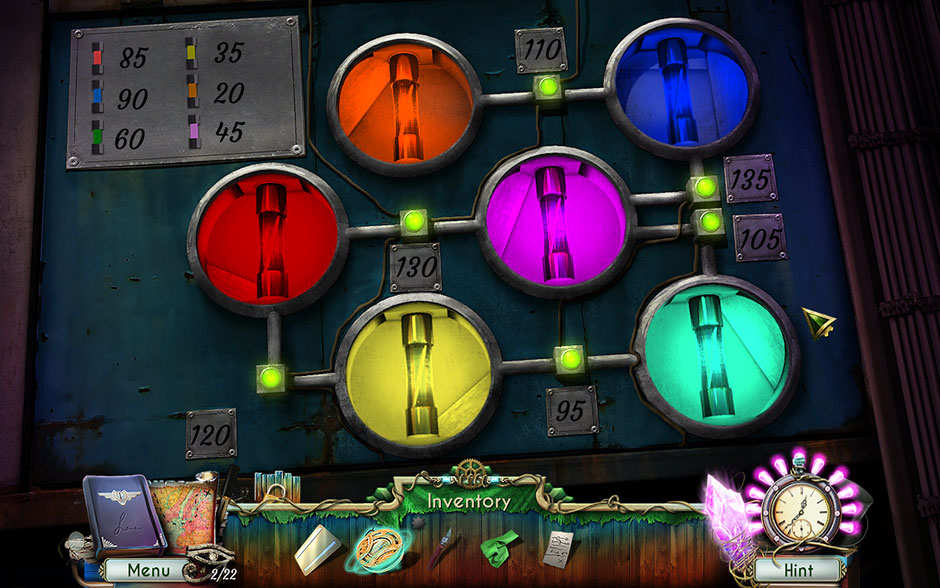
Dreamatorium Dr Magnus 2 Fuses Sum Minigame Solution
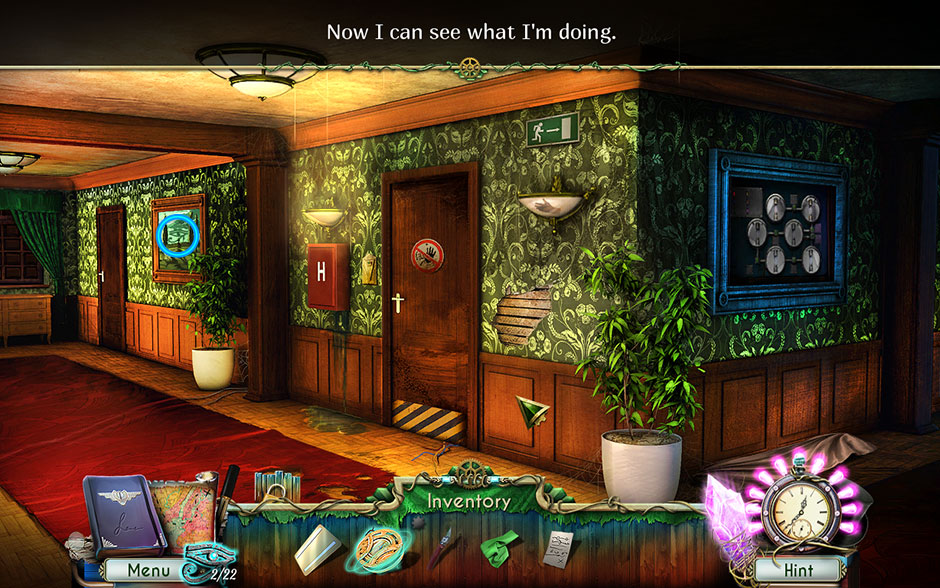
- Upon completing the puzzle, light will be restored to the Hall.
- Collect the Eye of Horus 7/22 in the painting on the far left side of the Hall.
Dreamatorium Dr Magnus 2 Eye of Horus 7 of 22
- Examine the lock to the left of the door closest to you. Use the Lab Key on the lock to open the door.
- Proceed through the door into the Laboratory.
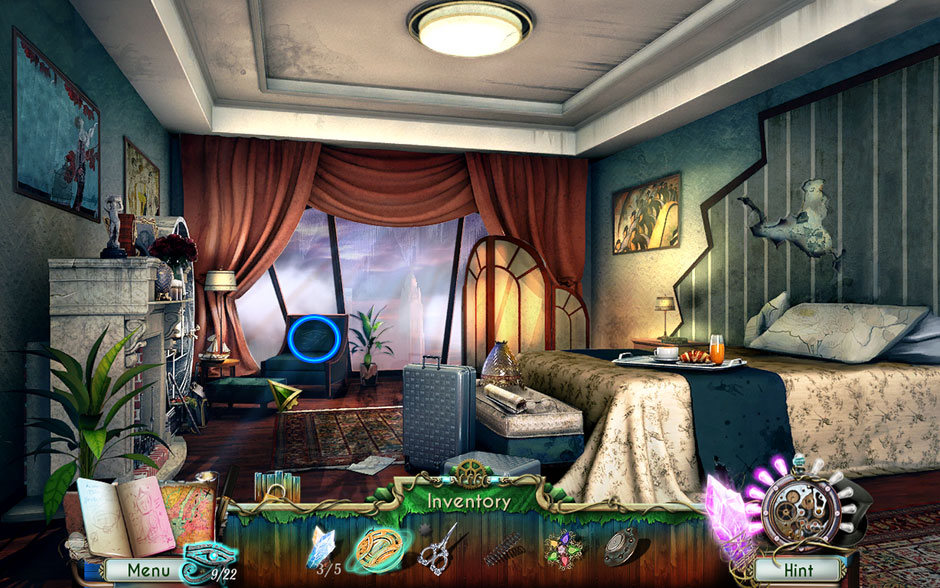
Laboratory
- Collect the Eye of Horus 8/22 on the upper left drawer of the bureau.
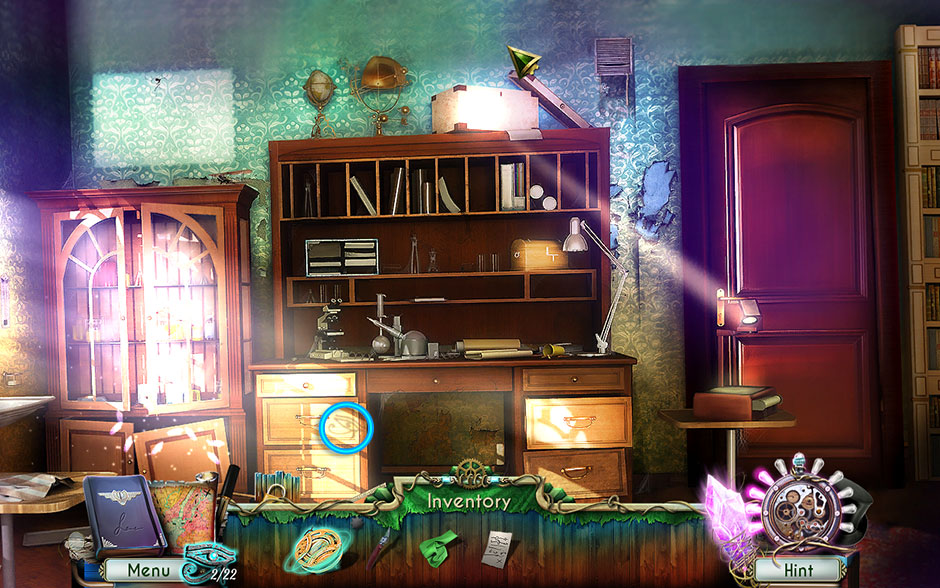
Dreamatorium Dr Magnus 2 Eye of Horus 8 of 22
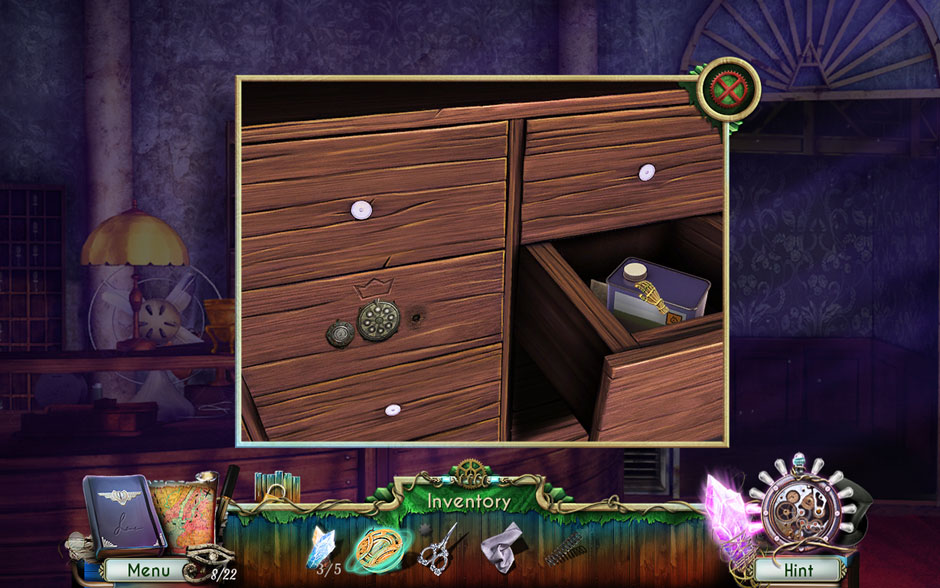
- Click on the hidden object area over the broken portion of the cabinet on the lower left.
- Find the items as indicated by their outlines. Use found items to reveal the locations of the other missing items. Successfully finding all the outlined items will reward you with three Tiles. Use the Tiles on the metal safe to unlock it, then collect the Box Key inside to add it to your inventory.

Dreamatorium Dr Magnus 2 Box Key Safe Location
- Take a closer look at the small wooden chest on the middle shelf of the bureau. Use the Box Key to open it, then click on the Pattern inside to add it to your inventory.
- Examine the microscope on the left side of the desk. Use the Cloth to clean the dirty lens. A code will be revealed: L9 R9 L0 R1.
- Open the lower right desk drawer. Click on the Folder inside to add it to your inventory.
- Select the Folder from your inventory to open it. This will complete the objective “Who is Graves?” Additionally, the Photo will be added to your inventory.
- Click on the Photo in your inventory to examine it and gather additional information on Dr. Magnus and Graves.
- Proceed through the door on the right and into the Laboratory Office.
Laboratory Office
- Collect the Eye of Horus 9/22 at the top of the bookcase on the right.
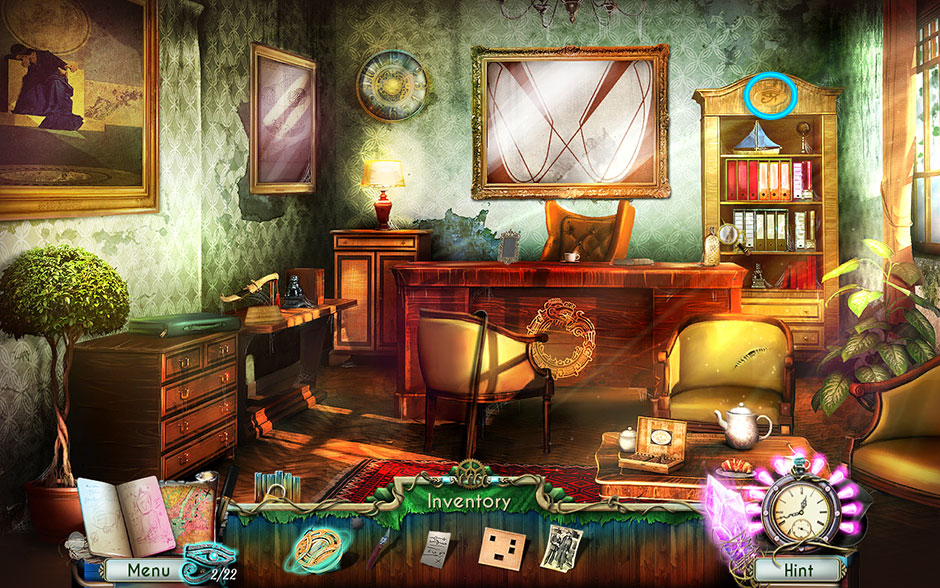
Dreamatorium Dr Magnus 2 Eye of Horus 9 of 22
- Examine the bookcase on the right. Click on the Figurine to the left of the binders to collect it. Click on the binders for a closer view and collect the Note The objective “Find the Dreamatorium” will be activated.
- Take a closer look at the chair with the stitched tear on the right. Use the Knife function of the Multitool to cut the stitching, then click on the Pearl 1/2 hidden inside to add it to your inventory.
- Click on the Cane hooked over the back of the chair in the center of the room to add it to your inventory.
- Examine the empty frame sitting on the desk. Place the Photo inside the frame, then click on it again for a closer view. Once you exit the zoomed view, you will be able to click on the Screw and add it to your inventory.
- Go back to the Laboratory.
Laboratory
- Take a closer look at the cabinet on the left. Click on the cabinet door to open it, then place the Figurine inside the music box. Click on the Pearls 2/2 once the hidden compartment drawer opens to add them to your inventory.
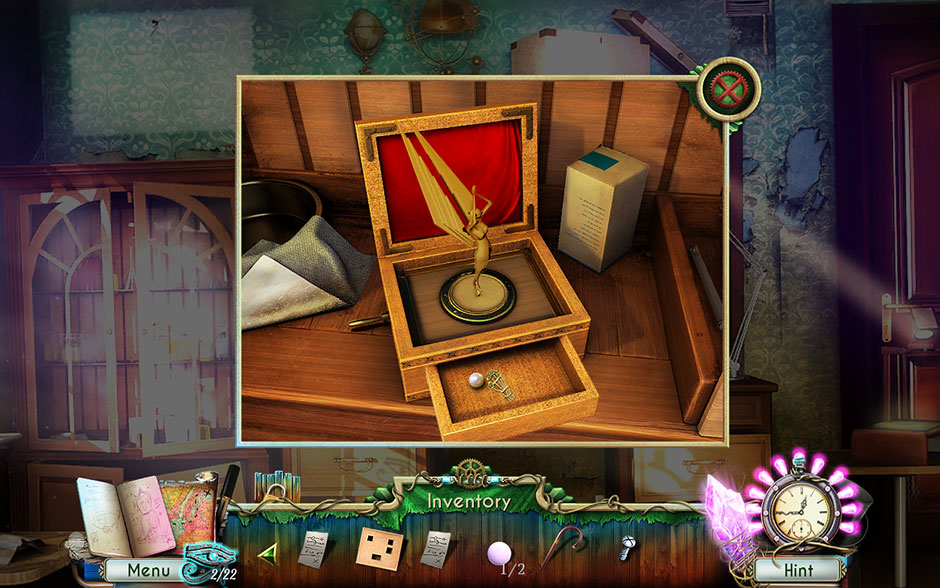
Dreamatorium Dr Magnus 2 Music Box Pearl 2 of 2 Location
- Return to the Laboratory Office.
Laboratory Office
- Examine the small table on the left. Place the Pearls in the top of the wooden box to open it.
- Use the Note and the Threatening Note on The Finder to trigger a minigame.
- Find matching symbols by clicking on them. A wrong move resets the game. Upon completing the puzzle successfully, the remaining Safe Code L2 will be revealed.
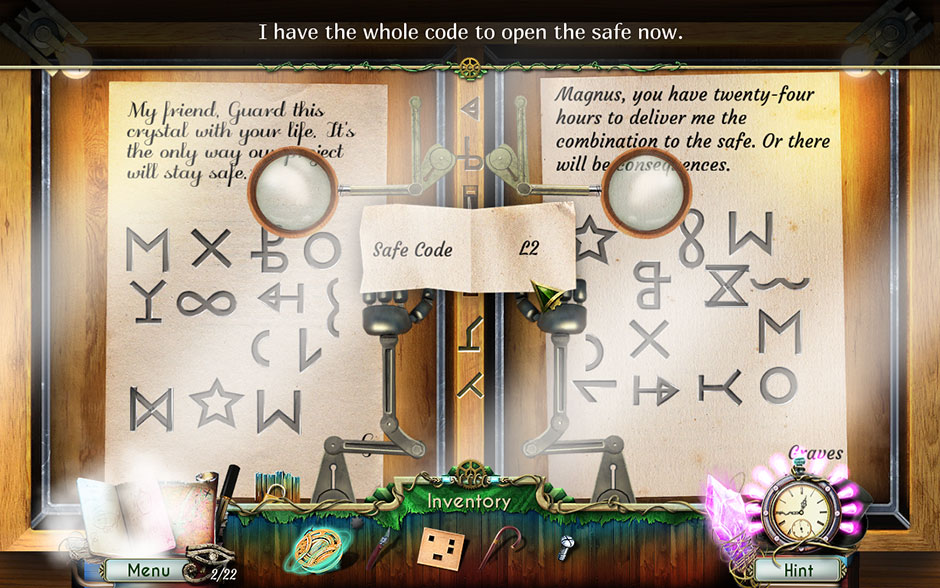
Dreamatorium Dr Magnus 2 The Finder Safe Code Solution
- Click on the painting hanging on the wall above the desk to knock it down, revealing a hidden safe.
- Take a closer look at the safe hidden in the wall. A minigame will be activated.
- Rotate the circle, following the code. Click and hold the dial to move it. Codes with L require you to move the dial counterclockwise, while codes with R require you to move the dial clockwise. Once you’ve input the code L9 R9 L0 R1 L2, click on the safe handle to open it. The objective “Laboratory Investigation” will be marked as completed. Examine the red notebook inside, then click on the blue Crystal hidden beneath to collect it.
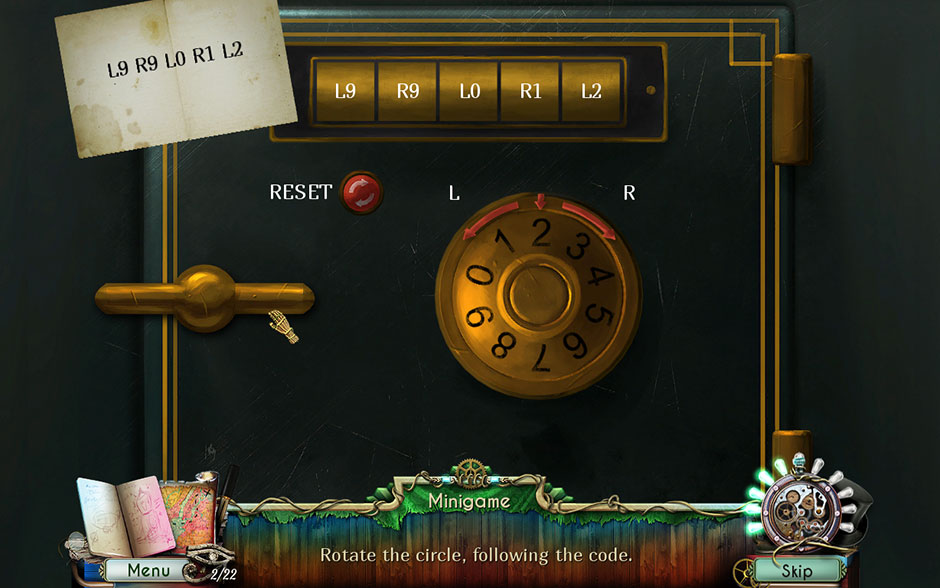
Dreamatorium Dr Magnus 2 Safe Code Solution
- Exit to the Laboratory Hall.
Laboratory Hall
- Take a closer look at the light fixture to the right of the door leading into the Laboratory. Use the Cane to retrieve the Wooden Hand and add it to your inventory.
- Go back outside of the Laboratory Building.
Laboratory Building
- Examine the wooden chest beneath the stairs on the right. Use the Wooden Hand on the slot on top of the chest to open it, then click on the Cube and the Shears Part inside to add them to your inventory.
- From your inventory combine the Shears Parts and the Screw, then use the Screwdriver function of the Multitool to complete the Shears.
- Return to the Backyard.
Backyard
- Take a closer look at the flowery hedge to the right of the open gate. Use the Shears to cut away the overgrowth, then use the Pattern on the symbols etched into the brick to reveal a code.
- Examine the table on the left. Use the Cube on the square base in the bottom right corner. Click on it again to trigger a minigame.
- Rotate each segment until you get the symbol indicated on the cipher. Empty fields are included, too. The solution is shown below.
Dreamatorium Dr Magnus 2 Cube Cipher Puzzle Solution
- Upon completing the puzzle, click on the Bookshelf Key to add it to your inventory.
- Go back to the Lobby.
Lobby
- Use the Amulet on the glowing outline to trigger a cutscene. Once completed, enter the Library.
Library
- Take a closer look at the glass case over the bookshelf straight ahead. Use the Bookshelf Key on the lock to trigger a minigame.
- Collect pairs of matching books. Your solution is behind them. Once you’ve completed this task, you will need to follow the sequence shown on the levers and repeat it to open the passage.
- Once completed, the Secret Passage will be revealed. Enter through to this new area.
Secret Passage
- Upon entering the Secret Passage, the objective “Find the Dreamatorium” will be completed.
- Collect the Eye of Horus 10/22 near the top of the stone wall.
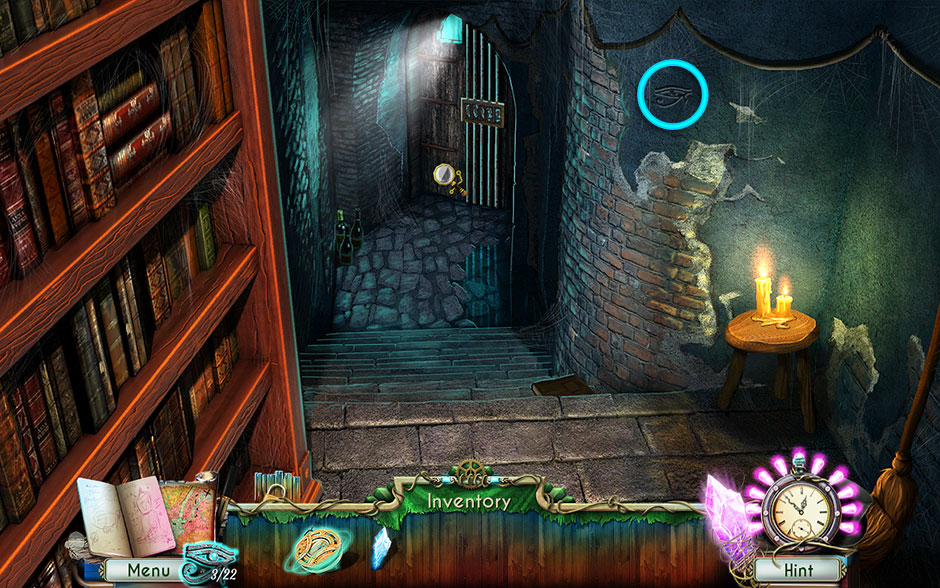
Dreamatorium Dr Magnus 2 Eye of Horus 10 of 22
- Examine the door at the bottom of the staircase. Use the Crystal on the door. The note over the crystal slots will move, and the item will now be re-added to your inventory as Crystal 1/5.
- Click on the note to reveal the Phone Number and add it to your inventory.
- Return to the Lobby.
Lobby
- Take a closer look at the phone on top of the cabinet between the Kitchen and Library doors. Use the Phone Number on the phone to dial, unlocking a new location.
Chapter 2: King’s Mansion
Mansion Front
- Upon arriving, the objective “Explore the Mansion” will become active.
- Collect the Eye of Horus 11/22 along the top row of pillars and to the right.
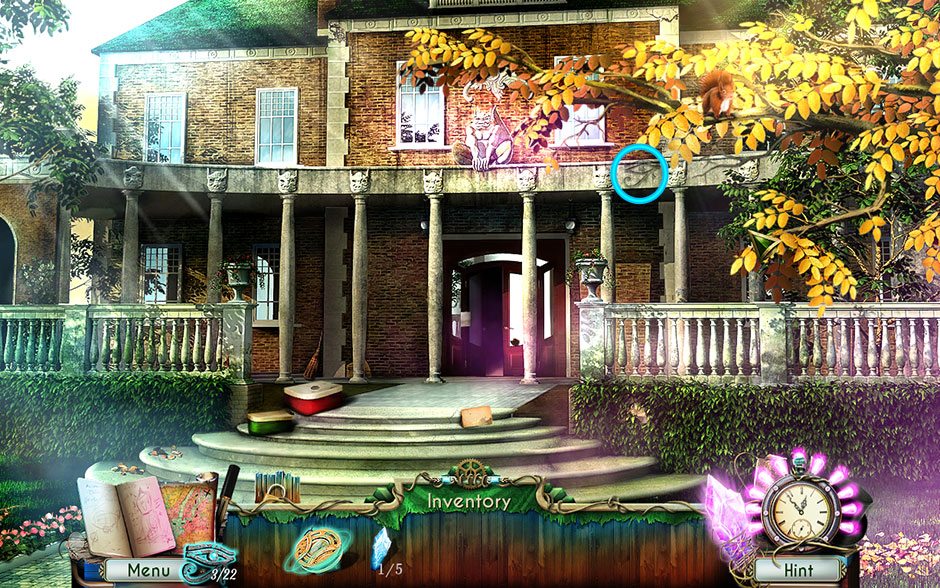
Dreamatorium Dr Magnus 2 Eye of Horus 11 of 22
- Examine the piece of paper lying on the steps ahead to add it to your Journal.
- Take a closer look at the boxes sitting on the left side of the steps. Click on the Matches and the Diamond to add them to your inventory.
- Select the Matches from your inventory. Click on the matchbox to open it and grab a match from inside. Click on the side of the matchbox to strike the Match and light it, adding it back to your inventory.
- Examine the door of the mansion straight ahead. Click on the note taped to the window to add it to your Journal and activate the objective “Find the Purple Crystal”.
- Click on the Box Lock 1/2 wedged into the corner of the right door window to add it to your inventory.
- Enter through the doors to the Mansion Lobby.
Mansion Lobby
- Collect the Eye of Horus 12/22 located at the top of the first pillar to the left of the staircase.
Dreamatorium Dr Magnus 2 Eye of Horus 12 of 22
- Examine the doors on the left. You will enter a minigame.
- Move the board by dragging it around the circle to guide each ball through the maze to its target. The easiest way to complete this puzzle is to focus on one ball at a time.
- Once the minigame is completed, the doors to King’s Study will be unlocked. Proceed through to the next area.
King’s Study
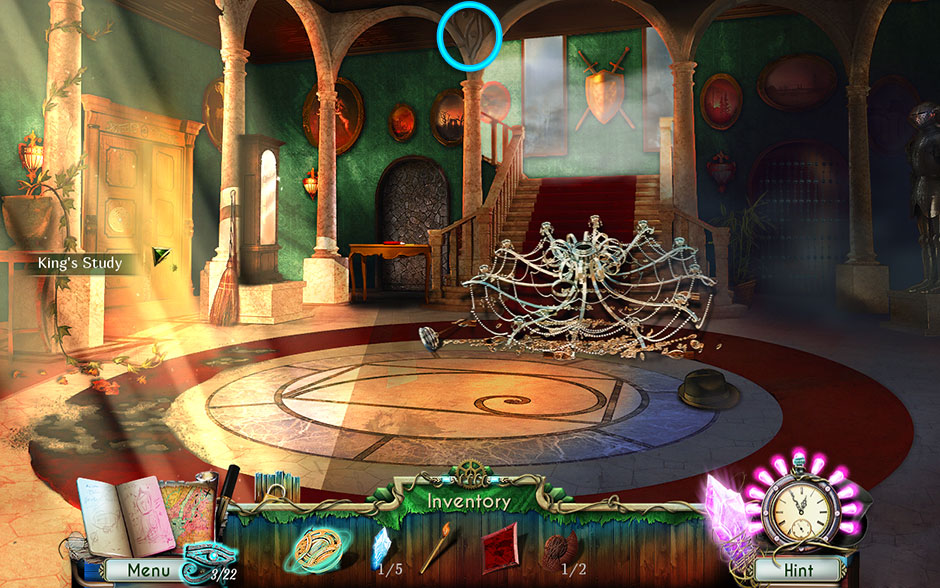
- Collect the Eye of Horus 13/22 at the top of the globe on the left.
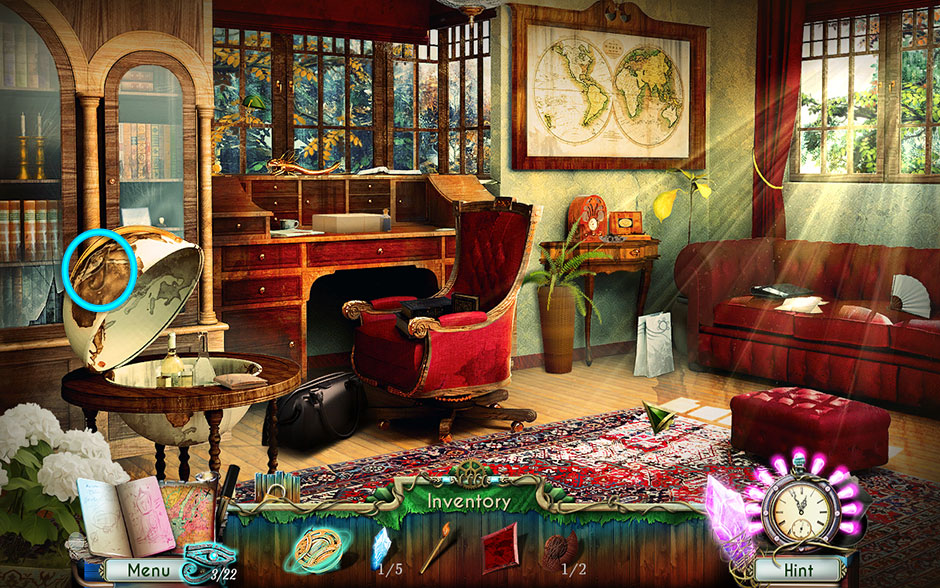
Dreamatorium Dr Magnus 2 Eye of Horus 13 of 22
- Take a closer look at the papers lying on top of the couch on the right. Click on the Sheet of Paper to add it to your inventory.
- Examine the small stand with the radio between the couch and the desk. Click on the Acorn to add it to your inventory.
- Click on the glass cabinet door on the left to open it, then take a closer look inside. Click on the Golden Bulb to add it to your inventory, then take a look at the award in the frame.
- Take a closer look at the desk. Use the Scissors function of the Multitool to cut the string tying the package together. Click to tear the paper away, revealing the typewriter. The objective “Find the Typewriter” will be completed.
- Use the Amulet on the glowing outline over the typewriter to trigger a cutscene.
- Place the Sheet of Paper in the typewriter, then click on the bottle of Denatured Alcohol to add it to your inventory.
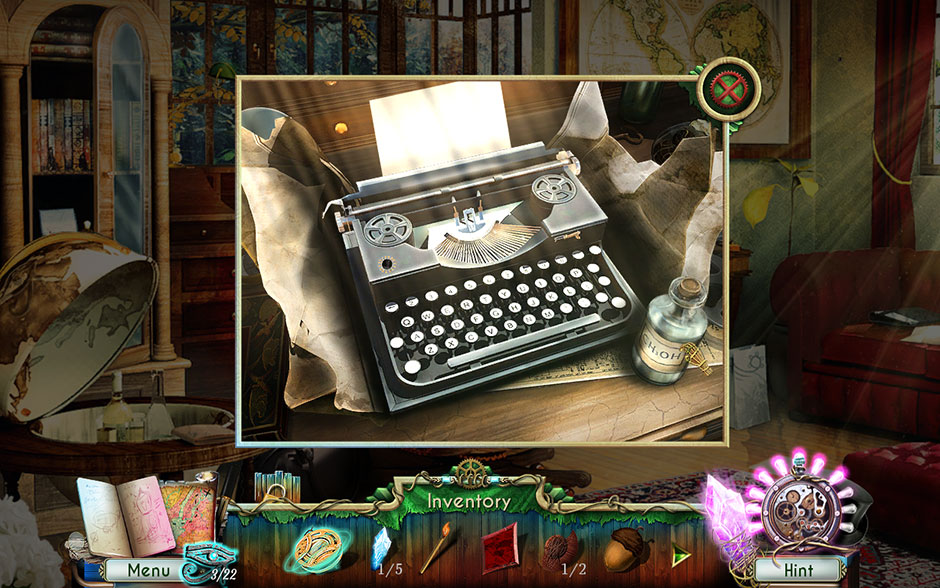
Dreamatorium Dr Magnus 2 Denatured Alcohol on Typewriter Desk
- Return to the Mansion Lobby.
Mansion Lobby
- Examine the dark corner of the lobby on the right. Click on the Denatured Alcohol and remove the cap, then use it on the lamp in the upper corner. Next, use the Match to light the lamp, restoring light to the area.
- Click on the playing cards scattered across the top of the cabinet to move them aside, revealing the Club. Click on it to add it to your inventory.
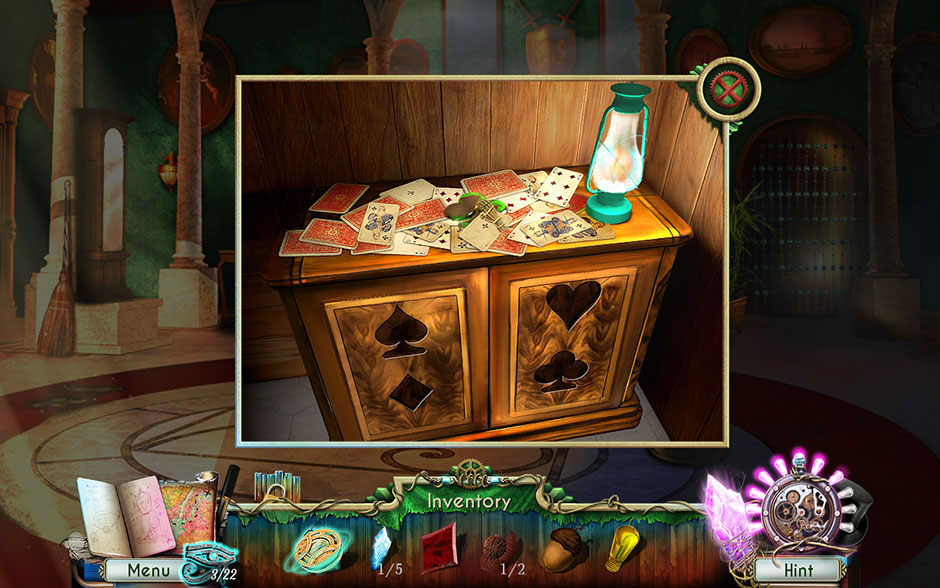
Dreamatorium Dr Magnus 2 Cabinet Club Location
- Go back outside to the Mansion Front.
Mansion Front
- Take a closer look at the squirrel up in the tree toward the upper right corner of your screen. Give the Acorn to the squirrel, who in return will drop the Box Lock 2/2. Click on it to add it to your inventory.
- Examine the boxes on the left of the steps. Use the Box Lock on the groove in the top of the red box to reveal a hidden object area.
- Find all of the buttons; there are 12 total. Some require an additional action, such as assembling scissors to cut them free, or clicking on various materials to reveal their locations. Once you’ve completed the area, the Zipper Slider will be added to your inventory.
- Make your way back to King’s Study.
King’s Study
- Take a closer look at the large black bag sitting on the floor at the foot of the chair. Use the Zipper Slider on the bag to open it, then collect the Envelope and the Flower Locket inside to add them to your inventory.
- Select the Envelope from your inventory for a closer view. Open it to reveal the Lock Code, 512, as well as a heart locket. Click on the locket to open it and add the Heart inside to your inventory.
- Exit to the Mansion Lobby.
Mansion Lobby
- Take a closer look at the table on the left side of the stairs. Use the Flower Locket on the journal to open it, revealing a minigame.
- Select tiles according to the numbers in order to recreate the shape on each drawing. The solutions are shown below.
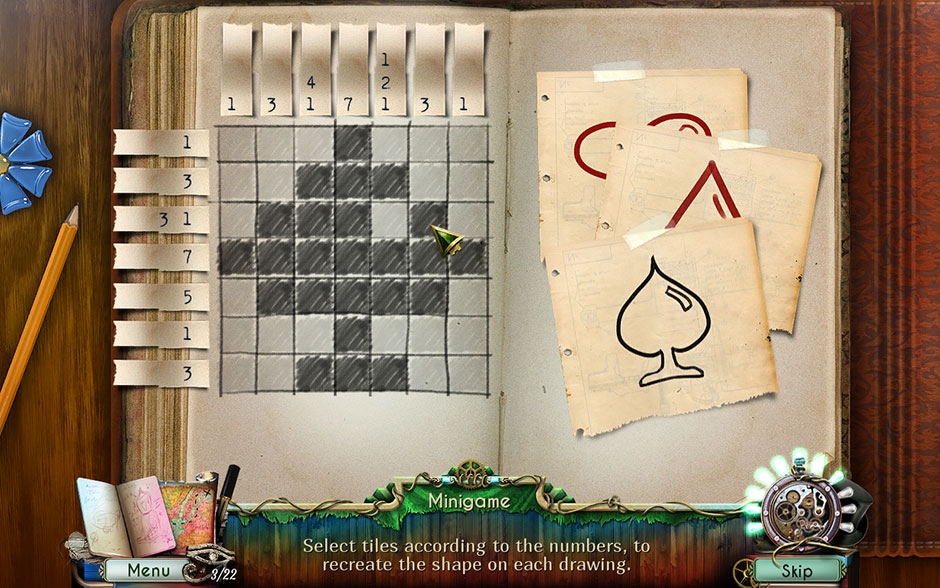
Dreamatorium Dr Magnus 2 Tile Minigame Spade Solution

Dreamatorium Dr Magnus 2 Tile Minigame Diamond Solution
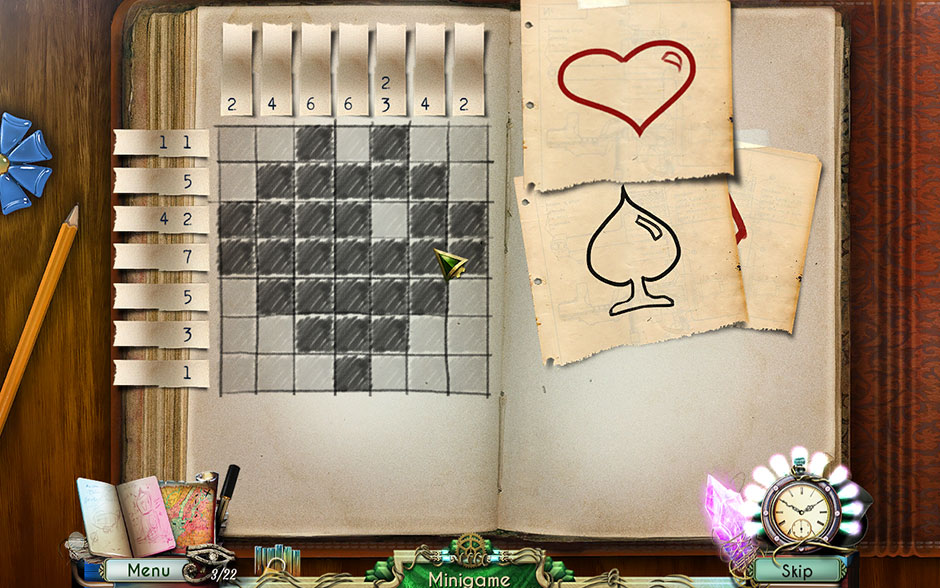
Dreamatorium Dr Magnus 2 Tile Minigame Heart Solution
- Upon completing the minigame, the doorway to the Garden will be revealed. Proceed through to the next area.
Garden
- Collect the Eye of Horus 14/22 in the wooden ceiling paneling in the upper left corner.
Dreamatorium Dr Magnus 2 Eye of Horus 14 of 22
- Examine the drawers on the left. Click on the left drawer to open it, revealing Bob the Robot Click on him to add him to your inventory.
- Open the right drawer and take a closer look at the Top Secret notepad. Thumb through the pages to find the Spade and add it to your inventory.
Dreamatorium Dr Magnus 2 Spade Location Notepad
- Close the left and right drawers, then use the Golden Bulb on the bottom drawer. Click to open it, revealing the Metal Box Click on it to add it to your inventory.
- Back in the main view of the Garden, examine the paper package lying on the table straight ahead. Click on the paper to tear it open, then read the note inside. The objective “Blackmail” will be added.
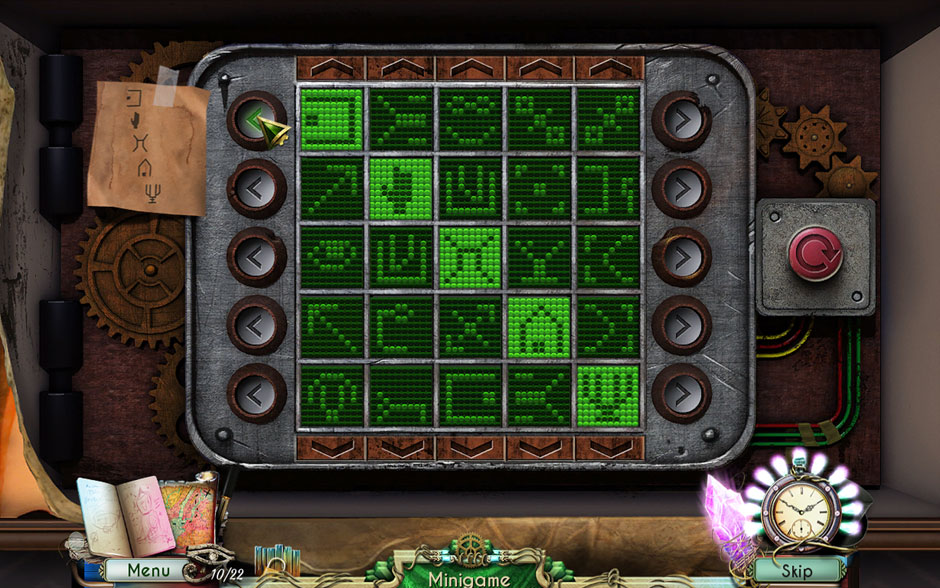
- Use Bob the Robot on the chessboard within the paper packaging to trigger a minigame.
- Highlight all the fields by moving the Robot Figure the way the Knight chess piece moves. The minigame is finished when all the squares are green. Once finished, click on the Code Lock Part 1/2 inside to add it to your inventory.
- Back in the main view of the Garden again, take a closer look at the green chair on the right. Click on the pink Glove resting on top of the chair cushion to add it to your inventory.
- Go back to the Mansion Lobby.
Mansion Lobby
- Examine the cabinet on the right side of the Lobby again. Place the Club, Spade, Heart, and Diamond in their respective slots in the face of the cabinet. Doing this will reveal a hidden object area.
- Find the items listed at the bottom of the screen. Upon locating all of them and completing the area, the Wooden Box will be added to your inventory.
- Select the Wooden Box in your inventory for a closer view. Click to open it, then click on the Crown inside to add it to your inventory in its stead. The objective “Explore the Mansion” is now complete.
- Return to the Mansion Front.
Mansion Front
- Take a closer look at the ivy to the immediate right of the steps. Use the Glove to clear the vines away and retrieve the Code Lock Part 2/2.
- Select the Metal Box from your inventory, then use the Code Lock Parts on it. You will be asked to input a code. Input the code V I II, or 512, which you discovered earlier in King’s Study. The box will open, revealing the Winding Key. Click on it to add it to your inventory.

Dreamatorium Dr Magnus 2 Metal Box Opens Revealing Winding Key
- Go back to King’s Study.
King’s Study
- Take a closer look at the typewriter on the desk. Use the Winding Key on it to restore it to working order, revealing a clue which will be added to your Journal.
- A new objective will be added: “Set the Clock”.
- Exit to the Mansion Lobby.
Mansion Lobby
- Examine the grandfather clock at the base of the pillar on the left. A minigame will be triggered.
- Place the gears in the correct positions so all of them rotate, then set the time to 6:15. The solutions are shown below.

Dreamatorium Dr Magnus 2 Clock Minigame Gears Solution
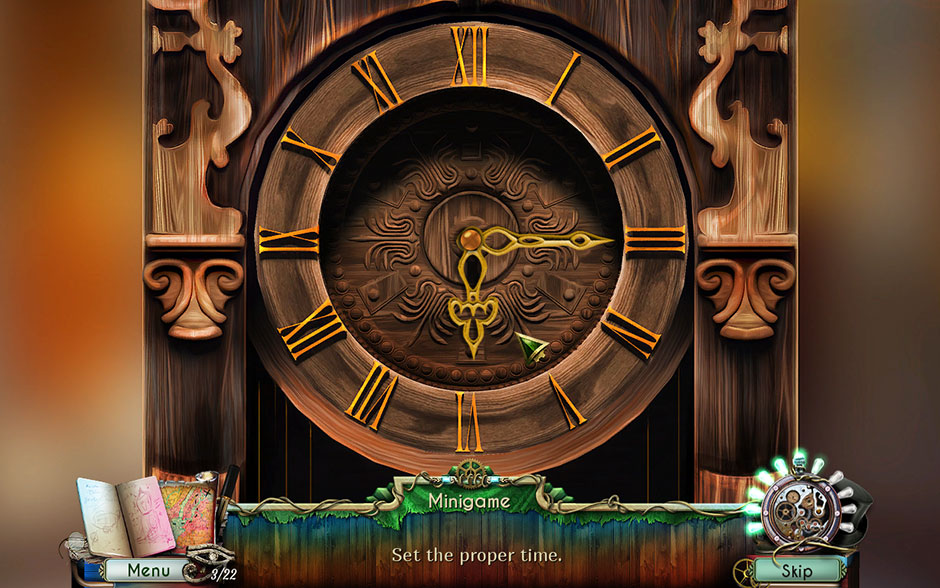
Dreamatorium Dr Magnus 2 Clock Minigame Time Set Solution
- Upon completing the minigame, the objective “Set the Clock” will be completed. Click on the purple Crystal 2/5 inside the clock to add it to your inventory.
- Once you collect the crystal, the objective “Find the Purple Crystal” will be completed, and a new location will be unlocked.
Chapter 3: Research Center
RC Front
- Upon entering the area for the first time, the objective “Enter the Rearch Center” will be added.
- Collect the Eye of Horus 15/22 located at the foot of the robot sculpture.

Dreamatorium Dr Magnus 2 Eye of Horus 15 of 22
- Examine the newspaper lying on the bench. It will give you a clue as to how the robot sculpture should appear.
- Take a closer look at the toolbox sitting on the ground on the left. Click on the Elevator Switch to add it to your inventory.
- Examine the toolbox again to trigger a minigame.
- Rotate each set of intersecting circles to create the symbols indiciated beneath the dials. The solution is shown below.
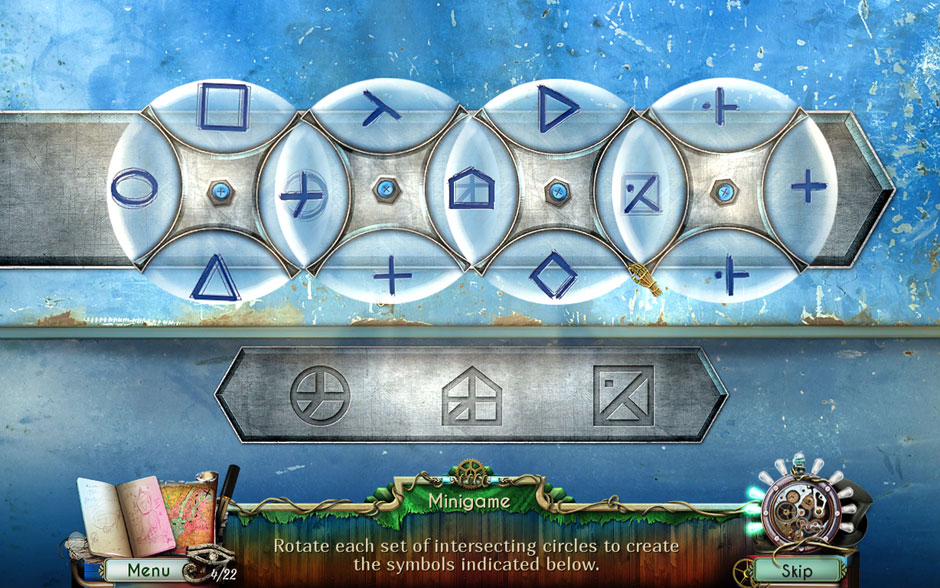
Dreamatorium Dr Magnus 2 Intersecting Circle Minigame Solution
- Completing the minigame will cause the toolbox to open. Click on it to reveal a hidden object scene.
- Find the items listed at the bottom of the screen. Upon finding them all, the Button will be added to your inventory.
- Take a closer look at the doors in the distance. Use the Button on the empty slot to repair the code panel.
- Use the Amulet on the glowing outline that appears to reveal the door code. Input the same sequence to gain access to the RC Foyer.
RC Foyer
- Upon entering the RC Foyer, the objective “Enter the Research Center” will be completed and “Deactivate Alarm” added.
- Collect the Eye of Horus 16/22 on the back of the robotic hand of the large gold sculpture.
Dreamatorium Dr Magnus 2 Eye of Horus 16 of 22
- Continue up the staircase to the RC Reception.
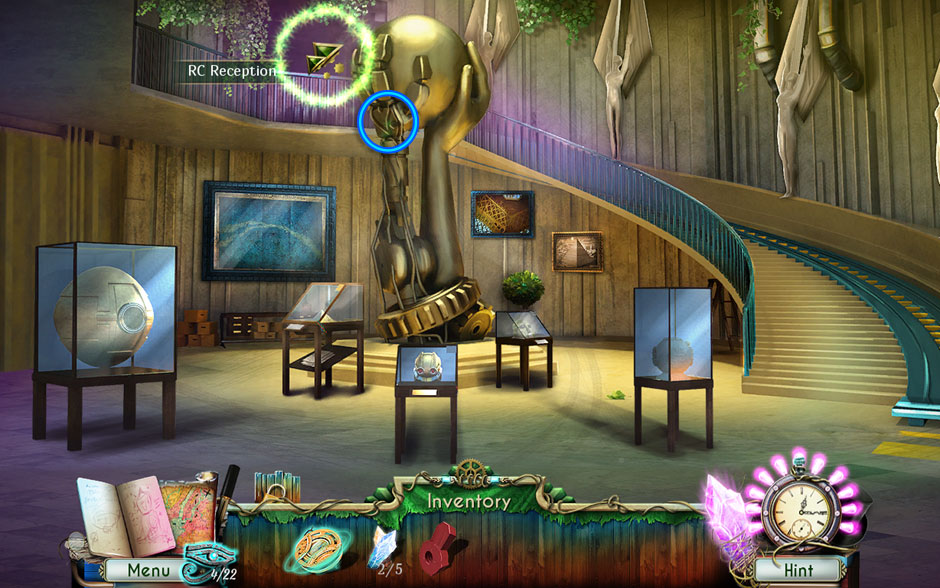
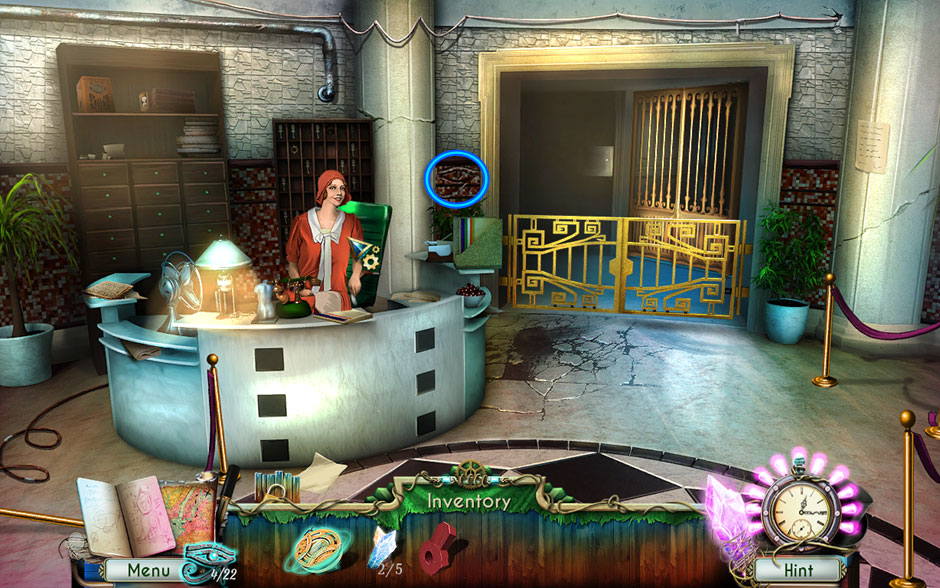
RC Reception
- Once you’ve entered this area, the objective “Trick the Receptionist” will be added.
- Collect the Eye of Horus 17/22 on the red tile wall between the left doorway and pillar.
Dreamatorium Dr Magnus 2 Eye of Horus 17 of 22
- Talk with the Receptionist, then offer her your Multitool.
- The area is now clear. Examine the Notebook lying on the reception desk to add it to your inventory.
- Select the Notebook from your inventory and click to open it. Thumb through the pages until you find the Boxcutter, then add it to your inventory.
- Click on the gold gates to open then, then take a closer look at the elevator.
- Use the Elevator Switch in the slot between the elevator buttons, then click the “Up” button.
- Enter the elevator to head to King’s Office.
King’s Office
- Upon entering the office, the objective “Trick the Receptionist” will be completed.
- Collect the Eye of Horus 18/22 within the large circular light fixture toward the upper right corner.
Dreamatorium Dr Magnus 2 Eye of Horus 18 of 22
- Take a closer look at the cardboard box sitting on the floor ahead. Use the Boxcutter to open it. Click on the Helmet inside to add it to your inventory, as well as the clock arrangement paper clue to add it to your Journal.
- Examine the desk on the right. Use the Amulet over the glowing outline. The objective “The Green Crystal” will be added.
- Make your way back to the RC Front.
RC Front
- Use the Helmet on the robot sculpture, then zoom in on the robot’s hand. Click on the Alarm Box Key to add it to your inventory.
- Return to the RC Reception.
RC Reception
- Examine the metal box on the wall to the left of the elevator. Use the Alarm Box Key to open it, triggering a minigame.
- Solve the jigsaw puzzle without rotating the pieces. The solution is shown below.
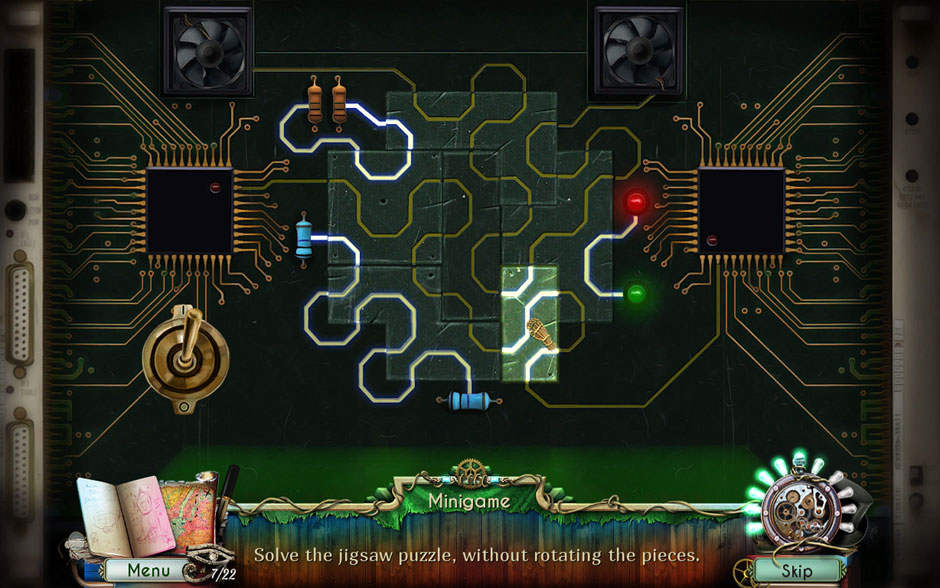
Dreamatorium Dr Magnus 2 Alarm Box Jigsaw Puzzle Solution
- Upon completing the minigame, the objective “Deactivate Alarm” will be completed.
- Go down to the RC Foyer.
RC Foyer
- Take a closer look at the display cabinet on the left side of the large gold sculpture. Click on the case to open it, then click on the Pyramid inside to add it to your inventory.
- Examine the gold-framed picture of the pyramid hanging on the wall beneath the stairs. Place the Pyramid in the slot at the top of the painting. A hidden object area will be revealed.
- Find the objects listed at the bottom of the screen. Upon locating them all, the Clock will be added to your inventory.
- Return to King’s Office.
King’s Office
- Examine the large case of clocks ahead. Place the Clock on the empty shelf to trigger a minigame.
- Set the clocks in the right order by switching their positions. The solution is shown below.
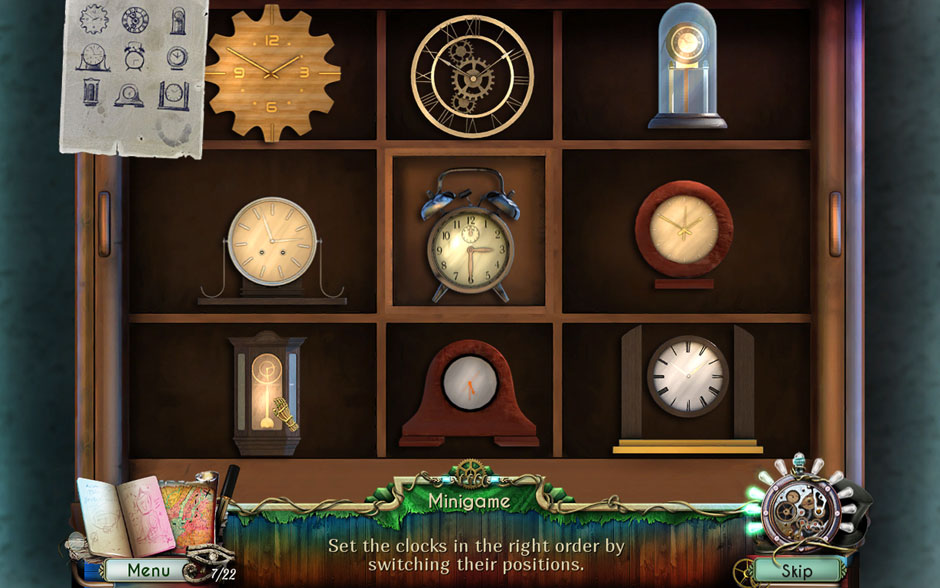
Dreamatorium Dr Magnus 2 Clock Arrangement Minigame Solution
- Once the minigame is finished, click on the Crown Key to add it to your inventory.
- Examine the desk on the right again. Use the Crown Key on the slot beneath the left drawers. This will open the display case. Click on the Crystal 3/5 to add it to your inventory.
- Upon collecting the item, the objective “The Green Crystal” will be completed.
- Speak with the Receptionist to reacquire your Multitool. The objective “Blackmail” will be marked as completed, and a new location unlocked.
Chapter 4: Hotel Reception
Hotel Reception
- Collect the Eye of Horus 19/22 on the wall above the elevator buttons.
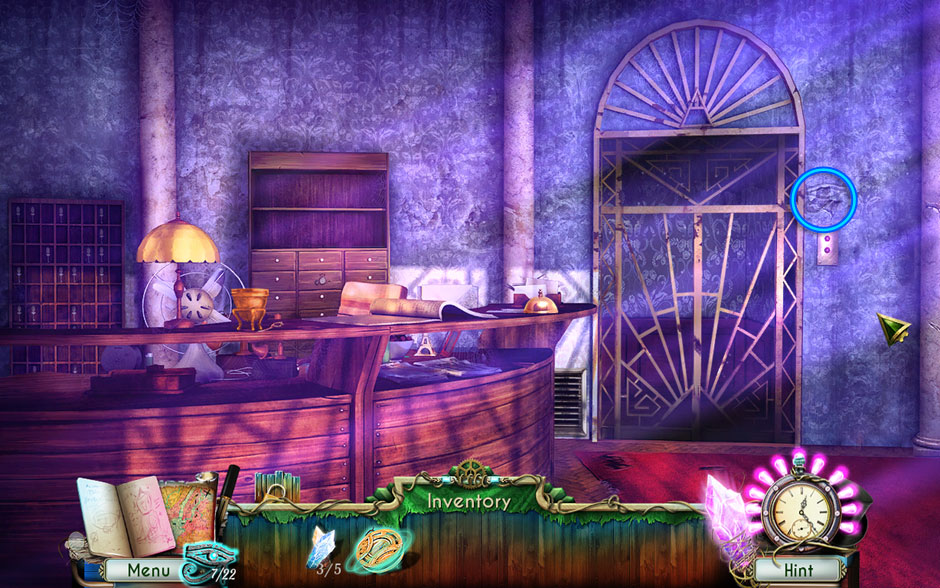
Dreamatorium Dr Magnus 2 Eye of Horus 19 of 22
- Take a closer look at the reception desk and ring the service bell.
- Speak with the Receptionist. The objective “Enter the Suite” will be added. Take the Elevator Key from him.
- Examine the portion of the counter below the Receptionist’s right arm. Click on the Scissors Half to add it to your inventory.
- Take a closer look at the elevator on the right. Press the “Up” button, then examine the inside of the elevator.
- Read the note taped to the elevator panel, then use the Elevator Key on the slot beneath it and press the “Up” button once again. This will take you to the next floor.
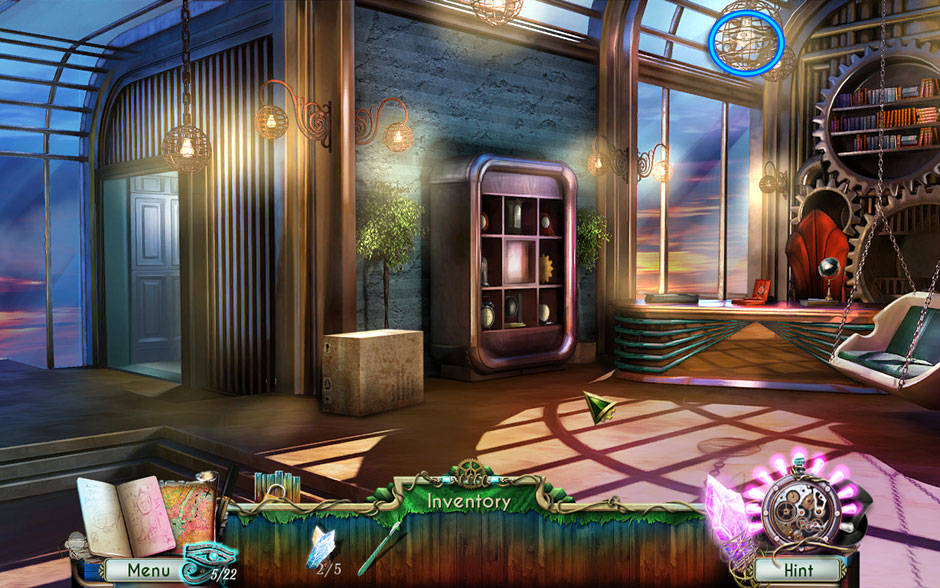
Royal Suite
- Collect the Eye of Horus 20/22 hidden within the painting over the mantle.
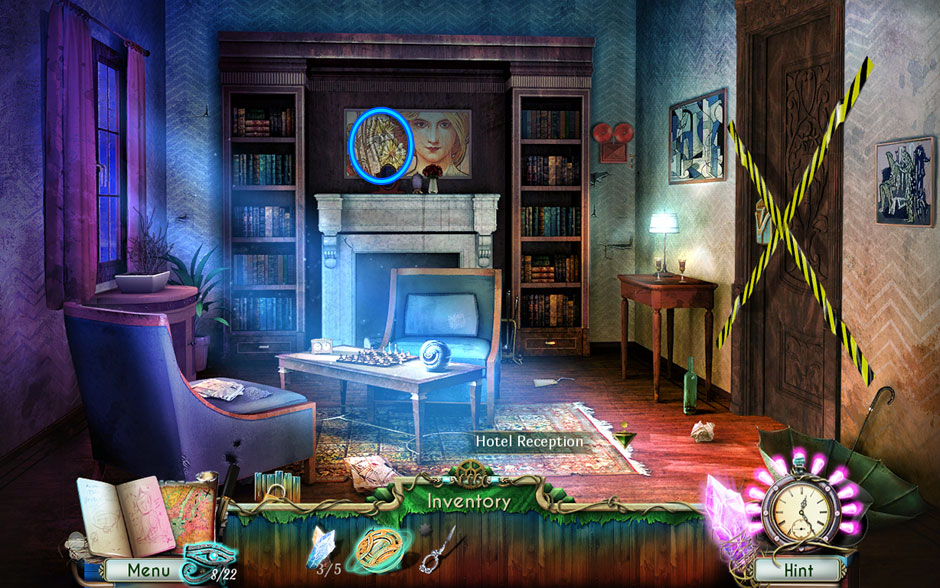
Dreamatorium Dr Magnus 2 Eye of Horus 20 of 22
- Take a closer look at the red alarm on the far wall and to the right. The objective “Activate the Alarm” will be added. Click on the Desk Key hanging next to it to add it to your inventory.
- Examine the small desk along the right wall. Click on the Rag to add it to your inventory.
- Use the Desk Key on the desk drawer to open it, then click on the Diary and the Brush inside to add them to your inventory.
- Select the Diary from your inventory, then open it. Click on the Spring inside to add it to your inventory.
- Examine the fireplace on the far end of the room. Use the Brush to clear the cobwebs away, then click on the Magnet and the Scissors Half (2) to add them to your inventory.
- Combine the two Scissors Halves to add the (incomplete) Scissors to your inventory. We’ll finish assembling these later.
- Return to the Hotel Reception.
Hotel Reception
- Take a closer look at the vent on the bottom left portion of the wall next to the elevator. Use the Magnet to retrieve the Alarm Handle and add it to your inventory.
- Go back to the Royal Suite.
Royal Suite
- Examine the red alarm again. Use the Alarm Handle on it, then click to complete the objective “Activate the Alarm”.
- Return to the Hotel Reception.
Hotel Reception
- Now that the alarm has been thrown, the Receptionist is gone, and a hidden object area has appeared over the front part of the counter.
- Find the objects listed at the bottom of the screen. Upon locating them all, the Suite Key will be added to your inventory.
- Examine the wooden cabinet behind the reception desk. Click on the right set of drawers to open them, then collect the Turpentine Can to add it to your inventory.
Dreamatorium Dr Magnus 2 Turpentine Can Location
- Select the Turpentine Can and click on the lid to unscrew it. Use the Rag on it to achieve the Turpentine, which will be added to your inventory in their stead.
- Go back up to the Royal Suite.
Royal Suite
- Examine the mantle on the far end of the room again. Use the Turpentine on the mirror covered in blue paint to clean it. A series of glyphs will be revealed and added to your Journal.
- Take a closer look at the taped off door on the right. Use the Knife function of the Multitool to cut the tape away.
- Examine the lock on the door and use the Suite Key to open it.
- Enter the Royal Suite Bedroom.
Royal Suite Bedroom
- Speak with the apparition. The objective “Enter the Suite” will be marked as complete.
- Click on the hidden object area beneath the painting in the far right corner of the room.
- Find the items listed at the bottom of the screen. You may need to click on the clothes hanging in the closet to reveal their locations. Upon completing the area, the Star Gem will be added to your inventory.
- Take a closer look at the mantle on the left. Click on the small box to open it, then click on the Drawer Button inside to add it to your inventory.
- Collect the Eye of Horus 21/22 on the cushion of the blue chair at the far end of the room.
Dreamatorium Dr Magnus 2 Eye of Horus 21 of 22
- Return to the Hotel Reception.
Hotel Reception
- Take a closer look at the wooden cabinet behind the reception desk again. Use the Drawer Button on the empty peg slot in the left drawer to trigger a minigame.
- Rotate the circles following the instruction on each circle to turn all the lights of the middle dial green. Upon completing the minigame, the drawer will be unlocked.
- Take a closer look at the cabinet drawer again and click to open it. Read the note left inside, then click on the Screw to add it to your inventory.
- Select the Scissors in your inventory and use the Screw on them. Next, select the Screwdriver function of the Multitool and use it to finish assembling the Scissors, adding them back to your inventory.
- Examine the reception counter again. Use the Star Gem on the slot at the top of the ornamental container to trigger a puzzle.
- The colors of the gems’ halves correspond with the flowers’ petals. Set each whole gem into one color. The solution is shown below.
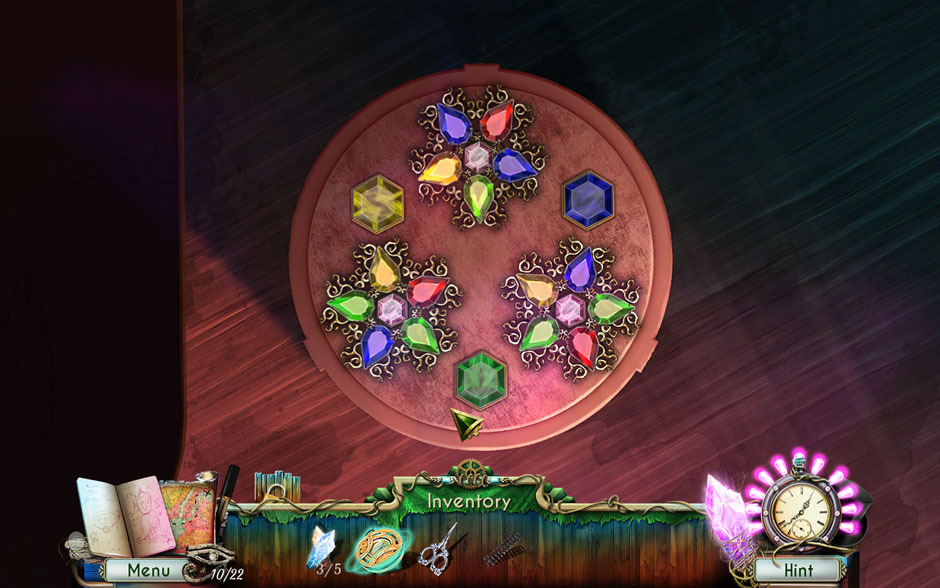
Dreamatorium Dr Magnus 2 Star Gem Minigame Solution
- The container is now open. Click on it for a closer view. Click on the Button 1/2 to add it to your inventory.
- Go back up to the Royal Suite.
Royal Suite
- Take a closer look at the planter on the left. If you try to use the Scissors function of the Multitool, it will break. Use the Scissors on the branches to cut them away, then click on the Square Tile to add it to your inventory.
- Enter the Royal Suite Bedroom.
Royal Suite Bedroom
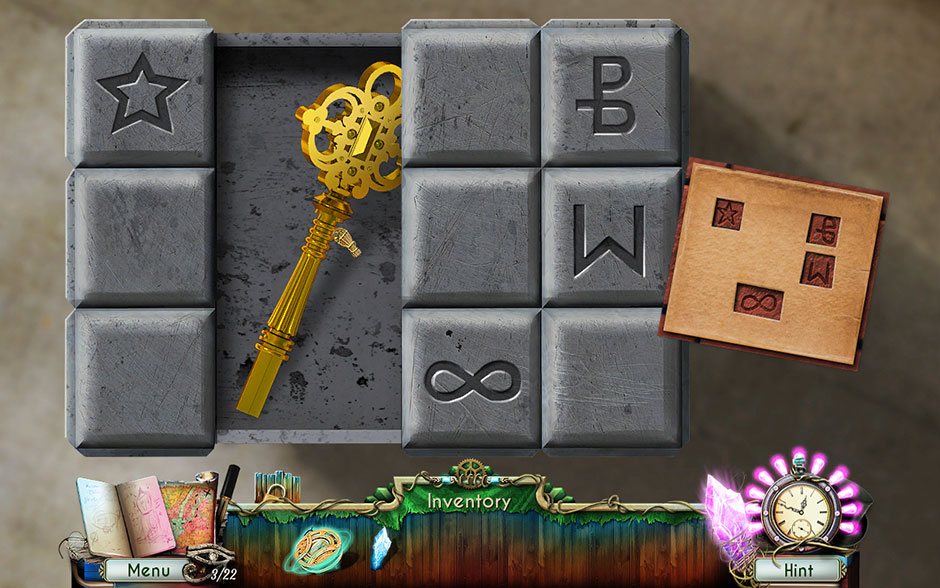
- Examine the painting in the far right corner of the room. Use the Knife function of the Multitool to cut the canvas away, revealing a hidden alcove beneath. Place the Square Tile in the empty slot of the mechanism to trigger a minigame.
- Use the arrows to move the symbols until you match them all with the drawing. The solution is shown below.
Dreamatorium Dr Magnus 2 Square Tile Minigame Solution
- Upon completing the minigame, click on the Envelope and the Button 2/2 to add them to your inventory.
- Select the Envelope from your inventory to open it. Click on the Gooseberries to add them to your inventory. The note inside the envelope will be added to your Journal.
- Examine the dome-shaped ornamental container at the foot of the bed. Use the Buttons on the empty slots to trigger a minigame.
- Solve the minigame by releasing all the buttons. A released button will appear yellow in hue. Once the container has been opened, take a closer look at the note inside.
Dreamatorium Dr Magnus 2 Button Release Puzzle Solution
- The apparition will appear again. Once you’ve spoken with them, click on the Bedroom Key to add it to your inventory, and proceed to the final location.
Chapter 5: House Lobby Revisited
Lobby
- Use the Bedroom Key on the door at the top of the stairs to open it.
- Enter Magnus Bedroom.
Magnus Bedroom
- Collect the final Eye of Horus 22/22 within the painting above the bed.
Dreamatorium Dr Magnus 2 Eye of Horus 22 of 22
- Take a closer look at the desk on the left. Click on the bottle of Cranberry Juice to add it to your inventory.
- Select the Cranberry Juice, then remove the cap and use the Gooseberries with it to obtain the Elixir of Dreams.
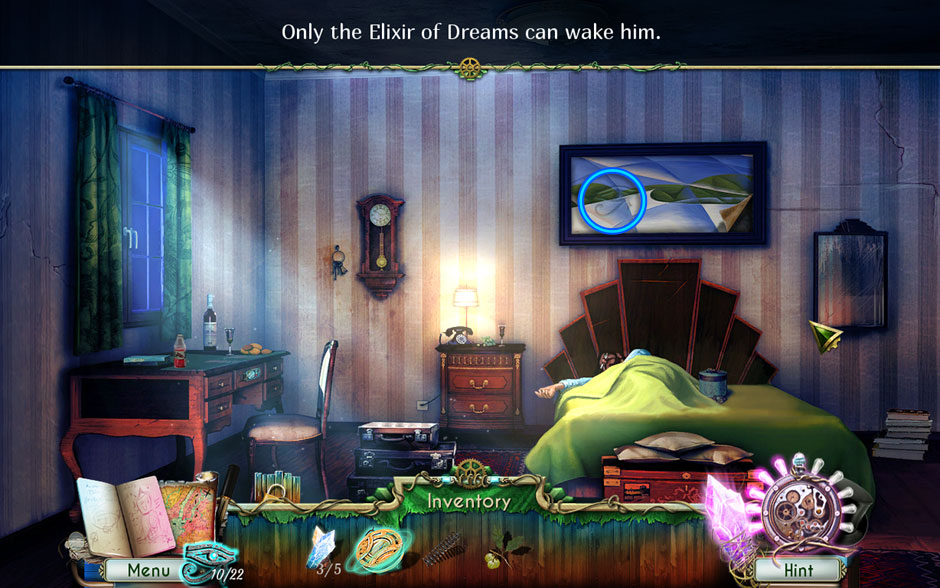
- Use the Elixir of Dreams on Dr. Magnus to wake him.
- Speak with Dr. Magnus. The objective “Wake up Dr. Magnus” will be completed and “Assemble the handle” added.
- Take a closer look at the writing desk on the left again. Click on the lock to trigger a minigame.
- Rotate the rings to assemble the picture. The center circle can’t be rotated. The solution is shown below.
Dreamatorium Dr Magnus 2 Ring Rotation Puzzle Solution
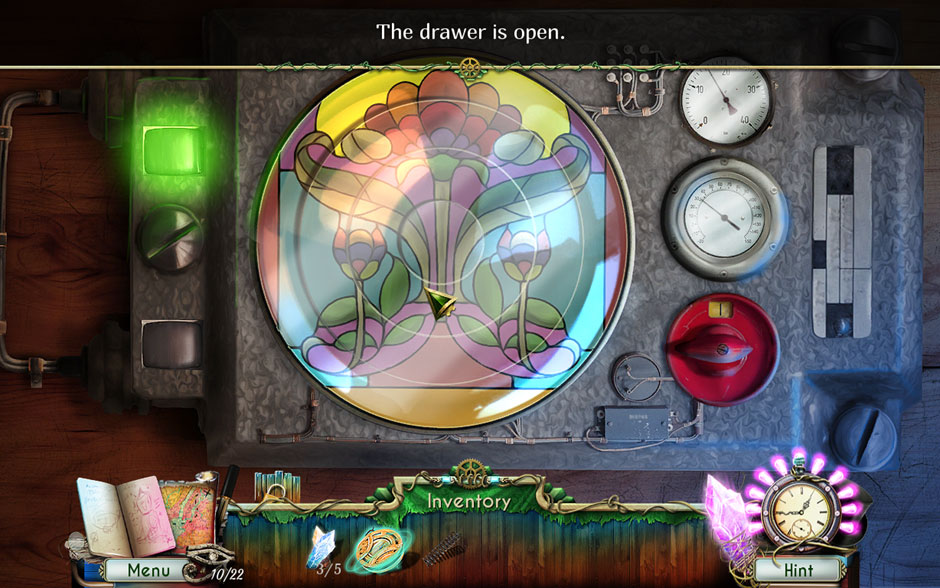
- Upon completing the puzzle, click on the red knob to open the drawer.
- Take a closer look at the writing desk once again and click on the drawer to open it. Click on the Handle inside to add it to your inventory.
- Examine the nightstand to the left of the bed. Click on the drawer to open it, then click on the Handle Base inside to add it to your inventory.
- Examine the clock hanging on the wall. Click on the Rusty Metal Bar sitting on top of it to add it to your inventory.
- Take a closer look at the bottom right corner of the painting on the wall above the bed. Click on the corner to pull the canvas away, then click on the Metal Pipe beneath to add it to your inventory.
- Select the Handle Base from your inventory, then use the Rusty Metal Bar, the Metal Pipe, the Spring, and the Handle on it in that order. You will acquire the Dreamatorium Handle, and the objective “Assemble the handle” will be completed as well as “Open the Dreamatorium” added.
- Exit to the Lobby.
Lobby
- Proceed forward through the double doors and into the Library.
Library
- Speak with Dr. Magnus.
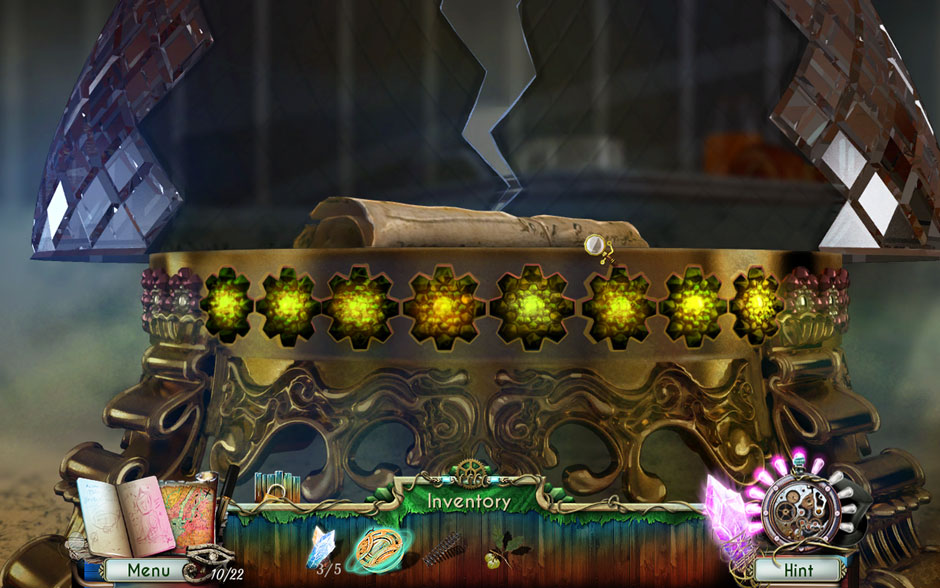
- Use the Amulet on the glowing outline that appears, then speak once again with Dr. Magnus. The three Crystals in your inventory will be separated.
- Continue forward into the Secret Passage.
Secret Passage
- Speak with the apparition, then take the White Crystal from him and add it to your inventory.
- Examine the door at the base of the stairs. Place the Purple Crystal, the Blue Crystal, the Green Crystal, and the White Crystal in their respective slots.
- Use the Amulet on the final crystal slot, then enjoy the final cutscene!
Congratulations! You’ve completed The Dreamatorium of Dr. Magnus 2!
Go to GameHouse to play this game!
Disclaimer: The Dreamatorium of Dr. Magnus 2 walkthrough is intended to guide you through the game and does not contain cheats, hacks, or serials.