Welcome to the Lost Tales – Forgotten Souls walkthrough. Lost Tales – Forgotten Souls by Rexard Entertainment is a hidden object adventure game. You take on the role of a mother who crashes her car on her way home and must journey through a place of magic and mystery to save her lost daughter. Use this walkthrough for hints, tips and tricks as you work your way through the game.
Contents
Tips and Tricks
Opening Screen: Here you’ll find your main options.
- Play: Starts a new game or continues where you last left off.
- You will only be allowed to choose your difficulty when you start a new game. Your options are “Casual” and “Expert”.
- Options: Go here to change your visual and sound settings.
- Credits: Use this to see the hardworking people who worked on the game.
- Change Player: Use this to select a player profile or to create a new one.
Inventory: Your inventory is kept in a bar at the bottom of the screen. Hover you mouse there to make the inventory appear.
Journal: Your journal keeps track of key information you find as you travel through the game. Located in the lower left corner, click on it to open it. You can flip through the information using the left and right keys at the bottom of the book.
The Hint Button: Feeling stuck in-game? Use this to get a hint for what to do next. It can be used an unlimited amount of times, but takes time to recharge.
Lost Tales – Forgotten Souls Walkthrough
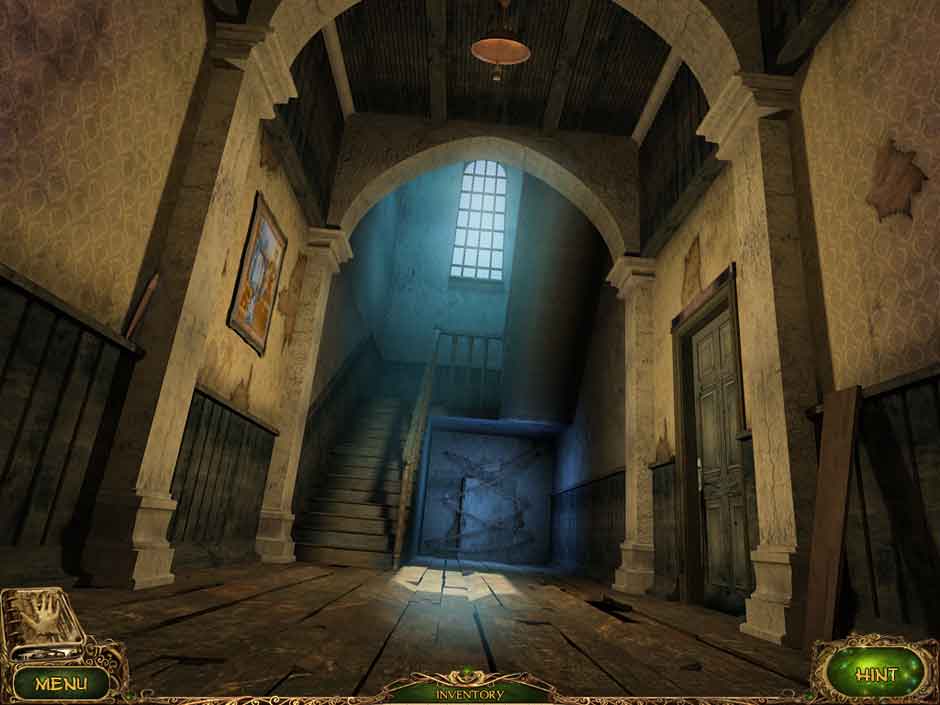
Chapter One: The Mystery of the House
Lost Tales Forgotten Souls Chapter 1
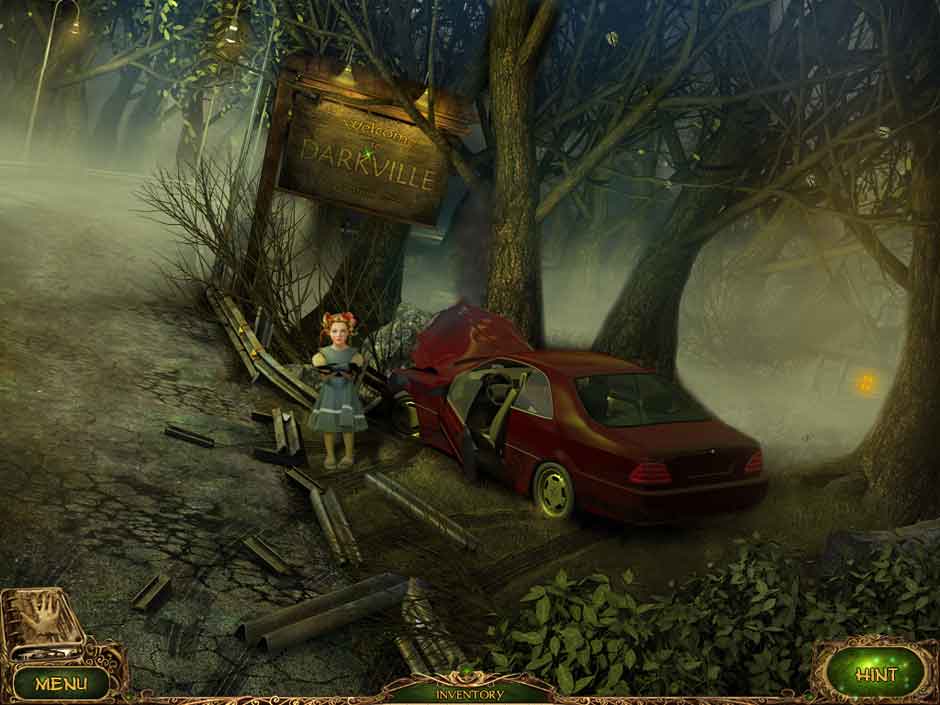
Car Wreck
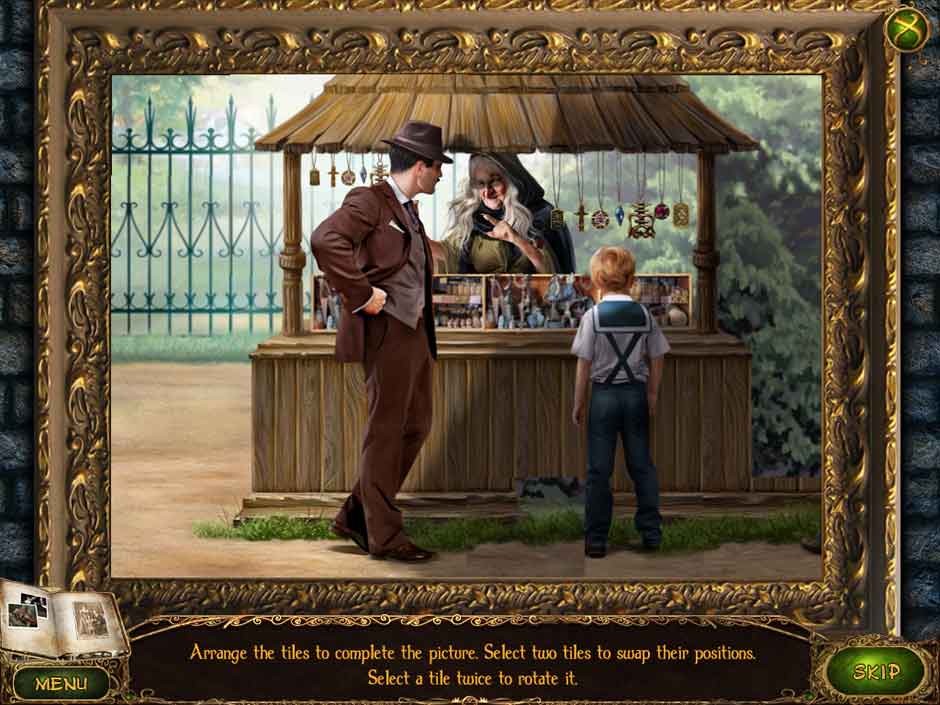
- You’re standing in front of your car wreck. Talk to your daughter, Maria, who is standing beside the car. Now you can click on the driver’s side door of the car to play a Hidden Object Scene.
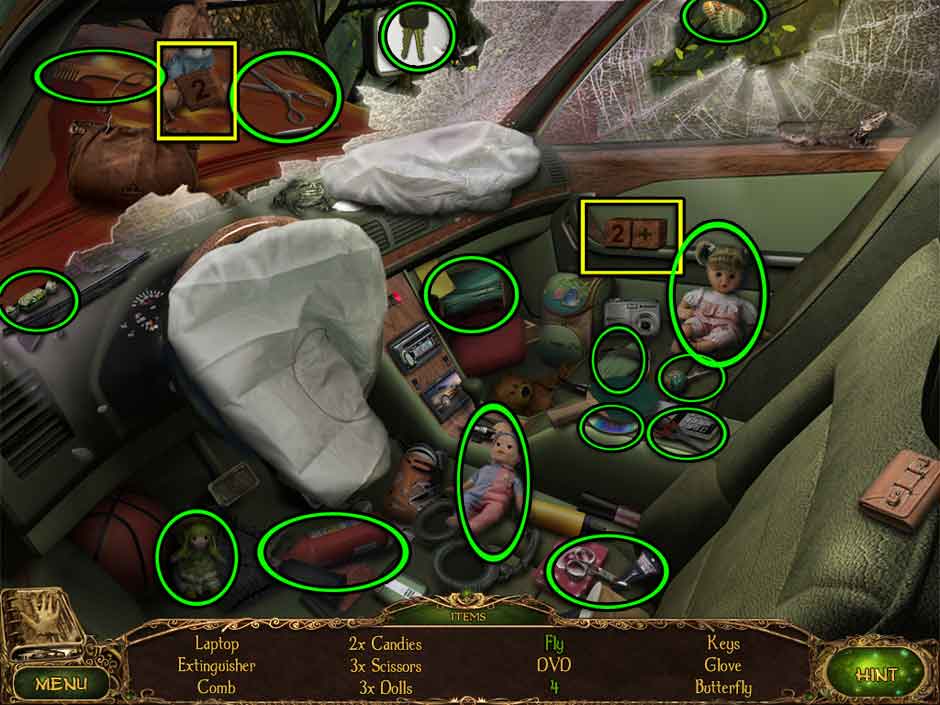
Lost Tales Forgotten Souls 01 HOS
- Collect all the objects on the list. To get the keys, you will have to click on the frog. To get “4”, use the block with a “2” on it with the other “2” and “+” blocks. When you are done, you’ll collect the Car Keys.
- Examine the trunk of your car.
- Use your Car Keys to open the trunk.
- Look at the trunk again.
- Click on the wheel, car jack, extinguisher and box to move them out of the way. Now collect the Flashlight, Wrench, and Lamp Oil.
- Use your Flashlight on the house in the lower right side of the screen to walk towards it.
Old Lady’s House
- Talk to the woman standing outside. Her name is Emma Spineker and she will invite you inside. Go inside the house to enjoy tea with her.
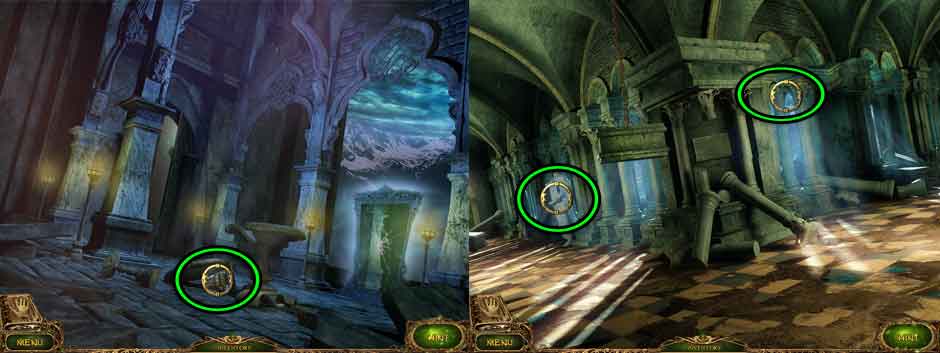
- When you are back outside, click on the crow near the doorway. Collect the Ladder from the grass and the Plaque 1/12 from the rock on the lower left.
- Look closer at the barrel.
- Collect the Plaque 2/12 that is sitting beside the barrel.
- Look closer at the well.
- You can use the Wrench here to fix the winch and lift it up. This will turn the well into a Hidden Object Scene when you click on it again.
- Collect all the objects on the list. The hammer leaning on the left of the well can be used to crack open the egg to collect the chick. Place the record from the roof of the record player to get the music note. When you are finished you will collect the Bunch of Keys.
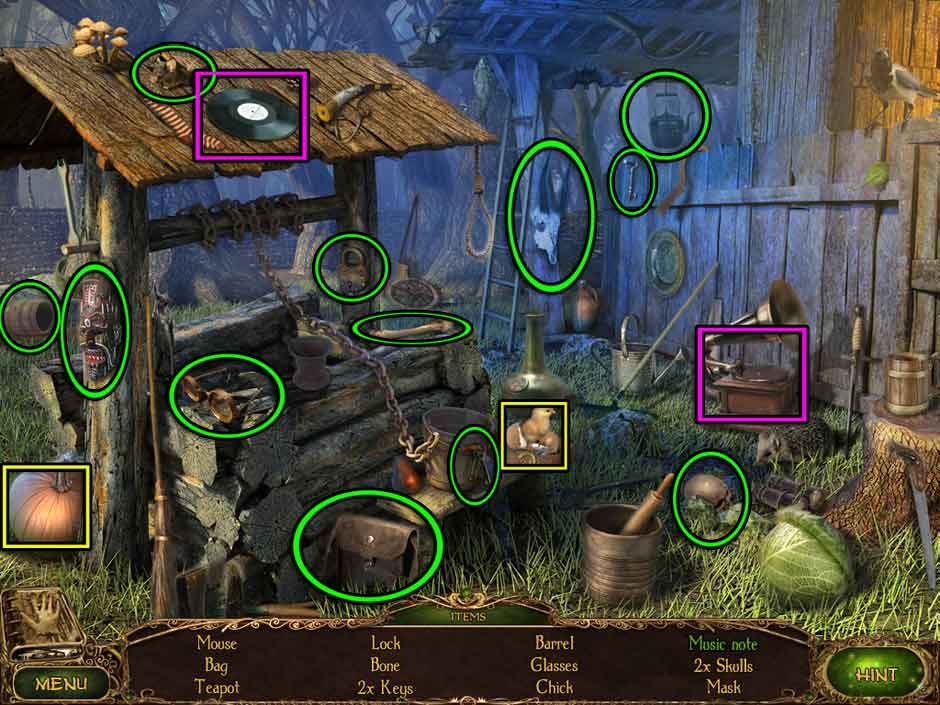
Lost Tales Forgotten Souls 002 HOS
- Look at the door on the far left side of the house.
- Use the Bunch of Keys to open the padlock and open the door to the shed. Go inside.
Shed (Main)
- Watch out for the dangerous looking bear traps. Take a closer look at the one in the middle.
- Collect the Funnel and the Plaque 3/12.
- Collect the Plaque 4/12 and 5/12 from the left corner and on top of the chest on the right. The Matches can be collected from the shelf on the right. Now open the door on the left and go through.
Storage Room
- It’s dark in here! Shed some light on the on the situation. Use the Funnel with the lamp, then use the Lamp Oil to fill the lamp up, then light it with the Matches. Now you can see the Plaque 6/12 on the floor by the bags and read the paper hanging on the wall. Now look closely at the box on the shelf.
- There is a piece of Plaque 7/12 beside the box.
- Look at the crates in the lower left side of the room.
- There is a piece of Plaque 8/12
- Click on the green glow in the center to start a Hidden Object Scene. Collect all the objects on the list. The wicker basket in the center holds the drum and you have to click on the chain in the upper left corner to get the horseshoe. You’ll collect the Pruning Shears when you’re done.
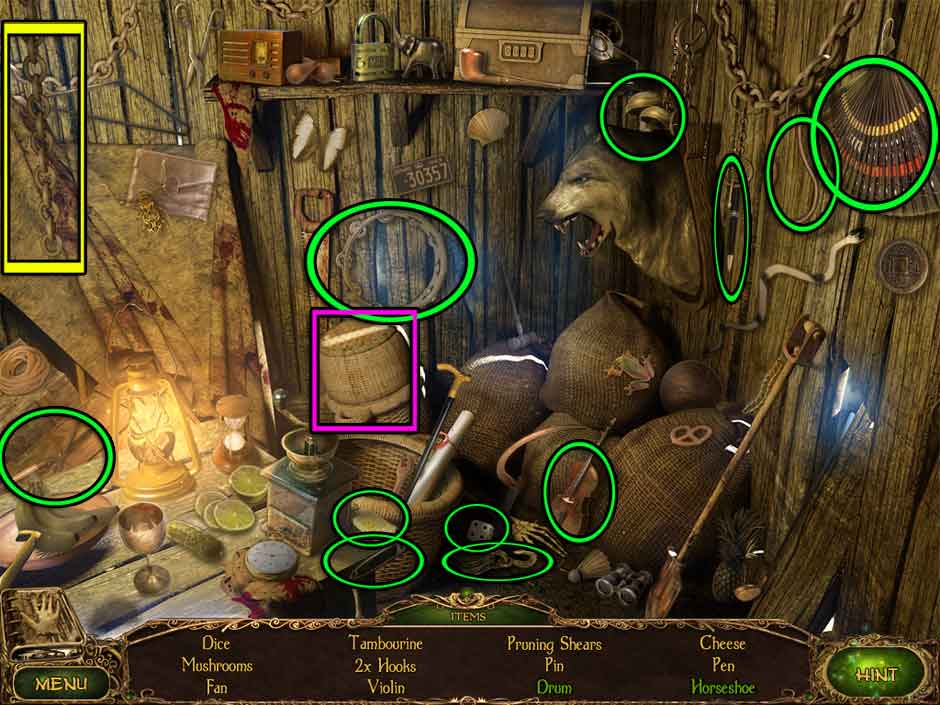
Lost Tales Forgotten Souls 003 HOS
Old Lady’s House
- The bushes on the right of the house can be cut through with the Pruning Shears. Do it three times before walking there.
Gravestone
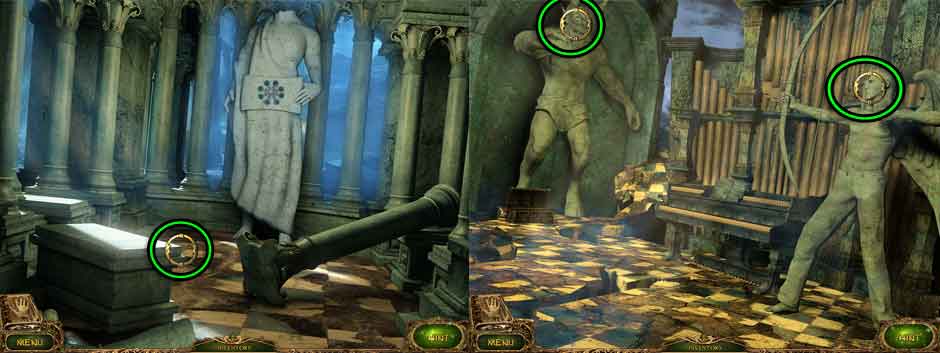
- Collect the three pieces of the Plaque scattered on the left, center and right. (9, 10, and 11/12.) Then use the Ladder against the side of the house so you can collect the Mailbox Flag.
Old Lady’s House
- Take a better look at the mailbox.
- Use the Mailbox Flag on the side of the mailbox, then click it to open the mailbox. Inside, collect the last bit of Plaque 12/12. You can read the newspaper here.
Gravestone
- Place the Plaque onto the gravestone to trigger a small puzzle. Piece all the broken bits together. You can click the pieces to rotate them. When they are in the correct spot, they can no longer be moved. In the end they will look like this:
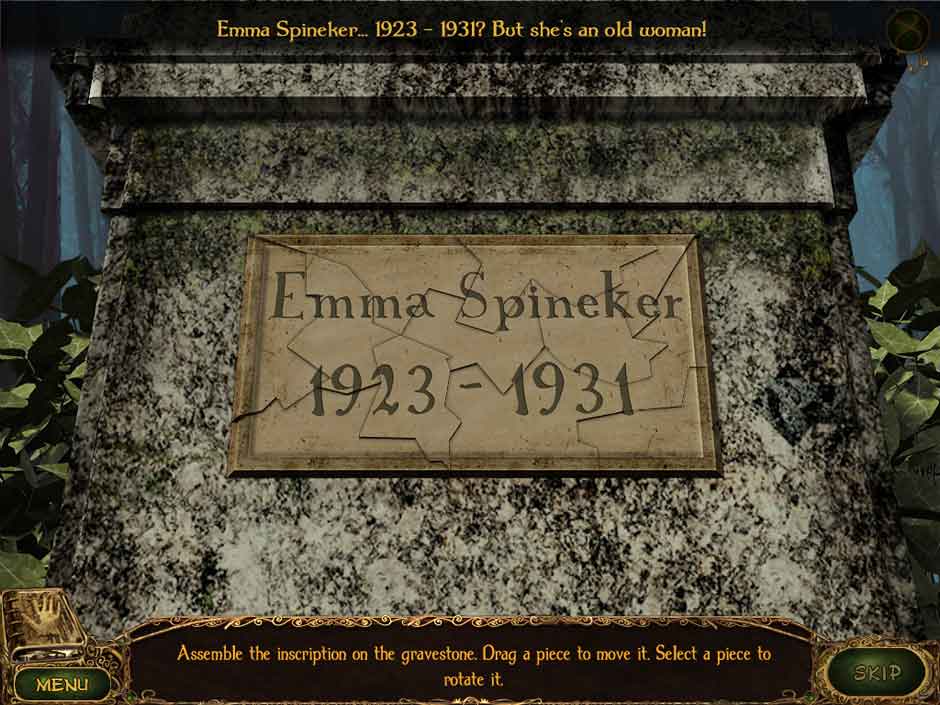
Lost Tales Forgotten Souls 004 Gravestone Puzzle
Storage Room
- Take another look at the box on the shelf.
- Enter the date: 1923. This will unlock the box. Click on it to open it, and collect the Cane and the Knife. The ribbon will go into your journal.
Shed
- Take another (careful!) look at the bear trap in the middle of the floor.
- Use the Cane to set off the trap, allowing you to collect the Pliers.
Storage Room
- Go ahead and look at the crates on the left side of the room.
- Use the Pliers here to open up the crate. Remove the lid and take the Crowbar from inside.
Old Lady’s House
- Look at the barrel in the grass.
- Use the Crowbar twice to smash it open. Collect the Bookcase Tile.
- Use the Crowbar to take the boards off the left window, then look closely at it.
- Collect the Moon Tile.
Shed
- There are boards across the door in the back that can be removed with the Crowbar. Take them down in a clockwise motion starting with the board nearest the lamplight. Look at the lock on the door.
- Place the Moon Tile on the lock. This triggers a puzzle where you have to arrange the tiles in the order of new moon to full moon. Use this pattern to unlock the door: B, A, D, C, B, E, D
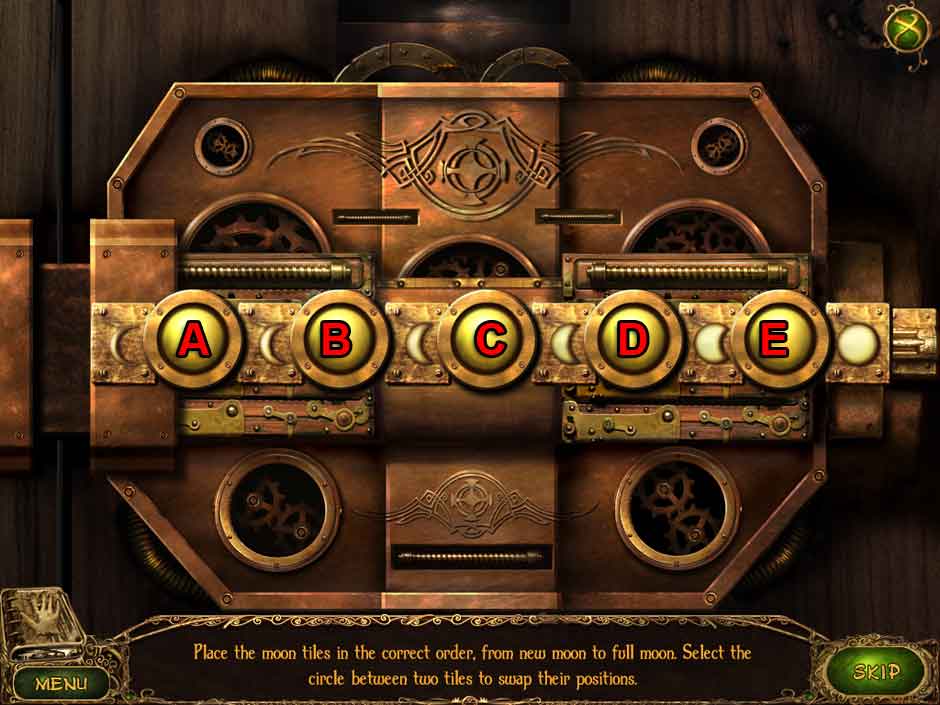
Lost Tales Forgotten Souls 005 Moon Puzzle
Study
- Click on the being in the chair to turn it around. Read the paper he is holding before looking at the tile puzzle in the shelves. You have to swap the pieces into the correct image. Double click them to rotate them. When you can this image, the middle will open and allow you to collect the Magic Book.
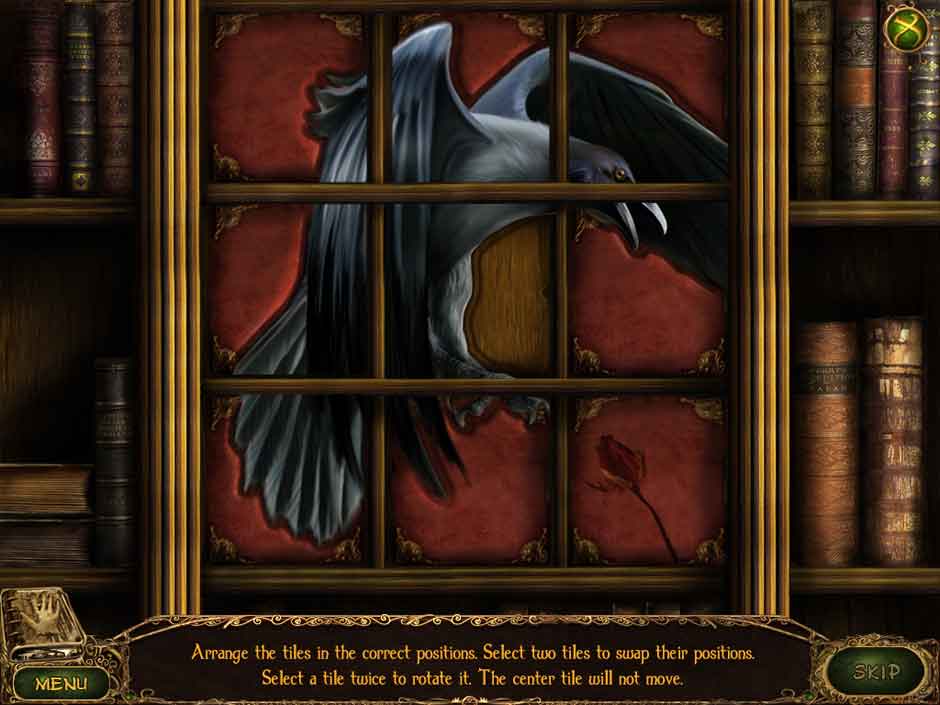
Lost Tales Forgotten Souls 006 Raven Puzzle
- Play the Hidden Object Scene. Collect all the items on the list. You will have to combine the two pieces of horns to collect the full set, and open the cage to free the bird. You’ll collect a Shovel when you are done.
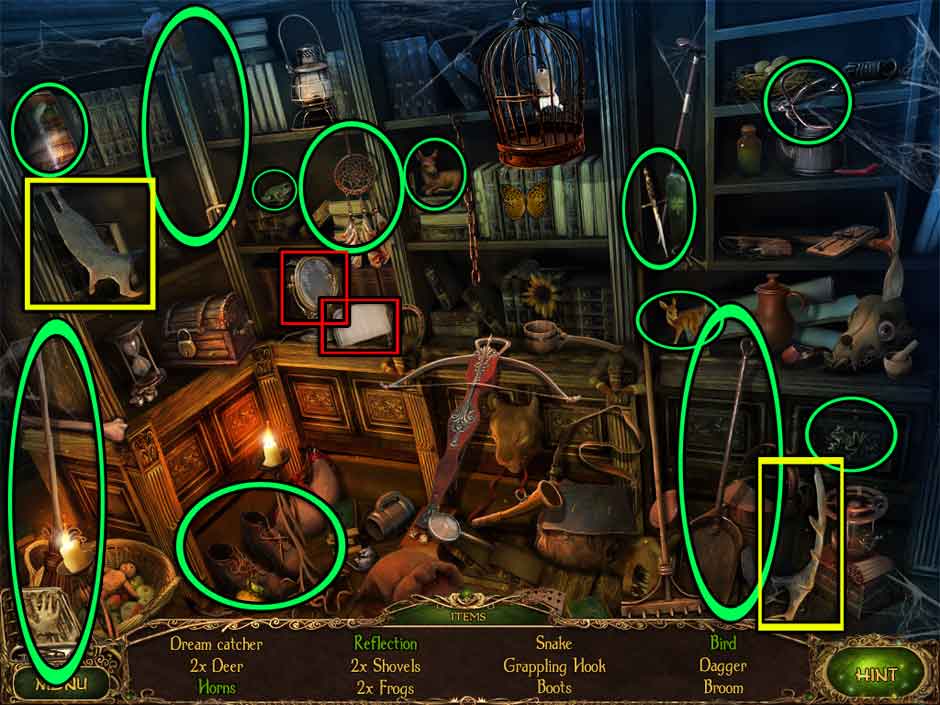
Lost Tales Forgotten Souls 007 HOS
Gravestone
- It’s time to get some more information on this mystery. Use the Shovel to dig up the grave, then look closely at the casket.
- Look at the picture beside the bear, then use the Knife to cut the teddy bear open. Collect the Clock Hand from inside the fluff of the bear.
Study
- Take a closer look at the clock.
- Use the Clock Hand on the clock. After the hands turn, collect the Book Symbol.
- Place the Magic Book onto the stand and look at it closer.
- Use the Book Symbol on the book and play the matching game.
Chapter Two: The Mystery of the Treeman
Lost Tales Forgotten Souls Chapter 2
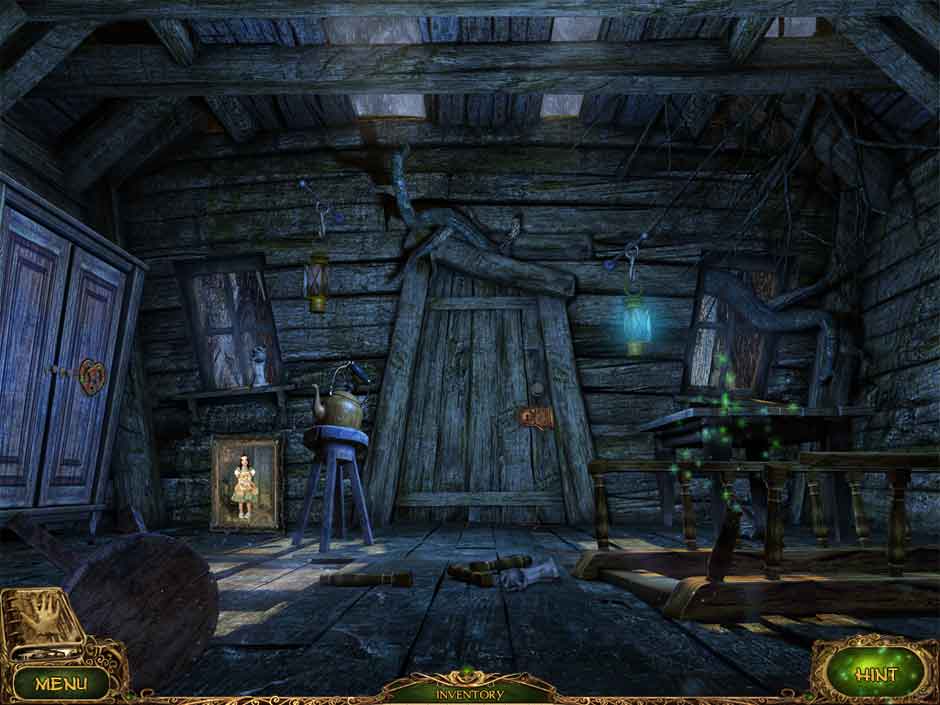
Dark Cabin
- Collect the Weight 1/8 off the floor and Weight 2/8 on the left. Take a look at the teapot on the stool.
- Take the lid off and collect the Key
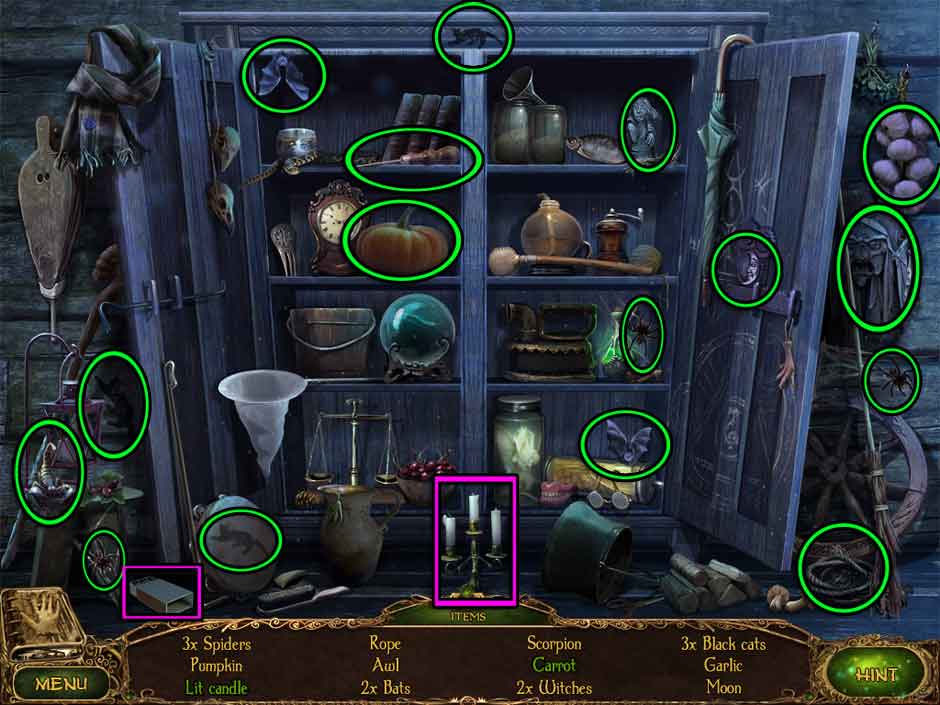
- Look at the table to start a Hidden Object Scene. Collect all the objects. Use the knife in the banister to cut the pumpkin for a slice. Move the basket at the leg of the table to find the metal stick. You’ll collect a Lockpick Part.
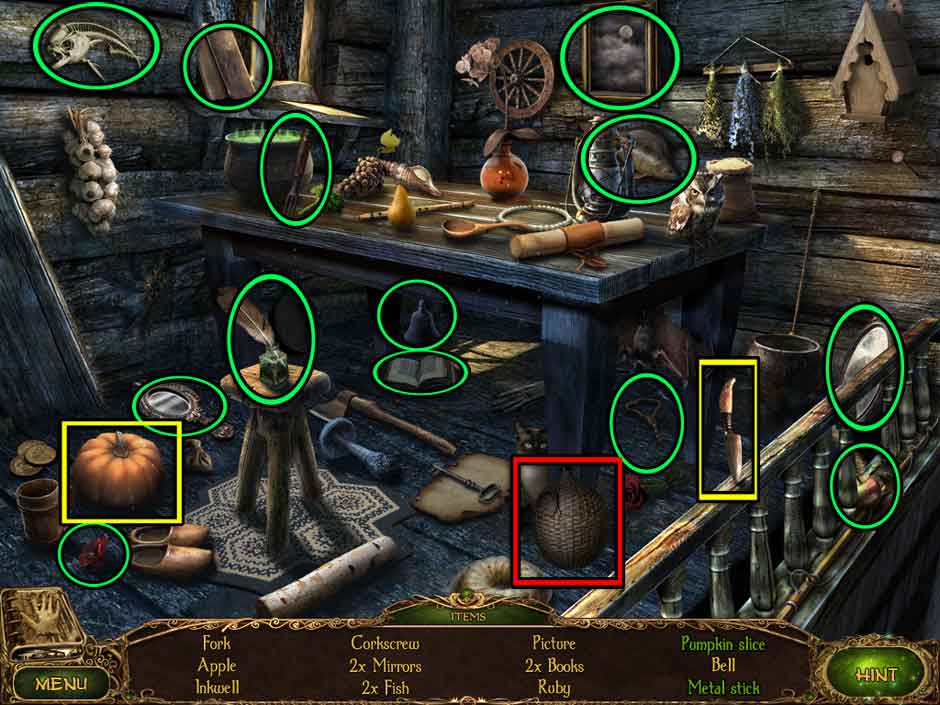
Lost Tales Forgotten Souls 008 HOS
- Look closer at the lock on the door.
- Insert the Lockpick Part. Move the lockpick to this position and hold it until the lock opens:
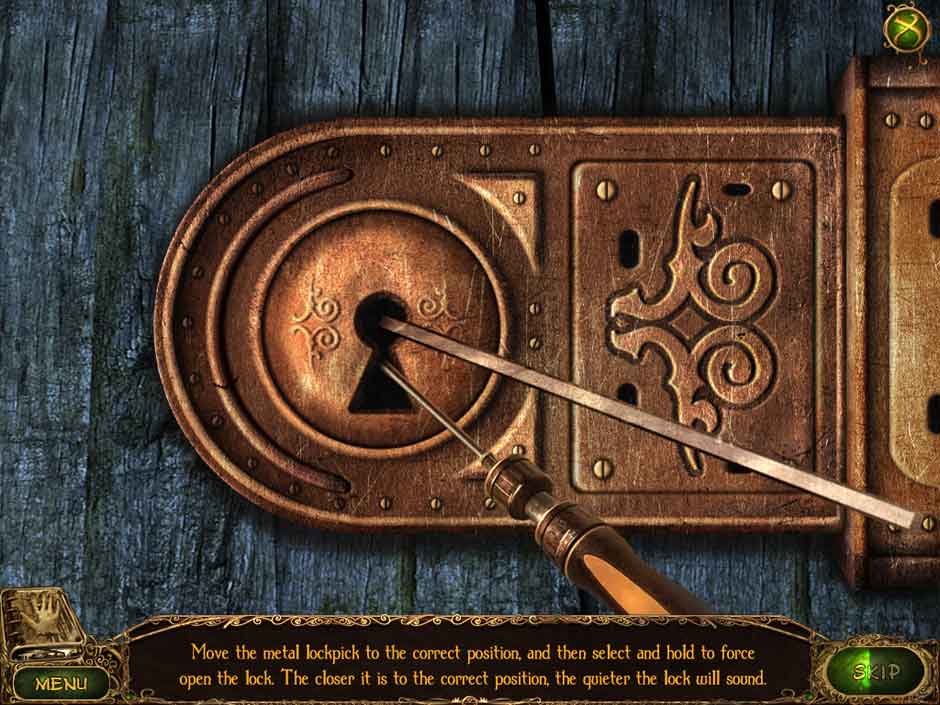
Lost Tales Forgotten Souls 009 Lock Puzzle
- Now go through the door.
Forest Opening
- Once Emma leaves you, collect the Weight 3/8 from the roots of the tree on the right. Then look at the scarecrow to start a Hidden Object Scene.
- Collect all the objects. Click on the stick hanging in the upper right to shoot the arrow into the screen. Click on the mask to make the eye appear. The Green Button is under the hat and will be the item you collect when you are done.

Lost Tales Forgotten Souls 010 HOS
Dark Cabin
- Take a look at the wardrobe on the left.
- Place the Green Button into the puzzle, then press the following arrows to complete the puzzle: E–D–F-F-C-C-E-B-B-F
Lost Tales Forgotten Souls 011 Button Puzzle
- Look inside the wardrobe again to start a Hidden Object Scene. Use the matches in the lower left corner to light the candle in the middle of the floor. Move the jar to find the carrot. When you’re done, you’ll collect the Rope.
Lost Tales Forgotten Souls 012 HOS
- Go forward through the door and then ahead once more to the Sacred Place.
Sacred Place
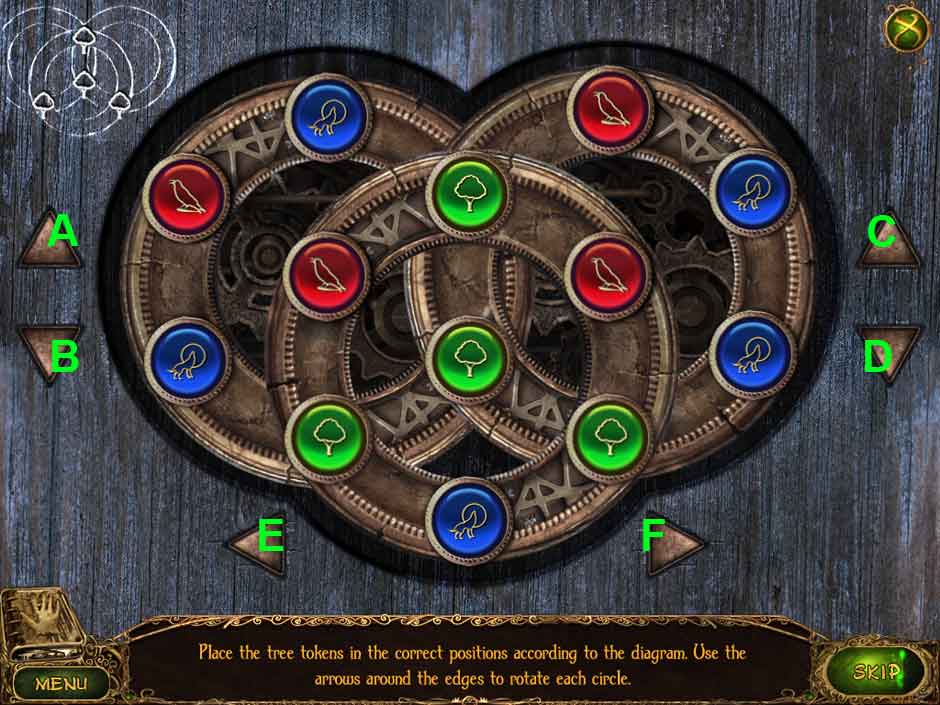
- Take a closer look at the puzzle on the base of the altar.
- Follow these steps from left to right. The goal is to copy the puzzle on the right section onto the left:
Lost Tales Forgotten Souls 013 Slide Puzzle
- Collect the weight that falls down.
Forest Opening
- Look at the hole in the ground that opens up.
- Use the Rope here and climb down into the hole.
Treeman’s Room
- There is a Treeman here. Talk to him and he will give you an Empty Bottle.
- Play the Hidden Object Scene on the right of the Treeman. Open the clam in the middle of the screen for the pearl and find the compass inside the book below it. You’ll collect the Axe.
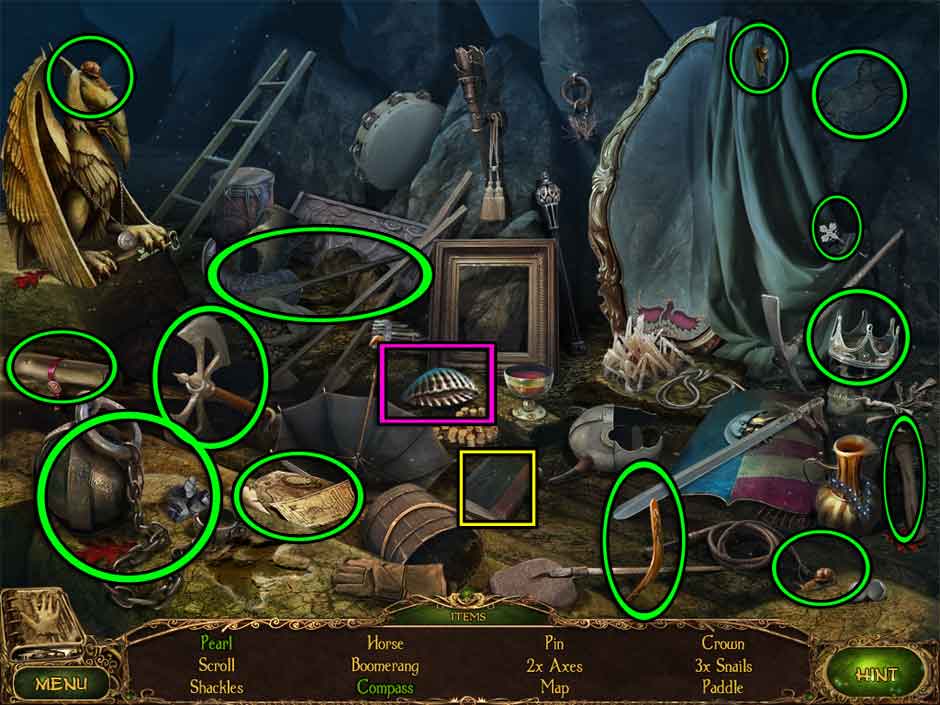
Lost Tales Forgotten Souls 014 HOS
- Climb out of the hole via the rope in the upper left corner.
Forest Opening
- There is a mark on the tree above the Scarecrow. Use the Axe there and look inside the hole it makes.
- Use the Key on the box. Collect Weight 5-8/8 as well as the Stone Jaw.
Treeman’s Room
- Take a look at the wall behind the Treeman to trigger a puzzle.
- You have to place the weights as so:
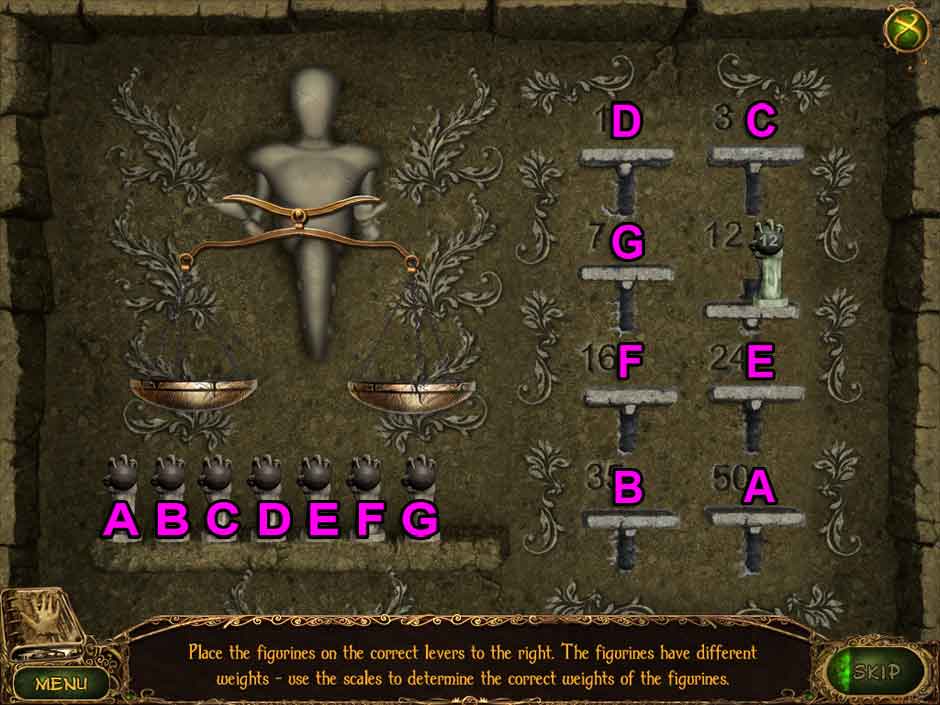
Lost Tales Forgotten Souls 015 Weight Puzzle
Sacred Place
- You can go up the stairs now and into the temple.
Temple
- Attach the Stone Jaw into the skull on the upper left. Take a look at the object on the base of the fountain to start a puzzle.
- This puzzle is based around making the patterns complete. You can click them to slide them into and out of the A, B, C, D, and E spots. Click the middle to spin the wheel.
- The patterns can be made as so:
- C – D – Spin – E – Spin – A – Spin – C – Spin – C – Spin – Spin – Spin – C – Spin – Spin – B – Spin – B
- C – Spin – B – Spin – C – Spin – D – Spin – Spin – B
- D – Spin – E – B – Spin – C – Spin – Spin – E – Spin – E – Spin – Spin – D – Spin – Spin – B – Spin – A – C
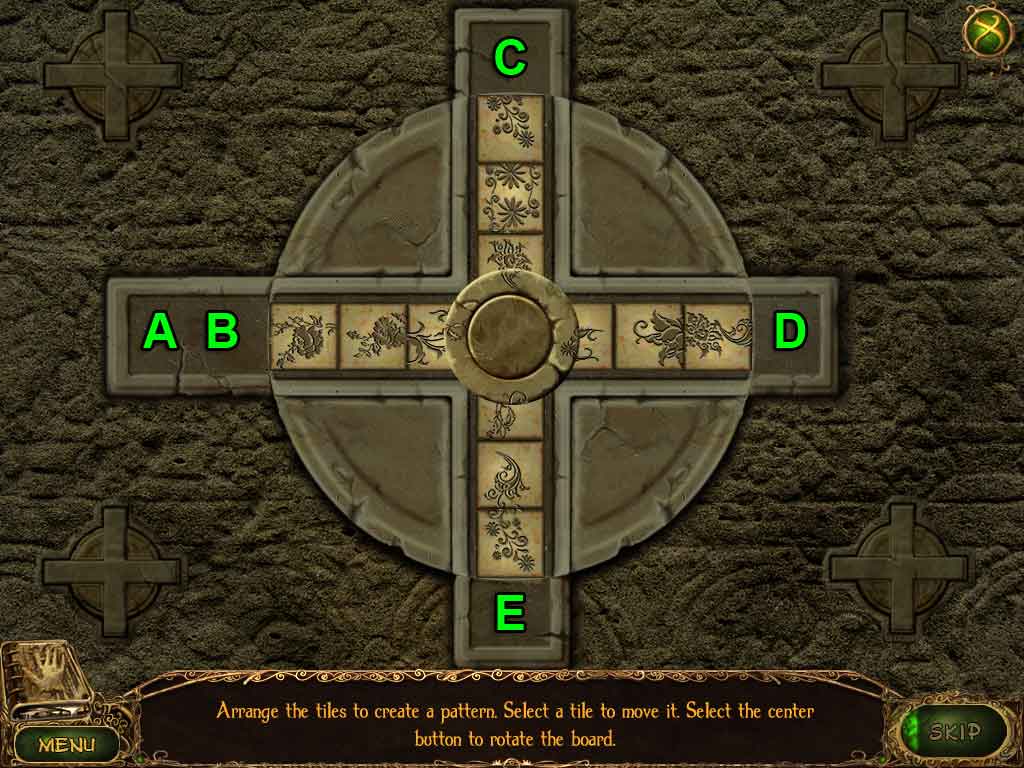
Lost Tales Forgotten Souls 016 Spin Puzzle
- Take a look at the fountain that is now on.
- Use the Empty Bottle to collect water, creating the Empty Bottle with Water. Also pick up the Scissors from the right side of the fountain.
Dark Cottage
- Look closely at the painting on the floor.
- Use the Scissors on the corner of the painting. Collect the Tree Medallion.
Treeman’s Room
- Give the Treeman the Bottle with Water. He will tell you his story and the stairs will be fixed. Go up them.
Statue
- Use the Tree Medallion on the base of the statue. The Amulet will drop, allowing you to collect it.
Treeman’s Room
- Give the Amulet to the Treeman, who is actually the soul of a little boy. He’ll be freed and he will give you the Amulet to help you on your journey.
Chapter Three: The Mystery of the Prison
Lost Tales Forgotten Souls Chapter 3
Book
- Use the Amulet on the first glowing circle of the book.
Prison
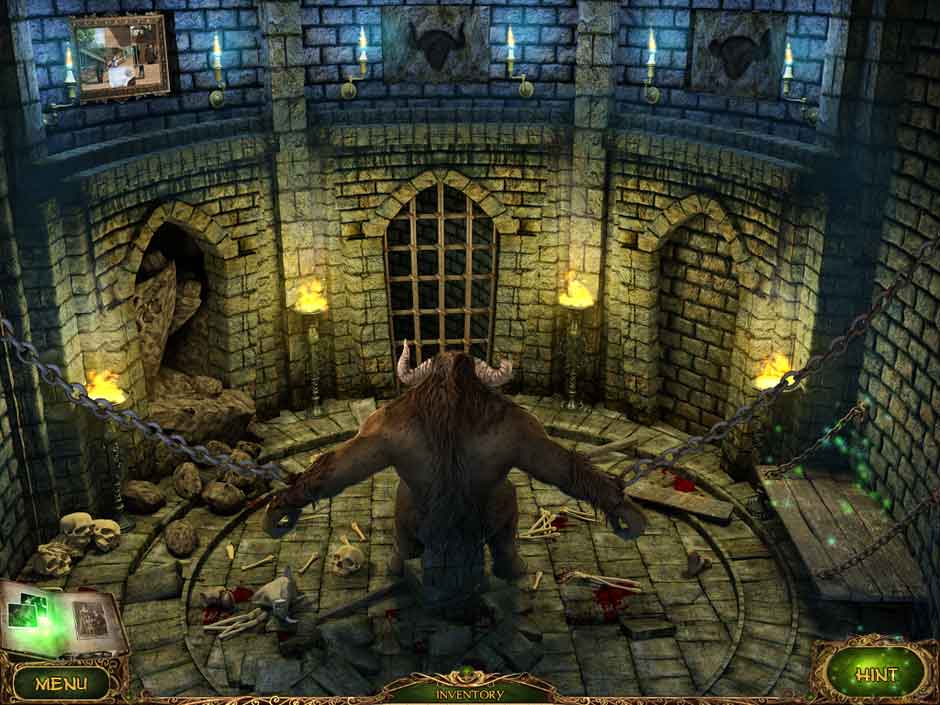
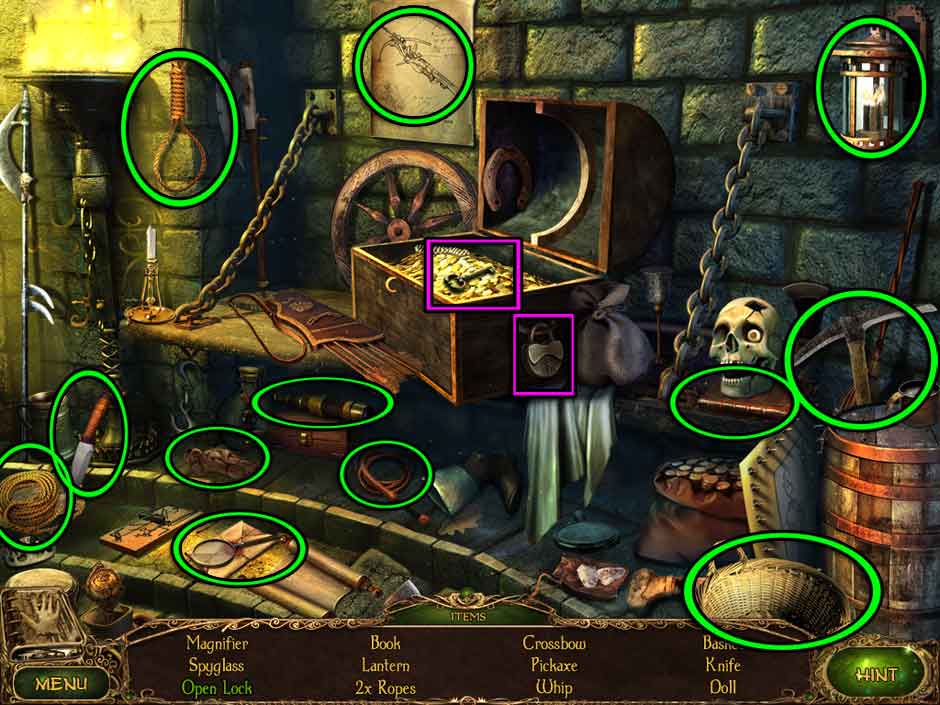
- Talk to the Minotaur, then play the Hidden Object Scene to the right. Use the key in the treasure chest to unlock the padlock so you may collect it. When you are done, you will collect the Pickaxe.
Lost Tales Forgotten Souls 017 HOS
- Use the Pickaxe on the rubble in the doorway to the left. Go through it now that it is clear.
Prison Cave
- Collect the Hammer from the lower left part of the cave.
Prison
- Look at the photo in the upper left corner.
- Click on the middle circles to rotate the pieces and form a picture. This is a random puzzle. When you are done, move through the opened door in the center.
Cellar
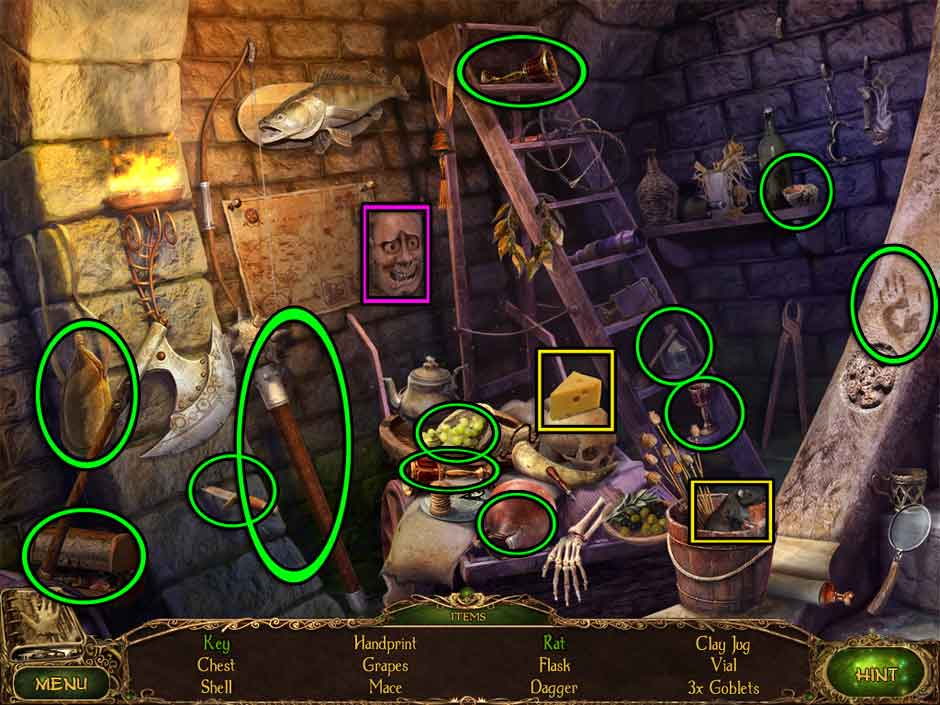
- Play the Hidden Object Scene. The rat needs the cheese before you can collect it and the key is hidden behind the devil mask. You will collect a Vial.
Lost Tales Forgotten Souls 018 HOS
- Take a closer look at the barrels.
- Use the Hammer to get inside the barrel and collect the Valve.
Prison Cave
- Towards the back and right, there is a pipe. Look at it.
- Use the Valve on the pipe to start the green acid flowing. Then collect the acid in the Vial to create the Vial with Acid.
Cellar
- Look at the chained stump.
- Pour the Vial with Acid on the chains to break them, then collect the Stone Minotaur.
Prison
- Place the Stone Minotaur into the empty slot in the top center of the screen. Click on the puzzle revealed to start it. Swap and rotate the tiles until this image is created:
Lost Tales Forgotten Souls 019 Puzzle
- Go through the opened door on the right.
Staircase
- Continue upwards.
Office
- Play the Hidden Object Scene. You can find the thermometer behind the elephant head and you can use the ink quill on the parchment to create and collect the signature. You will collect a Saw.
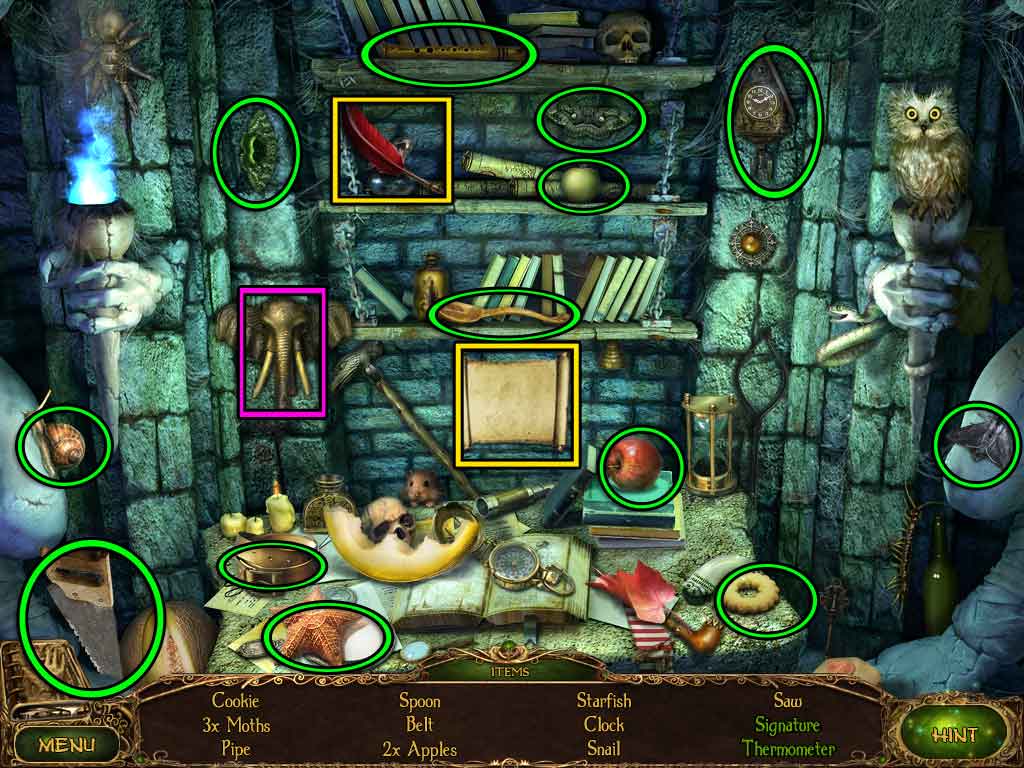
Lost Tales Forgotten Souls 020 HOS
Prison Cave
- Use the Saw to cut through the beam in the ceiling. You will collect the
Cellar
- Use the Board on the gap in the floor on the left side of the room. You can cross it into the next room.
Back Room
- Play the Hidden Object Scene here. Make sure you move the shield to get to a few of the objects and place the archer’s hand and bow back on his arm. You will get the rag.
Lost Tales Forgotten Souls 021 HOS
Staircase
- Take a look at the statue in the back.
- You can also melt these chains with the Vial of Acid. Break open the crack in the chest with the Hammer and then rub it down with the Rag. This will start a random puzzle where you move the minotaur heads into the slots.
- Collect the Skull Eyes.
Prison Cave
- Take a look at the skull in the back.
- Place the Skull Eyes into the skull to start the puzzle. You move the box by clicking the eyes.
- Click the left eye twice, then go back and forth between right and left until the box in in the correct position. Collect the Stone Minotaur.
Prison
- Place the Stone Minotaur into the slot on the upper right. Take a look at the picture revealed.
- This puzzle requires you to rotate the tiles. When you are done it will look like this:
Lost Tales Forgotten Souls 022 Puzzle
Chapter Four: The Mystery in the Basement
Lost Tales Forgotten Souls Chapter 4
Book
- Place the Amulet into the second slot of the book.
Foyer
- Collect the Brush 1/8 from the left and the Board 1/4 on the right. Then go up the stairs.
Upper Hall
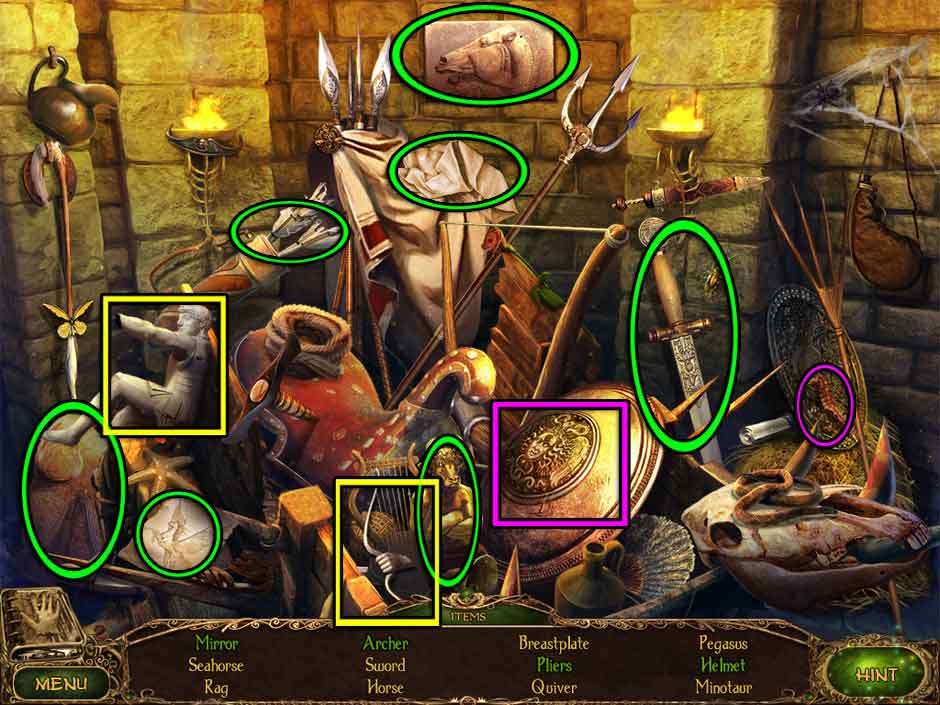
- Play the Hidden Object Scene. You’ll find the opera glasses under the top hat and the envelope behind the painting. There’s also a sphere behind the book. You’ll collect a Spear when you are finished.
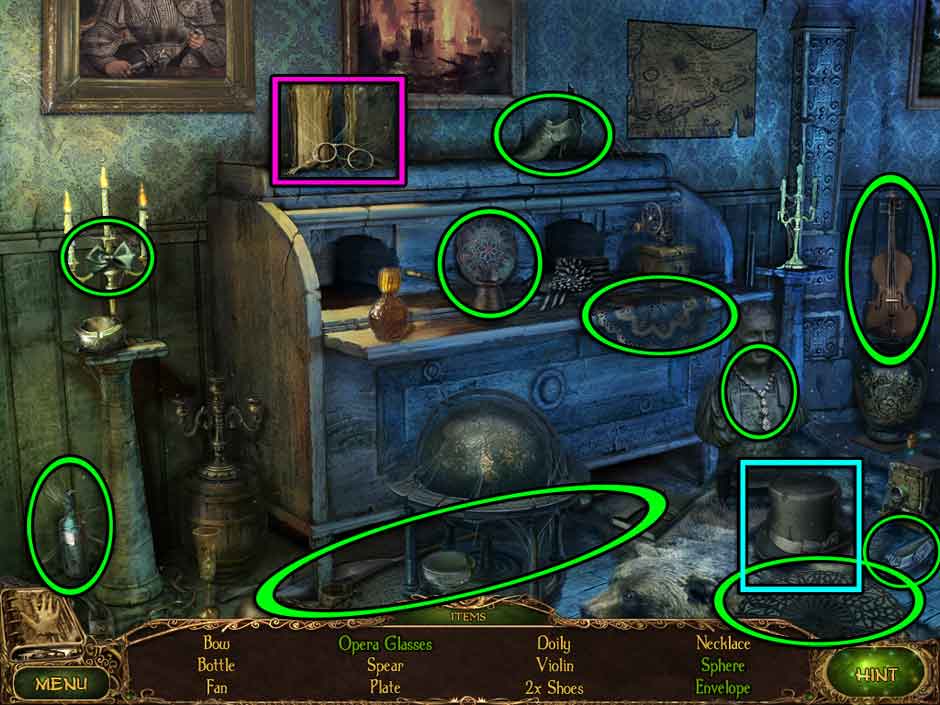
Lost Tales Forgotten Souls 023 HOS
- Collect the pliers on the lower left. Then take a look at the goat head mounted on the wall.
- There in a Brush 2/8 in his horn to collect.
- Knock the boar head off the wall. It will crack the floor. Take a closer look.
- Collect the Brushes 3/8 and the Board 2/4. You can’t get the statue yet.
- Head into the door on the left.
Piano Room
- Collect the Board 3/4 from the floor and look at the fireplace.
- Collect the Brush 4/8.
Foyer
- Take a look at the light in the ceiling.
- Use the Spear to knock down and collect the Door Handle.
- Take a look at the door on the right.
- Use the Door Handle to open the door and then go through.
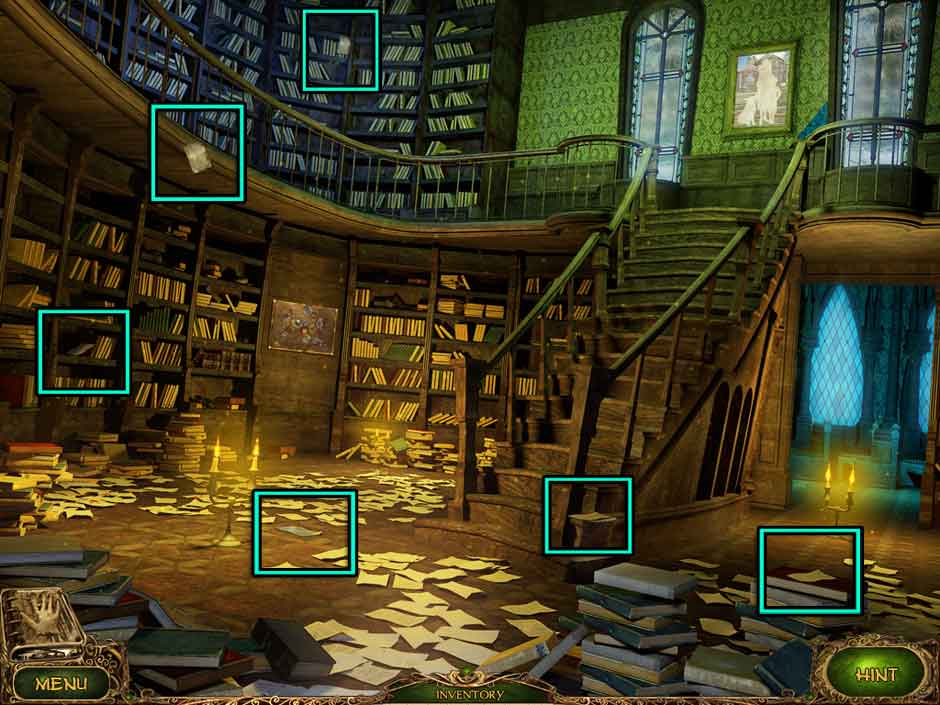
Library
- Play the Hidden Object Scene here. You’ll find the mask under the curtain and the pouch behind the picture on the wall. When you’re done you’ll collect the Hammer.
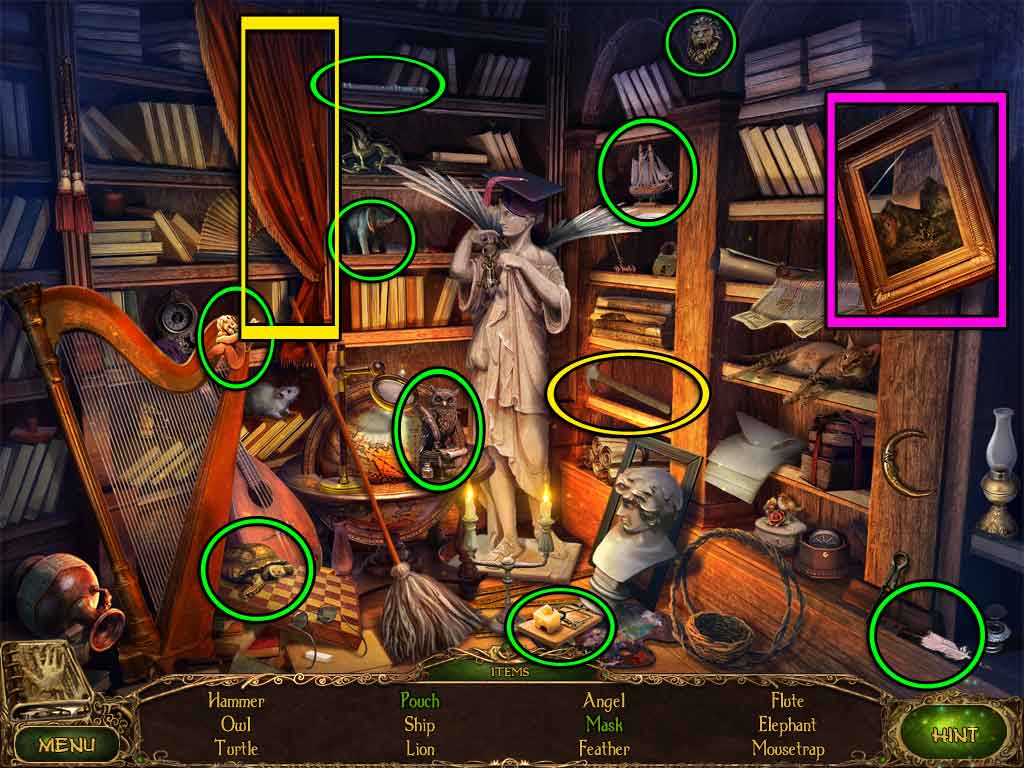
Lost Tales Forgotten Souls 024 HOS
- Collect the Board 4/4 from the floor and collect the ladder from the shelves.
Upper Hall
- Use the ladder underneath the trap door on the right.
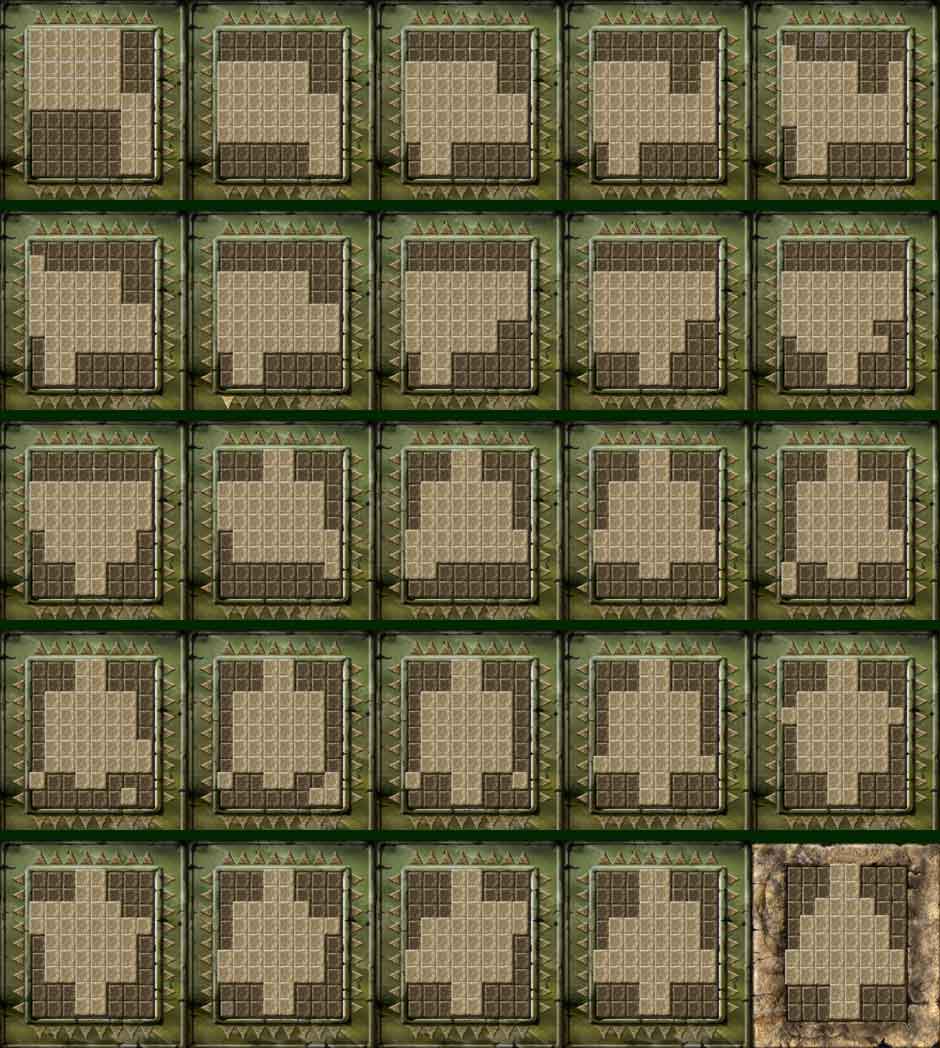
- Looking here will start a puzzle. Slide the pieces to unlock the door. You need to move the three bronze pieces to undo the locks, but first you need to move the silver pieces out of the way. When you’ve finished the puzzle, go through the door.
Lost Tales Forgotten Souls 025 Slide Puzzle1
Lost Tales Forgotten Souls 025 Slide Puzzle2
Attic
- Play the Hidden Object Scene. Make sure you water the flower pot to collect the flower and move the book to get to the skull. When you’re done you’ll collect an Oven Mitt.
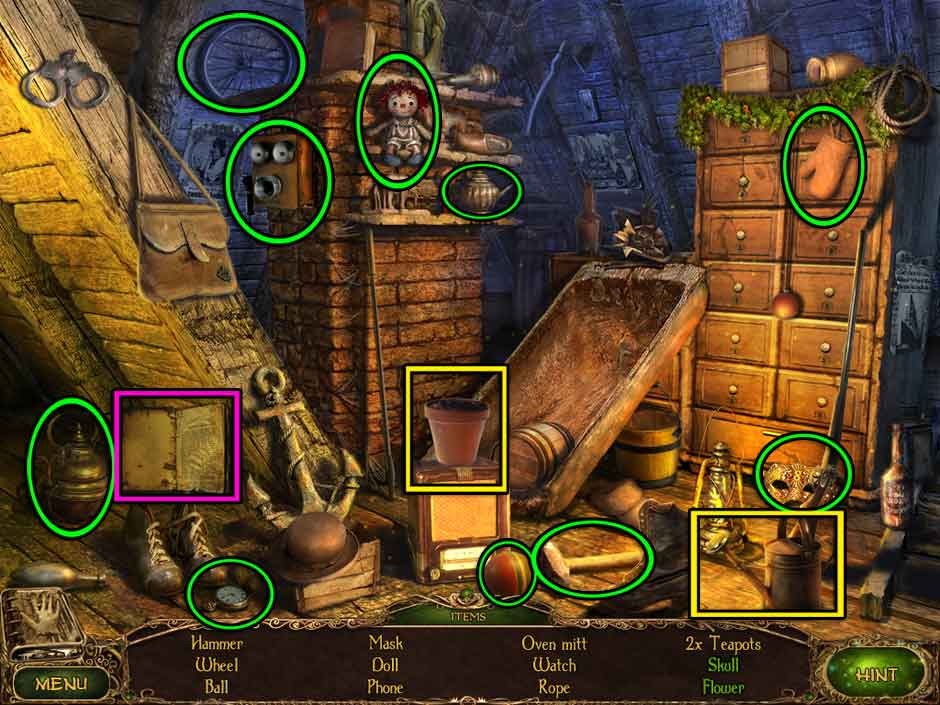
Lost Tales Forgotten Souls 026 HOS
- Take the Brush 5/8 in the angle statue’s hand.
Piano Room
- Look at the fireplace.
- Use the Hot Mitt to collect the
- Play the Hidden Object Scene that appears. The rose is hiding in a desk drawer and you’ll need to pour tea into the cup on the desk. When you’re done you’ll collect a Key.

Lost Tales Forgotten Souls 027 HOS
Foyer
- There is a door covered in chains in the back to look at.
- Collect a Brush 6/8, then use the Poker to pull Nails out of the mouse hole in the wall. Remove the chains with the Now go through the door.
Basement Stairs
- Here you will use the Boards to rebuild the stairs. Use the Nails on the and secure them with the Collect the Brush 7/8 from the wall, then continue down the stairs.
The Beast’s Prison
- Collect the Handle from the left corner of the room
Piano Room
- Look at the drawers on the far right.
- Use the Handle to open the middle drawer. Collect the Gears and the Brush 8/8.
Library
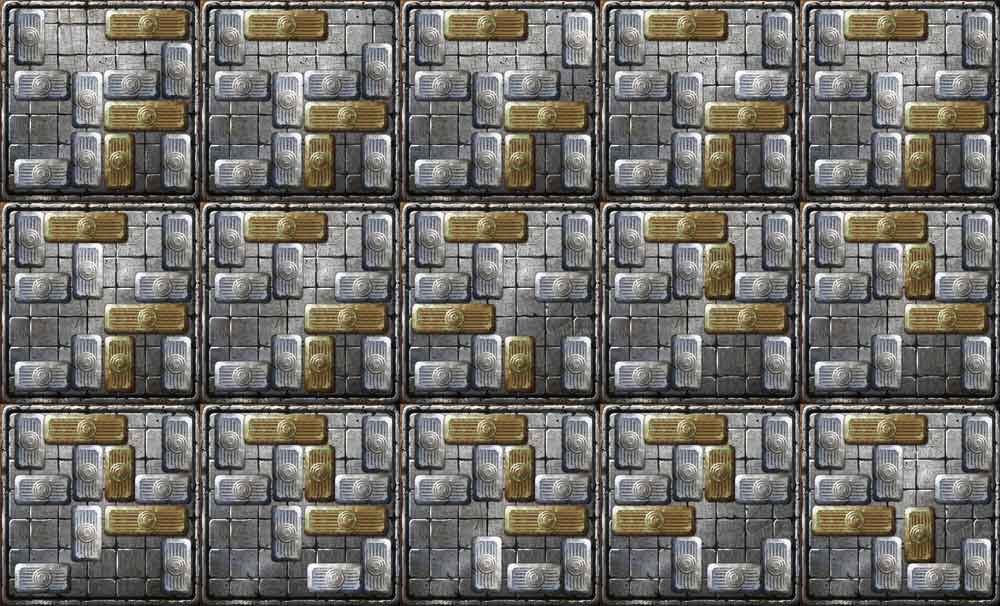
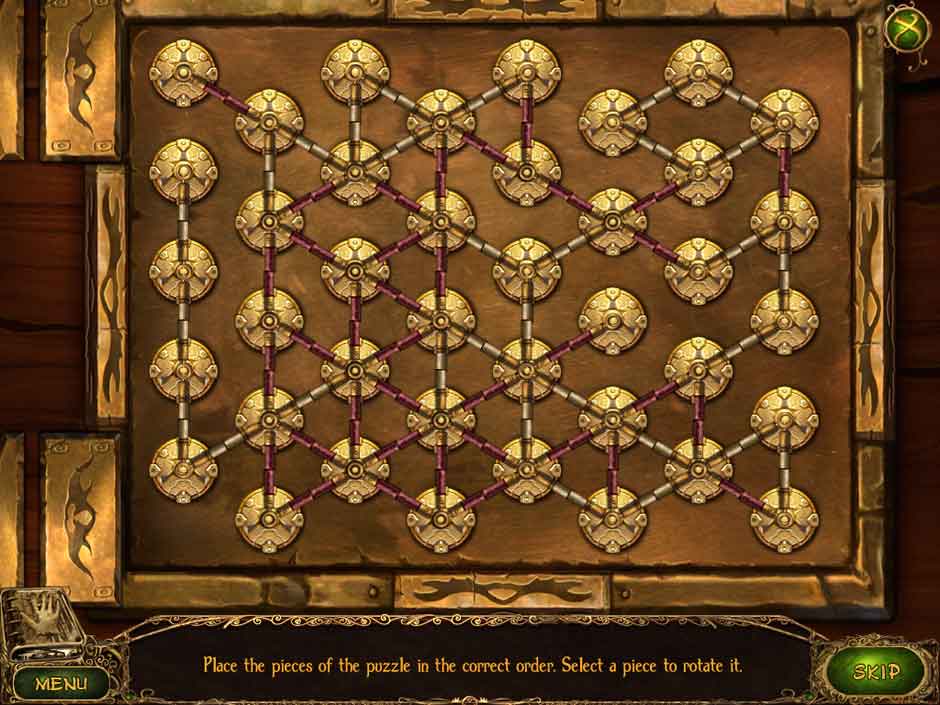
- Take a look at the panel in the back of the room.
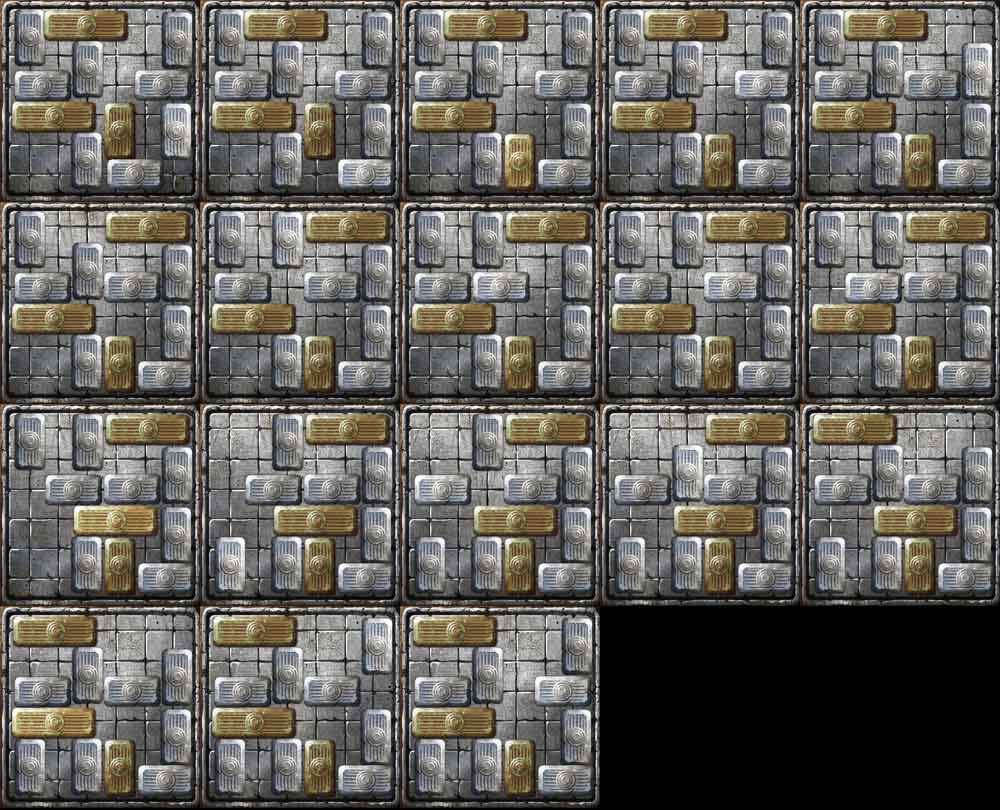
- Use the Gears here to start a puzzle. Place the gears as so:
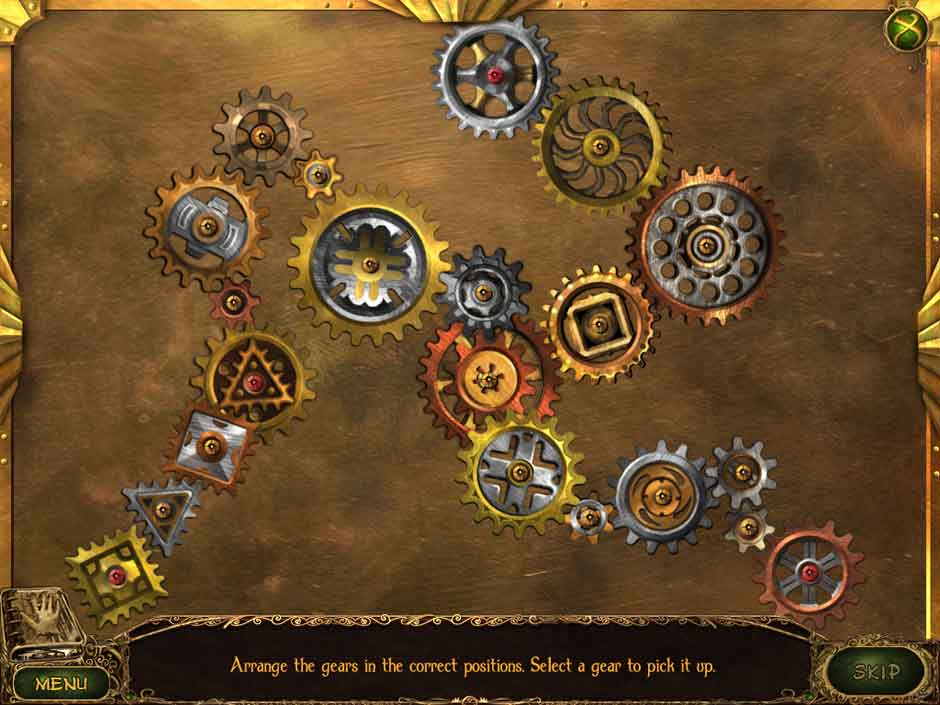
Lost Tales Forgotten Souls 028 Gears
- There is a new Hidden Object Scene to play. Move the pot on the left for the shell and the pot need the burner placed under it. There is also a key under the box with the weights. When you’re done you’ll collect the Safe Key.
Lost Tales Forgotten Souls 029 HOS
Foyer
- Behind the paining on the left is a safe. Take a closer look at it.
- Use the Safe Key to open the safe and collect the Sheet Music
Piano Room
- Study the piano.
- Place the Sheet Music on the piano to trigger a puzzle. As the music plays, notes will appear directly above the keys as well as over the piano. Quickly click on the matching notes before they float away!
- TIP: When multiple notes appear above the keyboard, you do not have to match them in that order.
- Collect the Hook.
Upper Hallway
- Take a look at the hole in the floor by the boar’s head.
- Use the Hook to collect the
Attic
- Look at the box on the table.
- Unlock the box with the Key before adding the Ballerina to the box. Collect the Photos.
Library
- Collect all of the Picture Pieces scattered across the room.
Lost Tales Forgotten Souls 030 Letter
- Now look at the picture in the frame at the top of the stairs.
- Use the Picture Pieces 6/6 to rebuild the photo, then use the Brushes 8/8 to set up colors for it. Paint the picture like the photo sitting on the right of the frame. Collect the
The Beast’s Prison
- Use the Amulet on the Beast. He’ll tell you more of the story behind Emma.
Chapter Five: The Mystery of the Broken Statue
Lost Tales Forgotten Souls Chapter 5
Book
- Use the Amulet on the fourth slot of the book.
Statue Room
- Collect the Mirror Fragment 1/7 from the left before looking at the broken statue in the center.
- Collect another Mirror Fragment 2/7 and the Statue Part 1/5.
- Go to the door on the left to start a puzzle. You must rotate all the pieces to look like the solution below. A piece will lock when it is in the correct position. When you are done, go through the door.
Lost Tales Forgotten Souls 031 Click Puzzle
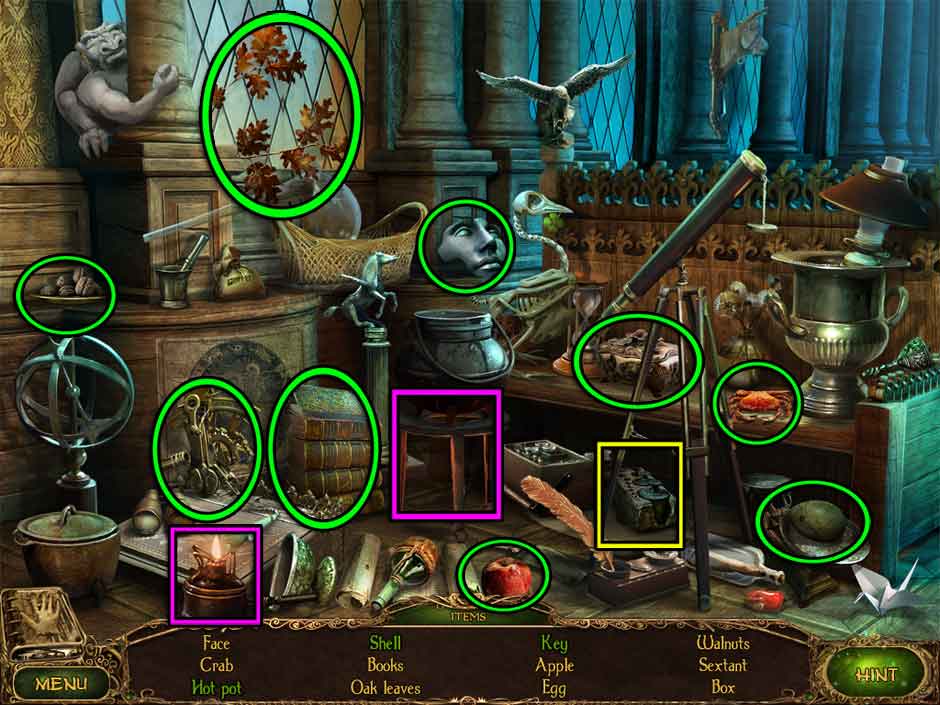
Pillar Hall
- Collect the Statue Part 2/5 from the back of the left side of the room, and the Mirror Fragment 3/7 from the center.
- Play the Hidden Object Scene. Use the sword on the mirror to get the piece of mirror. You’ll find the pumpkin behind the bucket and the feather under the nest. When you are done you will collect the Mirror Fragment 5/7.
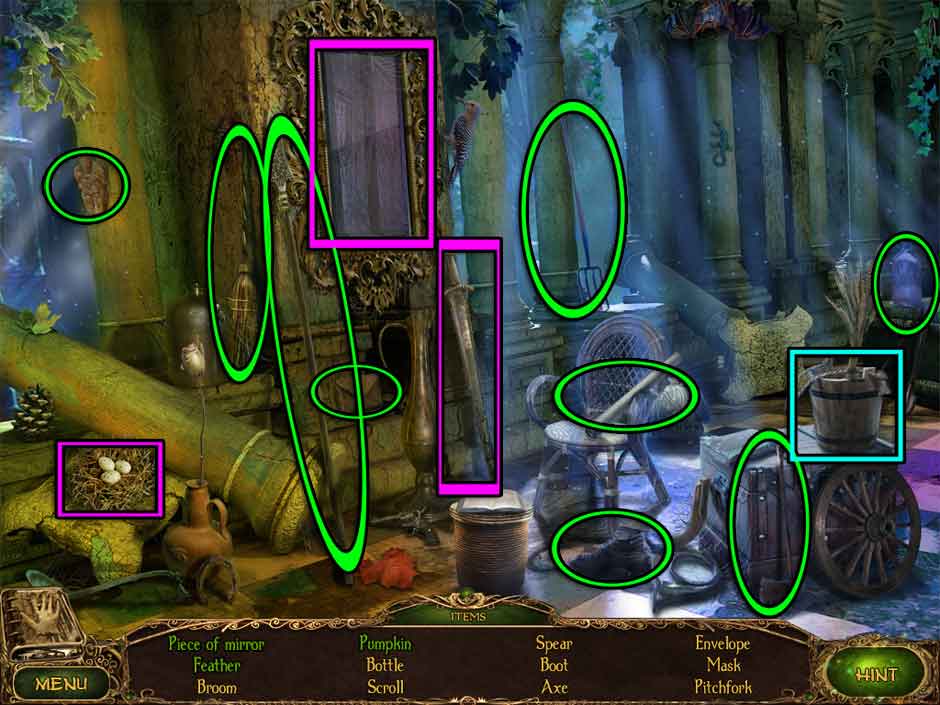
Lost Tales Forgotten Souls 032 HOS
Statue Room
- Move towards the right door.
Right Door
- Collect Mirror Fragment 5/7.
Statue Room
- Move towards the center door.
Center Door
- Collect the Mirror Fragment 6/7 from the left and the Bow 1/3 from the statue on the right. Look closer at the door to start a puzzle.
- Move the plate down to the bottom of the screen. Spin the pillar to match the image below, then raise the plate to align with the holes on the bottom. When you are done, go through the door.

Lost Tales Forgotten Souls 033 Turning Puzzle
Mirror Room
- Collect the two Statue Parts 3/5 and 4/5. Collect the last Mirror Fragment 7/7.
- Now use the Mirror Fragments on the mirror in the back. This will trigger a puzzle. Rotate and place the pieces to rebuild the mirror. Build the corners first and sides first. Dark blue pieces go on the bottom, lighter pieces towards the top. When it is done, you can pass through the mirror.
Through the Mirror
- Start the Hidden Object Scene. Collect all the items. You’ll move the treasure chest to find the pistol and the hedgehog is hiding in the bell, silly thing. You’ll collect the Pistol when you are done.
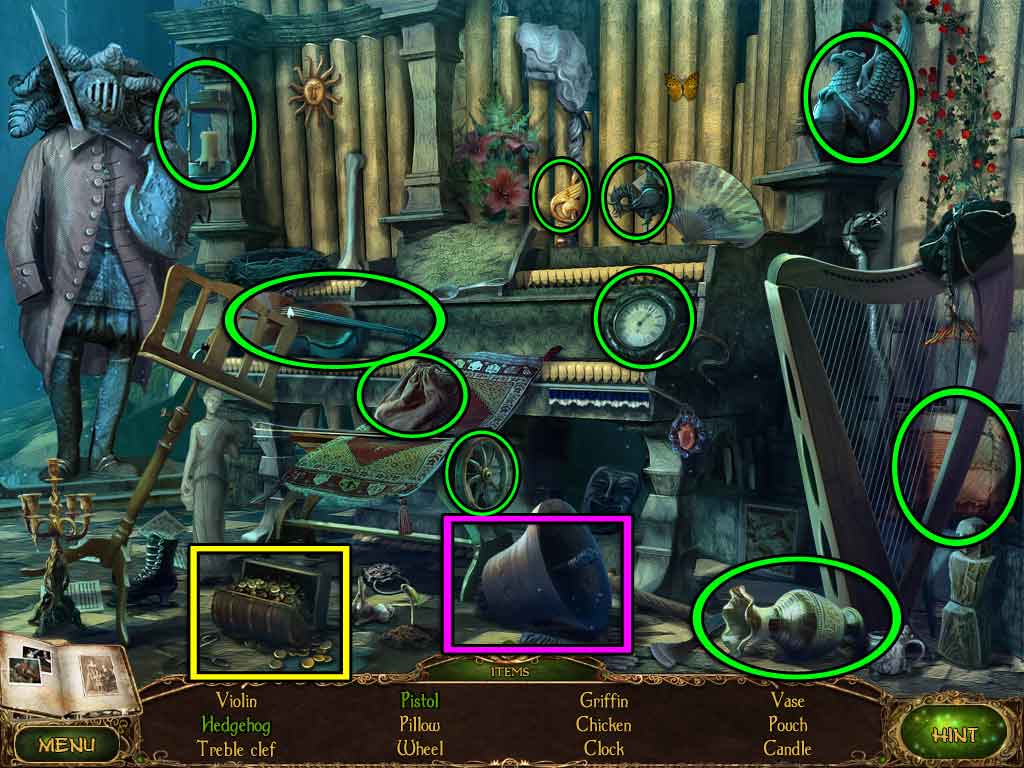
Lost Tales Forgotten Souls 034 HOS
Pillar Hall
- Play the new Hidden Object Scene. Collect all the items. Make sure you move the long pillow and the pitcher to find two of the creatures on your list. You will collect the Bow 2/3 when you finish.
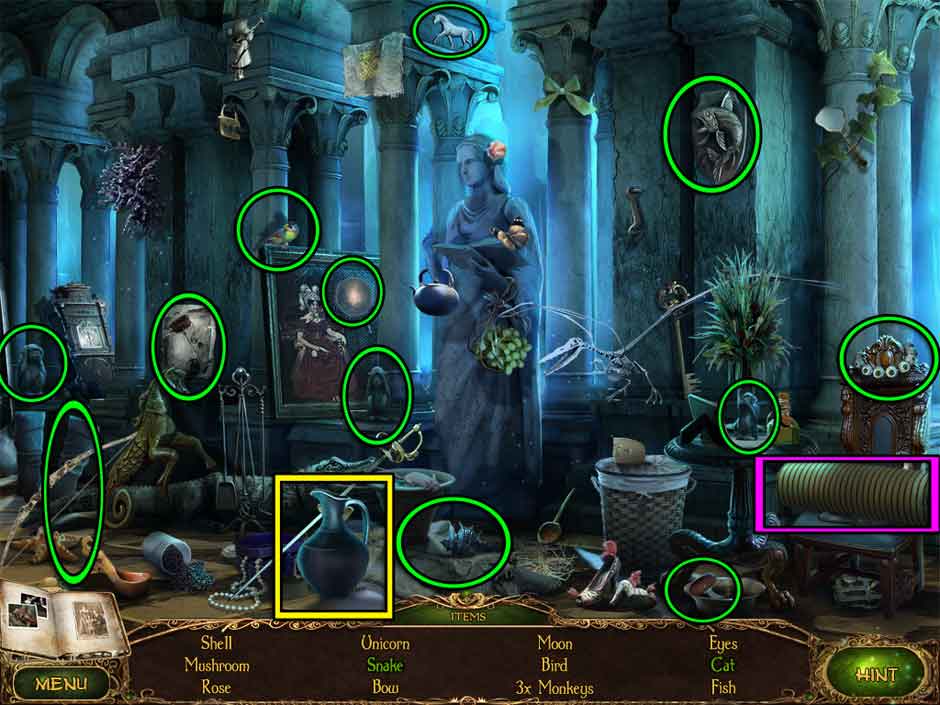
Lost Tales Forgotten Souls 035 HOS
- Use the Pistol to shoot the coffin out of the left top corner. Take a look at the broken pillar to start a puzzle.
- Untangle the ropes by click and dragging the green jewels. The ropes will change color when they are not crossing. Here are three examples of how to move the pieces around. When you are done, you will collect the Bow 3/3.
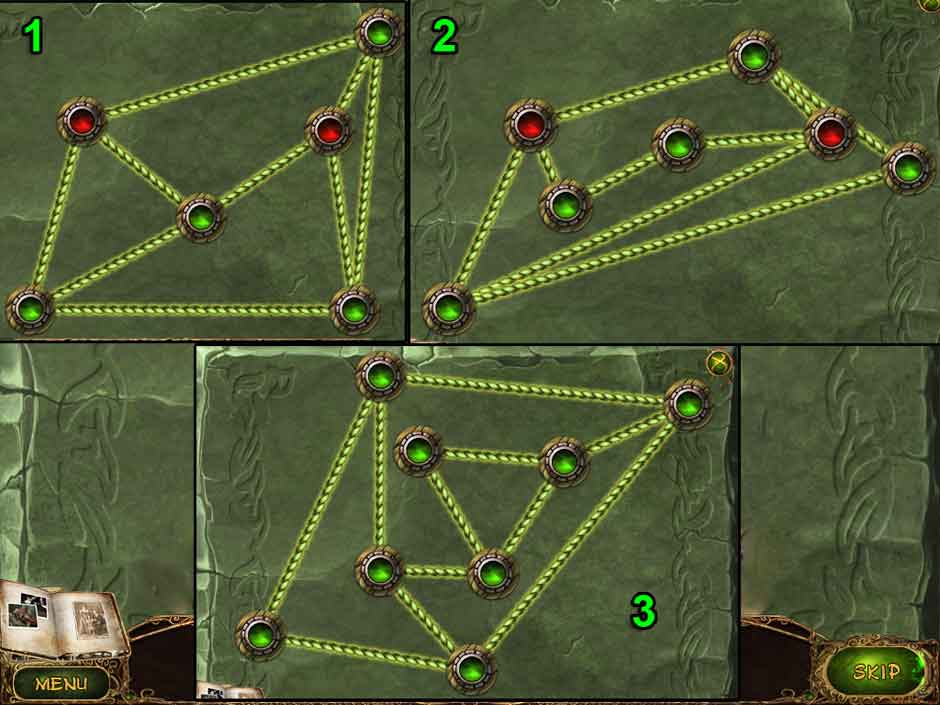
Lost Tales Forgotten Souls 035 Ropes
Through the Mirror
- Use the Bow on the statue to the right. He will shoot a treasure box down. Go look at it.
- Collect the Statue Part 5/5.
Statue Room
- Go back to look at the broken statue in the center of the room.
- Use the Statue Parts to fix the statue. Collect the key.
Mirror Room
- Play the new Hidden Object Scene. Collect all the items. You will find a frog if you move the incense burner and a mouse behind the decorative box towards the front. You will collect a Key when you are done.
Statue Room
- Go to the door on the right.
Right Door
- Match the two Keys with the slots in the door. Go through it.
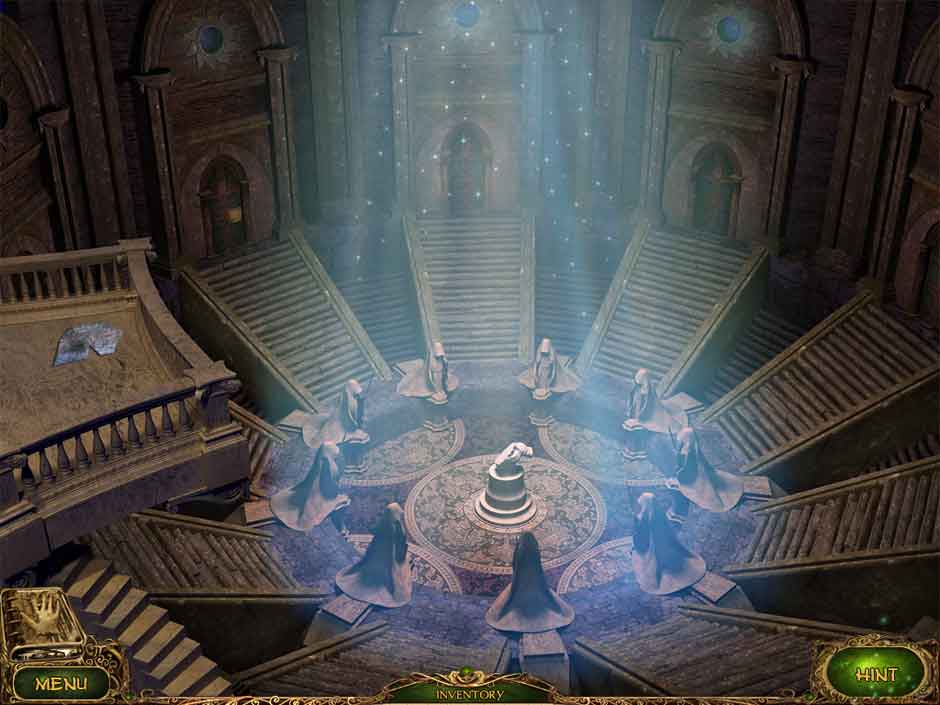
Token Room
- Look at the scroll the statue is holding.
- Clicking in the middle will collect all the tokens. You need to take them to the following locations and line them up on the screen:
Lost Tales Forgotten Souls 036 Tokens
Lost Tales Forgotten Souls 037 Tokens
Lost Tales Forgotten Souls 038 Tokens
- Place all the changed Tokens into the matching slots. Collect the Amulet.
Statue Room
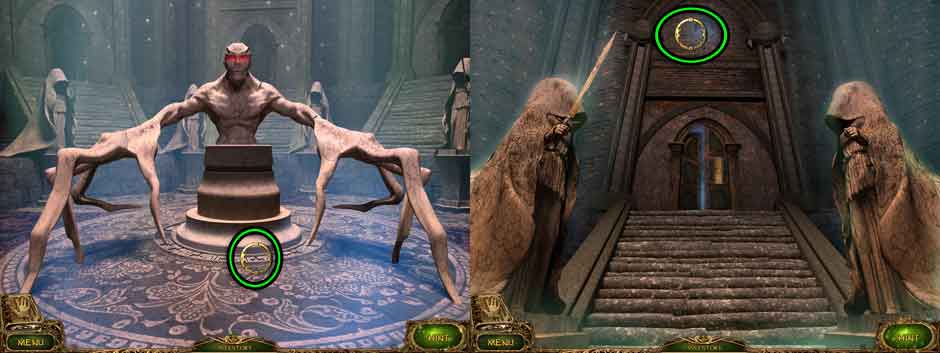
- Look at the statue in the middle again.
- Use the Amulet on the statue. He will send you back to the room to save your daughter.
Book
- Use the Amulet on the last slot of the book.
Study
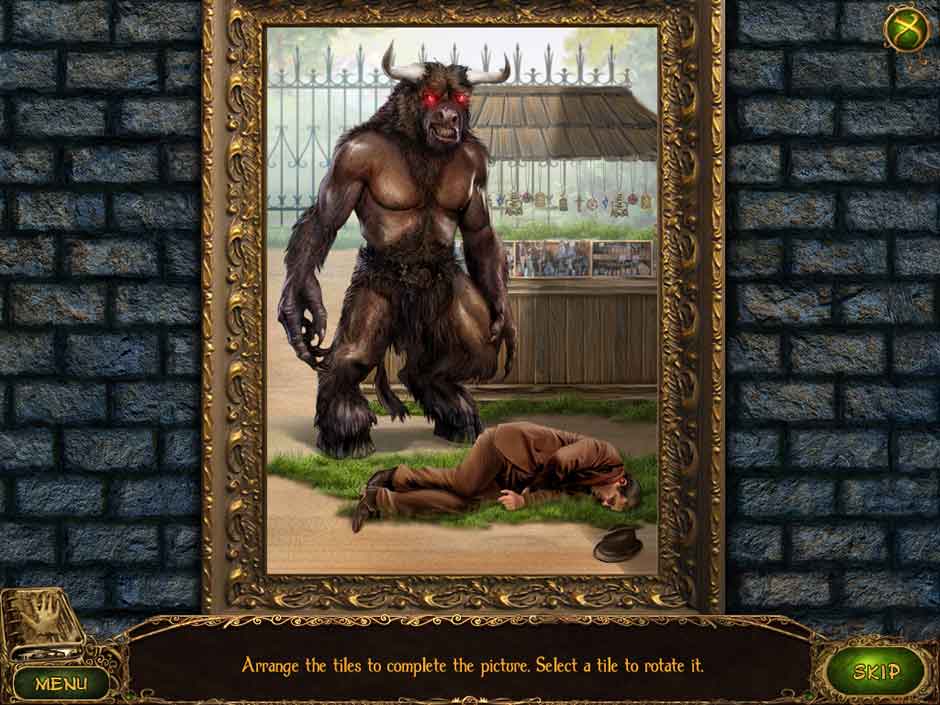
- Emma is trying to cast a ritual! Save your daughter by collecting things in the right side of the room and piling them on top of each other until your daughter can climb down.
- Emma will try to attack you. Click on her until she backs off then go back to building.
- Take the Amulet from Maria. The game’s last scene will play.
Congratulations! You’ve just beaten Lost Tales – Forgotten Souls! Was it truly just a dream…?
Lost Tales Forgotten Souls Chapter Ending
This Lost Tales – Forgotten Souls is meant as a guide and does not contain cheats, hacks, or serials.