Esther receives a letter from her uncle prompting her to attend a meeting with a mysterious man. She commences in a journey that will take her across the space. Join her as she attempts to use her wits to influence the past in order to change the future.
You can use Time Mysteries – The Final Enigma Walkthrough as a reference guide when the going gets tough from the beginning until the end. There are plenty of screenshots from actual gameplay to help you understand and solve the miseries.
Contents
General Tips & Tricks
- This walkthrough will assist you solve mini-puzzles and get all items required to complete the game successfully.
- Your first step is to play the tutorial to get more insights about gameplay elements.
- You must perform a task in order to progress in the game. You can look around to see which item you can pick or access your inventory to see if there is any item you can use.
- There is a Menu button at the bottom right of the screen. You can use this button to get access to the options screen.
- If you want information about gameplay, click the Menu button-Options-Help.
- Inventory is located at the bottom of the screen. Items collected throughout the game are kept here.
- Click anywhere outside the zoom-in window to close it. Tip: If you are able to zoom in on the area again, chances are you haven’t found everything in that location.
Difficulty Modes
When in Regular mode, Skip and Hint buttons recharge more quickly while active areas glitters. In Expert mode both the Skip and Hint buttons recharge slowly while active areas does not glitter at all.
Cursors
- Arrow Cursor-This cursor tells you the direction you are supposed to move to.
- Hand Cursor –This cursor tells you to pick an item to add to the inventory
- Mouth Icon- This cursor tells you that you can interact with another character in the game
- Magnifying Glass Icon – It tells you that you can zoom into the area to inspect it more closely
Hints: Move any of the above cursor around watching it to change. It is the only way to be sure that you have found and picked everything.
Elements in Gameplay
- Hidden Object Scenes (HOS): Hidden object scenes will be indicated by green sparkles. You will need to find items in these scenes. There is no penalty clicking on the scene or item severally.
- Inventory: You can access your inventory at the bottom side of the screen. Items collected in every scene go to the inventory.
- Hints: The hint button found near the Diary on the lower left side corner of your screen. When you are stuck, you can access it by clicking the question mark in the blue circle.
- Diary: The diary is located in the lower left side corner of the screen. There is a tab containing notes about the story line. You can read this section to keep up-to-date on the gameplay.
- Time-Travel Device: You can access this device from the lower tight side corner of your screen. This device functions like a map.
- Skip: You can click on the skip button if you don’t feel like solving a mini-game.
Time Mysteries: The Final Enigma Walkthrough
Esther Ambrose receives a letter from Merlin, her uncle, instructing her to travel through a difficult journey. She is given a task of fixing the past and preventing the world from becoming to an end. In Time Mysteries: The Final Enigma, you will play the role of Esther Ambrose. In the opening, Ester is attacked by his Merlin’s wife. This is your first task where you are supposed to defeat this sorceress. Keep in mind that your task is not only to save the world, but discover the enemy behind it. Your primary achievement is to rise to any challenge and save the world from catastrophe.
Chapter 1: Uncle Sean
House
- Zoom into the desk and take the Medallion. Open the bag on the Chair and take the Wooden Puzzle 1/4. Take the Room Key from the window.
- Click twice to tear the wall paper back. Use the Room Key to open the door. Enter inside, take notes from the man and then proceed to the street.
Street
- Click on the boy to talk to him and proceed to Uncle Sean’s House.
Uncle Sean’s House
- Click on the flower near the railing and take the Door Handle. Proceed to the alley. Click on the hooded man to talk to him and take the Crowbar. Go back to the street.
Street
- Zoom in near the boy and use the Crowbar on the chest. In the hidden object area, find all the items. Once you get the Shears, go forward one screen. Zoom into the basement window and use the Shears on the branches and then the Crowbar on the window.
Basement
- Enter the basement and click on the device in front of you. The mini-game will start. The primary goal of this game is to get the energy to the fuses by turning the dials. When you have done it successfully, click the handle on the right.
- Zoom into the shelf and take the Wooden Puzzle 2/4. Take the Cork from the bottle and remove the hanging cloth. Remove the curtain on the wall to reveal a hidden object area.
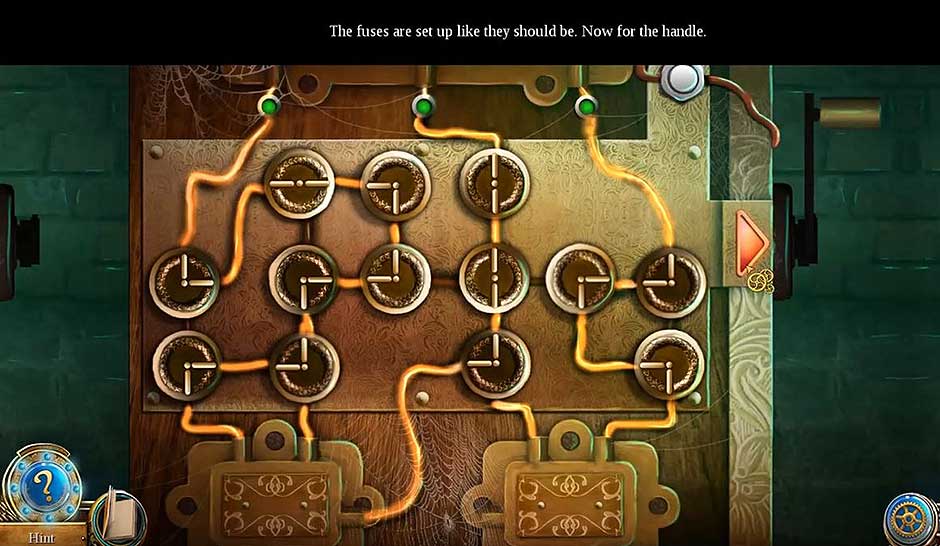
Time Mysteries The Final Enigma – Fuses
- Play the hidden object game to find all the items on the list. You will get an Empty Oil Can.
- Zoom into the machine on the back wall and use the Empty Oil Can on the empty platform. Start the machine by clicking on the valve and then click the handle to refill the Empty Oil Can.
- Zoom into the door at the top of the stairs and apply the oil from the Full Oil Can on the gears. Use the Door Handle to open the door. Go through the door.
Next Room
- Talk to the man and then Click on the device in front of you to start a mini-game.
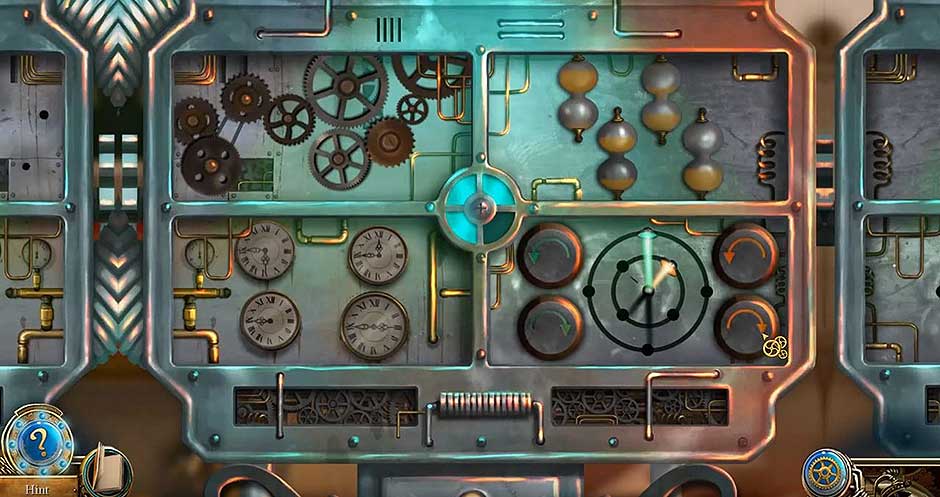
Time Mysteries The Final Enigma – Device
- The goal of the game is to place all the pieces in their right location. Clocks on the bottom left, gears on the top let and hourglasses on the top right. When done, move the arms of the clock in the bottom right by pressing the buttons on green and orange on the sides.
- Talk to Uncle Sean and then take the Time-Travel Device. Zoom into the Mirror and take the notes. Adjust to 487 on the Time-travel device and travel forward.
Chapter Two: Merlin’s World 487
Bridge
- Zoom into the bridge end, take the Chalk and zoom out. On the stone near the path, scroll to learn how to cast the spell.
- Use the Chalk to complete the drawing on the stone. Next to the drawing, move the stone and take the Frost Powder.
- Again zoom into the bridge and use the Frost Powder on the water. Cross the river to the Cave.
Cave
- Click on the 4 rocks to start the mini-game.
- The primary goal of this game is to find the correct sequence to light up the rocks. The solution is 2, 3 1, 4 then 4, 2, 1, 3 and finally 1, 4, 3, 2. Climb the cliff.

Time Mysteries The Final Enigma – Rocks
Cliff
- Click to play the HOS and collect all the items. The Bucket Handle goes to the inventory.
Merlin’s staff
- Click on the ground near the Merlin’s staff and take the Tough Branch. Zoom into the tree and speak to Merlin and then travel to 1796 to the street scene.
Street
- Zoom into the bucket and use the Cork on the hole and the Bucket Handle on the top. Take the bucket and travel to 487 to the cave.
Cave
- Place the Touch Branch on the Pickax Head. Take the Pickax and then go back one screen. Z
Bridge
- Zoom into the end of the Bridge and strike the Pickax on the ice thrice to break through. Refill the Bucket with water and return to the Cliff.
- Cliff
Zoom into the tree and place the Bucket Of Water on Merlin and then proceed to Merlin’s Hut.
Merlin’s Hut
- Zoom into the roof of the hut and read the notes. Take the Dragon Carving and then enter the hut.
Chapter Three: Nimue
- Zoom into the girl and take the Vines Stone. Place the Vines Stone on the bottom of the bowl and take the Dragon Key and Magic Crystals. Play the HOS and find all the objects on the list and take the Tobacco.
Alley
- Travel to 1796 to the alley and use the Tobacco on the man. Pick the Dragon Carving and travel in 487 to the Hut.
Hut
- Zoom into the chest and place the Dragon Key on the lock. Turn the key and place the Dragon Carvings on the chest. A mini-game will start.
- To solve this game, swap the tiles to create a picture. Take the 502 Times Crystal and use on the empty slot. Travel to the year 502. Take the Crystal Shard and return to the Hut. Take the Engraved Brooch from the dream catcher and the Magic Fruit from the magic plant. Travel in 487 to the cliff.
Cliff
- Use the Magic Crystals on the Merlin’s Staff; take the Magic Staff and travel to Uncle Sam at in the year 1796.
Uncle Sam’s house
- Place the Engraved Brooch on the cabinet’s lock to start a mini-game.
- Make sure all the hands are free by clicking on the right locks and then take the Wooden Puzzle.

Time Mysteries The Final Enigma – Cabinet
- In the latch, play the HOS and collect all the items. Receive the Letter A. Lower the machine and open the lid. Return to your room.
- On the desk, place Letter A on the book. Once the book is open, take the Dragon Shape. Place the Dragon Shape on the box near the bag. Take the Butterfly Catcher from the box and return to Merlin’s Hut.
Merlin’s Hut
- PlaceCatcher on the butterflies and enter the hut. Use the Medallion in the slot, pick the Rune Stone and return to the cave.
Cave
- Place the Rune Stone in the slot. Pick the Silver Sickle and the Cave Flower and return to Uncle Sean’s House. Place the Silver Sickle on the flower, take the Magic Flower and return to Merlin’s Hut.
Merlin’s Hut
- Place the Magic Fruit, Cave Flower, Crystal Shard and Magic Flower in the mortar and grind them. Take the Healing Salve and return to the hut.
Hut
- Zoom into the Nimue and place the Magic Staff and Healing Salve n the aura. Take the Visionary Crystal and return to Merlin’s Hut.
Merlin’s Hut
- Place the ladder next to the tree and return to Uncle Sean’s House.
Uncle Sean’s House
- Zoom into the mirror and place the Visionary Crystal on the empty slot. Return to Merlin’s Hut in 502.
Merlin’s Hut
- Talk to the man, zoom into the flower, pick the Future Time-Crystal and use it on the machine. Click to travel to the future. Play the HOS and find all the items. You will get a Screwdriver. Proceed to the Tower Door, and use the Screwdriver on the panel. A mini-game will start. Solve the game by lighting up all the light bulbs. Enter the lift.
Time Mysteries The Final Enigma – Light Bulbs
Chapter Four: The Workshop
Computer and Book
- Talk to the man and zoom into the computer. Open the bookcase by clicking on the right arrow twice and then the unlock button.
- Take the Nut Driver from the bookcase, read the book and return to Uncle Sean’s House in the basement.
Basement
- Use the Nut Driver to take out the nut from the robot. Play the HOS, get the Wrench and go back two screens. Play the HOS and receive the Tweezers.
- Use the Wrench to remove the lid from the street lamp. Take the Music Box Plate and return to the basement.
- Use the Tweezers to remove the Clock Dial from the arm of the robot. Go back to your room.
Your room
- Place the Clock Dial on the clock to start a mini-game. Solve the clock puzzle. Make sure to set the clock dials guided by the notes. If successful, take the Cylinder and return to the tower.
Tower
- Place the Music Plate Box and Cylinder on the music box. Pick the Times Crystal and use it in the slot in the Times machine. Return to the year 1812.
Year 1812
- Play the HOS and receive the Sabre. Remove the pot from the pack on the left. Use the Sabre to cut the rope and then open the door. Enter inside.
House
- Read the two books on the table and pick the 1/3 Small Mirror. Take the shovel from the fireplace and use it on the ashes. Proceed to the bedroom. Take the Tree Shape and 2/3 Small Mirror. Go back one screen.
- Place the Tree Shape in the empty niche near the fireplace. Pick the Wardrobe Key and return to the bedroom.
- Use the Key to open the wardrobe, play the HOS and get the 1/2 Mechanism Piece.
- Solve the mechanism puzzle found on the bed by removing all the objects. Get the 2/2 Mechanism Piece, go back one screen and use it in the empty slot. Go into the Workshop.
- Remove the blanket, read the book on the desk and pick the Drawer Knob, 1/3 Piano Key and Vision Crystal.
- Open the box near the chest and pick the Coal. Remove the curtain from the puppet theater and return to the bedroom.
- Place the Drawer Knob in the slot, open the drawer and then the letter. Pick the Dragon Head and 1/3 Metal Plate and return to Uncle Sean’s House.
Uncle Sean’s House
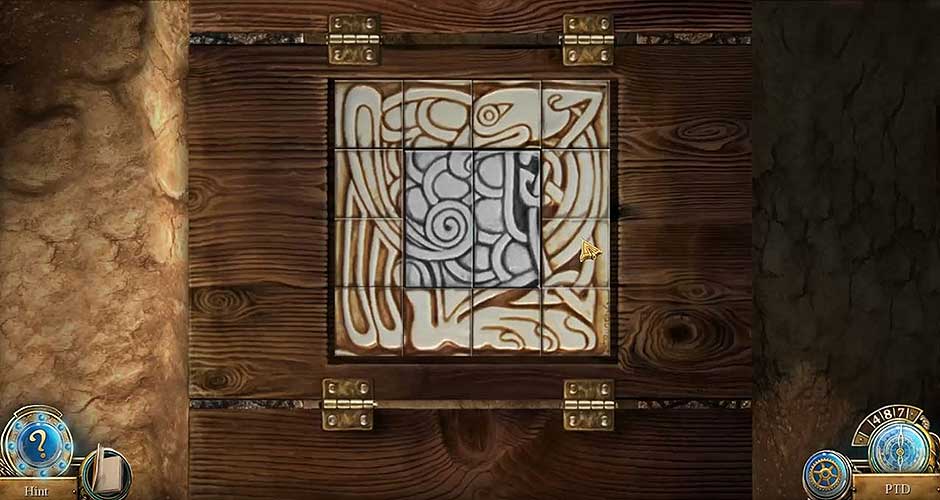
- Zoom into the mirror and place the Vision Crystal in the empty slot. Play the HOS, receive 4/4 Wooden Puzzle and return to the bedroom. Use the Wooden Puzzles in the slot to start the Wooden Puzzle mini-game.
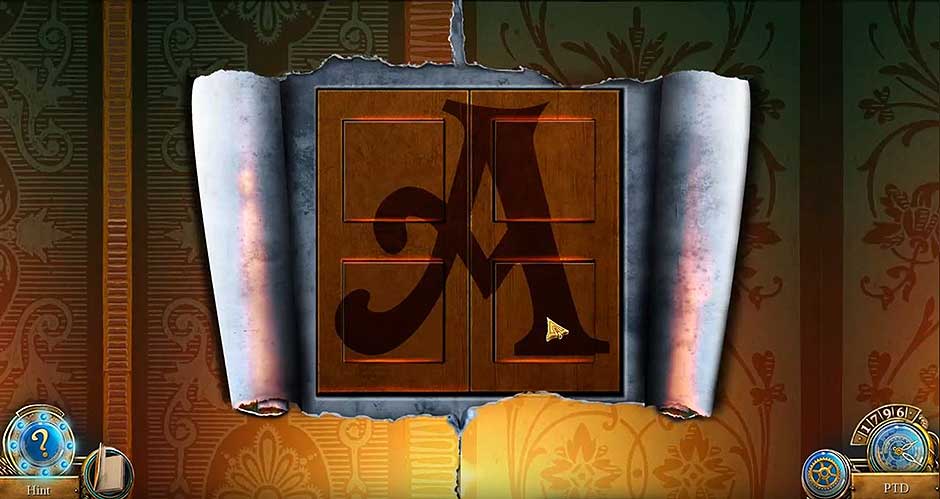
Time Mysteries The Final Enigma – Wooden Puzzle
- To solve the game, recreate letter A by swapping puzzle pieces.
- Take the Lance, read the book and return to the workshop to the teat 1822.
Workshop
- Use the Dragon Head and Lance on the puppet theater to start the Dragon Puzzle game. To solve this game, you must click the right buttons. Select the buttons A-C in the following sequence: C, A, C, and B. See the screenshot for the solution.

Time Mysteries The Final Enigma – Dragon Game
- Take the Times Crystal, place it on the times machine and travel to the year 1913.
Chapter Five: The House in 1913
- Remove the plate from the door; take the Chain and time-travel to the tower base.
Tower base
- Use the Chain on the Car’s mechanism.
- Play the HOS until you get the Gas Can. Zoom into the car and use it on the torch. Pick the Industrial Torch and time-travel to year 1913.
Year 1913
- Place the Industrial Touch on the door to open it. Get inside, zoom into the fireplace, and use the tongs on the hot stones. You will get the Hot Stone Lock.
- Read the notes on the table and take the 1/3 Russian Doll Lock.
- Go back one screen, use the Hot Stone Lock on the snow, pick the Stone Lock and return inside.
- Place the Stone on the niche to open the box. Take the Blue Mask and White Mask. Go back one screen.
- Use the Blue Mask on the statue on left and White Mask on the statue on the right.
- Enter the showroom.
Showroom
- Remove the cover from the glass cabinet, zoom in and take the Puzzle Lock Piece.
- Use the Nut Driver to remove the nut, open the lid and pick the Gears. Go down one screen.
- Use the Puzzle Lock Piece on the cabinet to start the mini-game. To solve this game, you must move the tiles to form the picture.
- Take the Lock Part and use it on the empty niche on the right door.
- Open the door, go in the bedroom and pick the Shield.
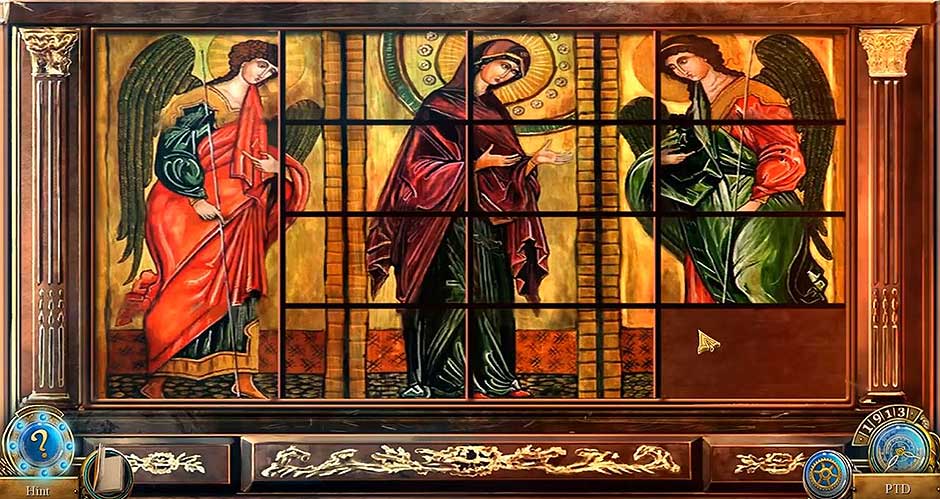
Time Mysteries The Final Enigma – Picture
- Open the window, play the HOS and receive the 2/3 Russian Doll Lock. Time-travel to the 487 to the Cliff.
Cliff
- Play the HOS and get the Stick With Resin. Time-travel to year 1913.
Year 1913
- Place the Stick With Resin on the item in the engraving’s mouth. Get the Black Rook and return to the showroom.
Showroom
- Remove the plate from the device and use the Gears on it. Pull the handle, and then go back to one screen. Enter the bedroom.
- Use the blankets on the bed to make a rope and use it on the hook. On the dresser, pick up the stamp and use it twice to break the glass display. Take the 2/3 Metal Plate and Vision Crystal, and time-travel to Uncle Sean’s House.
Uncle Sean’s House
- Place the Vision Crystal in the empty slot and return to the bedroom and into the garden.
Garden
- Open the cage and play the HOS. Receive the Corn. On the bird cage, place the Corn on the bird. Take the Gazebo Lock and the 3/3 Russian Doll Lock. Place the Gazebo Lock on the board; pick the Garden Key and time-travel in 1812 to the dining room
Dining Room
- Use the Key to open the door. Enter inside.
Chapter Six: The Garden
Dining Room
- Remove the blanket, move the planks and take the 2/3 Piano Key. Pick the Guard Plate. On the statue, play the mini-game.
- To solve this game, move the heads of the statues and weapons to find the correct poses. Take the Lens and go back two screens.
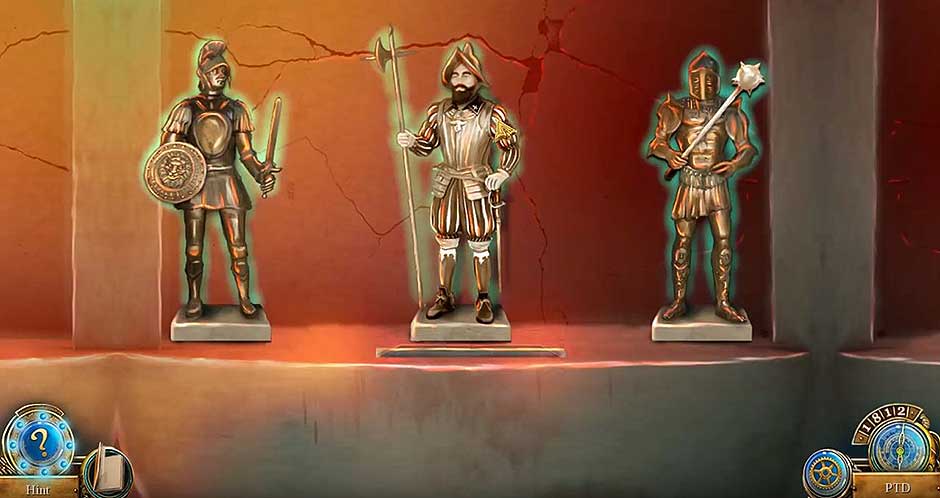
Time Mysteries The Final Enigma – Statues
- Place the Guard Plate to open the bag and take the Winder, and then return to the garden.
Garden
- Place the Winder on the ballerina and pick the 3/3 SMALL MIRROR and 3/3 PIANO KEY. Go back one screen. Use the Piano Keys on the piano to start the mini-game.
- To solve this game, play the correct sequence on the keys. Pick the Gen Piece and return to the showroom.
Showroom
- Place the 3/3 Russian Doll Locks on the doll to remove its heads. Pick the Black Bishop. Place the 3/3 Small Mirrors on the device to start a mini-game.
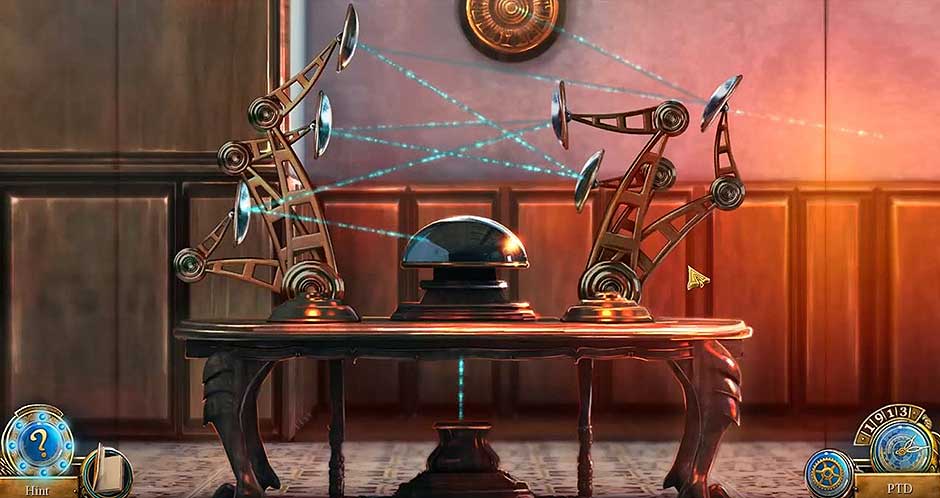
Time Mysteries The Final Enigma – Mirrors
- To solve this game, move the mirrors to enable the light to reach the spot on the wall.
- Place the Lens on the spot, pick the Fountain Heart and return to the garden. Use the Gen Piece and Fountain Heart on the fountain and time-travel to 1913.
- On the figures, pick the Spear, Sword and Mace. Use these things on the empty slots and pick the White King. Go back one screen.
- Use the Black Bishop, White King and the Black Rook on the chessboard. Take the Demon Seal and return to the showroom.
Showroom
- Use the Demon Seal on the plates and the Shied in the slots.
- Open the door, inside the garden, play the HOS. Get the Sharp Pick and use it on the Rune.

Time Mysteries The Final Enigma – Runes
- A mini-game will start. To solve it, activate all the runes in this order: 5, 1, 7, 4, 2, 4, 2, 8, 6, 8, 4, 8, 6, 1, 4, 8, 1, 5, 3, 4, 2, 8, 7, 4, 6.
- Pick the Triskele Symbol and place it in the empty slot on the Statue of Merlin. Pick up the Ring and use it on the finger of the statue of Viviane.
- Open the door and enter. Talk to Nimue and pick the Magic Seal. Time-travel to the bedroom, about 1812 to play the HOS.
- You will get 3/3 Metal Plate. Go back two screens and then play another HOS.
- Get the Candle and go to the workshop.
Workshop
- Place the 3/3 Metal Plates on the chest, open it and take the Circular Saw and go to Uncle Sean’s Lab (1796).
- Uncle Sean’s Lab
- Use the Coal on the empty slot and the Circular Saw to replace the old saw. Pick the Saw Prototype, go to the meadow (487) and use the Candle on the torch.
- Get the Burning Candle, return to the garden (1812), and use the Saw Prototype to cut the boards. Open the window, move the cloth, pick the Crystal Ball and return to Merlin’s Hut (502).
Merlin’s Hut
- Use the Burning Candle to light up the lantern. Pick up the Earth Seal. Go back one screen. Use both the Magic Seal and Earth Seal on the plate. A mini-game will start.
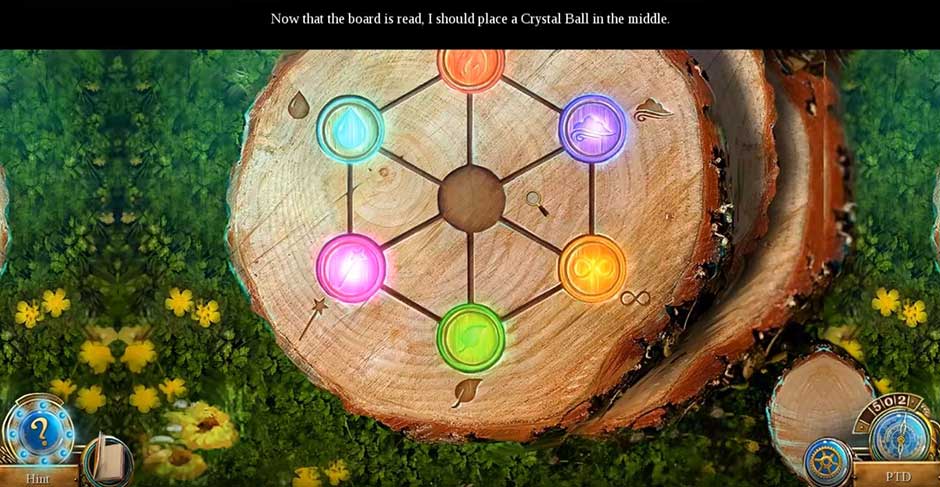
Time Mysteries The Final Enigma – Seals
- To solve this puzzle, move the seals to the right location based on the symbols next to the spot. Then put the Crystal Ball on the middle area. Return to the bedroom (1913).
Bedroom
- Zoom into the dresser and place the Merlin Crystal Ball on the glove.
Chapter Seven: The Cursed Medallion
- Open Michael’s pocket and take his Knife. Zoom on the floor and use the Knife to break the crack. Move the rocks and take the Lodestone.
- Place the Lodestone on the empty niche on the wall to activate the mini-game. To solve the game, click the stones on the correct order.
- Go forward to the cut scene, to the right and play the HOS.
- Get the Celtic Goddess Statuette and go back one screen.
- Use the Medallion and the Celtic Goddess Statuette to open the door to the Celtic Times. Enter Merlin’s Hut.
Merlin’s Hut
- Talk to Nimue and then play the HOS.
- Receive the Diamond and go to the Times Museum Chamber.
Times Museum Chamber
- On the wall, take the Celtic Dagger, go to the Celtic Times and enter the hut. Place the Celtic Dagger on the container and return to the Times Museum Chamber.
- Here, play the HOS to receive the ALPHA.
- On the token panel, place the Chest Token in the slot to start the mini-game.
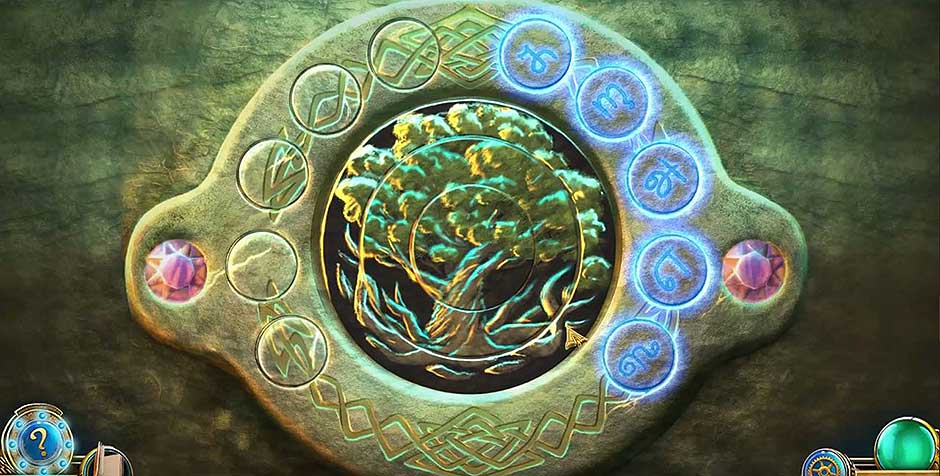
Time Mysteries The Final Enigma – Chest Token
- This game has three sections. In the section, click the buttons on the right in the right order. In the second section, move the times to the right places. In the third section, rotate the parts to form the picture.
- Pick the Omega and place it together with the Alpha in the slots.
- Open the box on the top shelf, pick the sword and place it in the slot in the stone.
- Pick the key and use it to open the box on the Shelf.
- Pick the Hourglass Token and place it in the empty slot.
- Open the panel and pick the Moscow Church Figurine. Proceed into the globe and use the Moscow Church Figurine. Proceed to Moscow (1913)
Moscow (1913)
- Place the Diamond in the slot and pick the Magic Glove. Return to the showroom
Showroom
- Use the Magic Glove to get the Cursed Medallion. Proceed to the Celtic Times.
Celtic Times
- Enter the hut and place the Cursed Medallion on the table. Play the HOS to get the Prism. Use it on the table to activate the mini-game. To solve the game, click on the stones in the correct order.
- Talk to the Nimue and return to the Museum and then to Moscow in 1913. Play the HOS and receive the Communicator. Go back to the Museum Hall and use it there. Go to the future.
- Open the desk drawer and read the notes on the Old Book and Blueprints. Get back to the Museum and use the Old Book there.
- Proceed forward. Read the notes on the desk; get the Shakespeare book from the bookshelf and the Gargoyle Head.
- Click on the bookshelf to start the mini-game. To solve this game, click on the books in the correct order.
- Zoom into the door and use the code 1984. Play HOS and correct Gargoyle Wing. Use it together with the Gargoyle Head.
- Pick the Story Puzzle and use on the board to activate a mini-game. To solve this game, turn the cubes to recreate the story. Place the Blueprints on the diagram.
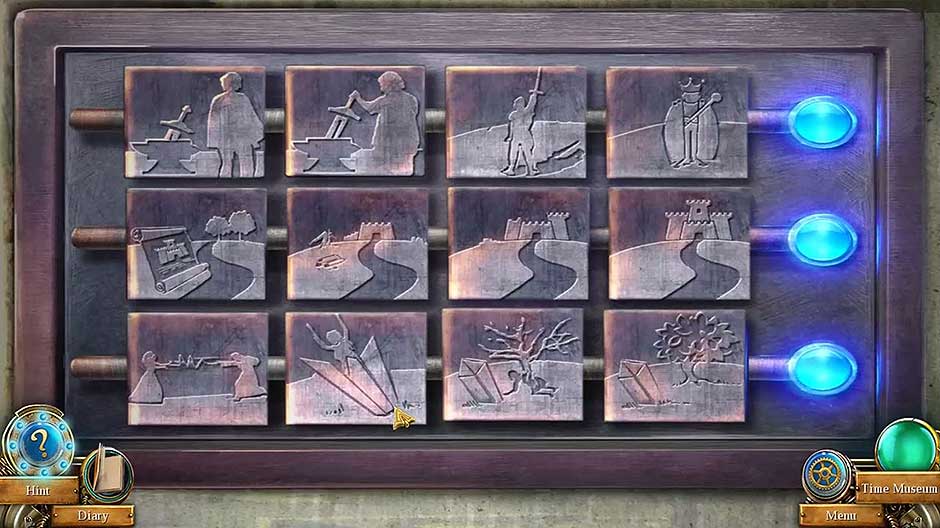
Time Mysteries The Final Enigma – Story Puzzle
Congratulations! You have successfully completed Time Mysteries: The Final Enigma! These are some of the tips and tricks, hints and guide that you will need to navigate through the game.
For more great tips and tricks, visit our blog!
The Time Mysteries: The Final Enigma Walkthrough is meant as a guide and does not contain cheats, hacks, or serials.

