Take on the role of a detective and discover the truth behind the mysterious invasion of zombies in Haunted Legends – The Undertaker. This guide will walk you through all the levels and puzzles. There are many valuable tips on how to play, as well as solutions to the all of the mini-games.
Contents
General Tips & Tricks
– From the Main Menu you will be able choose your player profile or create a new player profile and start the game. The Options button is also found here and by clicking it you will open a menu that allows you to adjust various game settings, such as sound, cursor type and window size.
– Since you are investigating what is going on in the town, you will be collecting clues along the way. All of these clues and notes are written down and saved in your Diary. If you are not sure of what to do, always open the Diary and read it as it often provides the information you need.
– There are three different difficulty levels for you to choose from.
– Casual is the easiest mode. If you choose this setting there will be sparkles highlighting an active area. Also, it will take less time for the hint and skip buttons to recharge.
– If you choose the advanced mode, active areas will not sparkle and it will take longer for the hint and skip buttons to recharge.
– The most difficult mode is the hard one. In this mode the hint and skip buttons recharge take a long time to recharge, no active areas will sparkle and the tips are disabled.
– As you play, your cursor will change according to the scene. If your cursor changes to a Magnifying Glass, you will be able to zoom in on an area. If you have the Hand Cursor, you will be able to pick up something and have it placed into your inventory. An Arrow means you can navigate to the next screen.
– All important items collected can be found in the Inventory. You can access your Inventory by just holding the cursor over the tab at the bottom of the screen. Once you use an item and it is no longer needed, it will automatically be removed from the Inventory.
– The Hint button is in the lower right corner of the screen. You can click on it for some help if you are not sure what to do. There is a recharge time before you can use it again.
– The Skip button shows up during games. You can use it if you are having trouble solving one or just don’t want to solve it at that time.
– During the game you will encounter Hidden Object Scenes. Sparkles indicate where a scene can be accessed. The Hidden Objects in the list are written in white or orange. Objects written in white can be clicked on when found and the ones in orange require an extra step to uncover. Keep in mind that the items in your list can differ from those in the guide since the list is randomly generated.
– In addition to solving the puzzles, 30 fish scales must also be found in order to complete the game.
Haunted Legends – The Undertaker Walkthrough
Chapter 1: Mrs. Fisher
– First, go over the door and take a closer look at the Newspaper that lands on the doorstep.
– Pick up the Handle that was underneath the Newspaper and attach it to the door.
– Knock and then enter the building.
– Speak with Mrs. Fisher.
– Examine the mirror with the monkey and get the Notes.
– Go over to the window and zoom in on it to get the Brush.
– Speak with Mrs. Fisher first.
– Examine the painting and take the Key.
– Zoom in on the flowers and take the Note by them. Move the plant’s leaves out of the way to reveal a Lens. Pick that up.
– Finally, zoom in on the window with the telescope in front of it. Take both the Coffin Handle and the Note.
– Zoom in on the window and take the Lens Socket found there.
– Go to the coffin and zoom in on it to be able to attach the Coffin Handle. Now you can open it.
– Inside the coffin you will find a Pirate Hook and Bone. Take those items.
– Zoom in on the lock. Unlock it using the Key. Take the Medallion Half.
– The first thing you will have to do here is put the Lens Socket and Lens into the Telescope in front of the window. Once you click on the Lens, you will receive a clue.
– Go and examine the Chest. It can be unlocked by rotating the disks until the code 712 is entered. Take the Iron Fish.
– The Iron Fish has to be open and closed so that the other Medallion Half you need is revealed.
– Zoom in on the pedestal and insert both halves of the Medallion. This triggers the appearance of a puzzle. Solve it by placing the pieces in their correct spots. The solution is shown in the screenshot.
– Enter the hatch.
Haunted Legends – The Undertaker – Statue
– Zoom in on the sink in the corner. Turn on the spigot two times by clicking it and take the Shovel.
– Next, examine the picture of skeletons on the wall. Insert the Bone into the picture and start a puzzle in which you have to correctly position bones. The solution is shown in the screenshot.
– Take the Bottle Filled With Powder from the mouth of the left skeleton.
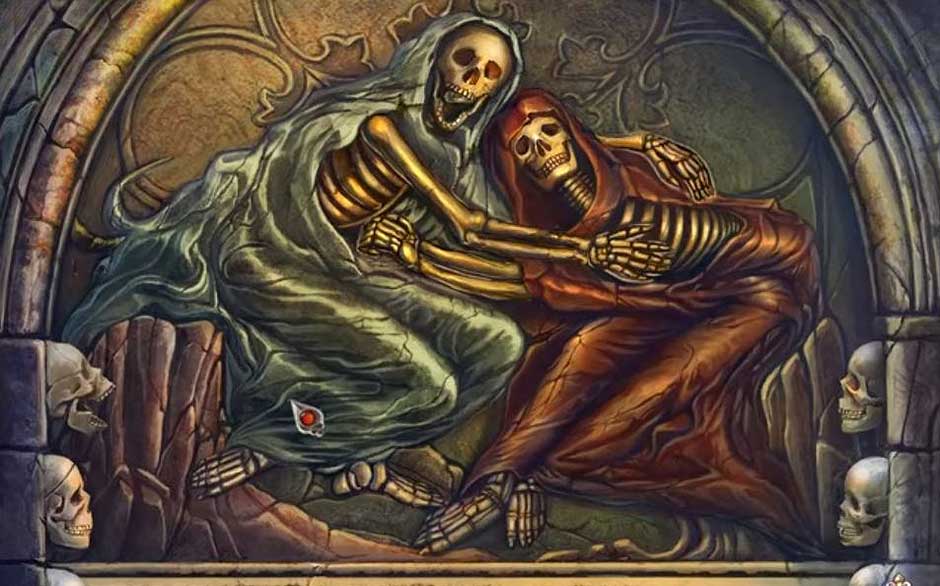
Haunted Legends – The Undertaker – Bones
– Zoom in on the tub of water. You will need to get the Long Hook. You can acquire it by putting the Pirate Hook you collected onto the mop’s Handle.
– Next, zoom in on the skull and grab the Wheel with the Long Hook.
– Go to the gurney and insert the Wheel to start a hidden object scene.
– Find all of the Hidden Objects.
– The grapes are found in the skull, the bell has to be clicked on to obtain the note, the fish is cut with the file to get the pouch and the snail has to be clicked on to get the moon.
– You will receive a Corkscrew.
Chapter 2: The Underground Crypt
– Examine the table and pick up the Bottle.
– Go to the sink and zoom in on it. Fill the Bottle with water using the spigot.
– Return to the table and zoom in on it once again. Now place both the Bottle With Water and the Bottle With Powder on top of it.
– Using the Corkscrew, open the Green Bottle. Pour the powder into the Green Bottle. You now have a Cleaning Solution that you can take.
– Return to the tub and pour the Cleaning Solution into the water. Once that is done, you have to drain the water by removing the Drain Plug.
– Enter the underground crypt.
– Go to the coffin and zoom in on it. Clear it off using the Brush. Take all the Buttons. Examine the images on the coffin.
– Go to the Gear and pick it up.
– Next, zoom in on the ceiling where the hole is and then examine the bottom of the ladder. The dirt can be dug up with the Shovel. Take the Shears you find there.
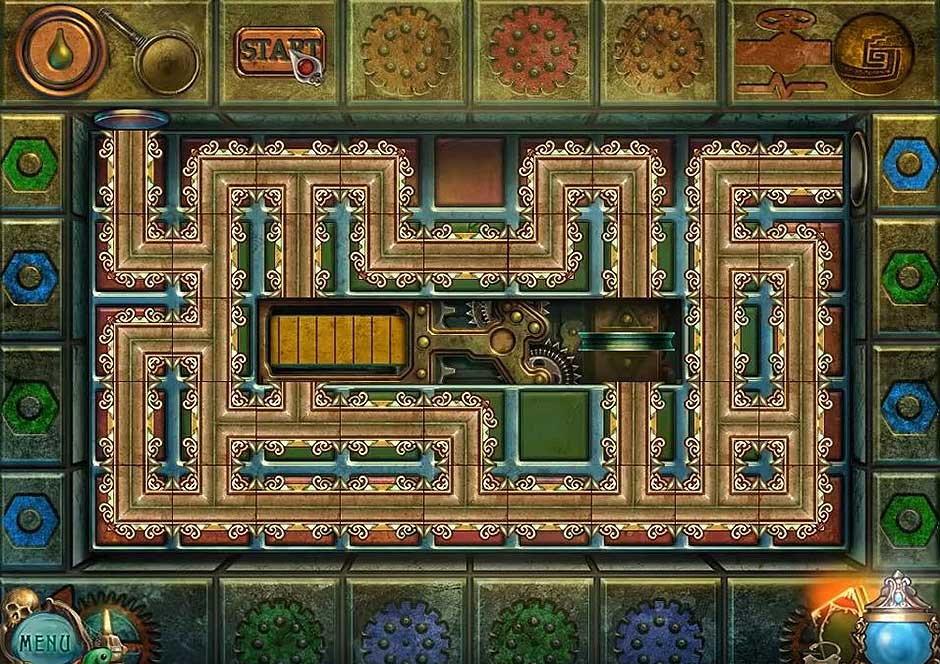
– Finally, go to the puzzle on the right side of the screen and trigger a mini-game by inserting the Buttons.
– Solve the puzzle as shown in the screenshot.
Haunted Legends – The Undertaker – Chest Key
– Once it is solved, take the Chest Key and continue to the next scene.
– Find all of the Hidden Objects.
– The note is obtained by clicking on the pitcher. The foam is obtained by moving the cone over to the test tube.
– Get the Red Fish.
– Unlock the chest with the Chest Key.
– Take the Note, Lobster Scale and Skull.
– Return to the underground crypt.
– Zoom in on the hole in the ceiling.
– Place the Skull in the opening and start a puzzle.
– Position the skulls in the puzzle as shown in the screenshot.
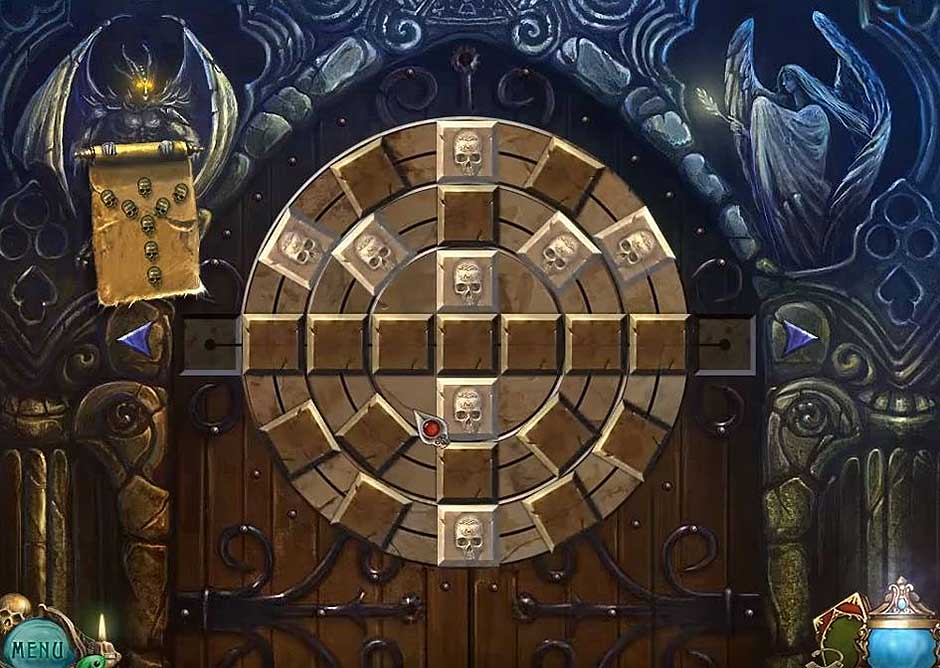
Haunted Legends – The Undertaker – Skull Disk
– Go into the hatch.
– Click on the owl.
– Zoom in on the cart and take the Note and Spring.
– Zoom in on the hole in the tree. Remove the boards and take the Screwdriver.
– Take a close look at the Undertaker and the hat.
– Go to the amulet and click on it and then the notes.
– Pick up the Torch.
– Zoom in on the bridge.
– Use the Torch to make the zombie’s hand go away.
– Pull the bridge handle above the railing and then pick up the fallen Handle.
– Place the Spring into the bridge gears and then pull the handle.
– Cross the bridge.
– First, zoom in on the plaque on the right side of the bridge. Use the Screwdriver to remove the screws holding it in place. Once you can take it off, you will find a Note and Skull to collect.
– Zoom in on the second lamppost on the left side of the bridge. Pick up the Angel.
– Zoom in on the gravestone and take the Owl Scale.
– Remove the vines on the grave by cutting them away with the Shears. Take the Green Fish.
– Zoom in on the door and insert the Skull into its lock. This triggers a puzzle.
– Solve as seen in the screenshot and then enter through the door.

Haunted Legends – The Undertaker – Skull Disk
– Enter the Hidden Objects Scene after it is activated by putting the Torch into the holder.
– Find all of the Hidden Objects.
– The hammer is acquired by attaching the head to the handle. Use the hammer on the hook to get the key. Get the bolt by using the wrench. Get the acid by using the bolt on the lid and then pour the acid over the chain to obtain the bas-relief. Place the bas-relief into the opening on the side of the casket.
– Get the Decorative Insert.
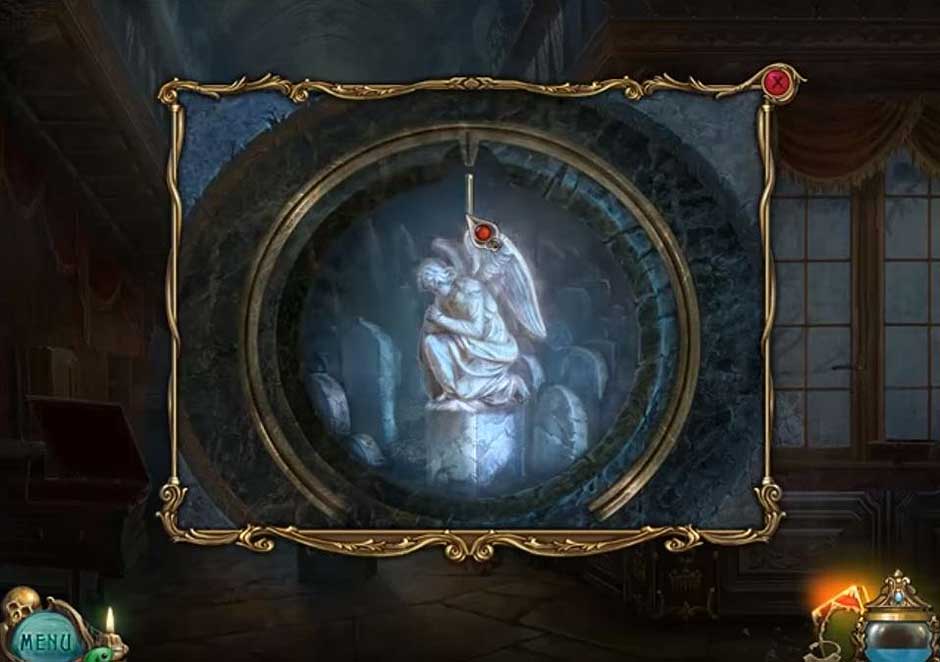
– Zoom in on the angel statue.
– Put the Decorative Insert into the opening to trigger a puzzle.
– Place the feathers as shown in the screenshot.
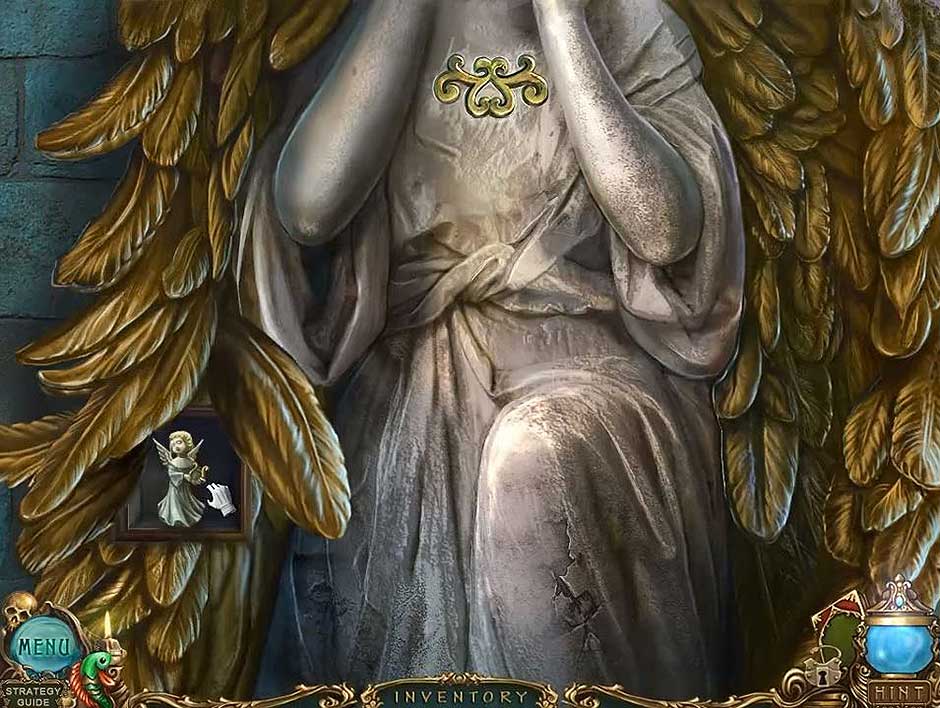
Haunted Legends – The Undertaker – Feathers
– Zoom in on the casket on the right side of the screen.
– Put the Angels on it and continue on down the stairs.
– Zoom in on the beacon. Get the Fishing Line using the Hook.
– Zoom in on the boat and take the Peg Leg. Attach the Hook and Fishing Line to the Rod and then take the complete Rod.
– Zoom in on the tent. Get the Pliers by using the Peg Leg on the seashell.
– Go down and enter the Hidden Object Scene.
– Find all of the Hidden Objects.
– Use glue on the book in order to acquire the fly. Place the fly near the spider web and you will be able to get the spade. Use that on the dirt and light the oil lamp with the matches. You now have the lamp and that is used on the wax seal.
– Get the Bike Horn.
– Zoom in to look over the ledge and then use your Rod to obtain the Lamp Handle.
– Proceed down the steps.
– Go to the beacon and insert the Lamp Handle into the opening. Click the handle to pull it.
– Zoom in on the cave and scare away the bats with the Bike Horn.
– Get the Sun Scale and Water Bucket.
– Zoom in on the tent and pour the water from the Bucket over the Pan. Take the Pan and the Yellow Fish.
– Move down twice and then go to the left.
Chapter 3: The Hospital
– Take the Note.
– Zoom in on the gate lock. Place the Red, Green and Yellow Fish into the slots to open the gate.
– Zoom in on the door’s lock.
– Remove the pin with the Pliers.
– Enter the building.
– Take the Poker near the furnace.
– Zoom in on the far wall and take the Note.
– Zoom in on the furnace and put the Pan in it. Use the Poker to get the Key.
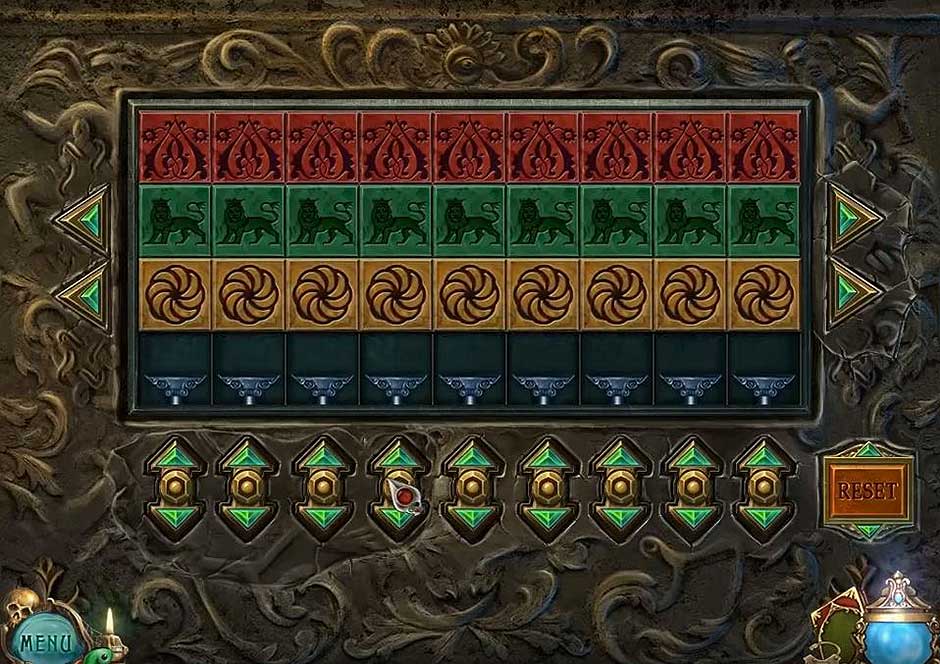
– Zoom in on the hospital door to activate a puzzle.
– Create the three stained glass patterns shown in the screenshot using the panels.
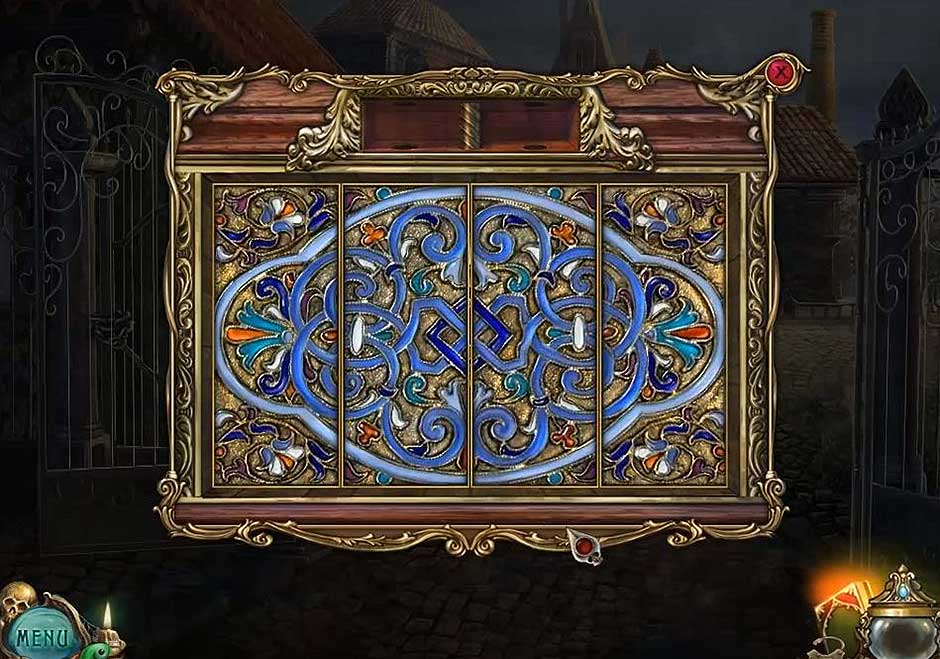
Haunted Legends – The Undertaker – Glass Pattern
– Unlock the door with the Key and enter the Hidden Object Scene.
– Find all of the Hidden Objects.
– The tweezers are inside of the box. The screwdriver is found by zooming in on the cage. Zoom in on the clock and remove the cover with the screwdriver. Take the clock hand.
– Zoom in on the mannequin and use the clock hand on the chest area. Take the heart using the tweezers and put it into the jar. Take the oiler and use it to oil the hinges, which reveals a key. Open the lock with the key.
– Take the Scalpel.
– Zoom in on the pot and move the boot to get the Deer Scale.
– Use the Poker to move the papers out of the way and take the Magnet.
– Zoom in on the package. Open it and use the Magnet to acquire the Tweezers.
– Take the Note.
– Go through the door on the left.
– Zoom in on the far wall. Remove the Saw Blade with the Tweezers.
– Zoom in on the book and cut the straps holding it closed with the Scalpel.
– Now open that book and take the Eraser found inside.
– Continue on to the hospital.
– Zoom in on the desk. Put the Saw Blade onto the Handle. Pick up the Hacksaw and the Note.
– Zoom in on the poster and clean it up with the Eraser. Take note of the clue found there.
– Go to the safe on the right wall and zoom in on it. Unlock it with the following code: 4-2-7. Take the Syringe.
– In the watch house, first zoom in on the bottle. Use the Syringe on it.
– Take the Fish Oil.
– Go back to the hospital.
– Zoom in on the table and put the Fish Oil on the teeth with the Syringe.
– Get the Handle.
– Enter the Hidden Object Scene.
– Find all of the Hidden Objects.
– First, get the bottle opener found on the shelf and use it to open the bottle. Take the cheese.
– Zoom in on the cage and open it. Put the cheese inside of it and then get the matches.
– On the shelf, click on the mortar, get the eye and click the mortar a second time.
– Zoom in on the head and put the eye into the right socket.
– Take the gypsum.
– Zoom in on the shelf and click on the three test tubes.
– Light the burner with the matches and click on the knob.
– Fill the mortar with gypsum and use the acid bottle with it. Use the pestle and take the gypsum.
– Zoom in on the cage. Fill the mold with the gypsum and take the ear.
– Attach the ear to the head.
– Get the Bandage.
– Put the Bandage onto the stool and take it. Place it in front of the cabinet.
– Zoom in on the top of the cabinet and attach the Handle to the door.
– Click the right side three times and the left side two times.
– Take away the rope and pick up the Tarp.
– Zoom in on the fire and put the Tarp on top of it.
– Continue on to the town square.
– Get the Bucket and Handkerchief.
– Zoom in on the fence. Take the Note and Horse Scale.
– Use the Bucket on the barrel and get the Cement.
– Zoom in on the bag in front of the building. Take the Note and Spiral Button.
– Zoom in on the grid in the alley. Cut it with the Hacksaw and enter the Hidden Object Scene.
– Find all of the Hidden Objects.
– Get the Shovel.
– Zoom in on the ground behind the fence. Dig up the dirt using the Shovel.
– Take the Paver Stones.
– Zoom in on the grid. Get the Rope.
– Zoom in on the Venus flytrap. Take the Watering Can.
Chapter 4: The Fort
– Enter the Hidden Object Scene.
– Find all of the Hidden Objects.
– Move the hat to get the card. Click the ant and get the acorn. Use the file with the rod and take the wire. Click the bat to find the clover.
– Get the Trowel.
– Zoom in on the pavement on the right side of the building. Take the Rose Scale.
– Pour the Cement into the Bucket and use the Trowel.
– Put the Paver Stones on the cement.
– Zoom in on the figure. Take the Note.
– Use the Watering Can on the seeds and keep the empty Watering Can.
– Go up the stairs.
– Zoom in on the cannon and take the Fuse.
– Click on the lid of the cannon.
– Zoom in on the cart and take the Sieve.
– Open the chest and take the Iron Glove.
– Zoom in on the door and clear away the debris. Take the Tobacco and the Sea Dragon Scale.
– Zoom in on the guard house. Take the Awl.
– Enter the tower and go up the stairs.
– Use the Iron Glove to pick up the Barbed Wire.
– Zoom in on the sack. Use the Awl on it and get the Brass Knuckles.
– Examine the right door. Unlock it by putting the Wire into the lock.
– Enter the building.
– Zoom in on the man and give him the Tobacco.
– Zoom in on the gun rack and take the Crow Scale.
– Zoom in on the window and take the Leaf.
– Examine the lantern and use the Brass Knuckles to break the glass.
– Take the Glass Shard.
– Use the Handkerchief to take the File.
– Examine the guard hut and use the File on the chain. Take the Chain.
– Go back to the town square. Zoom in on the right building’s door.
Chapter 5: Bell Tower View
– Trigger a puzzle by putting the Leaf into the lock.
– The solution is shown in the screenshot. Put the Spiral Button into the opening.
– Enter the bakery.

Haunted Legends – The Undertaker – Leaf
Haunted Legends – The Undertaker – Pins
– Speak with the Baker.
– Take the Ring on top of the table.
– Click on the bread once and then take the Poisoned Bread.
– Take the Oven Fork.
– Zoom in on the barrel. Use the Sieve and get the Bullet.
– Zoom in on the cabinet in the back and open the door. Take the Handle.
– Zoom in on the balcony and get the Curtain by using the Oven Fork.
– Zoom in on the Venus flytrap and give the Poisoned Bread to it.
– Use the Shovel in the plant pot to get the Conch Shell and Worm.
– Zoom in on the door lock. Activate the puzzle.

Haunted Legends – The Undertaker – Hexagon
– Solve as shown in the screenshot.
– Insert the Ring into the slot.
– Enter the bell tower.
– Zoom in on the bag hanging from the landing. Open it and take the Hammer and Matches.
– Zoom in on the gears by the ceiling. Attach the Rope and click on it.
– Zoom in on the bell and study the clue.
– Return to the bakery.
– Zoom in on the hatch and use the lock combination 3-2-1.
– Cut the rope with the Glass Shard.
– Take the Ladder.
– Now go down twice, turn left and go along the right path until you get to the tower. Go up and enter through the right door.
– Zoom in on the gun rack. Open the rifle and put in the Bullet. Take the Loaded Rifle.
– Zoom in on the window and put the Curtain on it. Click and go through it.
– Zoom in on the vine on the wall. Take the Lock Part.
– Zoom in on the left door. Shoot the lock with the Loaded Rifle and enter the Hidden Objects Scene.
– Find all of the Hidden Objects.
– Zoom in on the wheel and unscrew the nut with the wrench. Take off the cover and get the bullet.
– Take the rapier and use it to open the barrel lid.
– Zoom in on the barrel and get the Jack.
– Zoom in on the mechanism and put in the bullet to activate a puzzle. Solve as shown in the screenshot.
Haunted Legends – The Undertaker – Mechanism
– Use the Jack with the cannon. Take the Lighter.
– Put the Dynamite on the chest and light it with the Lighter.
– Get the Lock.
– Zoom in on the device and put the lock onto it. This will activate a puzzle. The code to enter is 7-5-8. Take the Rocket Casing.
– Go down three times and go to the right.
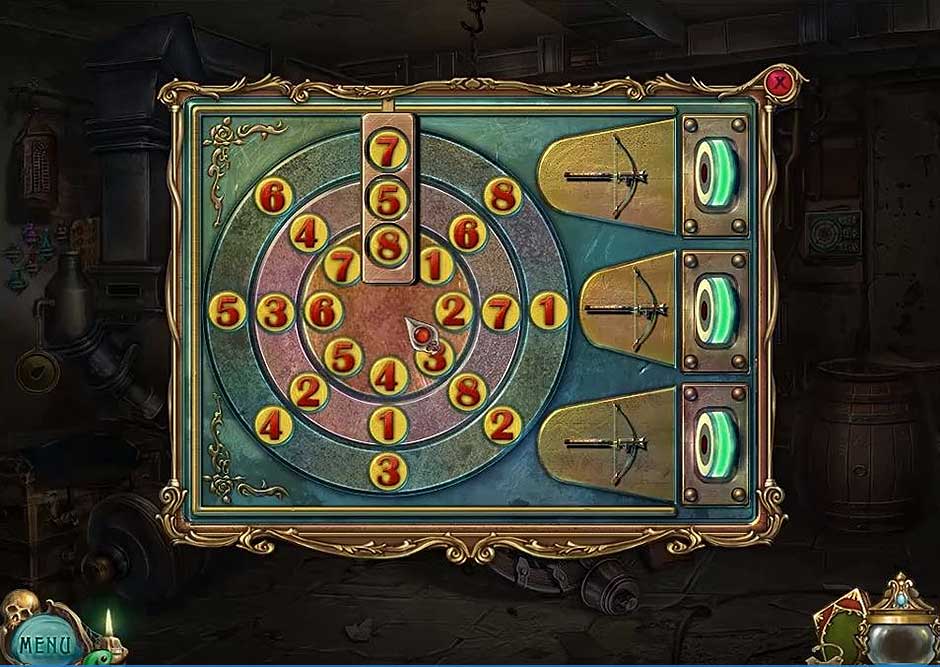
Haunted Legends – The Undertaker – Code
– Zoom in on the front of the store and focus on the window.
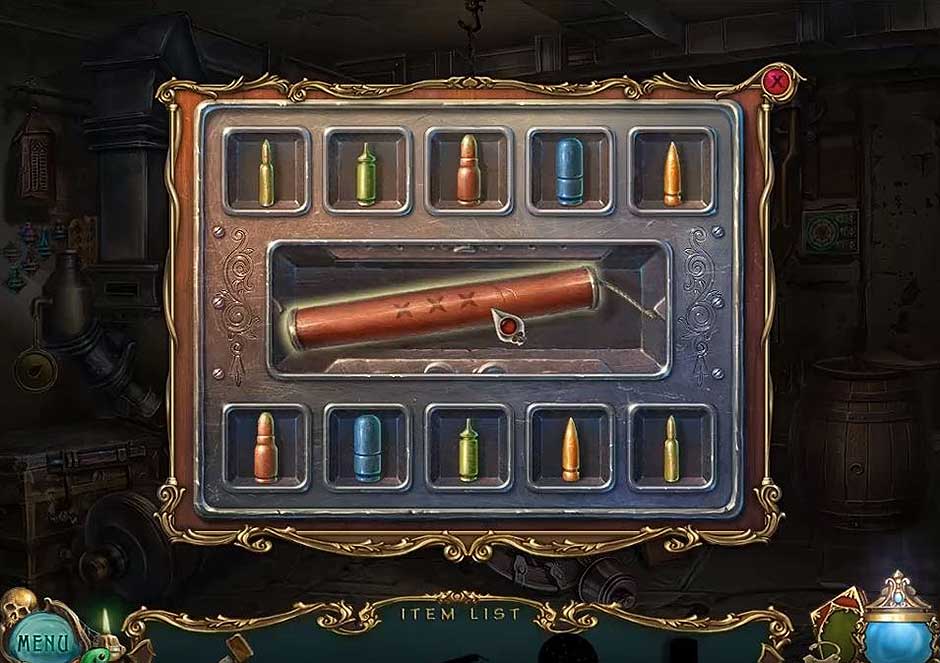
– Put the Lock Part into the lock and activate the puzzle.
– Mix the ingredients according to the recipe.
– Get the Gun Powder.
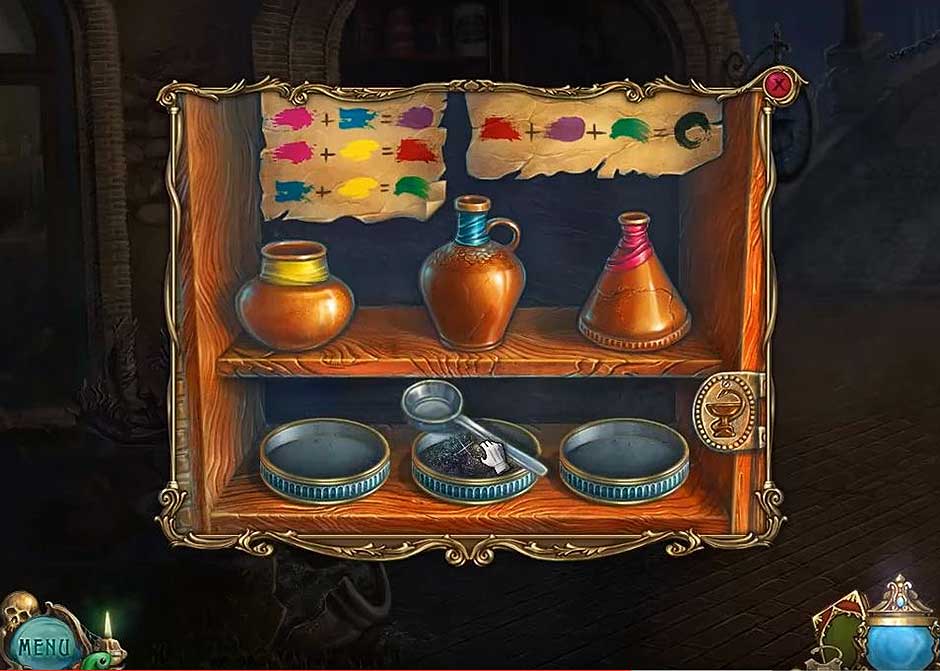
Haunted Legends – The Undertaker – Ingredients
Chapter 6: The Market
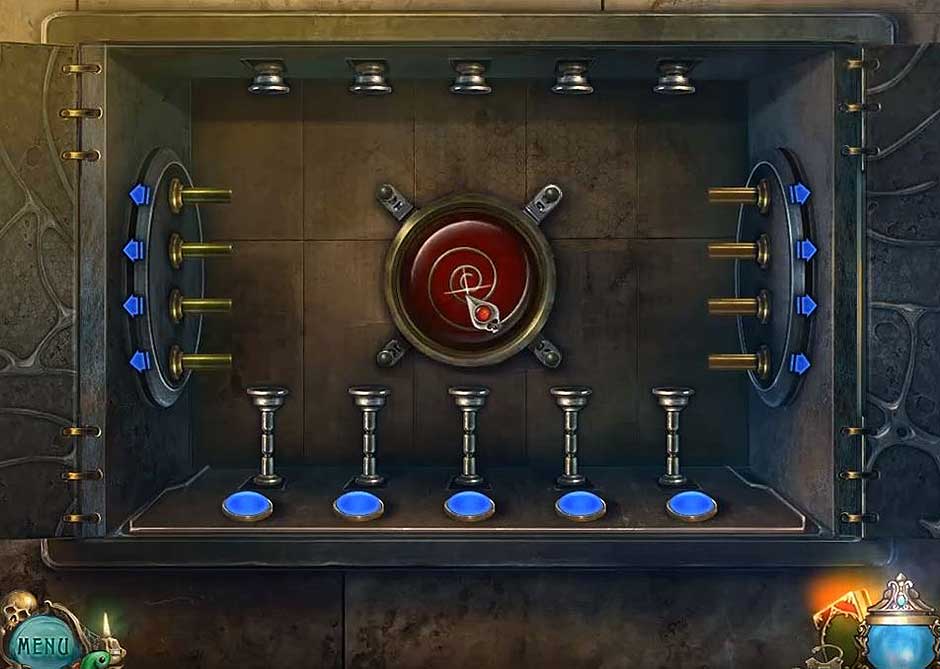
– Zoom in on the platform. Use Rocket Casing with the Matches, Fuse and Gunpowder. This will activate a puzzle.
– Solve according to the screenshot.
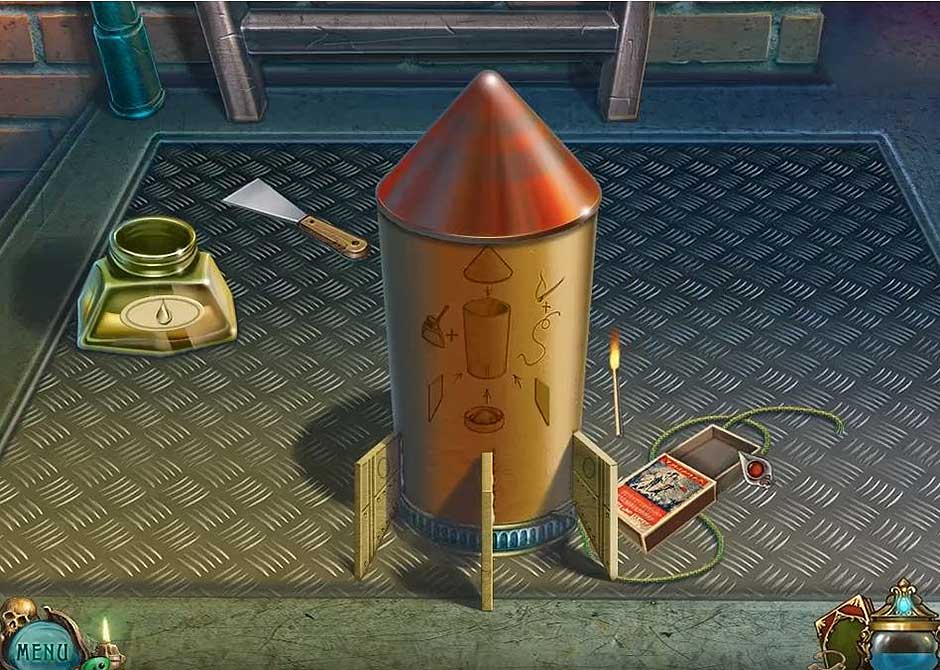
Haunted Legends – The Undertaker – Rocket
– Take the Light Bulb.
– Get the Glove and Flagpole.
– Feed the Worm to the crow and take the Weathervane.
– Zoom in on the grate. Remove it with the Flagpole.
– Dip the Watering Can into the water and fill it.
– Go to the right.
– Zoom in on the lantern and put the Light Bulb into it.
– Zoom in on the floor below the first landing and use the lantern.
– Zoom in on the nest. Use the Oven Fork to retrieve the Nail.
– Place the ladder in front of the wall on the right.
– Zoom in on the window and put the Weathervane on the hook.
– Enter through the window.
– Zoom in on the window and remove the paint with the Nail.
– Shatter the window and get the Handle.
– Zoom in on the winch. Put the Handle on it. Take the Handle.
– Pick up the wooden lid and place in onto the bridge.
– Go to the market.
– Zoom in on the cutting board.
– Zoom in on the nets. Move the one on the right and get the Sawfish.
– Place the Handle on the well and click.
– Zoom in on the bucket to activate a puzzle.
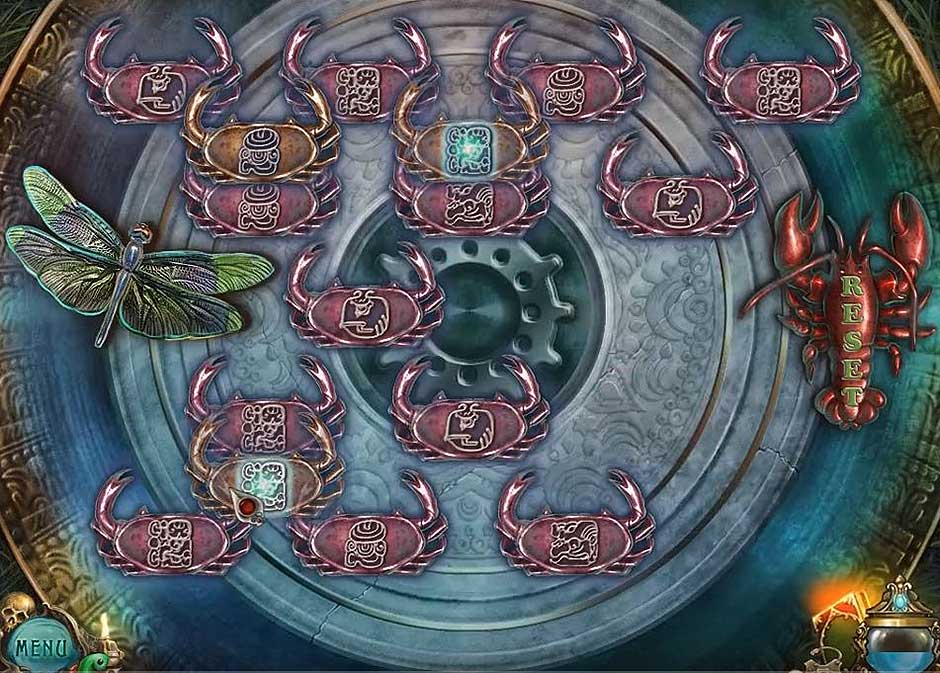
Haunted Legends – The Undertaker – Crabs
– Match the pairs of crabs.
– Solve according to the screenshot.
– Get the Gear Wheel.
– Take the Note.
– Zoom in on the girl hiding behind the crates. When she comes out speak with her.
– Get the Oar.
– Zoom in on the barrel. Take the Wheel.
– Zoom in on the barrel again and place the cutting board inside of it. Take the tar covered Board.
– Go down three times.
– Zoom in on the ground at the bottom of the stairs. Take the Tree Scale and Spoon.
– Put the Wheel on the car. Click on it.
– Zoom in on the broken barrel.
– Put the Spoon into the salt and take the Potassium Chlorate Crystal.
– Go down five times, turn left, take the right path and go up the tower.
– Open the cannon lid, if it is still closed.
– Pour the water onto the plants. Wait for the bees to swarm it.
– Zoom in on the cannon and take the Stone.
– Zoom in on the boards.
– Use the Sawfish on those boards and enter the Hidden Object Scene.
– Find all of the Hidden Objects.
– Get the Knife.
– Zoom in on the drain pipe and put the Stone into the hole.
– Take the Chimney Brush.
– Go in and enter the Hidden Object Scene.
Chapter 7: The Lighthouse
– Find all of the Hidden Objects.
– Solve as seen in the screenshot.
– Get the Oil.
– Zoom in on the well. Attach the Chimney Brush to the Chain and lower it down the well.
– Get the Jetton Commandant.
– Zoom in on the man. Give him the Jetton Commandant. Take the Scroll he gives you.
– Zoom in on the safe and put the Handle on it. Click.
– Zoom in on the hatch. Pour Oil on it to activate a puzzle.
– Solve the puzzle as seen in the screenshot.
Haunted Legends – The Undertaker – Pipes
– Zoom in on the table. Use the grinding stone to sharpen the Knife.
– Zoom in on the Net. Take the one on the left by cutting it free with the Sharp Knife.
– Zoom in the post. Cut the rope with the Sharp Knife.
– Zoom in on the trap in the water and open it.
– Take the Note out of the bottle and the Handle.
– Zoom in on the table. Use the Sharp Knife to cut the net. Move the fish.
– Take the Key and Shell Scale.
– Zoom in on the lock found on the side of the boat. Insert the Key and open it.
– Take the Scoop and Harpoon.
– Return to the Commandant’s house and enter through the window.
– Enter the Hidden Object Scene.
– Find all of the Hidden Objects.
– Get the Flint.
– Remove the manhole cover with the Harpoon.
– Zoom in on the manhole. Take the Handle and Fish Scale.
– Zoom in on the mechanism and insert the Gear Wheel and Handle.
– Pick up the boat and zoom in on it.
– Use the tar covered board on the boat.
– Use the Scoop on the water inside the boat.
– Use the Oar with the boat to cross the water.
– Zoom in on the shipwreck.
– Take the Note, Rum and Firewood.
– Zoom in on the fire pit. Take the Boulder.
– Put the Firewood into the fire pit and use the Flint to light it.
– Scare away the wolves by putting the Potassium Chlorate Crystal into the fire.
– Zoom in on the lighthouse. Get the broken Shovel.
– Zoom in on the wall on the left side. Take the Fresco Piece.
– Place the broken Shovel under the rails.
– Put the Boulder on the Shovel.
– Take the Lighthouse Key.
– Zoom in on the lighthouse’s door.
– Insert the Lighthouse Key and choose the numbers 4 and 7.
– Go inside.
– Zoom in on the cage and open it to take the Form.
– Click on the bar and get the Hook.
– Open the hatch and zoom in.
– Use the Hook on the lever to access the stairs.
– Zoom in on the telescope. Take the Lens.
– Zoom in on the railing and take the Pin.
– Light the candle with the Flint. Take the Wick.
– Zoom in on the crate and remove the Nails with the Hammer. Take the Lever and Tulip Scale.
– Attach the Lever to the switch and pull it.
– Take the Nugget.
– Go inside.
Chapter 8: The Hotel
– Zoom in on the table. Put the Form on it.
– Put the Nugget in the device.
– Turn the knob and use the Flint on the burner.
– Click the beaker and get the Key.
– Zoom in on the lock and put in the Key. Open the cage and get the second Fresco Piece.
– Pour Rum into the funnel. Put the Wick on it and light with the Flint.
– Zoom in on the safe. Attach the Handle and open it. Click on the lever.
– Zoom in on the area where the light shines. Wait for the fog to clear and continue.
– Take the Antenna.
– Open the door of the cable car. Take the Keys.
– Use the Sharp Knife to cut the deflated ball. Take the Rubber Strip.
– Zoom in on the hoist and take the Ice Axe.
– Zoom in on the ladder. Place the antenna on it.
– Zoom in on the chain over the ladder and put the Pin in it.
– Zoom in on the door and put the Lens over the lock.
– Zoom in on the lock and put in the Keys to open a puzzle.
– Solve and take the Starter and Crown Scale.
– Zoom in on the ground and put the two Fresco Pieces down.
– Place the pieces as shown to open the grid.
– Zoom in on the hatch and get the Chain and triangle Key.
– Zoom in on the hoist. Put the Chain and Rubber Strip on it.
– Zoom in on the cable car. Insert the Starter and activate the puzzle.
– Solve the puzzle as shown.
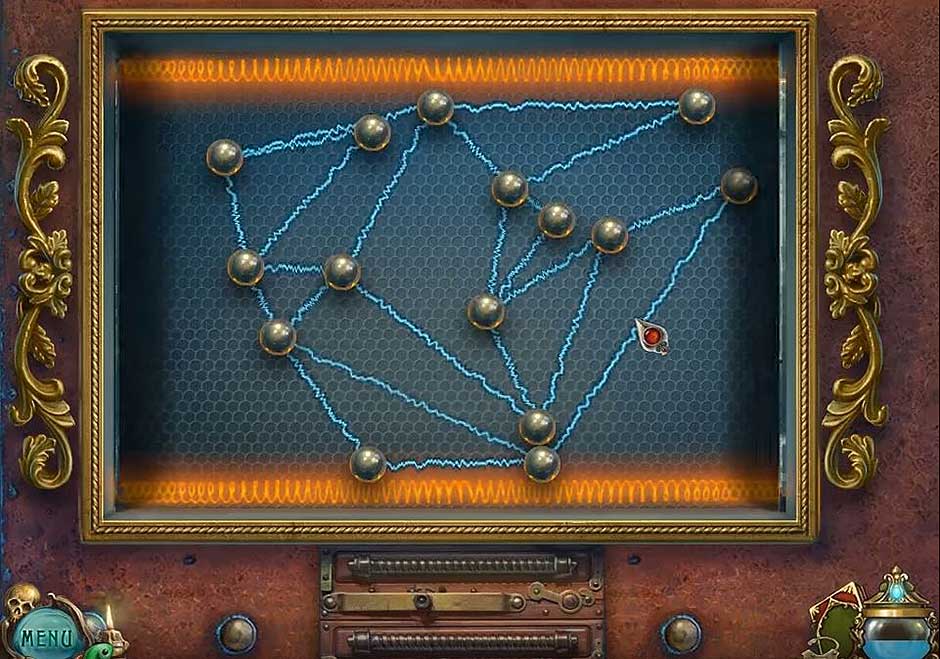
Haunted Legends – The Undertaker – Strings
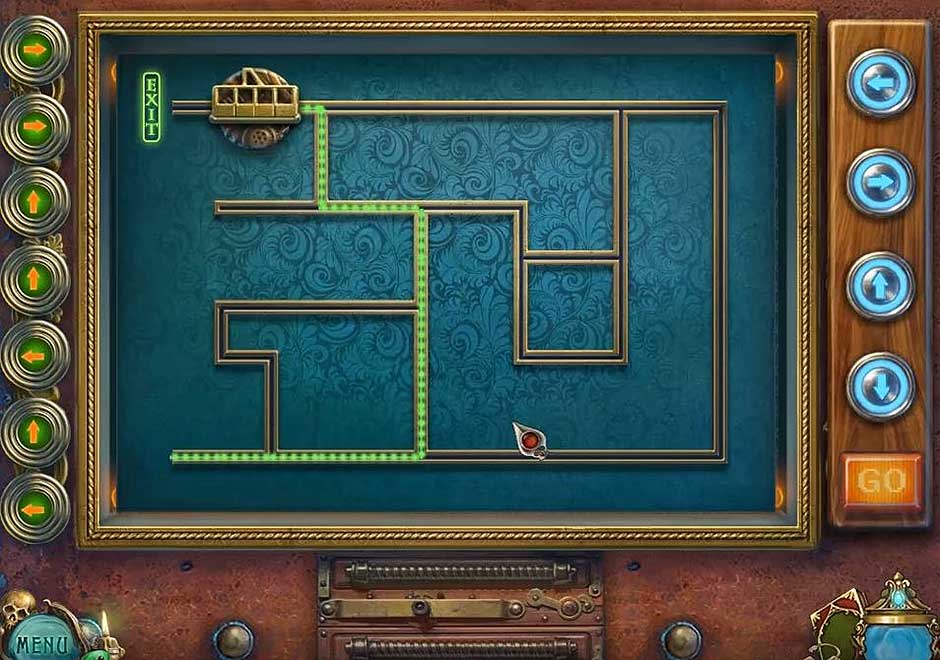
Haunted Legends – The Undertaker – Route
– Zoom in on the panel and put the triangle Key into the opening.
– Get the Tube.
– Zoom in on the door and remove the ice with the Ice Axe. Enter the Hidden Object Scene.
– Find all of the Hidden Objects.
– Get the Dolphin.
– Zoom in on the door of the hotel. Put the Dolphin on the rope.
– Ring the bells in this order: 2-4-3-1.
– Go inside.

Haunted Legends – The Undertaker – Bells
Chapter 9: The End
– Zoom in on the cubby and get the Note, as well as any others that will show up.
– Take the Lever.
– Zoom in on the chimney and put the Tube inside.
– Zoom in on the gramophone. Take the Snail Eye.
– Zoom in on the snail and take the Rag.
– Get the Ruler on the window sill.
– Enter the Hidden Object Scene.
– Find all of the Hidden Objects.
– Get the Can Opener.
– Zoom in on the panel and clear the oil away with the Rag. Take the Shell.
– Zoom in on the painting. Put the Shell into the slot and activate the puzzle.
– Enter the following pattern: A-7, H-4, D-4, J-6.
– Get the Fan.
– Zoom in on the gramophone.
– Use the Can Opener on the nut and take the Horn.
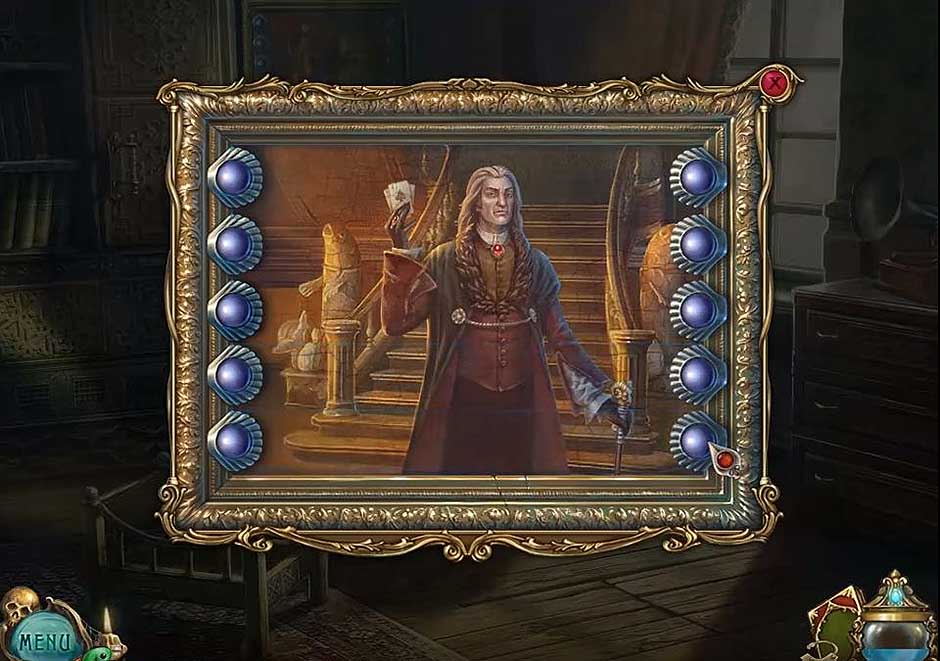
Haunted Legends – The Undertaker – Painting
– Zoom in on the chimney. Put the Horn into the opening.
– Melt ice on the stairs by using the Fan on the Horn.
– Zoom in on the left fish and click twice.
– Zoom in on the right fish and click twice.
– Zoom in on the stairs. Take Lock Pick and Eagle Scale.
– Zoom in on the cabinet. Open the door with the Ruler.
– Take the Fish Scale and Hose.
– Zoom in on the far door and use the Lock Pick on the lock.
– Zoom in on the wall. Take the Valve. Put the Hose into the opening.
– Look out the window.
– Get the Sea Horse and Starfish Scale.
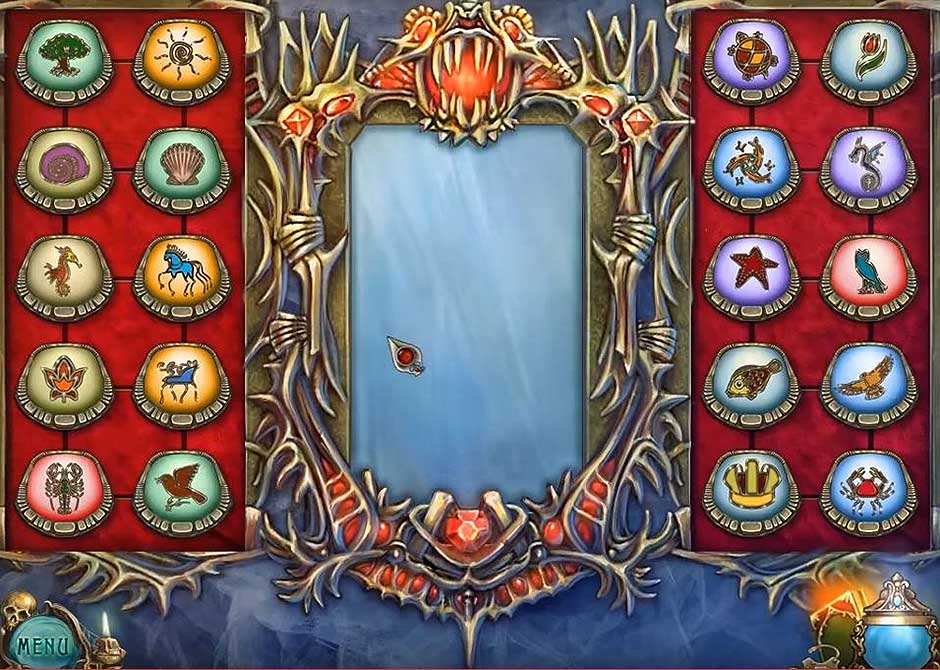
– Zoom in on the armoire and put the Sea Horse into the opening to start a puzzle.
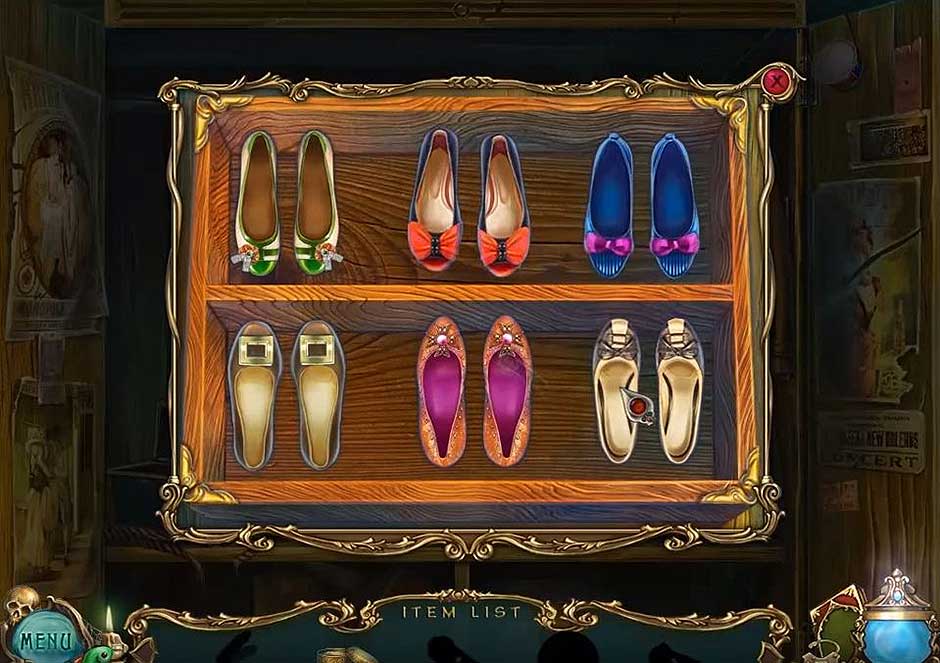
Haunted Legends – The Undertaker – Shoes
– Solve as shown.
– Trigger another puzzle by putting the two handles into the slots.
– Get the Pocket Knife.
– Zoom in on the painting and cut it with the Pocket Knife.
– Get the second Snail Eye.
– Examine the door on the left. Put the Valve in the lock and click twice.
– Take the Lever.
– Click on the hose.
– Zoom in on the snail and insert both Snail Eyes. Also insert both Levers.
– Click on the middle lever and take the Horse. Click on the left one for the Crab Scale.
– Zoom in on the window sill. Put the Horse on the box. Get the Note and Salt.
– Sprinkle Salt on the iced path.
– Zoom in on the bottom of the bridge. Get the Torch.
– Zoom in on the horse.
– Put the Torch onto the oil.
– Zoom in on the chimney.
– Place the Oiled Torch into it and take it again.
– Zoom in on the fireplace and use the torch in it.
– Enter the Hidden Object Scene.
– Find all of the Hidden Objects.
– Get the Wind Up Key.
– Zoom in on the suitcase. Give the drum to the toy bunny and put the Wind Up Key in the opening on its back.
– Get the Lock Piece.
– Zoom in on the panel and insert that to activate a puzzle.

Haunted Legends – The Undertaker – Lock
– Solve as shown.
– Repair the balloon with the Fabric, Needle and Thread.
– Take the repaired Balloon.
– Zoom in on the broken bridge and attach the Balloon to the hose.
– Get the Glove.
– Take the Ladder and Notes.
– Zoom in on the ground. Get the Hammer and Dragon Scale.
– Place the Ladder against the pole on the left.
– Zoom in on the icicle. Use the Hammer to break it off. Pick up the Icicle.
– Take the Turtle Scale.
– Zoom in on the mechanical fish. Put the Icicle on the nose once it has been assembled.
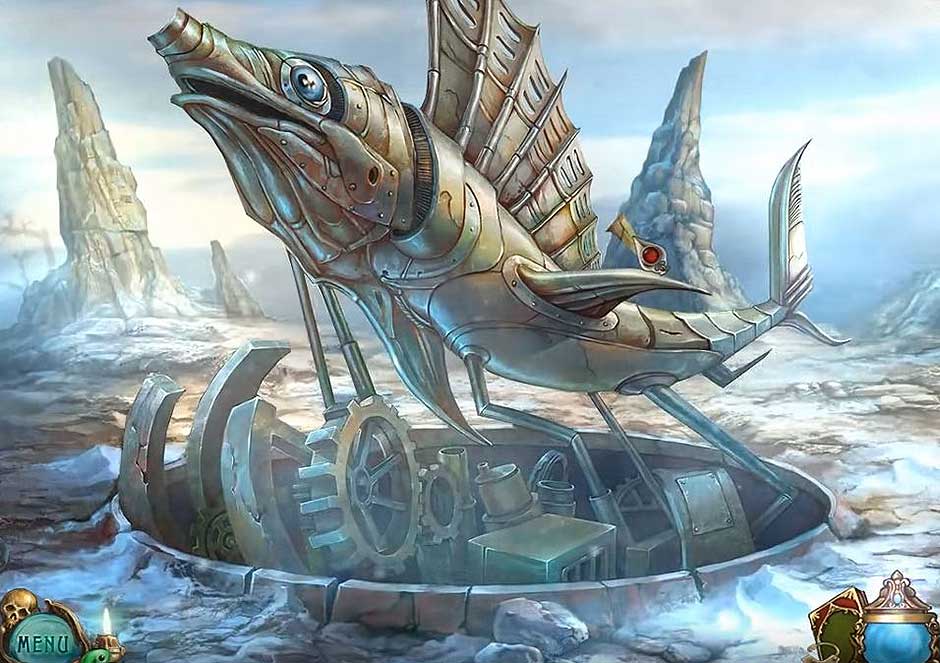
Haunted Legends – The Undertaker – Mechanical Fish
– Zoom in on the window and wipe it with the Glove.
– Use the Hammer to break the window.
– Zoom in on the cage and get the Notes. Insert the Amulet into the opening.
– Enter the hatch.
– Zoom in on the man.
– Take the first Lock Piece.
– Get the Notes.
– Leave and then go to the structure in the center. Zoom in on it and get the second Lock Piece.
– Zoom in on the door.
– Insert all pieces of the lock and activate the final puzzle.
– The solution pictured is one of the solutions. They are random.
Haunted Legends – The Undertaker – Pieces
Congratulations! You have now reached the end of Haunted Legends – The Undertaker and successfully completed all levels. Our blog has many more valuable gaming guides and you are welcome to check them all out.
For more great tips and tricks, visit our blog!
The Haunted Legends – The Undertaker Walkthrough is meant as a guide and does not contain cheats, hacks or serials.