Get ready for adventure in this Haunted Halls – Revenge of Doctor Blackmore walkthrough! Don’t worry if you’re stuck in one of the maddening puzzles of this game as you try to save the helpless victims of the vicious Doctor. This walkthrough will help get you, and your sanity, out safely! Full of tips and tricks and other useful information, it is sure to make your journey go much easier.
Contents
Haunted Halls – Revenge of Doctor Blackmore Walkthrough
Chapter 1: Doctor Blackmore’s Return
Take the Cigar and Feather from the Native American statue. Use the Cigar on the pirate hanging on the pillar. Collect the Target, Scissors, and Sugar Cube from the table on the left. You’ll place the Target under our friend the pirate. Collect the Tomahawk after the statue throws it. Give the Sugar Cube to the little creature in the plants so you can collect the Suitcase. You’ll see it now above your notes as you Portable Laboratory! Take another look at the plants to collect the Lighter.
Looking at the monitor on the right side of the screen will trigger a cutsceen. After it has finished, use the Tomahawk on the glass box so you can take the Button. Click on the tentacle to shoo it off before using the Scissors on the cigar you gave the pirate. Now you can use the Lighter to light it for him. Collect the Eye. Go to the door ahead of you and use the Button on the lower left slot and that Eye above the hands. This will start a tile swap puzzle. Finish it to go through the door. The solution is below:
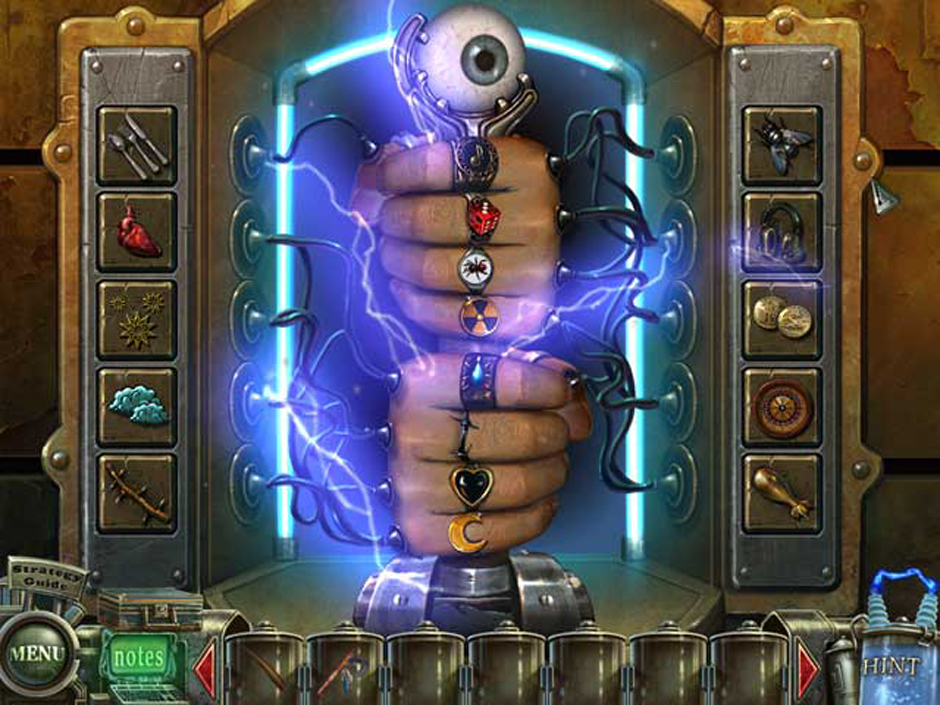
Haunted Halls – Revenge of Doctor Blackmore – Tile Swap Puzzle
Take the cables from the floor and add them to the stingray tank. Use the Feather on the pheasant hanging out on the sink. Collect the Egg that she lays then go out the door to the left. Here you will want to collect the Liquid Nitrogen from the table. (Take a look at those files, too!) Inside the cabinet is a hidden object scene. Place the objects in their proper places and in the end you will get a key item.
Pick up the Screwdriver and use it on the Screw. Take the Scissor Blade and use it with the Screw and Scissor Half before using the Screwdriver to create the Scissors. Use them to cut the netting and collect the Empty Pesticide Bottle. Now collect the Chemical Jars and Spray Cap and add the Chemical Jars and Empty Pesticide Bottle into the slots before mixing them. Now use the Spray Cap on the Pesticide Bottle. Congratulations! You now have Pesticide. Use it on the jar with scorpion so you can collect the Wires. You can use them on the battery. It will show you the code “539”, which you use on the box to open it. Take the Coin from inside.
There is a puzzle on the right wall. This is the solution:

Haunted Halls – Revenge of Doctor Blackmore – Wall Puzzle Solution
Collect the Fertilizer and Empty Bottle. Use the Fertilizer on the grass in the sink. Collect the Wheat Grain by clicking on it, then go back to the hall. Use the Liquid Nitrogen and Tomahawk to break the lock on the door. Go through the door and into the ward. The gentleman in the chair is your fiance. Select him to speak with him. Collect the Piece of Bread from the loaf on the floor and the Eye Glasses from the sink. Turn on the sink and use the Empty Bottle to collect Machine Oil. Open the suitcase in the lower left corner. Place the Egg in the nest inside the vent to the left. When it hatches, feed the chick the Wheat Grain. Go back to the Hall.
Give your Piece of Bread to the stingray and the Machine Oil on the gears of the machine to the right. Once you complete it you can place the Coin in the slot and collect the Latex Glove. This is the solution:

Haunted Halls – Revenge of Doctor Blackmore – Gears
Return to the Testing Room. There is a hidden object scene over the cabinet. Open it. Now, take away the netting and collect the Nippers. Take a look at the napkin and then collect the Tweezers and Blunt Knife, which you will use on the sharpening stone to make it a Sharp Knife. Use the Tweezers on the scorpion tail. This will get the venom into the tube. Use the Sharp Knife on the Lemon to collect it. Use the Lemon, then the Vial of Venom on the Acid Jar and collect it. Use this Acid on the lock and get the Can Opener. Give your Eye Glasses to the kangaroo and take the Jar it provides.
Go back to your portable lab. Use the Flowers from the upper right shelf in the Mortar and crush them with the Pestle. The flowers will become powder to put into the Solidifier. Take the Green Crystal and put it into the Grinder, then press the button. Use the Gold Powder in the Liquifier and press the button. Pour it into the Canisters to create the Eye Drops.
There is a helium canister in the back of the room. Use the Latex Glove on the nozzle and recollect it as the Floating Glove. Use it on the ceiling over the kangaroo. Use the Can Opener on the can that falls down. Take the Chicago Disk from inside. Now go back to the Ward and then to the left to reach the Monitor Room. Use your Eye Drops to make the hallucination go away before focusing on the computer. When you use the Chicago Disk here you will open a portal! Go ahead and go through it.
Chapter 2: Chicago
Collect the Shovel from the street then read the newspaper. Go ahead and click on the toys in the tree. Now use the Shovel on the dirt at the base of the water tower and collect the Worm before going up the road to a shed. There is a hidden object area here. Collect the items. When you’re done, you’ll have the Dynamite. Use the Shovel on the sand and put out the fire. Collect the Stone, Poker, and Metal Comb from pile of sand. Now go back to the Main Street
Use the Metal Comb on the two toys in the tree. Take the Twine. Set up the Dynamite at the base of the water tower. Go back to the shed area. Use the Twine on the bucket of glue, turning it into Sticky Rope. Dip this into the pile of gun powder to make a Fuse. Now go back to Main Street again. Add the Fuse to the Dynamite. A cutsceen will play. Now use the Tomahawk on the front door of the building on the left and go inside. Take the Umbrella from the coat rack. Go through the door under the stairs.
Break the window using the Stone. This will let out the smoke. Go back to the Foyer, then to the left to go to the Kitchen. Take the Oven Mitt. After you take it, you will find a puzzle above the mantle when you click on the clock. This is the answer to it:
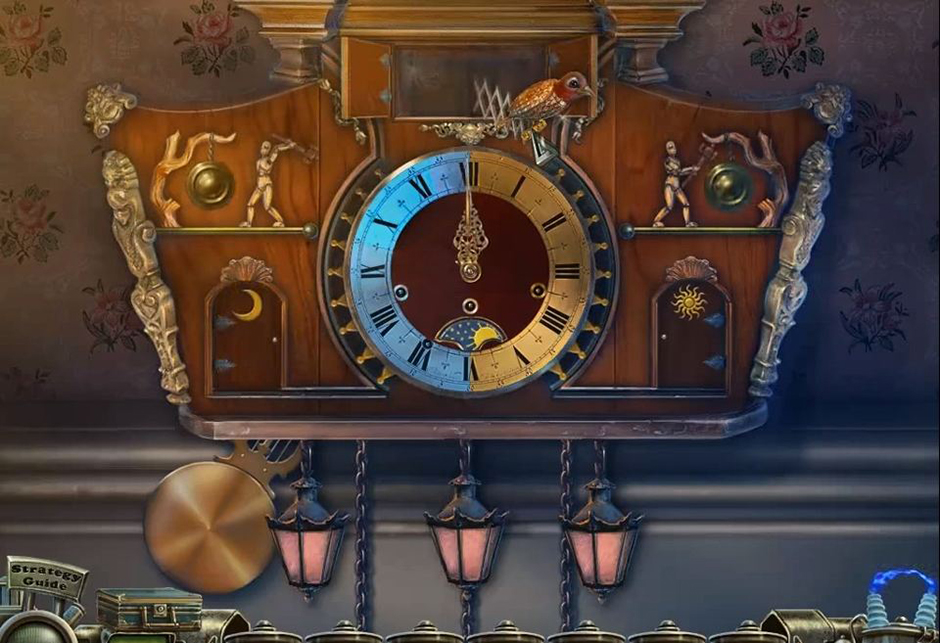
Haunted Halls – Revenge of Doctor Blackmore – Clock
You’ll collect the Fishing Line with Hook when you’re done.
Open the oven and use the Oven Mitt to grab the tray. Take the Smelling Salts from the wooden cupboard. Take the Vinegar. Now open the windows on the left and take a look outside. Help the beaver out by using the Tomahawk to get rid of the poison ivy. Take the Gas Mask and it will be added to your Portable Lab. Open it and do the following:
Use the Salt and Coal on the Grinder. Take the Dust and add it to the Liquifier. Pour the liquid back into the Grinder where you will add the Seeds. Grind all this together and place the dust into the Mortar before using the Pestle on it. Put the new dust into the device at the bottom. This will let you collect the Gas Mask. Now go back to Foyer.
Use the Fishing Line with Hook on the spear then add the Worm while looking at the fish tank. You will get the Fish. Now go back to the kitchen. Place the Fish onto the tray and use the Oven Mitt to put it back into the oven. Let it cook and then pull it back out, still using the Oven Mitt and collecting the Baked Fish. Now go back to the garage.
There is a hidden object area above. Start it and find the objects that are in black at the bottom of the screen. You will get the Belt. Now you can give the Baked Fish to the Cat sitting on the stand. When she jumps down you can collect her. Now go back to the Storeroom. Place the Cat inside the wheel and after that the Belt can be used on the fan and the smoke will clear out. Use the Umbrella to bring down the box behind the light. There will be a pot in the now empty shelf. You can use the Vinegar to clean it. You will get a code: “X27Z”. Take the Pliers from beside the tied up man before using the Smelling Salts to wake him up. Take the note from him. It will say “4ZHK”.
Now go back to the kitchen and take a look at the oven again. Take the Poker and use it on the coals. Use the Oven Mitt to collect the Iron Tooth. Look back out the window and give it to the Beaver so he can finish carving the tree. Take the Ladder and go back to Foyer where you’ll use it on the stairs. Climb up it. Use the Gas Mask to avoid the hallucination and the Pliers on the key stuck in the door. This will lead you to the next hidden object area. When you are done you will get the Salt.
Go in to the next area: The Study. You will want to fight the moving suit of armor with the Tomahawk. Now go back to the kitchen and use the Salt on the table. A puzzle will start where you grow a pumpkin. Just do as the instructions say and collect the Pumpkin when you’re finished and go back to the Study. There you’d use the Pumpkin on the suit of armor before going back down to the Foyer.
Look at the coat rack, then the staff. This will start a puzzle. You will want to match the puzzle to the largest painting above the stairwell. You will collect the Sword. Now go back to the Study and flight the suit of armor with the Sword to defeat it. Now you can put the codes “4ZHK” and “X27Z” into the cage in the back. A puzzle will start. Press the Red Button twice and then the Green button 5 times. Then go down to the room under the stairs.
Talk to the man standing here. Collect the Disk Piece and Blue Energy Orb. Go back upstairs from the ladder and click on the hidden object area on the left. Finish the puzzle and collect the Glue. Take the Disk Piece and Glue to the desk and combine them to create the Chernobyl Disk. Now go all the way back to the Screen Room and place the disk into the Chernobyl monitors. A portal will open. Go through.
Chapter 3: Chernobyl
Here in the plaza you’ll see a newspaper on the ground to look at. Keep the number “269-47”. Use the Tomahawk to clear the branches on the statue.
If you look at the broken window on the left. There is a coat that you can move around before you take the Drumsticks. Now go to the door in the far left corner. Go inside the gym and collect the Crowbar and then use it on the lockers. Take the Ammo from inside. There is a heater in the rear of the room. Use the Crowbar again on the heater and break the chain. Take the Ball then go back to Plaza.
Use the Crowbar to move the road chunks from the phone booth, then take a look in. Put the code from earlier in: 268-47. Take the Coin. Take a look at the playground and collect the Octopus Cutter. Now go back to the first area and take the gun from the top of the tank so you can use the Ammo. Once the well is clear, go look at the shop. Take the Clean Glass and Matches. Use the Crowbar to take the panel off of the tank. Now take the Drum and Funnel.
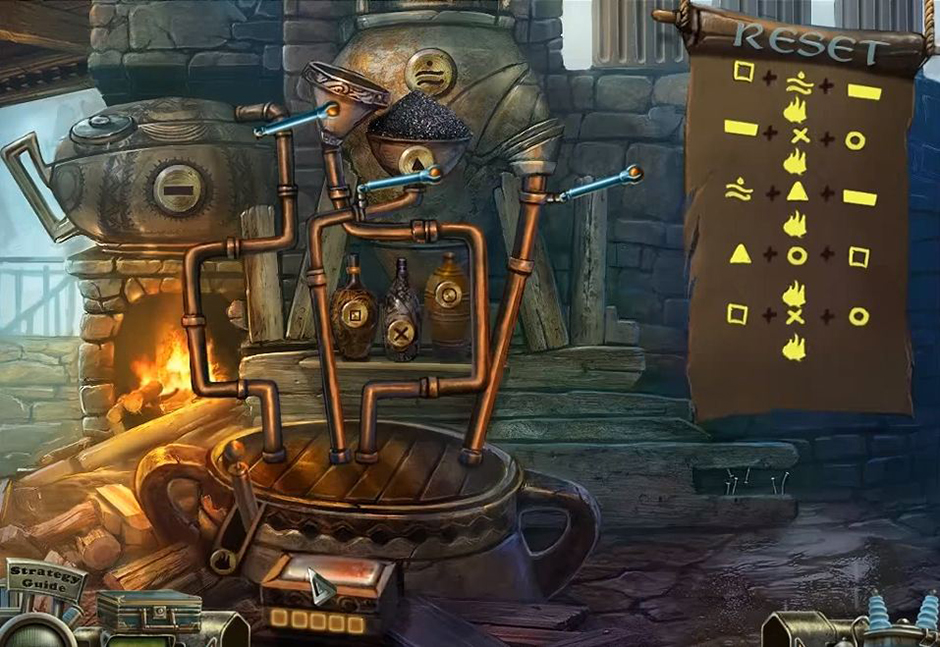
Inside the well you can use the Funnel to start a puzzle. You need to move pipes into place to make a Trumpet that you will collect.
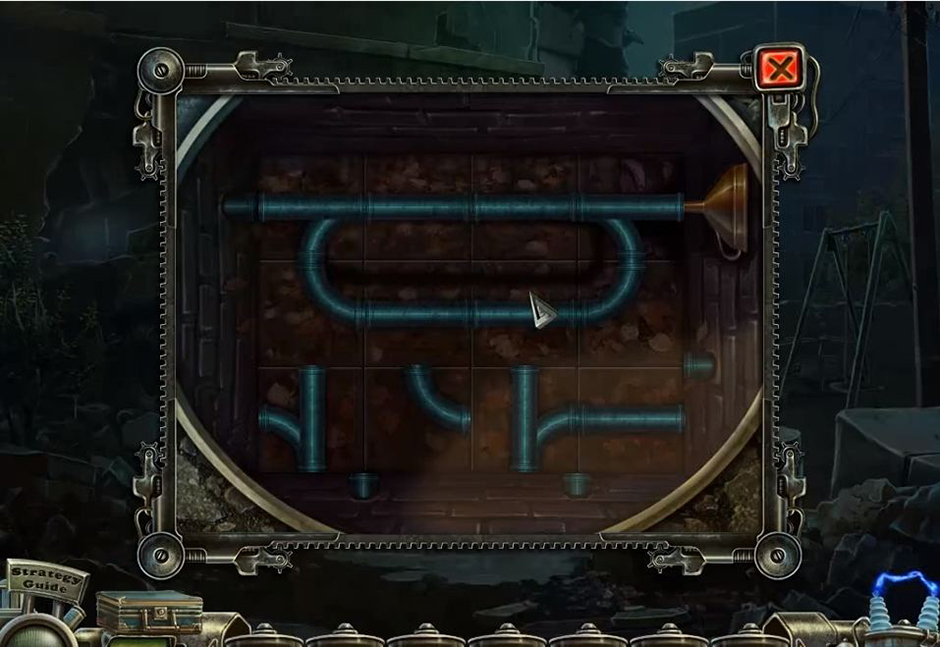
Haunted Halls – Revenge of Doctor Blackmore – Pipes Puzzle Solution
Go back to the lobby and select the red vending machine. Use the Clean Glass in the silver slot, then use a Coin to get a Fizzy Water. Now look at the boy statue at the other end of the room and use the Trumpet. Use the Drum and Drumsticks on the statue of the girl. Wait for them to finish their song then move onto the next area, then return to the plaza where you will give the shadow of a boy the Ball. Now use the broken area to start another hidden object game. Once you finish you will get the Pills. Now go to the Portable Laboratory.
Pour the ?, ?, and X tubes into the Liquidfier, then use the mix in the Grinder with Salt and H20. Put the powder into the Mortar with the Poison and use the Pestle to mix it. Pour this back into the Liquidfier with the ? and Y tubes before putting the mix into the Solidifier. Place the resulting crystal into the mortar with the Poison and Coal and crush it all together. Put this powder into the capsules. You will get the Pills. Use them on the hallucination in the hallway. Move the curtains away and collect the Bubbles. Go through the 2-A door to enter the classroom.
Take the Battery from the glowing calculator. Take the red-orange bag and collect the Gold Paint from inside. Collect the Sponge from the chalkboard after you rotate it out. Give the silhouette of a girl the Fizzy Water then pick up the Bobby Pin. Go back to the hallway and go into the 2-B classroom. There is a Handheld on the lower left desk to collect. Put the Battery inside it. You’ll begin another puzzle. Catch the eggs! Now look at the chalkboard that is at the back of the room on the floor. Take the Chalk from it. In the chest you can click on the star and it will fall apart. Go back to the hall.
Give the Basket to the girl silhouette. Take the Mushroom. Now go down to the basement and give the girl silhouette here the Bubbles. Collect the Bubble that appears and place it into the eye socket of the face painted on the wall. Go back to the Well. There is a puddle of water you can use the Sponge on to collect the Wet Sponge. Use the Mushroom on the large mushroom thingy and collect the Bubble that appears. Go back to the basement and use this Bubble on the other eye socket. A door will appear. Go inside and there is a hidden object area. Finish the puzzle to collect the Nippers. Take a look at the chained door before going back to Classroom 2-B. Look at the blackboard and clean it with the Wet Sponge and use the Chalk to draw a handle on the door. Return to the basement and go inside the now openable door.
In this room you’ll want to take a look at the power panel that is in the green locker.
Finishing this puzzle will turn the fence’s power off. You can use the Nippers to cut the fence and remove it. You can now talk to the gentleman sitting there before going back out into the basement. There is a hidden object area on the left you can access. You will get the Candle once you are done. Now go back to the plaza. Below the Ferris Wheel there is another hidden object area. You will collect a Star when you’re done. Now go back to Classroom 2-B.
Look at the chest under the window. Put the Star into the groove and then paint it with the Gold Paint. This will unlock the chest. The pieces inside need to be arranged into a totem pole. You will be able to collect the Suction Cups once you are done.

Haunted Halls – Revenge of Doctor Blackmore – Rope Solution
Go back to the basement. Place the Suction Cups in an octopus shape. Look at the plate on the right of the gentleman siting there. Place the Octopus Cutter and Candle on the plate. Light it with the Matches. Take the Octopus and place it into the groove on the gate-like door to the left. There will be a puzzle here. You need to match the colored numbers to the dials.
Now collect the Screen and Green Energy Orb. Go back to Classroom 2-B and look at the robot in the corner. You will trigger a puzzle if you place the Screen in the panel. Match the chips to the shapes. When you finish, take the Pompeii Disk. Now go back to the original Monitor room. Like the times before, place the Pompeii Disk into the collection of monitors then step through the portal.
Chapter 4: Pompeii
You’ll start in a courtyard with a big bull blocking the way. Go into the leftmost building and enter the dining area where there is a hidden object area in the corner. Find the objects and collect the Duster once you’re done. Then collect the Trident and the Corkscrew from the table. Look at the Herbs on the left and collect them before leaving back to the Courtyard. Give those Herbs to the Bull and use the Duster to clean the hatch and pick up the Feather. Use it on the Bull’s nose to make it sneeze. Pick up the Shield and the Ring. You can use the Ring on the hatch. Collect the Sword and Oil. Go into the Hostel and collect the Helmet and Flint.
Take a look at the bed on the right. Take the blanket off the bed to see the chest underneath. Now go to the dining area and go past it into the cellar. Pour the Oil into the hanging basin and light it with the Flint. Use the Corkscrew to remove the cork from the jar in the corner. Go back to the main area and collect the bust of Caesar and the Torch. Light the basin with the Torch, turning it into the Burning Torch. Use the Tomahawk to cut away the netting from hanging carcass. Collect the Cooking Fat then go back to the dining area where there is a hidden object area in the corner. When you are done you will collect the Laurel Leaves.
Use the Burning Torch on the wood in the oven. Now go back to the Cellar. There is a small box with leaves where you can use the Laurel Leaves. Place the leaves into the matching places. You will see a yellow outline when they are correct. You will collect the Laurel Wreath before you go back to the dining area and collect the Aquila from the top of the stone oven before going out to the Courtyard. Place the Laurel Wreath on the bust of Caesar and then go to the Hostel.
Cut the rope from the left beam with the Tomahawk. Now you can collect the Rope and use it on the “X” shown here:
Once the rope is hanging go to the bed on the left. Take the rope and attach it to the bed. Use the Bust of Caesar on the left and the bed will be lifted. Take the Lotion Container.
Combine the ? Vial, Salt, and Lemon in the grinder then take the powder from that and place it into the Soldifier. Take the crystal that forms and place it in the Liquifier. Add the liquid and the poison to the mortar and crush them. Add water and the powder into the Liquifier and then pour the liquid into a container to create the Ointment.
You can now collect the Helmet, Sword, Shield, Trident, and Net from the suits of armor. Arrange the objects as shown:
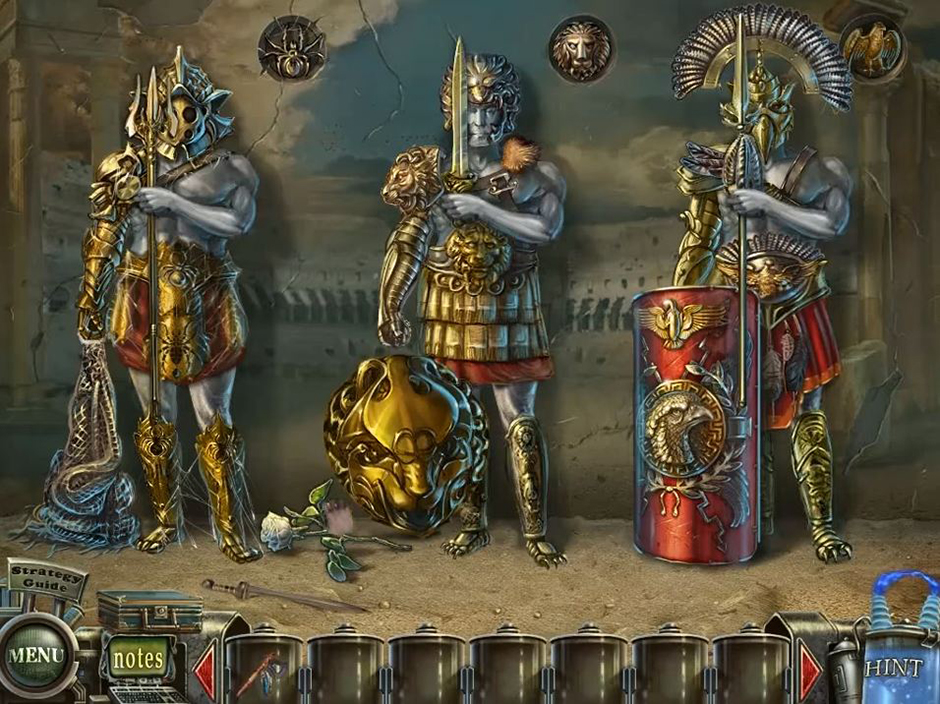
Haunted Halls – Revenge of Doctor Blackmore – Armor
You will be able to collect a White Rose when you finish. Now go back to the Cellar. Use the White Rose in the jar on the floor and it will become a Red Rose. Now go to the courtyard and give the Red Rose to the statue of the woman. You can now go forward to the Hall of Pillars. Pick up the Bucket then use it on the embers under the golden bull. Go up and collect the Signet Ring
Cut the Curtain Holder with the Tomahawk and collect it. Then go to the gold table and use the Signet Ring on the golden box there. You will be able to take a Emerald from inside of it. Now go on to the balcony next. Here you will use the Ointment to make the hallucination. Take the Soap Dish from the edge and then the hidden object puzzle on the left. When you’re done, you’ll have the Bellows to collect. Use it on the pile of ash and then take the Board. Now go back to the baths. There is a lion cub in the bathtub here and you can use the Board to help him escape and follow him back to the balcony. There is a hidden object puzzle on the left. You will collect the Hook when you are done. Now collect the Dirty Lion Cub and go back to the Cellar. On the far left you can look at the jugs and then use the Hook to collect the Key.
Go back upstairs to the dining area. Use the Soap Dish and the Cooking Fat on the oven to start a puzzle. The solution is here:
Haunted Halls – Revenge of Doctor Blackmore – Soap
Collect the Soap and go to the Hostel. There is a small chest you can use the Key to open it and then collect the second Emerald before going to the baths. Place the Dirty Lion Cub in the pool and wash him with the Soap. He will now be a Clean Lion Cub! Pick him up and head back to the Hall of Pillars and give him to the Lioness. Talk to the woman in the chair before taking the Curtain Holder and putting it in the base of the cat. Now you can place the Emeralds in it’s eye sockets. Now click on the “tail”. The chain will come down. Clicking on the gold bull will start a puzzle. This is the solution:
Now that the woman is free you can get the Yellow Energy Orb. You can put the Aquila above the chair in the slot. Remove the stones where the blue lights shine down. You’ll be able to collect the Alaska Disk. You can once again go back to the monitor room and place the disk into the slot, causing a portal to appear and move onto the next area.
Chapter 5: Alaska
When you arrive, there will be a car in front of you. Open up the hood and look inside to find the Screwdriver and remove the lid from the gas tank. Open the car door and collect the Knife and Insulating Tape. Now move onto the garden where you will see a prisoner. There is a lawn mower here. Collect the Straw and remove the red gas tank lid. Collect the Funnel from the scarecrow and then look at the wooden fence under the scarecrow. You can use the Screwdriver here on the screws to take them then collect the Ladder. Use the Tomahawk on the branches that are under the man. You will be able to collect Chopped Branches. Now go back to the car and look in the hood. Now you can use the Insulating Tape to fix the wires. Put the Funnel into the gas tank then go back to the inside of the car so you can grab the Lighter.
There is a metal drum on the porch of the main area. Use the Chopped Branches and Straw in that drum and then set it on fire with the Lighter. You can now collect the Snow Shovel and return back to the garden area. There is a pile of snow underneath the tree on the right side. Dig there with the Snow Shovel and then look closer. Take the Knife and cut the Hose and collect it before using the Tomahawk on the ice. Collect the Car Key. No go back to the lawnmower and place the Hose in the tank. Back at the car there is a light pole. Place the Ladder there and take the Light Cover. You’ll want to use it with the Hose at the lawnmower and when it is filled up you can collect the Gasoline and use the Car Key inside the car (under the radio) to start the car up. There will be a cutscene now.
Look at the hidden object area that is at the car. Finish the puzzle and collect the Chainsaw. You can now move to the next location and check around the steps. There is a small shed there you can look at where you can collect the Repair Kit and Jack. Remove the screws from the binocular machine with the Screwdriver so you can remove the plate and collect the Segment. Now go on to the shipwreck and head inside. Collect the Bone on the floor. There is a first aid box on the wall you can open. Inside you can collect the Twine. There’s a door on the left that you can use the Jack on to open it. This will lead you to another hidden object area. Once the puzzle is finished, you will get the Lens.
The door on the right starts a puzzle. This is the answer:
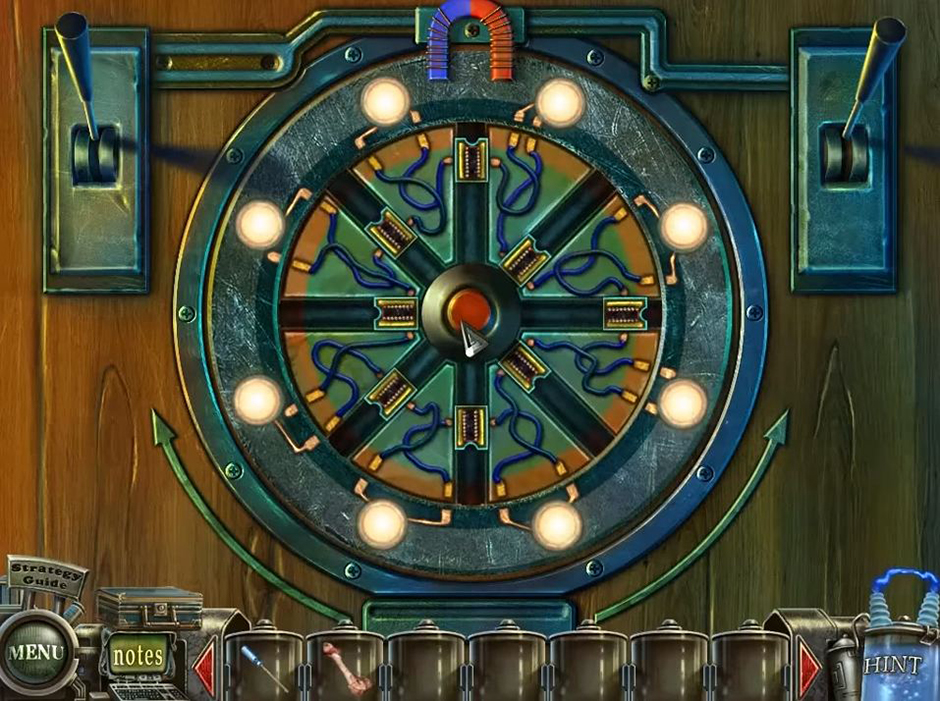
Haunted Halls – Revenge of Doctor Blackmore – Door Puzzle
Now you can go into the next area. There, you will want to use the Segment on the table. Remove the cracked lens and replace it with the Lens. You will now have the Spyglass. Now go back to the hold and start the next hidden object area. Finish the puzzle and you will be able to collect the Ammunition. Now go upstairs and pull on the hook and hose so they lower into the area. The Repair Kit can be used on the hose and the Spyglass goes onto the stand. Now head out to the clearing where you will see a bear. Use the Bone on the bear and collect the Leash before heading back to the deck. You can use the Leash on the gears in the motor. Now go back into the hold and bring the hanging hook down again before attaching the floor on the net. This will keep the cannon secured so you can use the hook to lift it. Now collect the Statue Head. Go to the wheelhouse now. You can set the Ammunition onto the table then use the bullets on the guillotine, take the paper, fold it and use the Twine on it. Now you can collect the Explosive Packet and go back up to the deck. Select the hook and raise it and then select the net to line everything up. Place the Statue Head and Explosive Packet inside the cannon before closing it up and moving it forward by clicking on the wheels. Put the right wheel on the number 5, and the left wheel on the 3. NOW FIRE THE CANNON! (By clicking on it, of course.)
Now go back to the car. There is a hidden object area here. Once you finish it you will be able to collect the Map. Now you can go back to the wheelhouse and focus in on the blue-lit screen in the corner. Use the Map here and take the code: 871 and 243. You will put this code into the safe on the lower right of the dash. Open it and take the Syringe Gun. Now it is time to go to your Portable Laboratory.
First put the water and seeds into the mortar and crush them with the pestle. Along with some poison, place the resulting powder into the grinder. Combine the powder, a lemon, and the vial labeled “A” into the Liquifier. This liquid, along with the Salt, into the mortar and crush it with the pestle. Put this all into the Solidifier. This crystal and poison need to go into the grinder now. That powder and water need to go into the Liquifier. Poor the mix into the syringe gun. You will now have the Anti-Freeze Tonic. Go to the Garden now and then into the Construction site. You can use the Anti-Freeze Tonic on the hallucination to make it go away, then look to the left window of the construction vehicle. There is a puzzle inside and this is the answer:
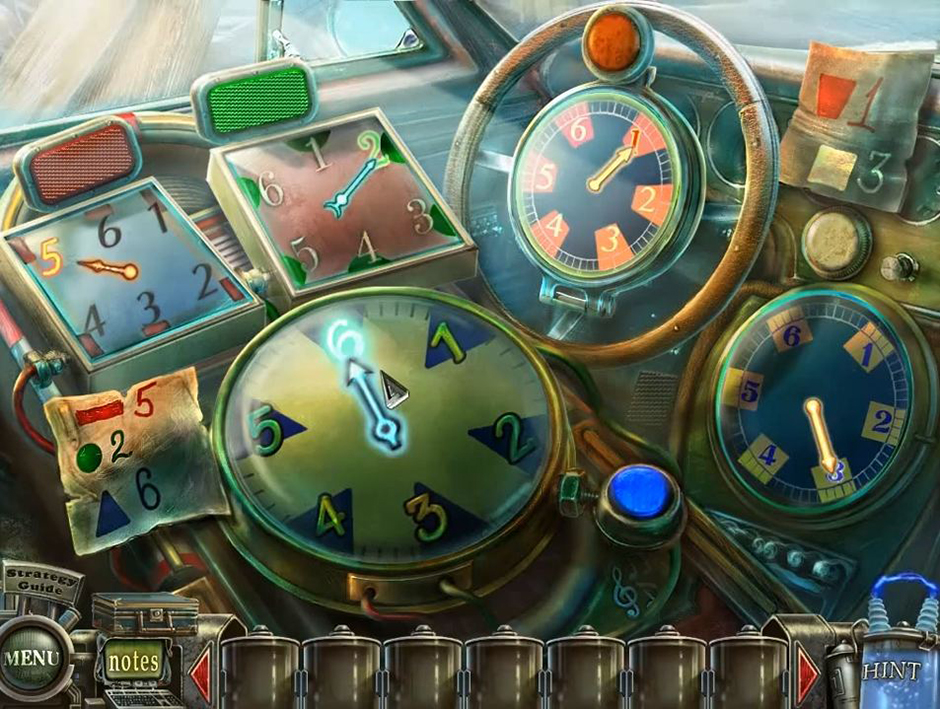
Haunted Halls – Revenge of Doctor Blackmore – Construction Vehicle
Once you are done with the puzzle, go back to the garden and speak with the gentleman. You can now collect the Pink Energy Orb. Now it is time to go back to the Monitor Room, and then from there, go back to the Ward. There is a suitcase under the right window. Open it up and use the Blue, Green, Yellow and Pink Energy Orbs into the slots. Now you can look at the robot in lights on the right and enter a puzzle. This is the answer:
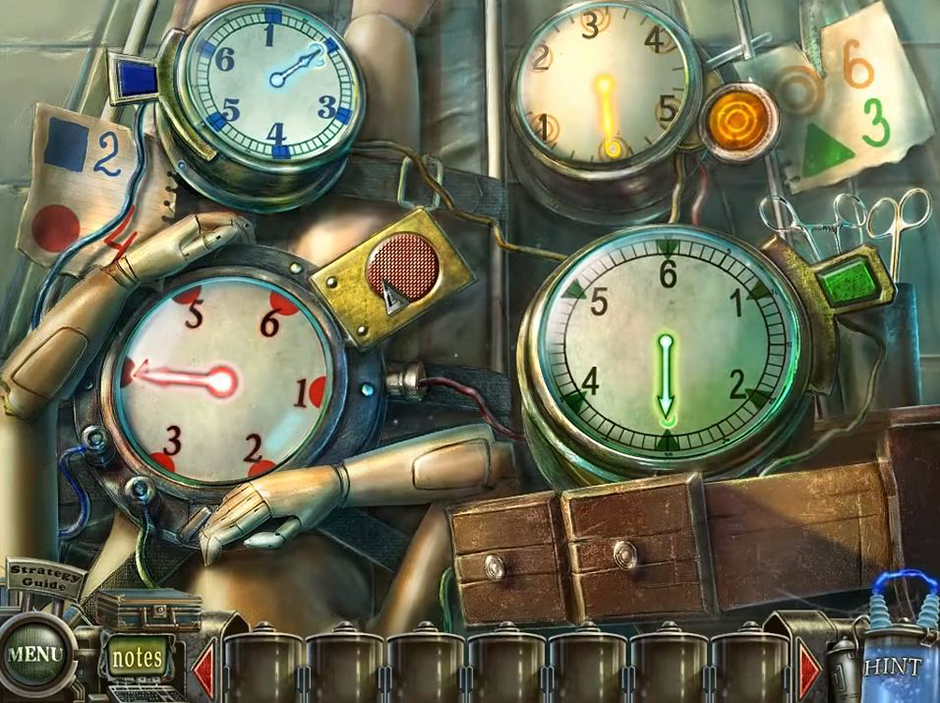
Haunted Halls – Revenge of Doctor Blackmore – Bomb
CONGRATULATIONS! You’ve completed our Haunted Halls – Revenge of Doctor Blackmore Walkthrough! If you liked this walkthrough, you might be interested in:
Haunted Legends – The Bronze Horseman
Haunted Halls – Fears from Childhood
This Haunted Halls – Revenge of Doctor Blackmore walkthrough is meant as a guide and does not contain cheats, hacks or serials.

