Welcome to the Witchcraft – Pandora’s Box walkthrough! The Crow Witch has kidnapped your daughter with the help of Pandora’s Box. Pursue her into a parallel world filled with magic, where you’ll harness the power of runes to gain special abilities in this haunting hidden object adventure. Our walkthrough will guide you along your journey with tips, tricks, puzzle solutions, and hidden object locations. Browse the Contents below to get started!
Contents
General Tips & Tricks
Whether you’re a hidden object veteran or just getting started as an adventurer, this section will provide you with all the basics, general tips and tricks you’ll need to get started.
- Witchcraft – Pandora’s Box is a hidden object adventure. You will be able to freely traverse scenes and locations while looking for items and objects necessary to solve riddles and puzzles to progress.
- When starting the game for the first time, you’ll be allowed to choose your difficulty:
- Casual – Hints recharge quickly. Active objects sparkle. Interactive help is available.
- Advanced – Hints charge slowly. Active objects do not sparkle.
- Expert – There are no hints. Active objects do not sparkle.
- To move between locations, move your mouse cursor to a doorway or edge of the screen. If an arrow appears, click to move to that location.
- You can fast travel between locations once you find the Map. The Map will also display any active tasks or locations.
- Your Journal on the lower left will keep track of any notes of interest during your adventure.
- The Inventory tab is located at the bottom of your screen. All Key Items you find during the game will be stored here for later use and are marked in bold in the guide below. You can lock the inventory bar in place by clicking the lock icon on the right side of the bar.
- The Hint button is located in the lower right corner of the screen. Click on this to receive a hint regarding what to do or where to go next.
- While in a hidden object scene, the Hint button will display the location of an item listed at the bottom of the screen.
- While in a puzzle or minigame, the Hint button will be replaced with a Skip button, allowed you to finish the puzzle without solving it.
- Any Runes you find during the course of your adventure will be kept in the lower right corner once you save the Lilliputian. Runes will glow when you’re in an area where they can be used.
Witchcraft – Pandora’s Box Walkthrough
You’ve just moved into your new home, but within the stacks of boxes lies one that should never be opened: Pandora’s Box. Get ready to take flight and pursue the Crow Witch into her dark realm.
Chapter 1 – The Temple
Mansion
- Take a closer look at the pile of boxes on the left. Click on the topmost boxes to remove them, revealing a box tied with string. Exit the closeup for now.
- A hidden object area will appear over the dresser on the right. Click on it to play.
- Find the objects listed at the bottom of the screen. Objects listed in green need an additional action before you can collect them.
- Use the Fly Swatter on the Fly to cross it off the list.
- Open the cabinet to collect the Paper Knife.
- Place the scroll into the bottle to collect the Message in a Bottle.
- Find the objects listed at the bottom of the screen. Objects listed in green need an additional action before you can collect them.
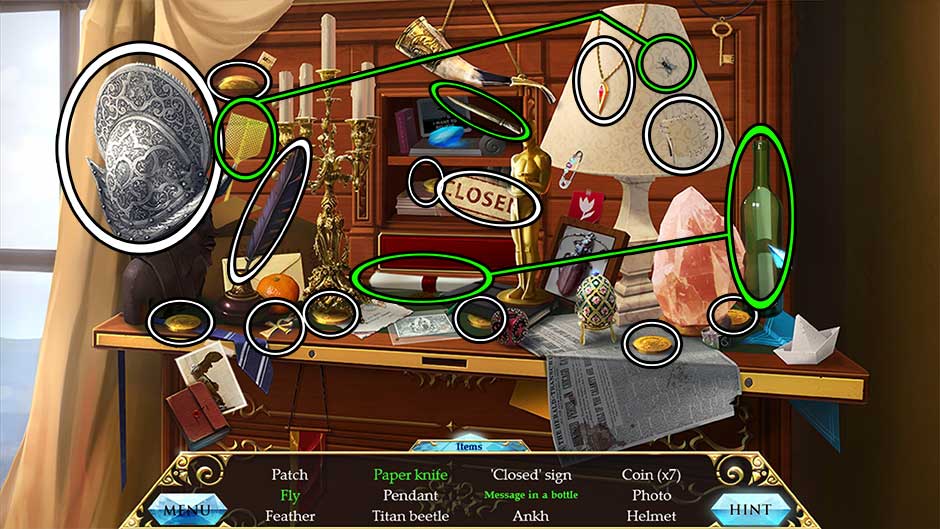
- Upon completing the area, the Paper Knife will be added to your inventory.
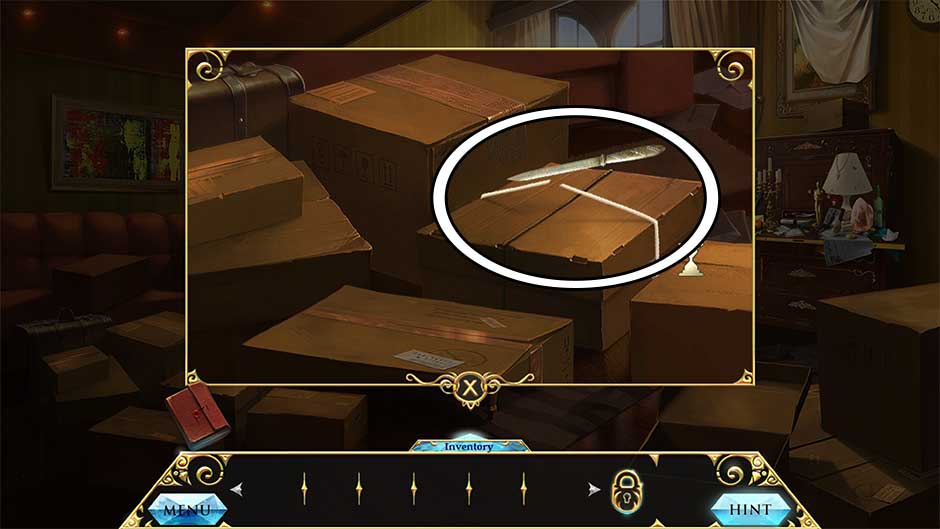
- Take a closer look at the pile of boxes on the left again.
- Use the Paper Knife to cut the string holding the box shut. Collect the Casket inside.
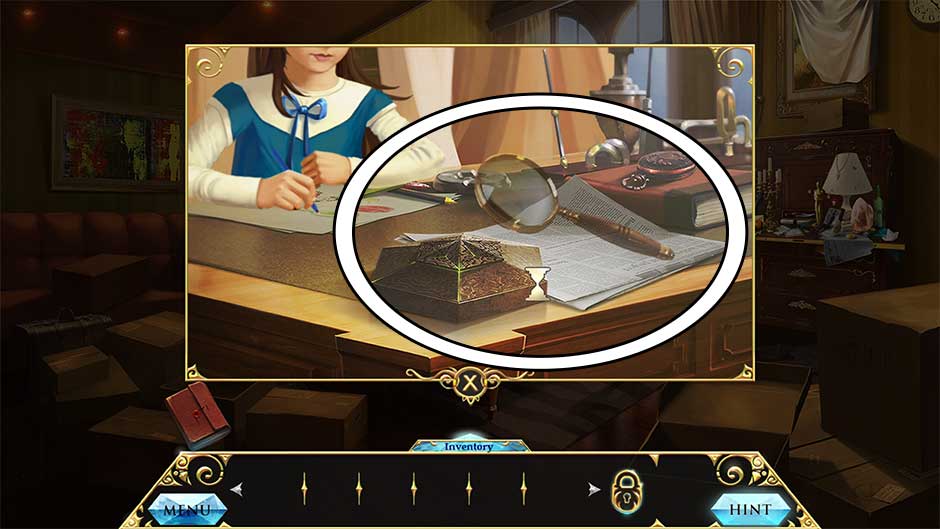
- Zoom in on the table in the middle of the room.
- Read the newspaper lying on the table, then click on the Magnifying Lens lying to the right of it to add it to your inventory.
- Use the Magnifying Lens to examine the Casket sitting on the table.
- Match the pairs of triangles by clicking them with the mouse. The puzzle solution is shown below.
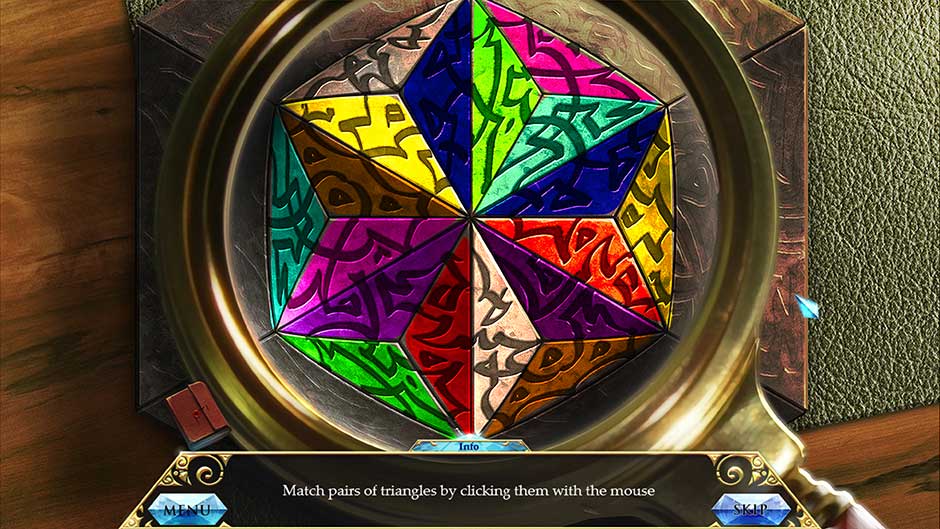
- Once the puzzle is completed, a cutscene will follow. Click on the mysterious Casket to be transported to a new location.
Temple – Hall
- Click anywhere to view a brief cutscene.
- Take a closer look at the hidden object area over the pile of items on the left.
- Find the objects listed at the bottom of the screen. Objects listed in green need an additional action before you can collect them.
- Use the Stone to break open the vases, revealing all the items listed in green within.
- Feed the Cheese to the Mouse to cross it off the list.
- Find the objects listed at the bottom of the screen. Objects listed in green need an additional action before you can collect them.

- Upon finding all the items, the Part of the Control Panel will be added to your inventory.
- Back in the main room, click on the Bones 1/7 and the Bas-relief Fragment 1/5 to add them to your inventory.
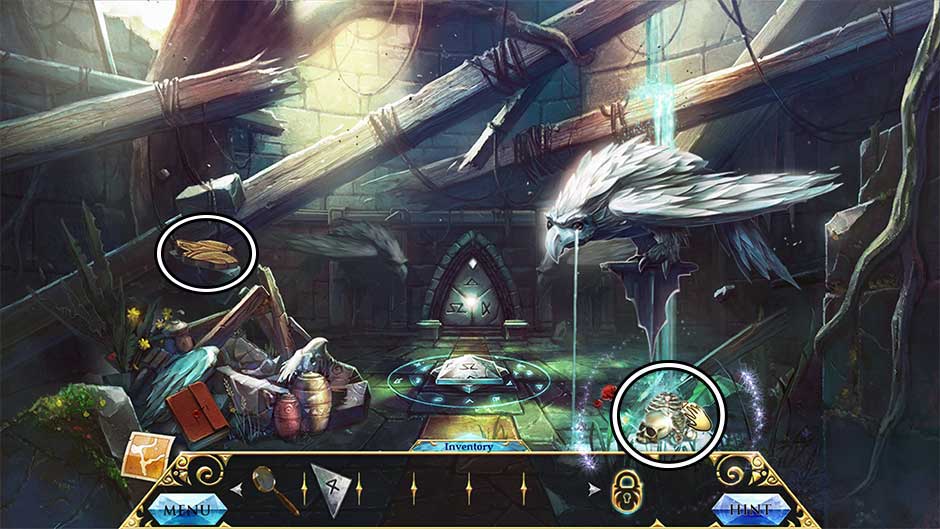
- Examine the device in the center of the room.
- Pick up the Map, then pick up the Bas-relief Fragment 2/5 to add it to your inventory.
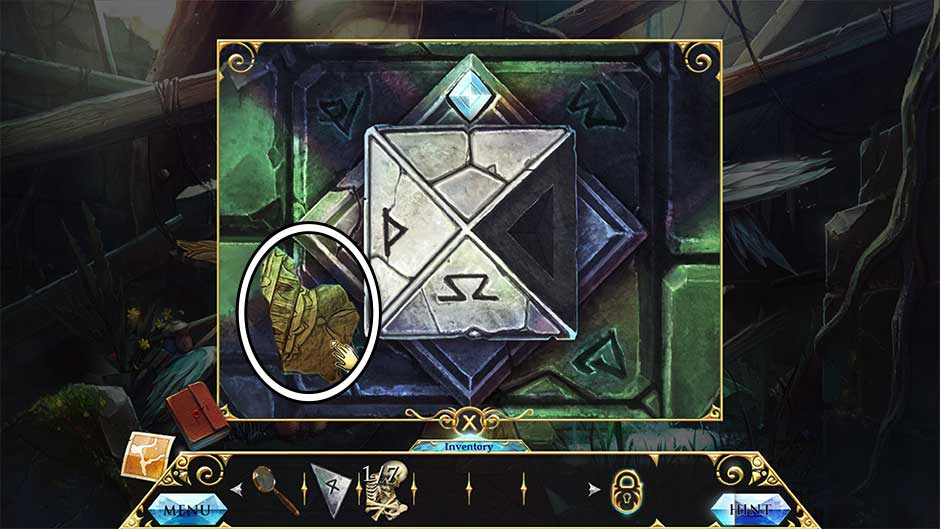
- Insert the Part of the Control Panel into the slot on the right, selecting the middle rune on the control panel.
- Back in the main area, the door will open ahead. You may need to click on the control panel or door one more time to activate this. Once the door opens, proceed through to the next area.
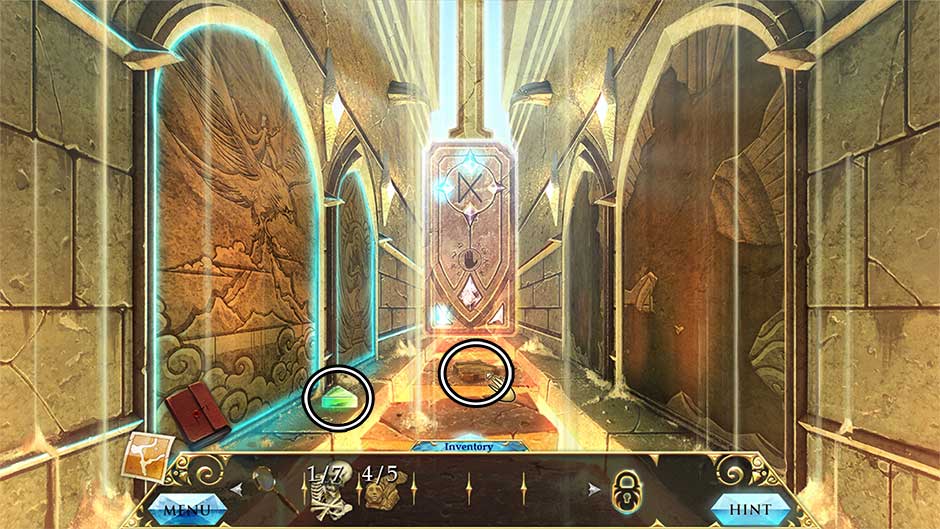
Temple – Present
- Pick up the Bas-relief Fragment 3/5 to add it to your inventory.
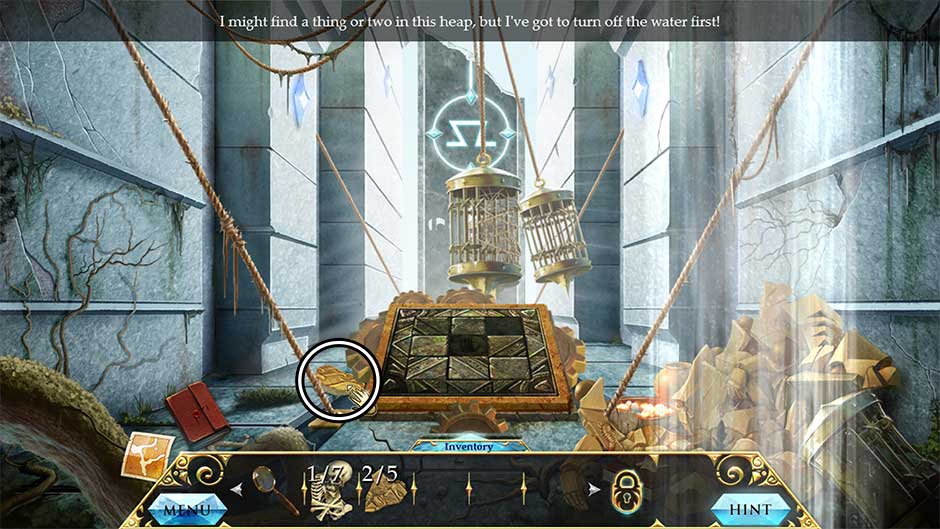
- Go back to the Temple – Hall.
Temple – Hall
- Take a closer look at the control panel in the center of the room. Select the rune on the right to open a new door.
- Proceed through the doorway to the Temple – Future.
Temple – Future
- Pick up the Bas-relief Fragment 4/5 to add it to your inventory.
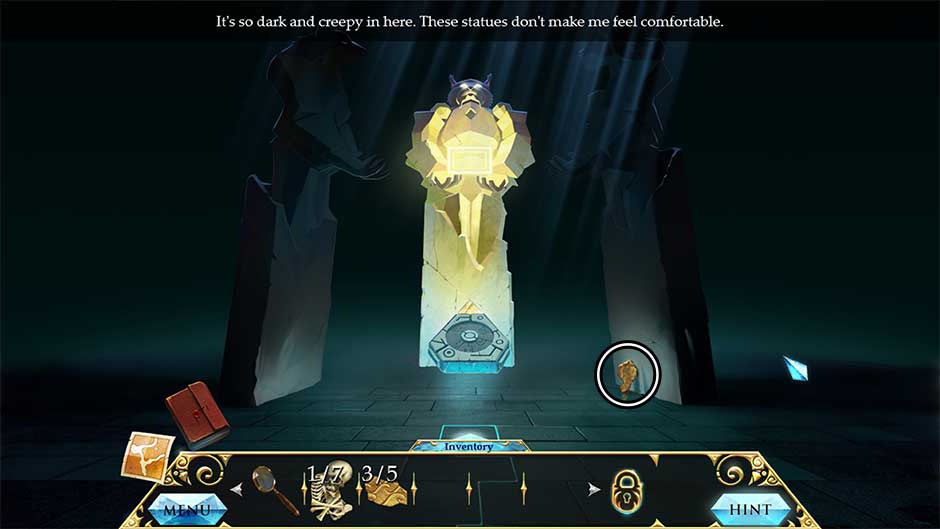
- Go back to the Temple – Hall.
Temple – Hall
- Examine the control device in the center of the room again. This time, select the bottom rune to open a new doorway.
- Continue through the doorway to the Temple – Past.
Temple – Past
- Pick up the Bas-relief Fragment 5/5 and the Projector Part to add them to your inventory.
- Take a closer look at the wall on the right.
- Use the Bas-relief Fragments 5/5 on the wall to trigger a puzzle.
- Reassemble the mosaic by moving the bas-relief parts with the mouse. Click a part to rotate it. The completed puzzle is pictured below.

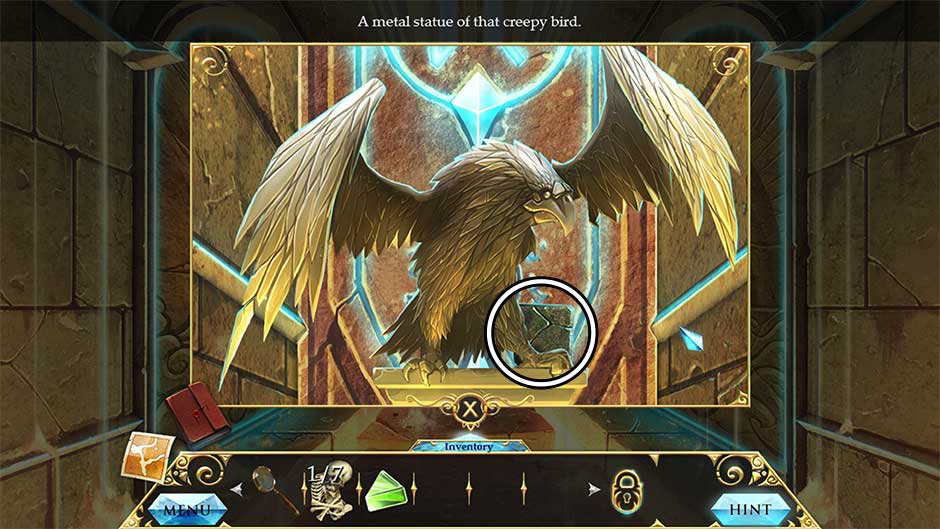
- After completing the puzzle, take a closer look at the far end of the corridor. Click on the handprint in the center of the panel to reveal a new feature.
- Take a closer look at the large bird statue that appears. Click on the Stone Plate to add it to your inventory.
- Head back to the Temple – Hall.
Temple – Hall
- Using the device in the center of the room, select the middle rune to change the door.
- Continue through the doorway ahead to the Temple – Present.
Temple – Present
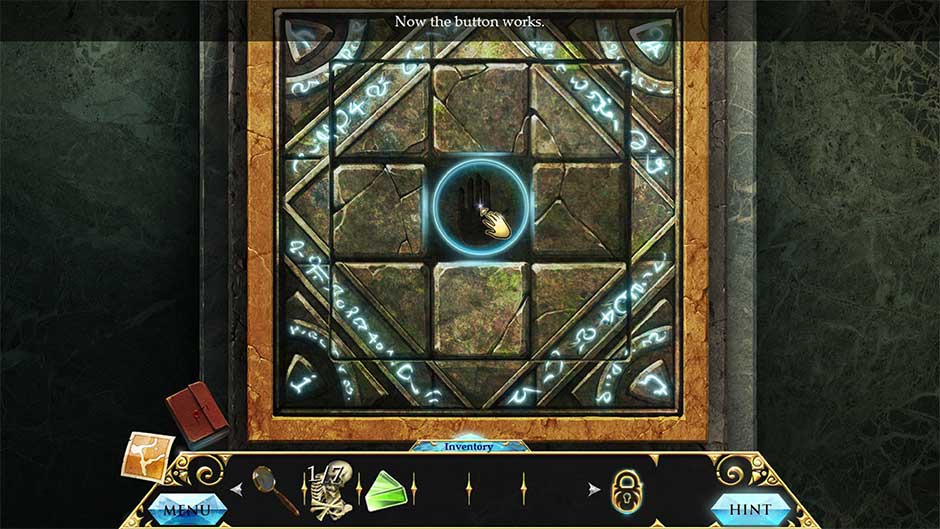
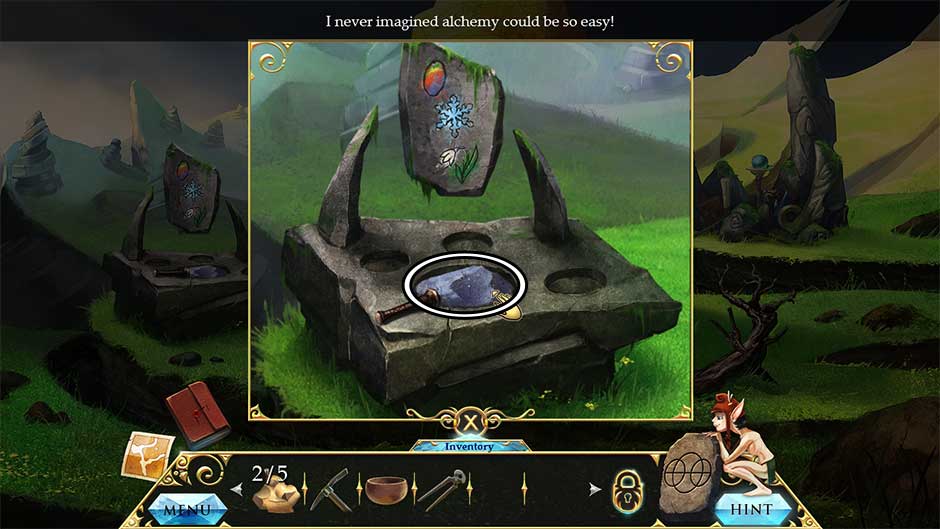
- Take a closer look at the panel ahead. Insert the Stone Plate to trigger a puzzle.
- Rearrange the stone plates by clicking on them. The puzzle solution is shown below. Upon completing the puzzle, click on the button in the center of the panel to activate the controls.
- After completing the puzzle, a hidden object area will appear over the ruins on the right.
- Find the items listed at the bottom of the screen. Objects listed in green will need an additional action before they can be crossed off the list.
- Place the deer shield fragments on the blue shield to cross the Deer off your list.
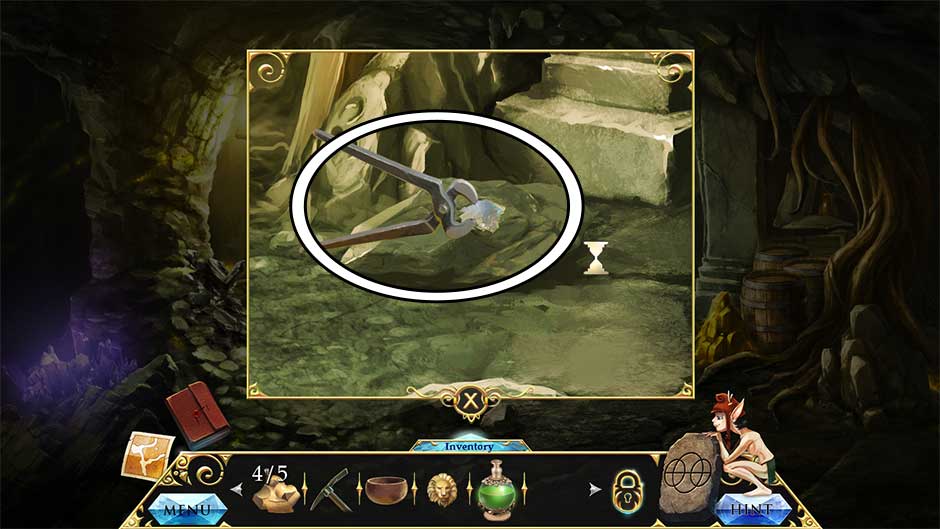
- Use the tongs to retrieve the Prism from the hot embers.
- Find the items listed at the bottom of the screen. Objects listed in green will need an additional action before they can be crossed off the list.
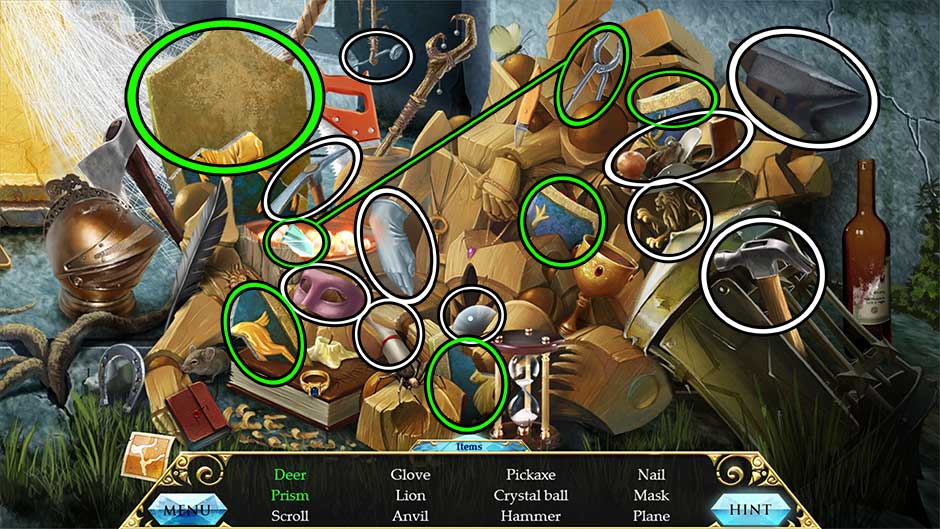
- Upon completing the area, Projector Part (2) will be added to your inventory.
- Return to the Temple – Hall.
Temple – Hall
- Examine the control panel in the center of the room. Select the rune on the right to change the door.
- Enter the Temple – Future.
Temple – Future
- Take a closer look at the device in the center of the room. Insert the Projector Parts (x2) into the bottom left and right corners of the floating triangular device. Brief visions will appear.
- Once both pieces have been inserted, pick up the Stone and the Chisel.

- Go back to the Temple – Hall.
Temple – Hall
- Take a closer look at the device in the center of the room. Select the bottom rune to open a new door.
- Enter the Temple – Past.
Temple – Past
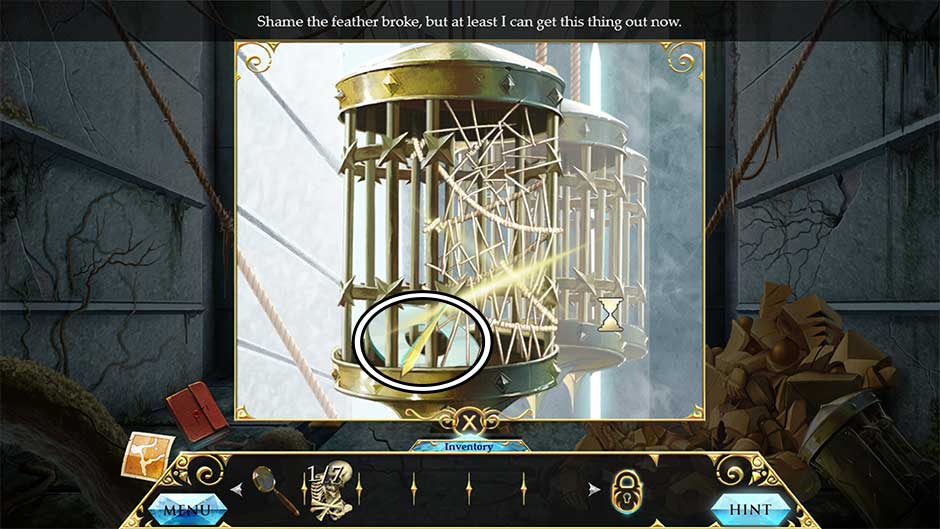
- Take a closer look at the bird statue straight ahead. Use the Chisel on the feather on the lower left, then use the Stone to knock it free, adding the Metal Feather to your inventory.

- Return to the Temple – Hall.
Temple – Hall
- Utilizing the control panel in the center of the room, select the middle rune to open a new doorway.
- Proceed forward into the Temple – Present.
Temple – Present
- Take a closer look at the cages hanging ahead. Use the Metal Feather to cut away the thorns. Click on the Crystal Disc inside to add it to your inventory.
- Return to the Temple – Hall.
Temple – Hall
- Zoom in on the device in the center of the room and select the rightmost rune.
- Proceed through the doorway into the Temple – Future.
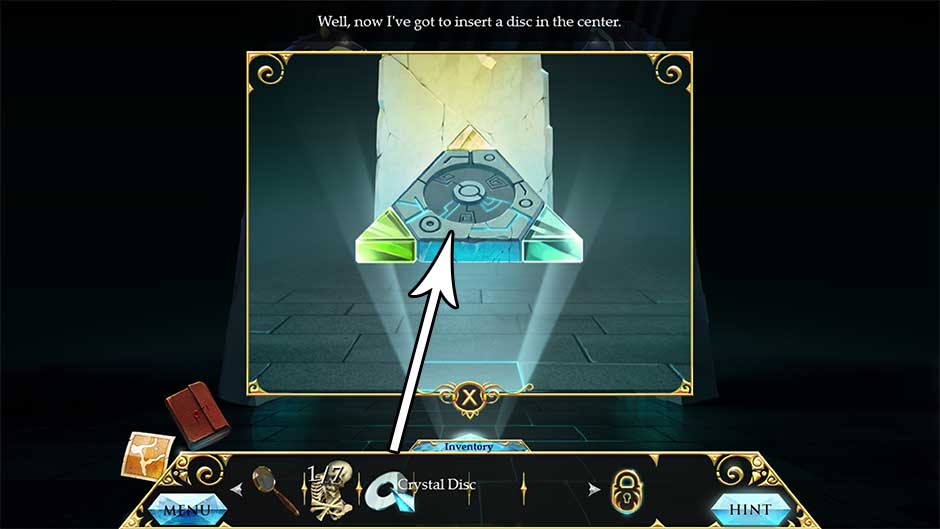
Temple – Future
- Examine the triangular device straight ahead. Insert the Crystal Disc to activate the console.
- A triangular mark will appear ahead. Go back to the Temple – Hall.
Temple – Hall
- Proceed through the doorway ahead, which now leads to the Colonnade.
Colonnade
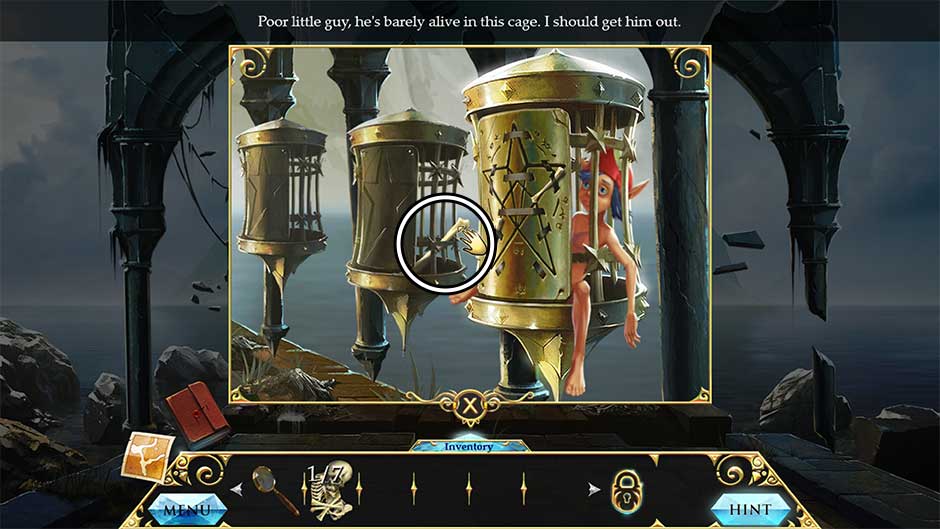
- Take a closer look at the occupied hanging cage on the right.
- Pick up the Bone 2/7 to add it to your inventory. You’ll return for the prisoner soon.
- Zoom in on the collapsed cage on the left side of the Colonnade.
- Pick up the Bone 3/7 to add it to your inventory.
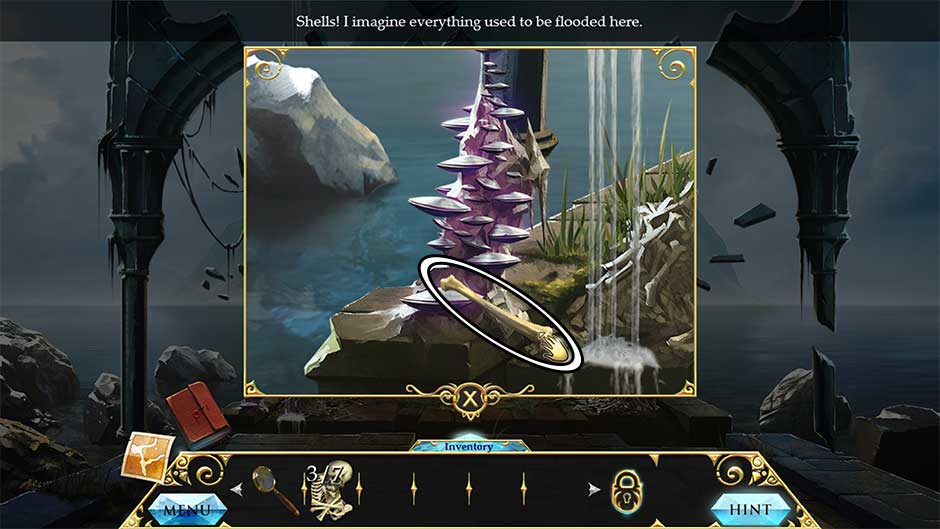
- Examine the purple shells attached to the pillar on the lower left.
- Pick up the Bone 4/7 to add it to your inventory.
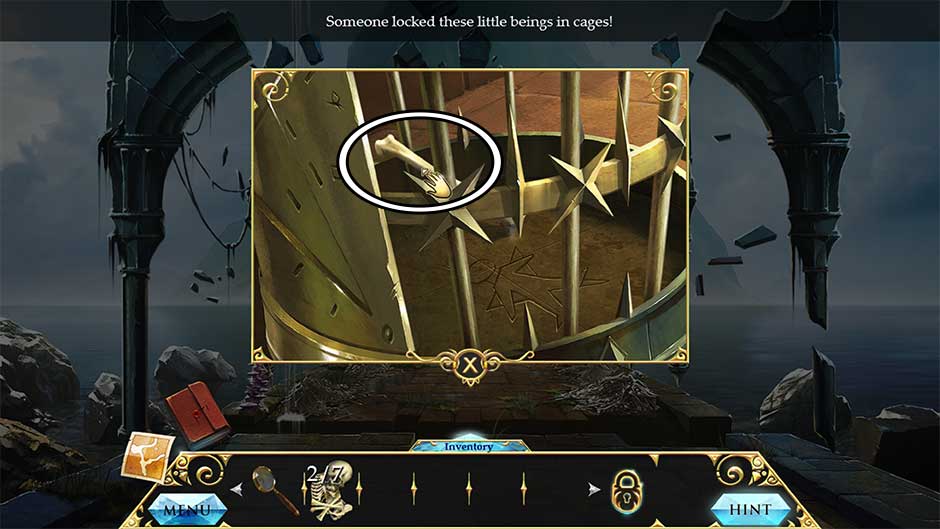
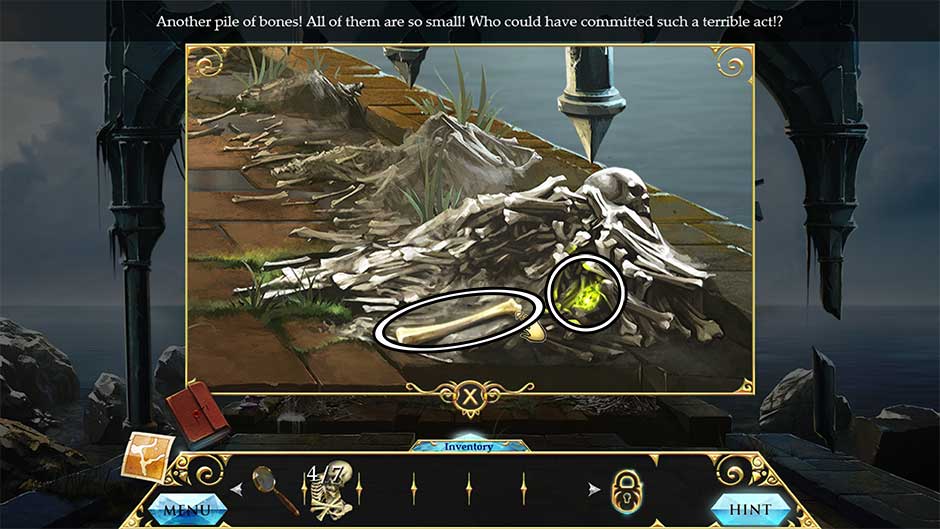
- Zoom in on the pile of bones beneath the caged prisoner on the right.
- Pick up the Bone 5/7 and the Emerald to add them to your inventory.
- Proceed forward to the Portal.
Portal
- Pick up the Bone 6/7 lying on the ground on the left.
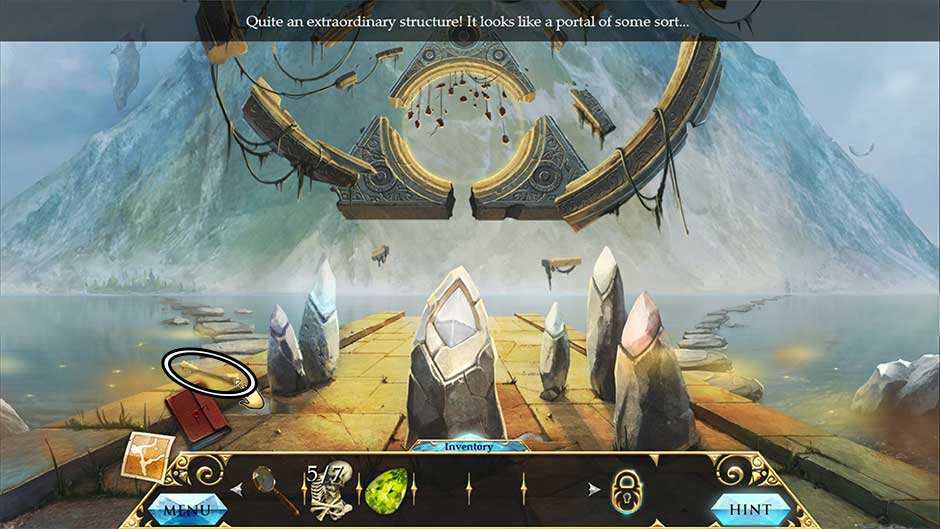
- Take a closer look at the center pinnacle stone with the white crystal to trigger a puzzle.
- Click the stones to copy the melodies. Click the white crystal in the center to repeat each tune. If you make a mistake on a tune, you will lose you progress and be taken back one step. Using the screenshot below as reference, the puzzle solution is as follows:
- Red, Blue, Red
- Red, Blue, Red, Yellow
- Purple, Blue, Purple, Yellow, Green
- Purple, Green, Blue, Yellow, Green, Red
- Click the stones to copy the melodies. Click the white crystal in the center to repeat each tune. If you make a mistake on a tune, you will lose you progress and be taken back one step. Using the screenshot below as reference, the puzzle solution is as follows:

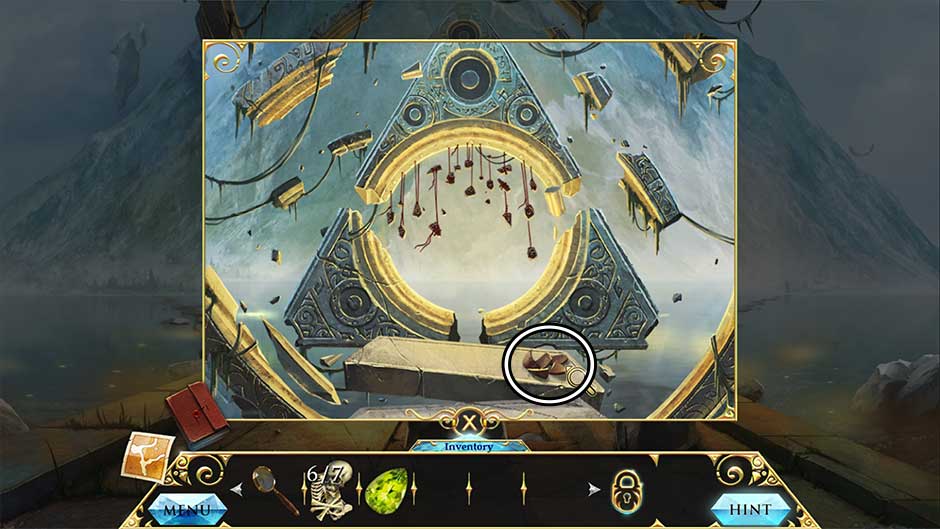
- Once the puzzle is finished, you’ll be able to access the portal up ahead. Take a closer look.
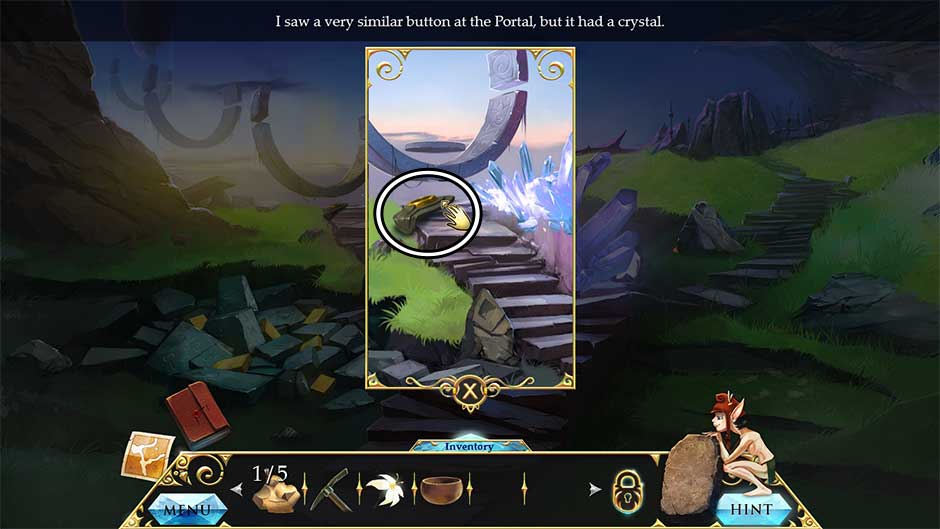
- Examine the object on the lower right. Pick up all the Cracked Bowl Fragments 5/5 to add them to your inventory.
- Take the path on the right to the next area.
Road to the Village
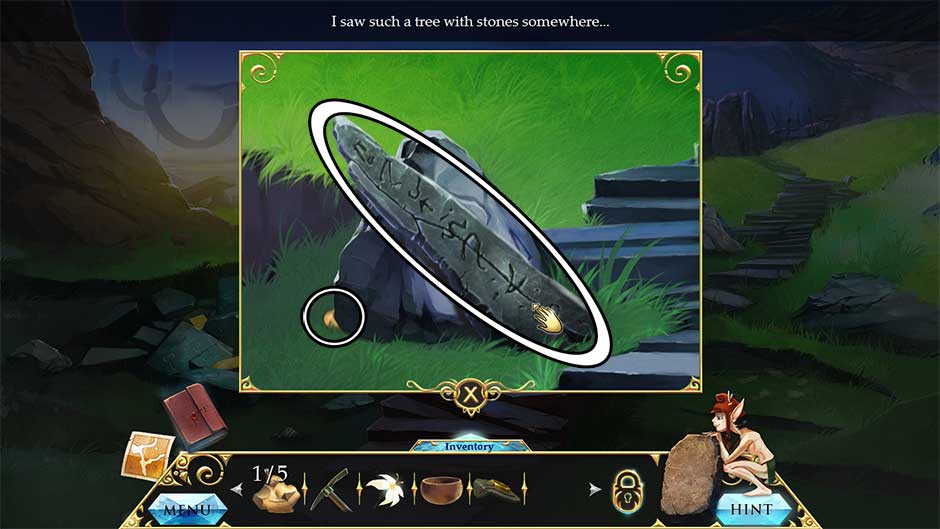
- Take a closer look at the base of the statue. Pick up the Medallion Part 1/5 to add it to your inventory.

- Zoom in on the face of the statue.
- Insert the Emerald into the center slot of the diadem.
- Return to the Portal.
Portal
- Take the Path to the Forest on the left.
Path to the Forest
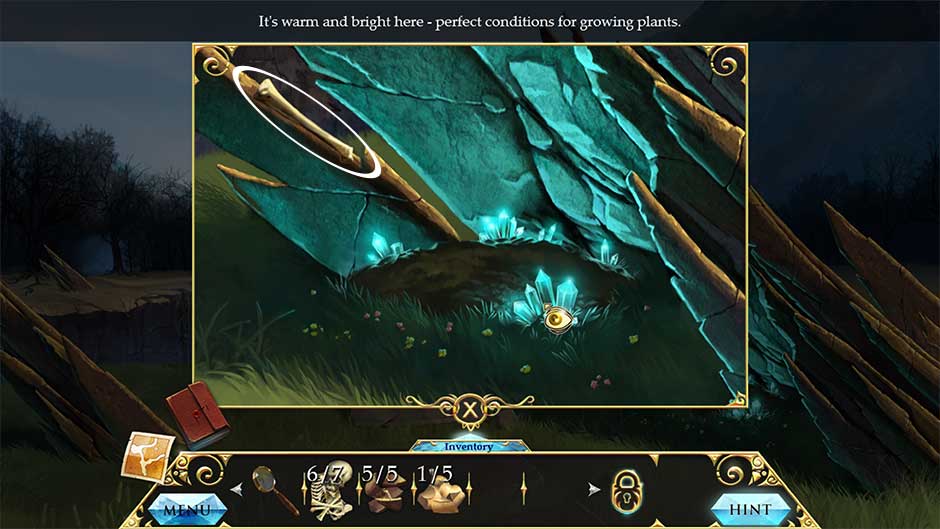
- Take a closer look at the glowing alcove on the right.
- Pick up the final Bone 7/7 to add it to your inventory.
- Return to the Colonnade.
Colonnade
- Zoom in on the cage containing the prisoner on the right.
- Use the Bones 7/7 on the front of the cage to trigger a minigame.
- Arrange the bones on the panel to release the cage door. The puzzle solution is shown below.

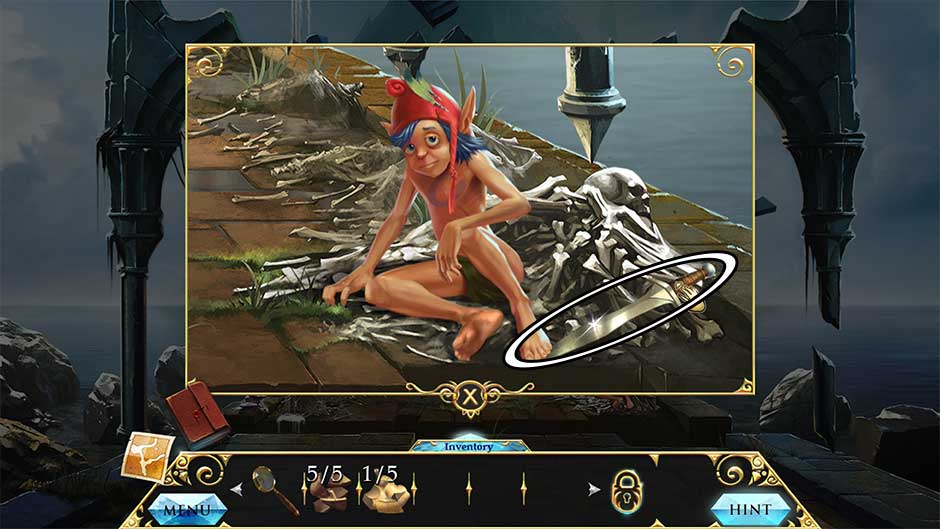
- Once the puzzle is finished, the prisoner will be freed. Zoom in on the freed prisoner.
- Speak with the prisoner, then pick up the Lilliputian’s Sword to add it to your inventory.
- Continue forward to the Portal.
Portal
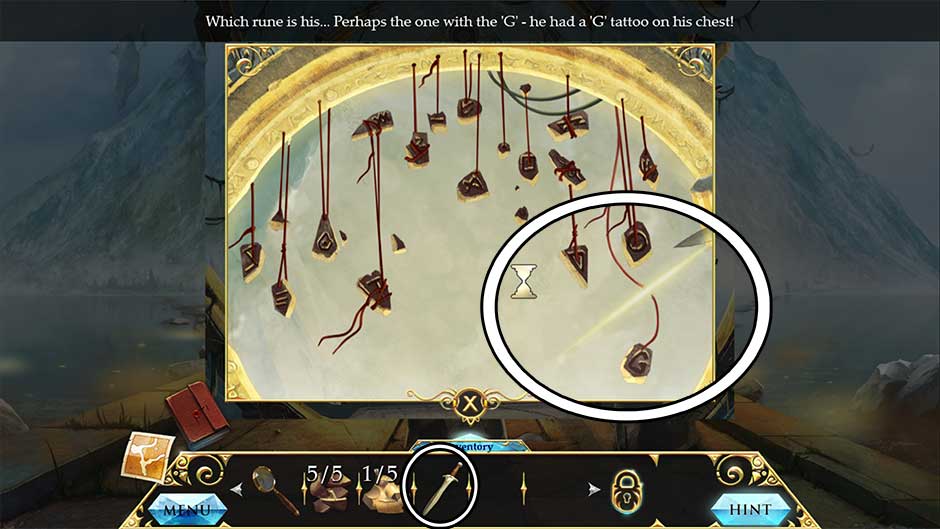
- Examine the portal up ahead.
- Take a closer look at the runes hanging from the top of the portal by the red threads. Use the Lilliputian’s Sword to cut down the Lilliputian’s Rune and add it to your inventory.
- Return to the Colonnade.
Colonnade
- Zoom in on the prisoner on the lower right again. Give the Lilliputian’s Rune to the creature.
- Make your way to the Path to the Forest.
Path to the Forest
- After the Lilliputian’s prompt, click on the bird to retrieve the Temple Disc.
- Return to the Portal.
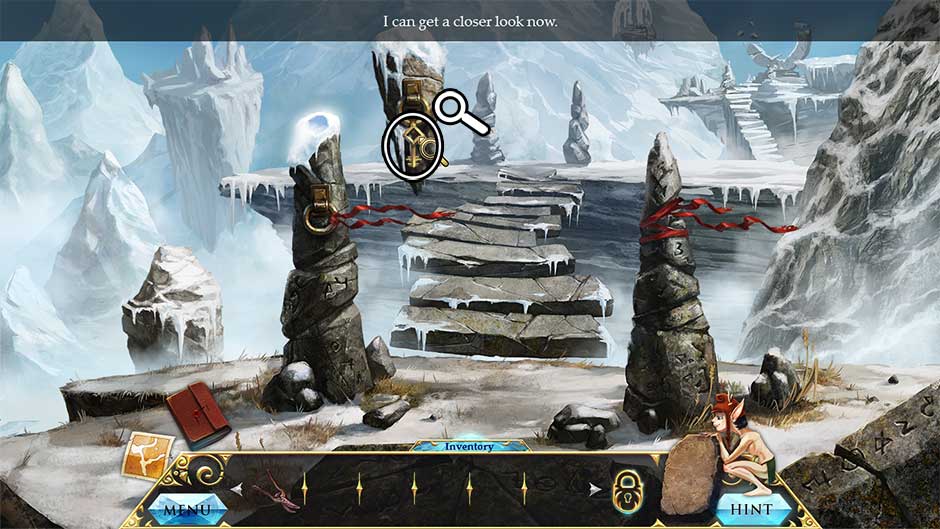
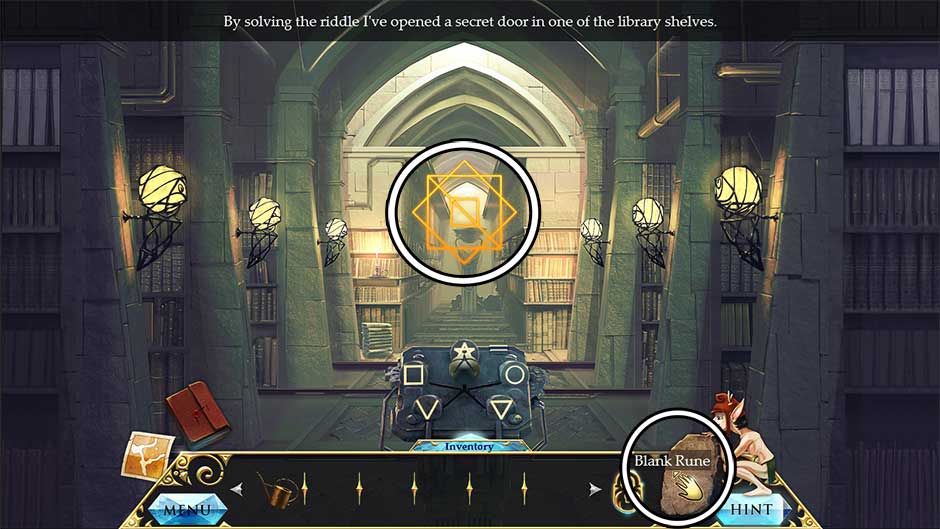
Portal
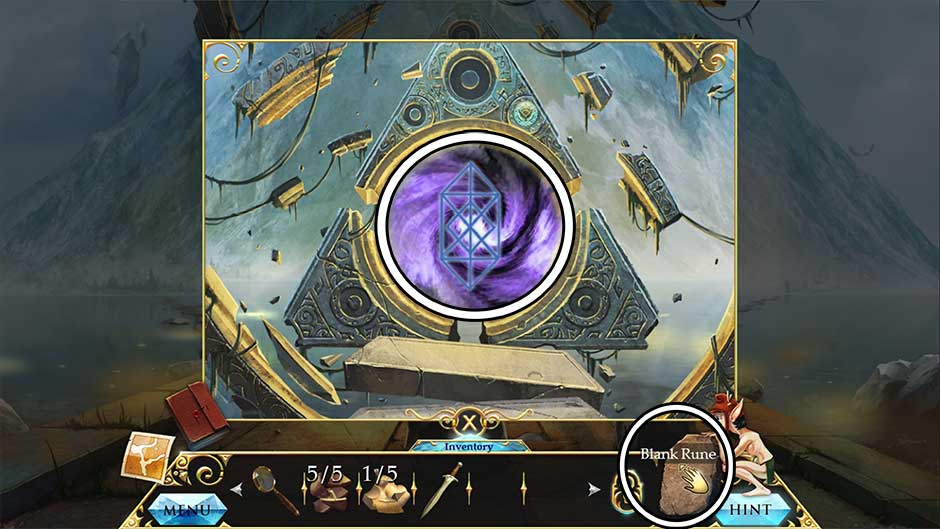
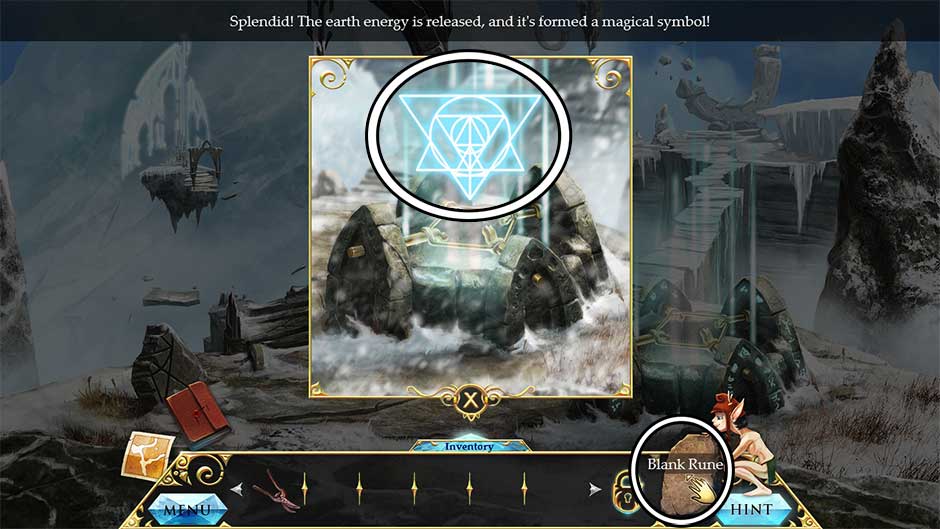
- Take a closer look at the portal up ahead. Insert the Temple Disc into the slot on the upper right.
- A magical symbol will appear in the portal. Use the Blank Rune the Lilliputian is holding on the lower right on the magical symbol to acquire the ‘Rising’ Rune.
- Head left, back along the Path to the Forest.
Chapter 2 – The Forest
Path to the Forest
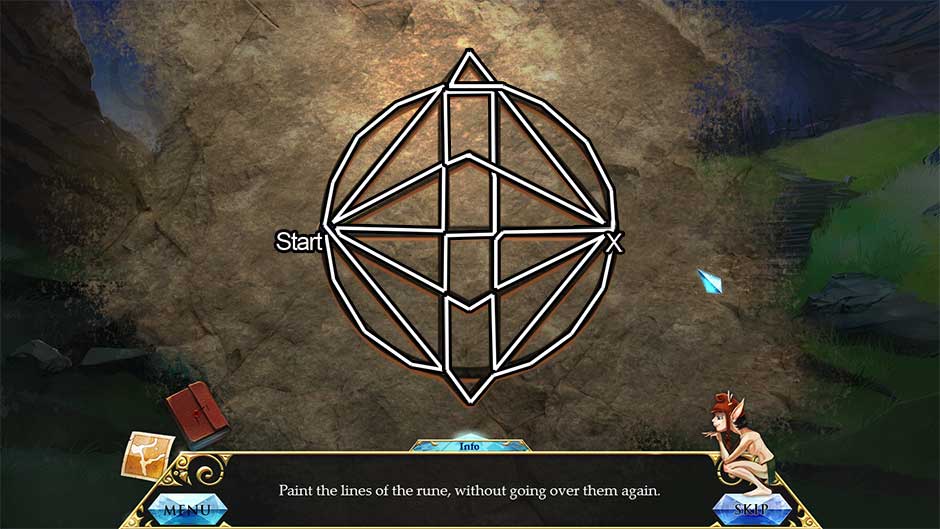
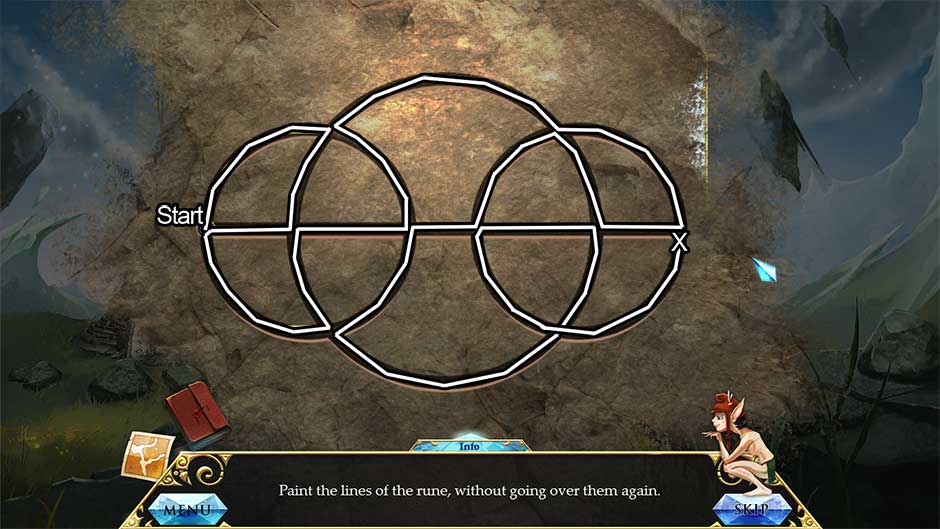
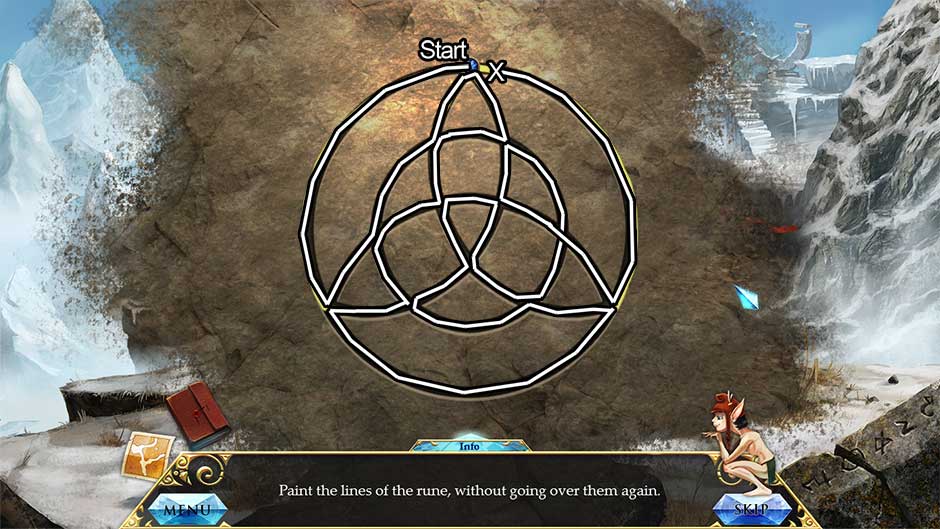
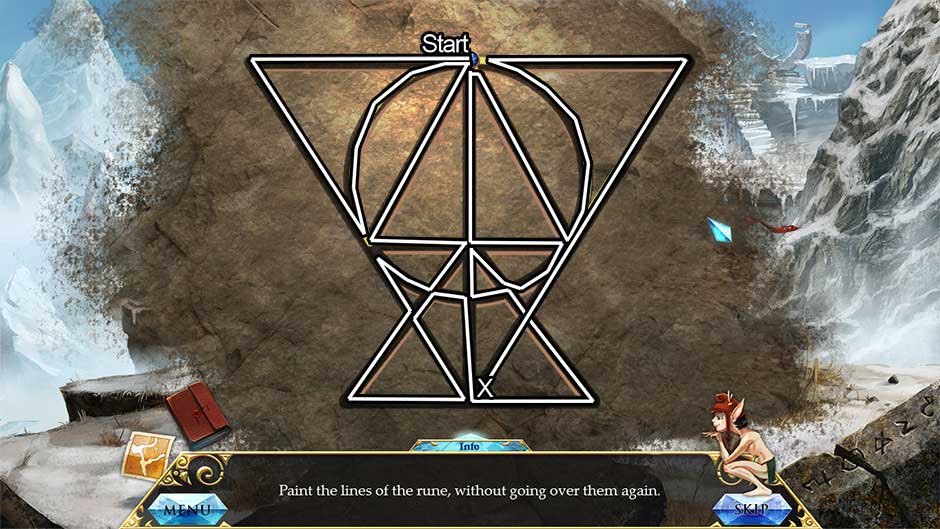
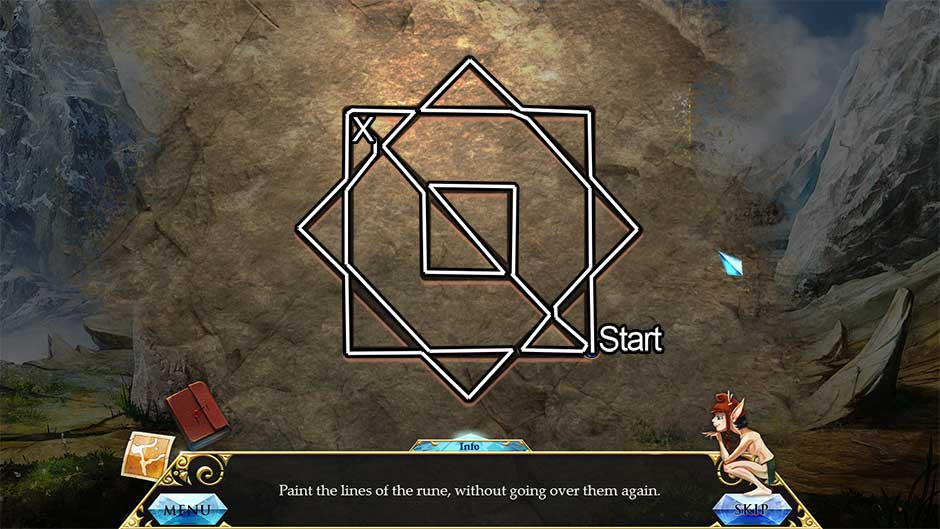
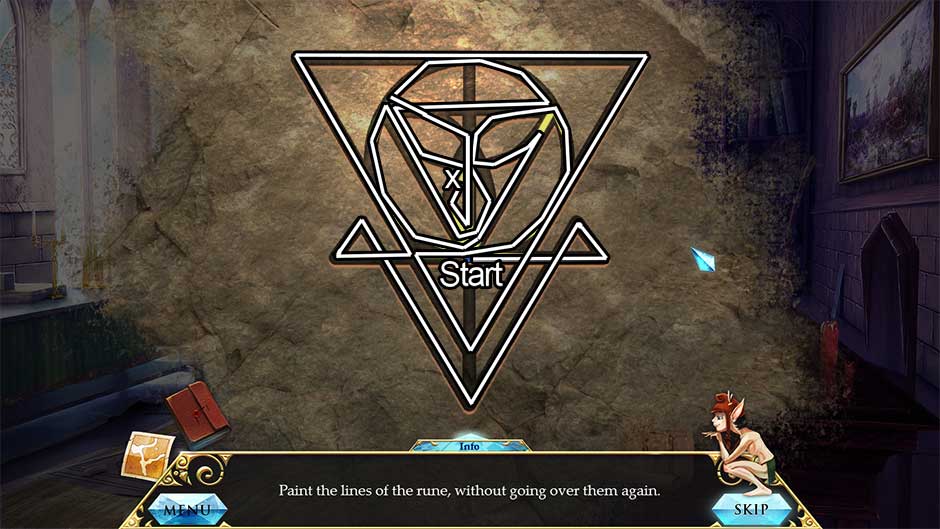
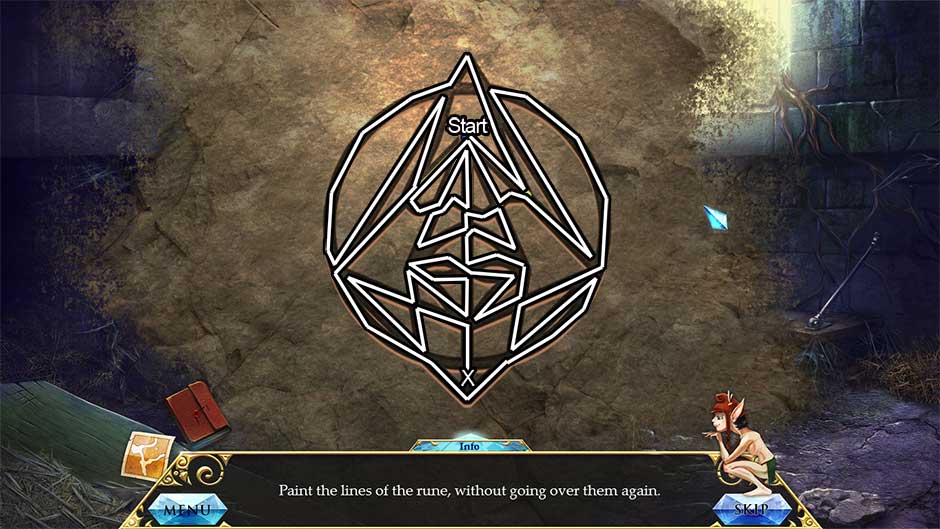
- Take a closer look at the chasm up ahead. Use the ‘Rising Rune’ on the chasm to trigger a minigame.
- Paint the lines of the rune, without going over them again. The solution is shown below.
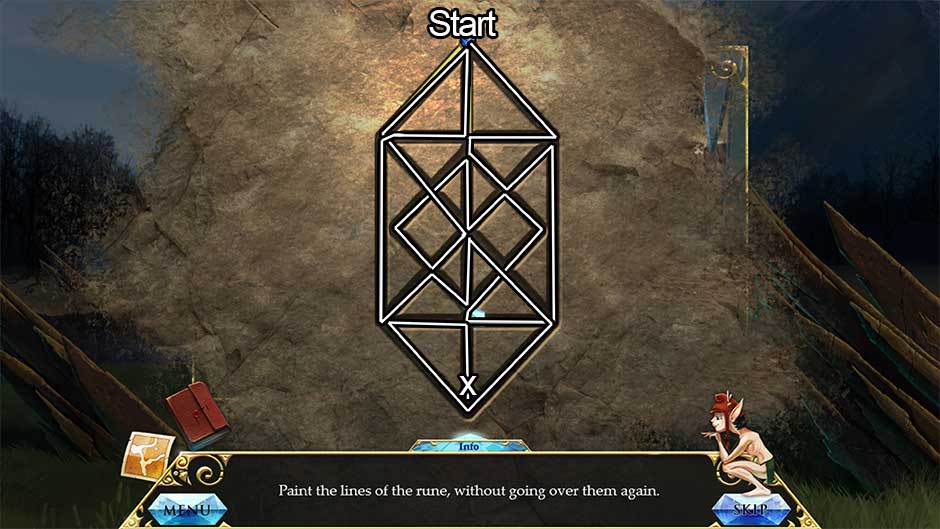
- Upon completing the puzzle, a bridge will extend across the chasm, and the rune slate will be wiped clean. Proceed forward across the bridge to the next area.
Woodcutter
- Upon entering the area, a cutscene will occur.
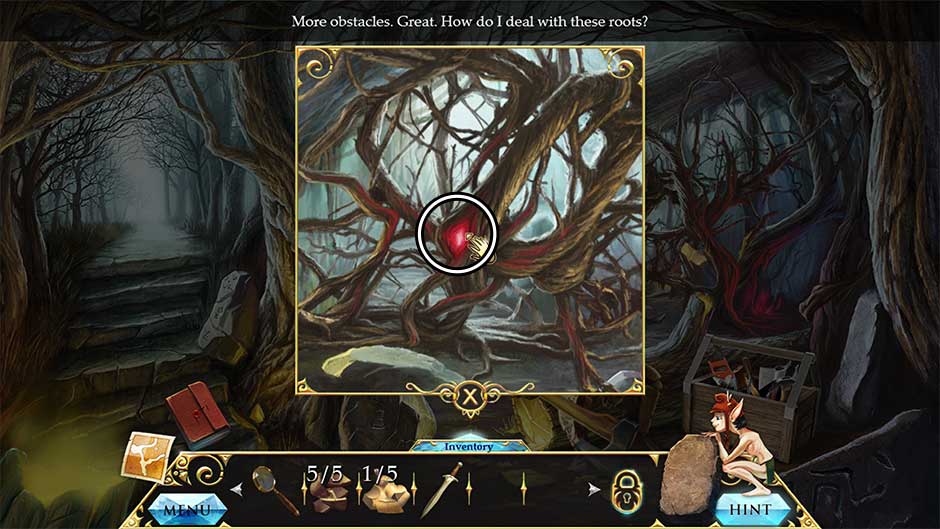
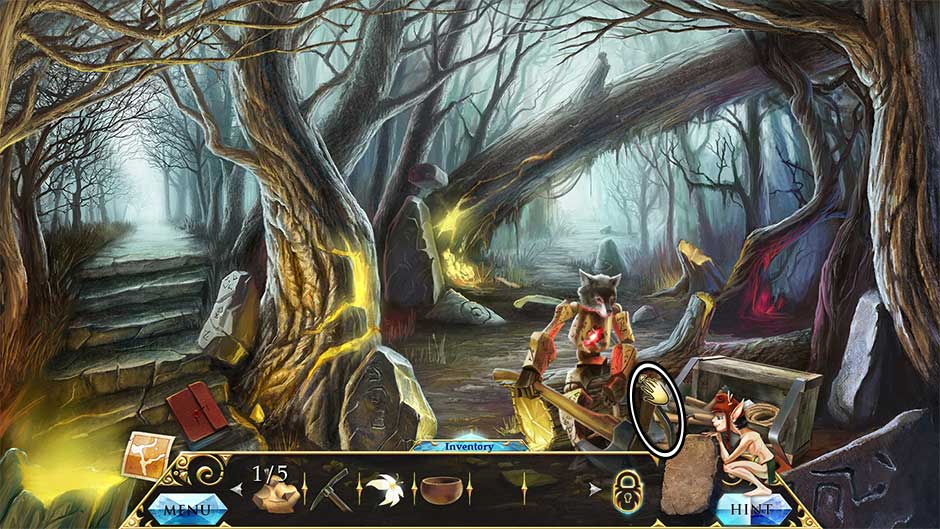
- Take a closer look at the bramble wall behind the wolf.
- Click on the Ruby to add it to your inventory.
- Speak with the wolf before leaving the area to learn what he needs.
- Continue up the steps on the left to the next area.
Tree Felling
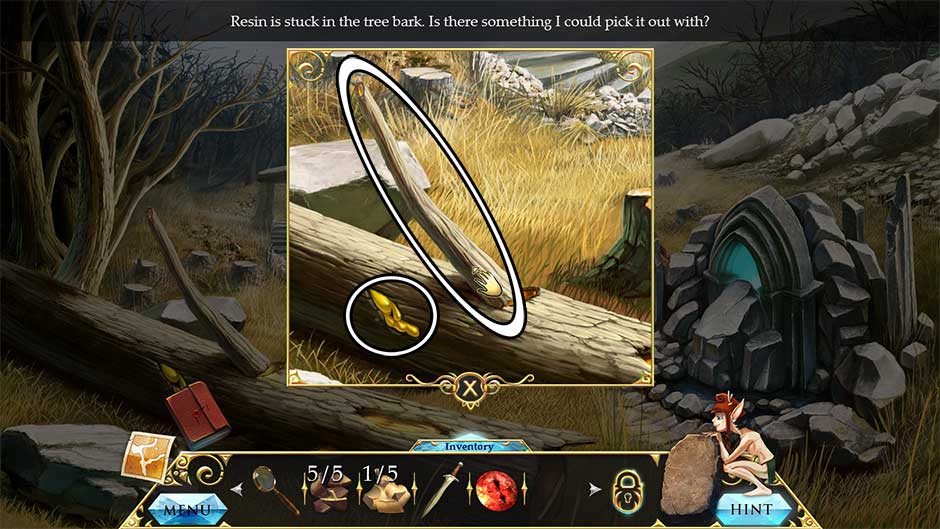
- Examine the fallen tree at the bottom of the screen.
- Click on the branch sticking up to acquire the Stick.
- Use the Lilliputian’s Sword on the Resin to add it to your inventory.
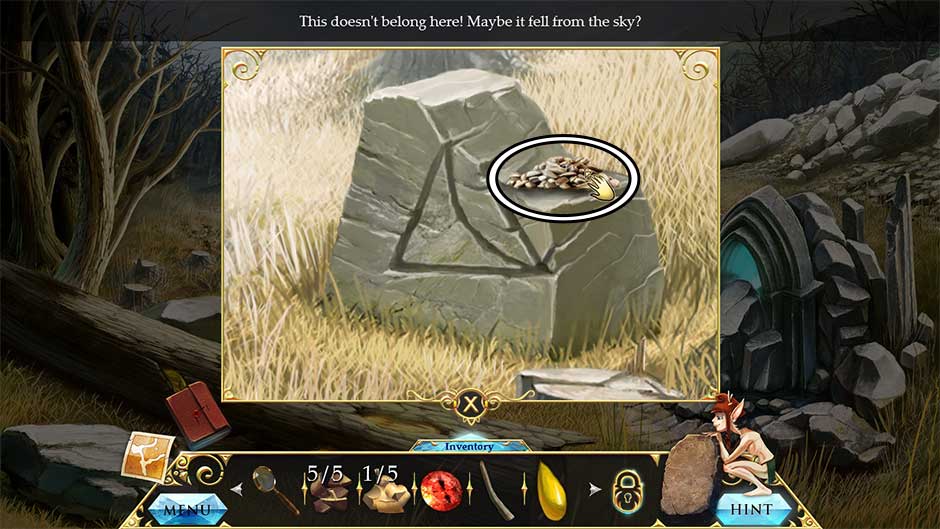
- Zoom in on the broken stone at the far end of the clearing.
- Click on the Seeds lying on top of the fragmented stone to add them to your inventory.
- Go back down to the Woodcutter.
Woodcutter
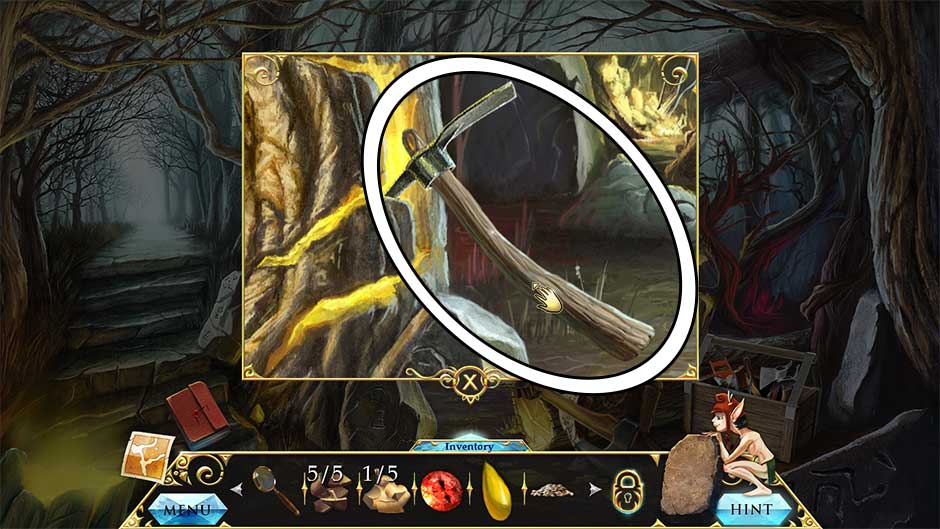
- Take a closer look at the pickaxe stuck in the glowing tree.
- Use the Stick on the pickaxe head, then click to add the Pickaxe to your inventory.
- Return to the Tree Felling.
Tree Felling
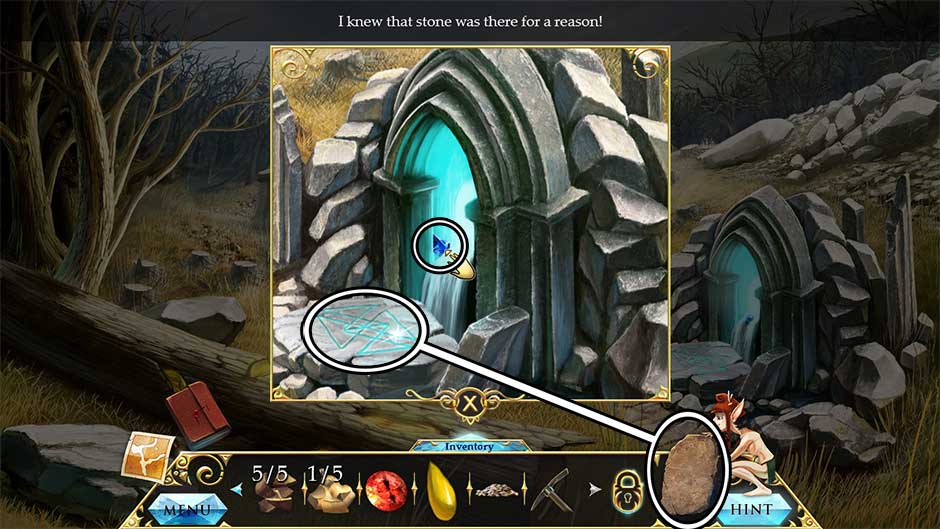
- Take a closer look at the glowing stone feature on the right.
- Use the Pickaxe on the boulder blocking the glowing archway.
- Collect the Sapphire to add it to your inventory, then use the Blank Rune on the marking in front of the spring to acquire the ‘Repair’ Rune.
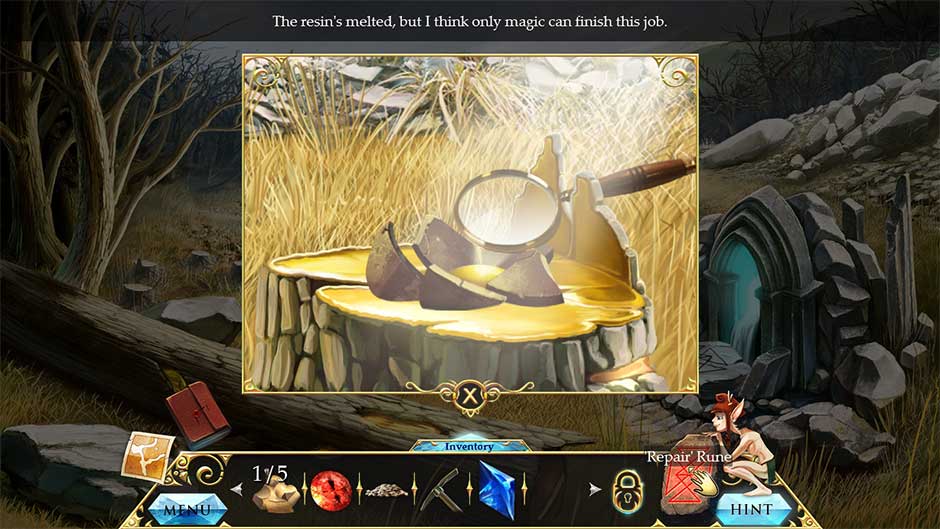
- Examine the tree trunk in the middle of the clearing.
- Place the Cracked Bowl Fragment 5/5 on top of the stump.
- Place the Resin in the middle of the bowl fragments, then use the Magnifying Glass to melt it.
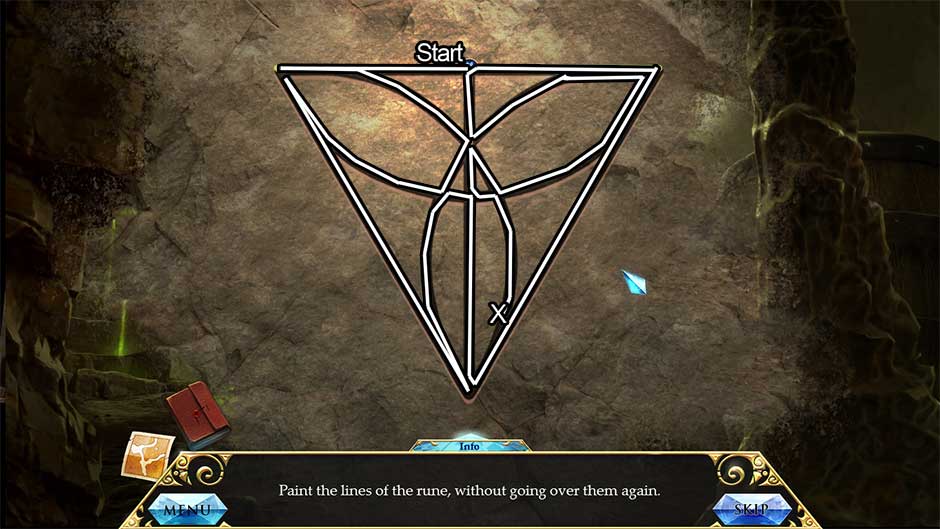
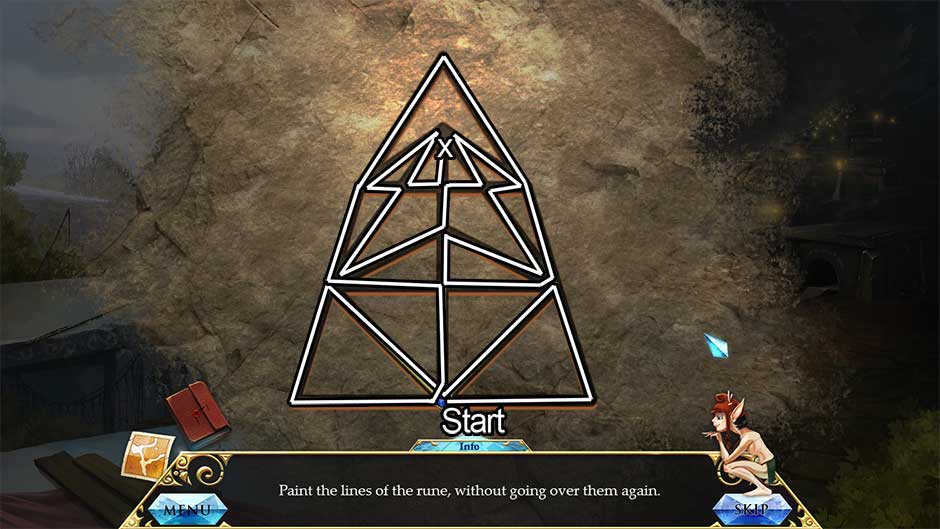
- Use the ‘Repair’ Rune on the fragments to trigger a minigame.
- Paint the lines of the rune, without going over them again. The puzzle solution is shown below.

- Once the puzzle is completed, pick up the Fixed Cup sitting on top of the stump. Note: The item will become the Empty Bowl once added to your inventory.
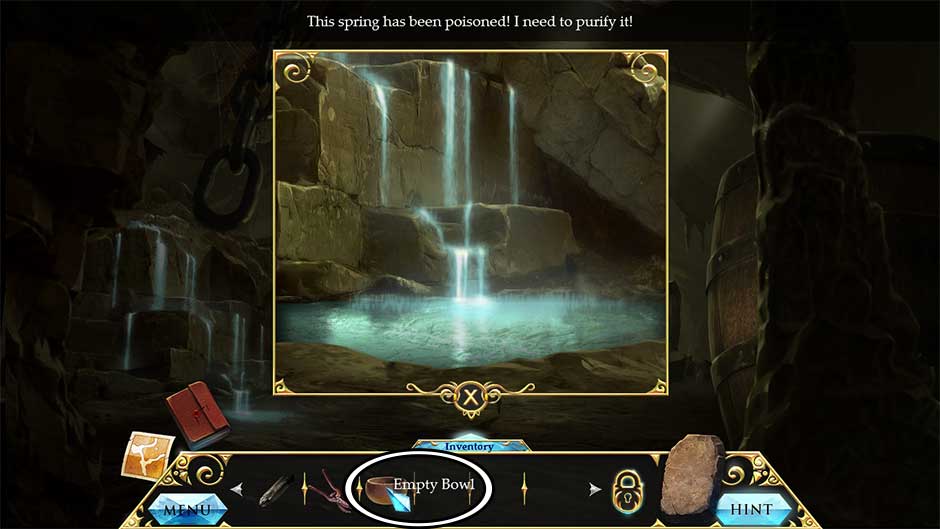
- Zoom in on the stone spring on the right again.
- Use the Empty Bowl on the spring to obtain the Cup of Water.
- Make your way back to the Road to the Village.
Road to the Village
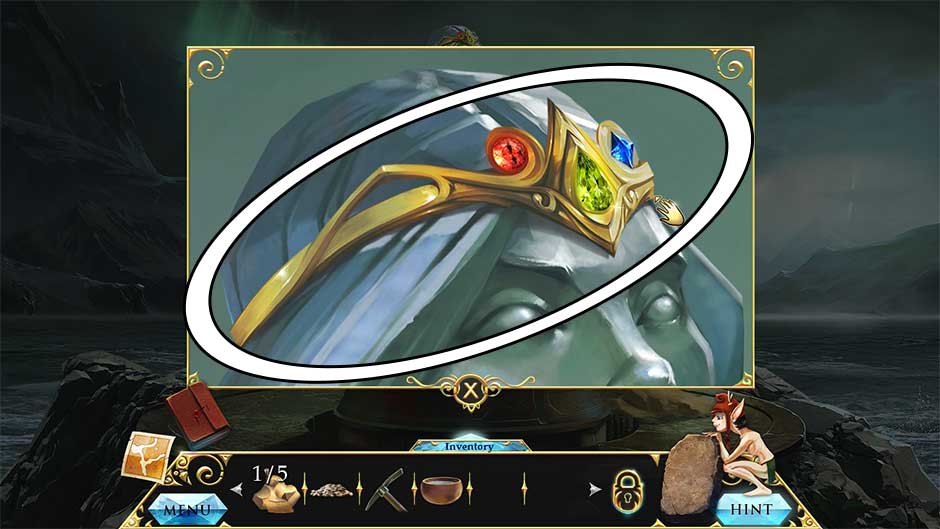
- Take a closer look at the face of the statue.
- Insert the Ruby and the Sapphire into the diadem on either side of the Emerald.
- Click on the Diadem to add it to your inventory.
- Return to the Woodcutter.
Woodcutter
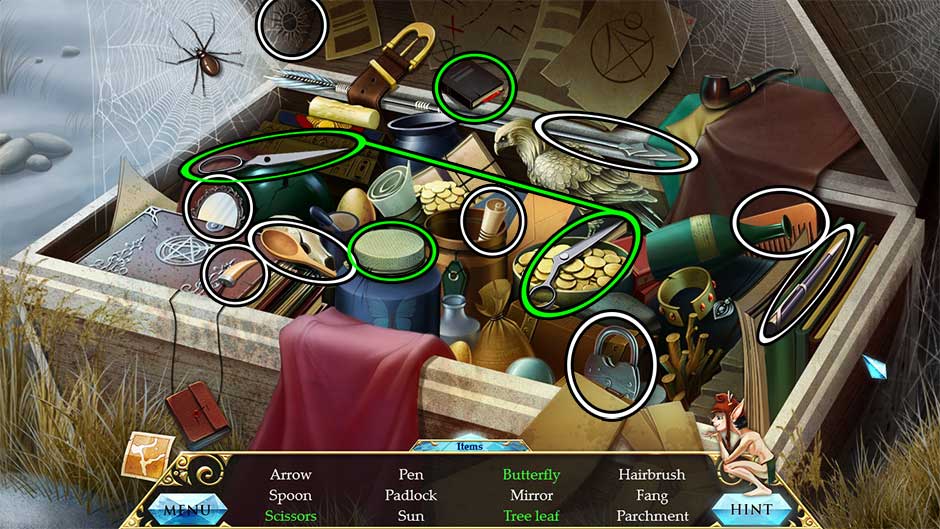
- Zoom in on the woodcutter and offer him the Diadem. He will fly into a rage, spilling the contents of his toolbox.
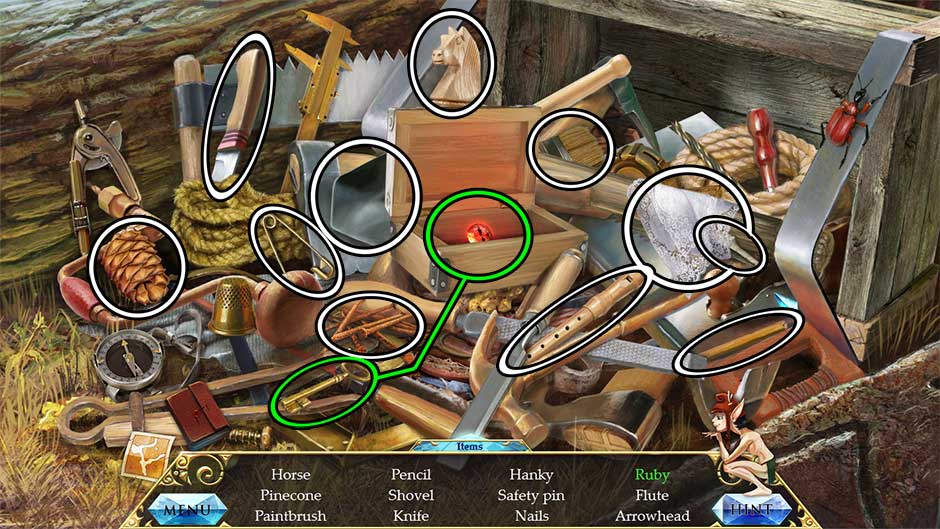
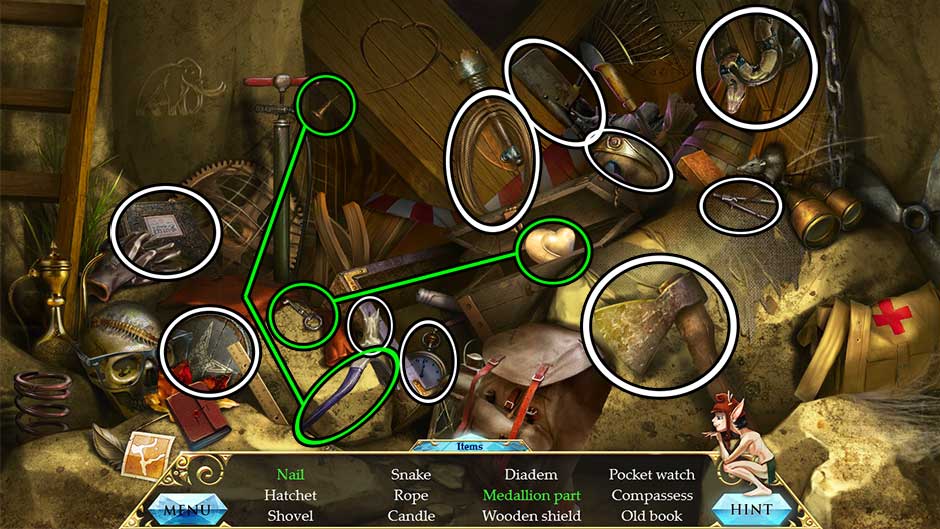
- Back in the main area, a hidden object area will appear over the pile of tools on the right.
- Find the items listed at the bottom of the screen. Objects listed in green require an additional action before they can be crossed off the list. Their locations are shown below. Upon completing the area, the Shovel will be added to your inventory.
- Go down to the Path to the Forest.
Path to the Forest
- Take a closer look at the patch of earth on the right.
- Use the Shovel to dig up the earth, then plant the Seeds. Use the Cup of Water on the hole.
- There’s one more component that’s missing here you’ll return for later. For now, return to the Tree Felling.
Tree Felling
- Zoom in on the spring on the right.
- Use the Empty Bowl on the spring to refill it again, once again adding the Cup of Water to your inventory.
- Proceed forward to the True Tree.
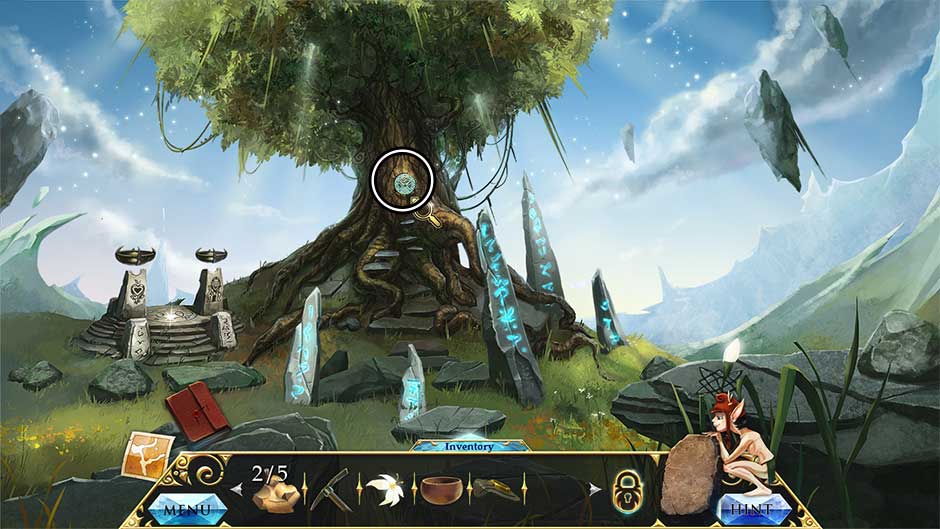
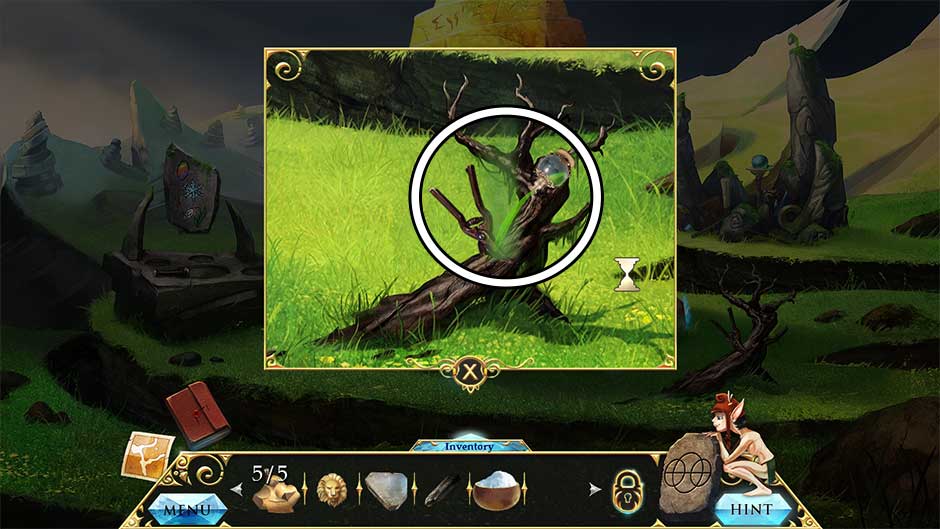
True Tree
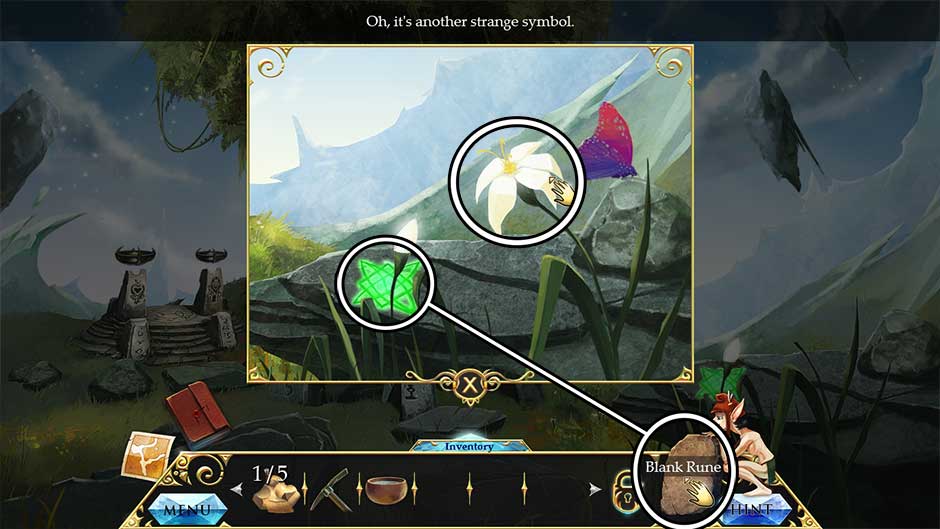
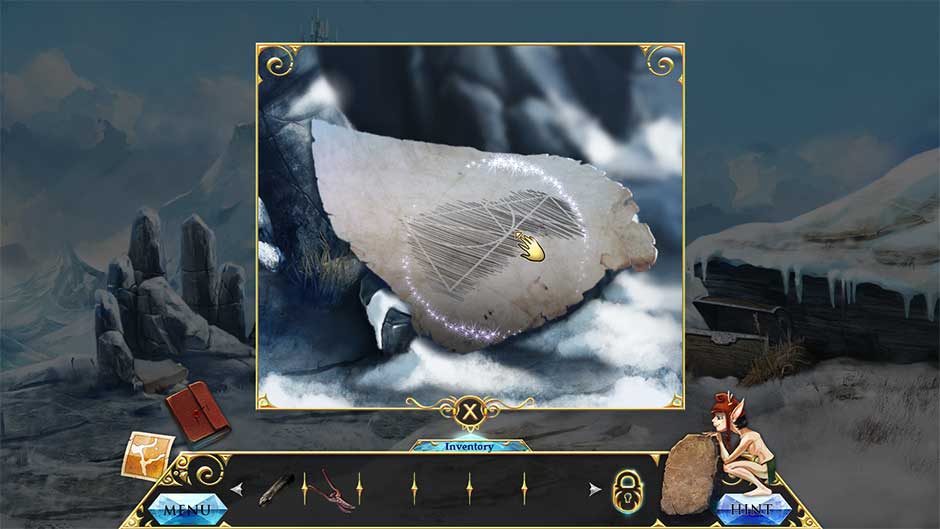
- Take a closer look at the rock on the right.
- Click on the Meadow Flower to add it to your inventory, then use the Cup of Water on the moss to remove it, revealing the ‘Growth’ Rune. Use the Blank Rune to collect it.
- Return to the Path to the Forest.
Path to the Forest
- Examine the patch of earth on the right again.
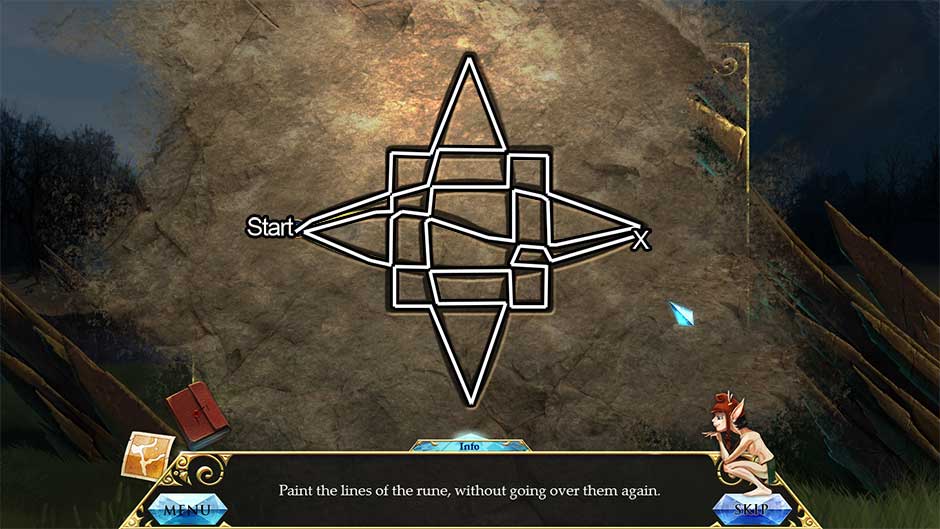
- Use the ‘Growth’ Rune on the soil to trigger a minigame.
- Paint the lines of the rune, without going over them again. The solution is shown below.
- Once the puzzle is finished, click on the Sapling to add it to your inventory.
- Return to the Woodcutter.
Woodcutter
- Zoom in on the woodcutter and offer him the Sapling.
- The woodcutter will clear a new path. Proceed forward via the path behind him to the next location, where a cutscene will occur. This path is a dead end.
- Pick up the Crowbar to add it to your inventory.
- Return to the Road to the Village.
Road to the Village
- Take a closer look at the slot at the base of the statue.
- Insert the Crowbar into the slot, then click on it to activate the lever.
- A portal to the far shore will appear. Enter into the blue portal to reach the next location.
Cable Car
- Examine the pointed stone at the base of the left set of steps.
- Click on the Mechanism Part 5 to add it to your inventory.
- Zoom in on the pointed stone to the right of the purple crystals.
- Pick up the Part of Rune Stone and Medallion Part 2/5 to add them to your inventory.
- Return to True Tree.
True Tree
- Insert the Part of Rune Stone onto the broken base between the other pointed rune stones.
- Click on the pointed, now-glowing rune stones so that they retract into the ground, allowing you to reach the tree.
- Click on the Forest Disc to add it to your inventory.
- Return to the Portal.
Portal
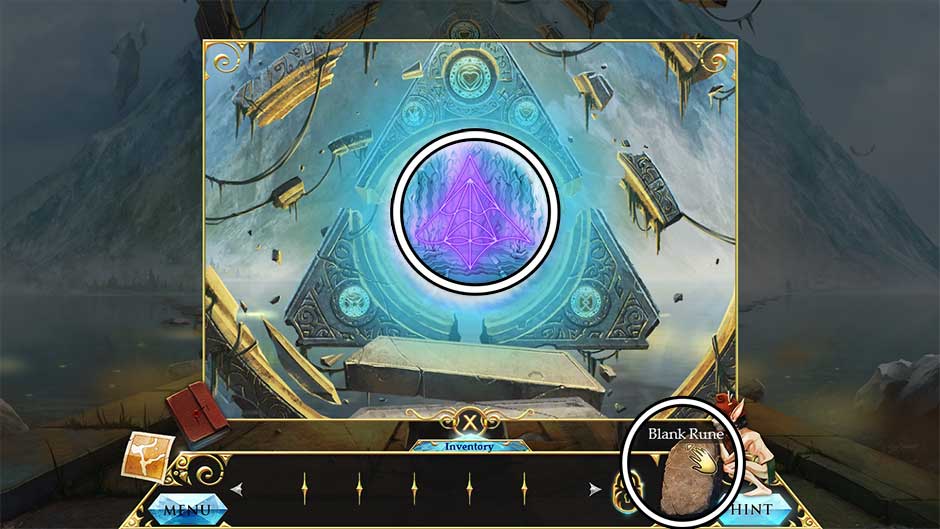
- Take a closer look at the portal up ahead. Insert the Forest Disc into the slot on the lower left.
- Another rune will appear in the portal. Use the Blank Rune to collect the ‘Opening’ Rune marking within the portal.
- Return to the Cable Car.
Chapter 3 – The Lilliputians
Cable Car
- Zoom in on the stone wall in the upper right corner, at the top of the steps.
- Use the ‘Opening’ Rune on the stone wall to trigger a minigame.
- Paint the lines of the rune, without going over them again. The puzzle solution is shown below.
- Upon completing the puzzle, the wall blocking the path will disappear. Enter the now-accessible Lilliputian’s Village.
Lilliputian’s Village
- Speak with the Elder, then continue up via the path on the left to Spiral Valley.
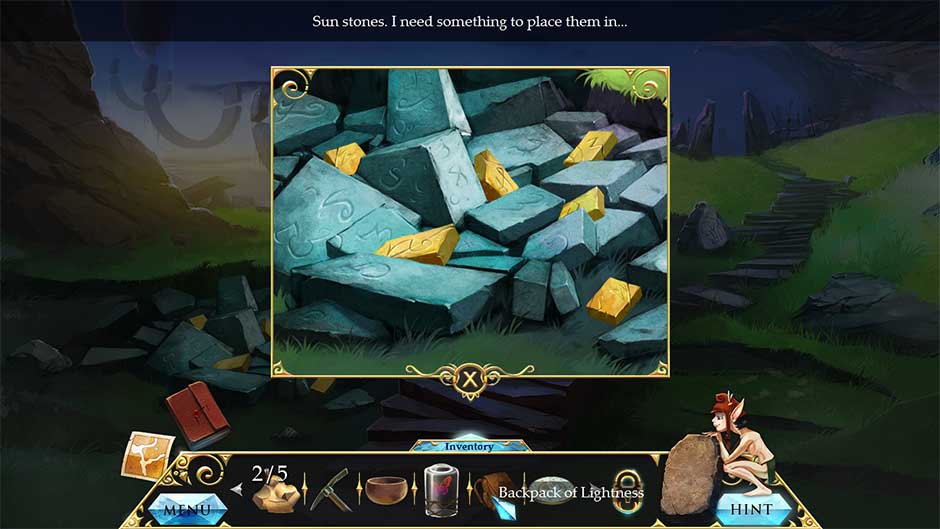
Spiral Valley
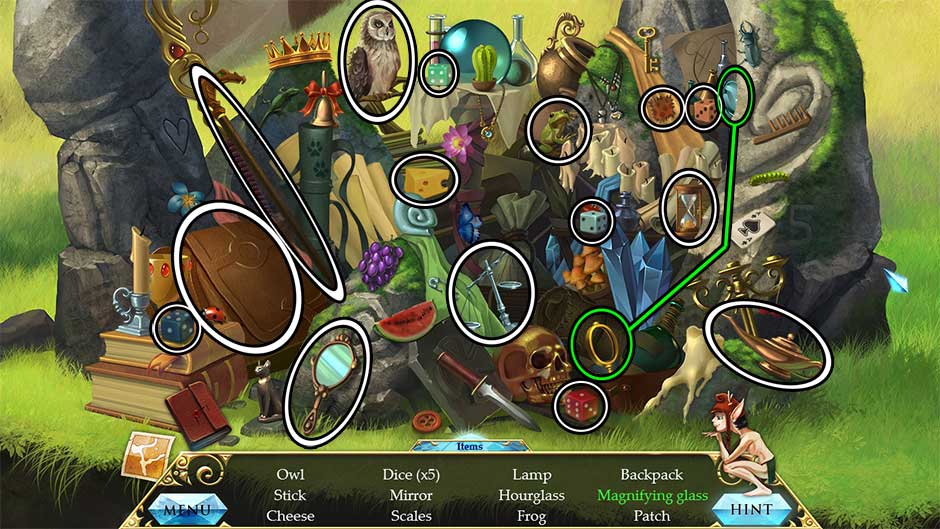
- Click on the hidden object area on the upper right.
- Find the objects listed at the bottom of the screen. The items listed in green require an additional action before they can be crossed off the list. Their locations are shown below. Once you’ve found all the items, the Backpack of Lightness will be added to your inventory.
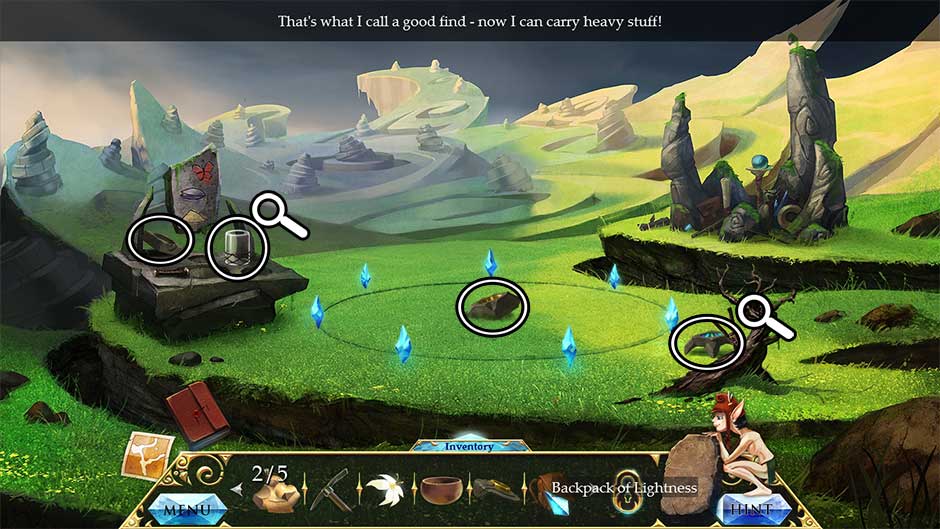
- Pick up the Mechanism Part 2 in the center of the circle.
- Zoom in on the tree on the lower right and pick up the Mechanism Part 3.
- Zoom in on the table on the left and pick up the Jar and the Mechanism Part 4.
- Go back to the Lilliputian’s Village.
Lilliputian’s Village
- Take a closer look at the stand on the right. Add Mechanism Part 2, Mechanism Part 3, Mechanism Part 4, and Mechanism Part 5 to the mechanism in that order.
- Head to the Tree Felling.
Tree Felling
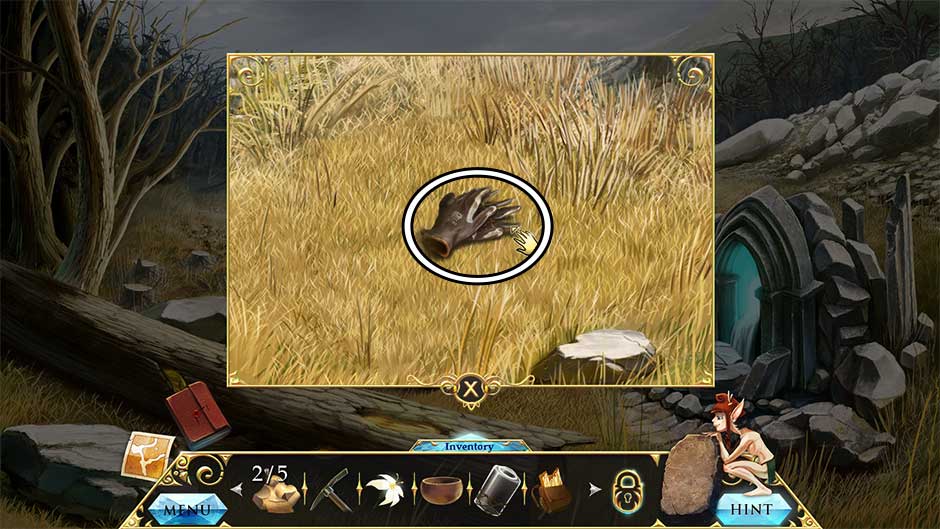
- Zoom in on the pile of wood lying on the ground. Use the Backpack of Lightness on the wood to obtain the Golden Logs.
- After collecting the logs, click on the Gloves lying on the ground beneath to add them to your inventory.
- Continue forward to True Tree.
True Tree
- Take a closer look at the rock on the right.
- Place the Jar on the rock, then place the Meadow Flower into the jar and click to collect the Jar with Butterfly.

- Make your way back to the Lilliputian’s Village.
Lilliputian’s Village
- Take a closer look at the mechanism on the right.
- Use the Golden Logs on the mechanism.
- The crystal in the center of the village will be driven away. Zoom in on the circular platform and pick up the Lilliputian’s Disc in the center.

- Go down to the Cable Car.
Cable Car
- Take a closer look at the pile of cobblestones on the left.
- Use the Gloves to remove the centipede.
- Use the Backpack of Lightness on the pile to obtain the gold Constructional Blocks.
- Return to the Portal.
Portal
- Take a closer look at the portal up ahead.
- Place the Lilliputian’s Disc into the slot on the upper left.
- Use the Blank Rune on the marking that appears in the portal to acquire the ‘Binding’ Rune.
- Return to Spiral Valley.
Chapter 4 – The Mountain
Spiral Valley
- The crystal from the village has been relocated here, and a Lilliputian stands in the clearing. Give the Constructional Blocks to the Lilliputian.
- Enter the Spiral Tower.
Spiral Tower
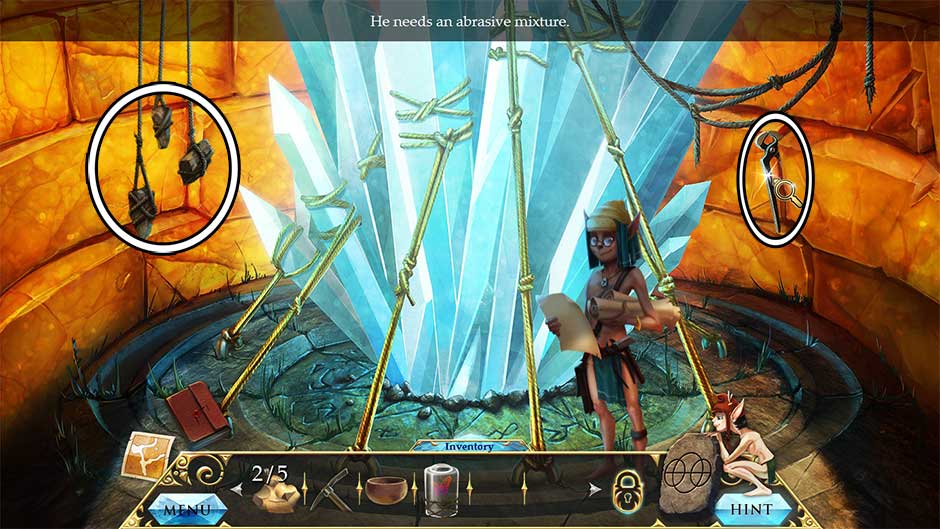
- Speak with the Lilliputian to learn what he needs.
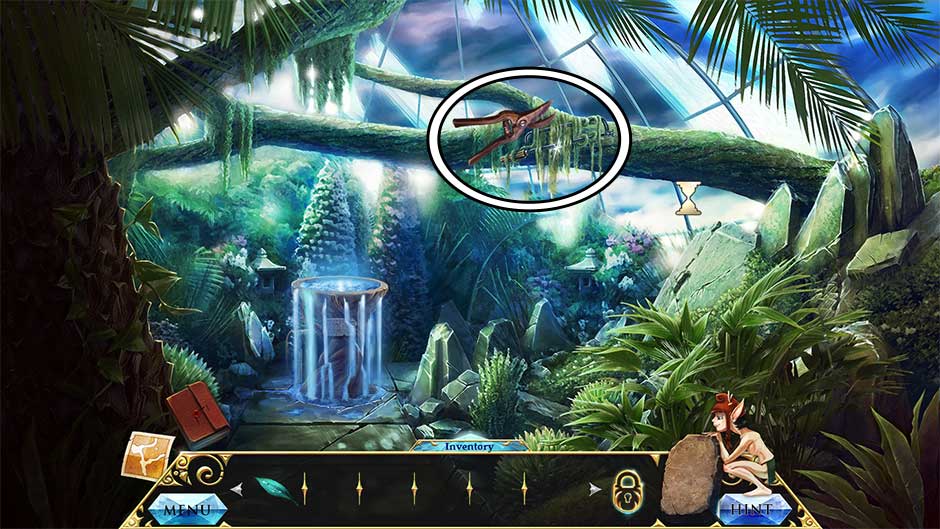
- Take a closer look at the wall on the right and pick up the Pliers.
- Take a closer look at the hanging instruments on the left. Click on them to lower the Lilliputian’s Bucket, then add it to your inventory.
- Make your way back to the Colonnade.
Colonnade
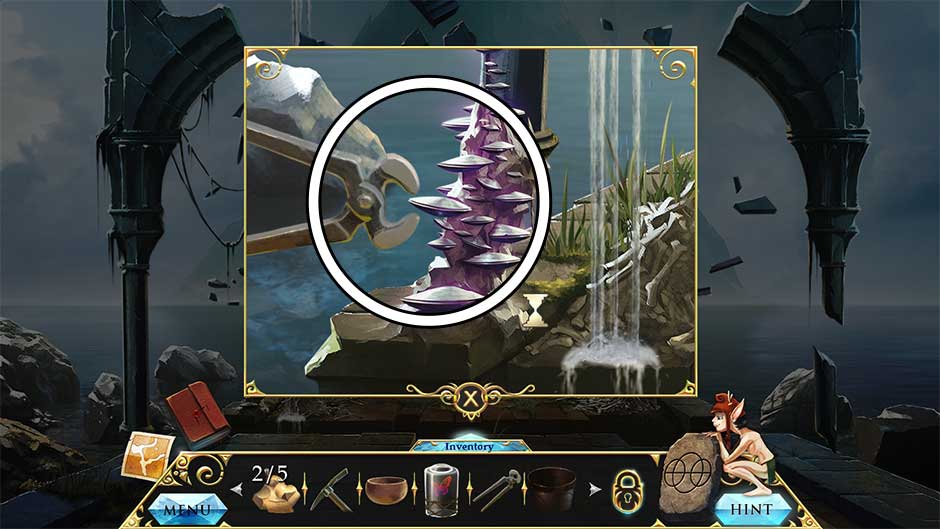
- Take a closer look at the cluster of purple shells in the lower left corner.
- Use the Pliers to remove the Shells, adding them to your inventory.
- Go to the Road to the Village.
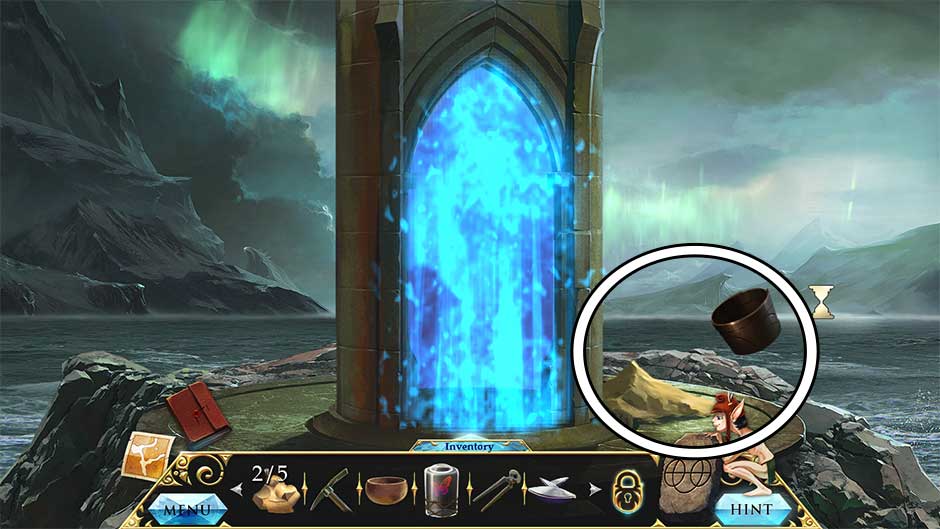
Road to the Village
- Use the Lilliputian’s Bucket on the sand in the lower right corner of the portal to add the Bucket of Sand to your inventory.
- Make your way back to Spiral Valley.
Spiral Valley
- Zoom in on the table on the left.
- Place the Bucket of Sand, the Shells, and the Jar with Butterfly into the slots on the table. Collect the resulting Abrasive Mixture.
- Enter the Spiral Tower.
Spiral Tower
- Give the Abrasive Mixture to the Lilliputian.
- Exit back out to Spiral Valley.
Spiral Valley
- Once you exit the tower, a cutscene will occur. Afterward, you will acquire the Magical Crystal.
- Go back to the Cable Car.
Cable Car
- Zoom in on the small pointed stone at the base of the stairs on the left.
- Insert the Magical Crystal into the slot in the small stone.
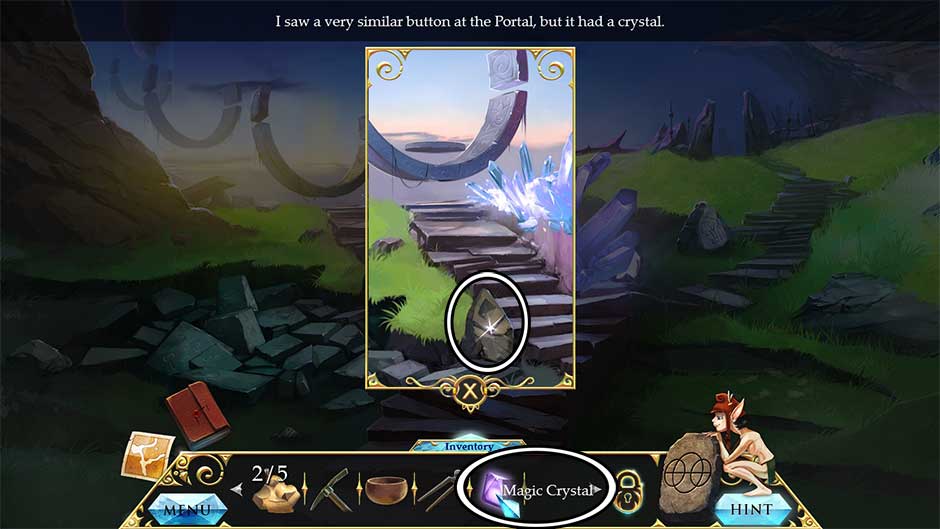
- A new path will be opened. Continue up the steps on the left to the Mountain Station.
Mountain Station
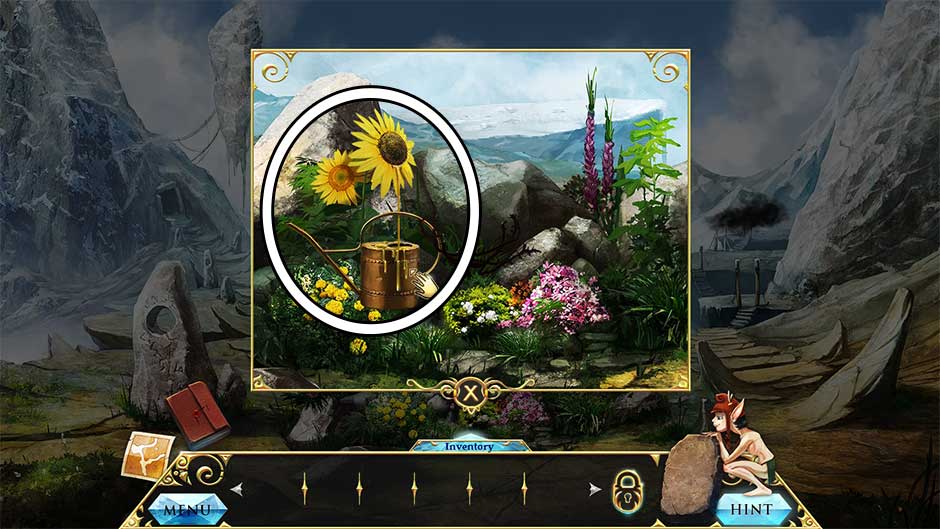
- Take a closer look at the bed of flowers.
- Click on the Medallion Part 3/5 to add it to your inventory.

- Enter the Mine via the path on the left.
Mine
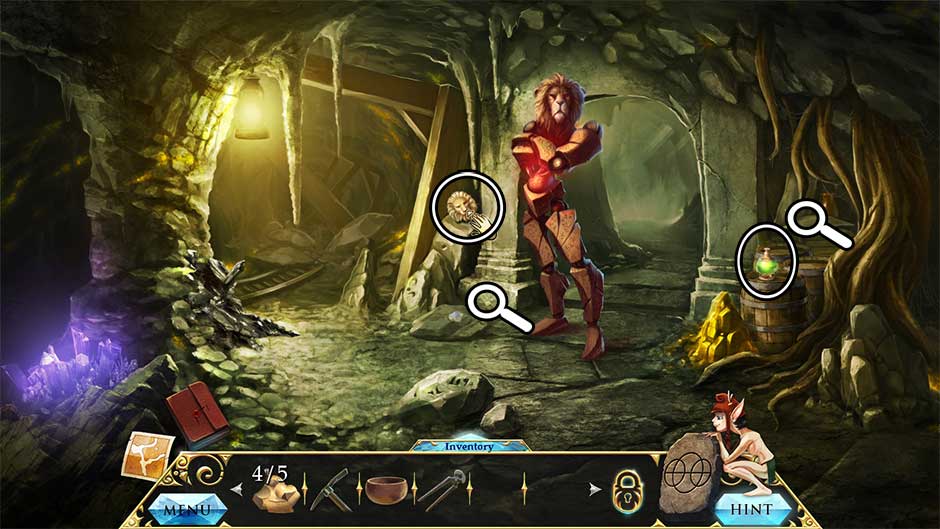
- Speak with the lion to learn of his needs.
- Click on the hidden object area in the yellow passage.
- Find the items listed at the bottom of the screen. Objects listed in green require an extra action before they can be crossed off the list. Their locations are shown below. Upon completing the area, the Medallion Part 4/5 will be added to your inventory.
- Back in the main area, pick up the Lion Amulet and the Acid, then take a closer look at the stone in front of the lion’s feet.
- Use the Pliers to pull the Opal from the rock, then add it to your inventory.
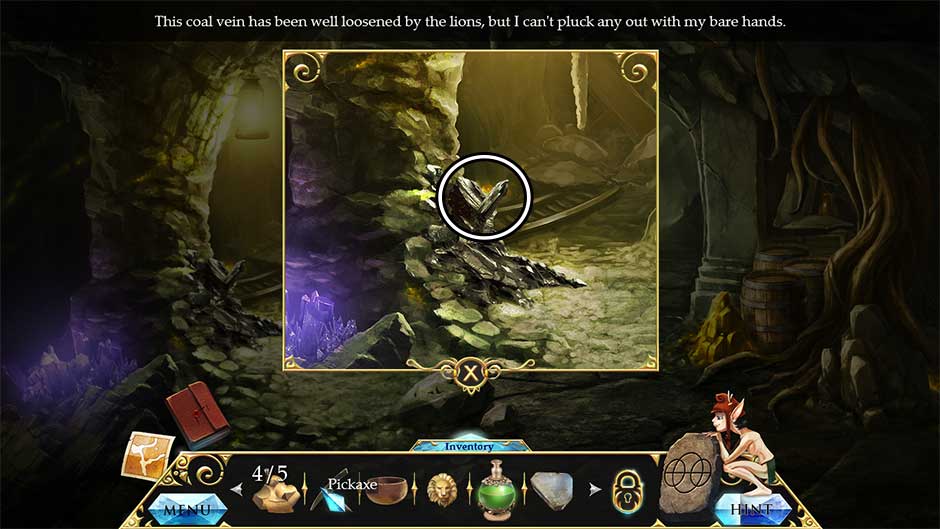
- Take a closer look at the base of the rock column on the left.
- Use the Pickaxe on the rock to acquire the Coal.
- Head back out to the Mountain Station.
Mountain Station
- Take the path on the right to the Bridge Across the Crevice.
Bridge Across the Crevice
- Take a closer look at the base of the left stone column and pick up the Medallion Part 5/5.
- Take a closer look at the top of the left stone column and use the Empty Bowl on the snow to acquire the Alpine Snow.

- Head back to Spiral Valley.
Spiral Valley
- Take a closer look at the tree branch on the right.
- Use the Acid to free the Garden Shears, adding them to your inventory. The Empty Jar will be added to your inventory as well.
- Return to the Mountain Station.
Mountain Station
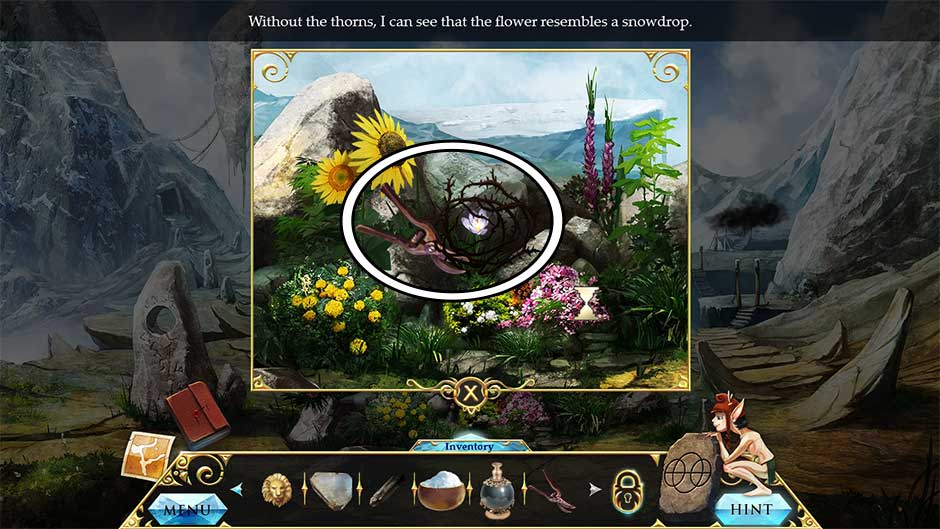
- Take a closer look at the flower bed.
- Use the Garden Shears to clip away the thorns, then click on the Snowdrops to add them to your inventory.
- Return to True Tree.
True Tree
- Take a closer look at the altar on the left.
- Place the Lion Amulet into the right bowl and the Medallion Part 5/5 into the left.
- Use the ‘Binding’ Rune on the Medallion Parts in the left bowl to trigger a puzzle.
- Paint the lines of the rune, without going over them again. The solution is shown below.
- Upon completing the puzzle, click on the ‘Soul’ Rune to add it to your inventory.
- Return to the Mine.
Mine
- Use the ‘Soul’ Rune to the lion.
- Enter through the doorway behind the lion to the Underground Refuge.
Underground Refuge
- Take a closer look at the glowing rune on the right toward the back of the cavern.
- Use the Blank Rune to acquire the ‘Decrease’ Rune.
- Use the ‘Decrease’ Rune on the large table in the center to trigger a puzzle.
- Paint the lines of the rune, without going over them again. The puzzle solution is shown below.
- Zoom in on the smaller table in the center of the room.
- Place the Opal into the center slot to trigger a puzzle.
- Position the points on the four corner crystals so that the beam of light refracts within the bounds of the altar only. Start the beam by pressing the central button. The puzzle solution is shown below.
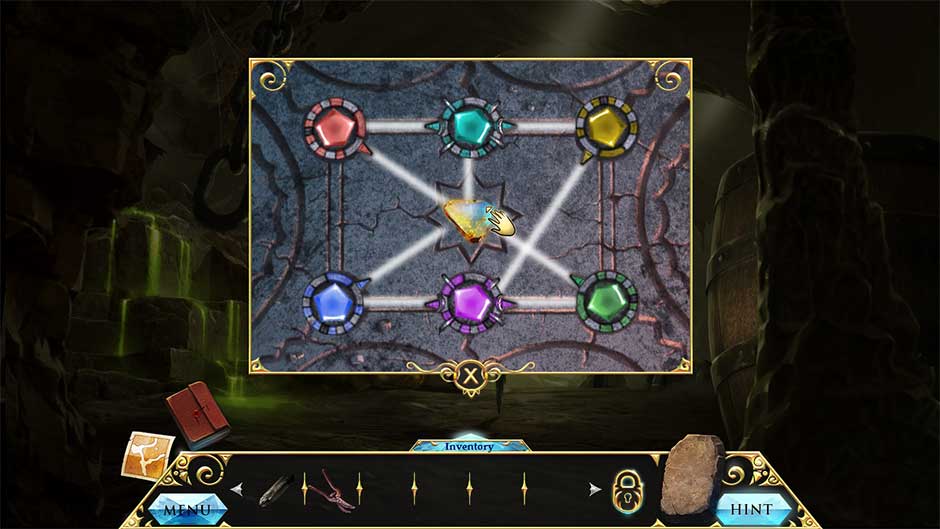
- Upon solving the puzzle, click on the charged Iridescent Opal in the center to add it to your inventory.
- Make your way back to Spiral Valley.
Spiral Valley
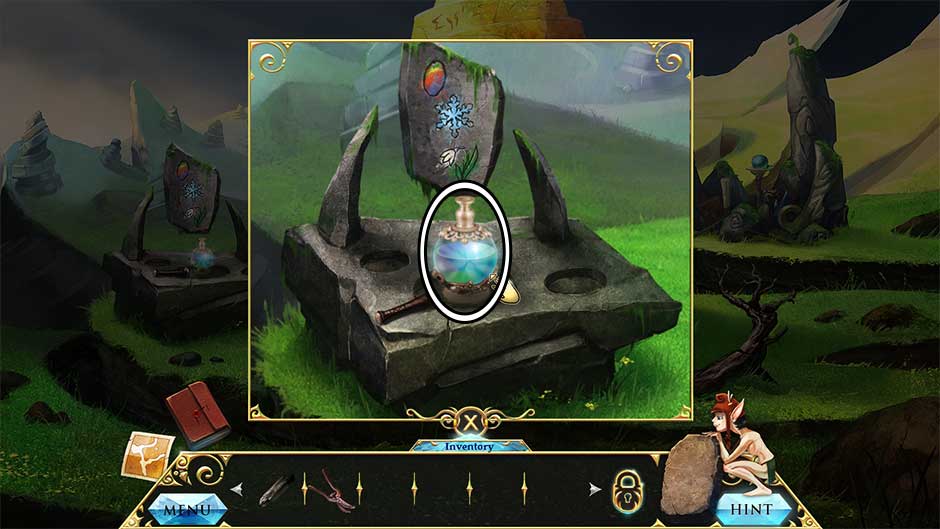
- Zoom in on the stone table on the left.
- Place the Snowdrops, the Empty Jar, the Alpine Snow, and the Iridescent Opal into the slots on the table.
- Pick up the resulting Potion of Purity to add it to your inventory.
- Return to the Underground Refuge.
Underground Refuge
- Take a closer look at the tainted fountain on the left.
- Use the Potion of Purity on the poisoned spring to restore it.
- Use the Empty Bowl on the purified waters to acquire the Mountain Water.
- Go back down to the Mine.
Mine
- Give the Mountain Water to the lion.
- Examine the face of the door on the right.
- Pick up the Mountain Disc to add it to your inventory.

- Return to the Portal.
Portal
- Zoom in on the portal straight ahead.
- Insert the Mountain Disc into the slot in the lower right corner.
- A new marking will appear in the portal. Use the Blank Rune on the marking to acquire the ‘Disperse’ Rune.
- Make your way back to the Bridge Across the Crevice.
Chapter 5 – The Mage
Bridge Across the Crevice
- Use the ‘Disperse’ Rune on the black fog blocking the gorge to trigger a puzzle.
- Paint the lines of the rune, without going over them again. The solution is shown below.
- With the fog cleared, continue forward to the Rocky Peaks.
Rocky Peaks
- Continue up via the path on the right to the Broken Cable Car.
Broken Cable Car
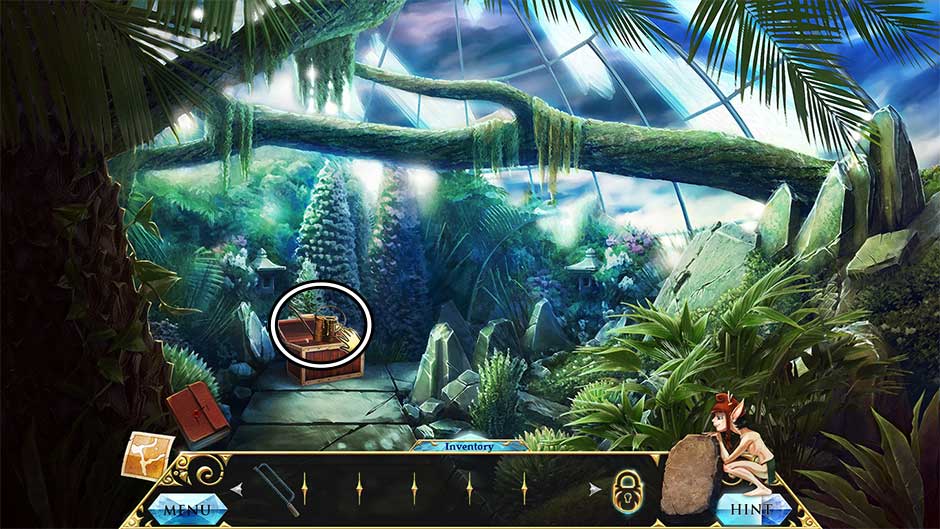
- Click on the hidden object area over the chest on the right.
- Find the objects listed at the bottom of the screen. Items listed in green require an additional action before they can be crossed off the list. Upon completing the puzzle, the Piece of Parchment will be added to your inventory.
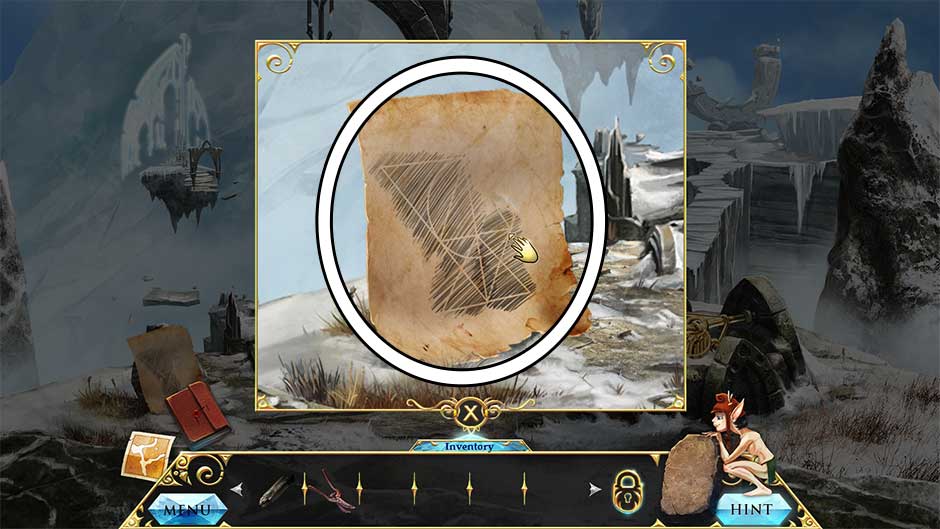
- Examine the stones on the left.
- Place the Piece of Parchment on top of the stone, then use the Coal to trace the outline onto the paper. Once finished, click on the Rune Part to add it to your inventory. Note: You will need to click on the drawing itself to pick it up, not the edges of the parchment.
- Go back down to the Rocky Peaks.
Rocky Peaks
- Take a closer look at the fragmented stone on the left.
- Place the Rune Part parchment from your inventory over the broken stone. Use the Coal once again to trace the outline. Once finished, click on the Rune Part again, same as before, to add it to your inventory.
- Make your way back to the Tree Felling.
Tree Felling
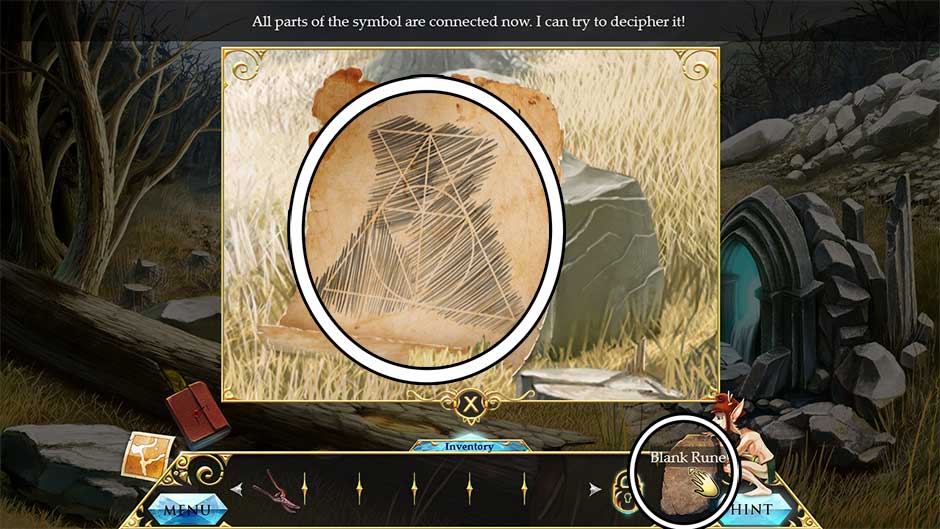
- Examine the broken stone where you formerly found the Seeds.
- Use the Rune Part parchment on the stone, followed by the Coal to trace the outline.
- Use the Blank Rune on the completed drawing to acquire the ‘Attract’ Rune.
- Return to the Bridge Across the Crevice.
Bridge Across the Crevice
- Use the ‘Attract’ Rune on the island floating in the distance toward the top of the screen to trigger a puzzle.
- Paint the lines of the rune, without going over them again. The puzzle solution is shown below.
- Upon completing the puzzle, the floating island will be pulled closer. Click on the island to take a closer look, clicking on the Metal Bars Key to add it to your inventory.
- Head back up to the Rocky Peaks.
Rocky Peaks
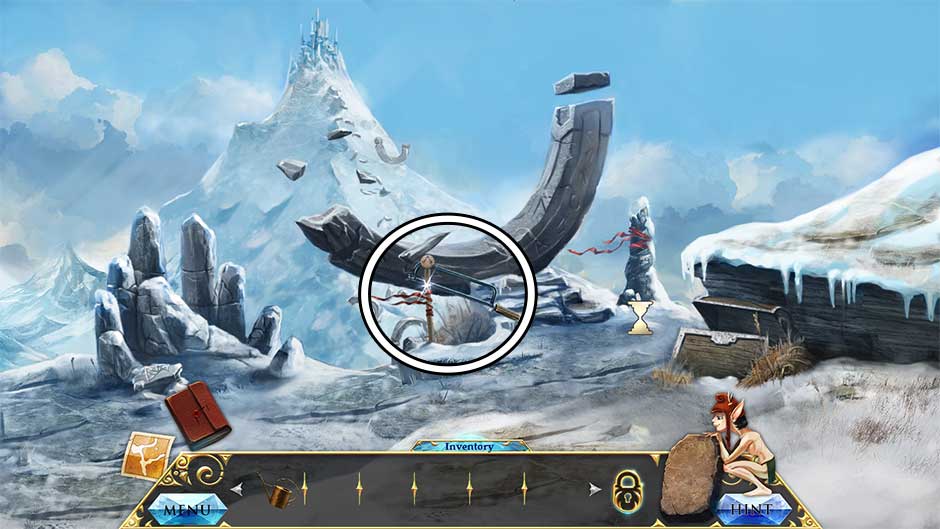
- Take a closer look at the gold apparatus on the right.
- Use the Metal Bars Key on the lock, then use the Blank Rune on the marking that appears to collect the ‘Great Attract’ Rune.
- Use the ‘Great Attract’ Rune on the floating island with the white sail on the left to trigger a puzzle.
- Paint the lines of the rune, without going over them again. The puzzle solution is shown below.

- Upon completing the puzzle, you will gain access to the Sail. Continue across the bridge on the left.
Sail
- After a brief cutscene, you will find yourself at a grand estate. Take a closer look at the door on the left.
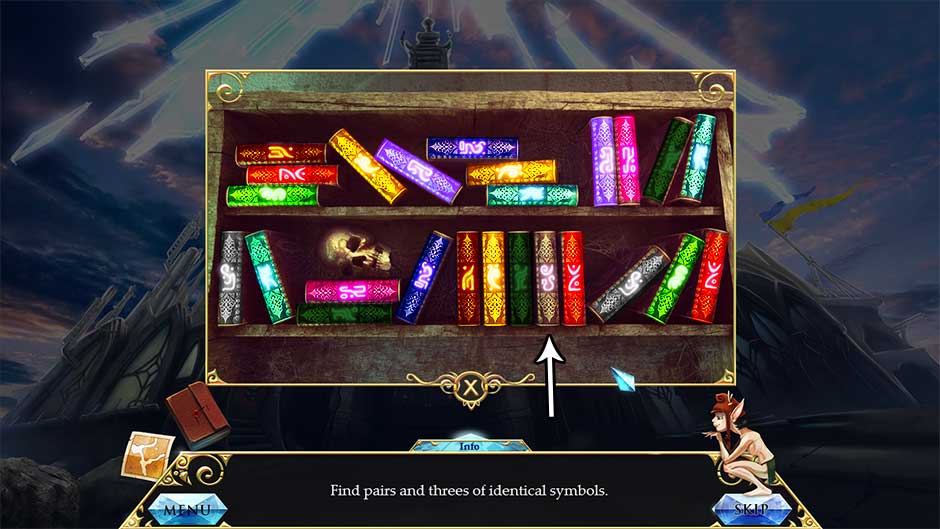
- Find pairs and threes of identical symbols on the spines of the books. The screenshot below shows the puzzle solution. After you find all the pairs, one book will remain. Click on it to open the door.
- Examine the center door to trigger another puzzle.
- Slide the colored key tiles to the matching locks. Tiles only move certain directions but can push other tiles. Press the button to reset. The solution is shown below.
- Move the green tile down to the bottom lock.
- Move the yellow tile up, pushing the red tile up 1 square.
- Move the red tile to the right, pushing the green tile to the junction.
- Move the blue tile to the left until it cannot move further.
- Move the green tile down, pushing the blue tile down 1 square to the junction.
- Move the yellow tile up to the yellow lock.
- Move the red tile over to the red lock.
- Move the blue tile over to the blue lock.
- Move the green tile down to the final green lock.
- Slide the colored key tiles to the matching locks. Tiles only move certain directions but can push other tiles. Press the button to reset. The solution is shown below.

- Examine the door on the right to trigger one more puzzle.
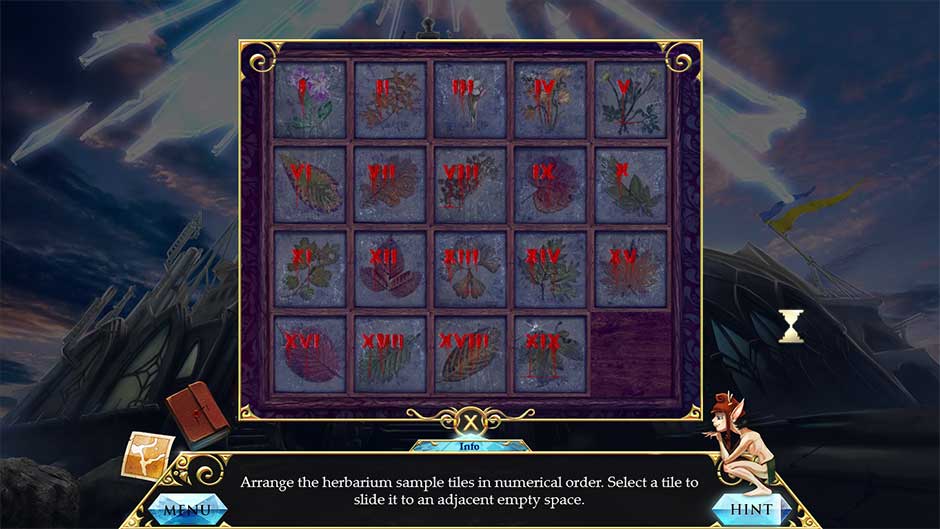
- Arrange the herbarium sample tiles in numerical order. Select a tile to slide it to an adjacent empty space. The puzzle solution is shown below.
- Go through the door on the right to enter the Greenhouse.
Greenhouse
- After the cutscene, click on the hidden object area ahead.
- Find the objects described at the bottom of the screen. You must solve riddles in order to find the items. Their locations are shown below, and the answer to the riddles is as follows:
- An open-ended barrel, I am shaped like a hive. I am filled with the flesh, and the flesh is alive! What am I?
Answer: Thimble - Look at my face and you see somebody, look at my back and you see nobody.
Answer: Mirror - Colored as a maiden tweaked, time was naught when I began; through the garden I was sneaked, I alone am the fall of man.
Answer: Apple
Note: You must first use the pliers to remove the foliage, revealing the fruit’s location. - I have five letters and people eat me. Remove my first two letters and I am an animal. What am I?
Answer: Grape - What shoemaker makes shoes without leather, with all four elements put together, fire and water, earth and air: every customer gets two pair?
Answer: Horseshoe - A very pretty thing am I, fluttering in the pale-blue sky. Delicate, fragile on wing, indeed I am a pretty thing. What am I?
Answer: Butterfly - A red cap on my head, a stone in my throat, if you tell me the answer, I’ll give you a Groat. What am I?
Answer: Cherries - First half: a fragrant tree, always colored green; second half: a tasty shape, a place to put ice cream.
Answer: Pinecone
- An open-ended barrel, I am shaped like a hive. I am filled with the flesh, and the flesh is alive! What am I?
- Find the objects described at the bottom of the screen. You must solve riddles in order to find the items. Their locations are shown below, and the answer to the riddles is as follows:
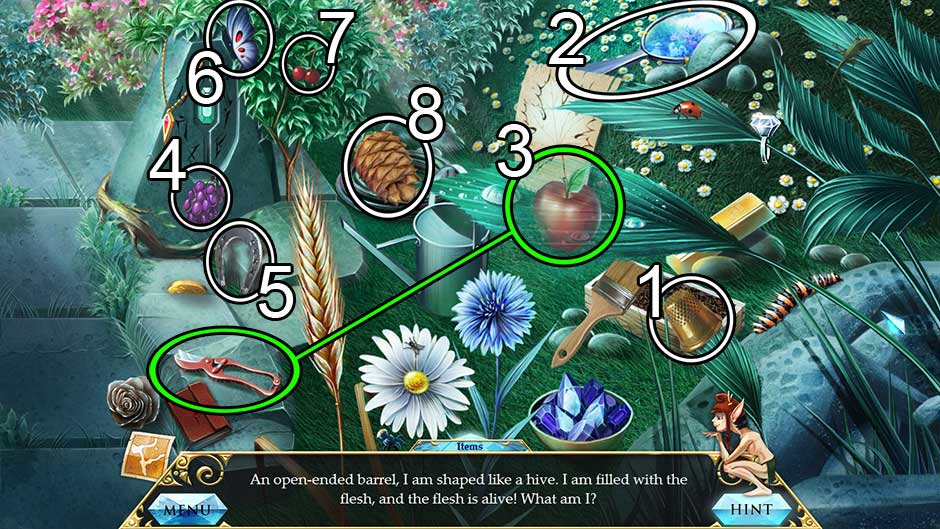
- Upon solving all the riddles and locating the items, the Drop of Dew will be added to your inventory.
- Back in the main area, use the Garden Shears to cut down the Saw and add it to your inventory.
- Use the Drop of Dew on the fountain to reveal a treasure chest.
- Click on the chest to open it and collect the Empty Oil Can
- Make your way back to the Broken Cable Car.
Broken Cable Car
- Use the Saw on Stick to add it to your inventory.
- Return to the Sail.
Sail
- Enter the doorway on the left.
Library
- Insert the Stick into the center of the console.
- A hidden object area will appear on the left.
- Find the objects described at the bottom of the screen. You must solve riddles in order to find the items. Their locations are shown below, and the answer to the riddles is as follows:
- This corner, this corner is no corner at all.
Answer: Ring - What builds up castles, tears down mountains, makes some blind and helps others see?
Answer: Sand
Note: You must first open the box on the right to reveal the Sand’s location. - What can be swallowed, but can also swallow you?
Answer: Water - What gets beaten, and whipped, but never cries?
Answer: Egg - Walk on the living, they don’t even mumble. Walk on the dead, they mutter and grumble. What are they?
Answer: Leaves
Note: You must first open the book before you can collect the Leaf. - What can burn the eyes, sting the mouth, yet be eaten?
Answer: Salt - My life can be measured in hours; I serve by being devoured. Thin, I am quick; fat, I am slow. Wind is my foe. What am I?
Answer: Candle - What has a face and two hands but no arms or legs?
Answer: Watch
- This corner, this corner is no corner at all.
- Find the objects described at the bottom of the screen. You must solve riddles in order to find the items. Their locations are shown below, and the answer to the riddles is as follows:
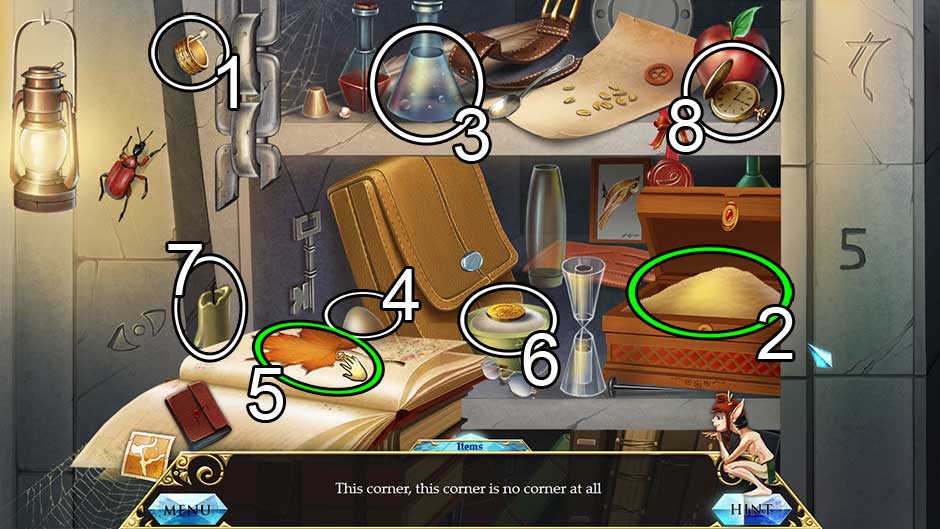
- Upon completing the area, the Maple Leaf will be added to your inventory.
- Zoom in on the statue at the far end of the hall.
- Place the Maple Leaf into the basin to make a new rune symbol appear.
- Use the Blank Rune on the symbol to acquire the ‘Transformation’ Rune.
- Return to the Mountain Station.
Mountain Station
- Take a closer look at the bed of flowers.
- Use the ‘Transformation’ Rune on the sunflowers to trigger a puzzle.
- Paint the lines of the rune, without going over them again. The solution is pictured here.
- Once finished, use the Empty Oil Can on the sunflower oil to add the Full Oil Can to your inventory.
- Return to the Sail.
Sail
- Enter the center doorway to enter the Workshop.
Workshop
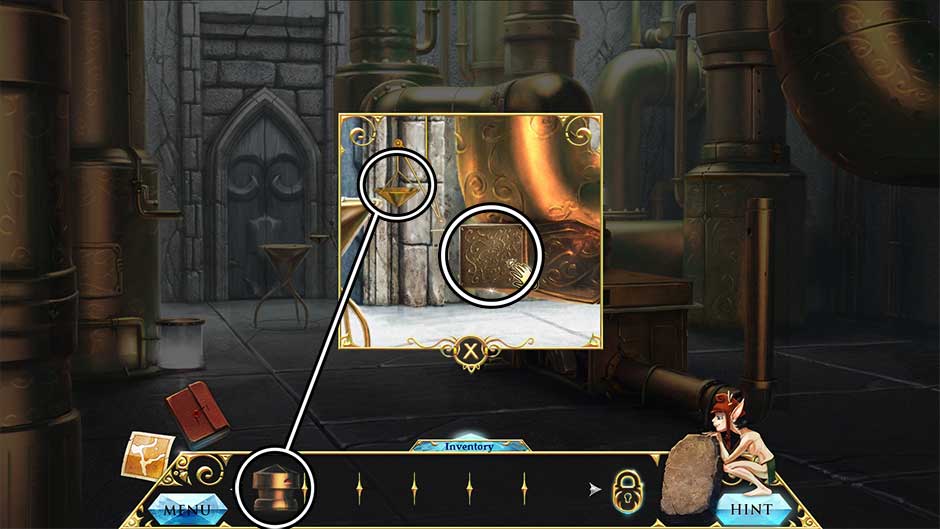
- Take a closer look at the base of the large mechanism on the right.
- Use the Full Oil Can on the rotating gears to silence them.
- Click on the Handle and the Whistle to add them to your inventory.
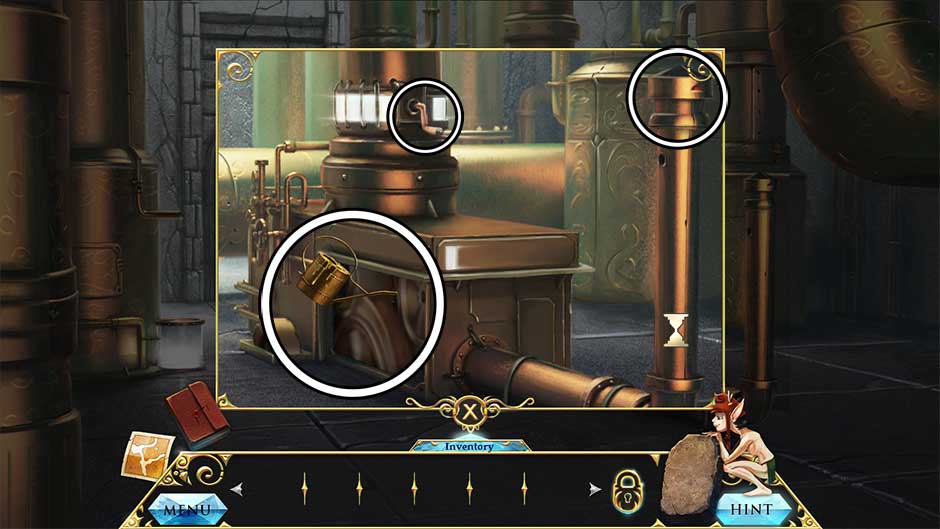
- Take a closer look at the large pipe on the left.
- Use the Handle to plug up the leak.
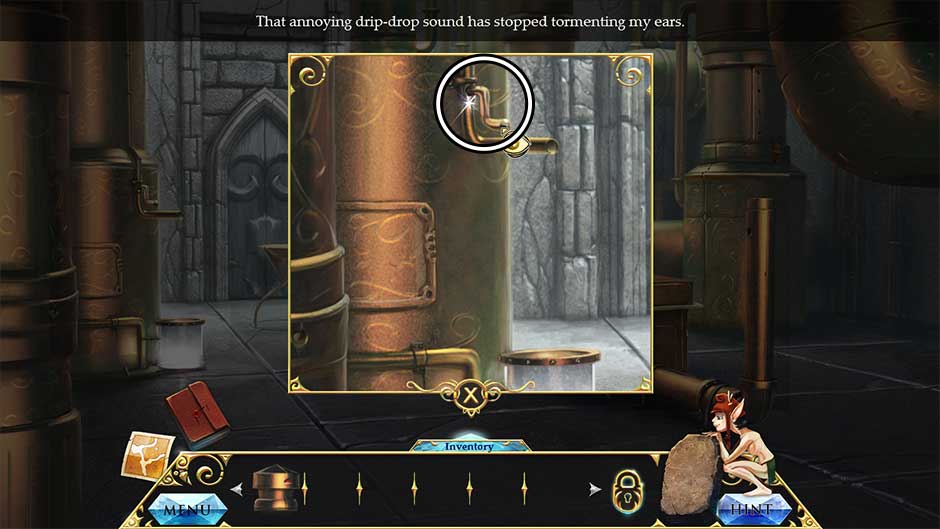
- Zoom in on the curved bottom of the pipe straight ahead.
- Click on the Steel Plate to add it to your inventory.
- Place the Whistle on the scale.
- Examine the base of the large mechanism on the right again.
- Use the Steel Plate to cover the square hole with the running gears.
- The door to the next room will open. Enter the Mage’s Study.
Mage’s Study
- Speak with the Mage.
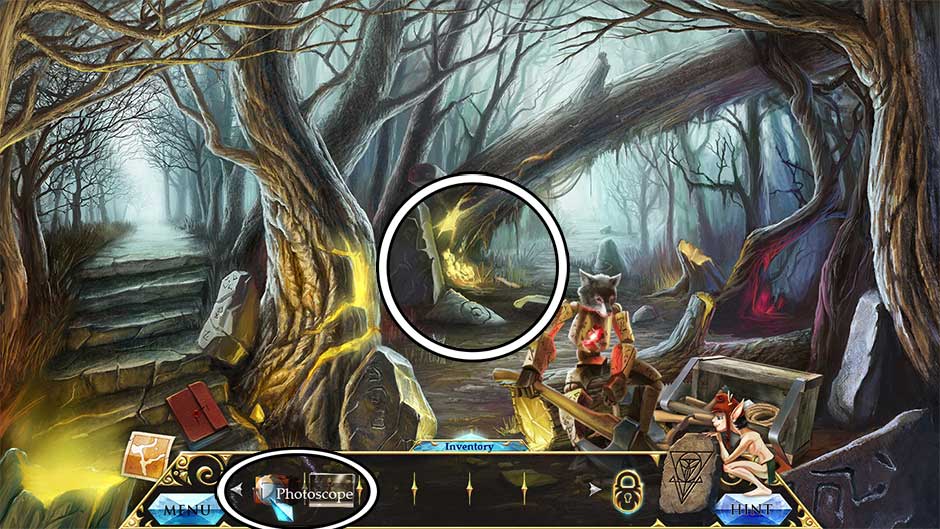
- Examine the desk on the lower right.
- Click on the Photoscope to add it to your inventory.
- A red marking will be revealed on the table. Use the Blank Rune to acquire the ‘Diminish’ Rune.

- Now it’s time to do some backtracking. Make your way back to the Mine.
Mine
- Take a closer look at the door on the right.
- Use the Photoscope on the hole to acquire the Photo of the Mine.
- Make your way to the Woodcutter.
Woodcutter
- Use the Photoscope on the area to the left of the lumberjack wolf to obtain the Photo of Woodcutters.
- Go to the Colonnade.
Colonnade
- Use the Photoscope here to acquire the Photo of Lilliputians.
- Return to the Mage’s Study.
Mage’s Study
- Show the Photo of the Mine, the Photo of Woodcutters, and the Photo of Lilliputians to the Mage.
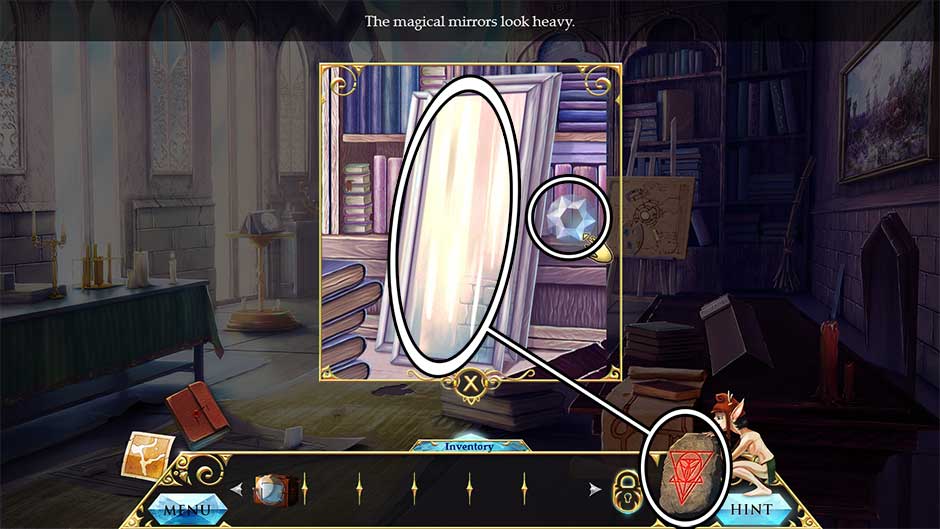
- The Mage will become inconsolable, but now you can take a closer look at the large mirror on the left.
- Take a closer look at the tall mirror to the left of the Mage.
- Click on the Lens to add it to your inventory.
- Use the ‘Diminish’ Rune on the mirror to trigger a minigame.
- Paint the lines of the rune, without going over them again. The puzzle solution is shown below.
- Upon completing the puzzle, click on the Reduced Mirror to add it to your inventory.
- Head to the Mountain Station.
Mountain Station
- Take a closer look at the pointed rock with the hole in it on the left.
- Place the Lens into the hole in the rock.
- Use the Blank Rune to acquire the ‘Increasing’ Rune seen through the lens.

- Go to the Lilliputian’s Village.
Lilliputian’s Village
- Take a closer look at the frame of the broken mirror on the right.
- Place the Reduced Mirror into the frame, then use the ‘Increasing’ Rune on it to trigger a puzzle.
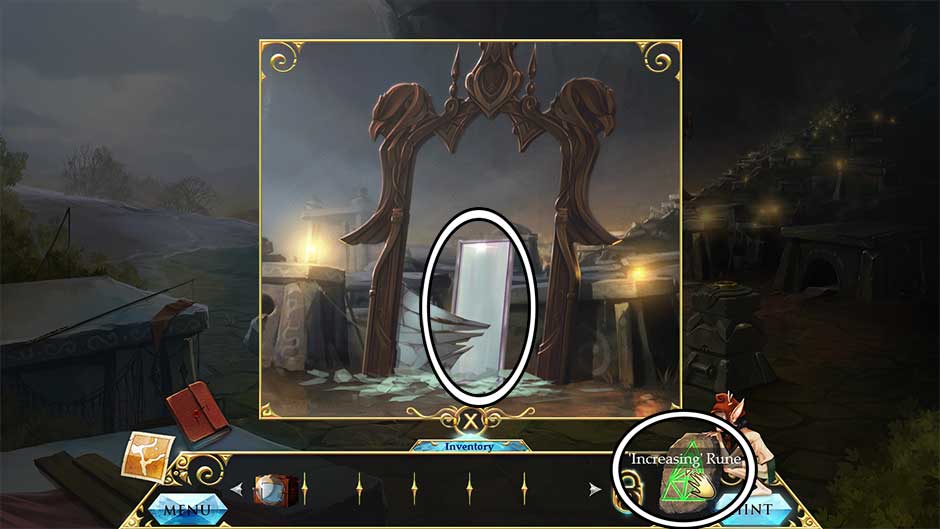
- Paint the lines of the rune, without going over them again. The puzzle solution is shown below.
- Upon completing the puzzle, the witch will appear in the mirror. Use the Photoscope on the scene unfolding to acquire the Photo of Daughter. Note: You may need to click the mirror scene and photo twice before the item is added to your inventory.
- Return to the Mage’s Study.
Mage’s Study
- Show the Photo of Daughter to the Mage. After speaking with him, he’ll reward you with the Mage’s Disc.
- Make your way to the Portal.
Portal
- Take a closer look at the portal up ahead.
- Insert the Mage’s Disc into the slot at the top of the portal.
- A new rune will appear in the portal. Use the Blank Rune on it to acquire the ‘Raise’ Rune.
- Upon exiting the portal close-up, you’ll be transported to a new location…
Chapter 6 – The Crow Witch
Dungeon
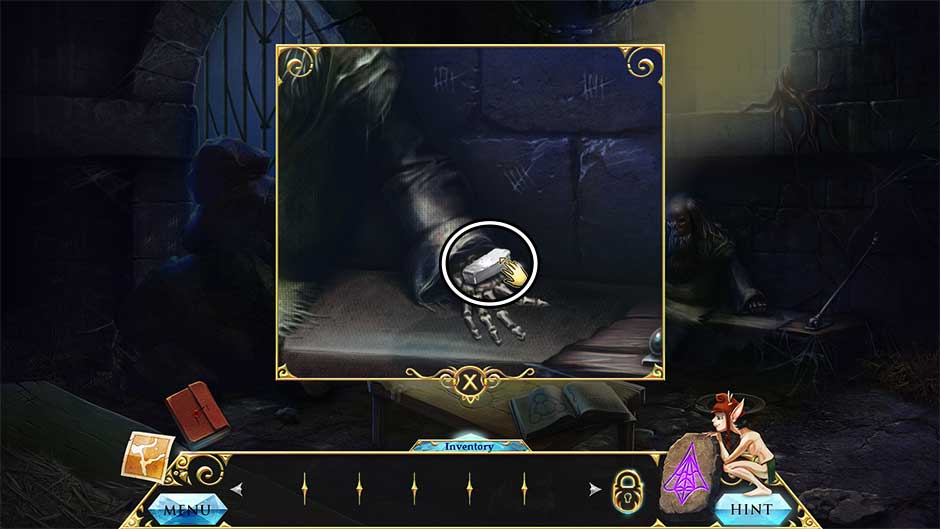
- Take a closer look at the bench where the prisoner’s skeleton is sitting.
- Click on each of the boney fingers to unfurl them, then click on the Chalk to add it to your inventory.
- Notice the pile of rubble blocking the doorway. Use the ‘Raise’ Rune on it to trigger a puzzle.
- Paint the lines of the rune, without going over them again. The puzzle solution is shown below.
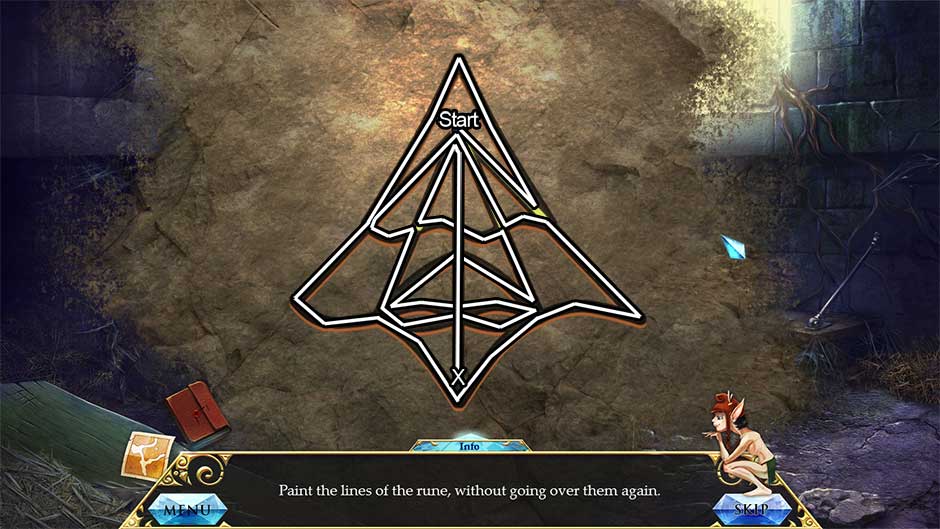
- Once you’ve completed the puzzle, the rubble will float. Collect the Page Parts 4/4 on the ground.
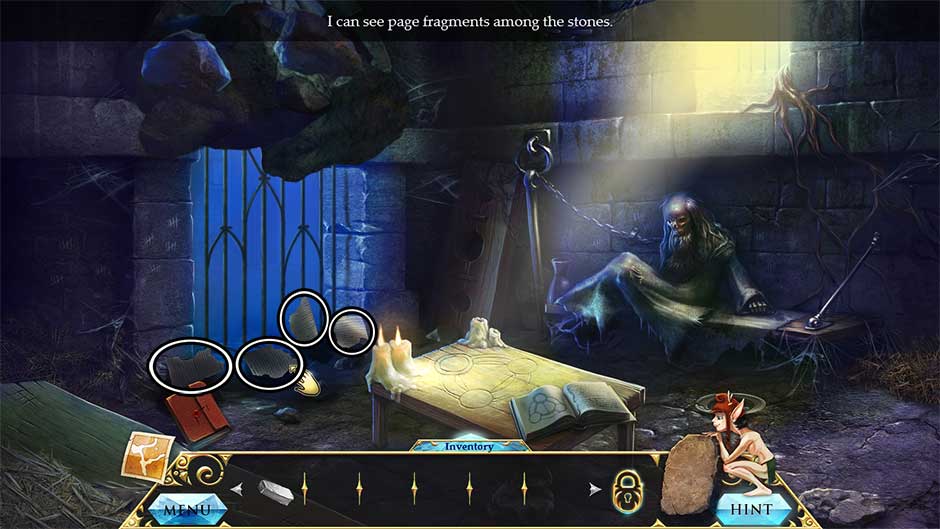
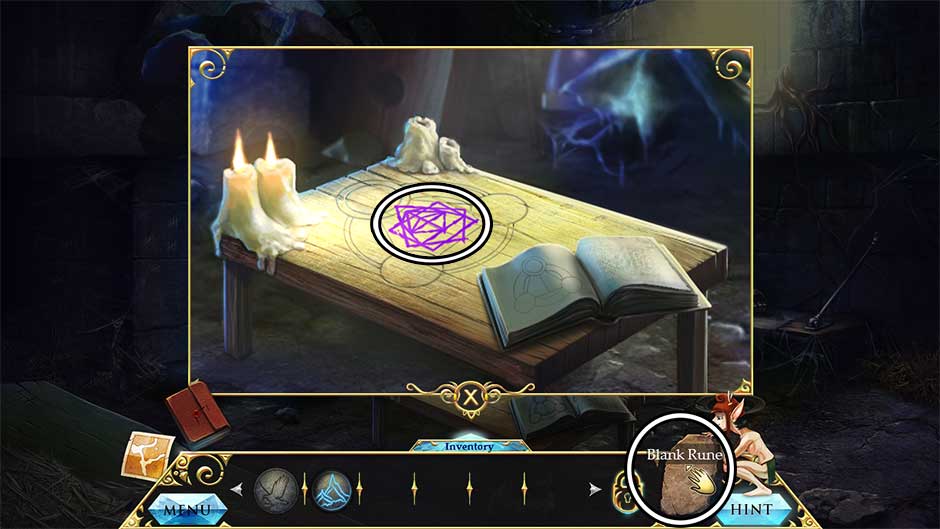
- Take a closer look at the book on the table.
- Insert the Page Parts 4/4 into the right side of the book to restore it.
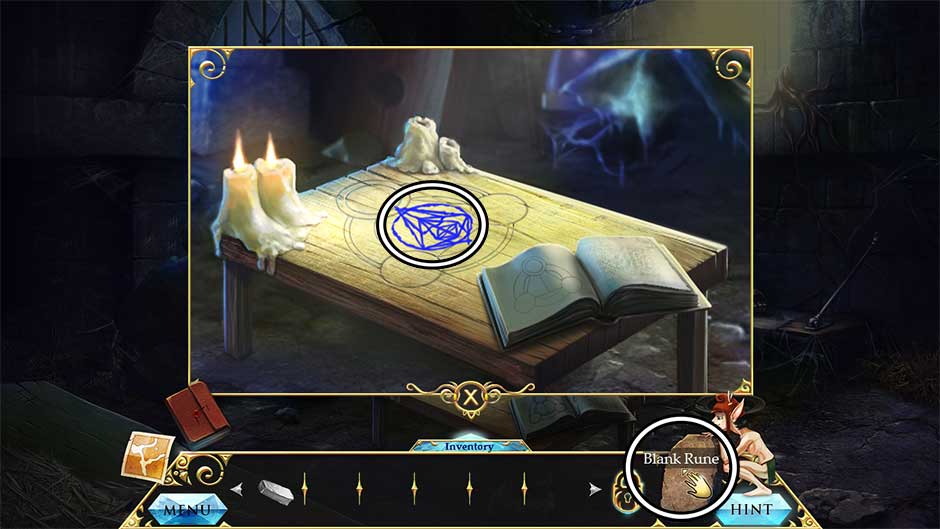
- Use the Chalk on the center of the marking on the table to draw a new rune. Use the Blank Rune on this marking to acquire the ‘Levitopen’ Rune.
- Use the ‘Levitopen’ Rune on the pile of rubble blocking the door to trigger a puzzle.
- Paint the lines of the rune, without going over them again. The puzzle solution is shown below.
- Upon completing the puzzle, the cell door will open. Proceed through to the next area.
Witch’s Collection
- Click on the hidden object area over the table on the left.
- Find the items listed at the bottom of the screen. Items listed in green require an additional action before they can be crossed off the list. Their locations are shown below. Upon completing the area, the Silk Handkerchief will be added to your inventory.
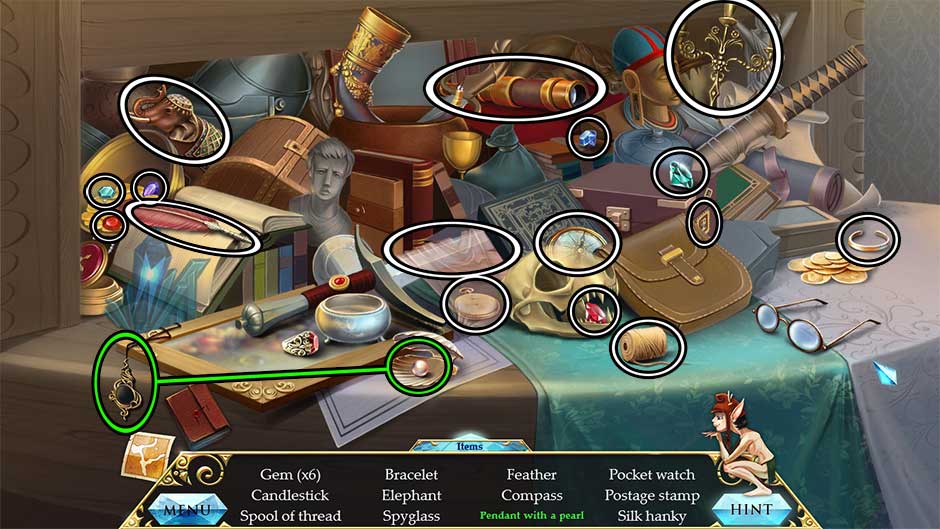
- Back in the main area, pick up the Bird Sign sitting on the table on the right, and the Mountain Sign sitting on the center pedestal.
- Go back to the Dungeon.
Dungeon
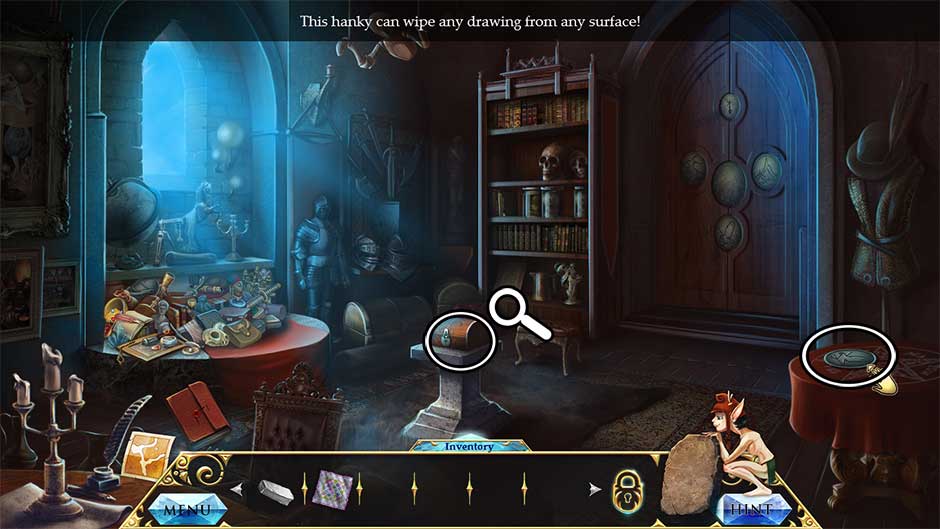
- Examine the table in the center of the cell.
- Use the Silk Handkerchief to wipe the table clean.
- Use the Chalk on the table to draw another symbol.
- Use the Blank Rune on the new symbol drawn on the table to acquire the ‘Transformation and Increase’ Rune.
- Return to the Witch’s Collection.
Witch’s Collection
- Take a closer look at the chest sitting on the center pedestal.
- Use the ‘Transformation and Increase’ Rune on the lock to trigger a puzzle.
- Paint the lines of the rune, without going over them again. The solution is shown below.
- Once you’ve completed the puzzle, open the chest. Collect the Tree Sign and the Door Key.
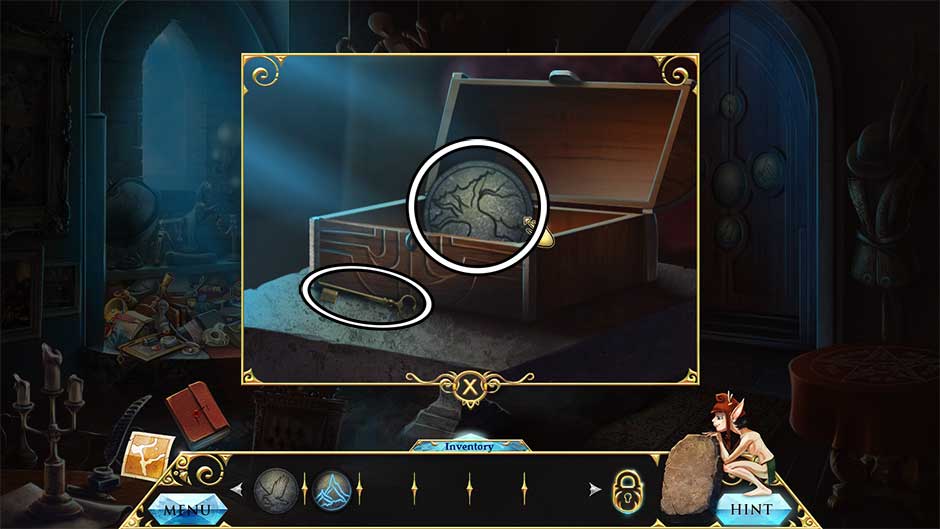
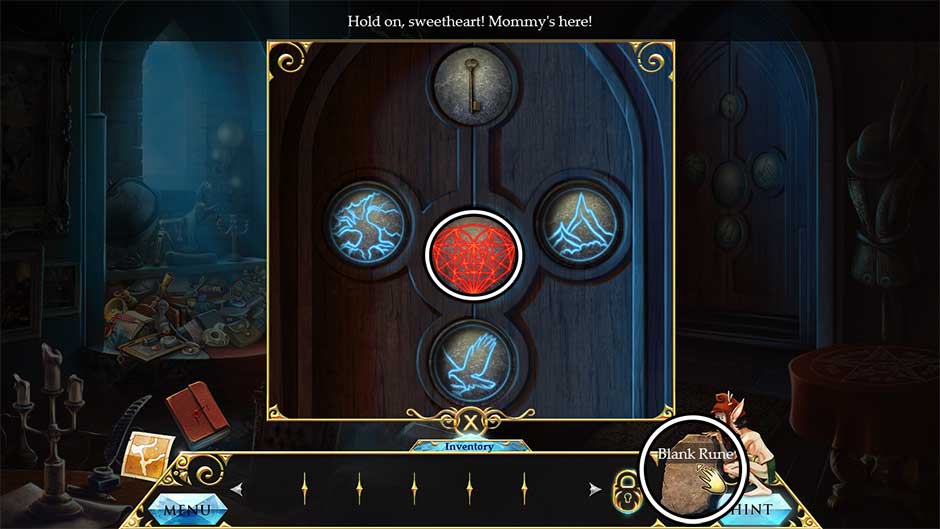
- Examine the door on the right.
- Place the Door Key, the Bird Sign, the Mountain Sign, and the Tree Sign into their respective slots. A new marking will appear in the center. Use the Blank Rune on it to acquire the ‘Love’ Rune.
- The door is open! Enter the Throne Room.
Throne Room
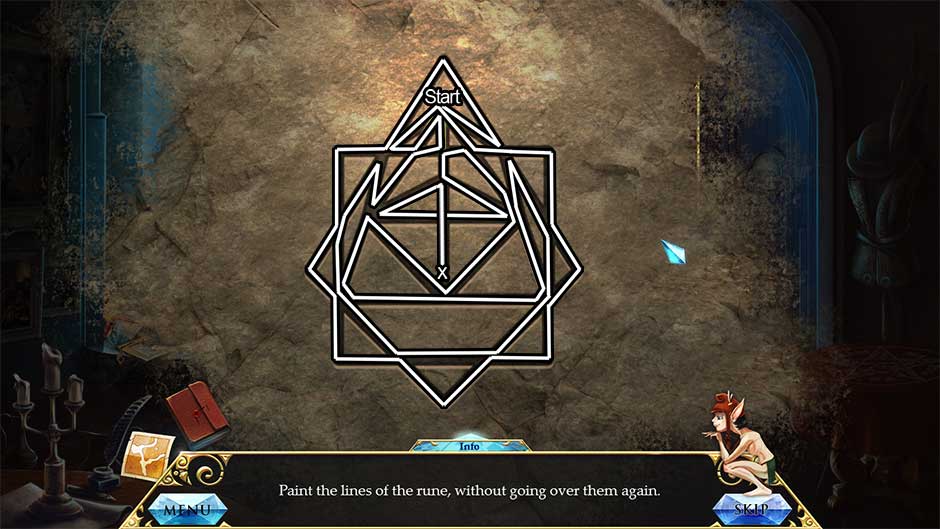
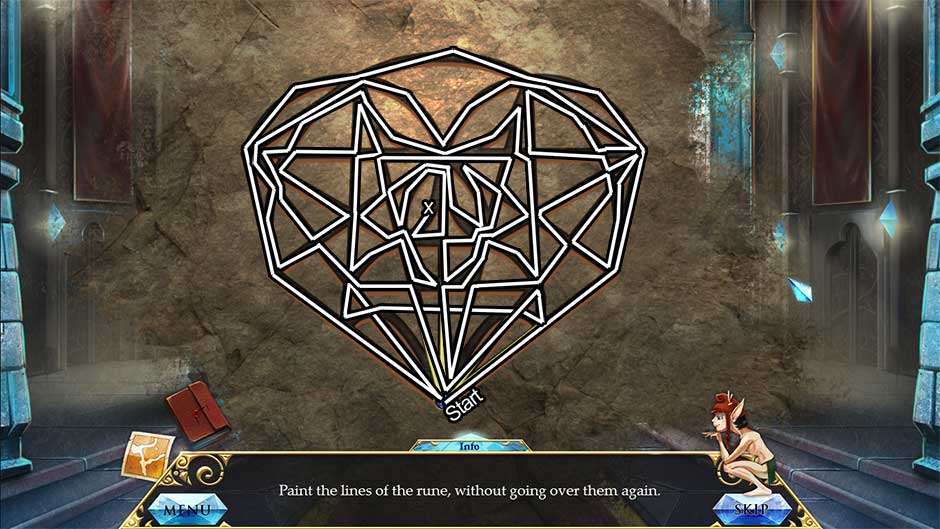
- Click on the area ahead to trigger the appearance of the witch. Use the ‘Love’ Rune on her to enter a puzzle.
- Paint the lines of the rune, without going over them again. The puzzle solution is shown below.
- Now watch the final cutscene.
Congratulations! You’ve completed Witchcraft – Pandora’s Box!

The Witchcraft – Pandora’s Box walkthrough is meant as a guide and does not contain cheats, hacks, or serials.


