Welcome to the Mortimer Beckett and the Book of Gold Official Walkthrough. Pragmatic introvert Mortimer and adventurous extrovert Kate are about to team up for an exciting hidden object adventure. But when Mortimer’s not finding solutions to problems, problems are finding him! This is the official guide and contains in-depth strategies, tips and tricks, mouse locations, and more! Select one of the topics from the Contents list below to get started.
Contents
General Tips & Tricks
Welcome to the tips and tricks section of the Mortimer Beckett and the Book of Gold walkthrough. This section covers all the basics: How to play, challenges and mice, as well as essential tips and tricks to help you on your journey.
How to Play
Mortimer Beckett and the Book of Gold is a hidden object game. The goal is to find the items or pieces of items necessary to progress. Sometimes you will encounter puzzles or minigames you will need to solve to continue. Use the scroll wheel on your mouse or the pinch gesture on your phone to zoom in and out of hidden object scenes.
Challenges
There are 18 challenges you can complete during the game: 3 for each chapter. Challenge types include:
- Silhouette Challenge – Find the items matching the silhouettes displayed.
- Mice Challenge – Find the number of mice specified in a limited amount of time.
- Jigsaw Challenge – Assemble the puzzle pieces to create a photo.
For more information on how to complete individual challenges, visit the Challenges section.
Mice Locations
Carl the mouse has returned in this game, but things are a little different this time around! A mouse is hidden in each of the game’s 60 story levels. Mice are transparent and will be difficult to find. As the hint button charges, the mouse will slowly come out of hiding. The further along the hint charge is, the more visible the mouse will be. After the hint has fully charged, the mouse will slowly slip back into hiding.
Mouse locations are random. A level’s mouse can turn up in any number of locations. For help on finding a level’s hidden mouse, visit the Mouse Locations section.
Additional Tips and Tricks
- Take a closer look! – Use the scroll wheel on your mouse, or the pinch gesture on your phone or tablet, to zoom into a scene for a closer view to help you find those well-hidden items.
- Find that mouse! – Keep a close eye out for mice in levels 1 – 60. Mice locations are random, and mice will appear, disappear, and reappear slowly throughout the level. Once you’ve found a mouse, you will not need to find it again.
- Time bright like a diamond! – Complete challenge levels quickly to earn diamonds, which can be used to purchase items for Mortimer’s private collection.
- No hints? Check! – Complete a story level without using a hint to earn a green checkmark. Complete every level without using hints to unlock a trophy!
- A moving gesture! – Sometimes you will be prompted to interact with an item. When this happens, a circle will appear. Either click, swipe, or rotate to complete the touch gesture.
- Let me take another selfie! – Complete jigsaw puzzle challenges to unlock photos for your photo album showing Kate and Mortimer’s adventures.
Mortimer Beckett and the Book of Gold Walkthrough
Welcome to the official walkthrough of Mortimer Beckett and the Book of Gold! This guide covers every part of the game – from level strategies and challenge how-to’s to mouse locations and trophies. Scroll up to the Contents section above to get started, or scroll down to dive right in!
Chapter 1 – The Woman, The Book, and The Janitor
Mortimer has found himself the heir of the Snuggford museum. What mysteries are yet to be discovered within the old piles and dusty shelves?
To view Mouse Locations for this chapter, visit the Mouse Locations section.
Tutorial
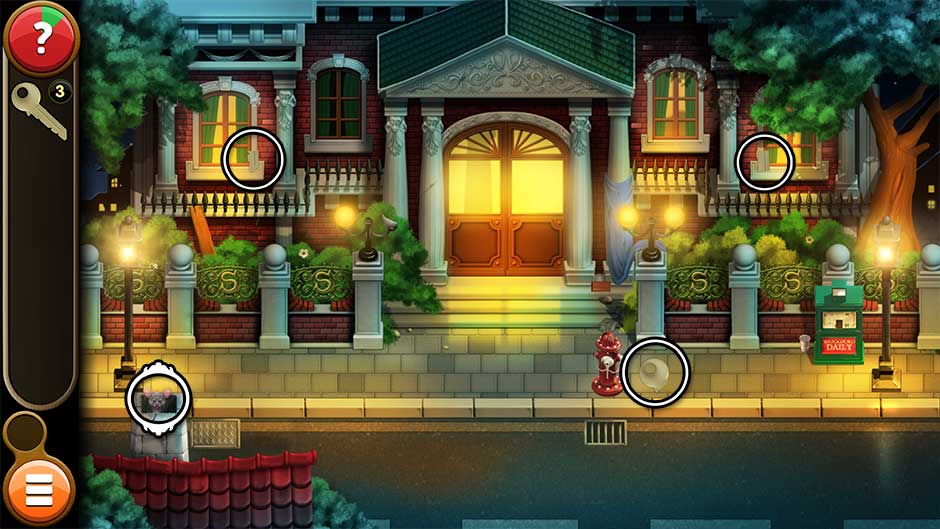
Find the pieces of the Key, then use it to open the door to the museum. The mouse will appear inside the chimney on the lower left. Their locations are shown below.
Level 1
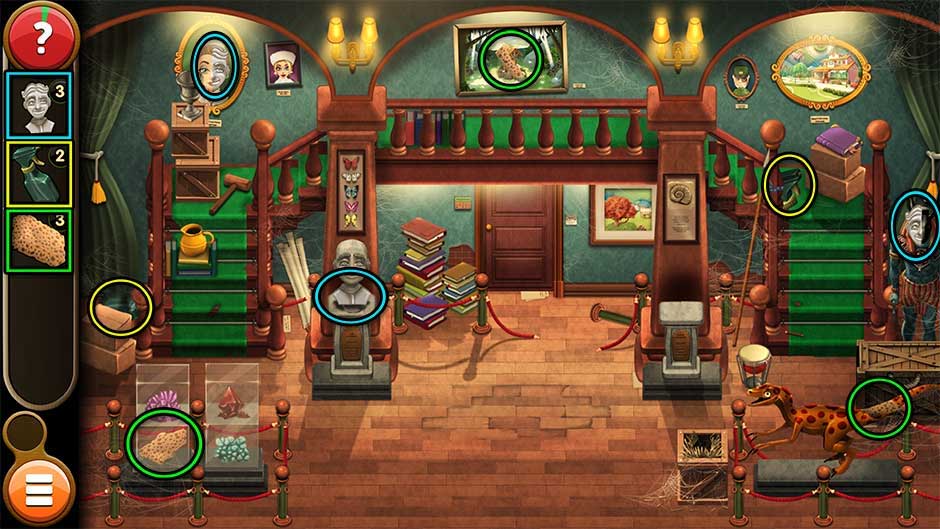
Find the pieces of the Bust, the Sponge, and the Cleaner Spray. Their locations are shown below.
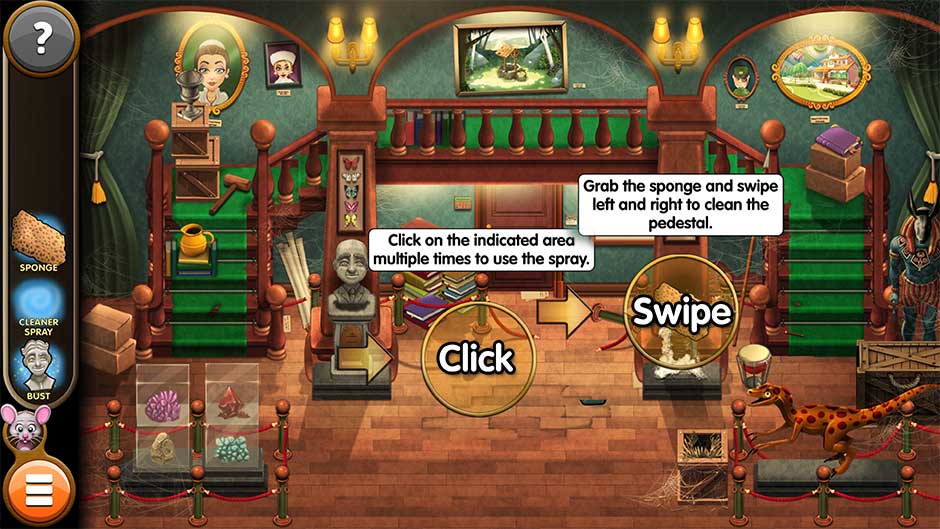
Now it’s time to clean the pedestal.
- Use the Cleaner Spray on the pedestal by clicking within the circle that appears multiple times to spray.
- Use the Sponge to lather the pedestal by holding and swiping back and forth within the circle that appears.
- Finally, place the Bust on the pedestal to finish the level.
Level 2
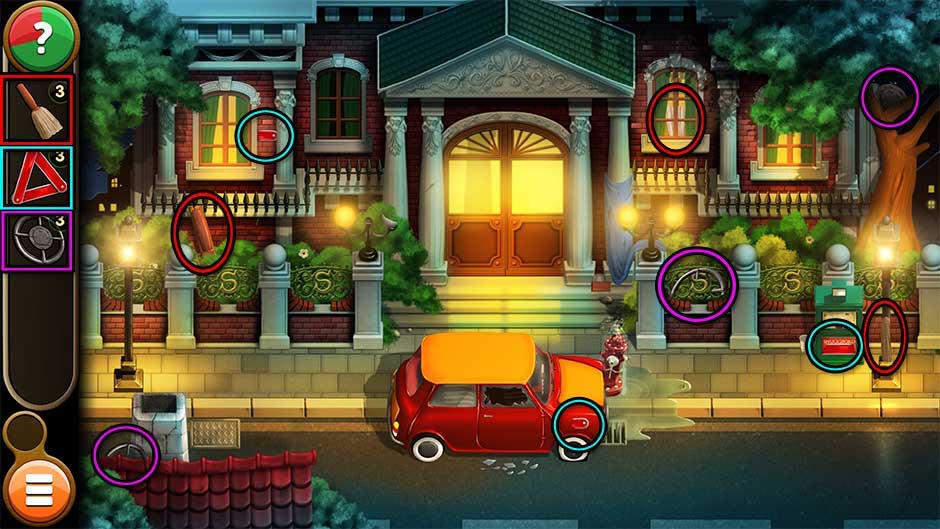
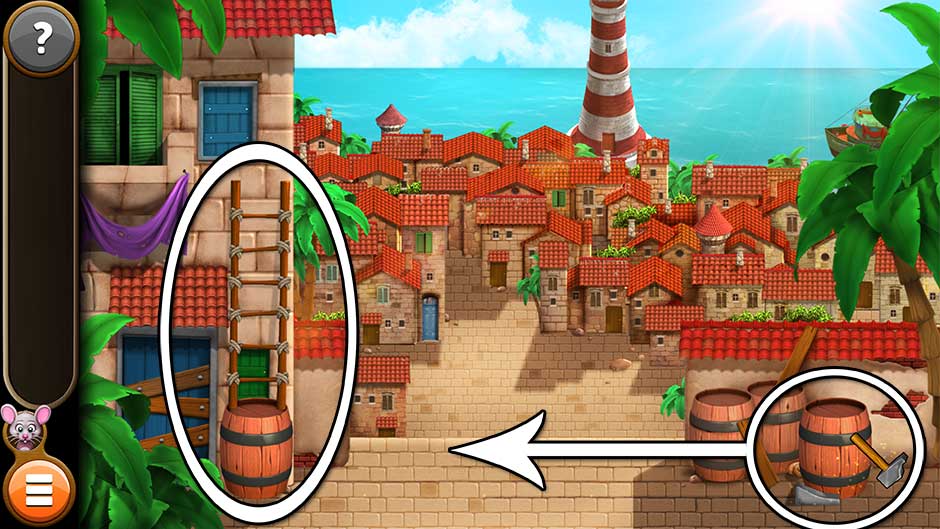
The door mechanism needs some missing components before it can open. Find the pieces of the Battery and the Blacklight. Their locations are shown below.
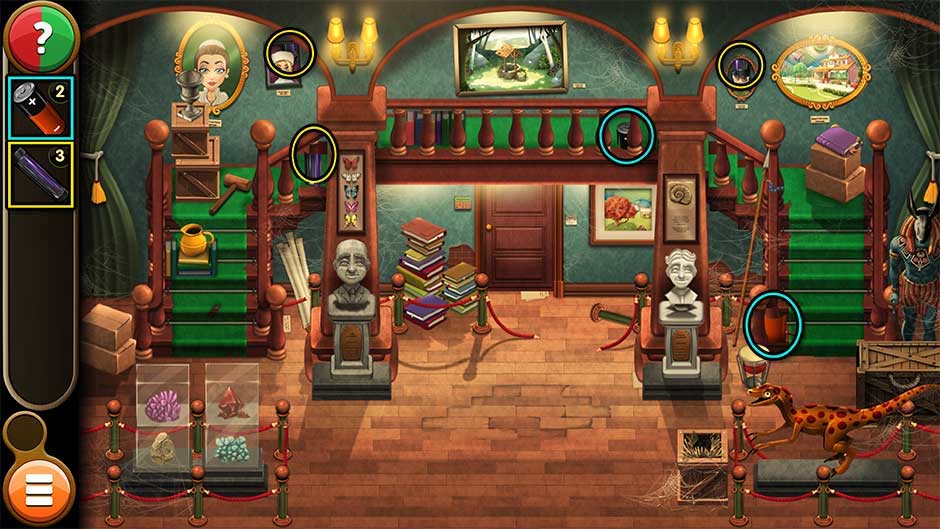
Once you’ve assembled both, the two will automatically combine in your inventory, creating the lit Blacklight. Use the Blacklight on the locations shown below to reveal hidden clues you’ll need to open the door.
- Painting I (woman): A spider has 8 legs & number 1
- Painting II (house): Number 7 & a triangle with 3 corners
- Painting III (tree): A lucky 4-leaf clover & number 0
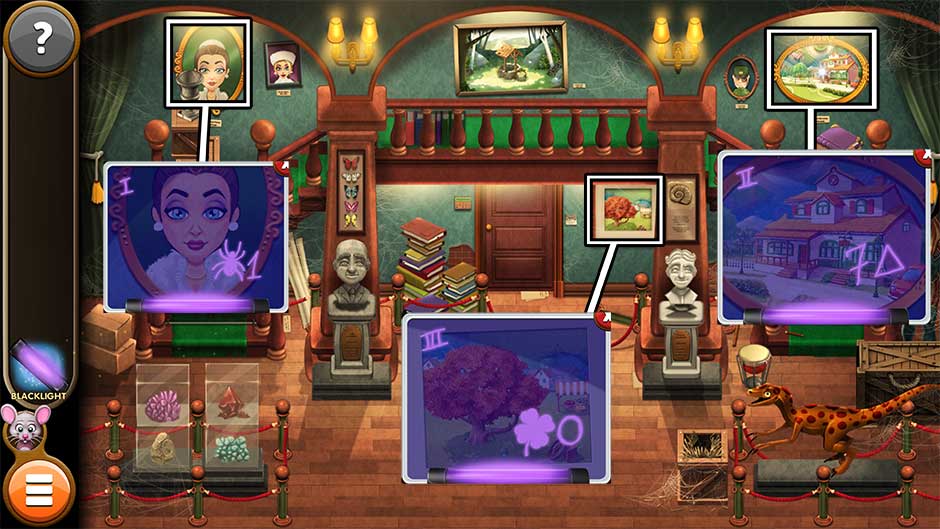
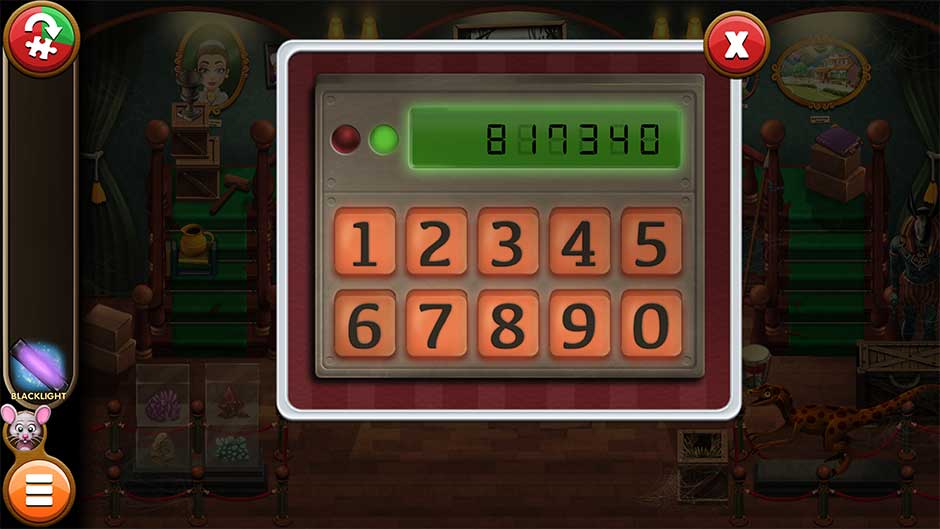
Click on the keypad to the left of the door to input the code. The code is 817340.
Level 3
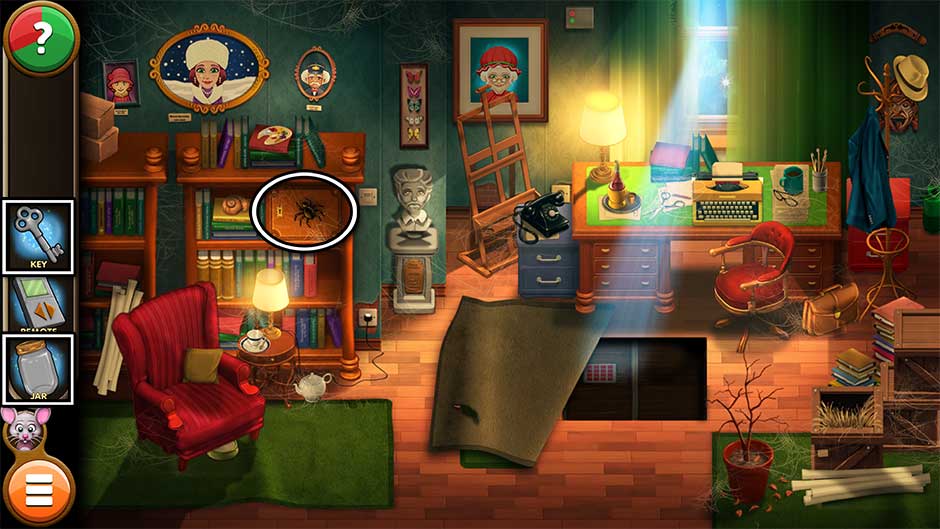
Locate the missing pieces of the Jar and the Remote. Their locations are shown below.
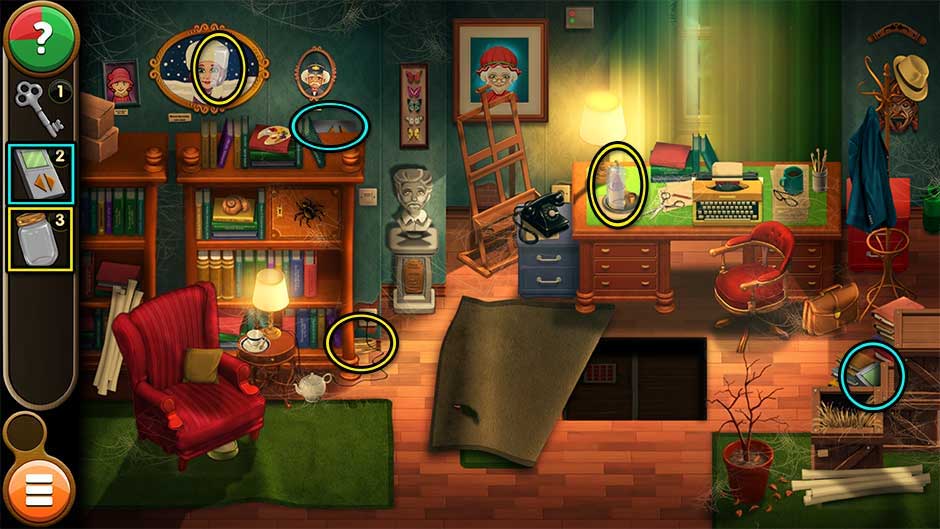
Use the Remote on the curtain behind the desk to open it, illuminating the hole in the floor. Take a closer look at the panel with the red buttons inside and click on the buttons shown below to reveal the location of the Key.
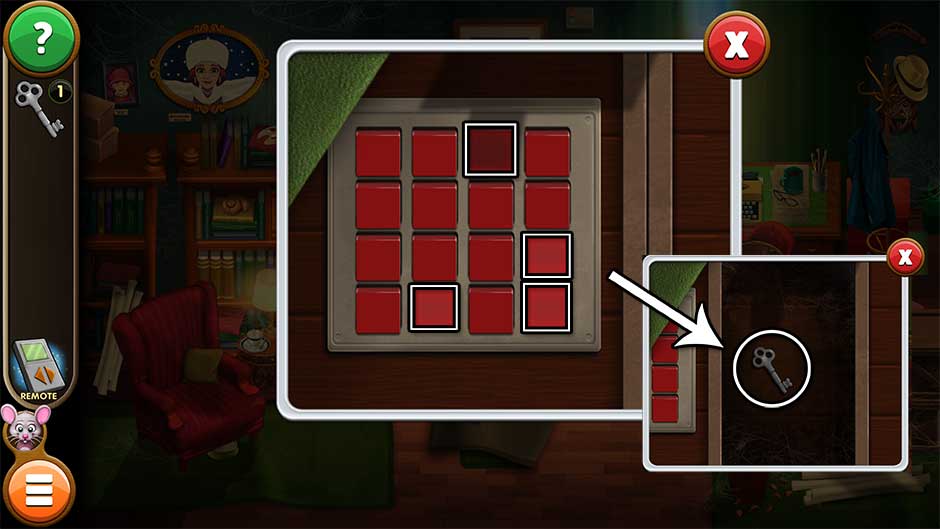
Use the Jar to capture the spider on the cupboard door, then use the Key to open it and complete the level.
Level 4
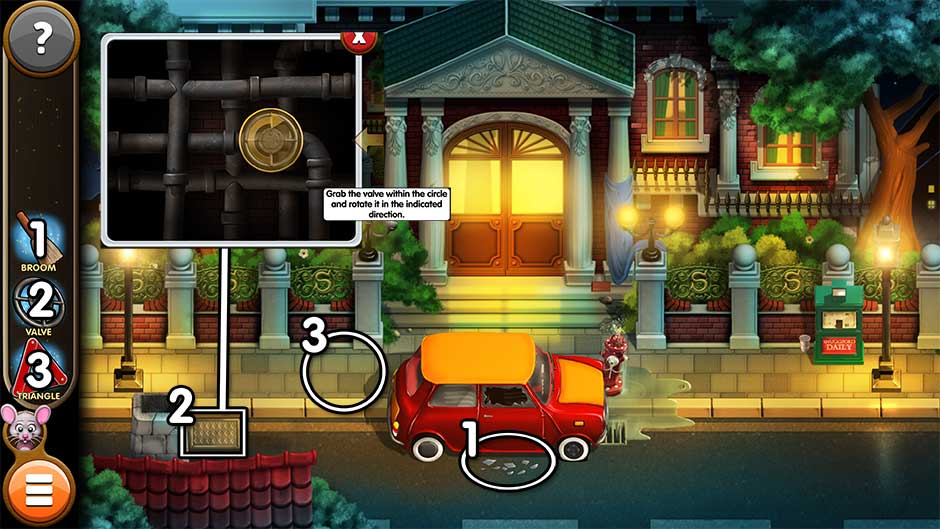
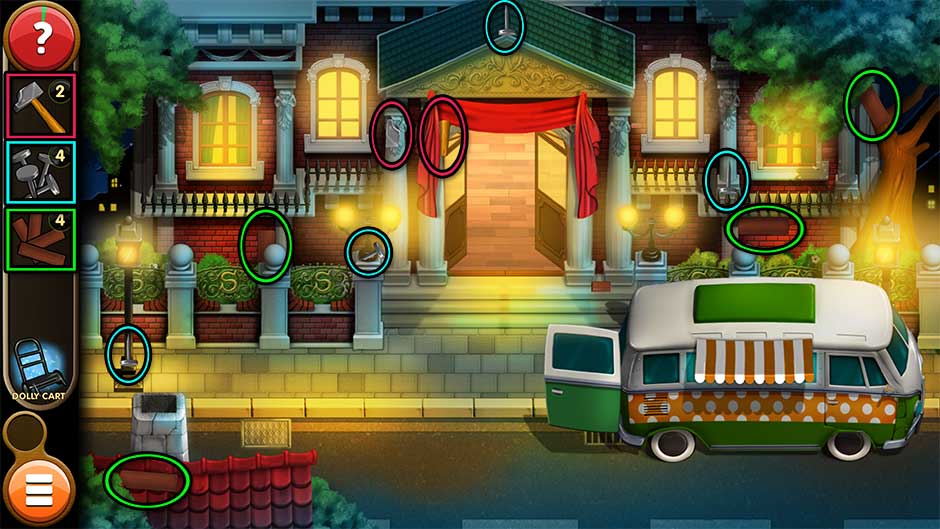
Locate the pieces of the Broom, the Valve, and the Triangle. Their locations are shown below.
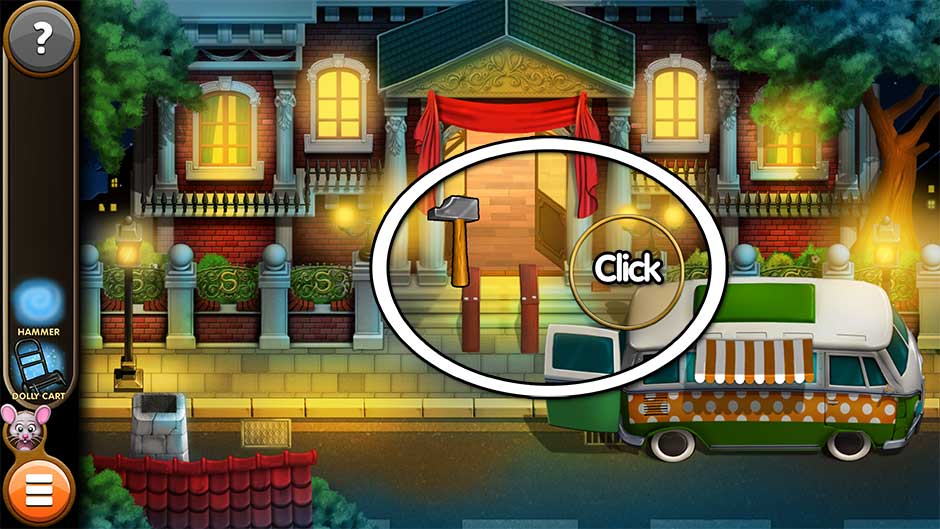
Now it’s time to clean up the crash scene.
- Use the Broom to clean up the broken glass below the car window.
- Zoom in on the metal panel in the street on the left. Use the Valve on the hole in the pipe. Click and hold, rotating clockwise within the circle that appears to turn the valve.
- Place the Triangle on the sidewalk behind the car.
Level 5
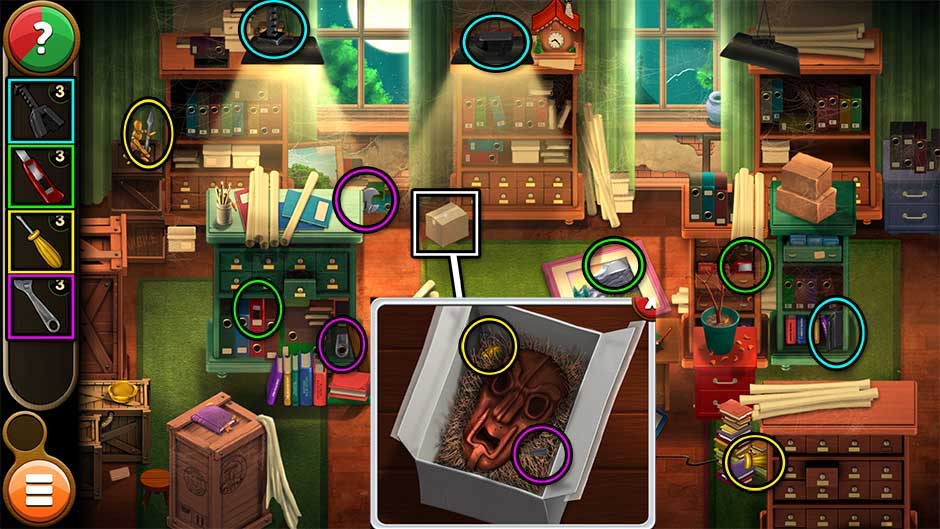
Find the pieces of the tools scattered around the room, including the Car Jack. Their locations are shown below. Once you find all the pieces of the Boxcutter (green), use it to cut open the box and recover the last piece of the Wrench and the Screwdriver inside.
Level 6
Find the missing pieces of the Rope and Ladder. Their locations are shown below. Once you’ve assembled the Rope, zoom in on the broken window toward the upper right. Use the Rope to retrieve the final piece of the Ladder outside.
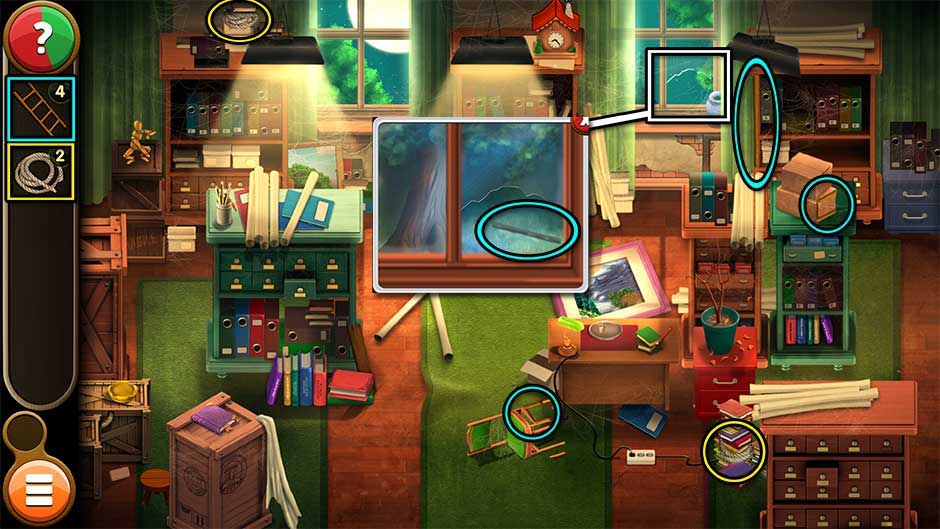
Level 7
Time to find some sheets! Find all six pieces of the Sheets you’ll need. Their locations are shown below.
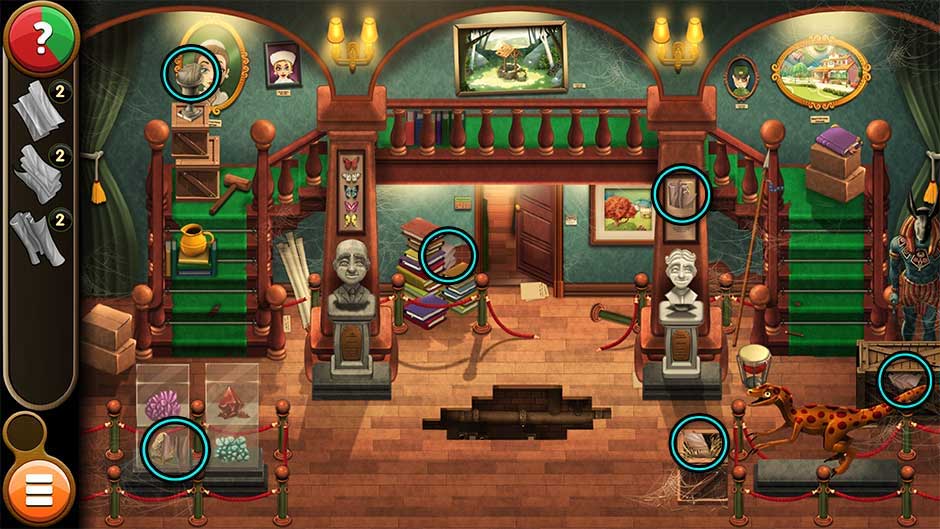
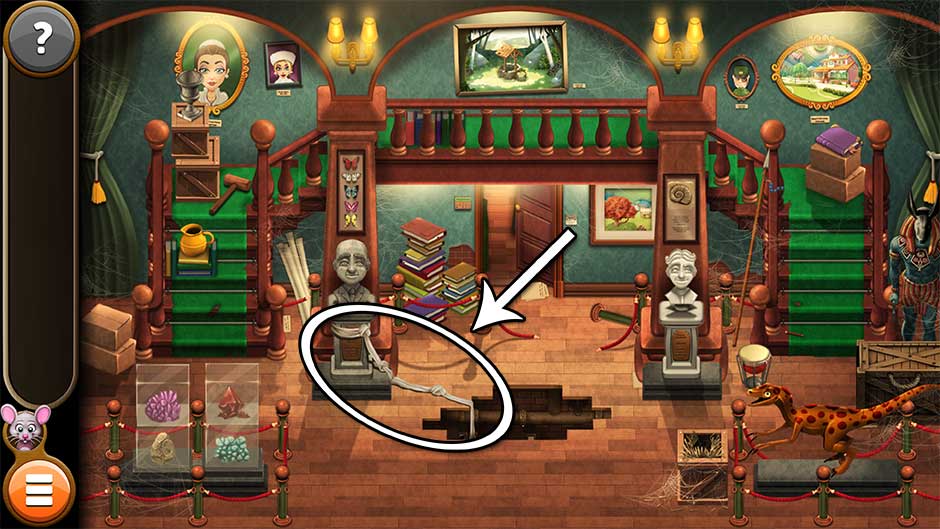
Once you’ve assembled all the Sheets, use them on the statue pedestal on the left, creating a makeshift rope dropping down into the hole in the floor.
Level 8
Find the pieces of the Stool, the Wrench, the Inflatable Boat, the Matches, and the Hose. Their locations are pictured below.

Now it’s time to plan your escape!
- Use the Matches on the boiler to light a fire.
- Place the Stool on top of the crate.
- Use the Wrench on the pipe. Click and hold, rotating counterclockwise within the circle that appears.
- Use the Hose on the air coming from the pipe.
- Use the Inflatable Boat on the end of the Hose on the floor.
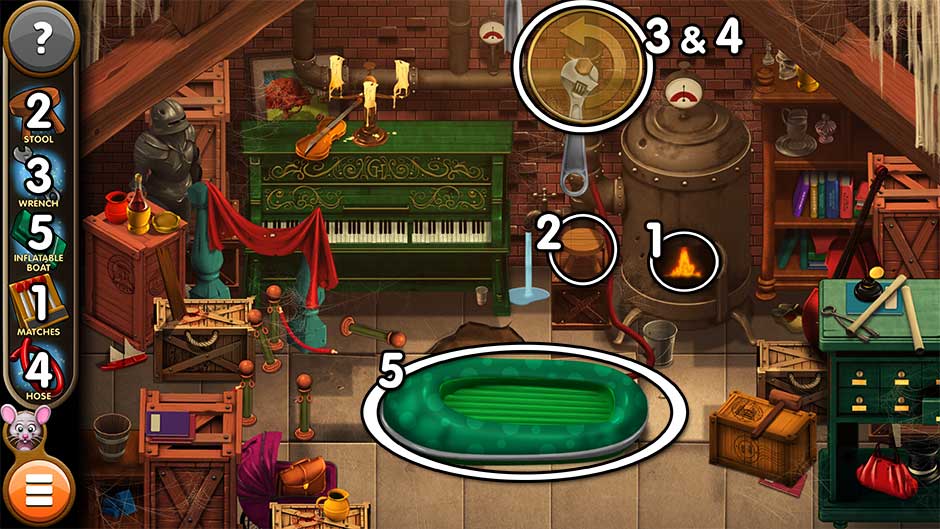
Now turn on the water faucet between the green piano and the boiler to flood the basement, creating your unconventional way out.
Level 9
It’s time to get this car back on the road. Click on the car’s trunk for a closer view, then click on the trunk to open it. Use the Screwdriver on the screws holding the wheel suspender down, then click on the Spare Wheel to add it to your inventory.
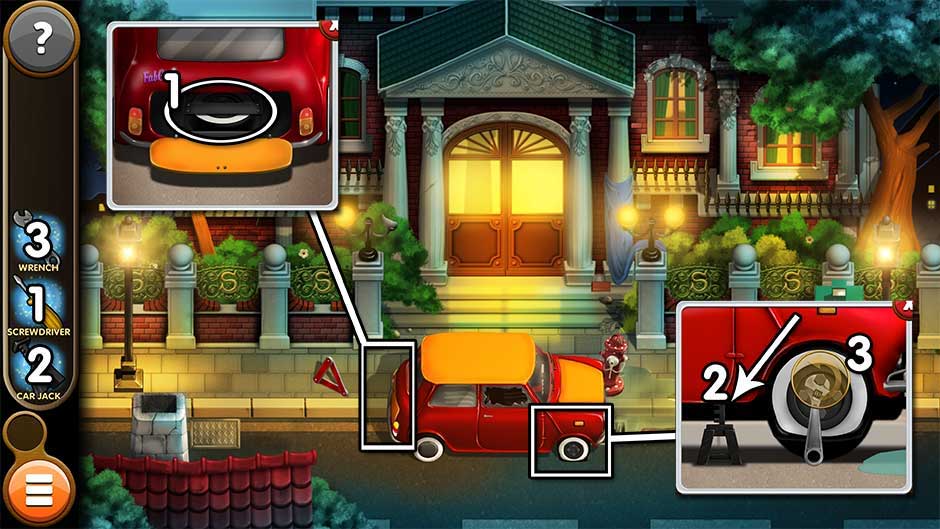
Next, take a closer look at the front wheel of the car. Place the Car Jack underneath the car to the left of the wheel well. Click on the jack until the car is lifted. Next, use the Wrench on the bolts holding the wheel on the car. Click and hold, rotating counterclockwise to unscrew the bolts. Once finished, click on the tire to remove it and put the Spare Wheel in its place. Use the Wrench on each of the bolts. Click and hold, rotating clockwise within the circle to tighten the bolts.
Level 10
Find the pieces of the Hammer, the Detector, and the Insulating Tape scattered throughout the room. Their locations are shown below.
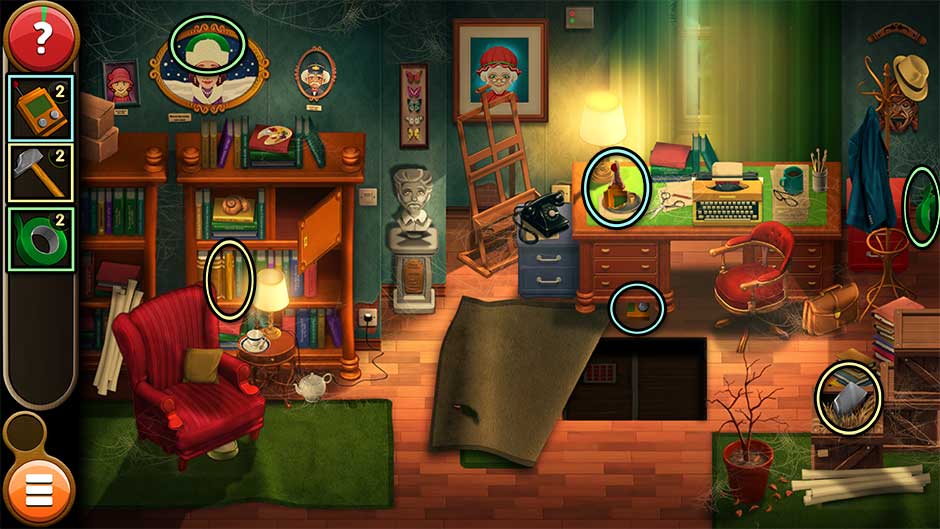
Once the objects have been assembled, use the Detector by clicking and holding, moving it to the painting of the grandmother at the top of the screen. Remove the painting from the wall, then use the Hammer on the wall to open a hole, revealing the wires. Use the Insulating Tape on the wires to repair them.
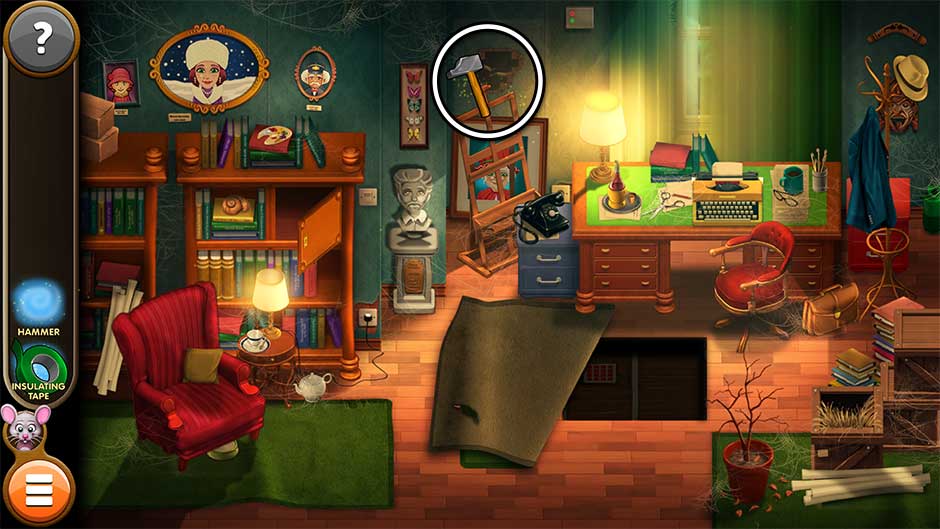
Now the phone on the blue file cabinet is working again. Click on the numbers to dial. The number to dial is 444-321.
Chapter 2 – Everyone Is Searching For Someone
Kate rushes to the airport after the Sheik, and Mortimer rushes after Kate.
To view Mouse Locations for this chapter, visit the Mouse Locations section.
Level 11
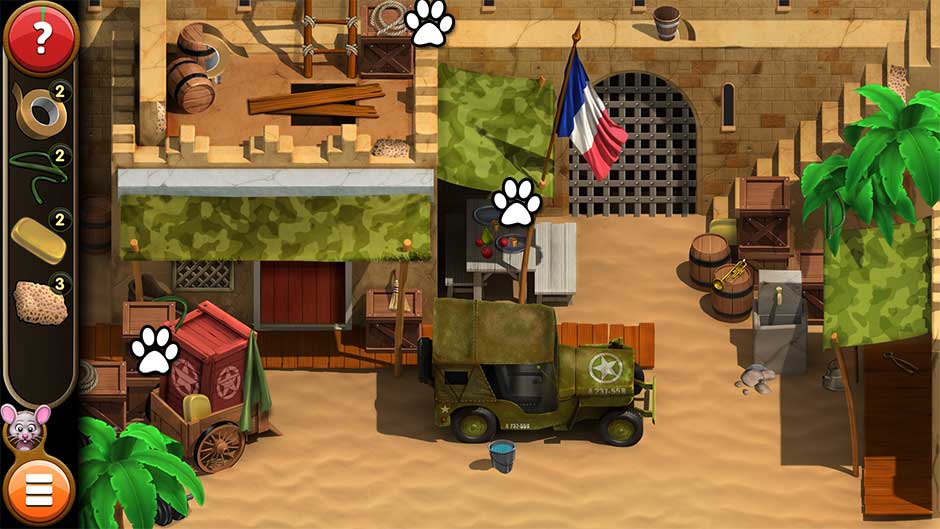
Find the pieces of the Shovel, the Crowbar, and the Pot. Their locations are shown below.
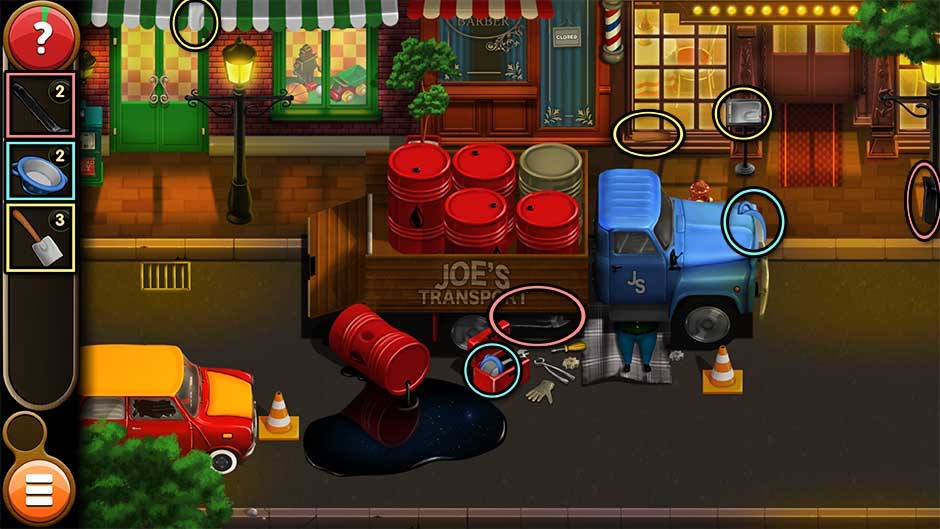
Once you’ve assembled all the tools, it’s time to clear the scene.
- Use the Crowbar on the tan-colored barrel to open it.
- Use the Pot on the contents of the barrel to fill it with sand.
- Use the Pot (filled with sand) on the oil spill in the road, then use the Shovel to remove the mess.
- Click on the traffic cone to move it out of the way.

Level 12
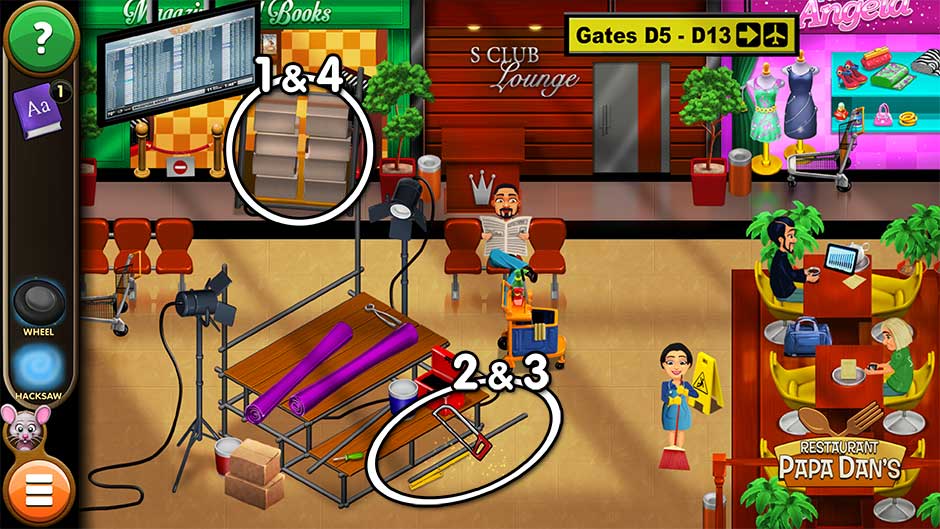
Find the missing pieces of the Wheel, the Folding Ruler, and the Hacksaw. Their locations are pictured below.
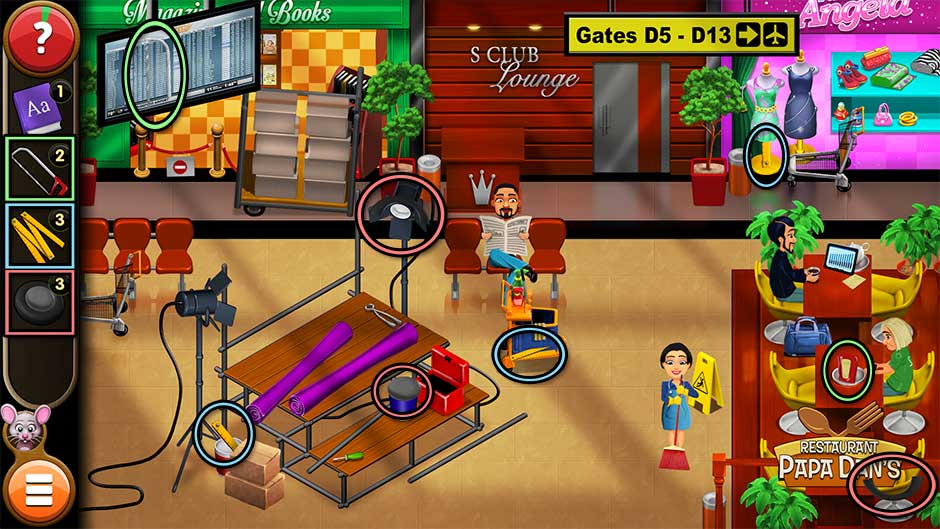
Now it’s time to find that dictionary.
- Use the Folding Ruler on the cart with the boxes on the upper left to gain the correct measurement.
- Use the adjusted Folding Ruler on the metal bar lying on the ground in front of the stage scaffolding.
- Use the Hacksaw on the measured bar to acquire the Axle.
- Use the Axel and the Wheel on the cart with the boxes to move it aside, revealing the location of the Dictionary.
Level 13
Find the pieces necessary to reassemble the GPS. The pieces of the GPS Antenna, the GPS Screen, and the GPS Cord are shown below.
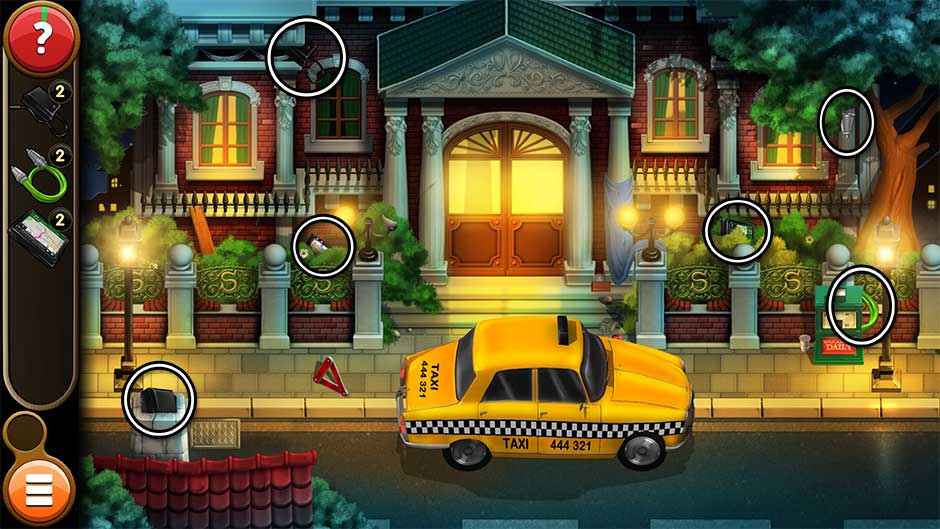
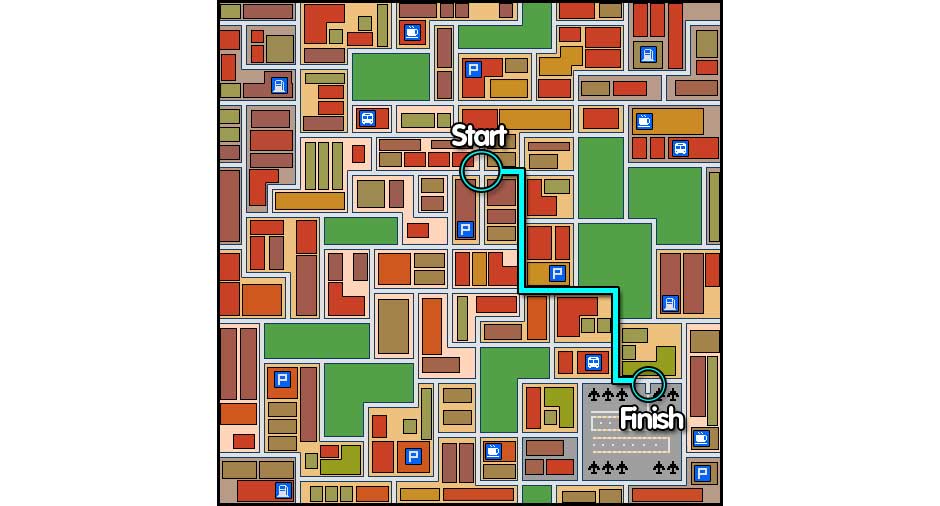
Once you’ve found all the components, they’ll automatically combine into the GPS in your inventory. Use the GPS on the cab to trigger a minigame.
Navigate your way to the airport by choosing to turn left, go straight, or turn right. A blue arrow will point you toward your end goal. To get to the airport, use the following directions: Forward, Right, Forward, Forward, Left, Forward, Forward, Right, Forward, Forward, Left, Right.
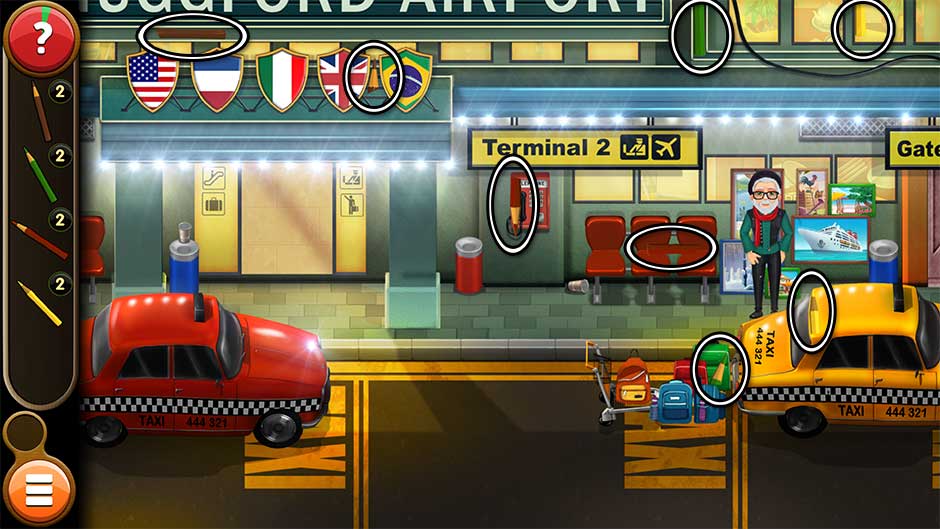
Level 14
The artist has misplaced his supplies. Find the colored Pencils he needs to create the artwork Mortimer has requested. Their locations are shown below.
Once all the Pencils have been found, they’ll become a set. Give them to the artist to trigger a minigame.
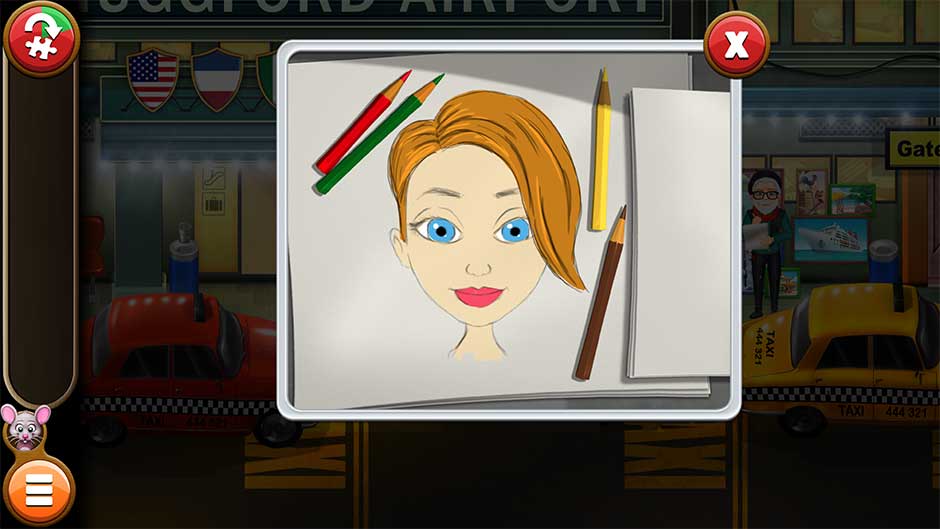
Choose from the options presented on the right to direct the artist and show him what Kate looks like.
- Choose the pointed chin (middle option)
- Choose the long bang flip (bottom option)
- Choose the blonde hair (top option)
- Choose the blue eyes (bottom option)
The completed portrait is shown below:
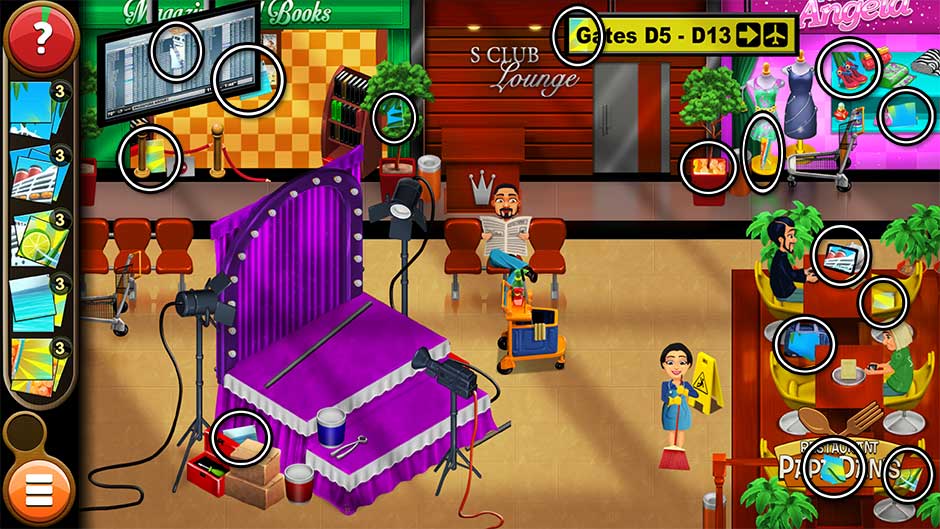
Level 15
Locate all the missing Tiles. Their locations are pictured below.
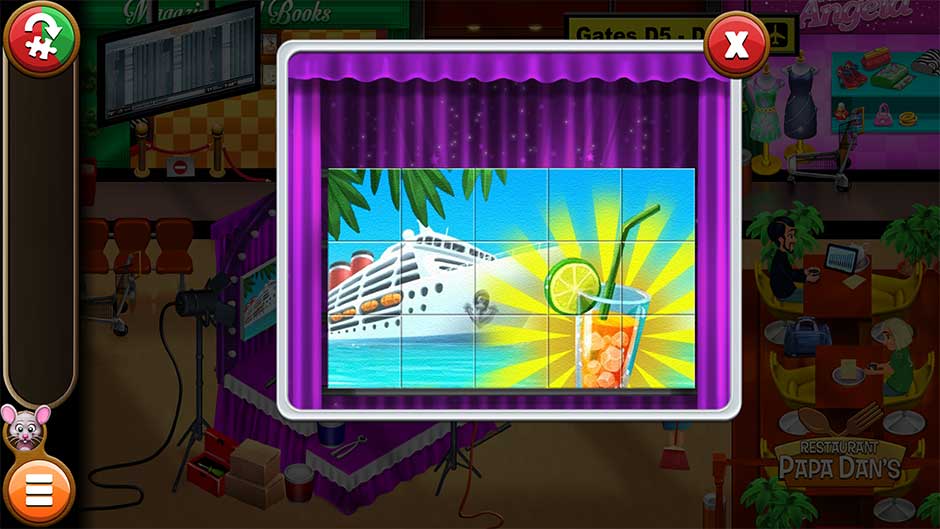
Once you’ve found all the tiles, take a closer look at the purple stage curtain. Use the Tiles on the shelves to trigger a puzzle.
Assemble the picture by placing tiles in the correct place on the shelves. The puzzle solution is pictured below.
Level 16
Find all the missing components of Kate’s purse: the Perfume, the Keys, the Lipstick, the Face Powder, and the Phone. The locations of all the various pieces are pictured below.

Level 17
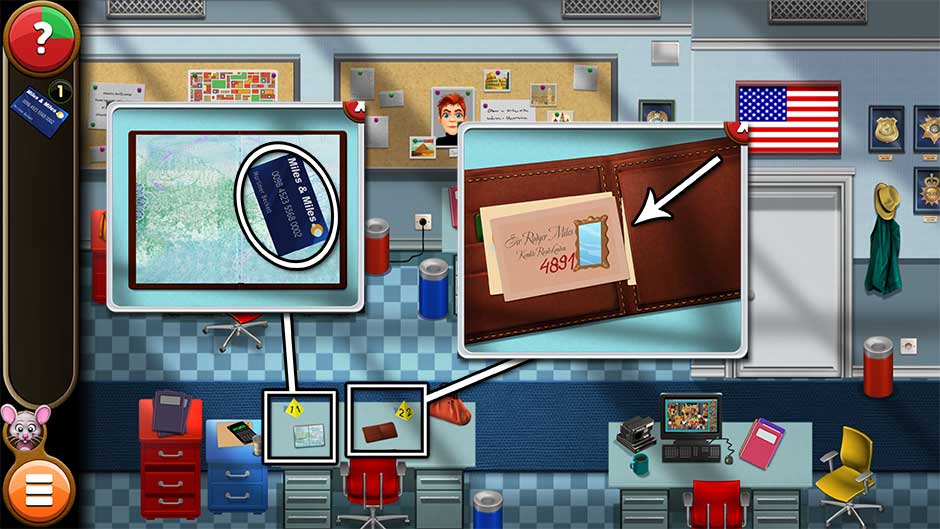
Find the missing pieces of the Passport and the Wallet. Their locations are shown below.
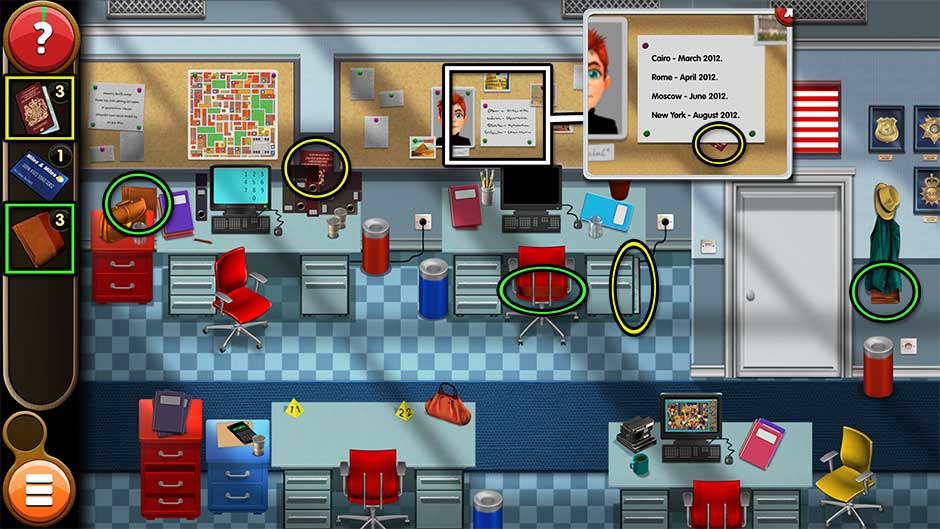
Once you assemble the Passport and Wallet, place them both on the empty desk on the lower left. Open the Passport and flip through the pages to find the Travel Card. Open the Wallet and remove cards from the slot on the right until you find one for Sir Roger Miles with the number “4891” written on it.
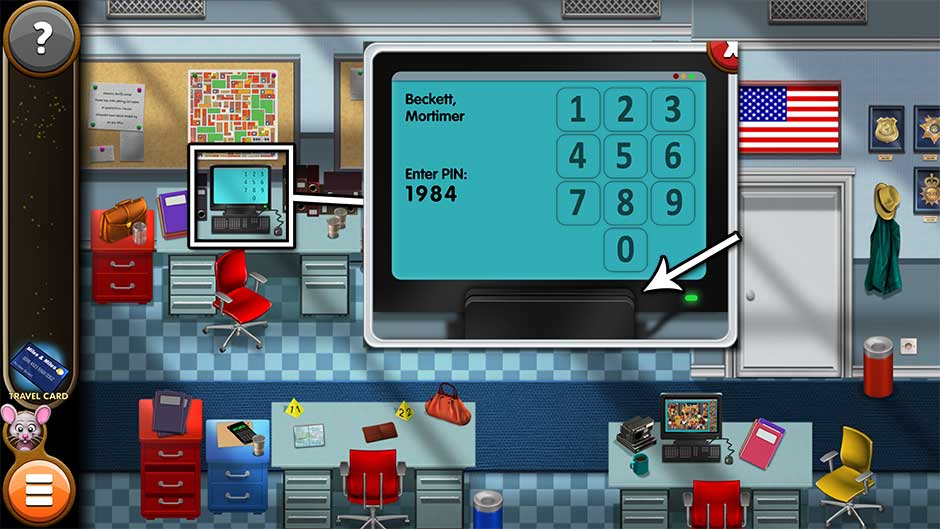
Take a closer look at the computer monitor with the blue screen toward the upper left. Slide the Travel Card through the card reader at the bottom of the window, then input the PIN “1984” – the code written in the wallet, mirrored.
Level 18
Find the missing pieces of the colored Tokens. Their locations are shown below.
Level 19
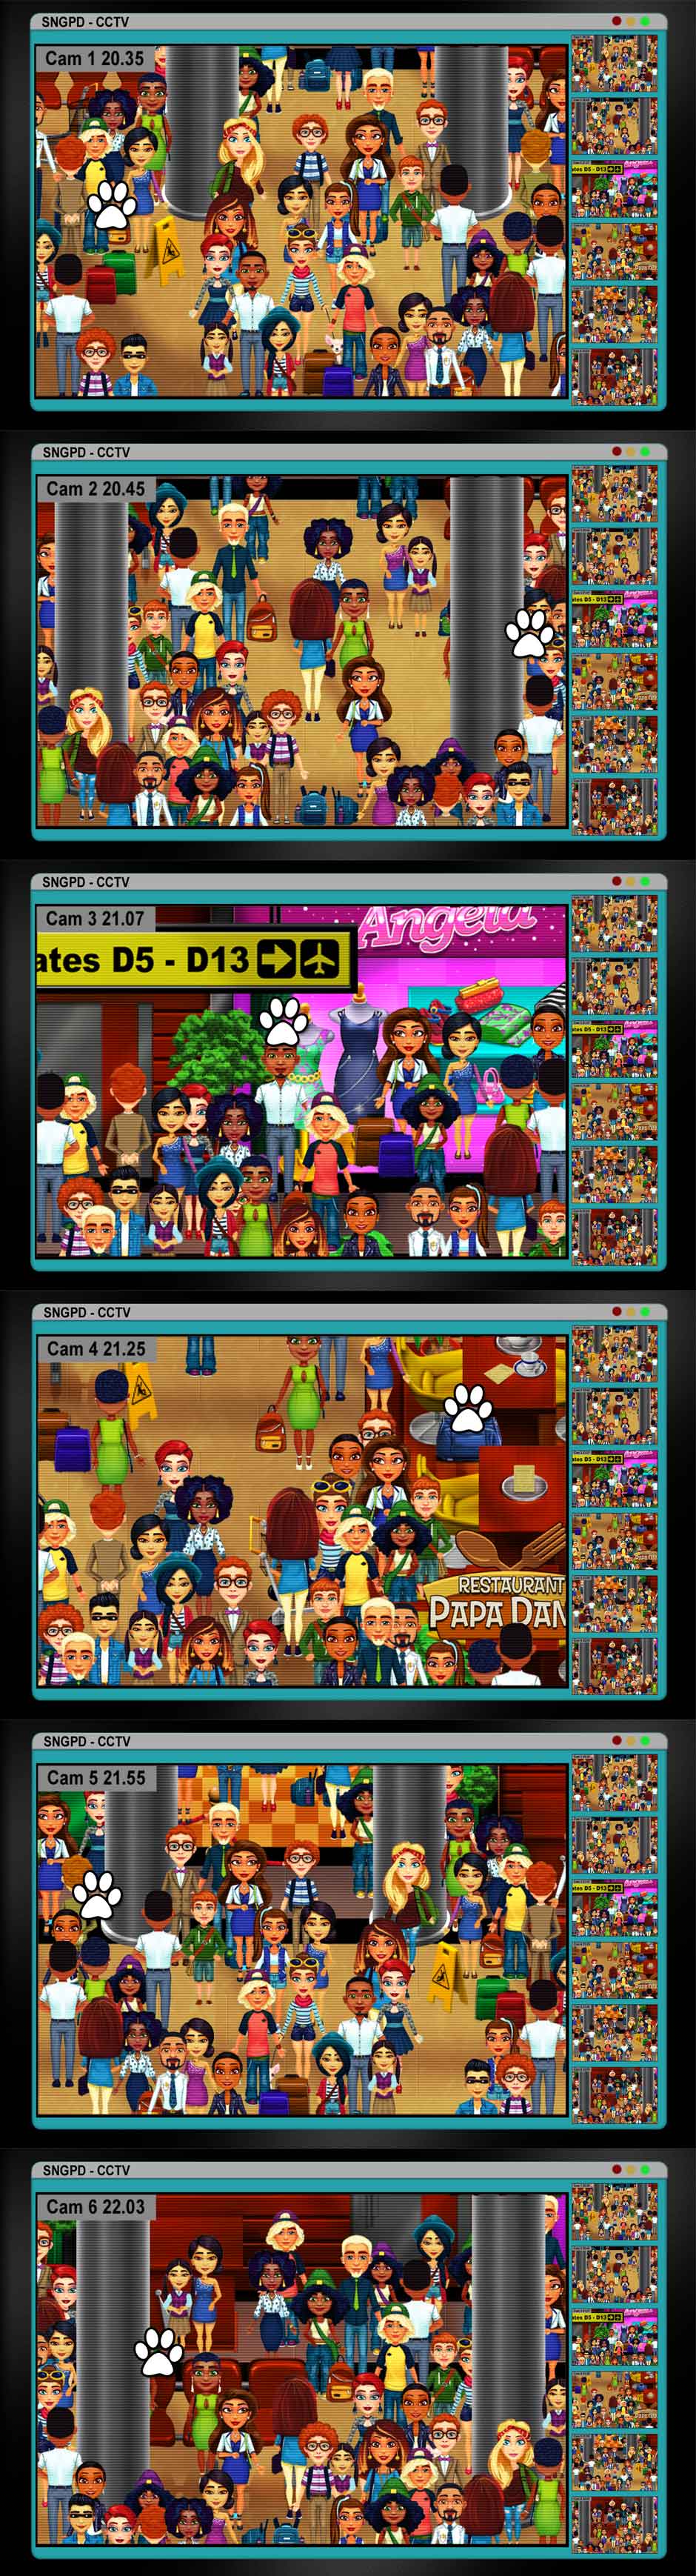
Find the woman Kate attempts to describe to the officer on the security footage. She’s blonde with red glasses and green eyes. Select a camera from the tiles on the right to view it. The woman’s location is randomized, but the possible locations she may appear are all shown below.

Level 20
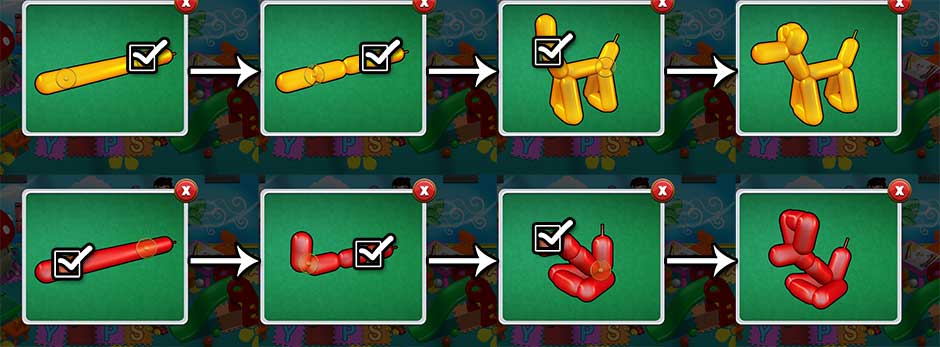
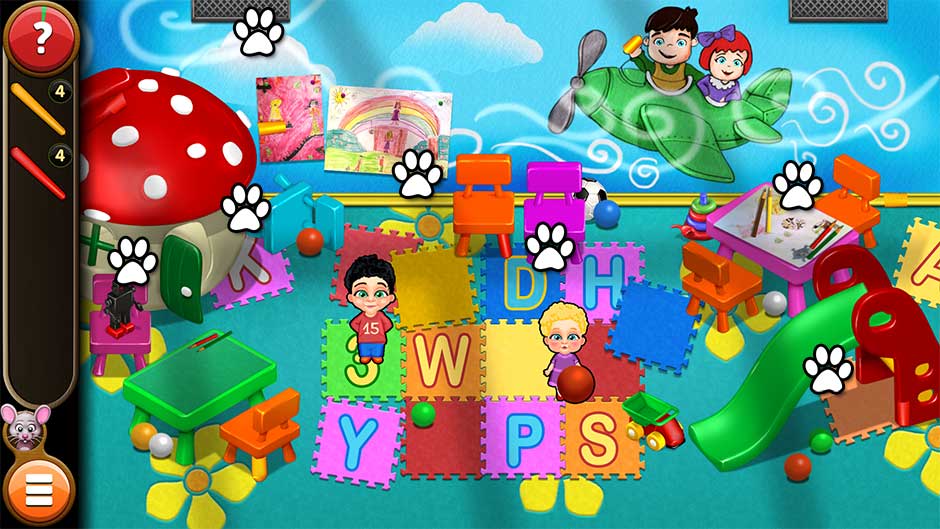
Locate the pieces of the red and yellow Balloons. Their locations are shown below.
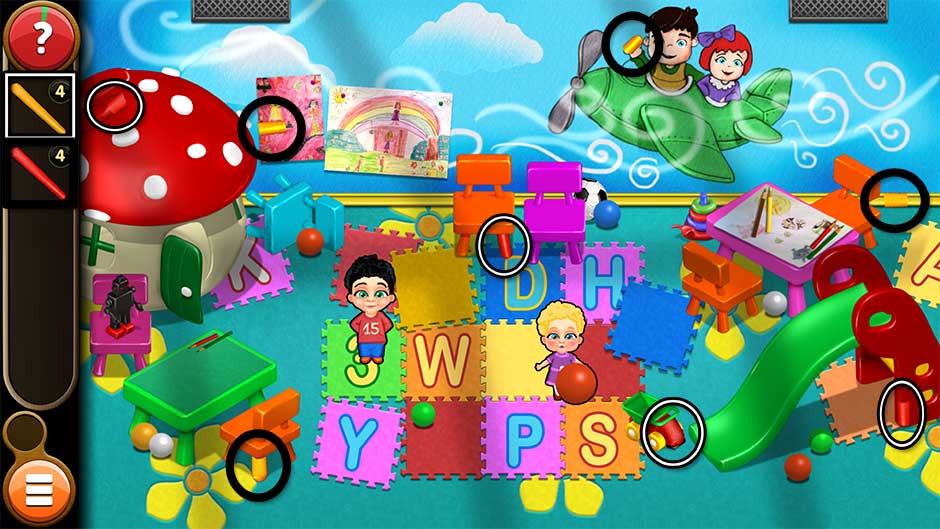
Once you’ve found the Balloons, it’s time to make some balloon animals for the kids! Drag each Balloon from your inventory onto the green table on the left to trigger a puzzle.
Click on one of the circles designated on the balloon to fold it and create a balloon animal. The solutions are as follows:
- Yellow: Right, Right, Left
- Red: Left, Right, Left
Chapter 3 – The Trail We Blaze
The unlikely pair find themselves in South America. What sort of jungle fever and perils await?
To view Mouse Locations for this chapter, visit the Mouse Locations section.
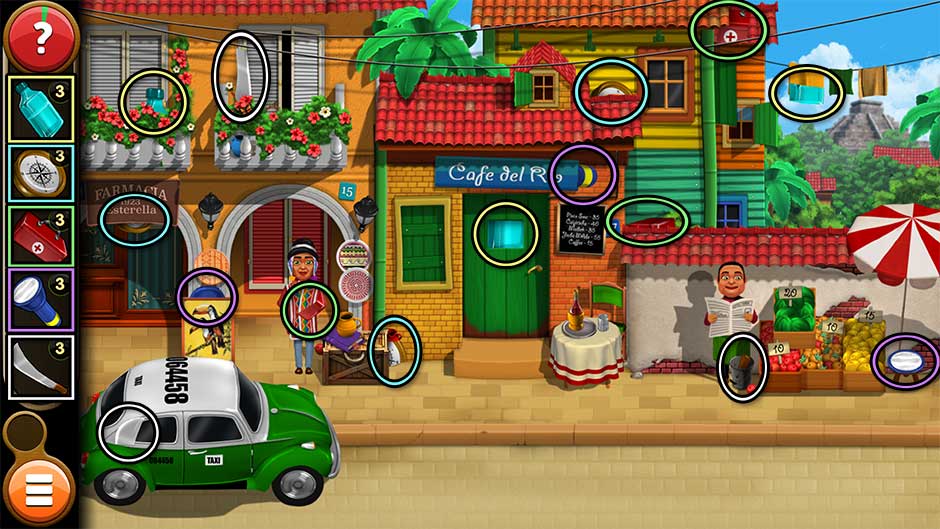
Level 21
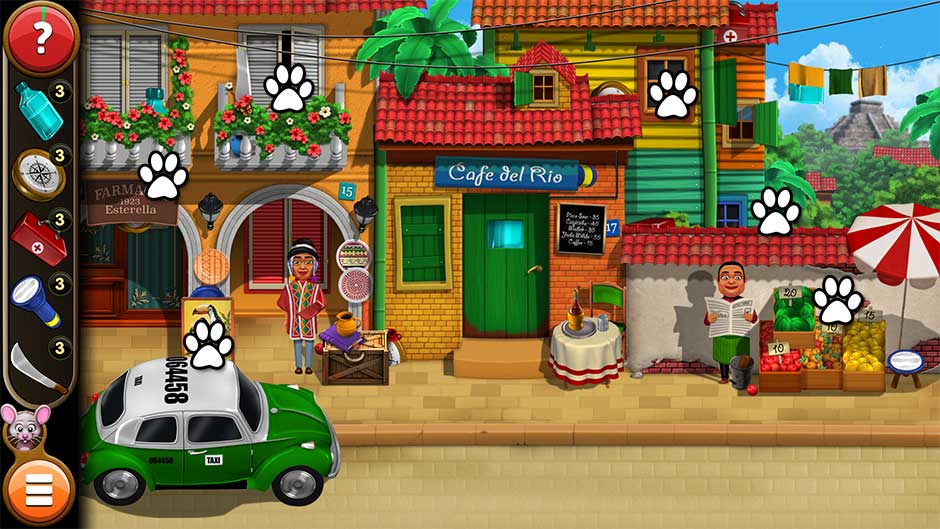
Before you set off into the jungle, it’s important to have the right supplies. Find the components necessary to assemble the Machete, the Bottle, the First Aid Kit, the Flashlight, and the Compass. Their locations are shown below.
Level 22
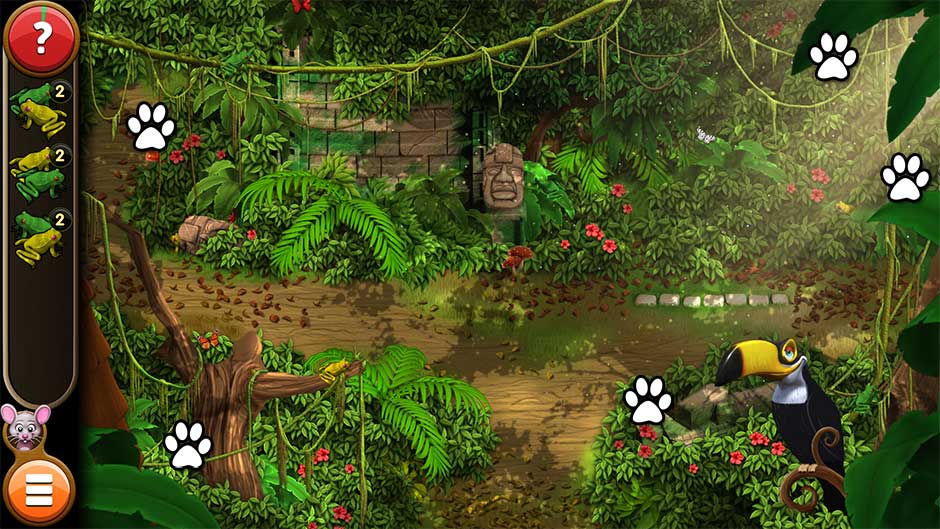
Find the pairs of Frogs scattered around the jungle. Their locations are shown below.
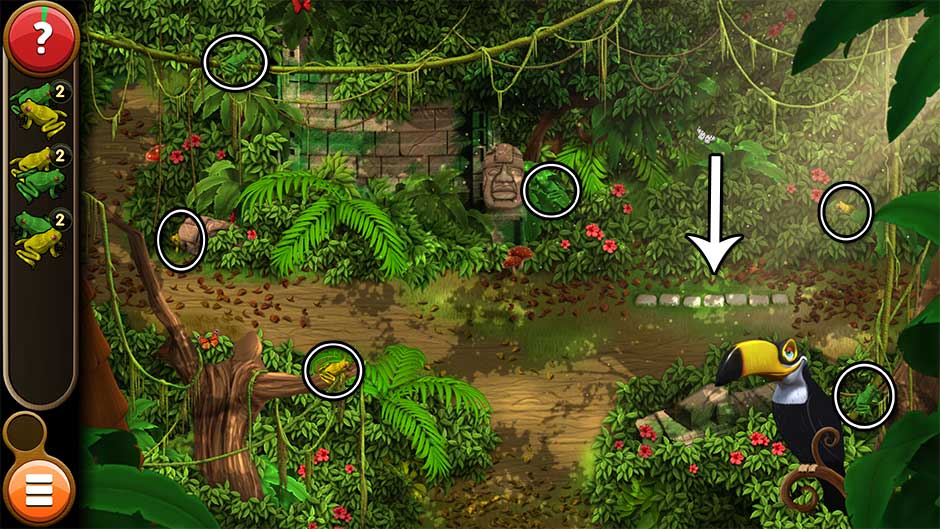
Once you’ve found all the Frogs, place each pair onto the stones the arrow points to in the screenshot above. This will trigger a puzzle upon closer inspection.
Move all the green frogs to the right, and all the yellow frogs to the left. Click on a frog to have it leapfrog over the frog in front of it and into the empty space. Frogs can only jump over one other frog, unless the space in front of them is empty. Green frogs can only move right, and yellow frogs can only move left.
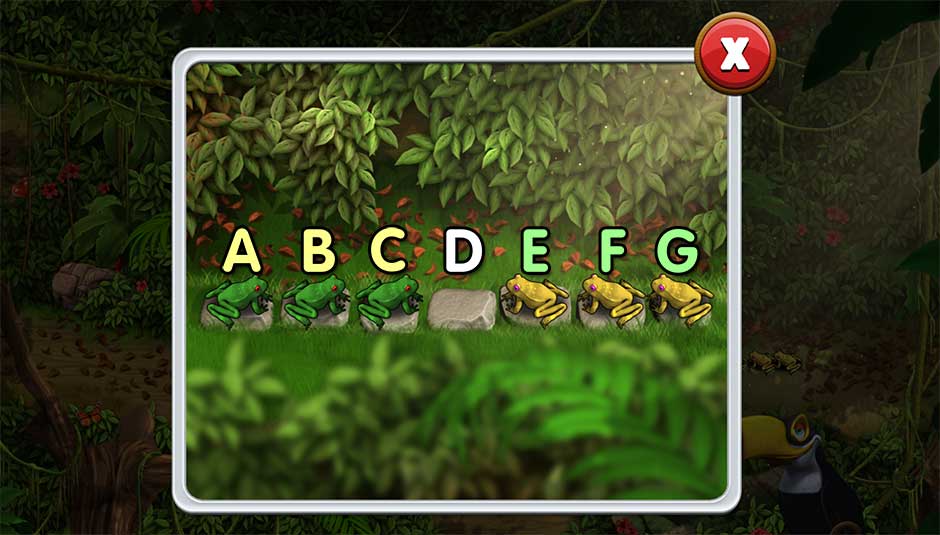
Using the screenshot above as reference, click on the frog occupying the lettered space in this order to solve the puzzle (D is the first empty space): E, C, B, D, F, G, E, C, A, B, D, F, E, C, and D.
Level 23
Find the 4 missing pieces of the Bowl. Their locations are shown below.
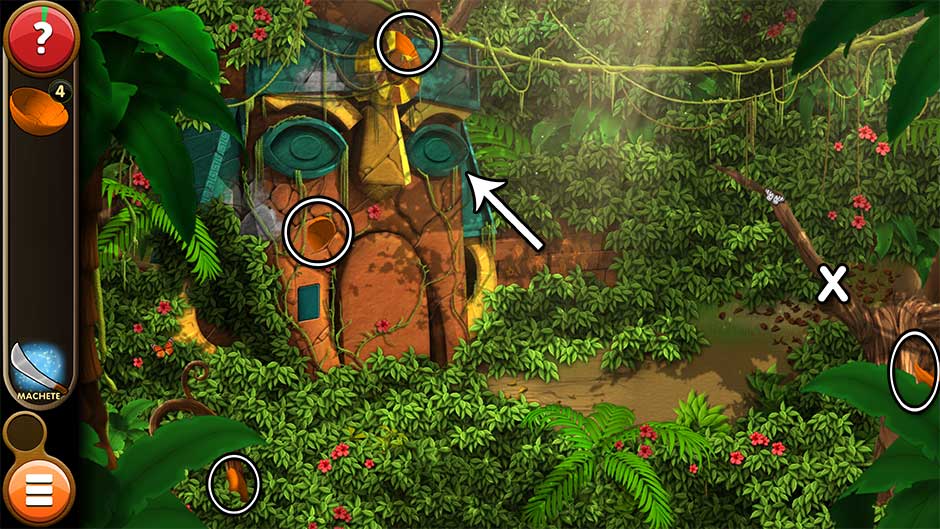
After assembling the Bowl, use the Machete on the branch indicated with an “X” in the screenshot above. Use the Bowl on the resulting sap to collect it, then click on the left and right eyes of the statue doorway. The left will stay open on its own, but you’ll need to use the contents of the Bowl to keep the right eye open.
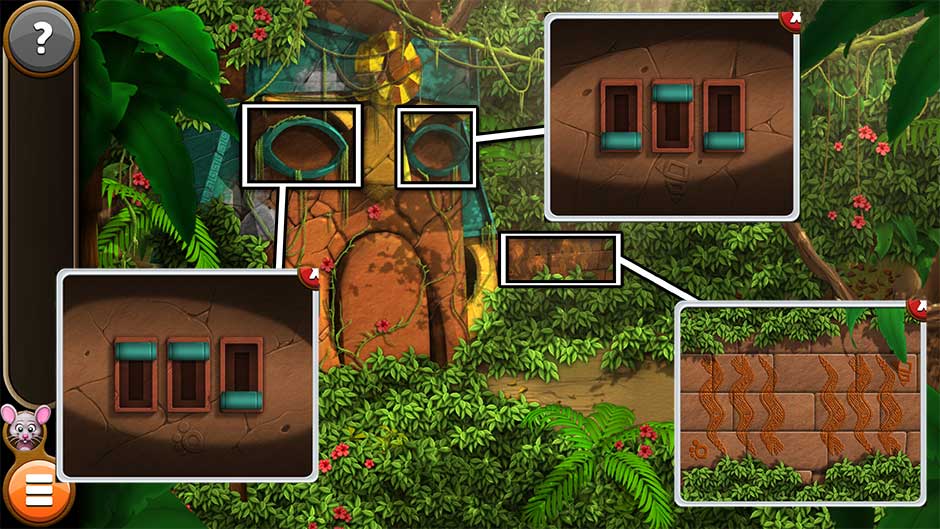
The left and right eyes contain levers which must be moved into specific positions. The mural on the wall nearby offers an important clue. Arrange the levers into the following positions:
- Left eye: Up, Up, Down
- Right eye: Down, Up, Down
Level 24
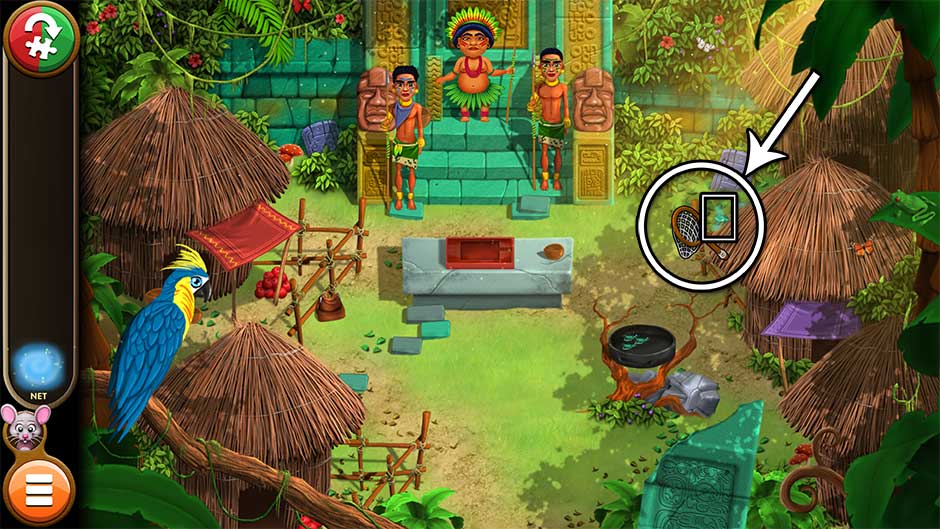
Find the 4 pieces necessary to assemble the Net. Their locations are pictured below.

Once you’ve finished assembling the Net, you’ll need to catch a total of 5 flies. The flies are blue-green in color and will fly in from the upper right corner of the screen. Click on the Net and hold it, moving it to the fly, then releasing the hold once the fly and the net are in the same position. When a fly is successfully caught, it will be transferred to the cooking pan. Upon successfully catching 5 flies, the puzzle minigame will finish.
Level 25
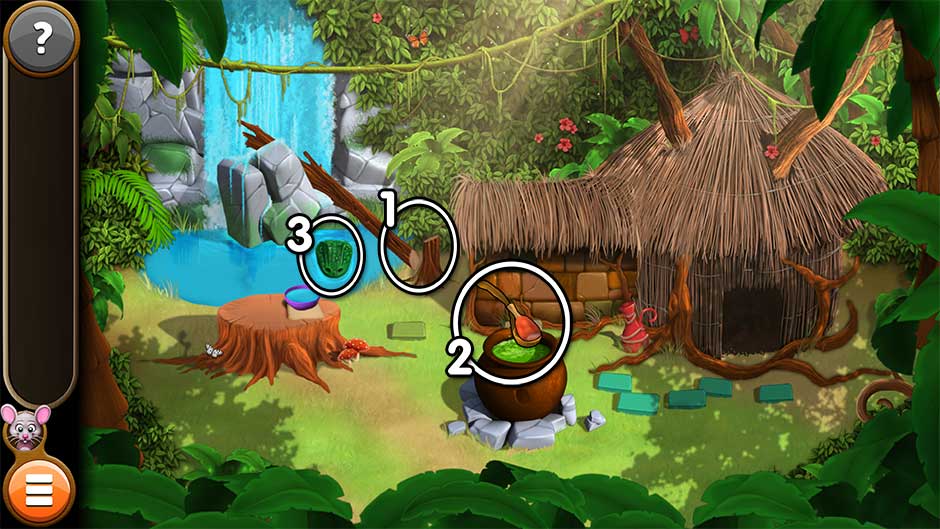
Find the components necessary to make the Axe and the Ladle. Their locations are shown below.
Now it’s time for Mortimer to plan his escape!
- Use the Axe on the tree to knock it down, creating a path.
- Use the Ladle on the cauldron to retrieve the Meat.
- Feed the Meat to the crocodile to distract it, giving you a chance to escape.
Level 26
Find the Blocks hidden throughout the area. Their locations are shown below.
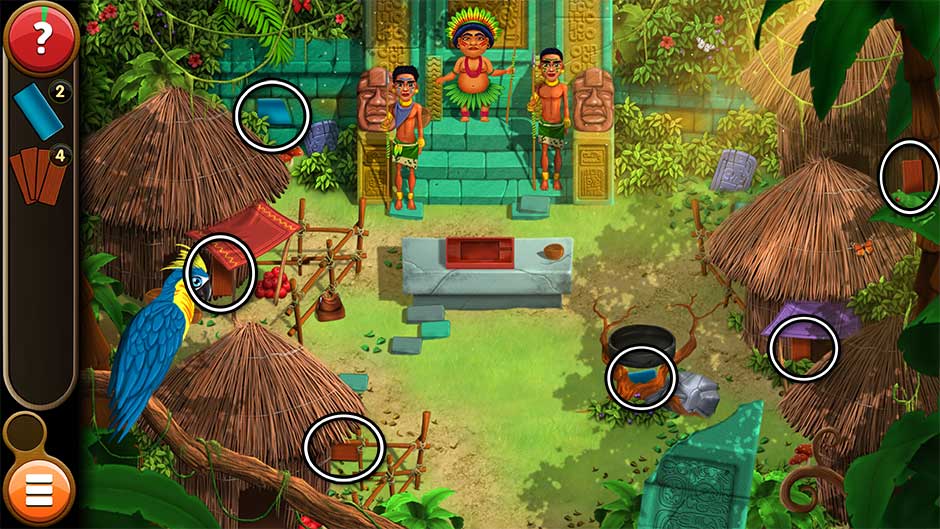
Once you’ve found them all, use the Blocks on the tray on the stone table in the center of the screen. Click on it to enter a puzzle.
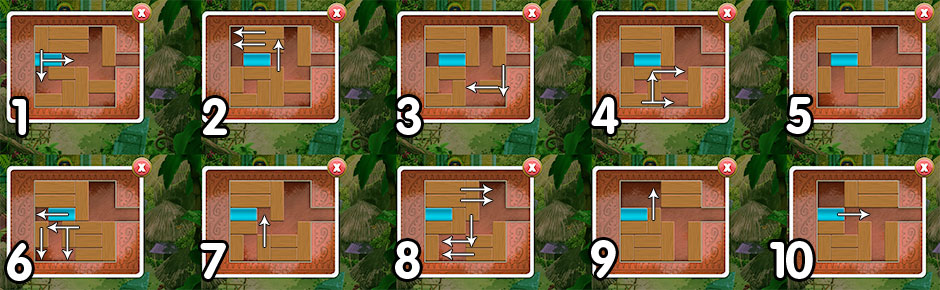
Slide the blocks so that the blue block can slide out of the box on the right. The step-by-step puzzle solution is shown below.
Level 27
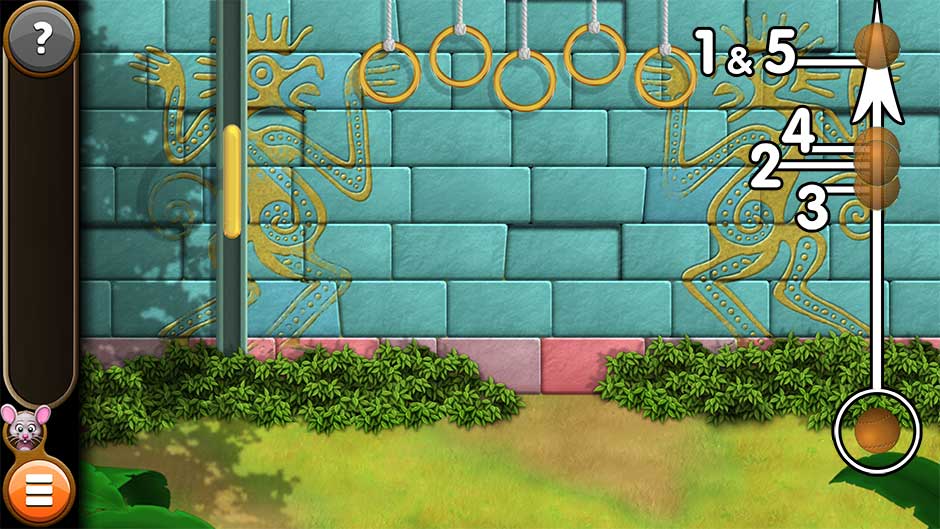
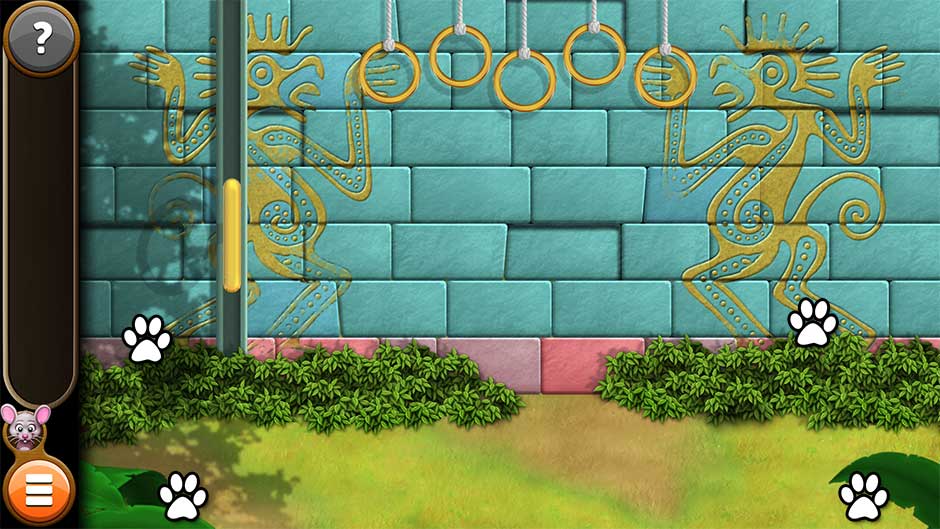
It’s time to show Suruwaha what you’re made of by besting him in an Aztec-style basketball game. Click and hold the ball on the lower right, moving it up or down to the correct height. Release the click to let go of the ball. The goal is to have the ball bounce through the gold hoop on the far left. Note: The gold hoop you need to bounce the ball through looks more like a slider. It’s on the track on the left.
Using the screenshot below as reference, move the ball to the correct height for each hoop and release. Once you’ve cleared all the rings, you’ll have beaten Suruwaha.
Level 28
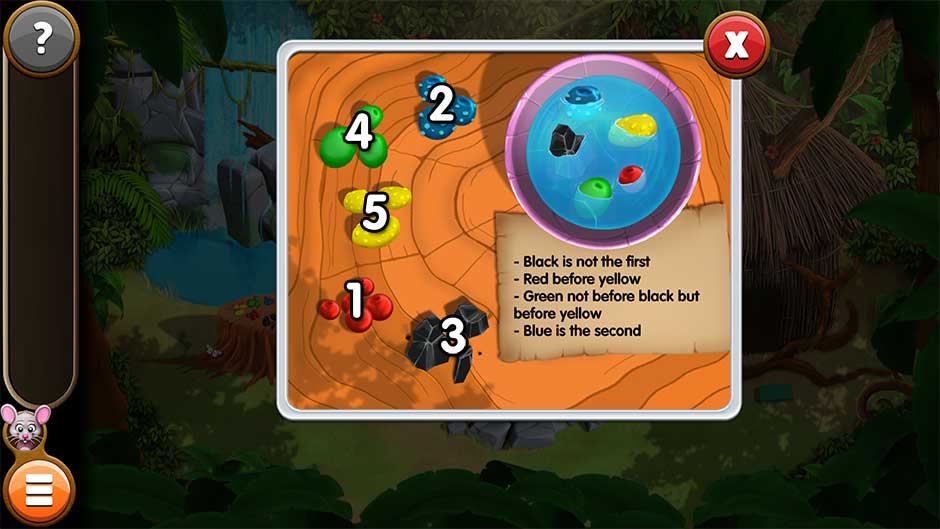
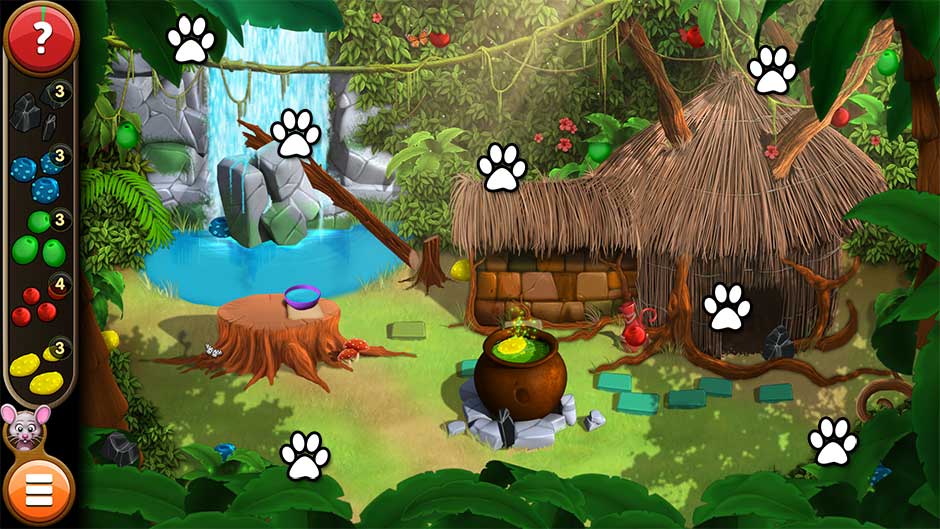
Find the Ingredients necessary for the potion. Their locations are shown below.
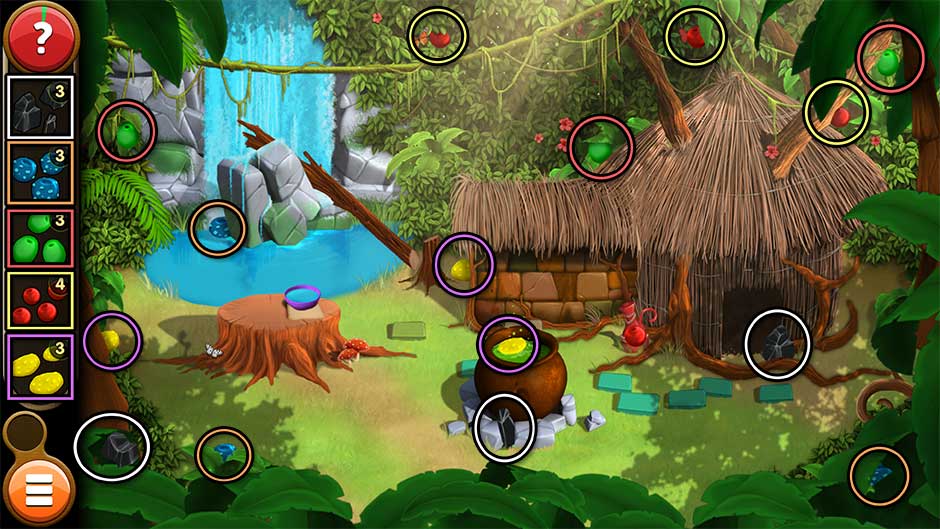
Once you’ve gathered all the Ingredients, place them on the stump in front of the pond. Solve the riddle written on the note on the stump. Add the ingredients in the following order:
- Red
- Blue
- Black
- Green
- Yellow
Level 29
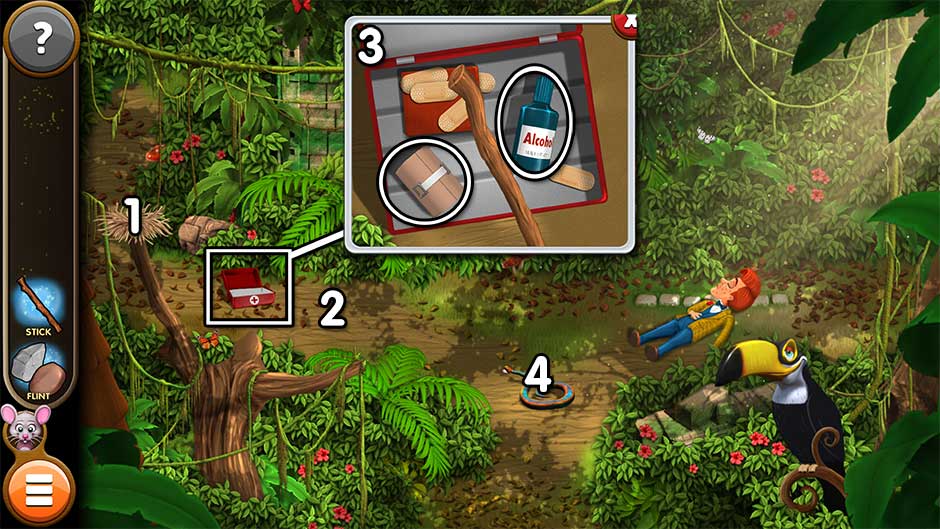
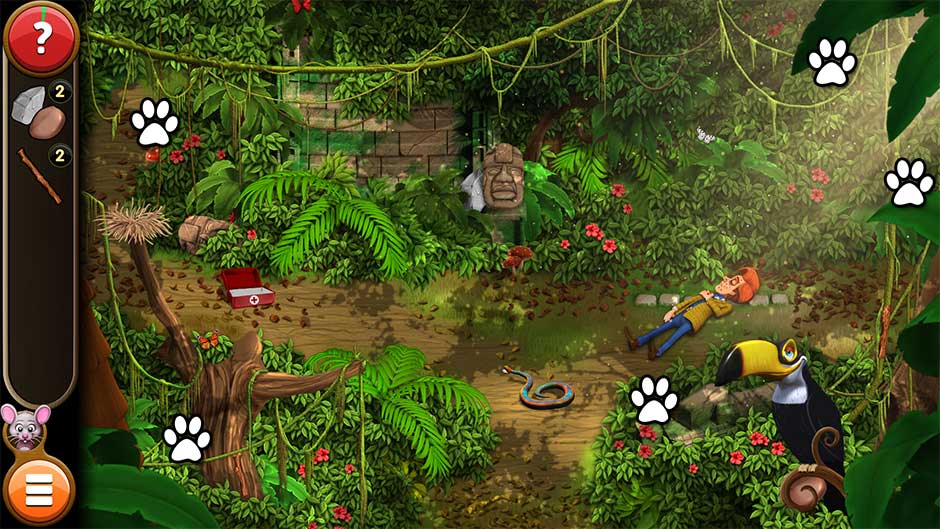
Find the missing pieces of the Flint and the Stick. Their locations are shown below.
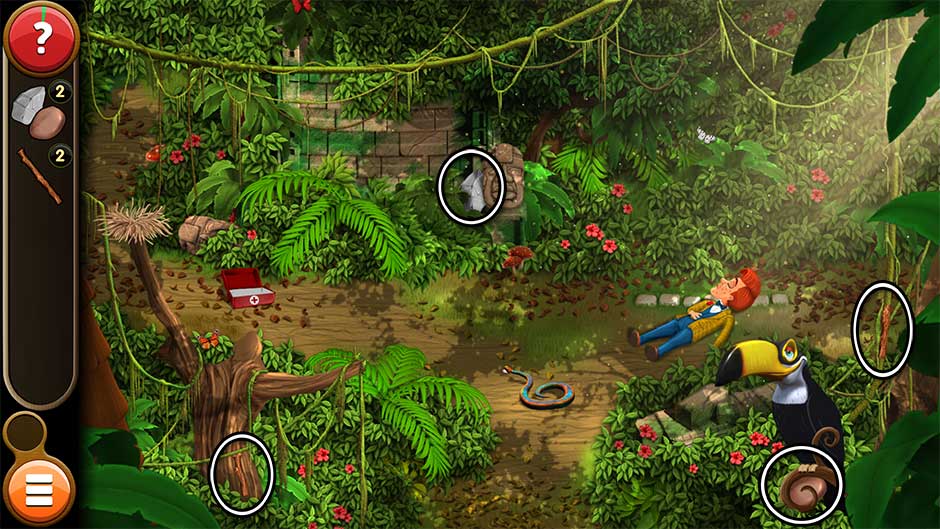
Now it’s time to rescue poor Mortimer!
- Use the Stick to knock down the nest.
- Use the Flint on the nest to create a fire.
- Take a closer look at the first aid kit. Use the Stick on the kit close-up. Place the bandage on the stick, followed by the alcohol to get the Torch.
- Use the Torch on the fire to light it, then shoo the snake away.
Level 30
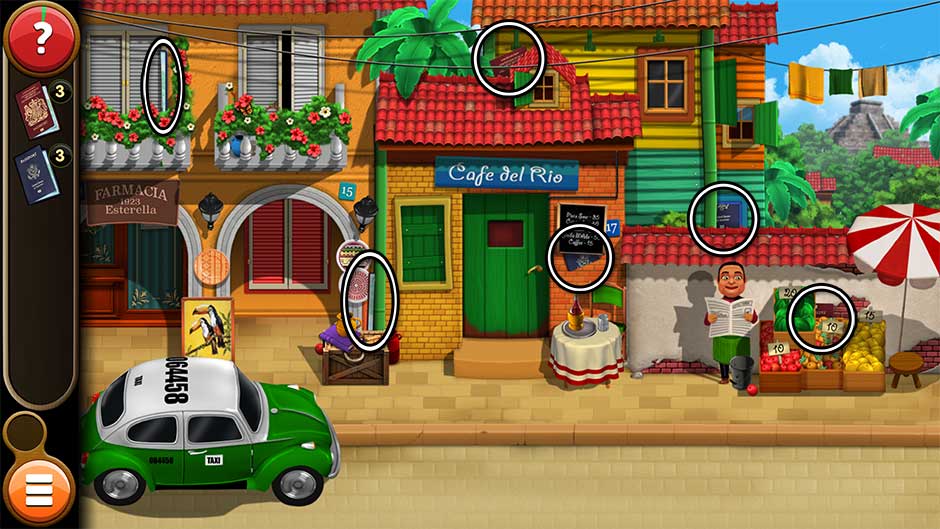
Find the pieces of the Passports. Their locations are shown below.
Chapter 4 – Out Of The Frying Pan, Into The Fire
Kate and Mortimer look for a way off the island, becoming stowaways in the process.
To view Mouse Locations for this chapter, visit the Mouse Locations section.
Level 31
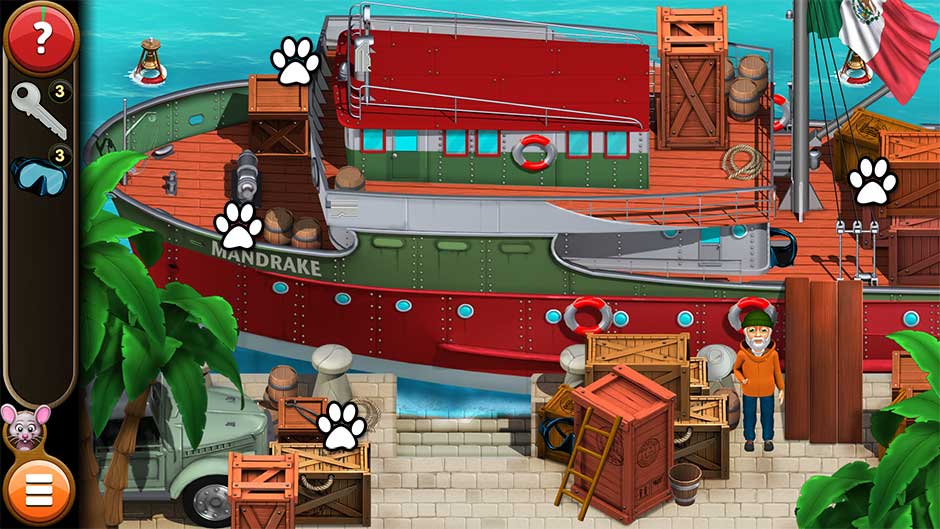
Find the missing pieces of the Key and the Scuba Mask. Their locations are shown below. Before you can pick up the final piece of the Scuba Mask, you’ll need to complete the Key. Once the Key has been completed, take a closer look at the truck on the lower left. Use the Key on the glove box to open it, then collect the final piece of the Scuba Mask inside.
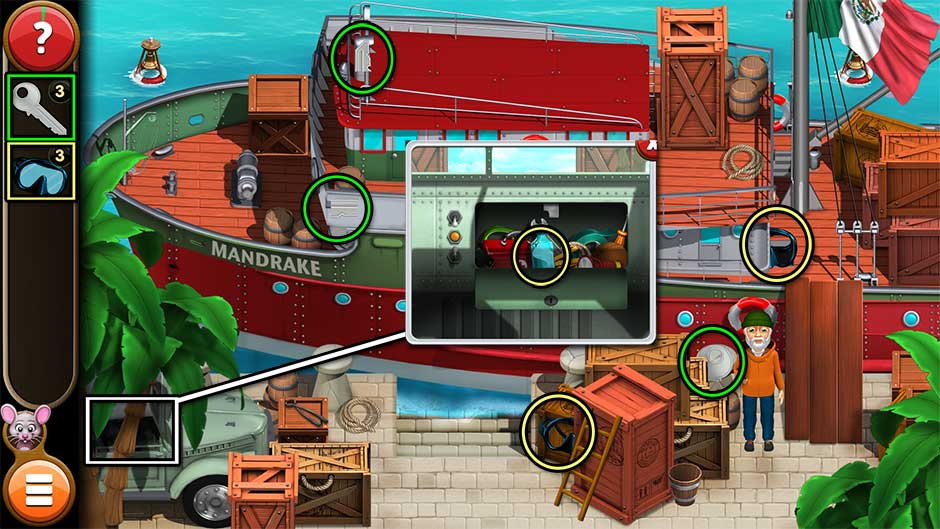
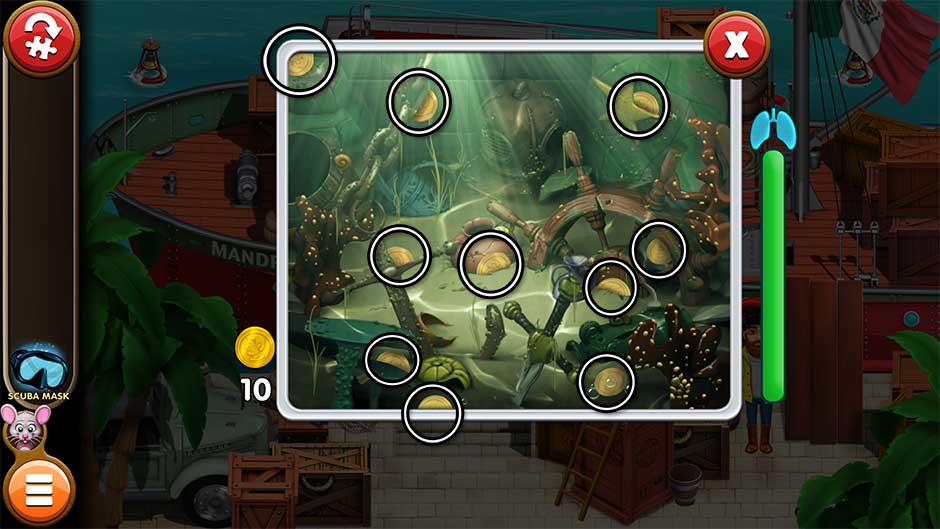
Now it’s time to find the missing coin collection. Use the Scuba Mask on the water at the edge of the dock. Collect the 10 Coins that are underwater. You only have a limited amount of time. If you run out of time, you’ll need to find all 10 coins again. The coin locations are random.
Level 32
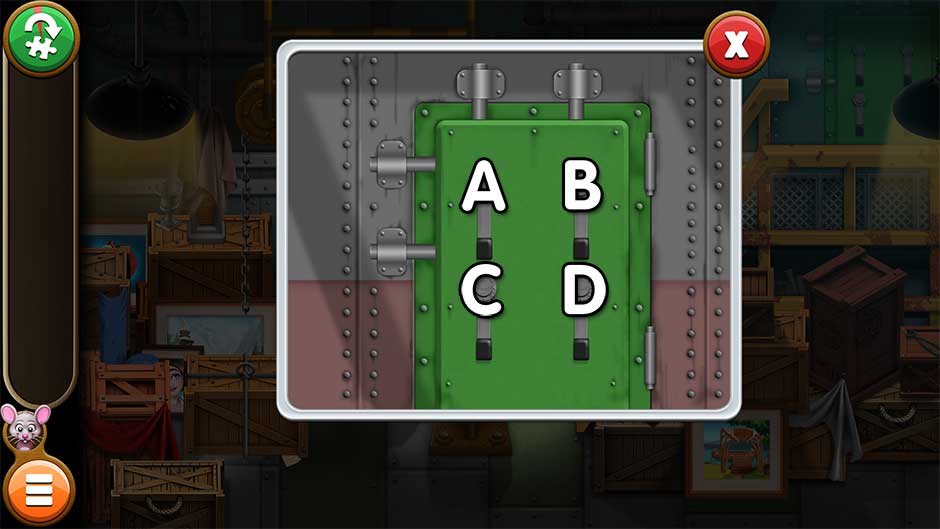
Find the missing Levers and all their pieces. Their locations are shown below.
Now take a closer look at the green door on the upper right. Use the Levers on the door to trigger a minigame. Click on the levers in the correct order to unlock the door. Using the screenshot below as reference, the correct order to open the door is as follows: A, B, C, B, D.
Level 33
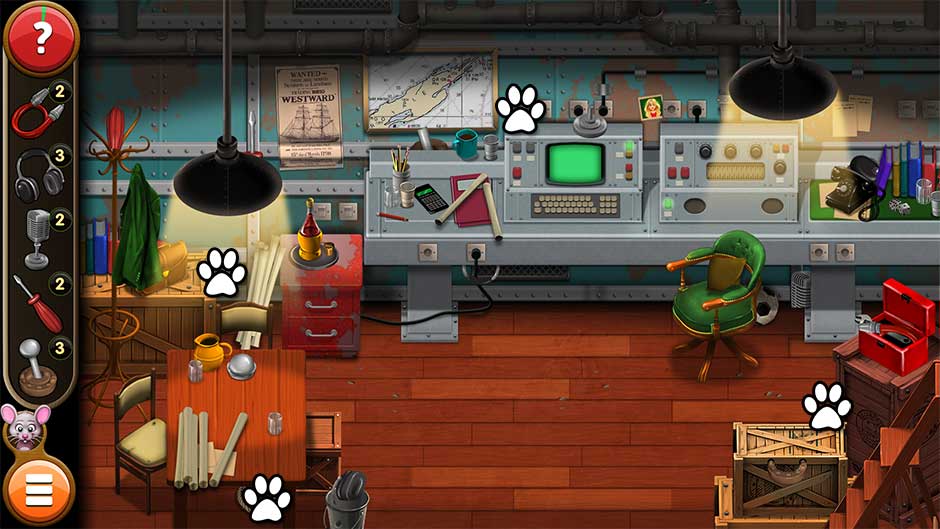
Find the missing pieces of the radio scattered around the room. The components you’ll need include the Earphones, the Microphone, the Switch, the Screwdriver, and the Cable. Once you’ve assembled the Screwdriver, use it on the red filing cabinet drawer to reveal the final piece of the Cable.
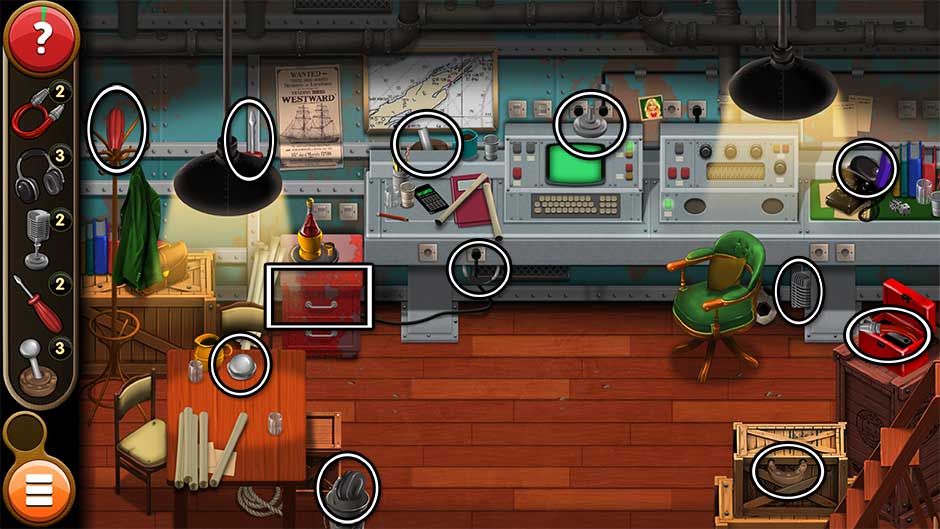
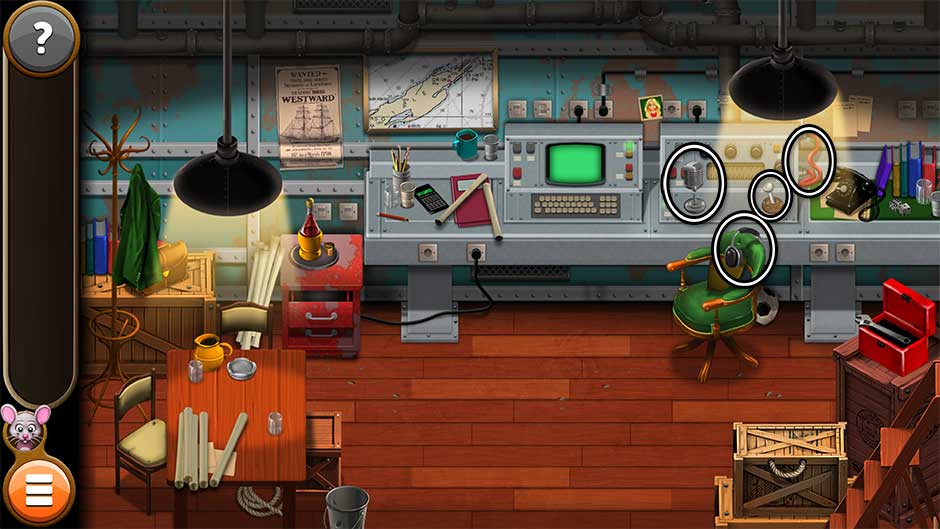
Now it’s time to assemble the radio. Place the Earphones, the Microphone, the Switch, and the Cable in the correct locations, shown below.
Level 34
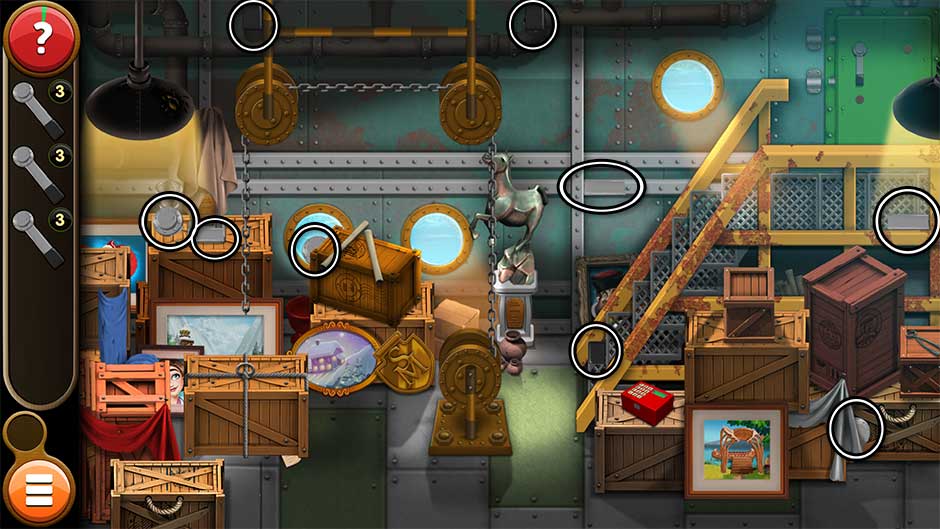
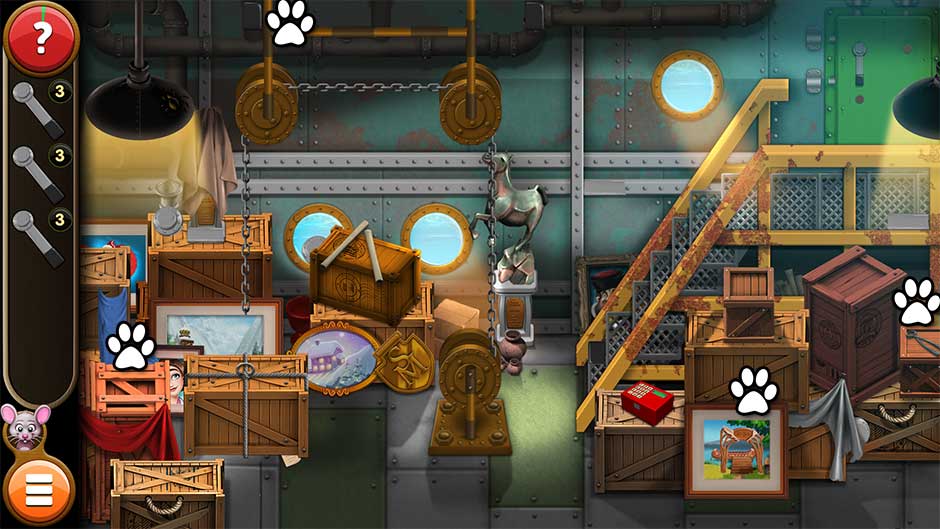
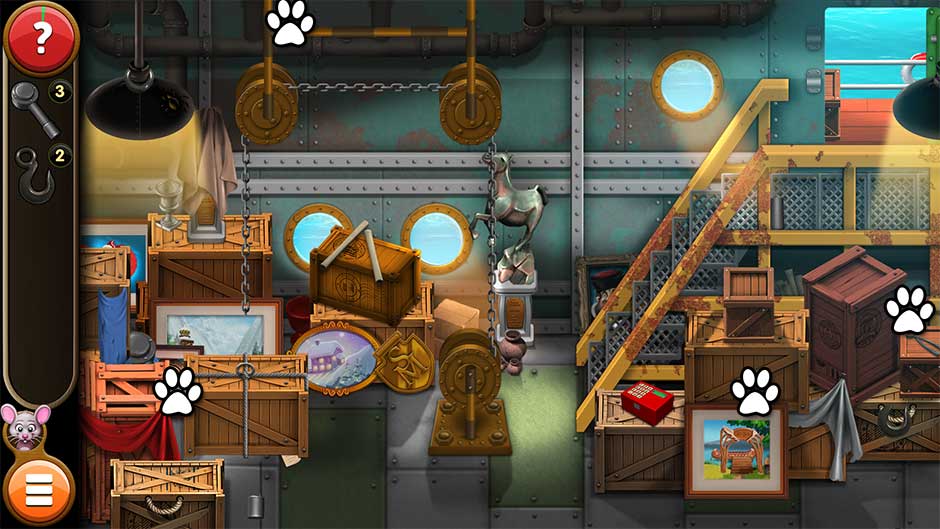
Find the missing pieces of the Handle and the Hook. Their locations are shown below.
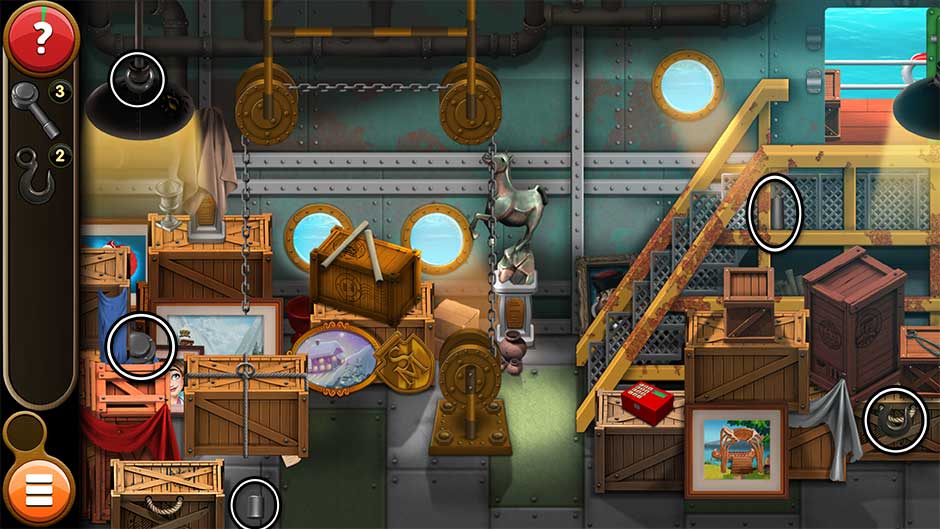
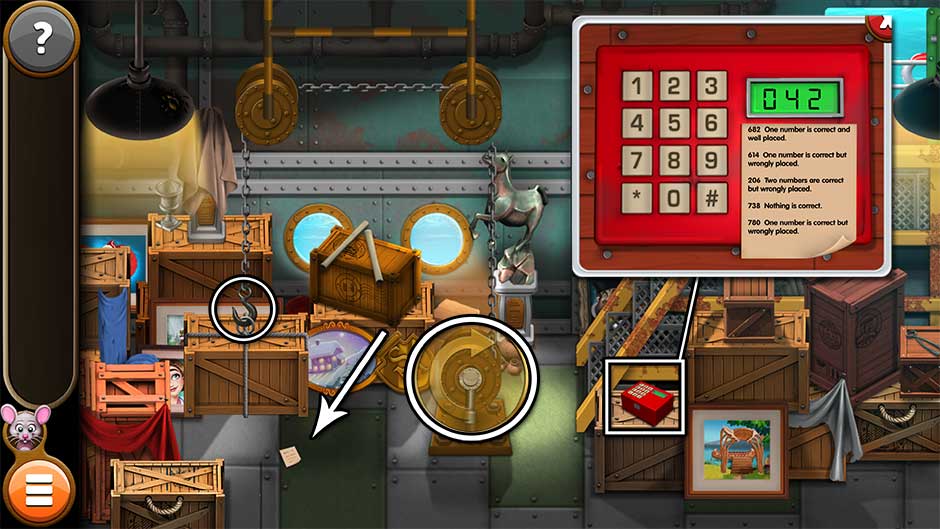
Once you’ve assembled the Handle and the Hook, use the Handle on the crank in the center of the screen and the Hook on the tied crate beneath the chain on the left. Click on the Handle to hoist the crate. Click and hold, moving your cursor clockwise within the circle to operate the crank. A note will be revealed beneath the crate. Take a closer look at the red box near the painting on the right and solve the clues on the note to open the box. The solution is 042.
Level 35
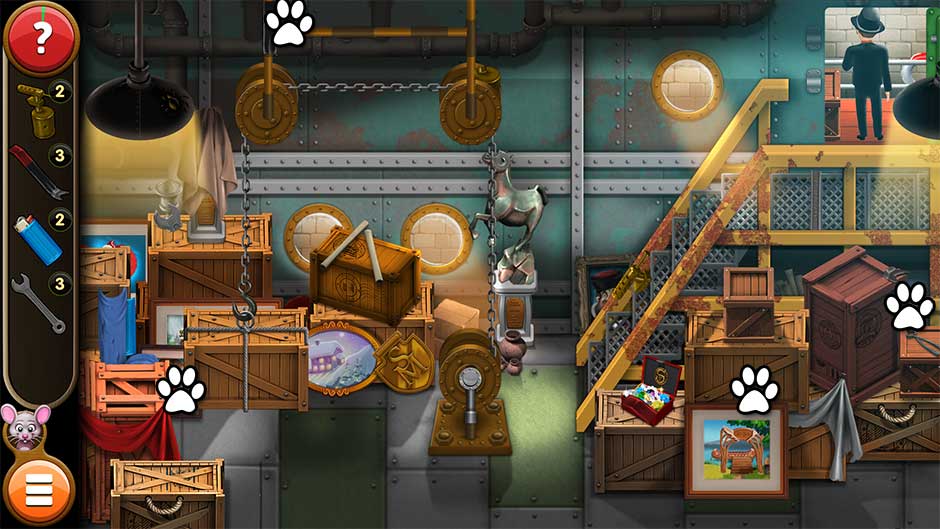
It’s time to plan your escape! Find the missing pieces of the Blowtorch, the Crowbar, the Wrench, and the Lighter. Their locations are shown below. Once assembled, you’ll need to use the Crowbar to open the crate containing the final piece of the Lighter. The Lighter will automatically combine with the Blowtorch to light it once both items are assembled.
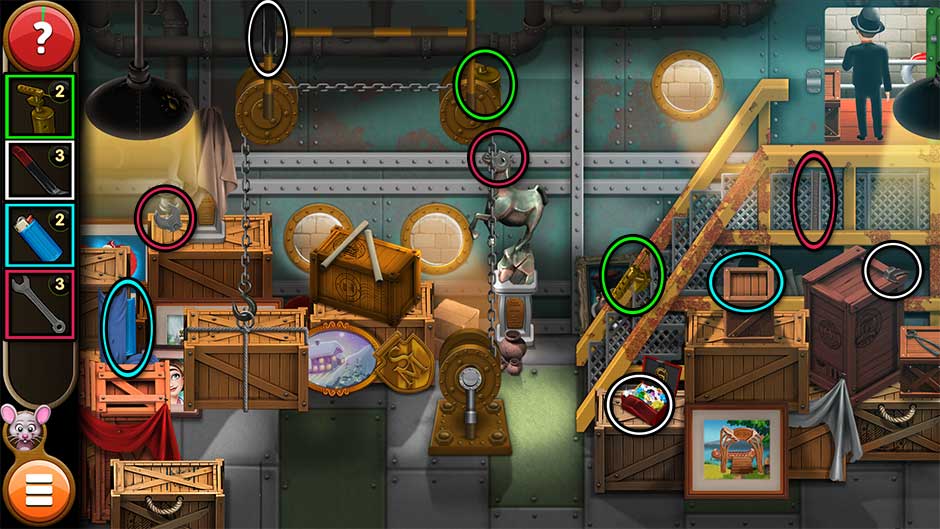
Now to escape. Take a closer look at the porthole between the crate with the scrolls on top and the horse statue. Use the Wrench to remove the bolts around the porthole, clicking and holding as you rotate your cursor counterclockwise within the circle. The bolt on the bottom right is stuck and will require the Blowtorch in order to be removed.

Level 36
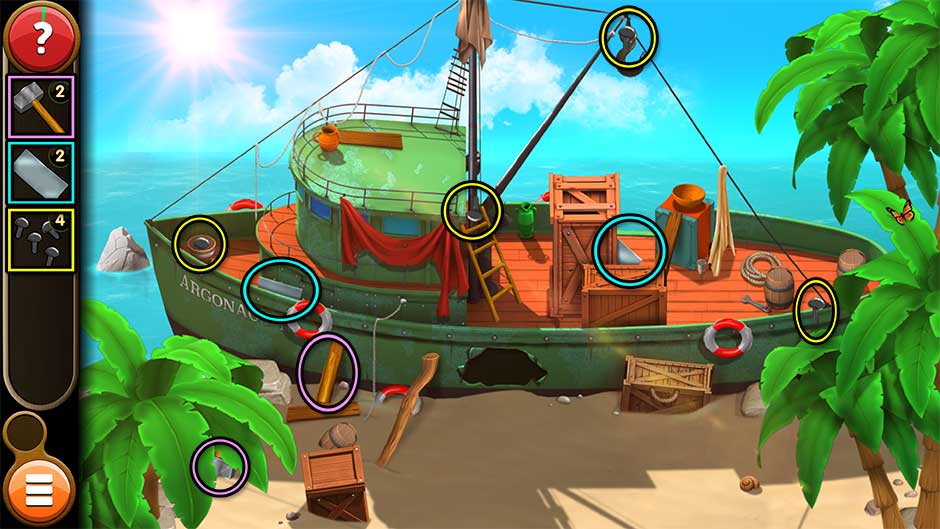
Find the pieces of Rope, Wood, and the Hammer. Their locations are shown below.
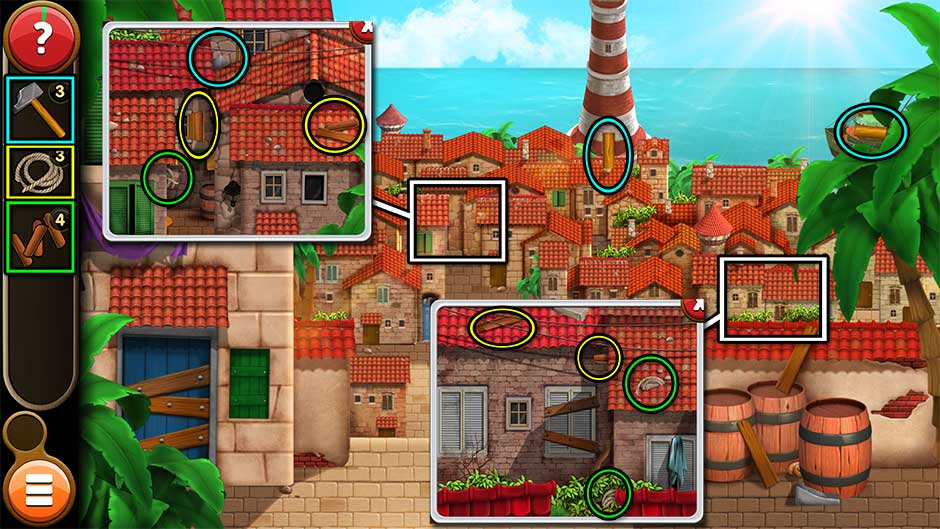
Once you’ve found all the pieces of Wood and Rope, the two will automatically combine in your inventory to create the Ladder.
Use the Hammer on the chock holding the barrel in place on the right. Roll the barrel over to the left, so that it’s standing next to the boarded-up door. Use the Ladder on top of the barrel to access the balcony.
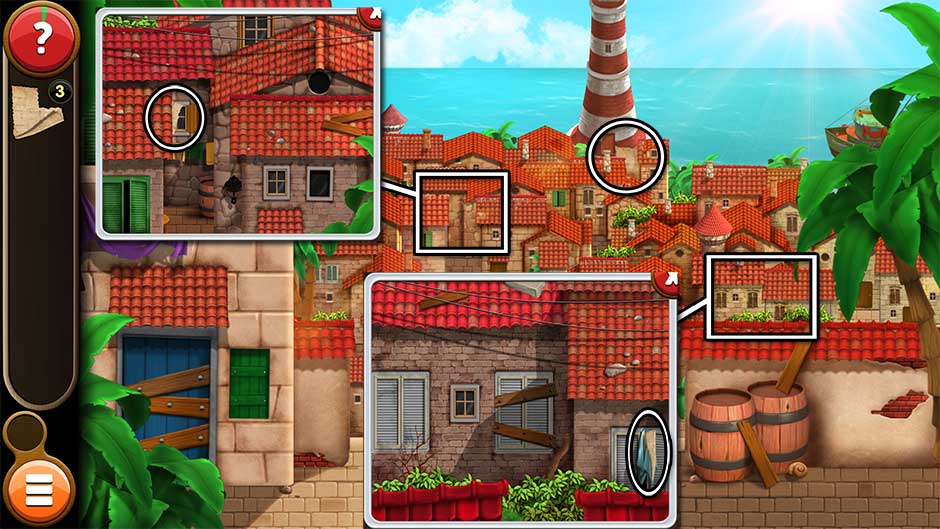
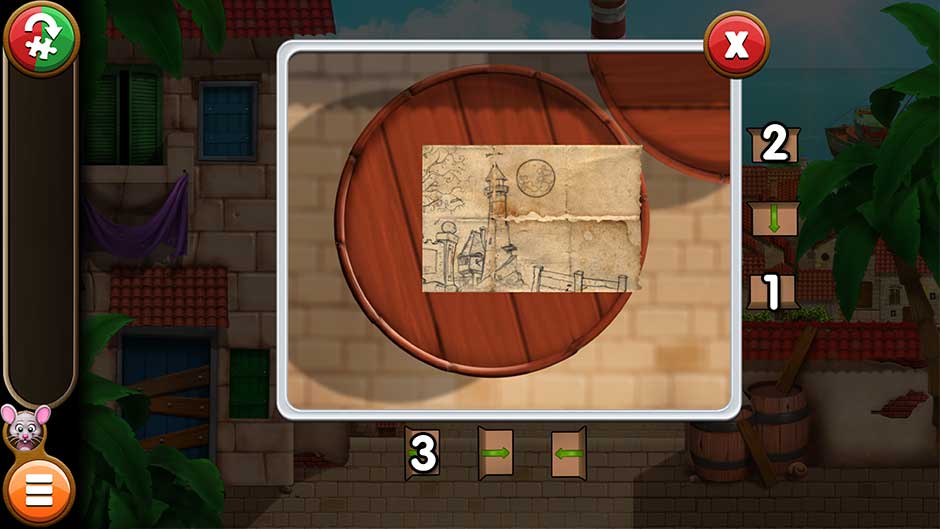
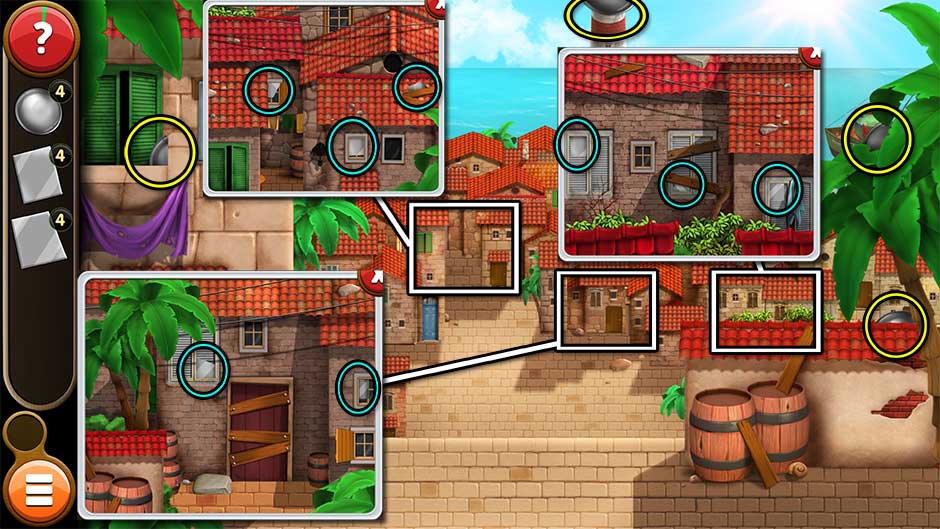
Level 37
Find the pieces of the Old Drawing. Their locations are shown below.
Take a closer look at the Old Drawing in your inventory. Click on the arrows at the bottom and on the right of the close-up to fold the drawing. The order in which you need to click them is shown below, along with the puzzle solution.
Level 38
Locate the pieces of the Lens and the Mirrors. Their locations are shown below.
Level 39
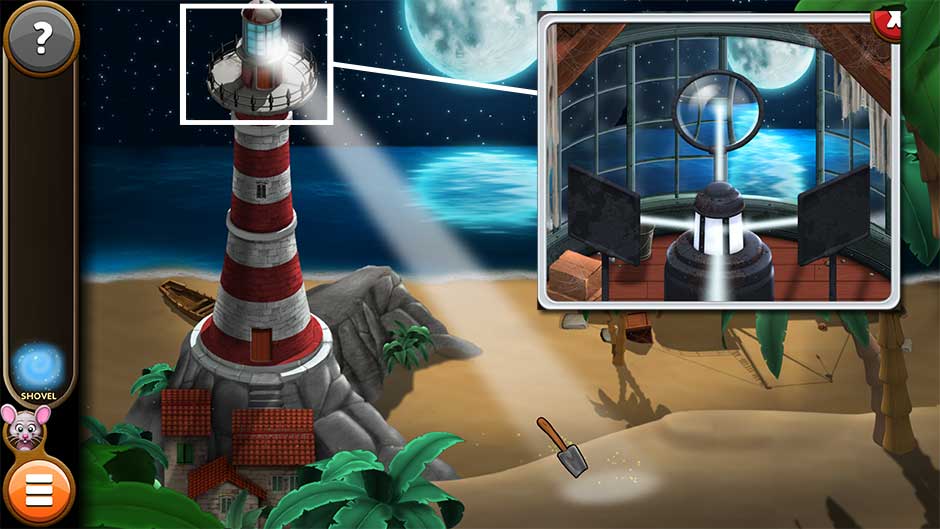
Find the missing pieces of the Shovel and the Machete. Their locations are shown below. You will need to use the completed Machete to reveal the location of the last piece of the Shovel hidden beneath the bush.

Take a closer look at the top of the lighthouse. Place the Mirrors into the square brackets on either side and the Lens into the circular ring in the middle. Click on all three so that they reflect the light in the center. The correct positions are shown below. Once the light is active, use the Shovel on the location it reveals in the sand.
Level 40
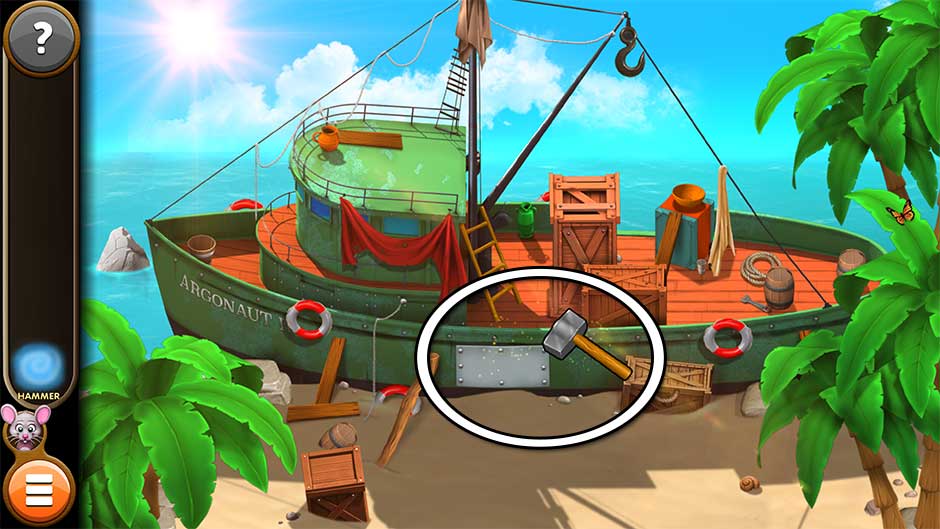
Find the pieces of the Metal Plate, the Nails, and the Hammer. Their locations are pictured below.
Now it’s time to patch the hole in the side of the boat. Use the Hammer on the hole to smooth out the edges. Place the Metal Plate over the hole, followed by the Nails. Use the Hammer to secure the patch in place and complete the repair.
Chapter 5 – The Treasures of the Desert
Kate and Mortimer venture into the desert, looking for clues.
To view Mouse Locations for this chapter, visit the Mouse Locations section.
Level 41
Find the pieces of the Painting. Their locations are shown below.
After assembling the Painting, you’ll need to compare the two. Find the differences between the two paintings. The differences are shown below.

Level 42
Find the missing pieces of the Pipes and the Fuel Tank. Their locations are shown below.
Zoom in on the basket of the balloon on the lower right. Place the Fuel Tank and the Pipes on the side of the basket.
Now there’s a puzzle to solve! Click on the sections of pipe to rotate them. The goal is to attach the fuel tank to the pipe on the upper right. Not all pieces of the pipe need to be used. The puzzle solution is shown below.

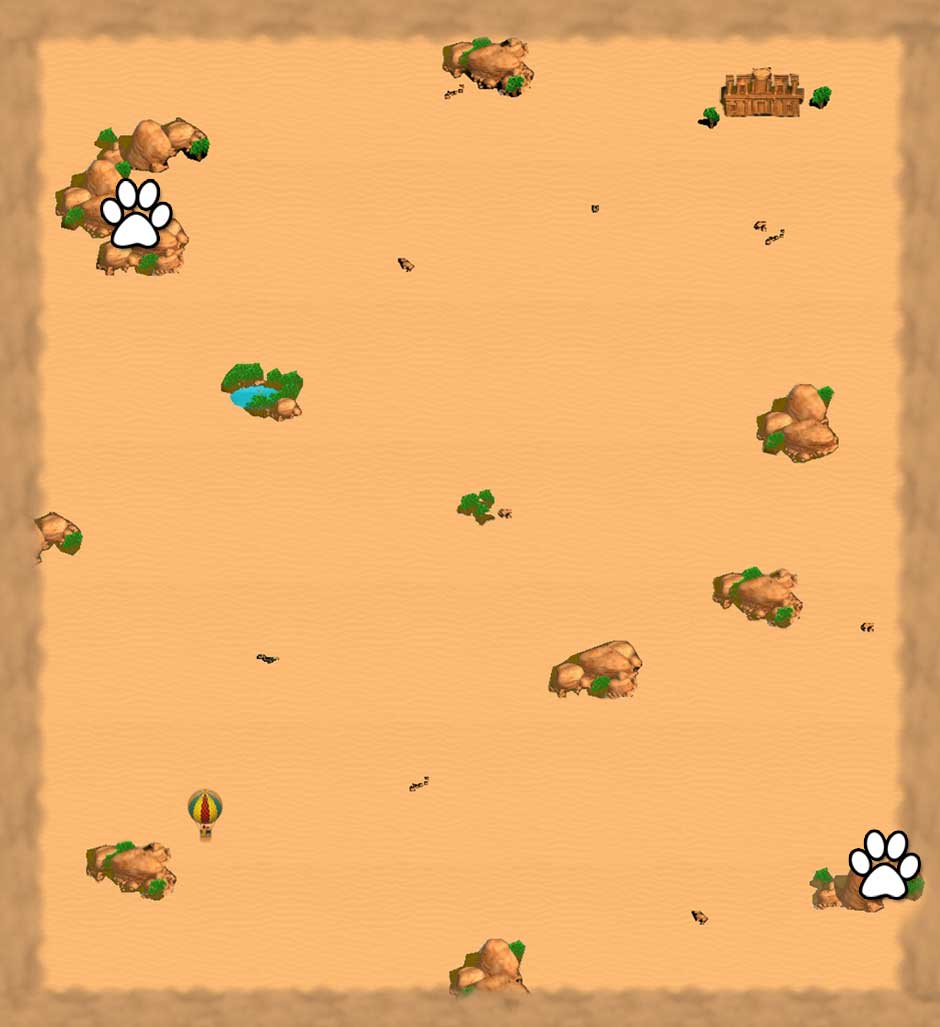
Level 43
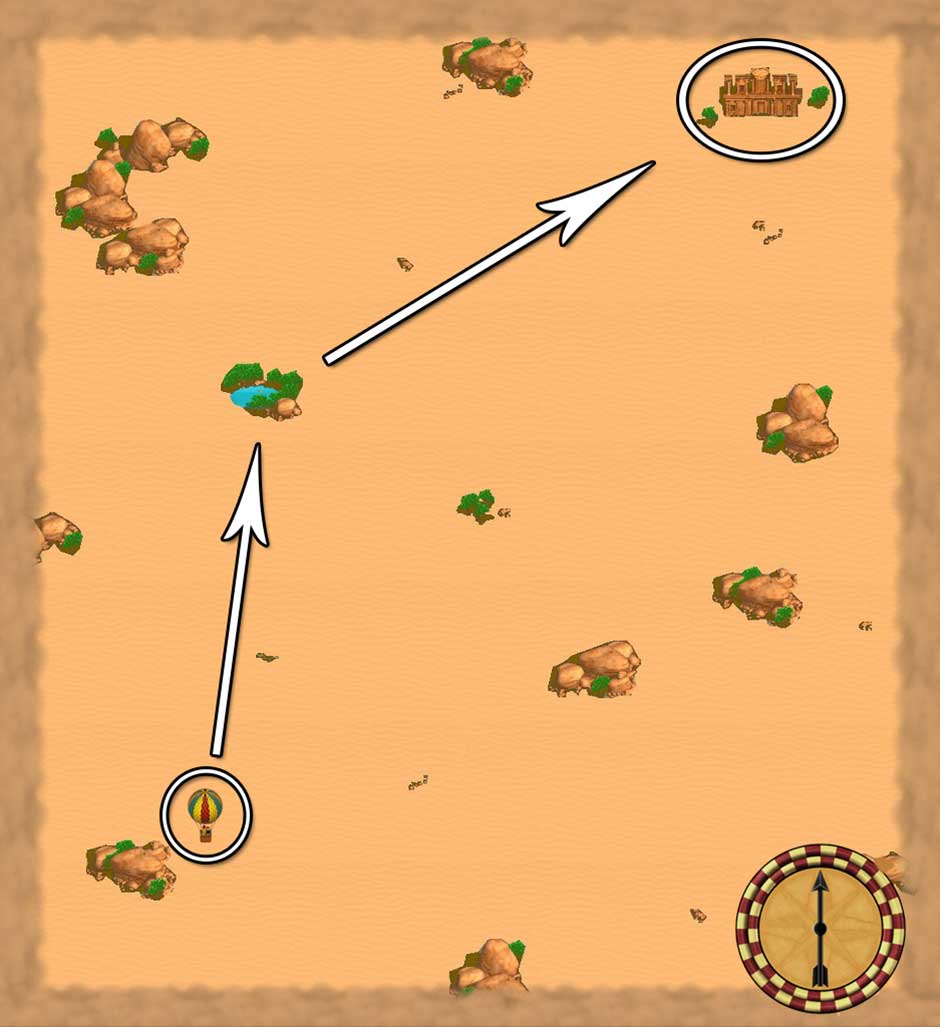
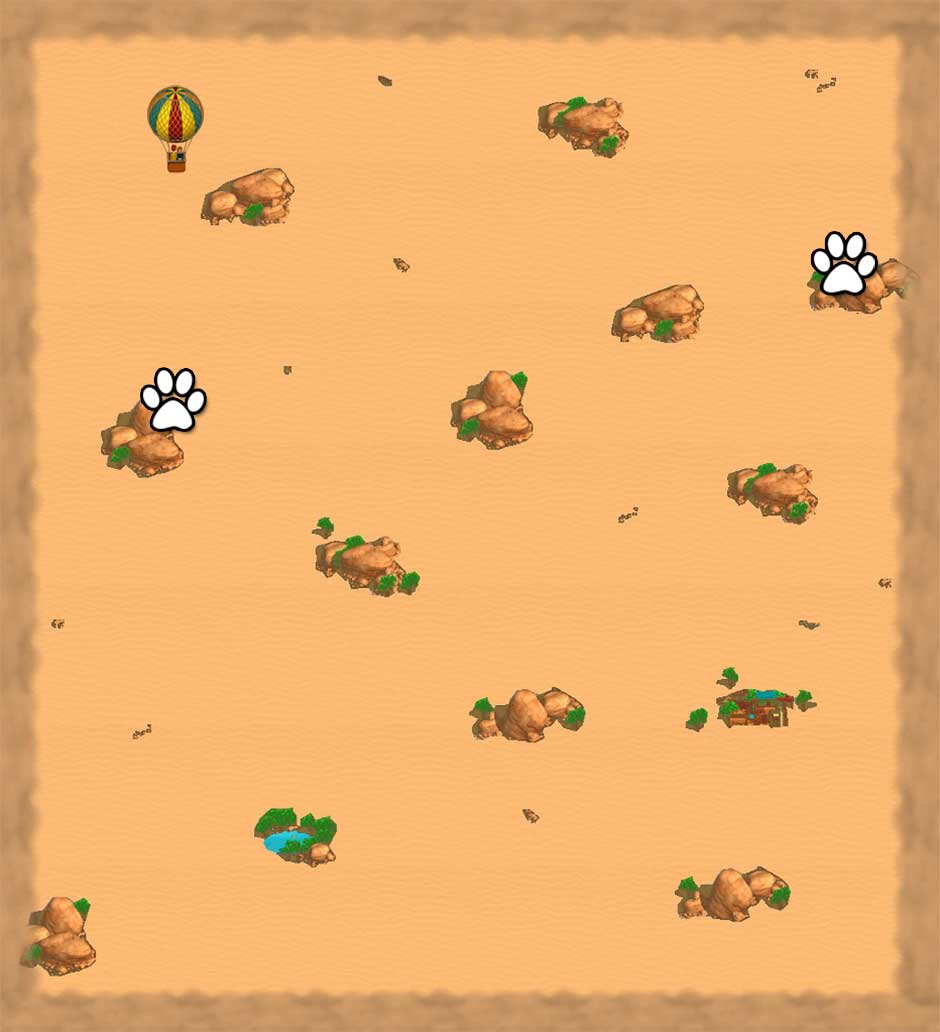
Cross the desert using the hot air balloon. To control it, click and hold the arrow of the compass on the lower right. The direction the compass arrow points is the direction the air balloon will move.
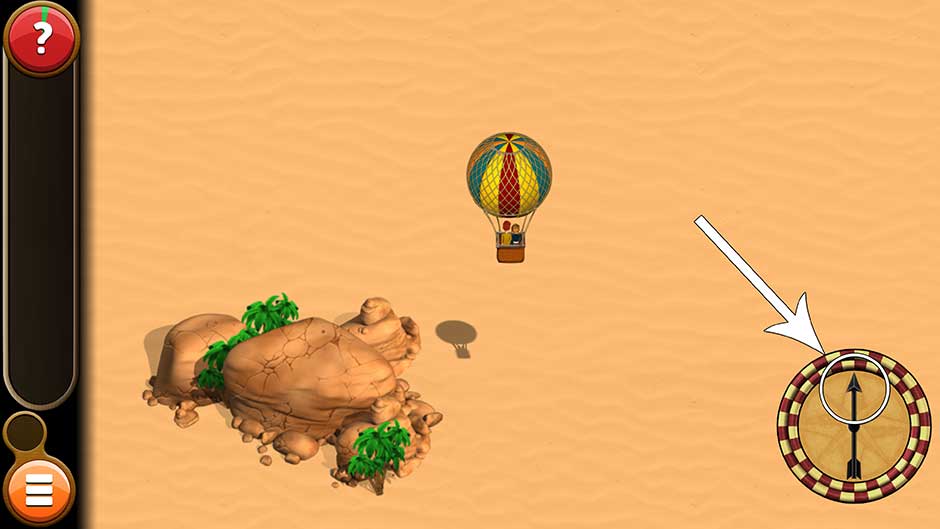
The goal is to reach the temple on the other side of the desert. Use the map below to plot your journey. The recommended path is marked below.
Level 44
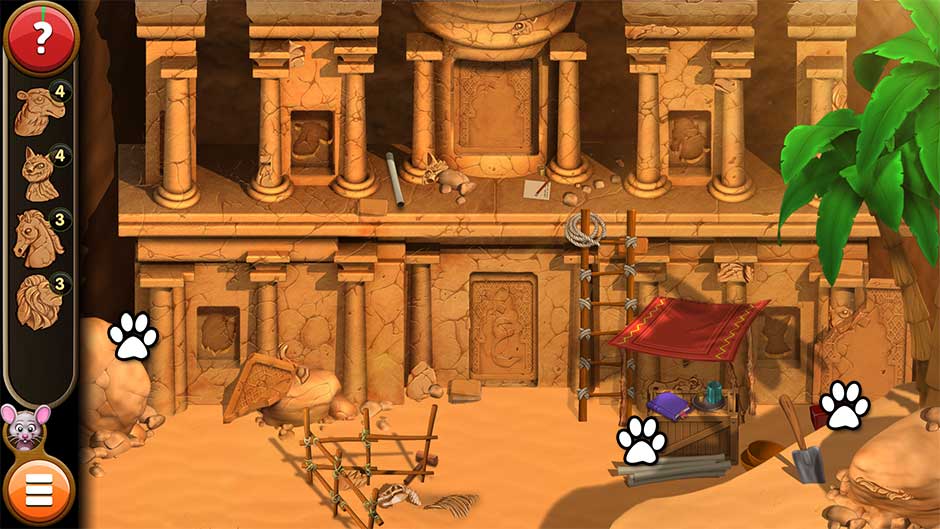
Find the missing pieces of the stone Fox, Horse, Camel, and Lion. Their locations are shown below.
Once you’ve completed all the reliefs, place them into their respective slots, pictured here:
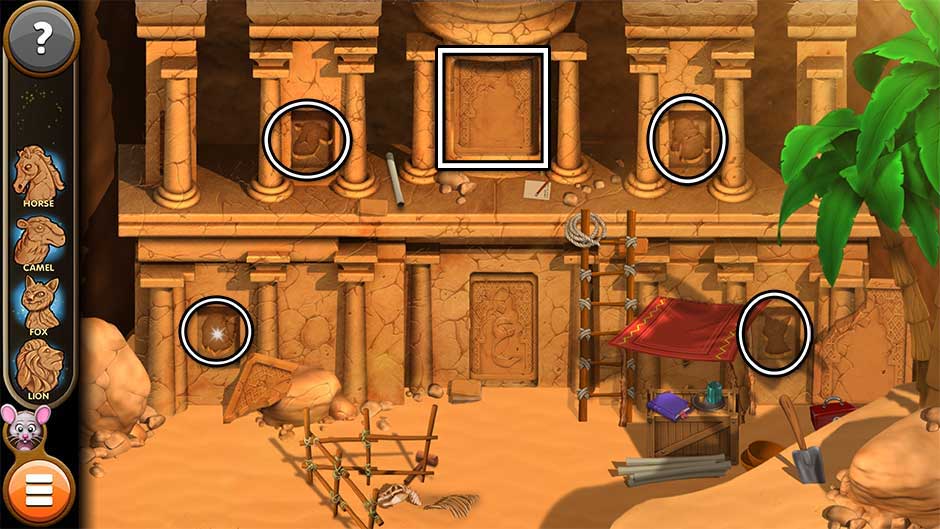
A secret compartment will open, shown within the square in the screenshot above. Click on it to play a puzzle minigame.
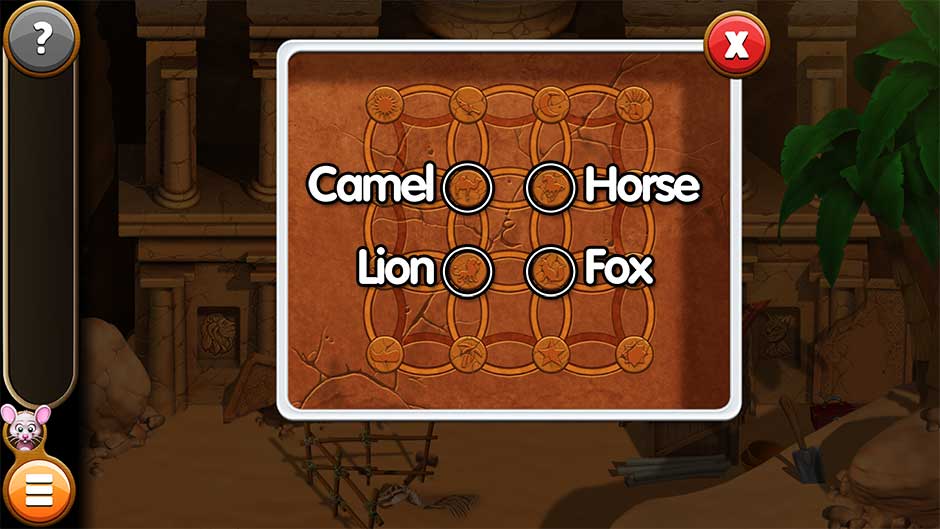
Click on the circles to rotate them so that the Fox, Horse, Camel, and Lion are in the same positions in the center of the puzzle are they are on the surrounding ruins. The puzzle is randomized, however the solution is the same:
- Camel in the upper left of the center circle.
- Horse in the upper right of the center circle.
- Fox in the lower right of the center circle.
- Lion in the lower left of the center circle.
Level 45
Time to navigate the desert again. This time, you’ll be taking the balloon to a nearby town to escape the incoming sandstorm. Control the balloon by moving the compass needle in the lower right corner. The direction the needle is pointing is the direction the balloon will float. Use the map below to find the best route to help you navigate to the nearby town.

Level 46
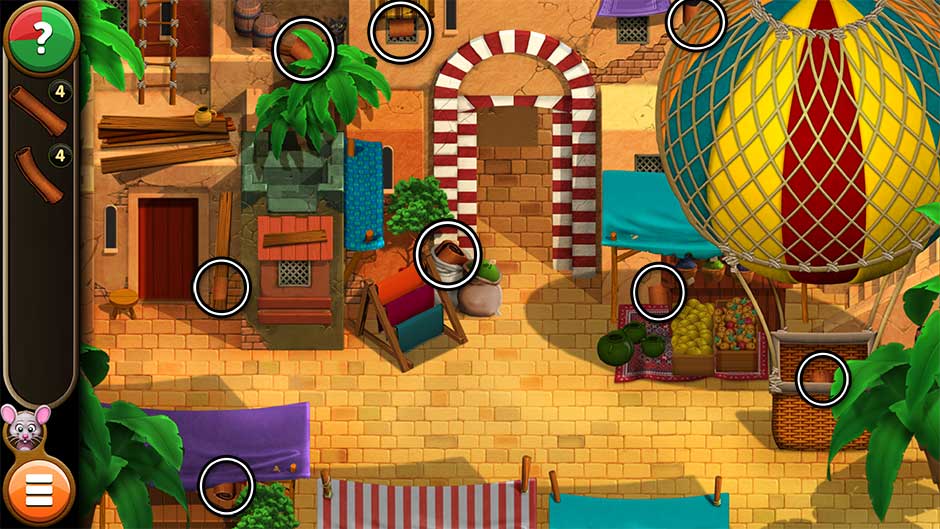
Find the missing pieces of clothing and saddlery Kate needs. You’ll need to find the pieces of the Shoes, the Hijab, the Blanket and the Saddle. Their locations are shown below.
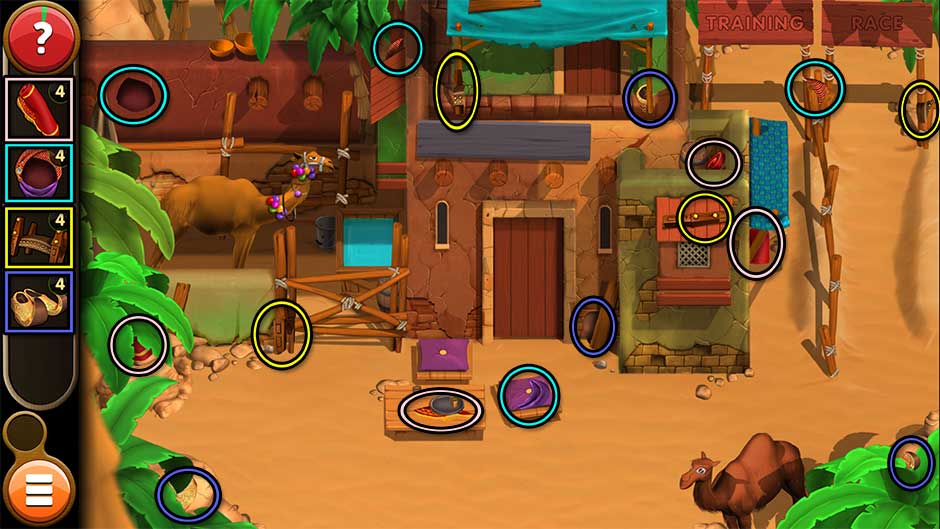
Once you’ve found all the items, place the Blanket and the Saddle onto the camel on the left.
Level 47
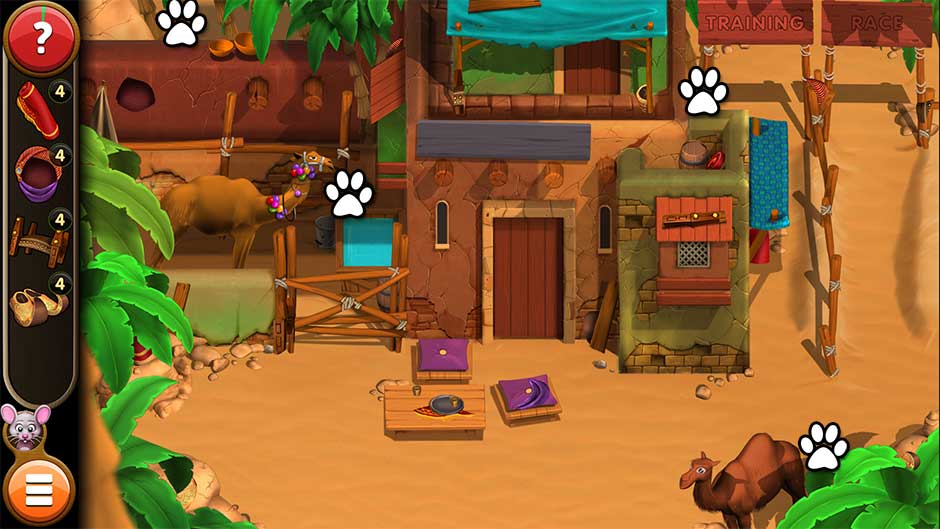
Upon starting the level, click on the “Training” sign in the upper right corner to begin.
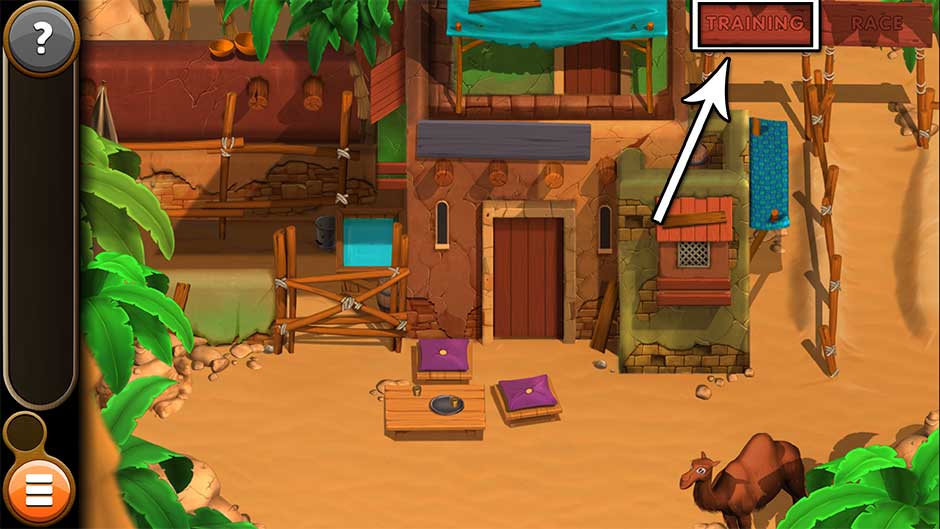
Practice racing the camel across the desert. The camel will run on its own. The meter on the upper right displays how much of the race course you’ve run. The only thing you need to worry about is the circle in the lower right corner. Watch the circle carefully. Every time “Click Now!” appears, click inside the circle to give the camel a temporary speed boost. You will need to do this as soon as the text appears, every time it appears in order to finish the Training course successfully.
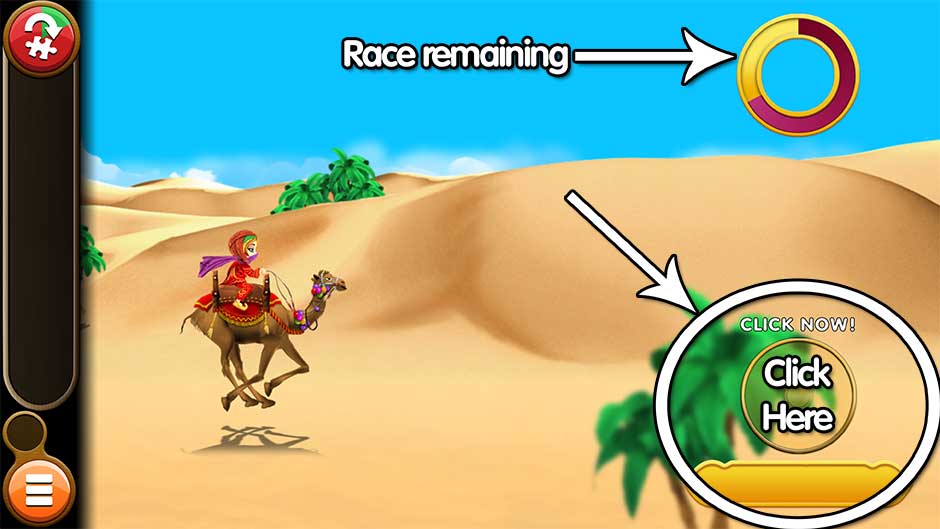
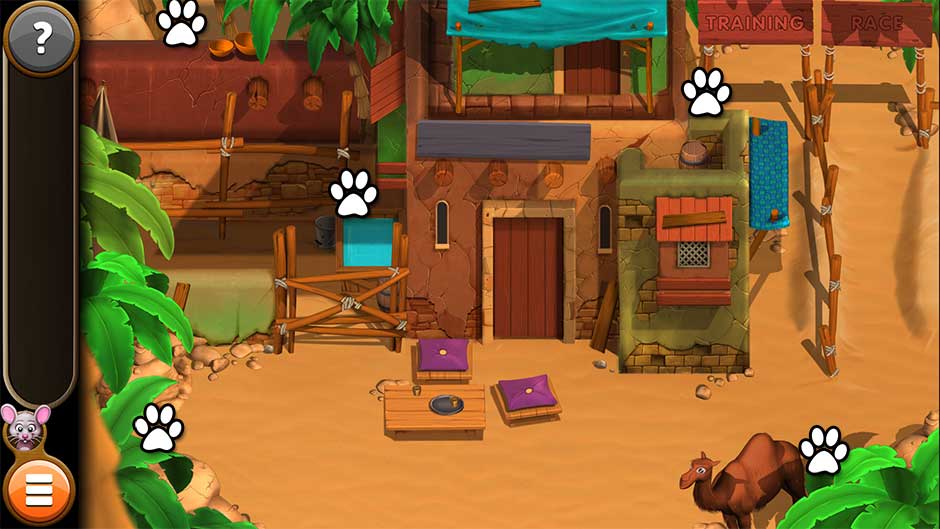
If you need more practice, click on the Training sign in the upper right corner again. If you’re ready for the real thing, click on the Race sign beside it on the upper right. Note: This is also the screen where this level’s mouse will appear. Don’t forget to find it before starting the race! (See the Mouse Locations section if you need help.)
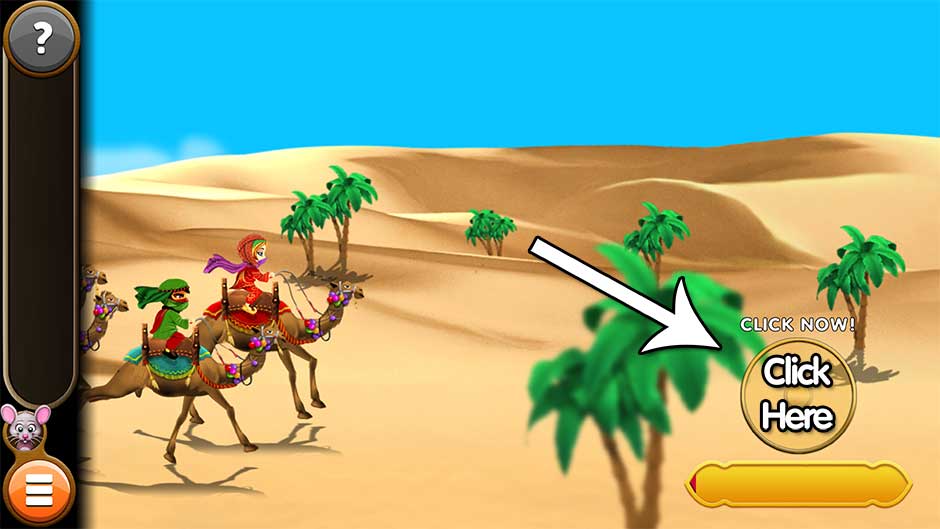
The race works the same as training, only this time there’s competitors, and the meter showing the length of the course won’t be there. To win, you’ll need to use speed boosts. Click within the circle on the lower right every time “Click Now!” appears as quickly as possible. Godspeed!
Level 48
Find the missing Planks, Bricks, and Bowl. Their locations are shown below.
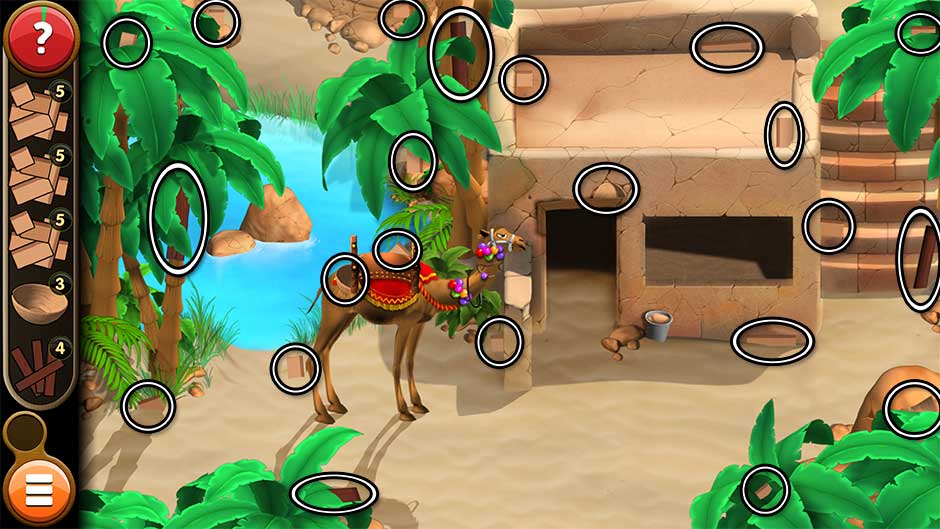
Once you’ve found everything, use the Bowl on the oasis pond to obtain the Water. Use the Planks on the doorway to create a door.
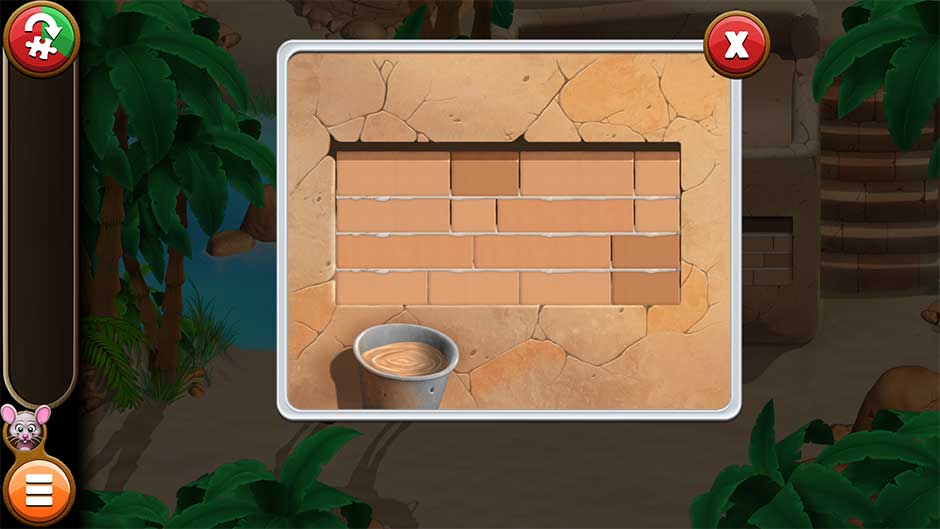
Zoom in on the opening in the side of the dwelling. Use the Water on the contents of the bucket at the bottom of the close-up, then use the Bricks on the close-up to trigger a puzzle.
Place the Bricks into the hole to fill it. Drag bricks into the empty slot to line them up. You will need to use all the bricks. The puzzle solution is shown below.
Level 49
Locate the missing pieces of the Tea Strainer, the Tea Leaves, the Knife, the Kettle, and the Tea Set. Their locations are shown below.
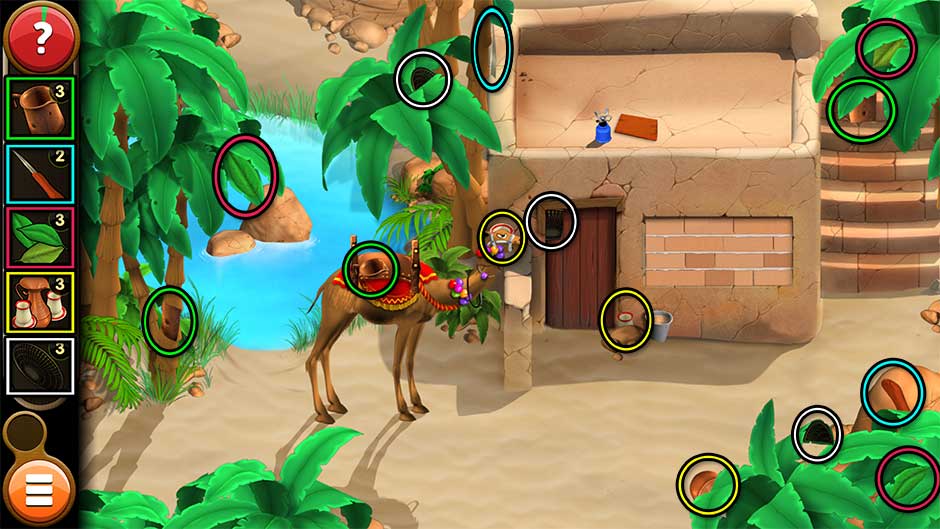
Once you’ve found everything, use the Kettle on the oasis pond to fill it with water. You’ll need it to brew the tea.
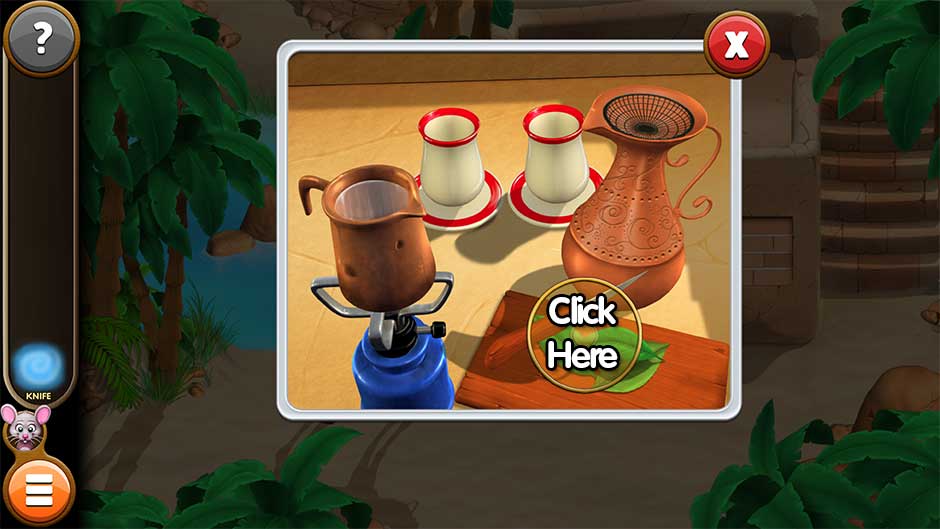
Take a closer look at the portable burner and the cutting board on the rooftop. Place the Tea Set above the cutting board. Place the Tea Strainer on top of the tea set pitcher and the Kettle on top of the burner. Put the Tea Leaves on the cutting board and use the Knife to chop them up by clicking within the circle that appears.
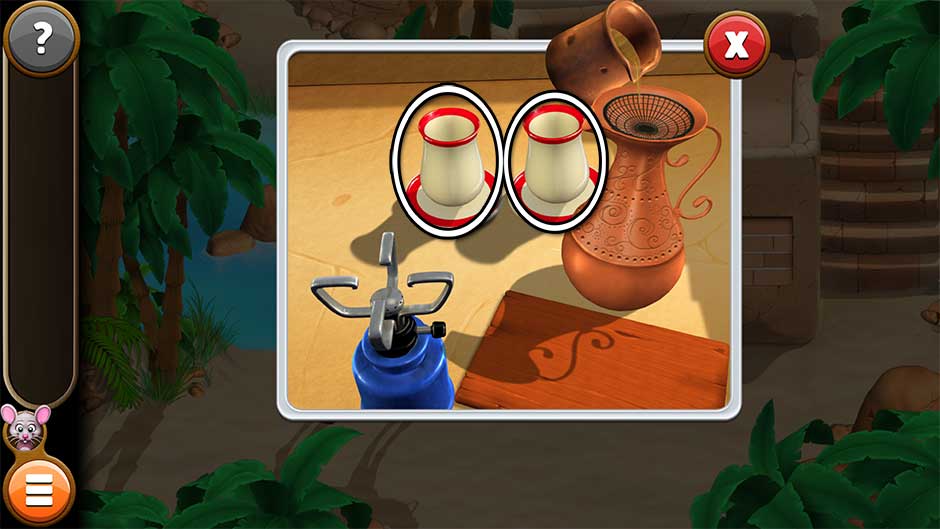
Once chopped, the Tea Leaves will return to your inventory. Use them on the kettle filled with water on top of the burner to brew the tea. Once brewed, pour the contents of the kettle into the pitcher with the strainer, and finally, use the pitcher filled with tea to fill the red and white teacups.
Level 50
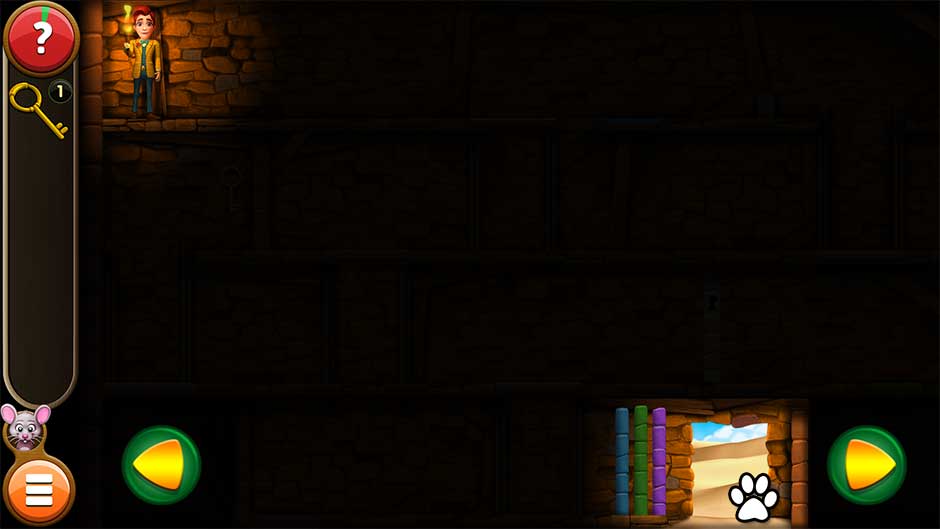
Find your way out of the underground maze. Use the arrow buttons in the lower left and right corners of the screen to control Mortimer, allowing him to walk left or right. The entire maze will be dark, only allowing you to see the area immediately around Mortimer. Thankfully, we’ve turned on the lights for this walkthrough!
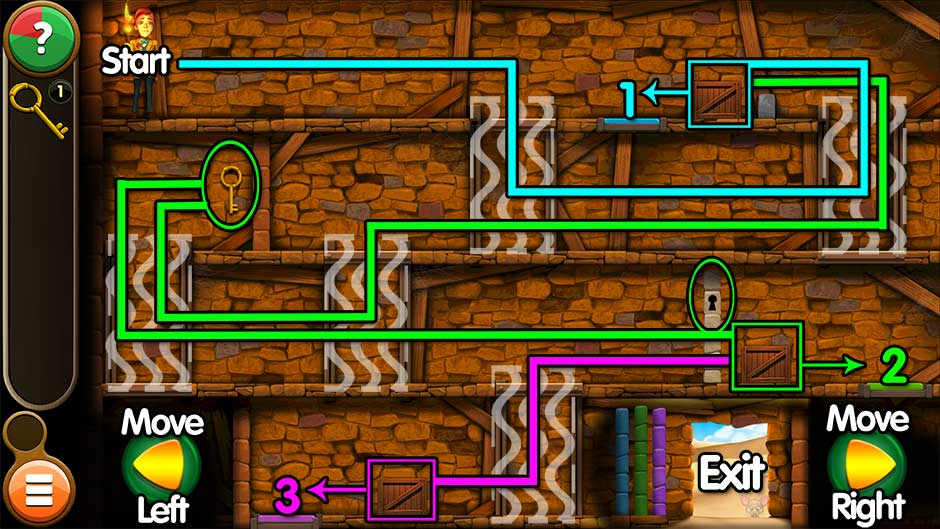
Using the screenshot above as your guide, the puzzle solution is as follows:
- From the Start: (Blue Path) – Move Mortimer right until he encounters the elevator. Once the elevator has lowered, continue moving Mortimer right until he takes another elevator up. From here, move left. Push the crate onto the first switch by continuing to move left until it presses the switch.
- (Green Path) – Go right and take the elevator back down. Continue left past the first elevator you took until you reach a third elevator. Take this one down to the third level. Now continue left, taking another elevator up back to the second level, where moving right will allow you to collect the Key.Once you have the Key, go left and back down the elevator to the third level. From here, move right until you reach a wall with a keyhole. The Key will unlock the way, where you can now push the next crate right onto the green switch.
- (Magenta Path) – Go left and stop at the first elevator you reach. This one will take you down to the bottom level. Continue left to reach another crate. Push the crate left until it comes to rest on the final switch.
Now simply walk to the right and out the exit to sweet, sweet freedom!
Chapter 6 – Endings and Beginnings
Kate finds herself at the Sheik’s palace and Mortimer struggles to find water. Will the two ever see each other again?
To view Mouse Locations for this chapter, visit the Mouse Locations section.
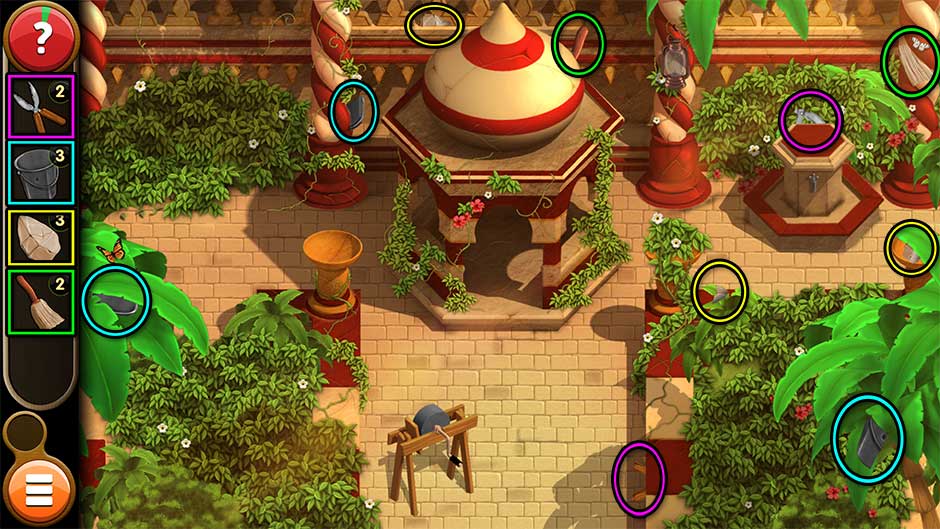
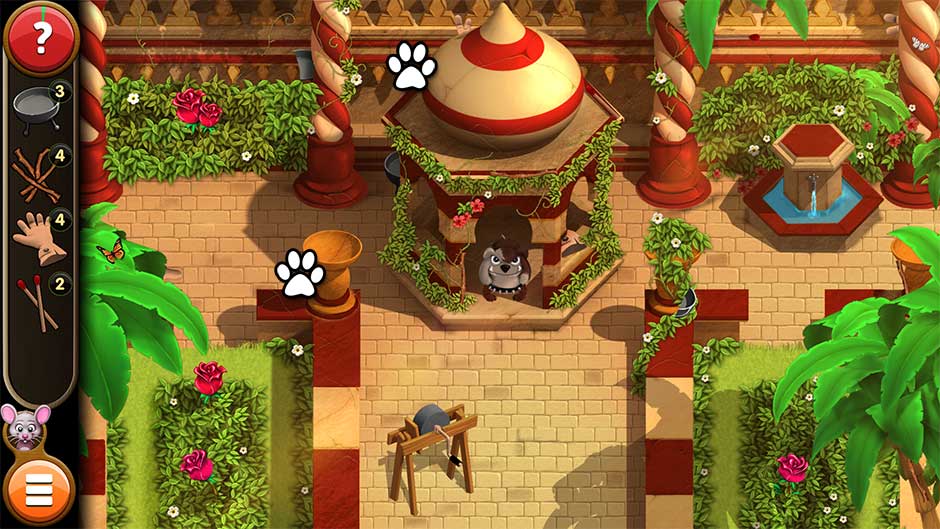
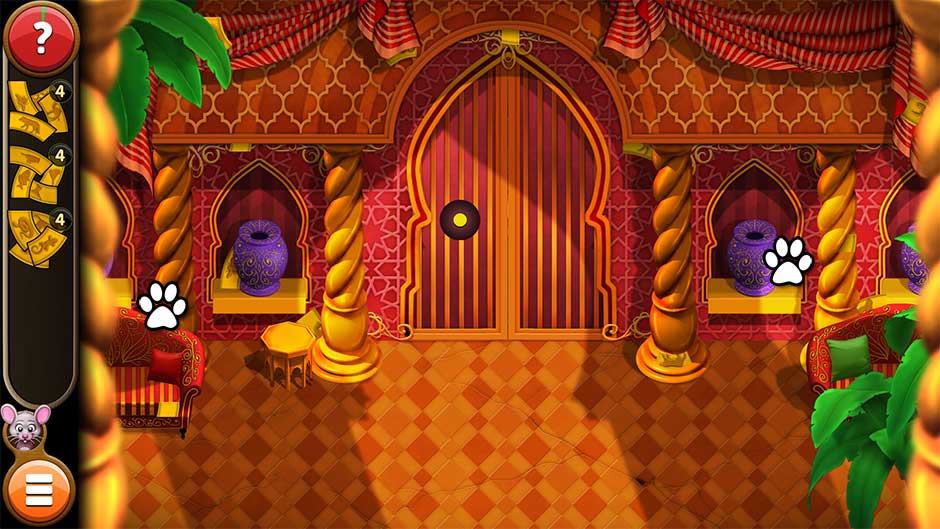
Level 51
Find the pieces of the Bucket, the Blunt Shears, the Rock, and the Broom scattered throughout the area. Their locations are pictured below.
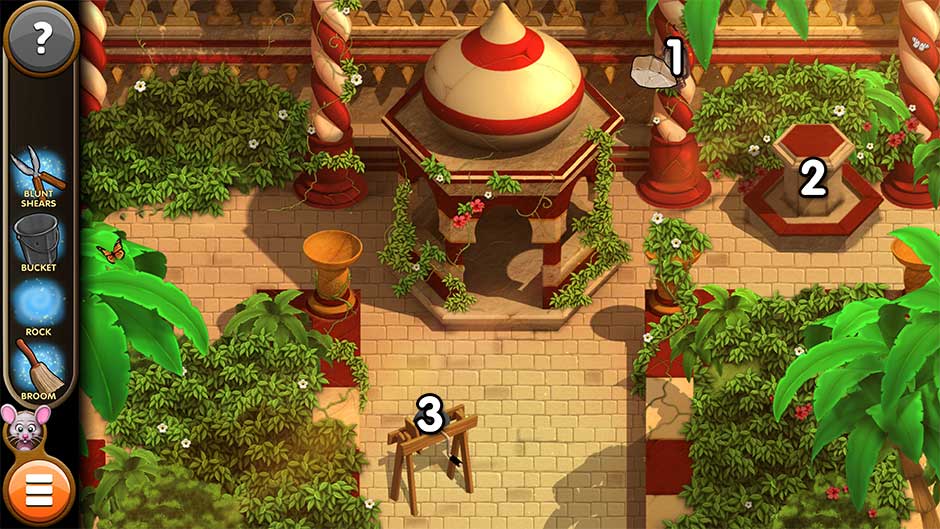
With all the items assembled, you’ll need to sharpen the Shears for the next part.
- Use the Rock to knock down the Oil Lamp.
- Use the Oil Lamp on the fountain faucet on the right, then turn on the water. Fill the Bucket with Water.
- Use the Water on the sharpening stone, followed by the Blunt Shears.
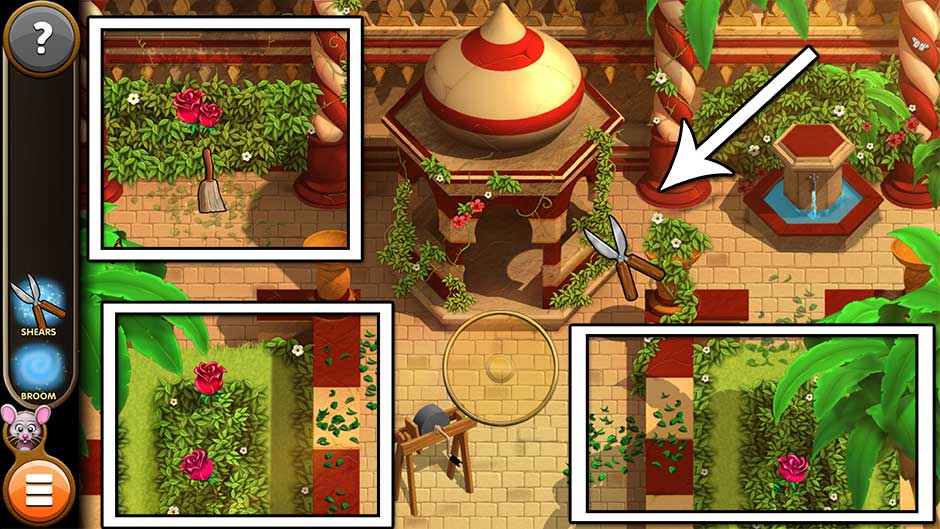
Now the Shears are sharp enough for the next part of your task. Use the Shears to trim the garden on the left, right, and around the gazebo. You’ll need to click within the circle that appears to use the Shears. Once finished, use the Broom to sweep up the mess.
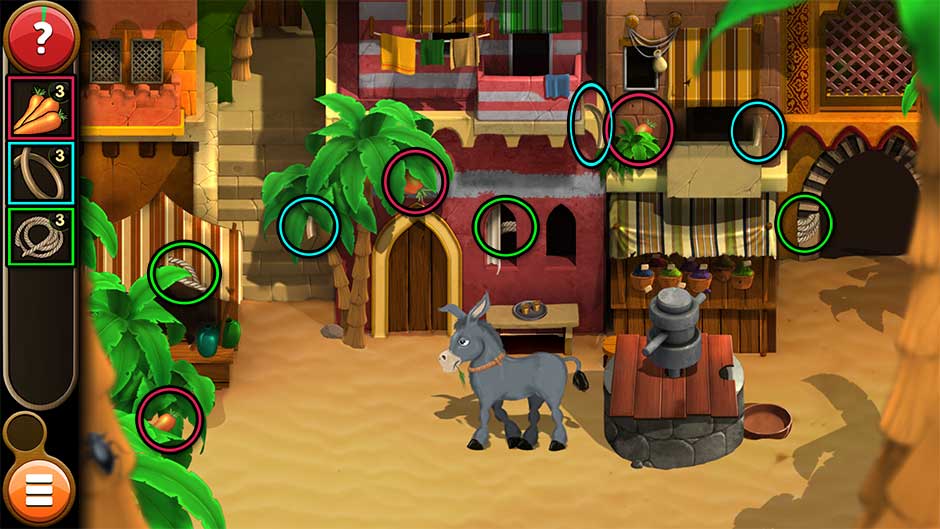
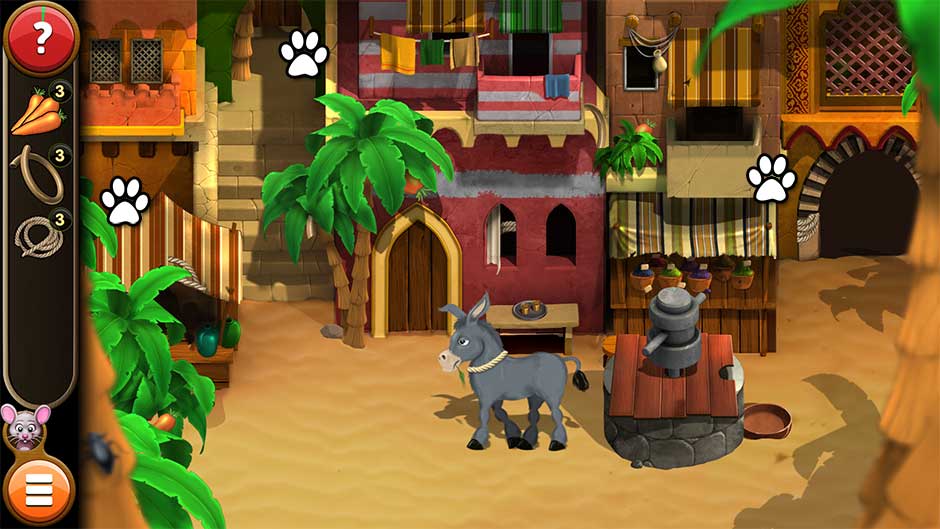
Level 52
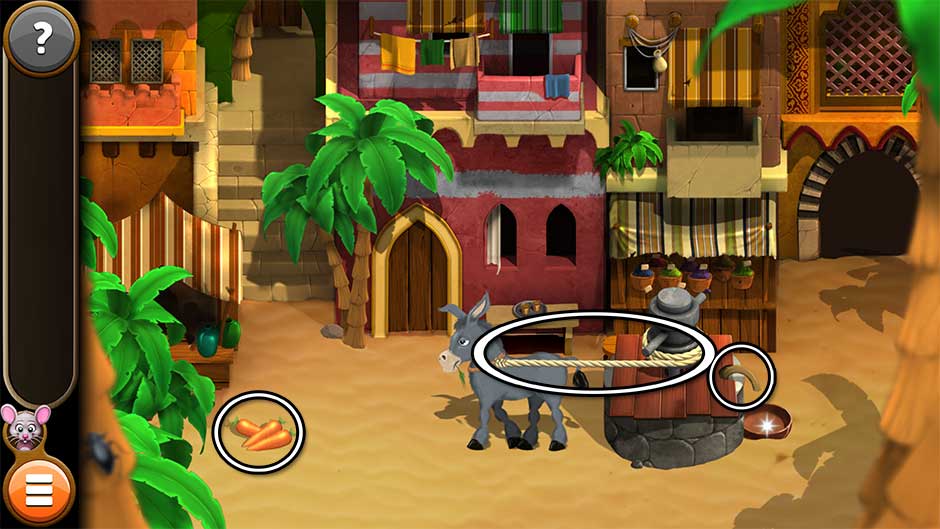
Find the pieces of the Rope and Hose, as well as the Carrots. Their locations are shown below.
Once found, attach the Hose to the right side of the well and the Rope to the donkey. Place the Carrots in front of the donkey to coax it into moving, filling the bowl with water.
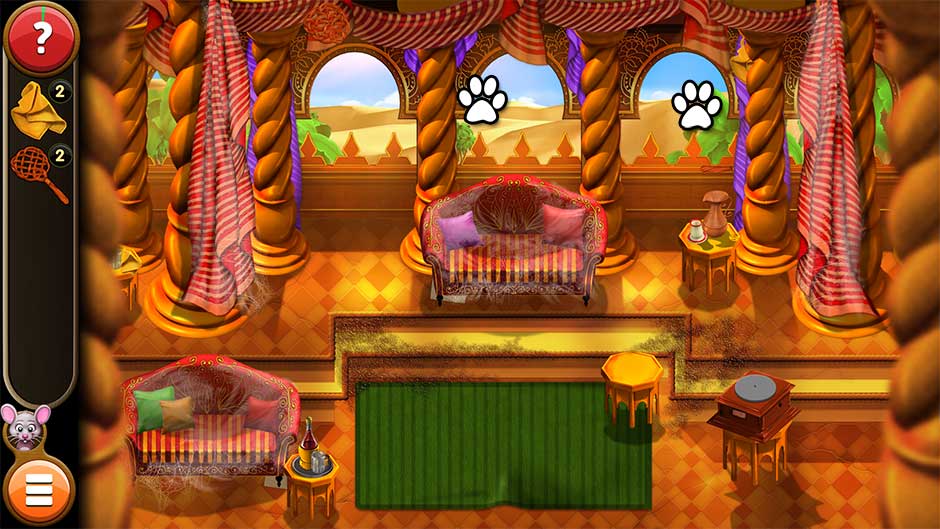
Level 53
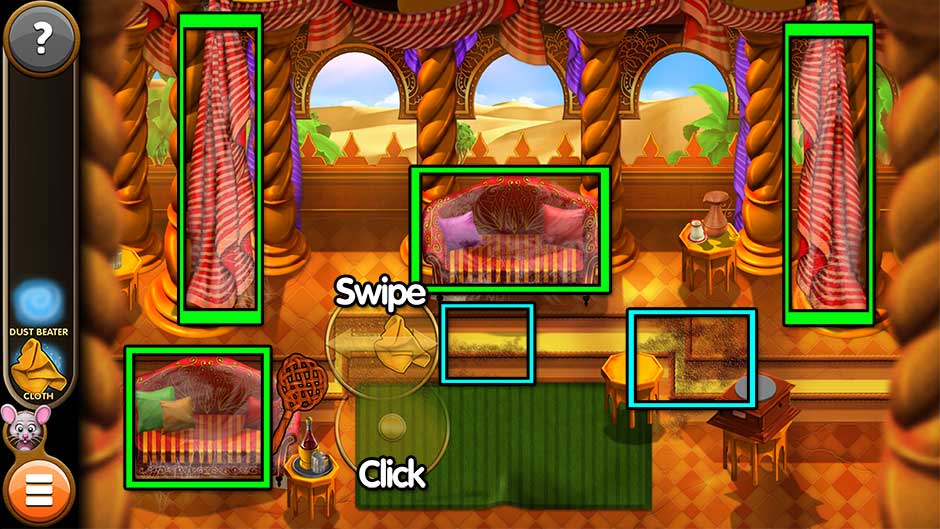
Find the pieces of the Dust Beater and the Cloth. Their locations are shown below.
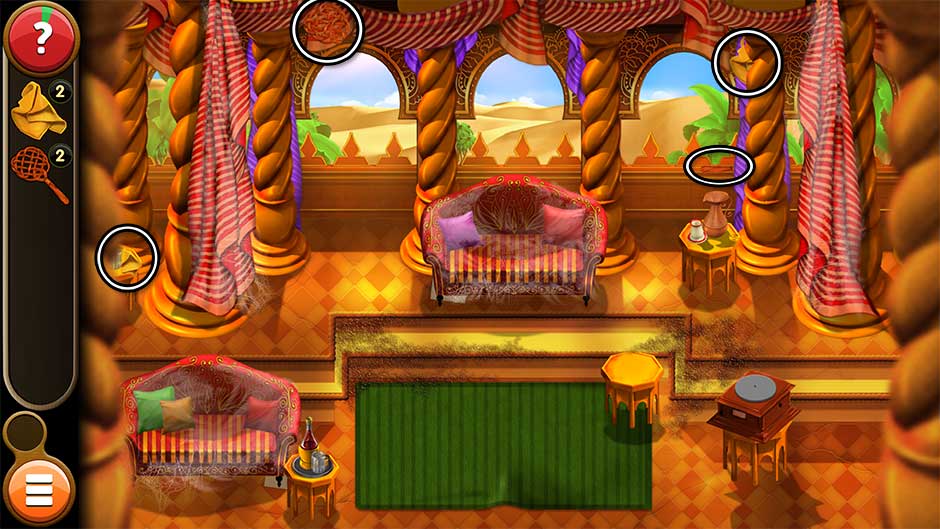
Once assembled, use the Dust Beater to clean the couches and the curtains. Click multiple times within the circle that appears to use the item. Use the Cloth to clean the dirty floor. Swipe back and forth within the circle that appears to use the item.
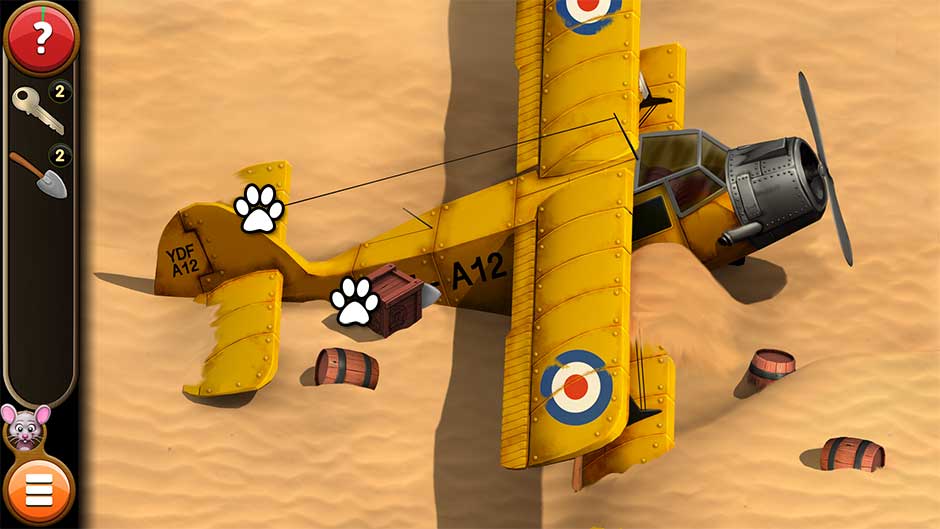
Level 54
Find the pieces of the Key and the Shovel. You’ll need to use the completed Shovel to find the last piece of the Key. Their locations are shown below.
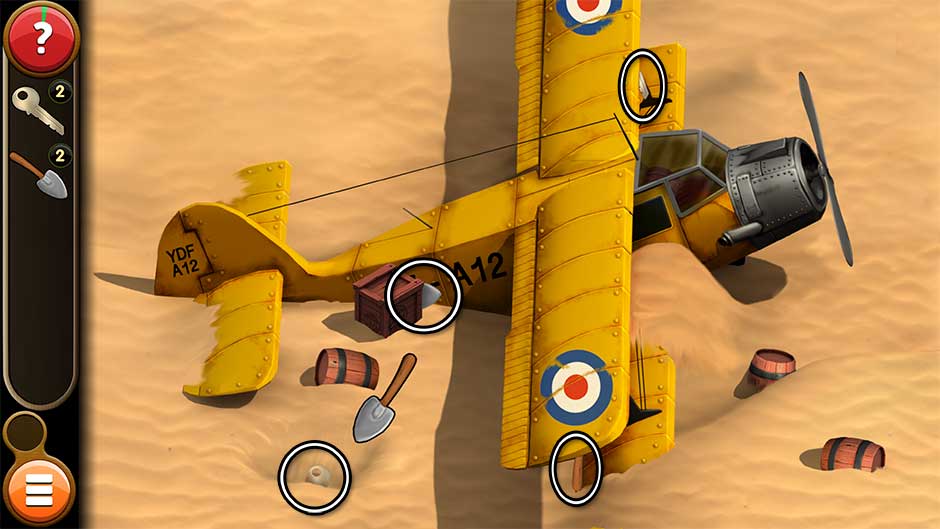
Next, use the Shovel to dig out the front of the wing. Use the Key to open the door to the plane. Inside, click through the materials on top of the log book until you come to the torn page with a list of numbers. These are an important clue you’ll need to solve the upcoming puzzle.
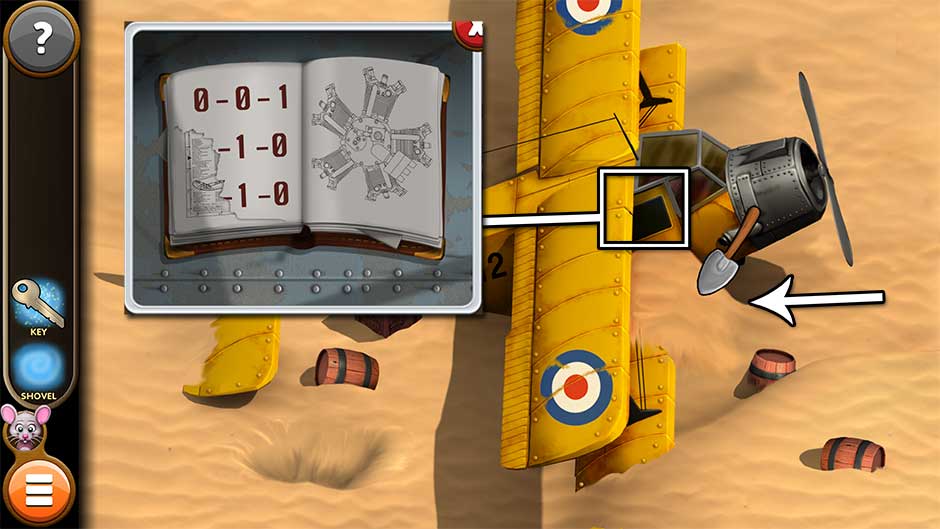
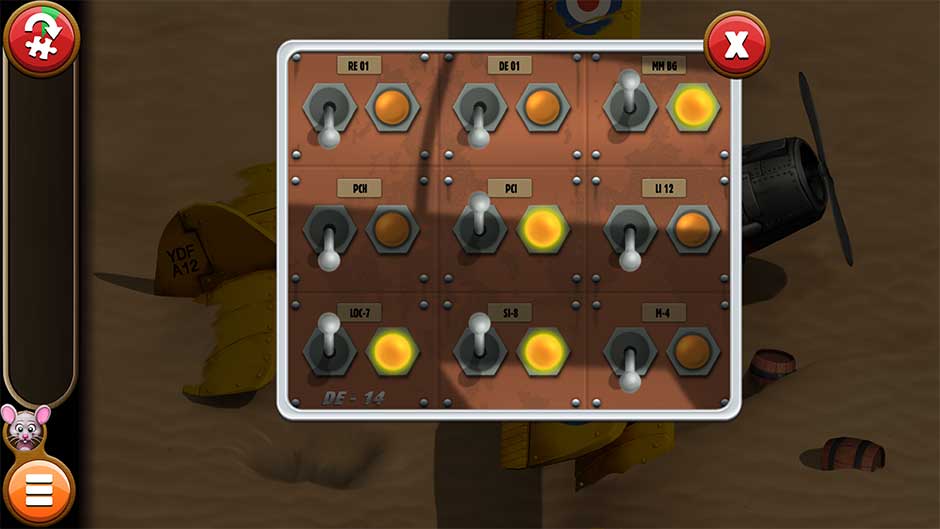
Now take a closer look at the plane’s engine and propeller. Flip the switches into the correct positions to start the engine. 1 = On and 0 = Off per the clues in the log book. The last two switches you’ll have to guess. The puzzle solution is shown below:
Level 55
Find the pieces of the Firewood, the Matches, the Empty Bowl and the Glove. Their locations are shown below.
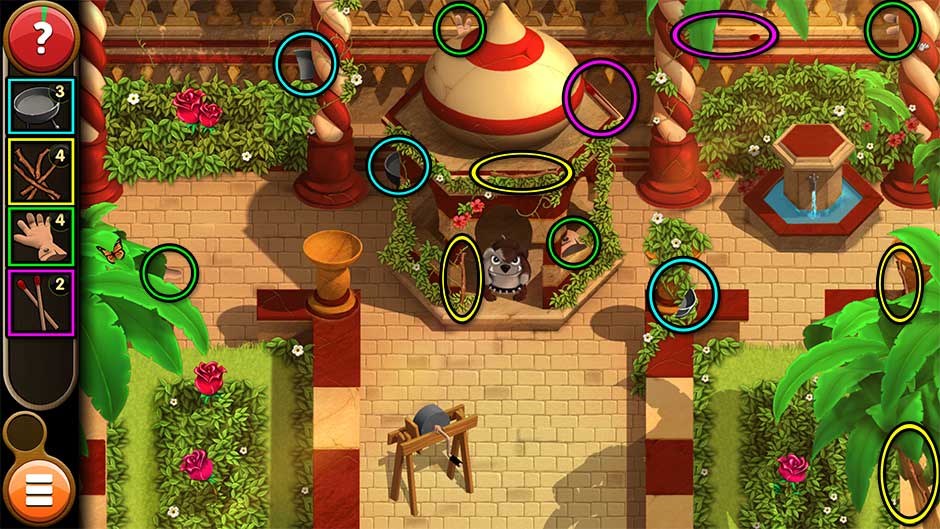
Now it’s time to do something about that pesky guard dog. Place the Firewood in front of the dog, then light it with the Matches. Use the Empty Bowl on the fountain to fill it with Water, then place it over the fire in front of the guard dog.
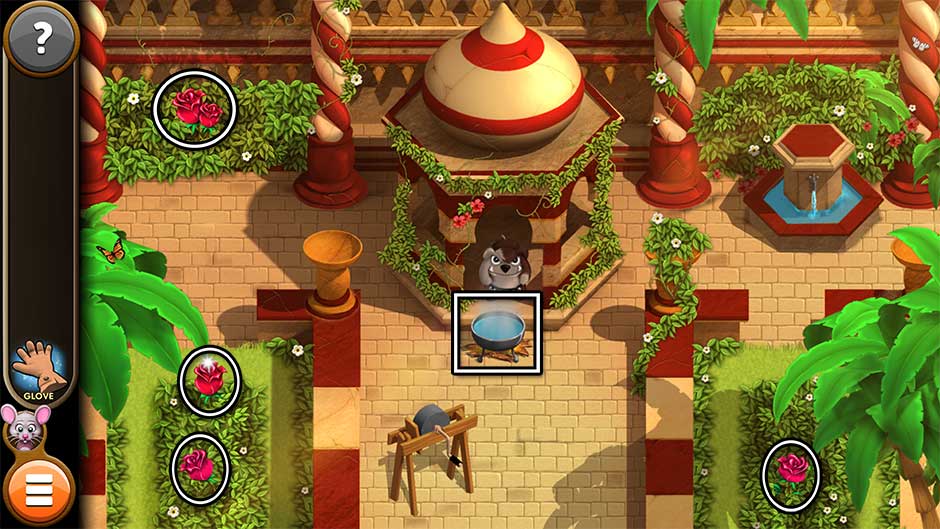
Next, collect the Flowers around the garden using the Glove from your inventory. You can only pick up one at a time. Every time you pick a Flower, put it in the pot of water in front of the dog. Repeat this using all the roses in the garden to eventually put the dog to sleep.
Level 56
Find the items necessary to clean the Jeep – the Soap, the Hose, the Sponge, and the Duct Tape. Their locations are shown below.
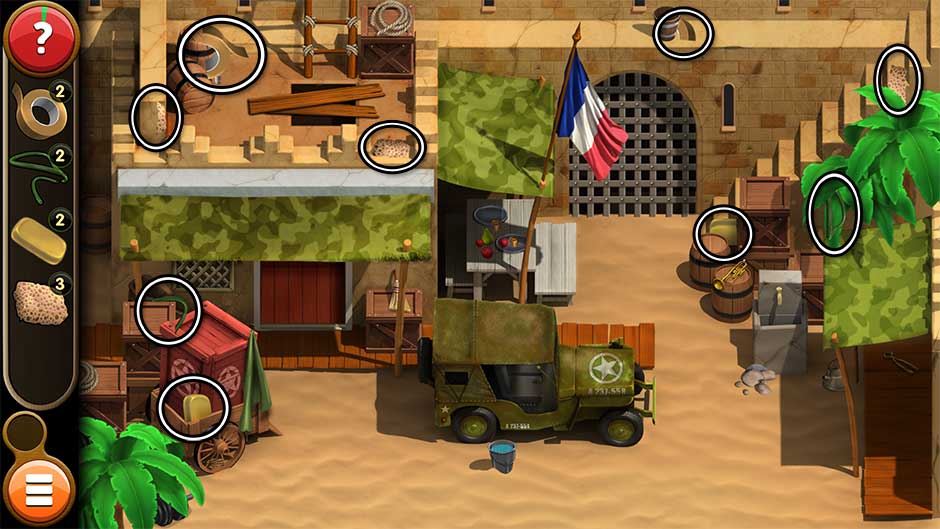
Once you’ve found all the objects, attach the Hose to the stone fountain on the right. Use the Duct Tape to repair the hole in the hose.
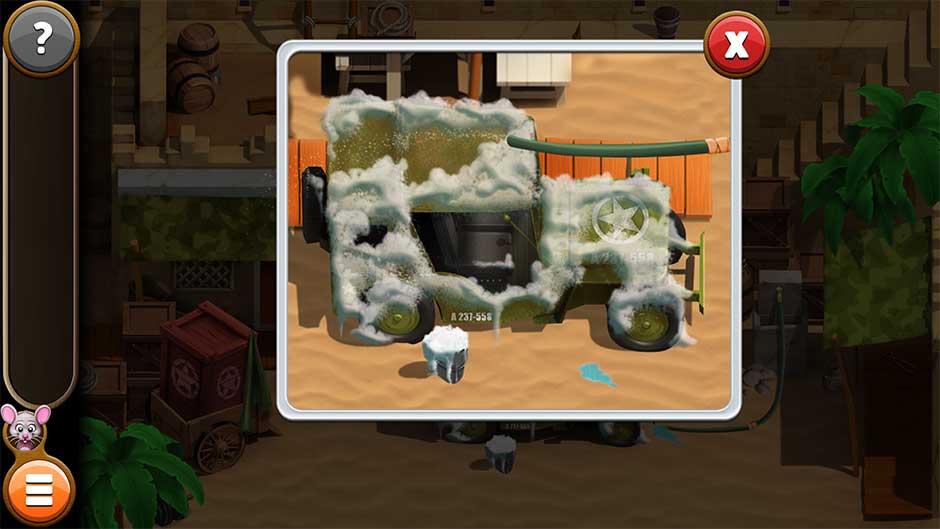
Next, zoom in on the Jeep. Drop the Soap into the bucket of water. Use the Sponge on the bucket of suds and start washing the Jeep by swiping back and forth in the circle that appears.
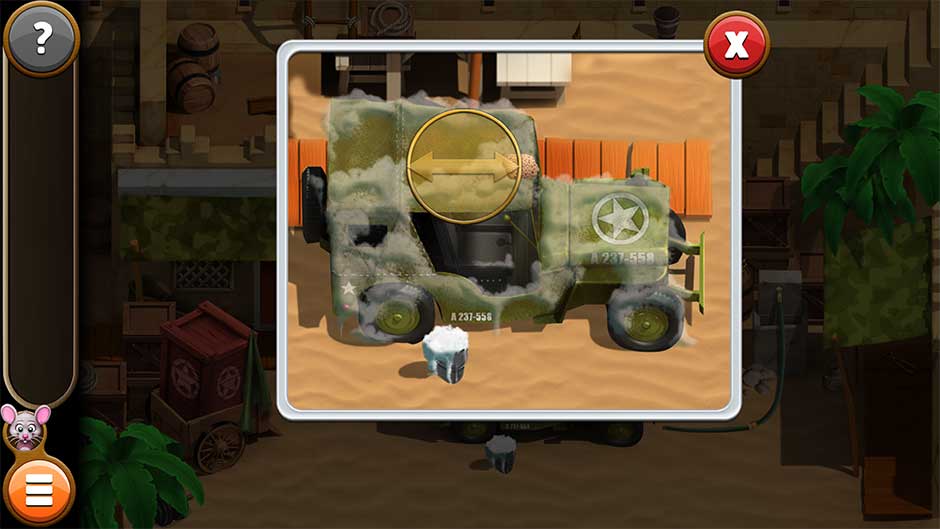
Finally, click on the faucet to turn the water on to the hose. Use the Hose to rinse the Jeep.
Level 57
Find the Lock Pieces scattered throughout the area. Their locations are shown below.
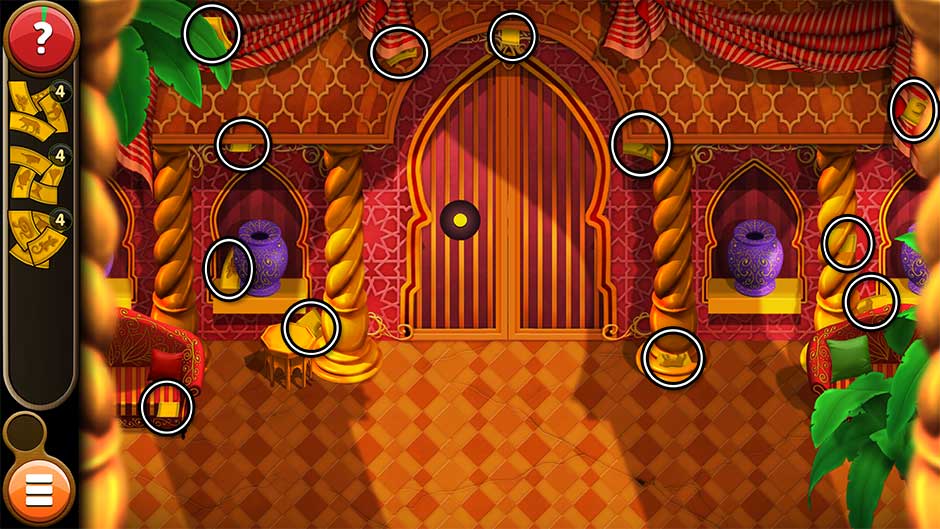
Take a closer look at the circular slot in the door. Use the Lock Pieces on the slot to trigger a puzzle.
Click on the circles on the right to rotate the rings. The smallest circle rotates the smallest ring, the medium circle rotates the center ring, and the largest circle rotates the largest ring. Rotate the rings until all the symbols are in the correct positions. The puzzle solution is pictured here:
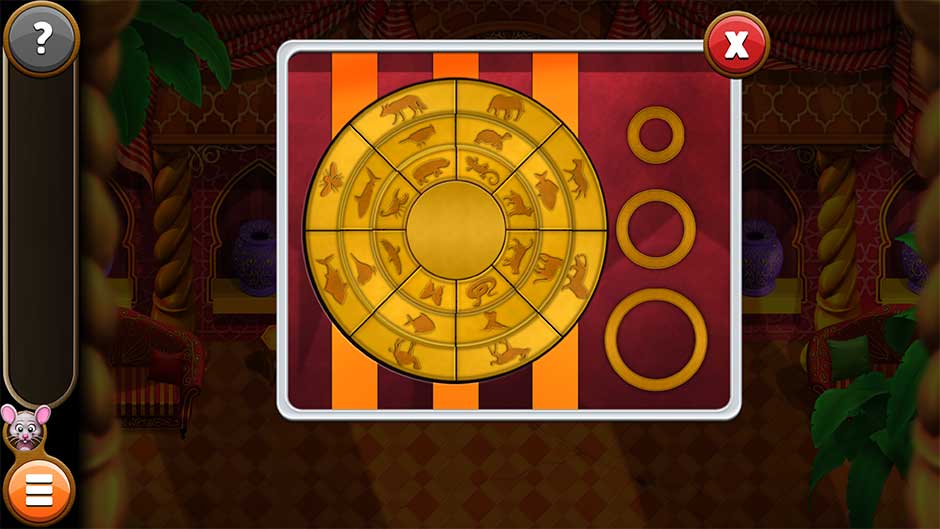
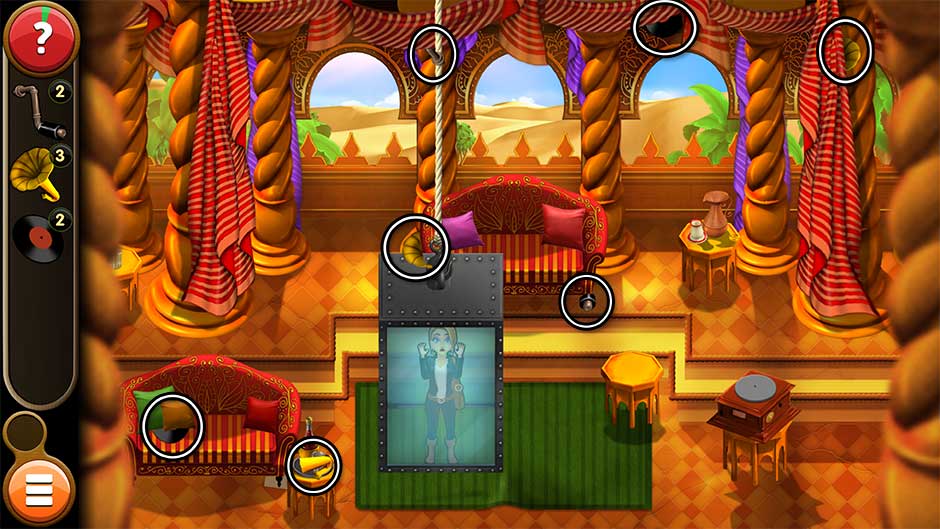
Level 58
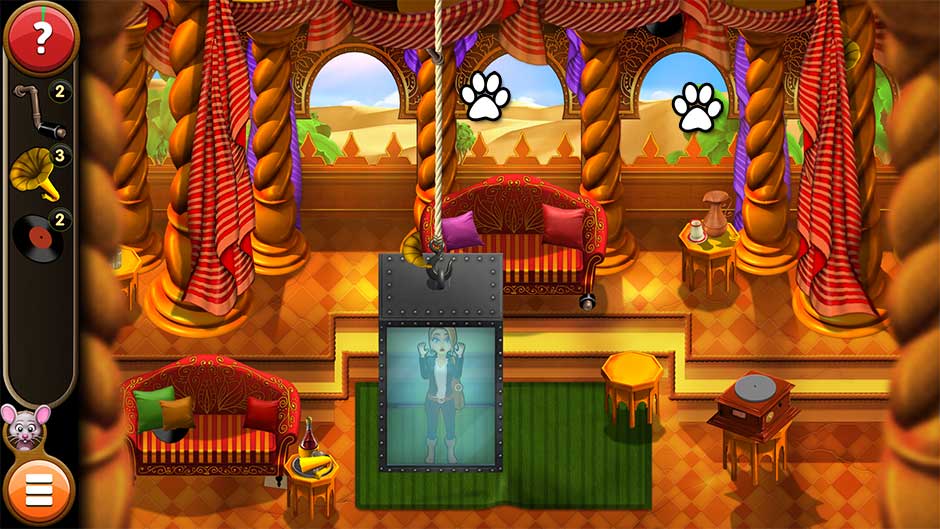
Find the pieces of the phonograph – the Horn, the Record, and the Crank. Their locations are shown below.
Once all the pieces have been found, use the Horn, the Record, and the Crank on the phonograph on the table on the right.
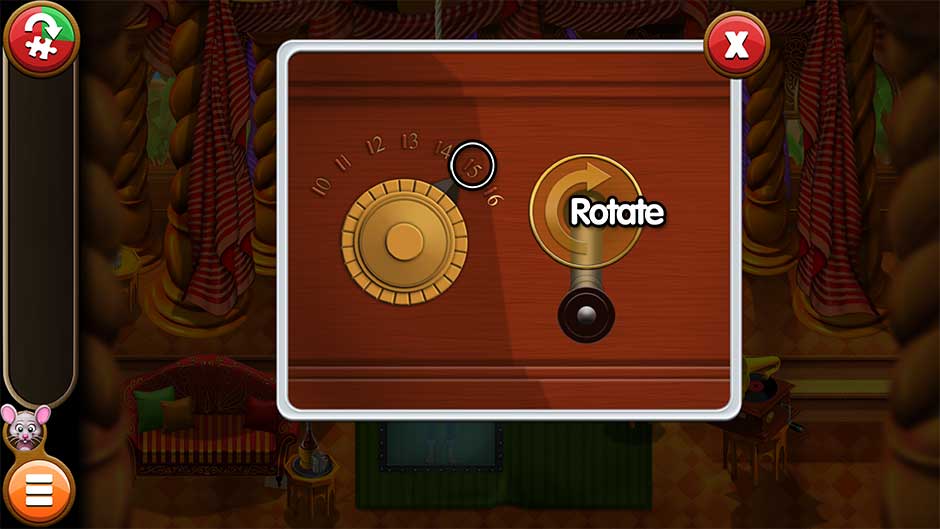
Take a closer look at the phonograph. Click on the dial to find the correct tone needed to shatter the glass. The correct solution is 15. Once selected, rotate clockwise within the circle that appears to operate the handle and play the music, freeing Kate.
Level 59
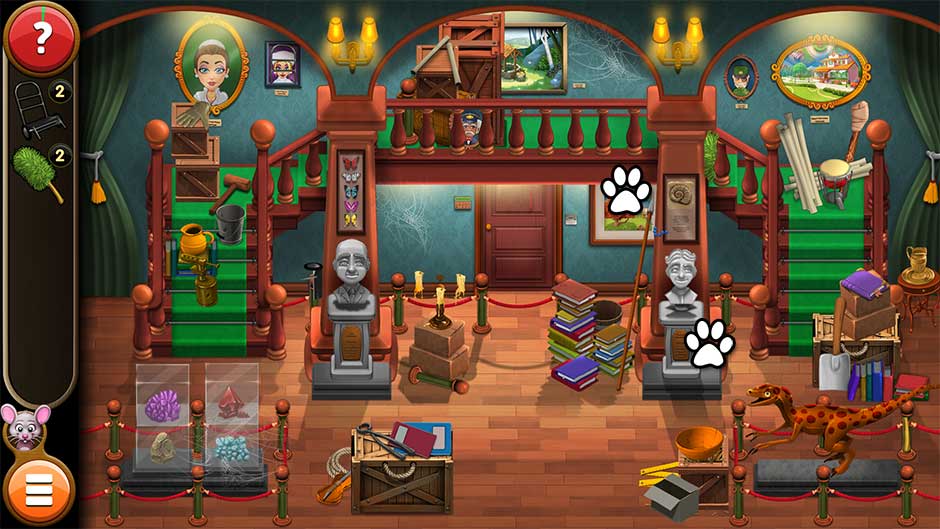
Ah, back at the museum! But it’s kind of a mess… Find the pieces of the Dolly Cart and the Feather Duster, shown below.
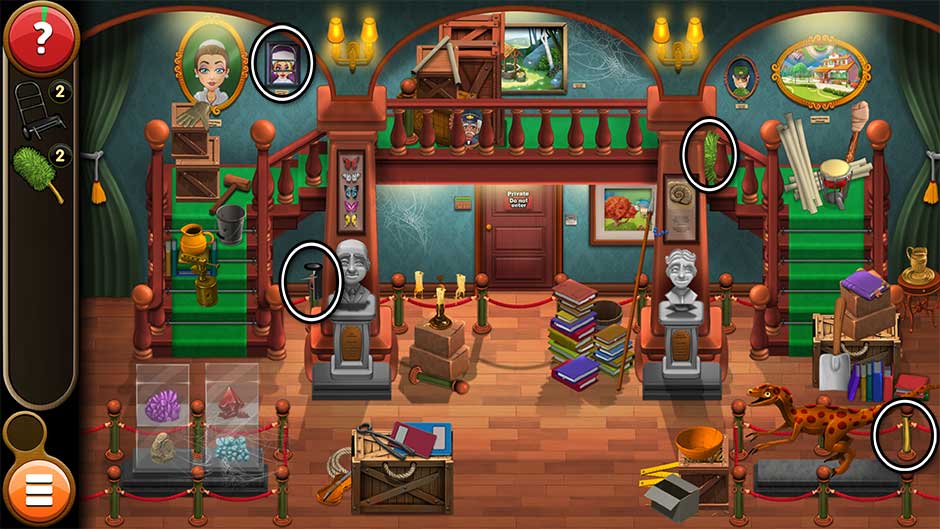
Once assembled, use the Dolly Cart to cart away the piles. Use the Feather Duster to remove the cobwebs. Swipe back and forth within the circle that appears to dust.
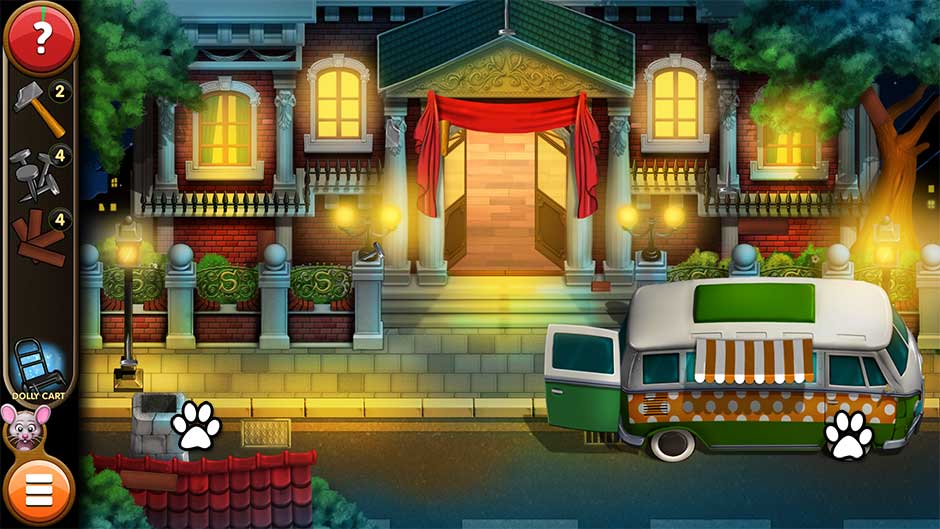
Level 60
Find the Planks, the Nails, and the pieces of the Hammer. Their locations are pictured below.
Place the Planks down over the steps of the museum entrance. Use the Nails on the planks and the Hammer to secure them. You’ll need to click within the circle that appears to use the Hammer.
Now it’s time to cart in the supplies. Click on the van on the right to remove a package. Use the Dolly Cart in your inventory on the package, then move it straight up over the plank ramp and into the museum. You’ll need to do this a total of 3 times to move all the supplies.

And now it’s time to party!
Congratulations! You’ve completed Mortimer Beckett and the Book of Gold!
Challenges
There are 18 challenges for you to conquer in addition to the game’s 60 story levels. Each chapter contains 3 challenges: Silhouette Challenge, Mice Challenge, and Jigsaw Challenge.
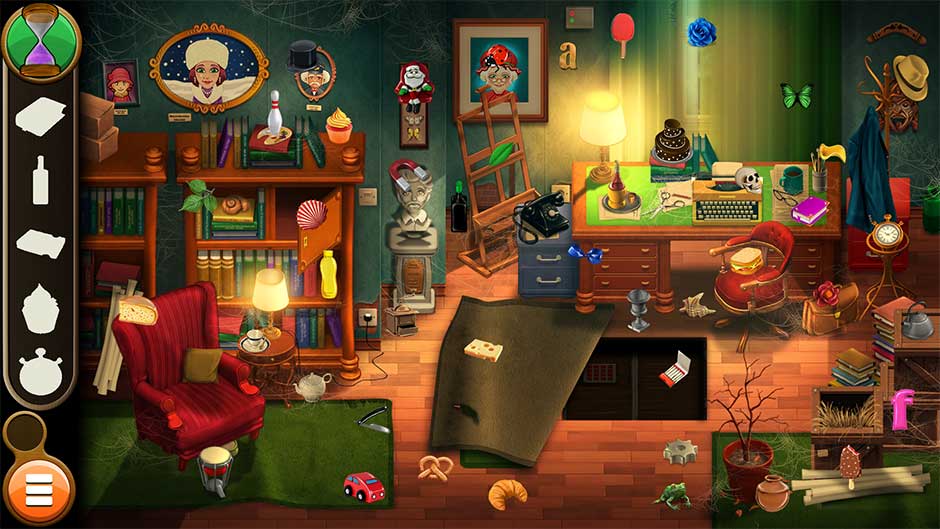
Silhouette Challenge
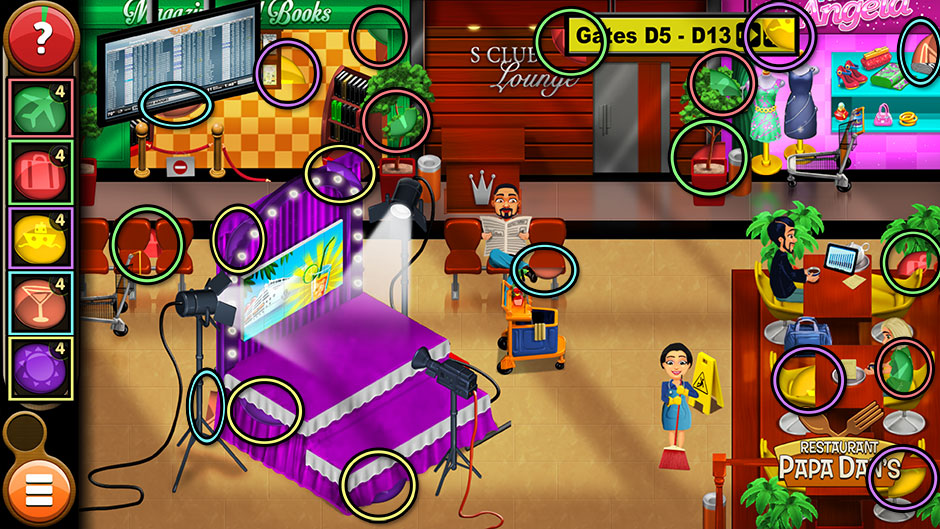
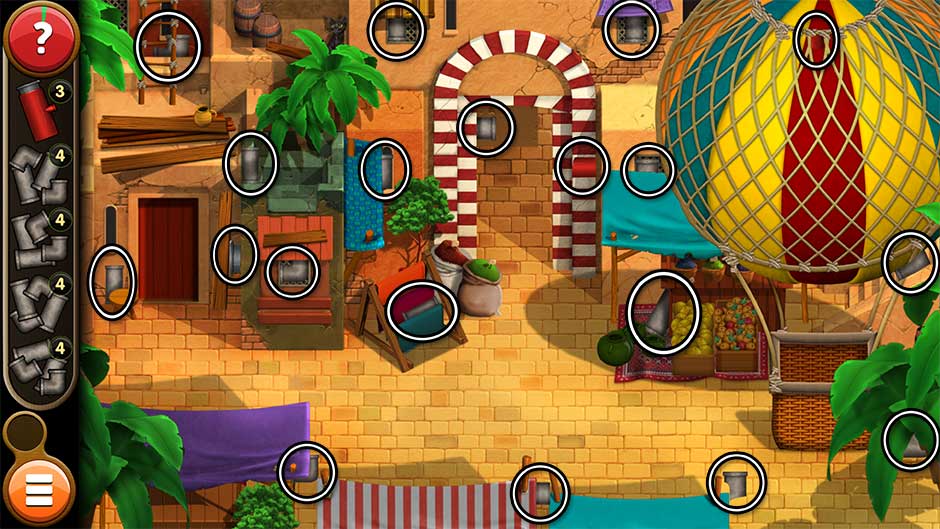
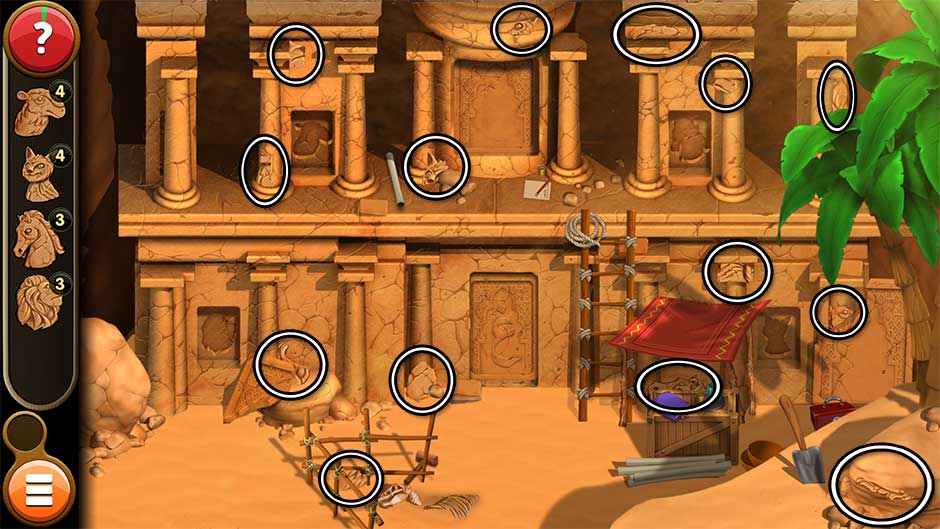
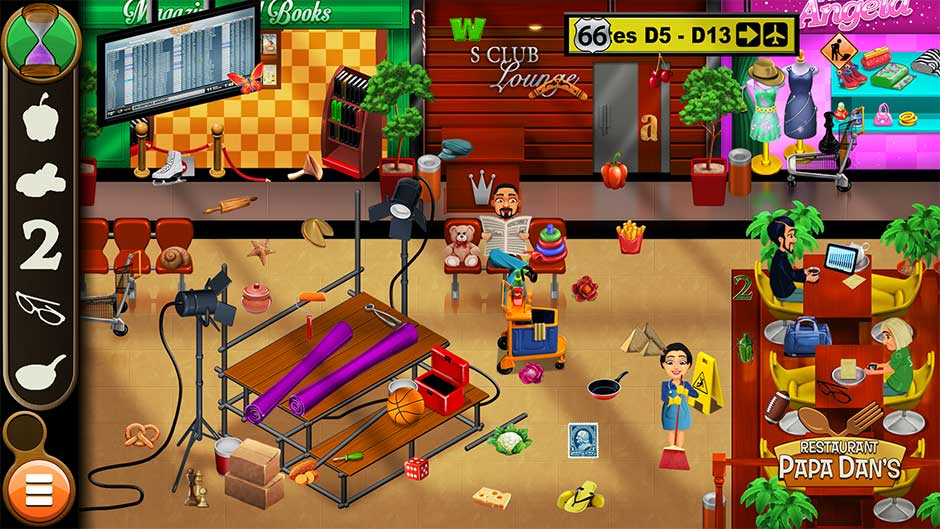
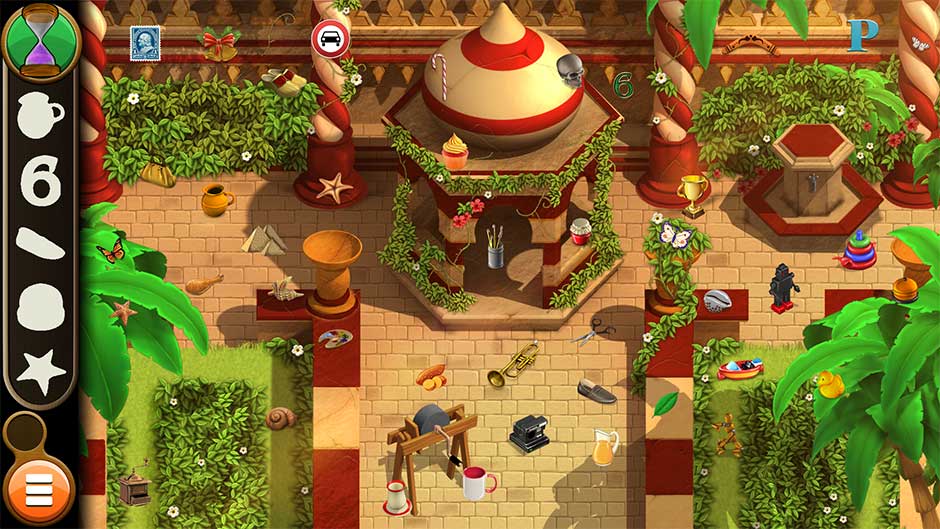
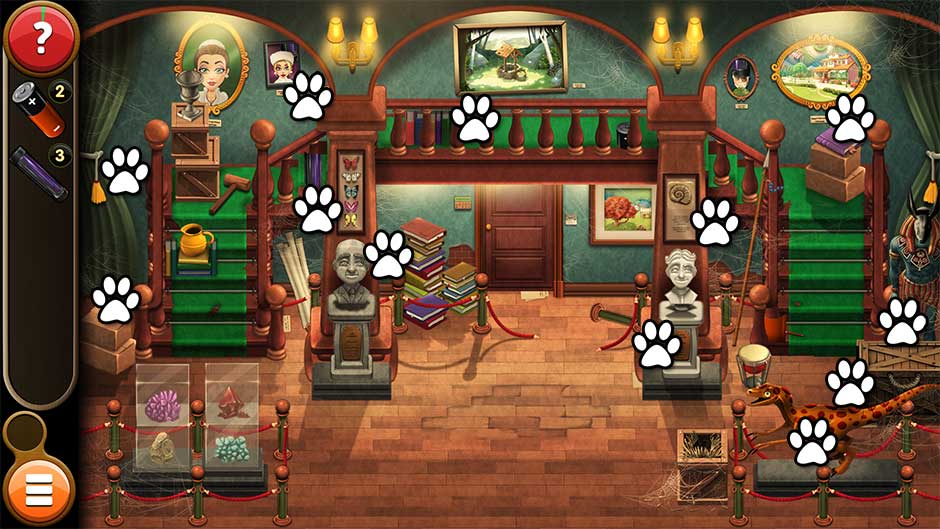
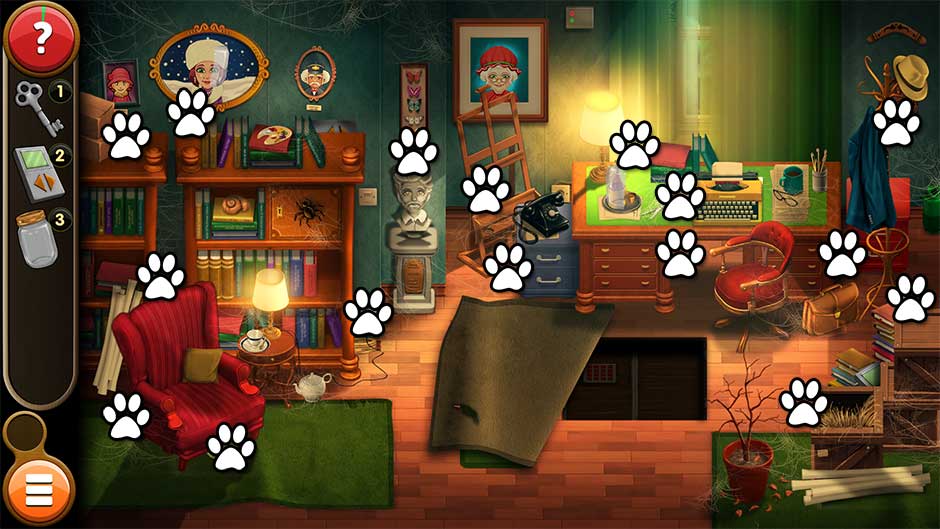
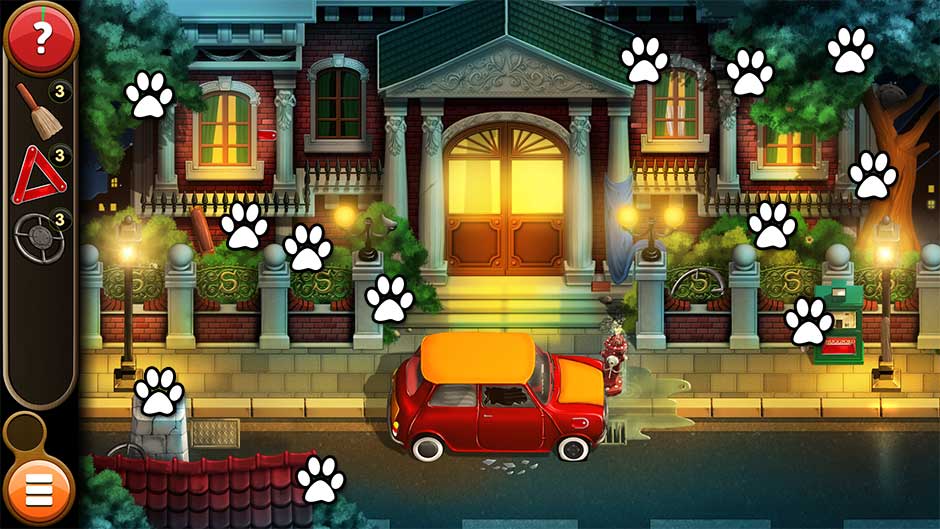
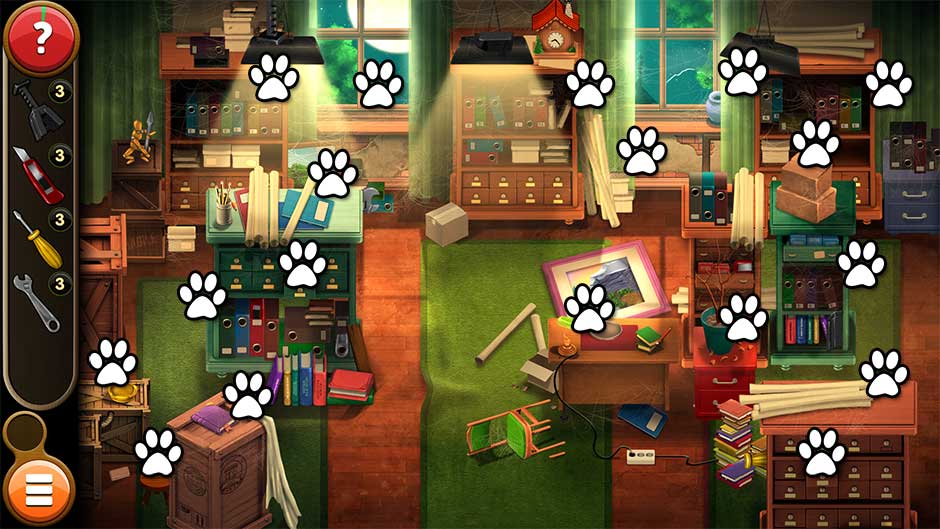
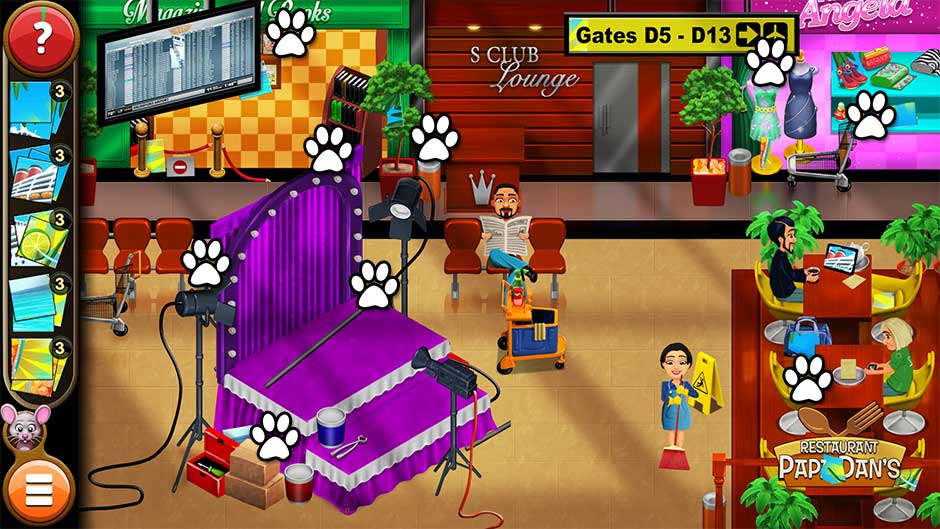
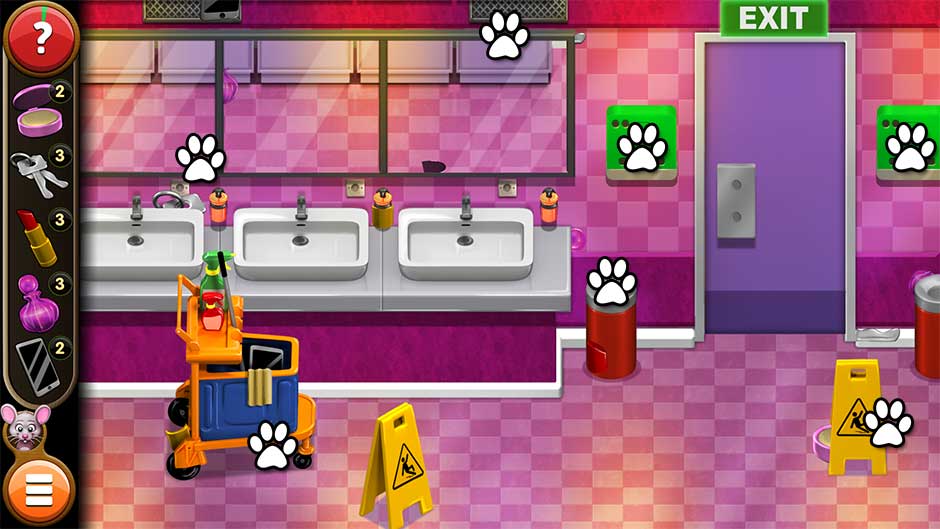
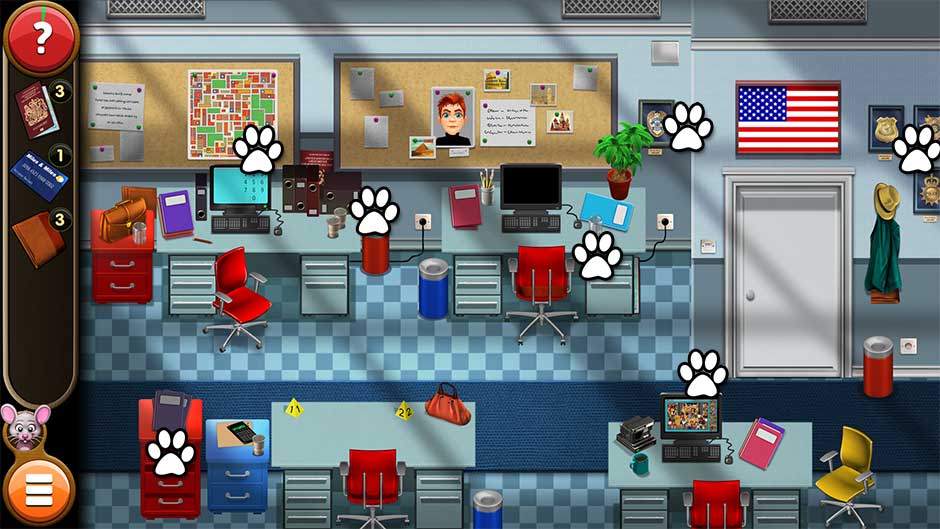
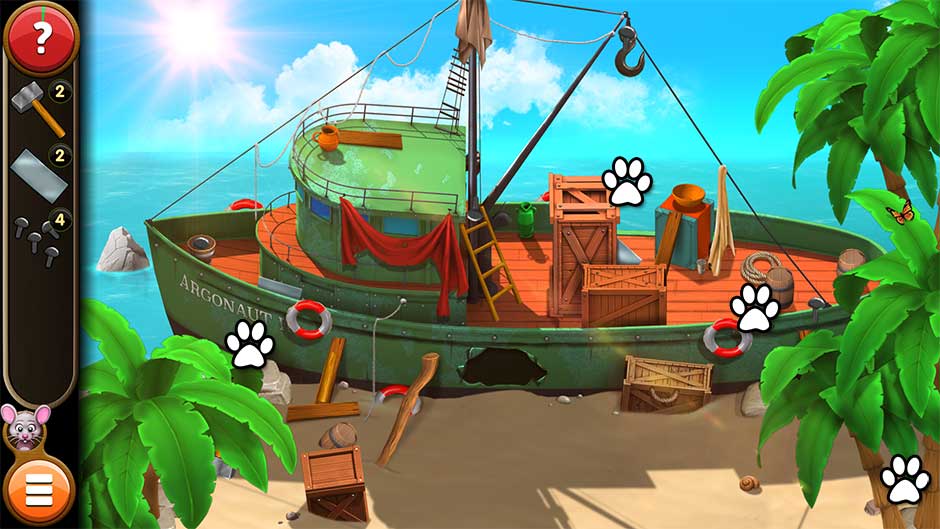
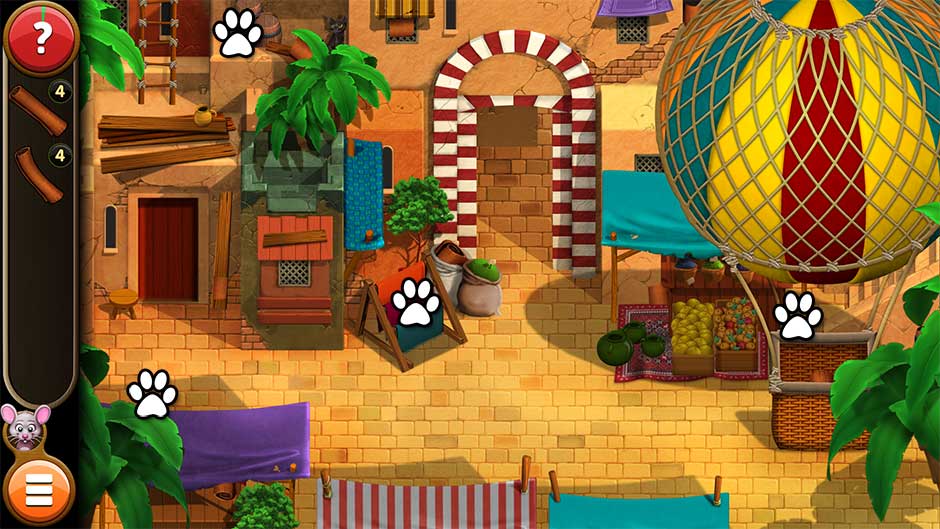
Collect all the items as represented by their silhouettes on the left. Be careful not to click on items whose silhouette isn’t shown! Earn hourglass badges by completing the challenge in the allotted amount of time. To make things more challenging, the scene will always be zoomed in. Click and hold to move around the scene.
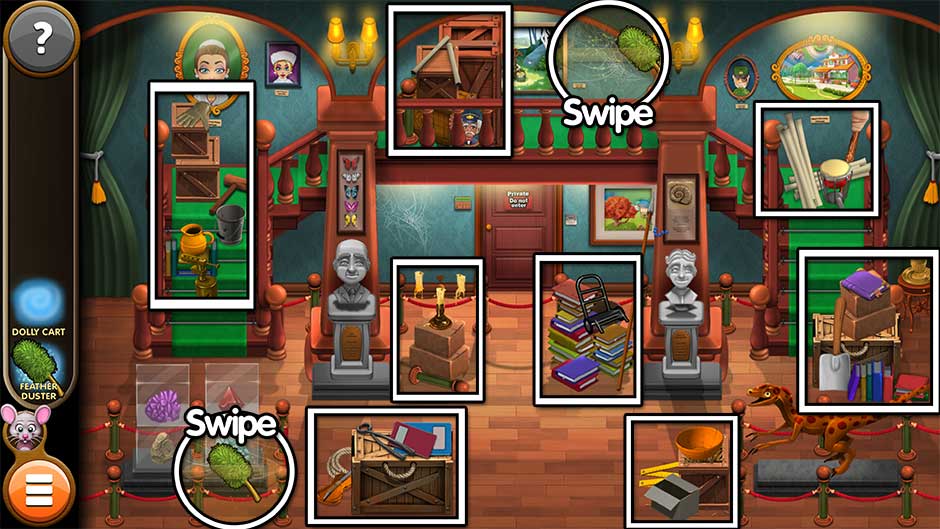
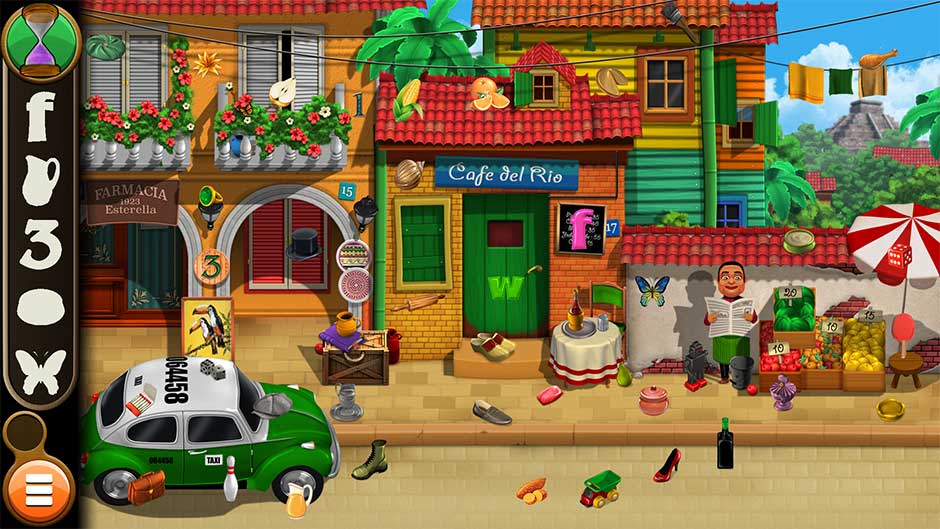
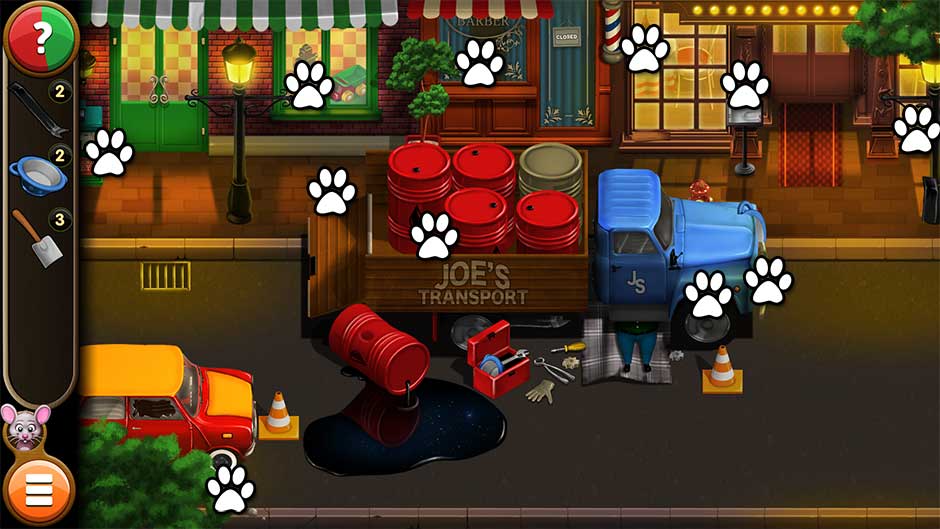
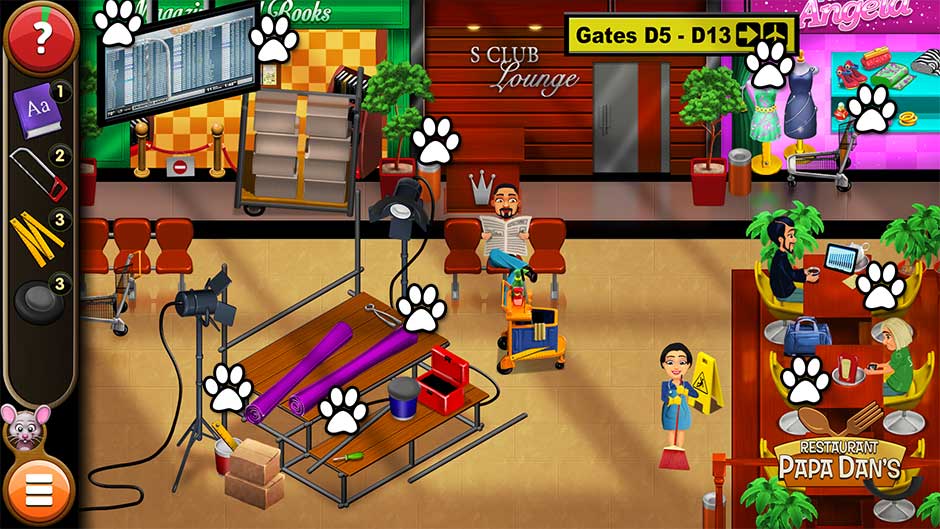
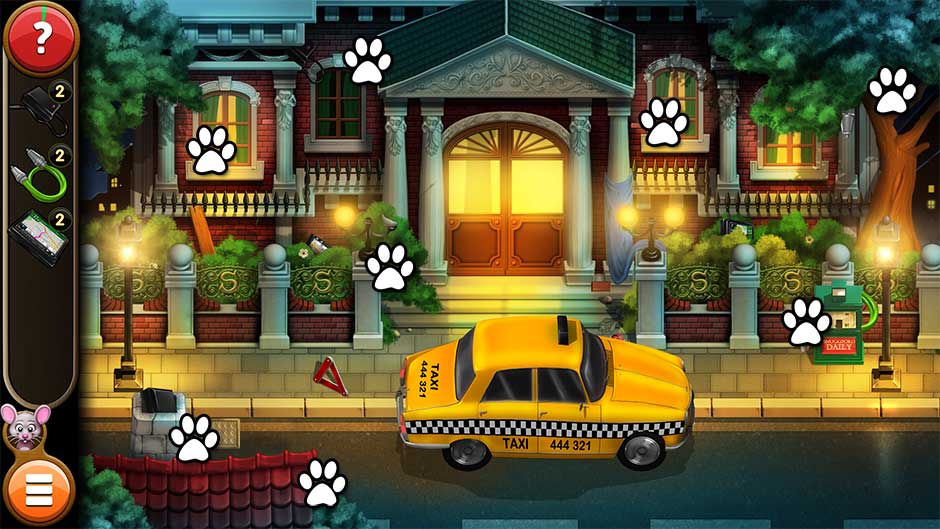
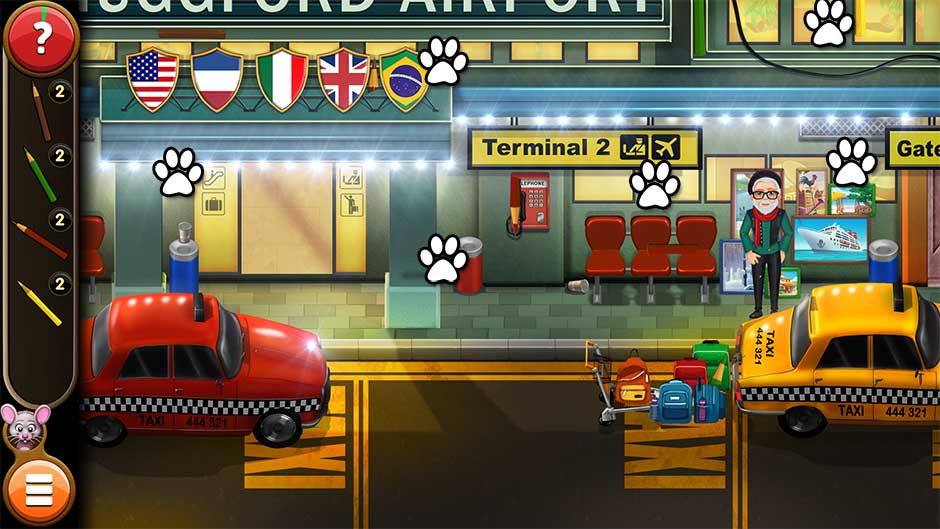
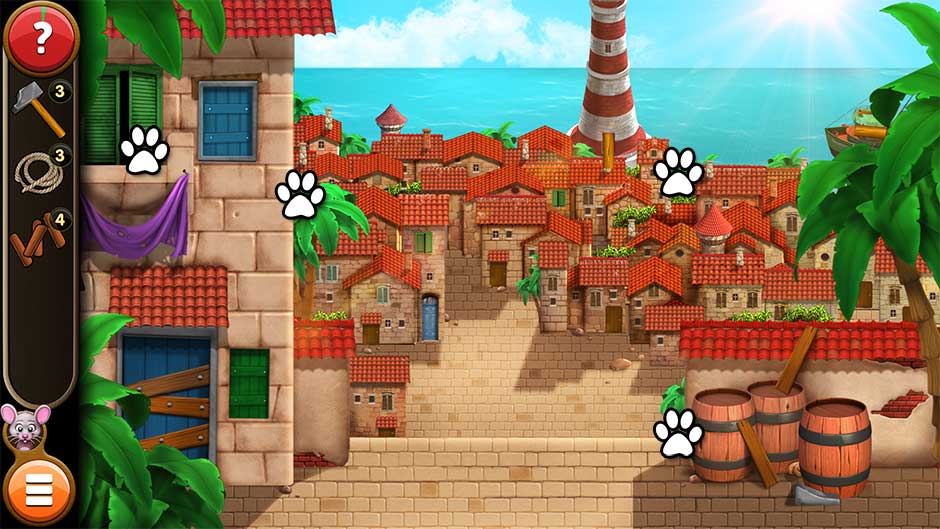
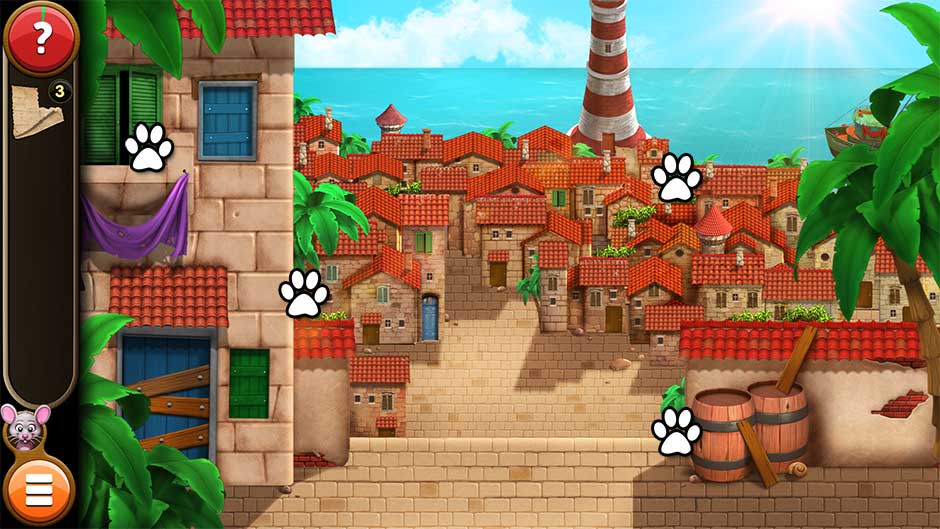
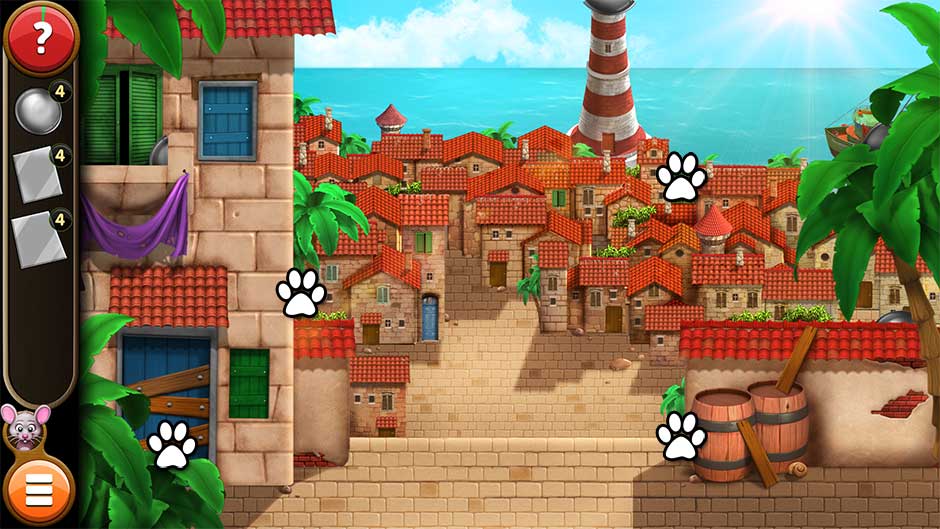
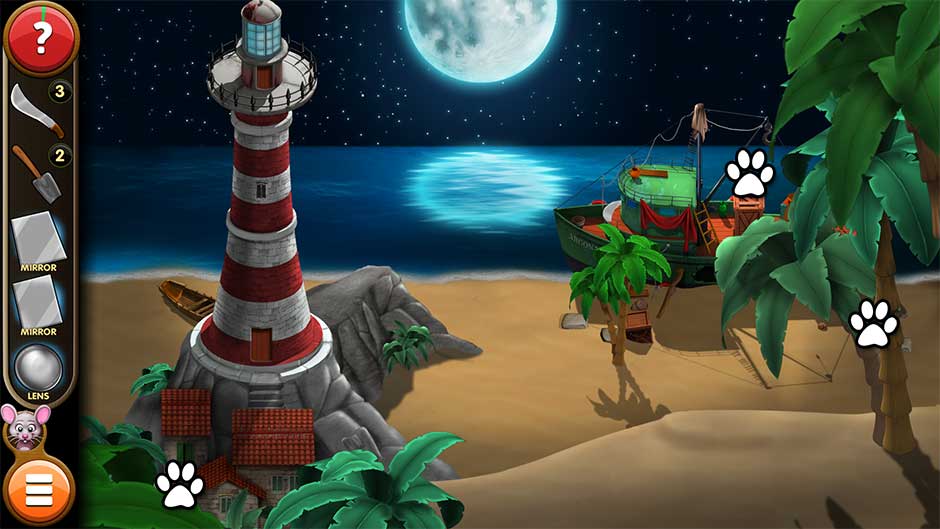
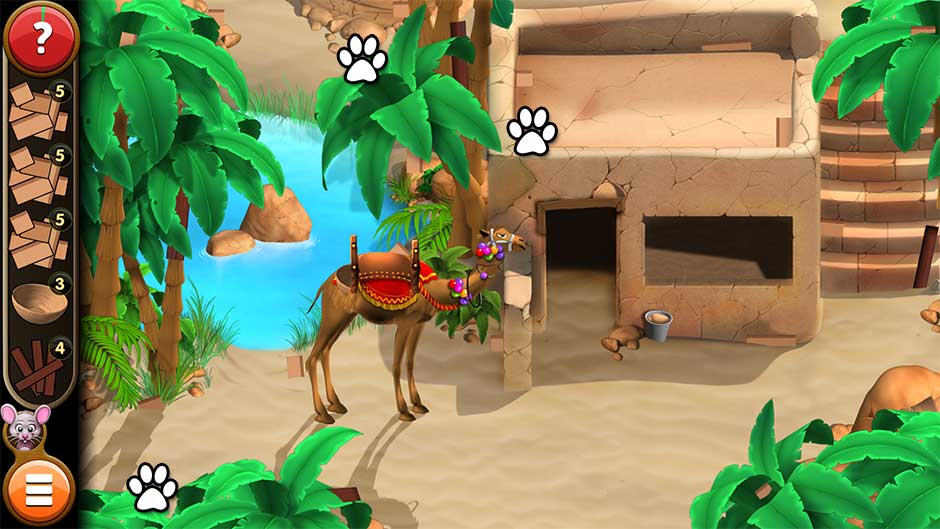
The items you will need to find are random each time you play. To help with these challenges, the following images are zoomed-out versions of the challenge levels. Finding items quickly will be up to you!
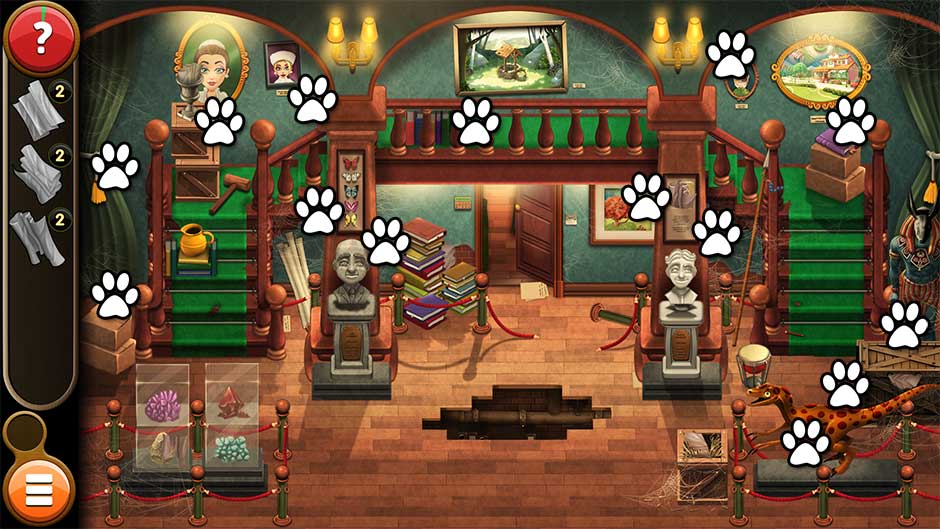
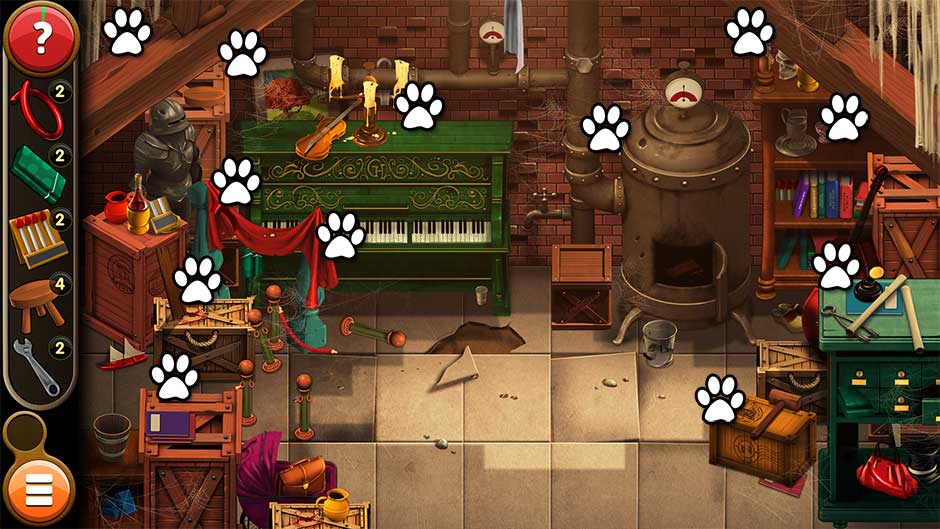
Mortimer Beckett and the Book of Gold – Silhouette Challenge – Chapter 1
Mortimer Beckett and the Book of Gold – Silhouette Challenge – Chapter 2
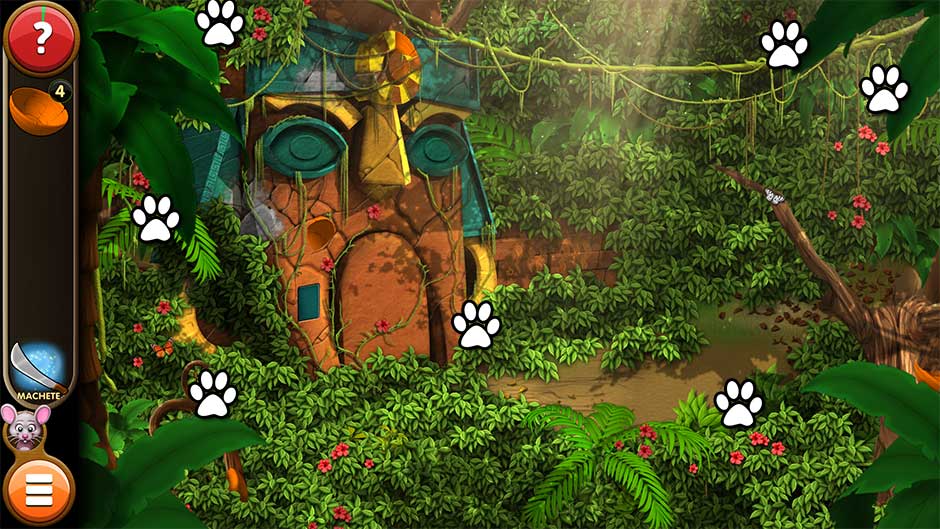
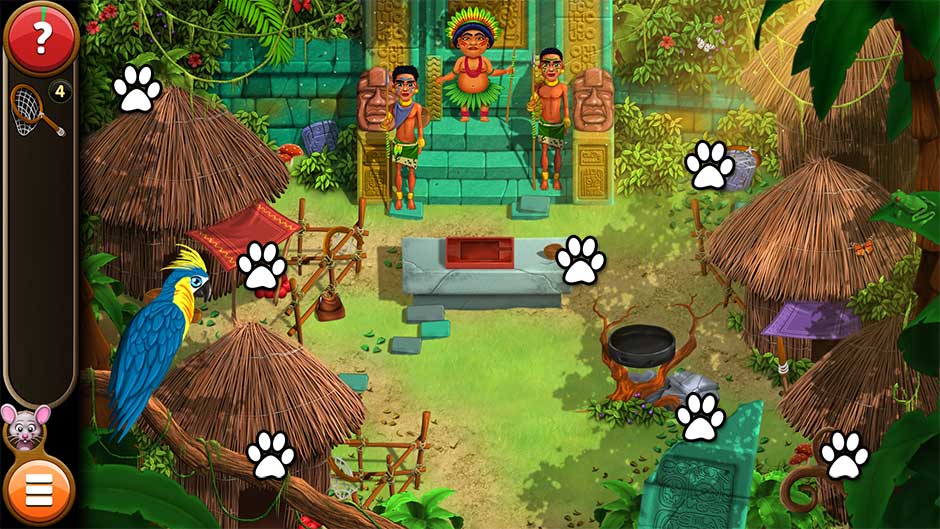
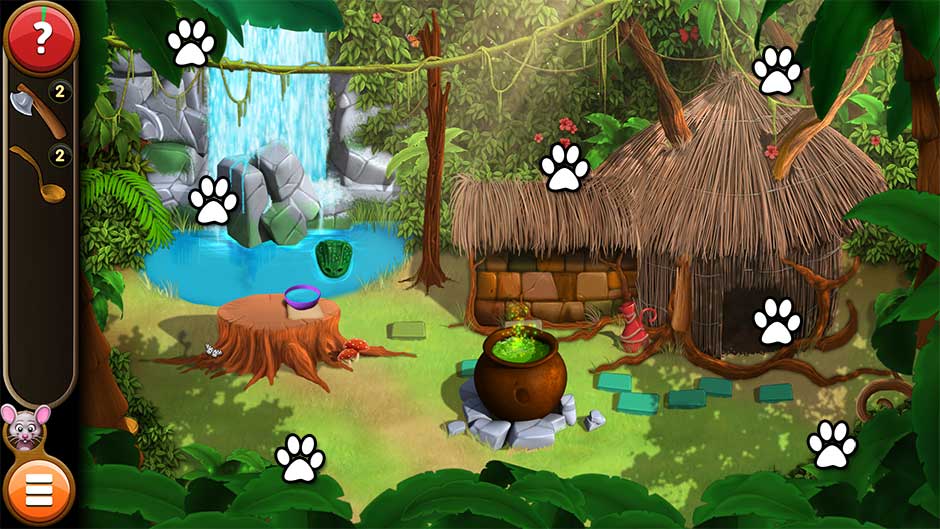
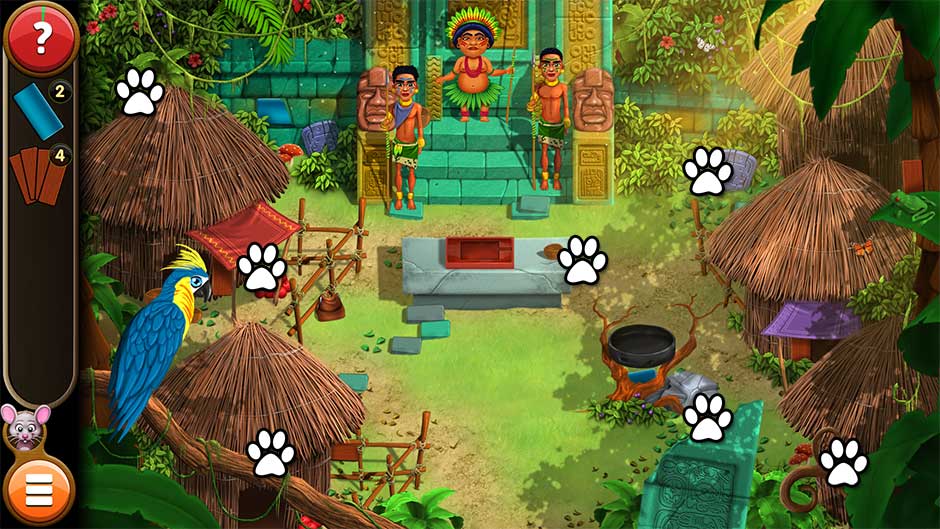
Mortimer Beckett and the Book of Gold – Silhouette Challenge – Chapter 3
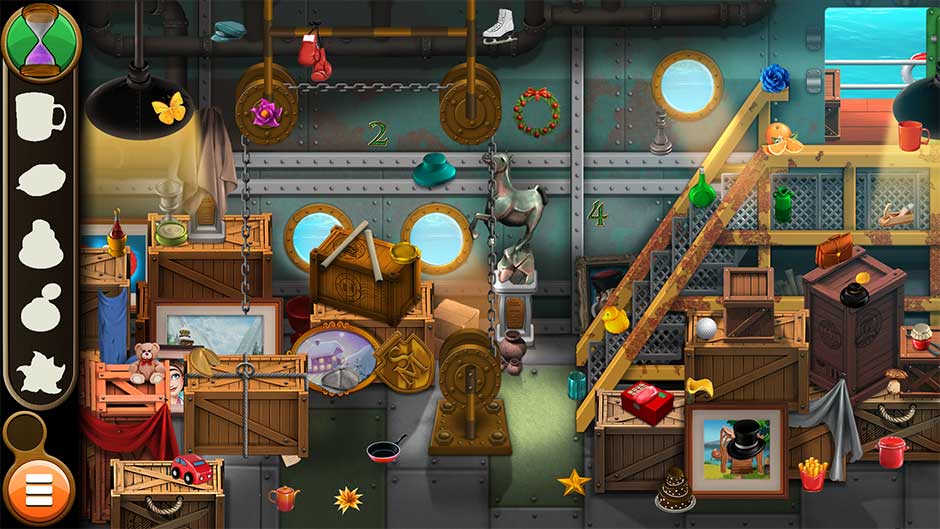
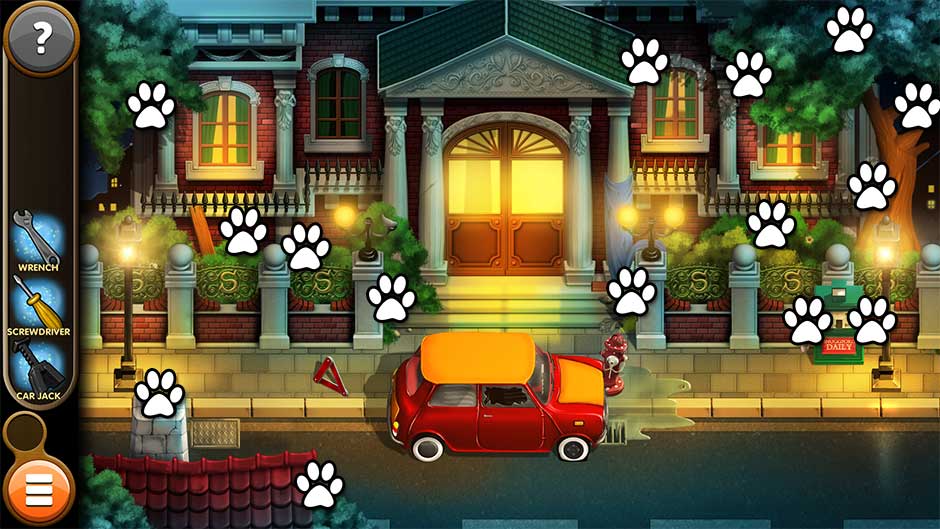
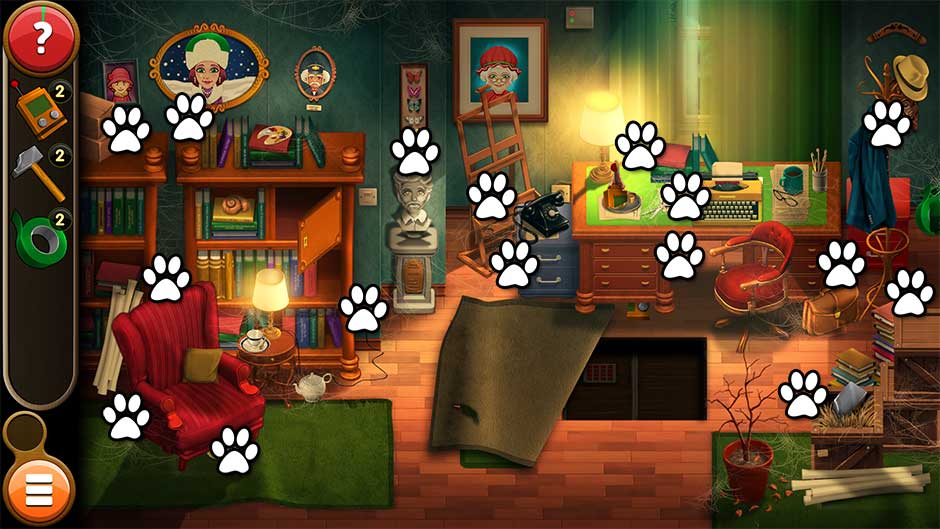
Mortimer Beckett and the Book of Gold – Silhouette Challenge – Chapter 4
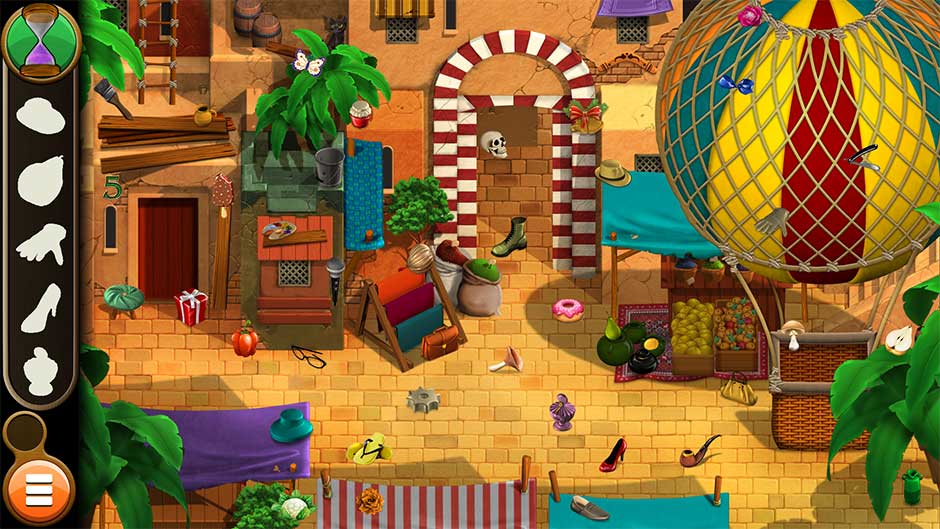
Mortimer Beckett and the Book of Gold – Silhouette Challenge – Chapter 5
Mortimer Beckett and the Book of Gold – Silhouette Challenge – Chapter 6
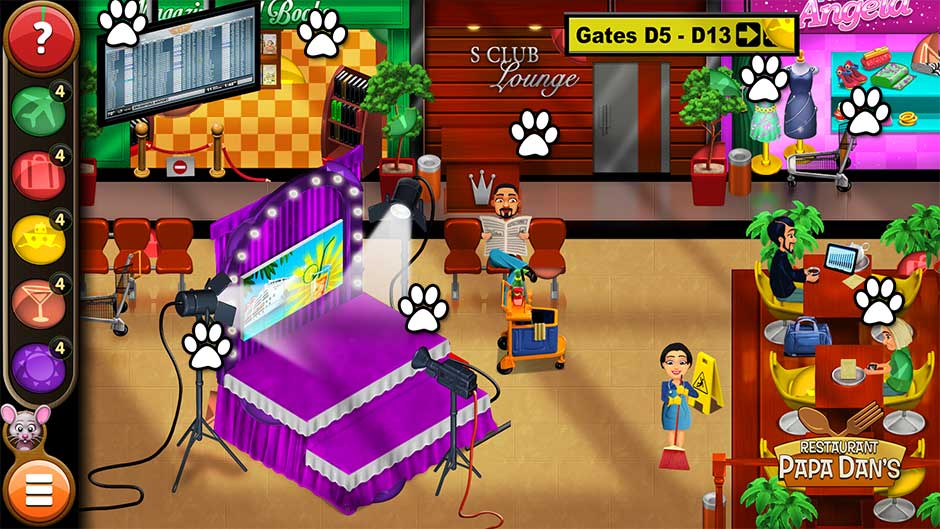
Mice Challenge
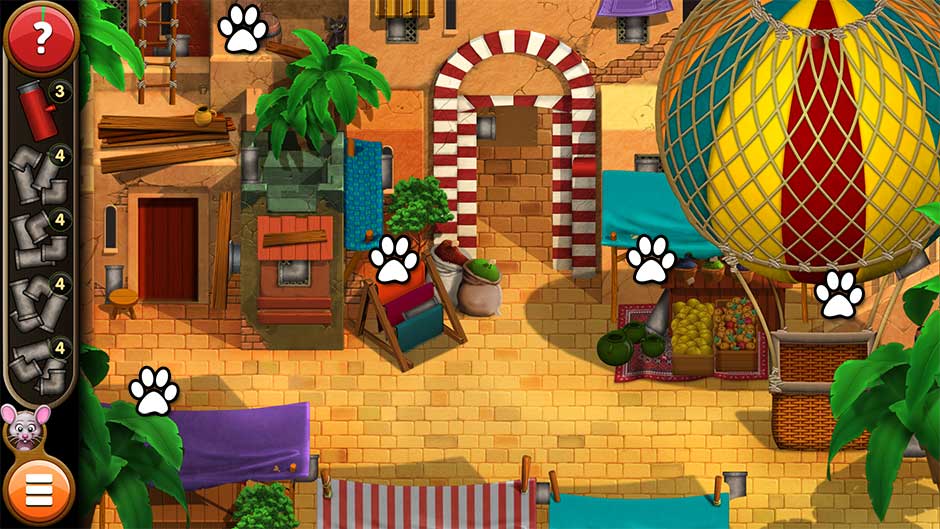
Find the required number of mice shown on the left as quickly as you can. You will only have a limited amount of time. Earn an hourglass badge by completing the challenge within the allotted amount of time. To make things more challenging, the scene will always be zoomed in. Click and hold to move around the scene.
Mice locations are random each time you play. Remember to move the scene around often to find them all!
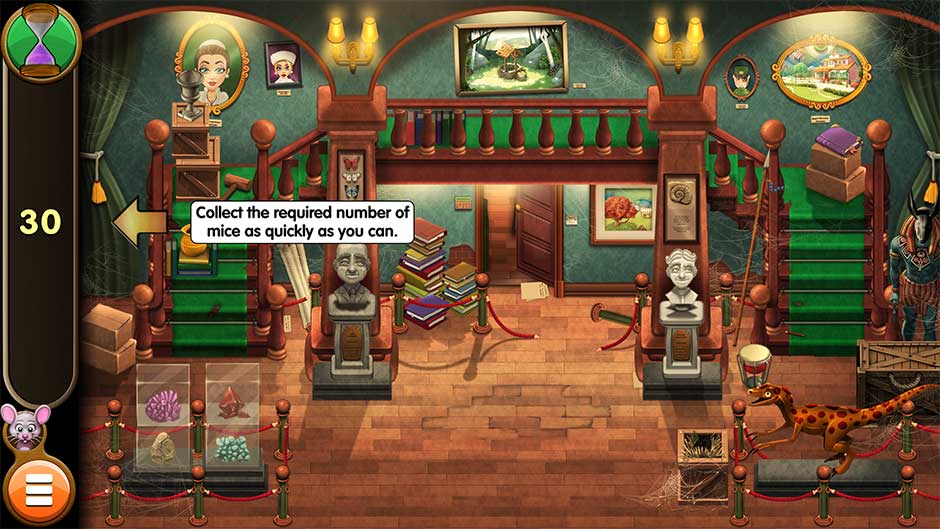
Mortimer Beckett and the Book of Gold – Mice Challenge
Jigsaw Challenge
Drag the pieces of the jigsaw puzzle into place to assemble a photo. Photos you assemble will be shown in your Photo Album. Earn an hourglass badge by completing the challenge within the allotted amount of time. Jigsaw piece locations will change, but the solutions are always the same. The following images show the puzzle solutions for each Jigsaw Challenge:
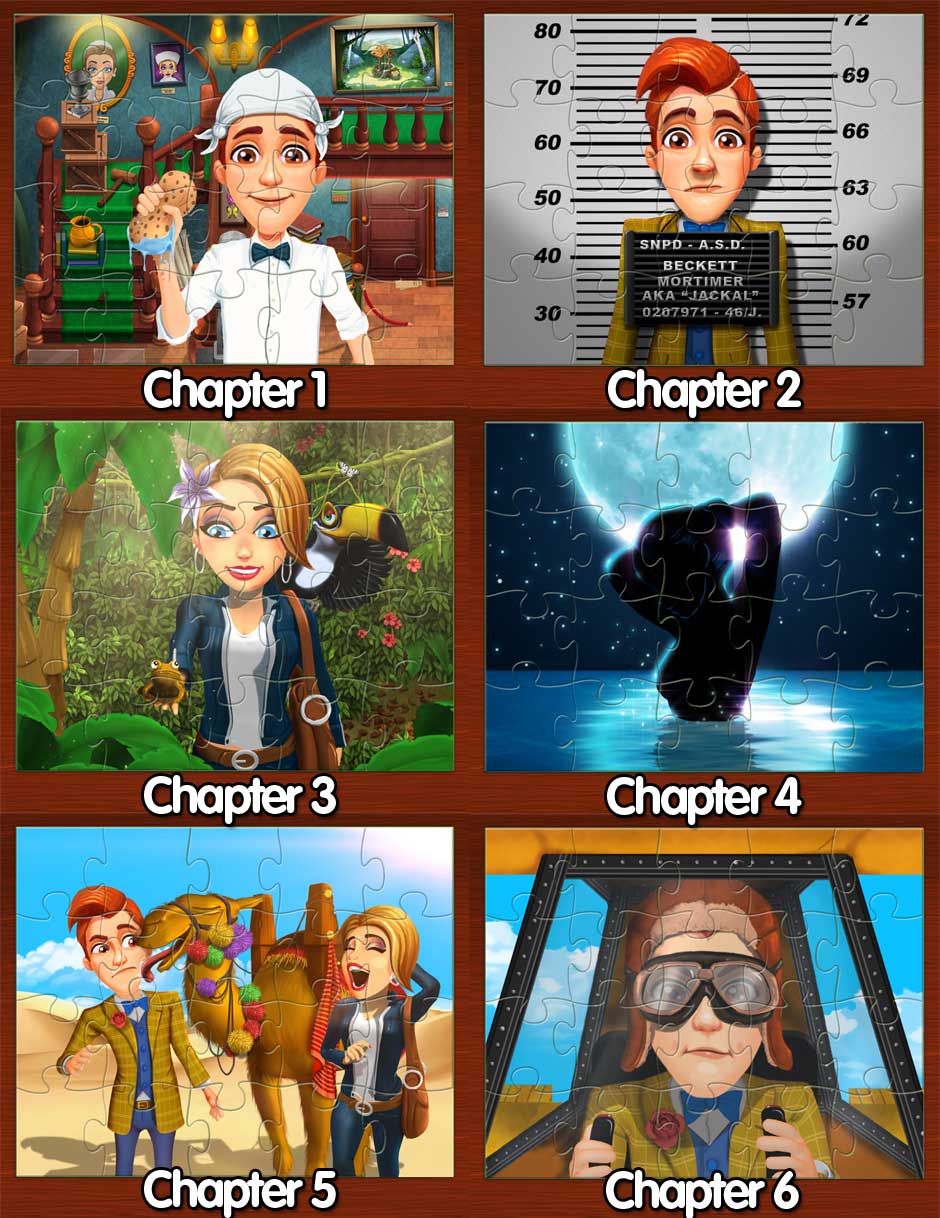
Mortimer Beckett and the Book of Gold – Jigsaw Puzzle Challenge Solutions
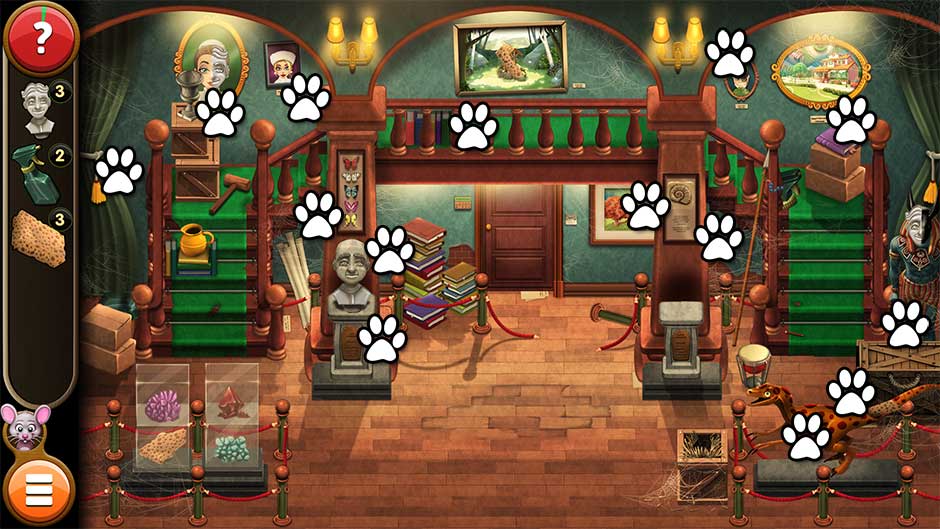
Mouse Locations
Mortimer Beckett isn’t the only world traveler! Carl the mouse is back and will show up in each of the game’s 60 story levels. This section lists every level and location where Carl the mouse may pop up. Note that mouse locations in this game are random. For more information, visit General Tips & Tricks. This section does not include challenge levels.
Chapter 1 – The Woman, the Book, and the Janitor
Mice locations for levels 1 – 10.
Level 1
Mortimer Beckett and the Book of Gold – Mouse Locations Level 1
Level 2
Mortimer Beckett and the Book of Gold – Mouse Locations Level 2
Level 3
Mortimer Beckett and the Book of Gold – Mouse Locations Level 3
Level 4
Mortimer Beckett and the Book of Gold – Mouse Locations Level 4
Level 5
Mortimer Beckett and the Book of Gold – Mouse Locations Level 5
Level 6

Mortimer Beckett and the Book of Gold – Mouse Locations Level 6
Level 7
Mortimer Beckett and the Book of Gold – Mouse Locations Level 7
Level 8
Mortimer Beckett and the Book of Gold – Mouse Locations Level 8
Level 9
Mortimer Beckett and the Book of Gold – Mouse Locations Level 9
Level 10
Mortimer Beckett and the Book of Gold – Mouse Locations Level 10
Chapter 2 – Everyone is Searching for Someone
Mice locations for levels 11 – 20.
Level 11
Mortimer Beckett and the Book of Gold – Mouse Locations Level 11
Level 12
Mortimer Beckett and the Book of Gold – Mouse Locations Level 12
Level 13
Mortimer Beckett and the Book of Gold – Mouse Locations Level 13
Level 14
Mortimer Beckett and the Book of Gold – Mouse Locations Level 14
Level 15
Mortimer Beckett and the Book of Gold – Mouse Locations Level 15
Level 16
Mortimer Beckett and the Book of Gold – Mouse Locations Level 16
Level 17
Mortimer Beckett and the Book of Gold – Mouse Locations Level 17
Level 18
Mortimer Beckett and the Book of Gold – Mouse Locations Level 18
Level 19
Mortimer Beckett and the Book of Gold – Mouse Locations Level 19
Level 20
Mortimer Beckett and the Book of Gold – Mouse Locations Level 20
Chapter 3 – The Trail We Blaze
Mice locations for levels 21 – 30.
Level 21
Mortimer Beckett and the Book of Gold – Mouse Locations Level 21
Level 22
Mortimer Beckett and the Book of Gold – Mouse Locations Level 22
Level 23
Mortimer Beckett and the Book of Gold – Mouse Locations Level 23
Level 24
Mortimer Beckett and the Book of Gold – Mouse Locations Level 24
Level 25
Mortimer Beckett and the Book of Gold – Mouse Locations Level 25
Level 26
Mortimer Beckett and the Book of Gold – Mouse Locations Level 26
Level 27
Mortimer Beckett and the Book of Gold – Mouse Locations Level 27
Level 28
Mortimer Beckett and the Book of Gold – Mouse Locations Level 28
Level 29
Mortimer Beckett and the Book of Gold – Mouse Locations Level 29
Level 30

Mortimer Beckett and the Book of Gold – Mouse Locations Level 30
Chapter 4 – Out of the Frying Pan into the Fire
Mice locations for levels 31 – 40.
Level 31
Mortimer Beckett and the Book of Gold – Mouse Locations Level 31
Level 32
Mortimer Beckett and the Book of Gold – Mouse Locations Level 32
Level 33
Mortimer Beckett and the Book of Gold – Mouse Locations Level 33
Level 34
Mortimer Beckett and the Book of Gold – Mouse Locations Level 34
Level 35
Mortimer Beckett and the Book of Gold – Mouse Locations Level 35
Level 36
Mortimer Beckett and the Book of Gold – Mouse Locations Level 36
Level 37
Mortimer Beckett and the Book of Gold – Mouse Locations Level 37
Level 38
Mortimer Beckett and the Book of Gold – Mouse Locations Level 38
Level 39
Mortimer Beckett and the Book of Gold – Mouse Locations Level 39
Level 40
Mortimer Beckett and the Book of Gold – Mouse Locations Level 40
Chapter 5 – The Treasures of the Desert
Mice locations for levels 41 – 50.
Level 41
Mortimer Beckett and the Book of Gold – Mouse Locations Level 41
Level 42
Mortimer Beckett and the Book of Gold – Mouse Locations Level 42
Level 43
Mortimer Beckett and the Book of Gold – Mouse Locations Level 43
Level 44
Mortimer Beckett and the Book of Gold – Mouse Locations Level 44
Level 45
Mortimer Beckett and the Book of Gold – Mouse Locations Level 45
Level 46
Mortimer Beckett and the Book of Gold – Mouse Locations Level 46
Level 47
Mortimer Beckett and the Book of Gold – Mouse Locations Level 47
Level 48
Mortimer Beckett and the Book of Gold – Mouse Locations Level 48
Level 49
Mortimer Beckett and the Book of Gold – Mouse Locations Level 49
Level 50
Mortimer Beckett and the Book of Gold – Mouse Locations Level 50
Chapter 6 – Endings and Beginnings
Mice locations for levels 51 – 60.
Level 51
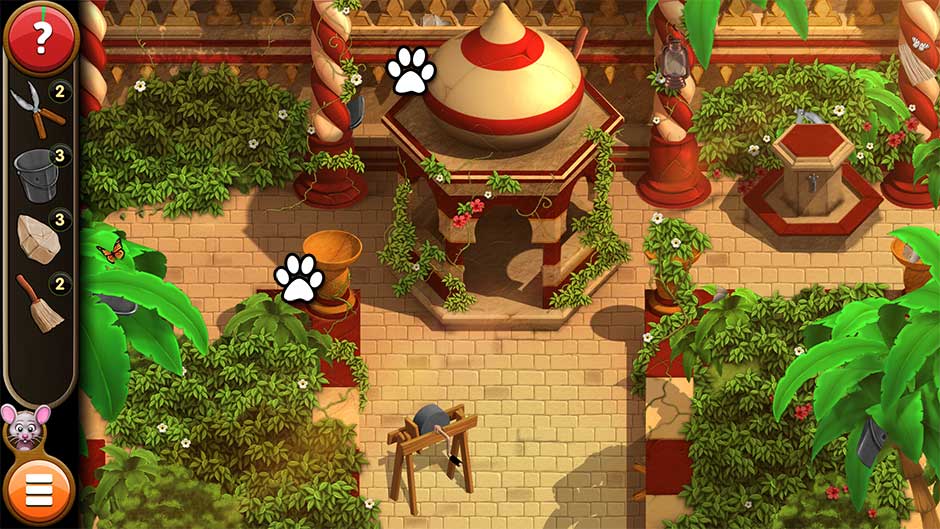
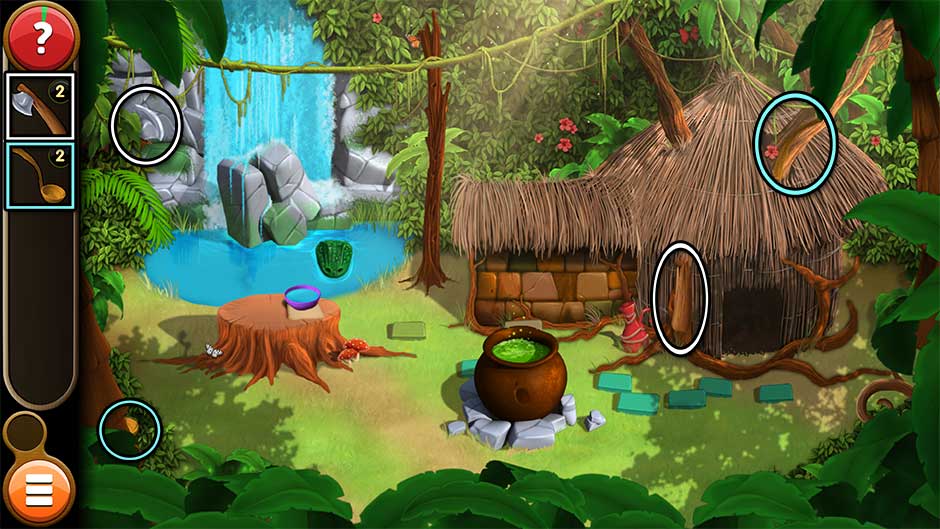
Mortimer Beckett and the Book of Gold – Mouse Locations Level 51
Level 52
Mortimer Beckett and the Book of Gold – Mouse Locations Level 52
Level 53
Mortimer Beckett and the Book of Gold – Mouse Locations Level 53
Level 54
Mortimer Beckett and the Book of Gold – Mouse Locations Level 54
Level 55
Mortimer Beckett and the Book of Gold – Mouse Locations Level 55
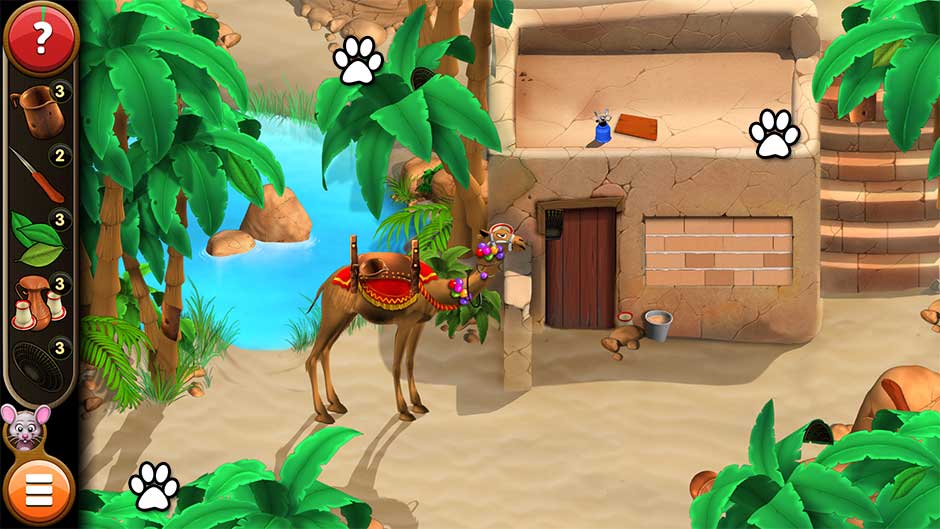
Level 56
Mortimer Beckett and the Book of Gold – Mouse Locations Level 56
Level 57
Mortimer Beckett and the Book of Gold – Mouse Locations Level 57
Level 58
Mortimer Beckett and the Book of Gold – Mouse Locations Level 58
Level 59
Mortimer Beckett and the Book of Gold – Mouse Locations Level 59
Level 60
Mortimer Beckett and the Book of Gold – Mouse Locations Level 60
Trophies
Relive memoires of your adventures through 14 unlockable trophy achievements. Click on the suitcase icon in the upper right corner of the level select map to view your collection of trophies.
| Trophy Name | Description | How to Unlock |
| You Got This! | Complete Level 1. | Finish the first level. |
| Who’s the Janitor? | Complete Chapter 1. | Finish levels 1 – 10. |
| Looking for Someone? | Complete Chapter 2. | Finish levels 11 – 20. |
| Trailblazer! | Complete Chapter 3. | Finish levels 21 – 30. |
| It’s Getting Hot! | Complete Chapter 4. | Finish levels 31 – 40. |
| Too Hot to Handle? | Complete Chapter 5. | Finish levels 41 – 50. |
| Mission Accomplished? | Complete Chapter 6. | Finish levels 51 – 60. |
| Give Us Some Credits! | Watch the credits. | From the start screen or level select map, click on the options button in the upper left corner. Select “Credits” and watch. |
| Say Cheese! | Collect all the photos for the album. | The photo album is in the upper right corner of the level select map. Complete all the jigsaw puzzle challenge levels (magenta) to unlock all the photos. Note: If you’re playing on iOS or Android, the second half of the photo album will be unlocked when you sign into Facebook via the game app. |
| Are You Up for the Challenge? | Complete all the challenge levels. | Complete all 18 challenge levels across all game chapters. |
| What Took You So Long? | Collect all the hourglasses. | Complete all the challenge levels within the allotted time. An hourglass icon will appear next to levels which you’ve completed successfully within the timeframe. |
| No Cheating! | Earn a green checkmark for each level. | Complete story levels 1 – 60 without using any hints or puzzle skips. |
| Gotta Catch ‘Em All! | Find all the mice in the game. | Find the mouse hidden in each of the game’s story levels 1 – 60. For more help, see the Mouse Locations section. |
| Going Once, Going Twice…! | Purchase all the objects from the auctioneer. | Click on the diamond icon in the upper right corner of the level select map to access Mortimer’s private collection. Earn diamonds by playing challenge levels. Use these diamonds at the auction to purchase objects for his collection. From the private collection, select the gavel icon in the upper left corner to visit the auctioneer. Purchase all the items from the auctioneer to obtain this trophy. |
Didn’t Find What You Need?
We Can Help!
Whether you’re having trouble with your game or just need a few additional tips and tricks, our helpful support staff are just a click away!

The Mortimer Beckett and the Book of Gold Official Walkthrough is meant as a guide and does not contain cheats, hacks, or serials.