In Sable Maze – Sullivan River, you have been haunted in your dreams by an older friend from your childhood that you use to spend time with at camp. These dreams have been going on for over two months, and they have even caused you to experience insomnia. In an attempt to get to the bottom of these dreams, your therapist has recommended that you take a trip back to your old campground in hopes of putting your bad dreams to rest. However as you return to the campground, you find that it has changed.
Contents
General Tips & Tricks
General Tips and Tricks and Game Play
When navigating throughout the game, there are various aspects that you will need to know how to utilize to advance further in the game.
Notebook – The notebook is used to store all of the clues that are important for you to remember as you advance in the game. Tip: The notebook is the best place to go first if you cannot figure out where to go next.
Magnifying Glass Icon – The magnifying glass icon appears when there is something to investigate. This will allow you to zoom in on specific places and things that are important to your advancement in the game.
Difficulty Settings – You can choose between three different difficulty settings: casual, advanced, and hard. Tip: You cannot change difficulty after gameplay starts.
Inventory – The inventory screen is located at the bottom of your screen. This is where items you collect go.
Hidden Object Scenes – Hidden object puzzles are mini-games that often produce items needed to advance in the game. Tip: If you are looking for a yellow word when you click on the correct hidden place, this word will turn white indicating that it is now in plain view.
Hand Cursor – The hand cursor appears when you can interact with an item. It looks like a skeletal hand.
Hints – The hints icon is the lantern image in the lower right-hand corner of the screen. Tip: For people who do not like to go through the notebook over and over to find the different clues, this is a much faster way of progressing through the game content.
Gears – When the cursor turns into gears, you will need to use an item in your inventory to interact with the location.
Skip – This button is associated with the various mini-games throughout the larger game. Mini-games have to be completed in order to move to different parts of the game. If you are having a hard time with a particular one, you can merely click the ‘Skip’ button to get around it. Tip: This can also be used if you just do not feel like doing the mini-game.
Sable Maze – Sullivan River Walkthrough
Chapter 1: The River
Zoom into the bulletin board and collect the map. Get the wooden letter “A” and place it onto the tree. This opens up the first hidden object area.
Complete to get the gate key. Use the key to pick the lock and move to the next area.
Click the bike and collect the pocket knife. Then, click the sign to get the note. Use the pocket knife to collect the wooden badge. Click the nurse’s office door on the left side of the screen. Get the horse emblem and the note. Click the bear on the right, and use the wooden badge. Get the hacksaw and click on the pole. Then choose the director’s office door, and turn the key that is in the keyhole.
Enter into the office. Click on the skeleton. Then, collect the scarf and note. Click on the suitcase. Then, collect the fishing pole and click the frame to collect the picture. After clicking the safe, cut the chain using the hacksaw. Open the safe and to collect the blowtorch and note.
Click on the brambles and torch them with the blowtorch. Click the bag and open the buckle with the pocket knife. Collect the code. Click the root and collect the dry leaves. Click the grate to collect the reel. Then, click the effigy and burn the dry leaves with the blowtorch after placing them around its base. Collect the green tile. Click on the collapsed house to access the next hidden objects area.
Collect the fire emblem. Then, go to the forest boardwalk. After clicking the tree roots, collect the “3” button with the fishing rod. After clicking the mailbox, wipe it off with the scarf. Complete the puzzle.
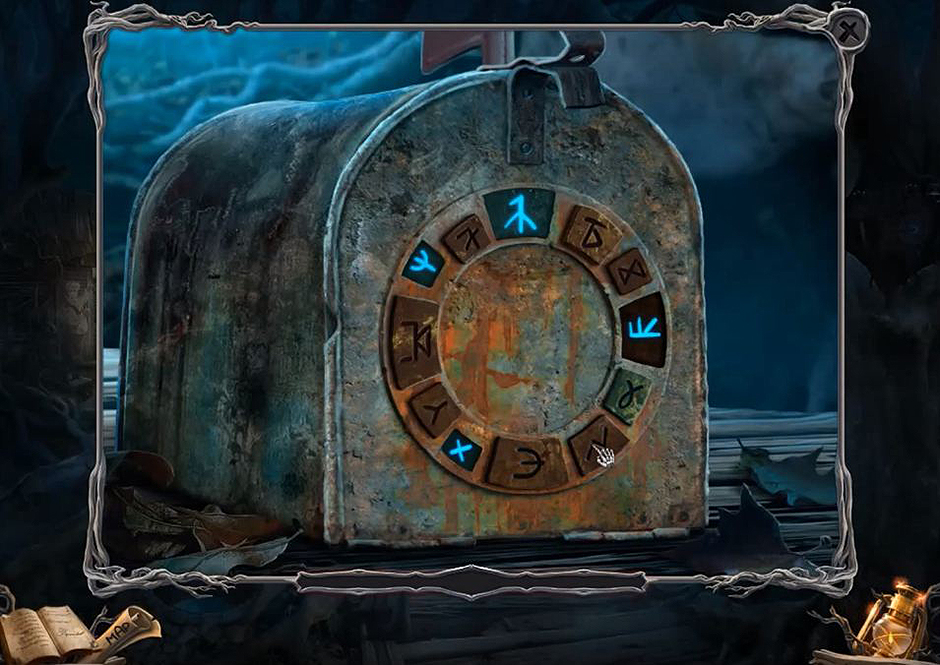
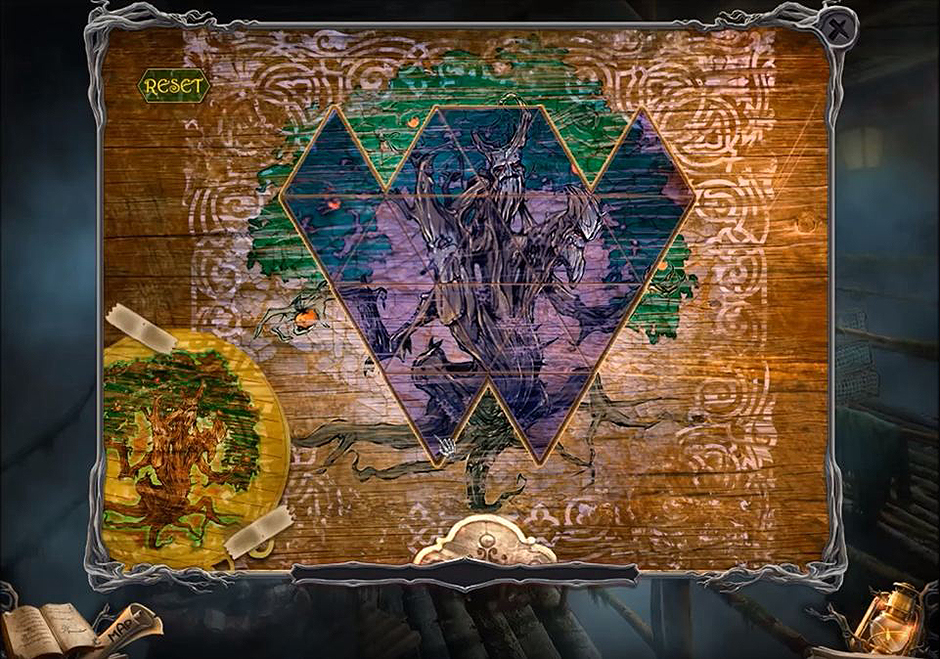
Sable Maze – Sullivan River – Runes
After retrieving the package, open it with the pocket knife. Then, get the tape reel piece as well as the note from inside. After clicking on the tree, you will use the green tile for the next puzzle.
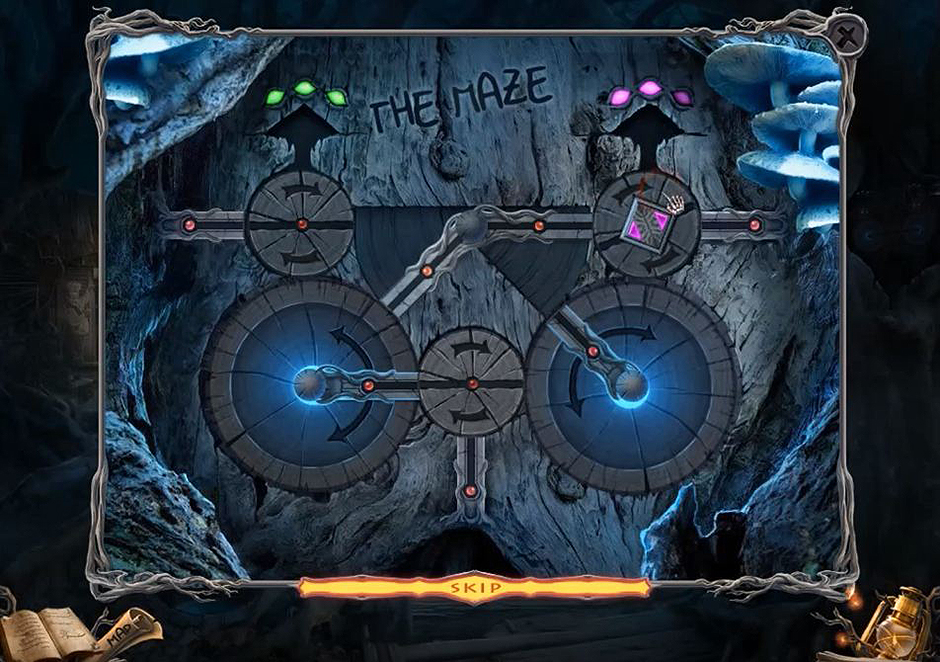
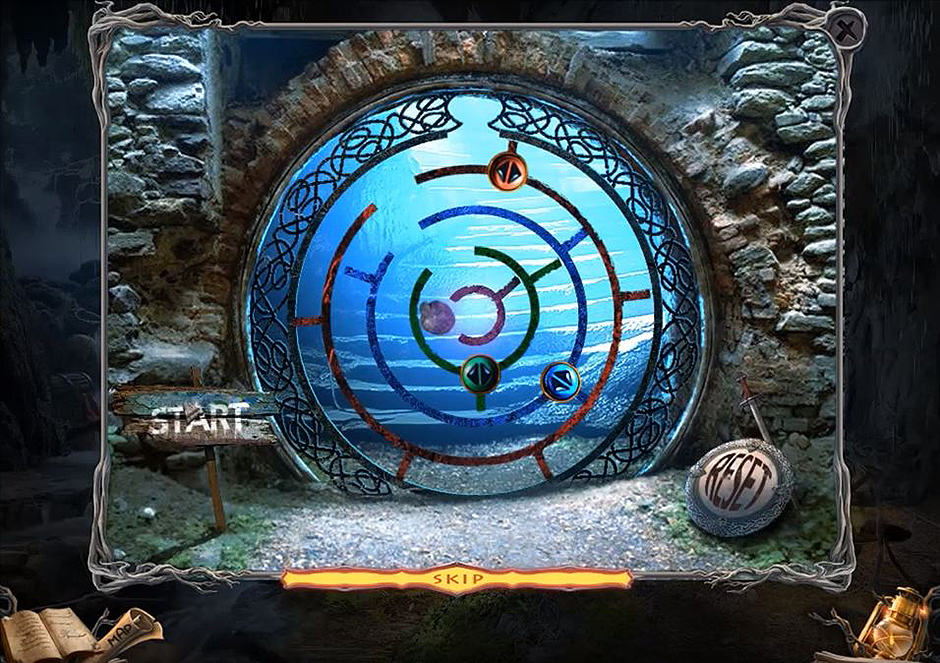
Sable Maze – Sullivan River – The Maze
Collect the screwdriver and go to Mess Hall. Zoom into the pedestal and use the screwdriver on screws. Collect the life preserver emblem from the compartment. Click the statue and collect the wooden stick.
Go to director’s office and click the banner. Click safe and use the fire emblem, the horse emblem, and the life preserver emblem on the door to trigger the puzzle.
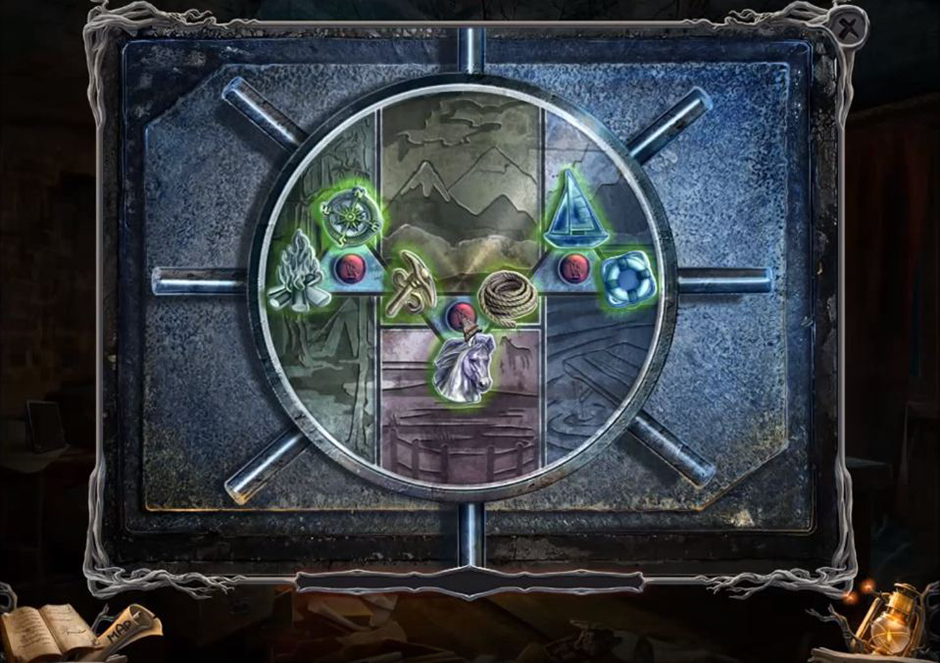
Sable Maze – Sullivan River – Emblem
The solution and layout of the puzzle are random. Collect the trinket, crowbar, and note. Go to the courtyard, and click the nurse’s door. Use the crowbar to open it and go inside.
Chapter Two: Nurse’s Station
Chapter Two: Nurse’s Station
Click the top drawer and collect the tape reel. Click the window and collect the photo. Click the shelves to access a hidden objects area.
Collect the bandage and go to the fire pit. Click the tape deck and use the tape reels. Click the play button, and collect the tile with the symbols. Go to the mess hall. Click the electrical panel. Wrap the bandages around the wires to unlock a puzzle.
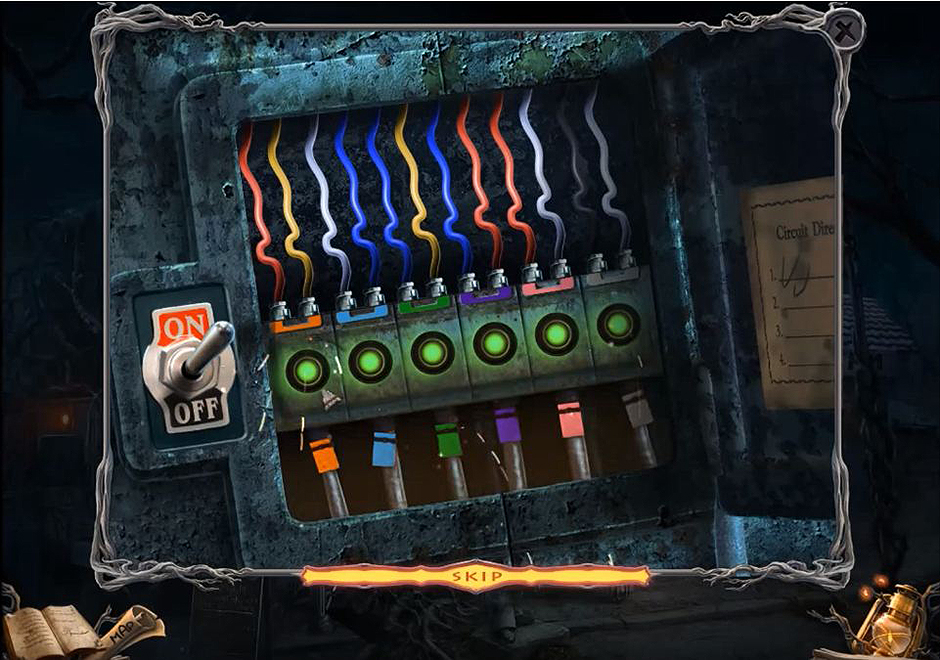
Sable Maze – Sullivan River – Wires
Go to the mess hall. Click the pots, the lid, and then the pasta. Collect the pasta ladle and click on the hatch. Use the tile with symbols to unlock the next puzzle. Complete the puzzle by moving tiles until the symbols match, and collect the broom head. Go to the mess hall exterior, and click the window. Then, clear the cobwebs with the brook to gain access to the next hidden objects area.
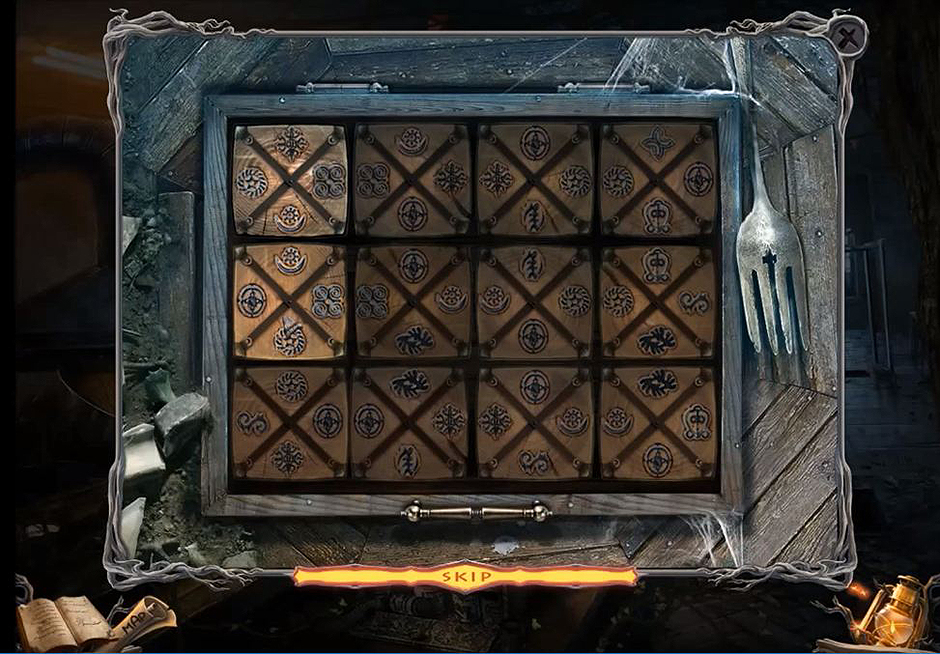
Sable Maze – Sullivan River – Matching Symbols Solution
Collect the plunger and go to the mess hall. Click the sink and use the plunger on it. Collect the toy propeller. Go to the fire pit. Click the collapsed house area for another hidden object area.
Collect the wire cutters and use them on the grate to cut the bars. Get the code and go to the director’s office. Use the code on the suitcase to get the revolver. Then, go to the nurse’s office. Click on the hole in the ceiling, and then fix the blimp with the toy propeller. Then, collect the bullets. Use revolver on the door and click on shelves to access next hidden objects area.
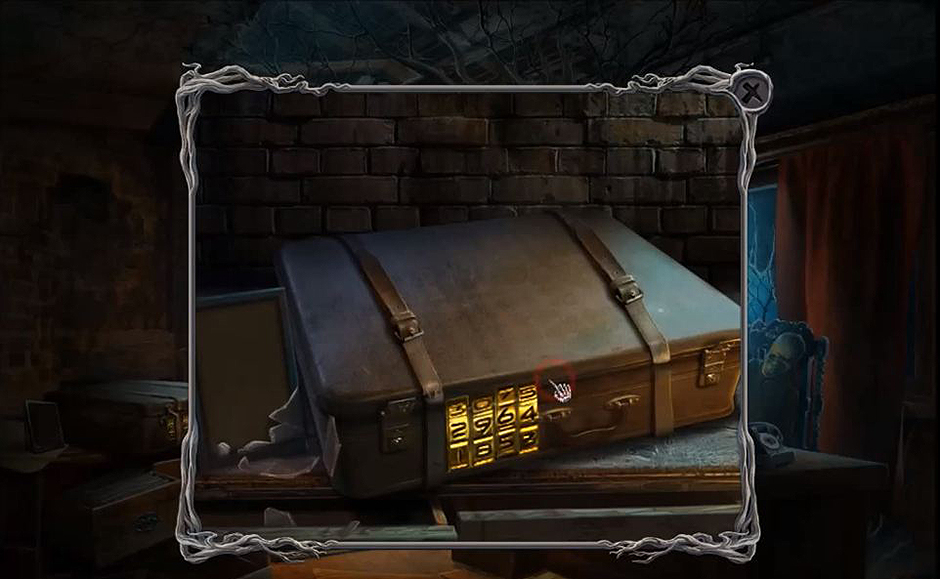
Sable Maze – Sullivan River – Suitcase Code
Get the glass shard and go in the doorway to the infirmary. Click the mirror, then click the moss and use the glass shard to remove it. Click on the bed, and collect the note. Click the sheets to the get mortar. Click the cabinet. Use the “3” button to trigger puzzle. Collect the red nose and pestle. Put the mortar with the pestle and place on the lab equipment. Click the ground moss. Click the dial, the valve, the beaker, and collect tree-fighting elixir. Then, head to the nurse’s station.
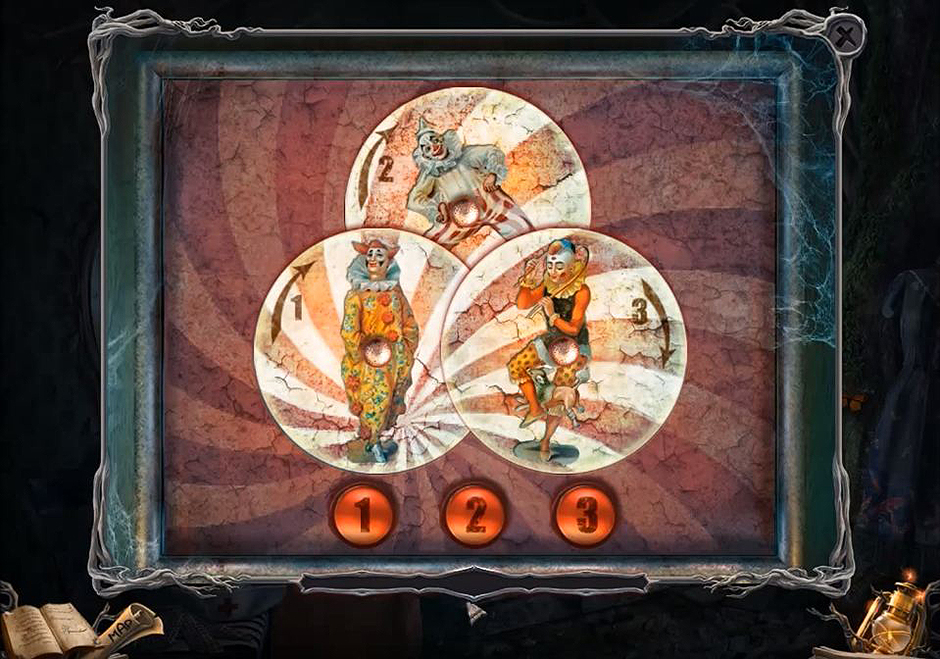
Sable Maze – Sullivan River – Clowns Puzzle
Click on the clown, and use the red nose to collect the silver pendant. Then, head to the forest boardwalk, where you will use the tree-fighting elixir on the trees. Go to the tree houses, and click on the well. Collect the weight and the rope, and then go to the mess hall. Click on the pulley, and then, on the hook, place the weight there. Get the machete, and then go back to the exterior of the mess hall. Click the window to access the next hidden object area.
Complete to collect the hook. Go to the tree house. After clicking on the cage, open it by breaking the lock with the machete. Click the door to collect the mechanical bird. To get in the tree house, place the climbing tool up on the ladder. Click the teddy bear to get the note. Click the stitching 3 times and get the wind-up key. Click the cloth and then on the train, place the wind-up key on it to unlock a puzzle. Get the nut and go back to the tree house scene.
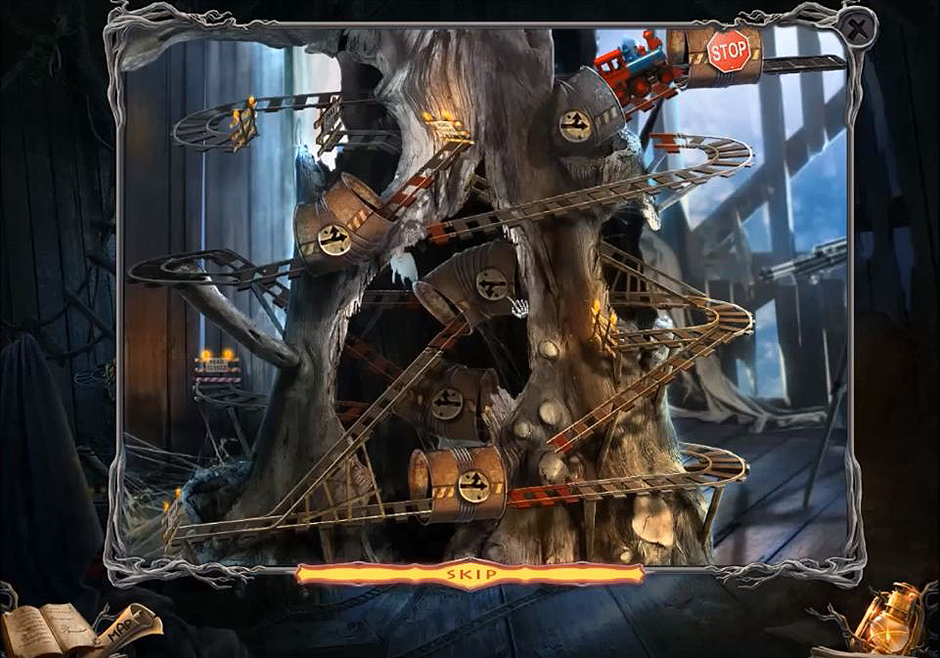
Sable Maze – Sullivan River – Train
Click the well, and then on the handle use the nut on it. Use the handle to collect the lens. Go to the treehouse. After clicking on the telescope, you will use the on it. Click on the lens, and then use your cursor to click on the tree hole. Get the horseshoe and the dryad before going to the fire pit. Then take a right turn to the stable. To open the gate to the stable, you will use the horseshoe as a key.
Chapter 3: The Horse Stable
Click the cart and collect the half of shears. Go into the stables. Click the broken jack and get it. Go to the horse trail. Click the hobby horse, and collect the pliers. Use them on the keys, and go into the apple orchard.
Click the tree to get the half shear. Go to the exterior of the stables. Go inside. Click the spur and use the pliers to fix the spur wheel. Get the gear. Click the cabinet. Use the gear to open the lock, and use the handle on the door. Get the note, the sugar cubes, and the magnet. Go back to the apple orchard.
Click the downspout, and use the magnet to pull from inside the spout. Use the crank, and then go to the stable gate. After clicking on the cart, you will use the jack to fix it. Get the red level before going into the stable gate. After clicking on the door, place the red level on the door to trigger a puzzle.
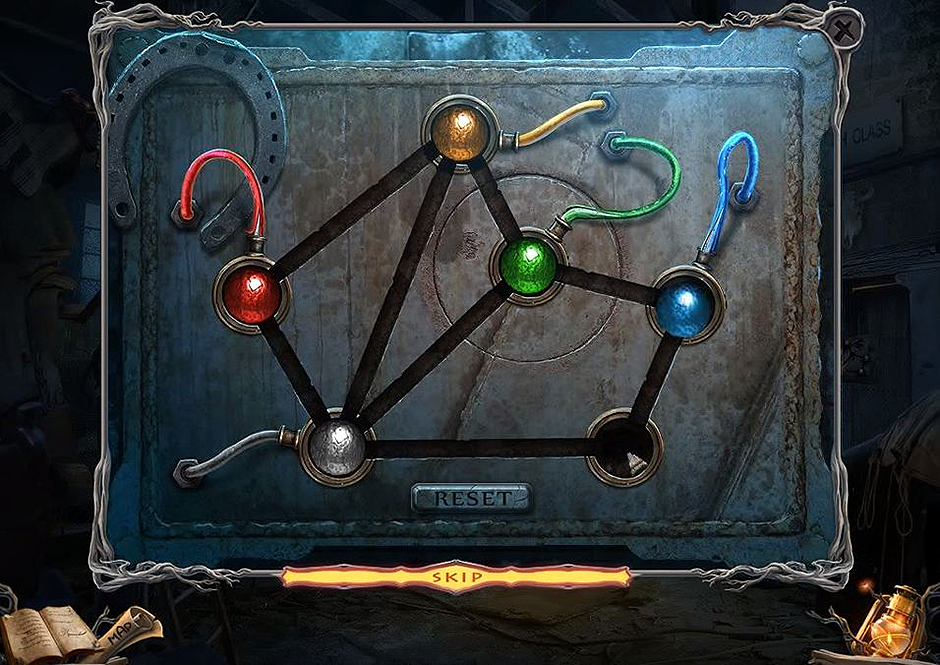
Sable Maze – Sullivan River – Puzzle Solution Chapter 3
After completing the puzzle, go to the blacksmith class. Click the furnace and put the silver pendant onto the plate. Use the crowbar, and collect the silver tree. Click the workbench, and collect the chisel and 2 notes. Click the fireplace to access the next hidden object area.
Collect the grinding wheel. Click the grinder and put the grinding wheel on it. After clicking the wheel, the dull shears will need to be used on it. Head back to the horse stables. Click the horse, and then use the shears on the branches. Click the empty stall, and get the wheel. Go to the apple orchard. Use the chisel on the tree, after clicking on it. Then, retrieve the wooden figure, before going back to the blacksmith class. Click the workbench. Put the wooden figure and the silver tree in the picture. Pick it up. Click the fireplace for the next hidden object area.
Complete to get the harness, and then you will head to the stable gate. Click the cart, and put the wheel on it. Give the sugar cube to the horse, and then place the harness on its back. Click the horse.
Chapter Four: Center Stage
Click the trumpet to get the boards. Use the pliers to collect the mouthpiece. Then, head to the archery range. Click on the pots and put the pasta ladle and the dryad sprout down into the pot. Then, collect the tile, the note, and the powder. Next, go to the dormitories.
Click on the tree and use the boards on it. Then, click the shutter and collect the rank. Go to the horse trail. Click the hobby horse, and then rake the grass. Take the teddy key, and go to the dormitories. Click the window, and unlock the lock with the teddy key. Then, go into the kid’s house.
Click the shelves and get the ice pick and the rocket. Click on the clock and take the matches and the note. Then go towards the boy. Click on the bed frames. Then, grab the bottle and place the bottle rocket in it. Light it with the matches. Go to Derrick’s bunk. Then, click the cabinet to reveal the next hidden object area.
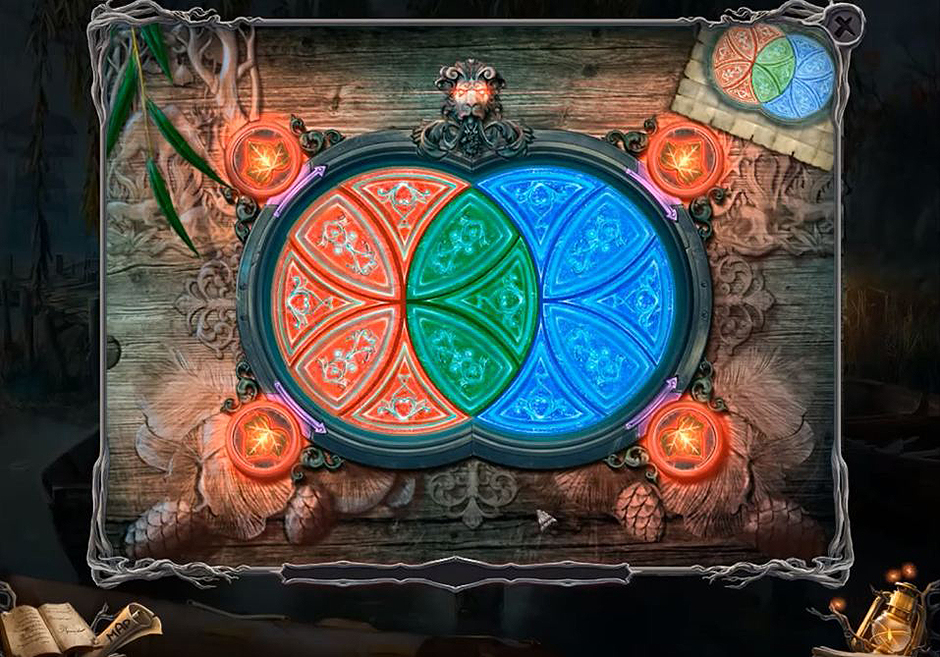
Collect the rubber mallet. Click the pillow and get the rubber band. Click the pillow again to get the book. Take the note. Then, click the table for the 2nd tile. Go to the shower room. Click the tiles, and then use the ice pick and rubber mallet on them. Click the compartment for the 3rd tile. Click the valve to turn off the water. Click the shower, and place the 3 tiles in the slots, which will open a puzzle. Arrange the tiles until they are with their matching colored circles.
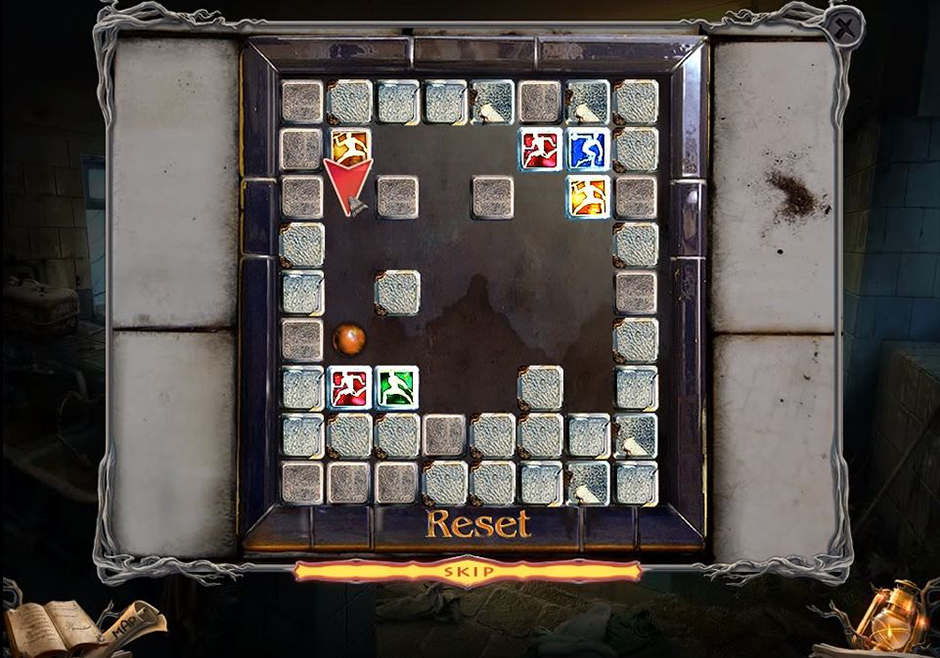
Sable Maze – Sullivan River – Puzzle Chapter 4
Collect the squirt gun, and go to the kids bunk. Click the shelves. To get the sling shot, use the squirt gun. Go to the shower room. Click the lights. Then to get the blue soldier, use the slingshot. Go to Derrick’s bunk. Click the shelves to reveal the next hidden object area.
Collect the crank, and go back to the stage. Click the pole, and then with the winch use the crank. Get the red soldier. Then, go to Derrick’s bunk. Click the table, and put the soldiers in their slots to get the apple pieces, the bow, and the arrow. Go to the archery range.
Click the gate, and collect the note. Click the targets. To unlock the next puzzle, you will need to use the arrow and the bow. Shoot the targets until the row s full of stars.
Sable Maze – Sullivan River – Arrow and Bow
Get the clock winder. Then, you will head to the dormitories and up to the bunks. Click the clock. Then in the nest, place the mechanical bird. In the hole, place the clock winder. Set the clock to noon to get the key. Go to the archery range. Click the gate and use the key to unlock it. Go through the gate and into the art house.
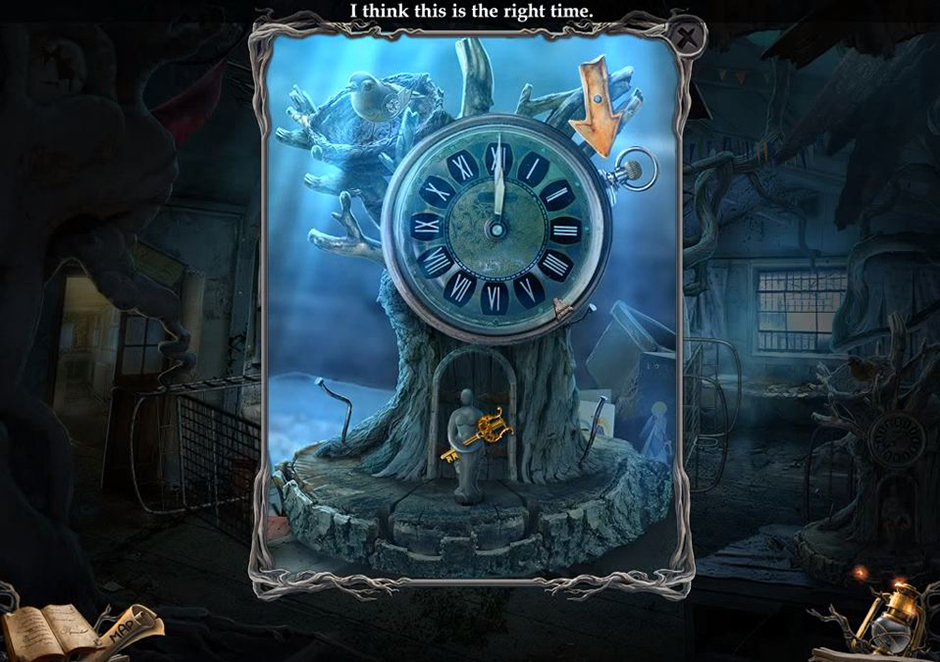
Sable Maze – Sullivan River – Clock
Chapter Five: Enter the Classrooms
Click the classroom door. Click the table for the next hidden object area.
Collect the paint. Click the shelf. Get the water and the green paint. Go to the art house. Click the stove. Put the water into the kettle. Click the burner. On the spout, place the mouthpiece. Go upstairs and into the woodworking class.
Click the lamp. Click the chair to get the yellow paint. Click the workbench. Get the drill piece and apple piece. Click the board to get the note. Go to the art class. Click the table. Put the green, yellow, and red paint on the table to trigger a puzzle. Collect the blueprint and then the drill bit. Go to the woodworking class.
Click the workbench, and use the blueprint to trigger a puzzle. Collect the nesting box, and then head for the stage. Click the sign, and then, on the nail, place the nesting box. Collect the woodpecker. Go to the art house. After clicking on the door, you can place the woodpecker on the branch. Go into the dance class.
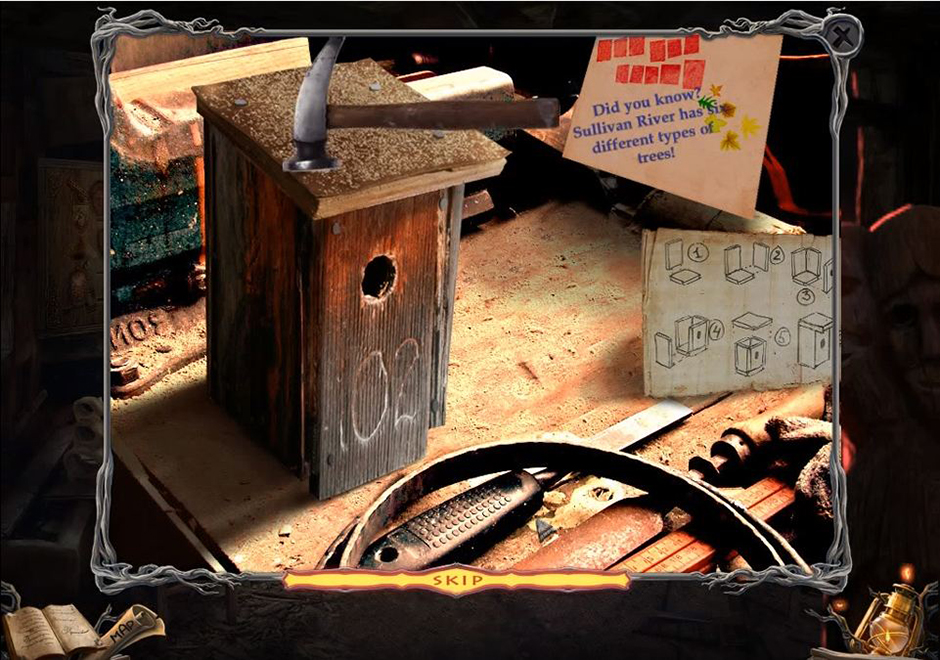
Sable Maze – Sullivan River – Nesting Box
Click the railing. Use the drill on the screws. Collect the handrail. Click the piano to trigger a puzzle and get the tomahawk. Once you click on the door, and then, on the boards, you will use the tomahawk. Go into the orchestra class.
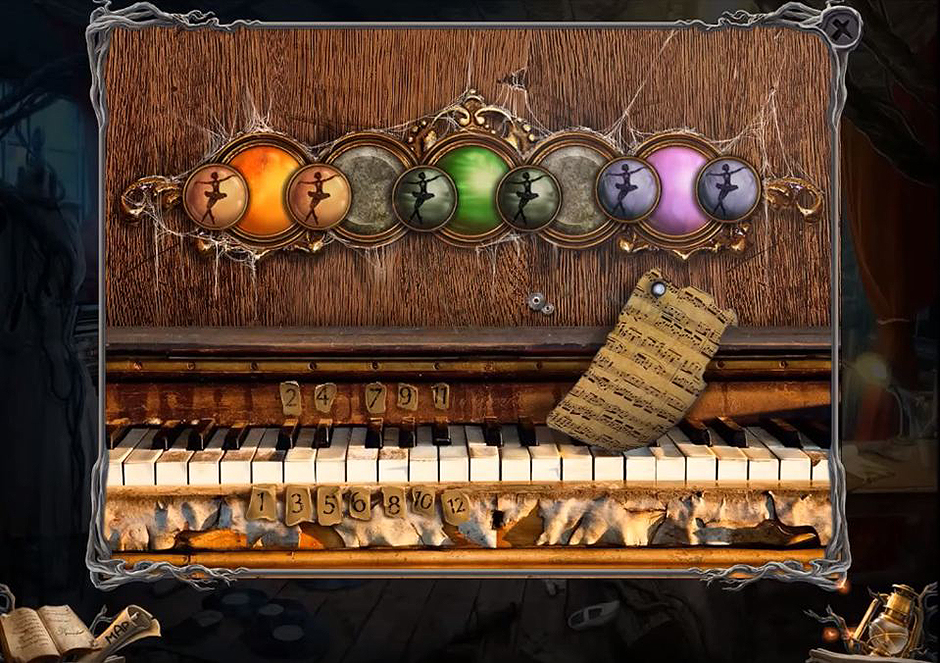
Sable Maze – Sullivan River – Piano Solution
Click the stained glass for the next puzzle. Click the wall, and then on the hole, use the rubber mallet. Get the hook, the apple, and the book. Click the table. On the violin hole, you will use the hook. Get the heart key and the apple. Click the hatch. Use the handrail on the hatch. Click it for the next hidden object area.
Get the mask. Go to the art class. Click the shelf. On the piano brace, you will use the hook. Click the table for the next hidden object area.
Get a solvent. Click the easel. Get the note. To trigger a puzzle, place the solvent over the black paint. Click the ancient letters first. Spell: ATLANTA. Get the dryad name. Go to the woodworking class.

Sable Maze – Sullivan River – Atlanta
Click the chair. On the box lock, you will use the heart key on it. Get the note and the bracelet. Click the compartment door. Use the mask to trigger a puzzle. Move the masks in line with their matching items. Get the tools. Then, head into the dance class where you will then proceed to the orchestra class. Click the piano. On the piano lid, you will utilize the piano brace. Get the piano string, the apple, and the razor blade. Click the hatch to access a hidden object area.
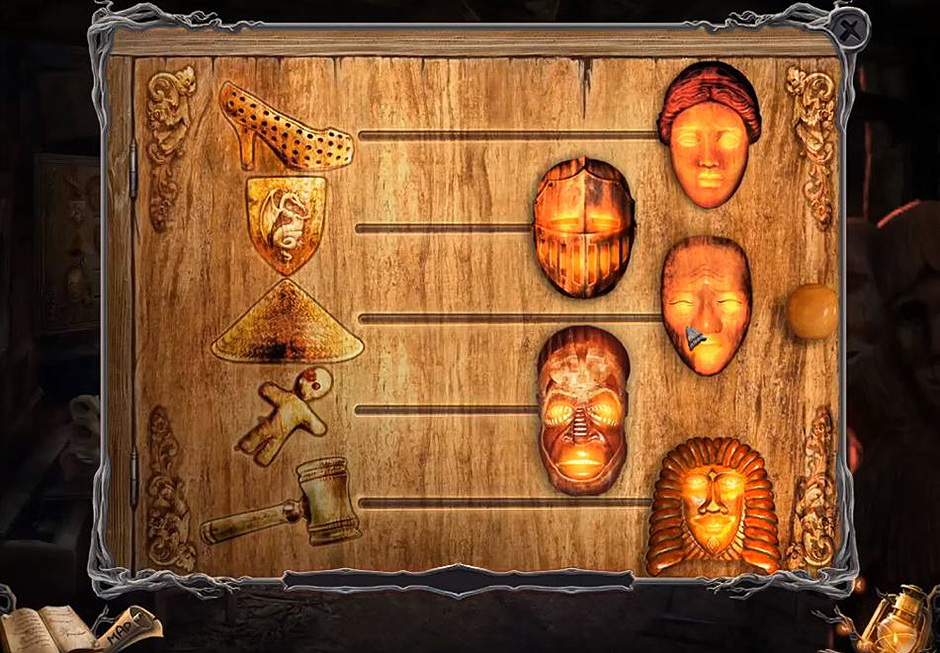
Sable Maze – Sullivan River – Masks
Get the ant farm. Go to the dance class. Click the piano. Use the piano string on the piano. Click the keys as follows: 10-1-5-1-3. Click on the branch. Then, you will destroy the termites with the ant farm. Get the termites and the apple. Go to the woodworking class. Click the easel. Put the picture on the easel. Use the tools, the dryad name, 6 apples, and 4 figures on the picture. Get the heart. Go to the apple orchard. Click the ghost children. Give the heart to them. Go to the bridge that goes to the mill.
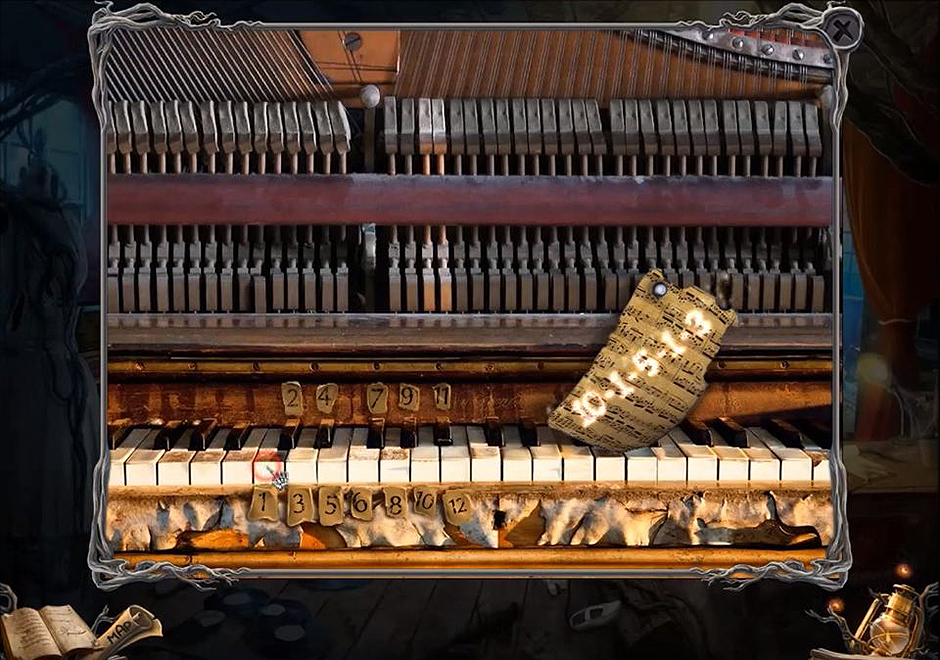
Sable Maze – Sullivan River – Piano Keys
Chapter Six: The Watch Tower
Click on the control panel. Use the solvent on the panel. Click the panel door then the winch. Click the branches and collect the broken pump. One the branches, use the termites in your inventory. Click under the bridge to access a hidden object area.
Collect the handle. Use the air pump to pump up the boat. Go to the dock. First, click on the tree. After that, click the trunk to collect the leaf button and life buoy. Use the rope in your inventory to tie the life buoy. Click the life buoy to go across. Click the tower and collect the thorn. Click the waterfall to collect the net piece. Go to the dock.
After clicking on the package, you will open it with the thorn. Get the animal trap, and go to the watch tower. After clicking on the boat, you will use the animal trap. Click the shed to access a hidden objects area.
Get the leaf button. Go outside. Click the wharf. On the gate slots, you’ll use the leaf buttons to open the next puzzle.
Sable Maze – Sullivan River – Leaf Buttons Puzzle
Go to the campgrounds. Click the tent and get the smoke bomb and the note. Click the fire then the backpack. Get the note, the lever, and the trigger ring. Go to the bridge mill. Click the life jacket. Use the trigger ring on it. Click the trigger ring and collect the buoy ring. Click under the bridge for the next hidden objects area.
Get the lantern. Go to the campground. Click the fire. The light the lantern, use the stick on the fire. Click the lit lantern. Click under the pier and put the lit lantern there. Get the netting. Go to the watch tower. Click the buoy, where you will collect the lobster using the net. Click the tower, and you will use the lobsters to get rid of the thorns. Go to the viewing platform.
Click the plank and collect the insulated flask. Click the spotlight controls and get the picture part. Use the lever on the bracket and click. Get the broken bulb. Go to the campground. Click the fire, and use the insulated flask to get hot water. Click the tent and on the ice, use the hot water. Get the pin. Click the other tent, then its zipper. Once on the zipper, use the pin on it. Get the scraper. Go to the watch tower. Click the buoy. After this, you can use the scraper on the shells there. On the lock there, you will use the buoy key. Click the door to get the picture part. Click the shed to access a hidden object area.
Collect the hook. Go to the viewing platform. Click the nest to get the picture piece. Click the chest. Put the picture pieces on it to trigger a puzzle. Get the note, the shovel, and the empty bottle. Go to the exterior of the watch tower. Click the waterfall, and the hit the rock with the shovel. Go behind the waterfall to collect the apple piece.
Sable Maze – Sullivan River – Puzzle Solution Chapter 6
Chapter Seven: The Maze
Click the closed off area. This is where you will use the shovel. Get the apple half. Click the mazes entrance. Use the apple on the slotto to trigger a puzzle.
Sable Maze – Sullivan River – Labyrinth
Go into the labyrinth. Click the writing. By using the broken light bulb on the stone, you will receive a clue. Click the stairs to get the apples. Go to the waterfall cave. Click the waterfall to access a hidden objects area.
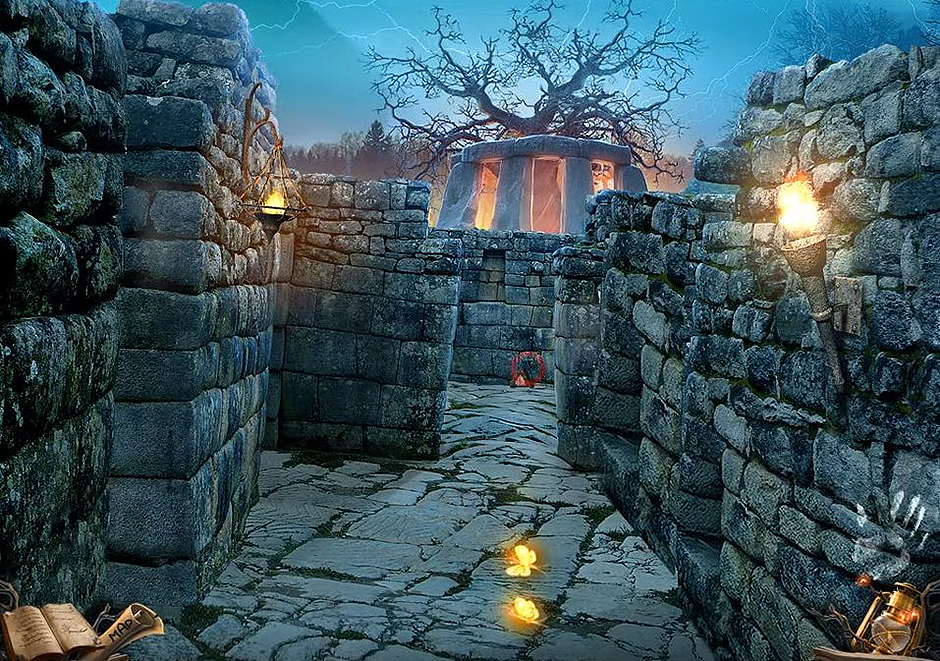
Get the kite with the string. Go to the labyrinth. Click the twisted roots. Put the kite with the string and collect it. Go inside the labyrinth. Go through the maze with these directions. Go straight ahead. Turn right. Turn left At this point, you will use the smoke bomb on the dryad before turning left again. Go through to the lit path to the Tree of Wishes.
Chapter Eight: The End
Click the pot to get the pickaxe. Click the tree trunk. Collect the tears by using the empty bottle. Get the bottle of tears. This is where you go back to the labyrinth and its steps. Click the stone. On the chipped piece, you will use the pickaxe. Get the sickle blade. Move forward 2 times. Move left 2 times. Click the skeleton to get the staff. Go to the labyrinth stairs.
Click the kite. Then, on the roots, you’ll use the staff. Get the note, the bucket piece, and the sickle handle. Go to the waterfall. Click the waterfall to access a hidden objects area.
Collect the glue. Click the bucket.. Use the glue and the bucket piece to repair it. Get the bucket. Click the waterfall. Use the bucket to collect a bucket full of water. Go to the labyrinth. Go straight forward. Turn left. Turn left. Go to the lit path to the tree of wishes.
Click the pot. Put the bucket of water, apples, and the bottle of tears down in the pot. Go into the passageway. Follow the butterfly path. Move forward twice. Click into the tree. Use the sickle to pierce the tree.
Sable Maze – Sullivan River – The Butterfly Path
This completes the walkthrough of Sable Maze – Sullivan River. By following the walkthrough, you will get to experience the storyline from the beginning to the end. We hope that you enjoyed the journey!
For more great tips and tricks, visit our blog!
The Sable Maze – Sullivan River Walkthrough is meant as a guide and does not contain cheats, hacks or serials.