They say love transcends everything. But can it surpass the barrier between life and death? The Last Dream walkthrough will guide you on your journey as you attempt to find out. Our walkthrough will take you through each location, each puzzle, and point out all photos and cat toy achievement items along the way.
Contents
General Tips & Tricks
If you’re just getting started with the game, or need general guidance or tips, this section will take you through all the essentials you need to know.
- There are four difficulty levels you can choose from when starting a new game. Difficulty can be selected independently at the start of the main game, as well as at the start of the bonus gameplay.
- Red Dreamcatcher – Hints and skips recharge quickly. Zoom zones close automatically.
- Yellow Dreamcatcher – Hints and skips recharge slowly. Zoom zones close automatically.
- Blue Dreamcatcher – Hints and skips recharge slowly. Zoom zones do not close automatically. No tutorial available.
- Green Dreamcatcher – No hints, skips and tutorials are available.
- The Cat can be found in the lower left corner of your screen once saved, and acts as your companion. The Cat can accomplish tasks you may not be able to do otherwise. Tip: Not sure what to do next? Try using the Cat!
- Your current tasks and objectives are displayed in the bottom right corner of your screen. Simply click “Tasks” to view them at any time.
- Achievement Item Collectibles are italicized in the written portion of the guide below. All Photos and Happy Friend items are outlined in the guide below.
- Inventory Items are identified in bold in the guide below.
- This walkthrough includes the extra gameplay content available in The Last Dream Platinum Edition. To play it, click on the Extras portion of the Main Menu once you’ve completed the game, then select Extra Gameplay. In the guide below, this section is identified as “Bonus Chapter: Elizabeth’s Dream”.
The Last Dream Walkthrough
Chapter 1: Welcome to the Dreamland
A dream-like landscape leads into an eerie carnival. Can you reach Elizabeth without succumbing to the perils that lie ahead?
Cliff Edge
- Look at the base of the gnarled tree on the right. Click on the Stick to add it to your inventory.
- Take a closer look at the bushes straight ahead and use the Stick to retrieve the Key and add it to your inventory. Read the note Elizabeth left.
- Attempt to follow Elizabeth through the gate. However, it will shut before you can reach her. Proceed to the gazebo on the right.
Gazebo
- Take a closer look at the cat lying on the cushion. Photo 1 of 10 is on the ground to the left. Use the Key to free the cat.
- Collect the Ticket that was underneath the cat. When you attempt to leave, you will become trapped!
- Take a closer look at the mangled tree ahead and use the Cat on the branch to free yourself, then return to the Cliff Edge.
Cliff Edge
- Examine the closed gate. Use the Ticket on the wolf’s head to gain passage through. You will be transported to an entirely new area: an old carnival.
Entrance
- Take a closer look at the ticket stand on the left. The Photo 2 of 10 can be found hanging from a Paper Clip. Collect both of these.
- Examine the tent on the right. Use the Paper Clip to pull up the zipper, and enter the tent to find a hidden object scene. Find all the items here and place the completed items in their proper locations. For example: the completed Postage Stamp goes on the gift, and the Key is used to open the cupboard beneath the mage. Collect the resulting Air Rifle to add it to your inventory.
- Take a closer look at the volleyball net on the right. Use the Cat to dig up the sand, revealing the Hat.
- Exit the close-up and use the Hat on the clown next to the “Welcome to the Dreamland” sign. Take a closer look at the item he drops and add the Remote Control to your inventory.
- Head left to the next area.
Toy Cars
- Use the Remote Control on the purple car to drive it into the water, then take a closer look at the tree to trigger a puzzle. Drop the balls by clicking on them and turn on all the switches. A switch will be turned on once it turns green. The solution is shown below.
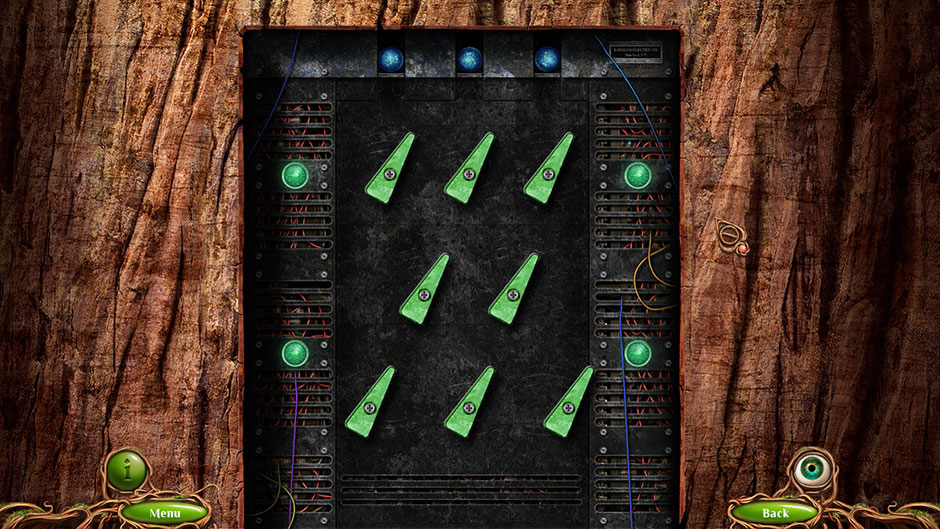
The Last Dream Switch Lever Puzzle Solution
- Take a closer look at the bench down the path. Click on the leaves to clear them aside, then click on the Plastic Bullets to add them to your inventory.
- The Happy Friend 1 of 7 achievement item, the Milk Saucer, is under the bench.
- Click on the lion statue to break it, then click on the Trash Bin to add it to your inventory.
- Take a closer look at the stream on the right. Click on the leaves to clear them away and add the Acid to your inventory. Next, use the Trash Bin on the water to obtain the Bin Full of Water. Combine the two in your inventory to receive the Strong Acid.
- Go back to the Entrance.
Entrance
- Take a closer look at the ticket booth on the left. Place the Ticket on the counter, then click on the blue Coin given in return to add it to your inventory.
- Look at the machine beneath the sign. Use the Coin in the slot on the left, then click the following directional buttons: Right, Up, Right, Up, Right, Down, Right. Upon completing the sequence, you will be rewarded with the Knob.
- Proceed forward to the Train.
Train
- Use the Strong Acid on the swing ride on the right, then take a closer look at the debris. Click on the Chain to add it to your inventory.
- Take a closer look at the tracks ahead and use the Chain on the tracks. Attach the other end of the chain to the spinning chairs on the left. Click on them to re-align the track.
- Examine the train up ahead. Use the Knob on the center slot, then click it to turn on the train, moving it out of the way. Head forward to the next area.
Ferris Wheel
- Take a closer look at the inflatable castle on the left. Click on the Chess Piece to add it to your inventory.
- Examine the shooting range on the right. Place the Plastic Bullets on the counter, followed by the Air Rifle to trigger a puzzle.
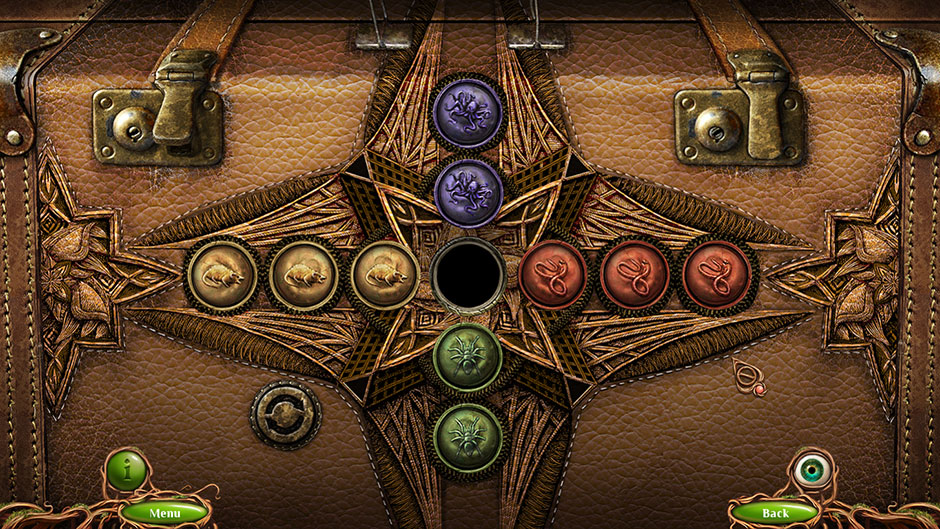
- Click on a bowl with a symbol to load the rifle with that color of bullet, then click on the target to shoot and paint each section correctly. The solution is shown below.
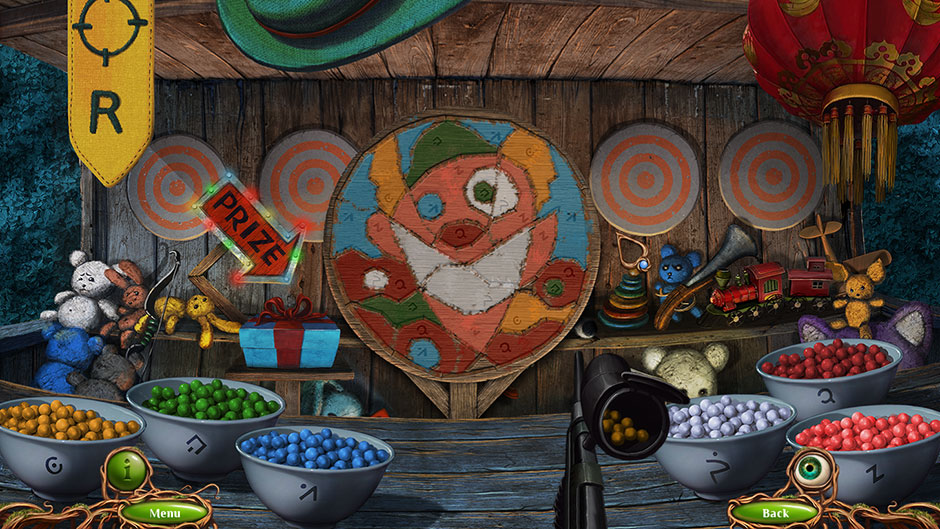
The Last Dream Paintball Puzzle Solution
- Upon completing the puzzle, click on the Handle presented to add it to your inventory.
- Go back to the Entrance.
Entrance
- Take a closer look at the volleyball net on the right. Use the Handle on the mechanism to lower the Net and add it to your inventory.
- Go to the Toy Cars area.
Toy Cars
- Take a closer look at the chess sets on the right. Place the Chess Piece on the board to trigger a puzzle.
- Place eight chess queens on an 8×8 chessboard so that no two queens threaten each other. The solution is shown below.
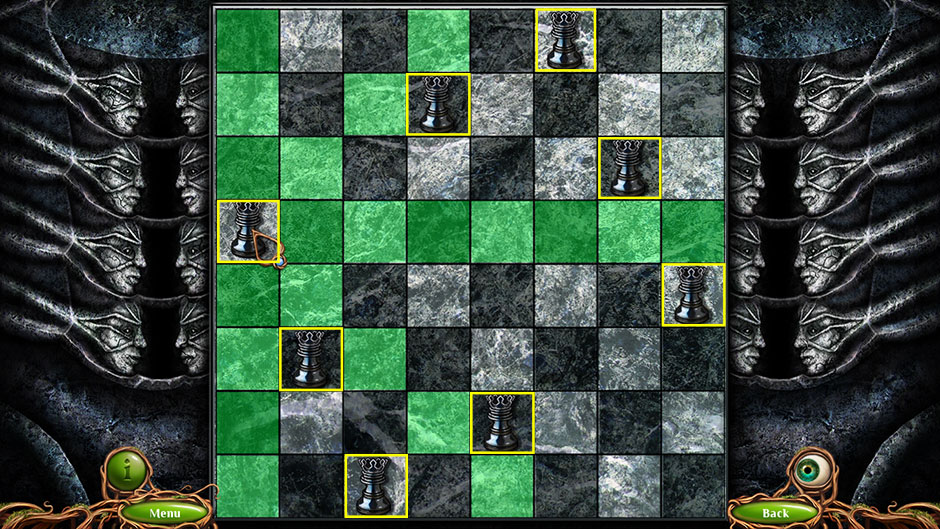
The Last Dream Chess Piece Puzzle Solution
- Upon completing the puzzle, click on the Fuse that appears to add it to your inventory.
- Proceed to the Ferris Wheel.
Ferris Wheel
- Take a closer look at the generator. Remove the front panel and the broken fuse inside, then place the Fuse in the slot to restore power.
- Place the Net over the fallen carriage ahead, then click on the generator to blow the photo into the net. Use the Cat to retrieve it from there.
Chapter 2: The Farm
After traversing the perils of the carnival, you will be taken to a picturesque farm. A boarded up wooden house lies ahead, and a gate opens to a dirt path. The postbox will suddenly come to life and hop away down the road.
Yard
- Take a closer look at the fence on the right. Click on the Rope to add it to your inventory.
- Examine the tree stump straight ahead in the distance. Click on the Tongs to add them to your inventory.
- Proceed forward onto the Porch.
Porch
- Click on the plant on the far end of the porch to move it. We will come back for this later. For now, head right to the next area.
Outdoor Kitchen
- Use the Cat on the green snake to turn it into the Hose, then click on it to add it to your inventory.
- Examine the pile of wood on the right. Click on the Hammer and the Firewood beneath to collect them.
- Examine the foot of the deck straight ahead, beneath the support beam. The Photo 3 of 10 is wedged under the deck. Next to it is the Hook, which you should also collect.
- Combine the Hook and the Rope in your inventory to acquire the Rope with Hook.
- Take a closer look at the shelf on the left. Click on the Kerosene to add it to your inventory.
- Examine the stove straight ahead and collect the Cauldron. Note the instructions on the piece of paper, which offers a tip as to what you’ll need to do. Click on the door to open it, revealing hot coals within. Use the Tongs to retrieve a Hot Coal, then place the Firewood inside and add Kerosene.
- Back in the main view, take a closer look at the corner counter. Click on the Rainbow-striped Ball to collect the Happy Friend 2 of 7 achievement item. Next, click on the cloth to remove it, then have the Cat open the paw print door. Collect the Syrup inside.
- Return to the Porch.
Porch
- Take a closer look at the light fixture hanging from the overhang. Open it, then place the Hot Coal inside. The hole nearby will be illuminated, revealing the Control Unit.
- Now it’s time to check out that plant again. Take a closer look and use the Hammer to remove the nails from the board. Tip: The puzzle pieces we need are missing. We will need to return here later.
- Head left back out into the Yard.
Yard
- Examine the foot of the swing on the left. Use the Rope with Hook on the beam, then back in the main view, click on the lawnmower to catch it.
- Take a closer look at the snagged lawnmower. Use the Control Unit on the empty slot on the right. Taking control of the lawnmower will allow you to break through the barrier at the far end of the Yard.
- Proceed forward through the gate and into the next area.
Well
- Take a closer look at the stream of water on the right. Use the Cauldron here to obtain the Cauldron of Water. Place the Hose on the bank before exiting the close-up.
- Click on the tractor to enter a hidden object area. Find the components needed to assemble the various items. Once assembled:
- Use the Magnet to retrieve the final piece of the Knife.
- Use the Knife to cut open the seat and acquire the last piece of the Starter.
- Use the Starter to turn on the engine, revealing the final component of the Screwdriver.
- Use the Screwdriver to remove the center of the steering wheel and obtain the final piece of the Key.
- Use the Key on the lock box to obtain the Hacksaw for your inventory.
- Backtrack to the Outdoor Kitchen.
Outdoor Kitchen
- Take a closer look at the shelf on the left again. Use the Hacksaw to cut up the colored Tiles and add them to your inventory.
- Go left to the Porch.
Porch
- Examine the plant again and use the Tiles on the slots to trigger a puzzle. The goal is to arrange the pieces in order to create the shape shown. The solution is shown below.
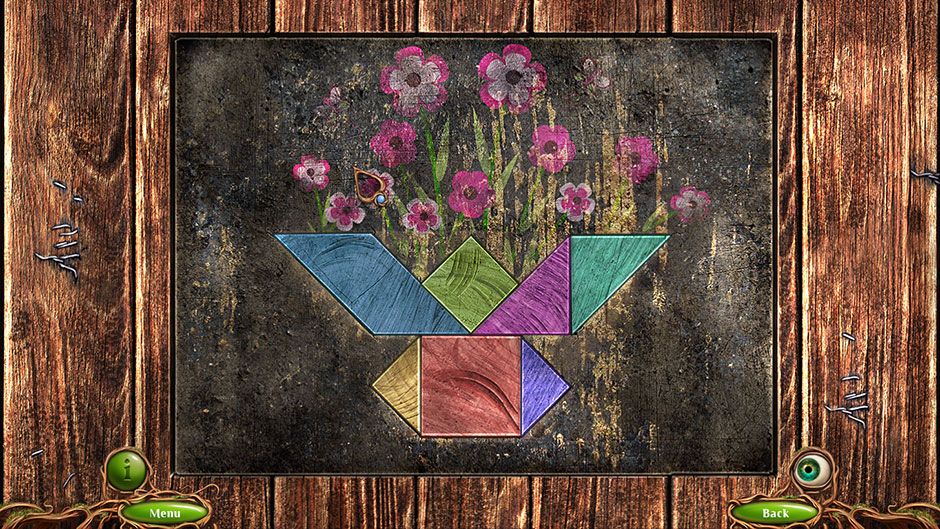
The Last Dream Colored Tiles Puzzle Solution
- Upon completing the puzzle, click on the Shawl to add it to your inventory.
- Go back to the Outdoor Kitchen.
Outdoor Kitchen
- Take a closer look at the outdoor stove. Place the Cauldron of Water on the burner, then pour the Syrup inside. Use the Shawl on the mixture and the Tongs to retrieve it. You will acquire the Shawl with Syrup.
- Make your way back to the Well.
Well
- Examine the ant hill in the lower right corner. Use the Shawl with Syrup on the ant hill, then click on the Funnel to add it to your inventory.
- Take a closer look at the stream on the right again. Use the Funnel on the end of the hose.
- Back in the main area, click on the left end of the hose to water the tree. You can now gain access to the postbox. Click on the GPS inside to be transported to the next area.
Chapter 3: Auto Garage
The GPS will lead you to the past, to an old auto garage that you and Elizabeth inherited. It’s since fallen into disrepair, but perhaps there will be clues here that lead you one step closer..
Lot
- Attempting to move forward will cause a barrier to appear, blocking your path.
- Take a closer look at the hood of the car. Click to open it, then remove each of the caps on the battery. Read the tip left here and note what you’ll need to do next. Exit the close-up for now.
- Examine the inside of the car. The Happy Friend 3 of 7 achievement item, the Cardboard Box, is sitting in the back seat. Click on the Plastic Bottle in the front seat to add it to your inventory.
- Enter the Maintenance Shop on the left.
Maintenance Shop
- Click on the Burner on the left and the Crowbar on the right to add them to your inventory. Click on the right drawer to open it and collect the Knife and the Tape inside.
- Combine the Knife and the Plastic Bottle in your inventory to obtain the Half-bottle.
- Click on the tires at the back of the shop to remove them, then collect the Empty Bottle hidden inside.
- Examine the control panel hanging on the upper left. Click the button to turn it on.
- Use the Cat on the hanging hook to retrieve the Broken Vacuum Cleaner from the maintenance pit. Combine it with the Tape in your inventory to acquire the Repaired Vacuum Cleaner.
- Before leaving, take a closer look underneath the desk and collect the Piece of Hose and the Rag, then head back outside.
Lot
- Examine the locked door on the left labeled “665”. Use the Crowbar to pry off the lock, then enter.
Shipping Bay
- Click on the Bucket straight ahead to add it to your inventory.
- Examine the chainsaw sitting on top of the safe. Tip: We will be returning here often. For now, collect the Tweezers. Place the Half-bottle into the top of the chainsaw, then exit for now.
- Examine the table at the far end of the room. Collect the Empty Jar and the Stick. Combine the Rag and the Stick in your inventory to obtain the Torch.
- Place the Empty Jar beneath the funnel of the apparatus, then the Burner to the left of that. Exit back to the Lot for now.
Lot
- Take a closer look at the car again. Place the Bucket in front of the tire, then place the Piece of Hose in the car’s gas compartment. Click on the filled bucket of Gas to add it to your inventory.
- Back in the main view of the area, use the flaming barrel on the right to light the Torch, acquiring the Burning Torch.
- Take a closer look at the barrel on the left beneath the tree. Use the Empty Bottle on the toxic water within to obtain the Water.
- Return to the Shipping Bay.
Shipping Bay
- Examine the apparatus on the back table again. Attach the Water to the tube above the burner, then use the Burning Torch to light it. Collect the resulting Distilled Water to add it to your inventory.
- Go to the Maintenance Shop.
Maintenance Shop
- Examine the hanging control panel again. Use the Tweezers on the blue Button to add it to your inventory.
- Go back to the Shipping Bay.
Shipping Bay
- Take a closer look at the table on the right. Use the Button on the slot here and push it. A puzzle will be activated over the conveyor belt.
- Remove 2 or more boxes of the same color by flicking on them. Don’t let the boxes reach the box with the key on the right. You win if you manage to remain until the last line appears. If you clean an entire column, the next move will push any remaining boxes back together.
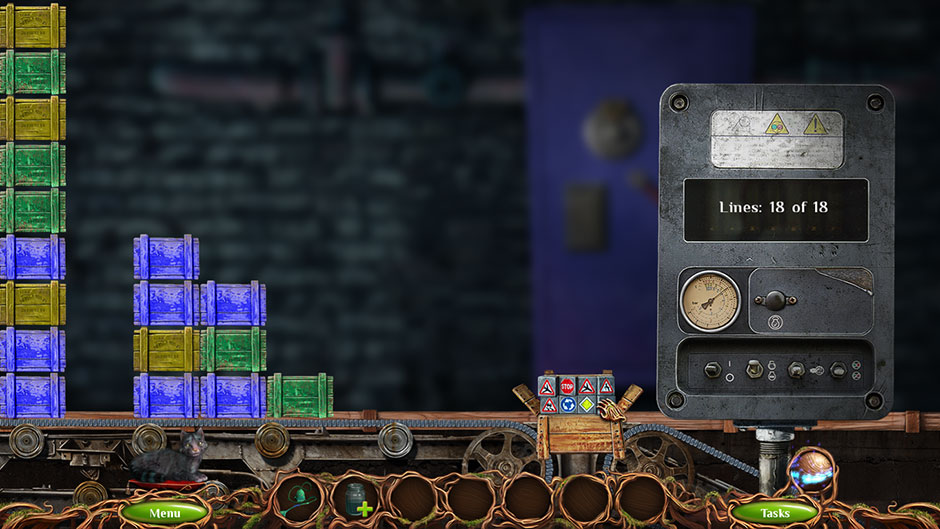
The Last Dream Conveyor Belt Puzzle Solution
- Upon completing the puzzle, click on the Tiles to add them to your inventory.
- Exit back out to the Lot.
Lot
- Examine the barrier blocking your path. Use the Tiles on the puzzle panel to trigger another puzzle.
- Place all the puzzle pieces so that they cover the entire grid. Tip!: Signs will align vertically, so use this to figure out where each piece should go. An example of this, and the final solution, are shown below.
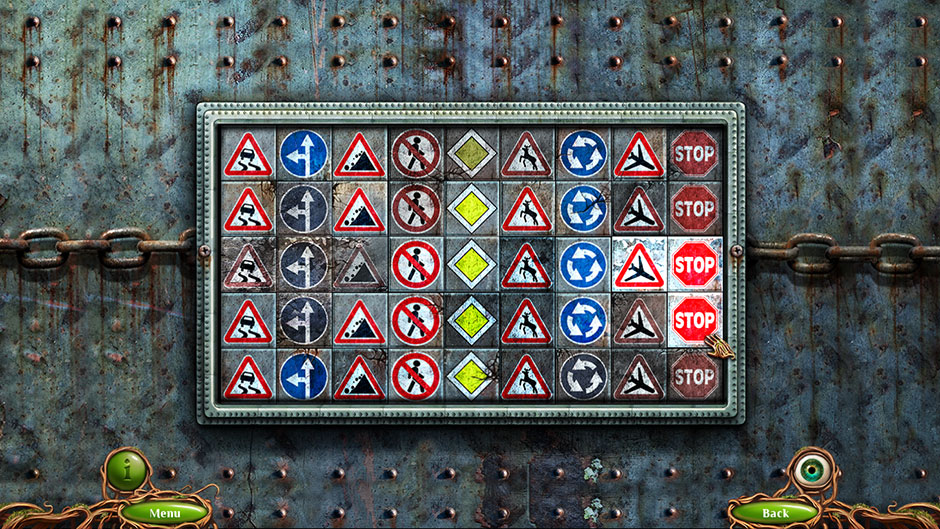
The Last Dream Sign Tiles Puzzle Solution
- Once the puzzle has been successfully completed, the barrier will disappear. Use the Repaired Vacuum Cleaner to clear out the blue and green dust cloud.
- Examine the blue doors marked “667” next to the now-accessible garage. Tip: The numbers on the wheel here match the safe door in the Shipping Bay, providing you with the code to open it.
- Return to the Shipping Bay.
Shipping Bay
- Take a closer look at the blue safe on the left. Solve the sequence and enter the code using the numbers you found on the door marked “667” outside. Rotate right to enter the first digit. Rotate left to enter the second digit.
- Once the puzzle is completed, take a closer look inside the safe and collect the Photo 4 of 10 on the bottom shelf, as well as the Chain on the middle one.
- Examine the red chainsaw on top of the safe. Use the Gas on the funnel, then add the Chain to the blade. Click on the completed Chainsaw to add it to your inventory.
- Exit back out to the Lot.
Lot
- Take a closer look at the blue doors marked “667” again. Use the Chainsaw to cut away the branches blocking your path. Enter through the door to access a hidden object scene.
- Find the items and components needed to assemble the items required to complete the area.
- Use the completed Radio on the upper right shelf to obtain the final piece of the Soldering Iron.
- Use the Soldering Iron to repair the television, then click to change channels until a secret compartment opens, revealing the last piece of the Rasp.
- Use the Rasp on the clay tile within the clamp to obtain the final piece of the Medallion Key.
- Use the Medallion Key on the hole in the wall to get the final piece of the Ballerina.
- Use the Ballerina on the hole in the counter on the left to reveal the location of the Alkali, which will be added to your inventory.
- You’ll find yourself back out in the main Lot. Combine the Alkali and the Distilled Water to earn the Electrolyte.
- Take a closer look at the hood of the car again and use the Electrolyte on the battery. Examine the inside of the car and click on the steering wheel to turn on the headlights, illuminating the dark hanger bay ahead.
- Enter the garage to be transported to the next location.
Chapter 4: Miniature
What’s going on? You’re shrinking..! You’ll find yourself in a colorful bedroom, however you’re now miniature! You will need to navigate the area, and your small size adds an extra challenge.
Floor
- Click on the Batteries lying on the floor directly in front of you to add them to your inventory.
- Click on the remote control on the left to open the front panel and place the Batteries inside.
- Examine the top of the pile of books on the right. Click on the Paper Clip to add it to your inventory.
- Take a closer look at the stuffed pink bunny. Click on the stitching to tear it open and collect the Wadding within. Click on the Button nose to add that to your inventory as well.
- Examine the dripping bottle on the right. Use the Wadding on the liquid to obtain the Wet Wadding. Use the Wet Wadding on the remote control on the left to remove the jam.
- Click the lever on the now-clean remote control to extend the ladder on the truck, allowing you access to the desk above.
Desk
- Click on the jar on the left to open it. The Jar Lid will be added to your inventory. Once the wasp has landed inside the jar, place the Jar Lid back on top to trap it.
- Take a closer look at the computer on the left and collect the Pencil.
- Look at the drawer on the desk edge at the bottom of your screen. Use the Pencil to pry the drawer open, then collect the Photo 5 of 10, the Thread, and the Ruler inside. Combine the Thread and the Paper Clip to obtain the Harpoon.
- Examine the fan sitting on the desk. Use the Button on the slot, then click on it to switch it on.
- Look at the pirate ship model on the left. Use the Harpoon to gain access. There’s a hidden object area on board.
- Find the components of the items needed to complete the area. Once the first item has been assembled:
- Use the Medal Key to open the chest on the right, obtaining the final piece of the Pump.
- Use the Pump on the left to restore it to working order.
- Use the Wheel on its stand to reveal the location of the last piece of the Winch.
- Place the Winch on the hanging rope. Once the bay is open, click on the Pump to remove the water and collect the final component of the Lighter.
- Use the Lighter on the cannon straight ahead. The cannon blast will break the piggy bank on the shelf on the right side of the room.
- Back in the main area, examine the notebook lying on the table. Click on the pages and paper to fold the various types of origami until you successfully fold a Paper Airplane.
- Climb back down to the Floor.
Floor
- Take a closer look at the remains of the broken piggy bank. Click on the Keyboard Key to add it to your inventory.
- Examine the top of the pile of books on the right again. Use the Ruler to traverse the gap to the shelf. Use the Pencil to erase the scribble on the front of the book, revealing a Password you will need.
- Climb back on top of the Desk.
Desk
- Take a closer look at the computer on the left. Use the Keyboard Key on the missing spot. Since you found the Password just a short moment ago, it will be input automatically. Once entered, the disk drive will open, revealing the Toothpick.
- Back in the main view of the Desk, use the Toothpick on the Paper Airplane. After a brief cutscene, you will find yourself on top of the Cabinet.
Cabinet
- Collect the Gear lying on the cabinet directly in front of you.
- Click on the glass figure to break it, then take a closer look at the pieces to enter a puzzle. Arrange the pieces in order to create the shape. Click on a piece to rotate it. The puzzle solution is shown below.
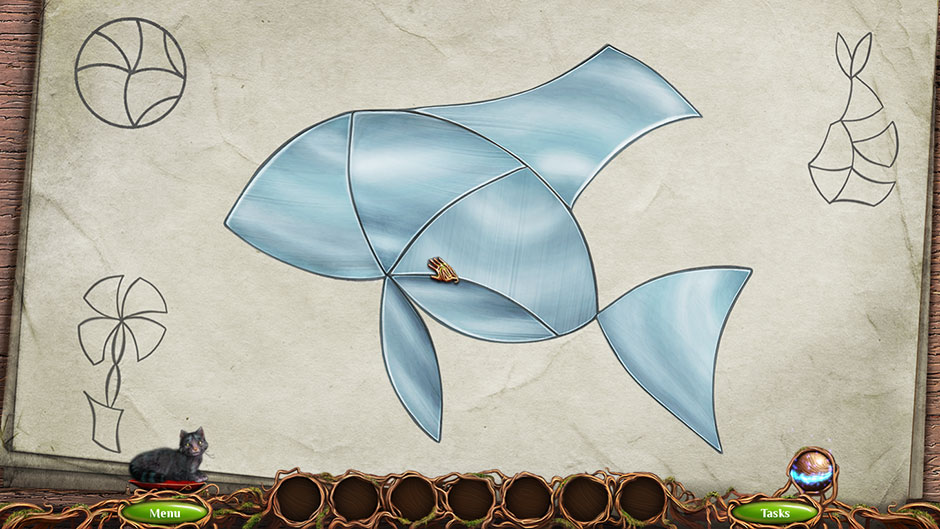
The Last Dream Glass Fish Puzzle Solution
- Once completed, click on the Glass Fish to add it to your inventory.
- Examine the horse statue on the right. Click on the Magnet in the upper corner to add it to your inventory. The Happy Friend 4 of 7 achievement item, the Teddy Bear, is sitting directly in front of you.
- Back in the main area, take a closer look at the fish bowl on the left. Use the Glass Fish on the inside to clear the water. Flip the switch on the left, then use the Magnet to acquire the Gear (2).
- Take a closer look at the mechanism to the right of the fish bowl. Use the Gear and Gear (2) on the device to trigger a puzzle.
- Place the gears so that they fit into the grooves. Click on a gear ring to rotate it. Tip: Pay attention to the shape of the gears as they’re rotated, and try to match them to the rings. The puzzle solution is shown here.
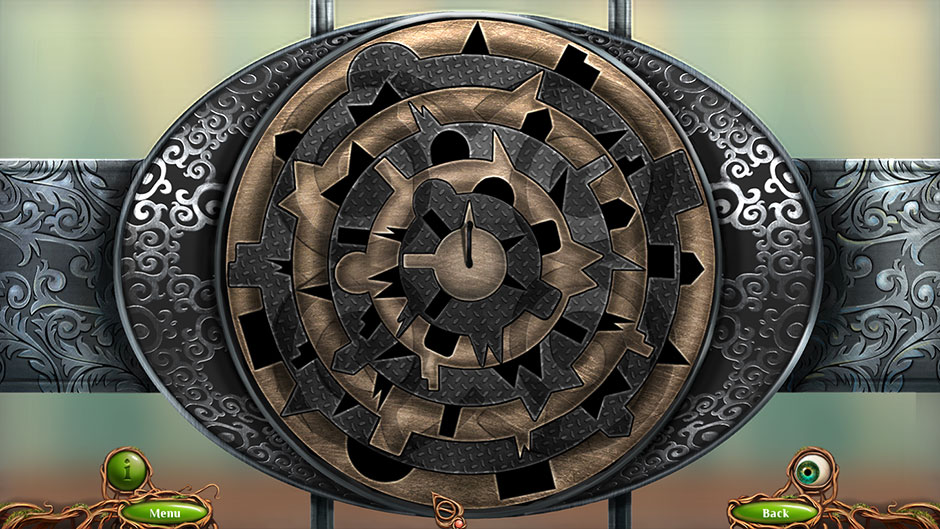
The Last Dream Gear Alignment Puzzle Solution
- Once the puzzle has been completed, you’ll be able to access an elevator to the top of the Shelf.
Shelf
- Click on the carton of paperclips to knock it off the top of the shelf. Collect the Rubber Band beneath to add it to your inventory. Use the Rubber Band on the nail pegs at the edge of the shelf, then head back down to the Cabinet.
Cabinet
- Examine the spilled Paper Clips and click on them to add them to your inventory.
- Head back up the lift to the top of the Shelf.
Shelf
- Use the Paper Clips on the rubber band slingshot, then click on it to throw the chain over the light fixture on the upper right. Collect the Key hanging here to finish this chapter.
Chapter 5: The Dark Forest
You will find yourself in a dark and spooky forest. A fierce plant blocks the path ahead, while a lonely windmill stands atop a hill to the right. One step closer to finding Elizabeth.
Forest
- If you attempt to move forward, the Barrier will block you again. Head up the path to the right.
Windmill
- Take a closer look at the cart and barrel on the bottom right. Click on the Crowbar lying on the ground to add it to your inventory.
- Examine the hay cart on the left. The Photo 6 of 10 is hidden in the upper right corner of the close-up. Click on the hay to clear it aside until the Sickle is revealed, then collect it.
- Look at the fence toward the bottom of your screen. Use the Crowbar to pry off the Plank and add it to your inventory.
- Examine the left side of the windmill ahead. Click on the stone brick to remove it, then collect the Puzzle Piece and the Happy Friend 5 of 7 achievement item, the Cylinder, within.
- Enter the windmill.
Windmill Interior
- Take a closer look at the sacks in the lower left corner. Use the Cat to scare away the mice, then cut open the bag with the Sickle and collect the Corn inside.
- Examine the struggling blue bird on the right. Use the Sickle to cut it free and collect the Rope left behind. Tip: You will need to zoom in again to get it.
- Examine the container belt straight ahead and place the Corn inside the container.
- Take a closer look at the puzzle door toward the upper right. Use the Puzzle Piece here to start the puzzle. The goal is to arrange the chips so that nothing is repeated in any column or row. The solution is shown below.
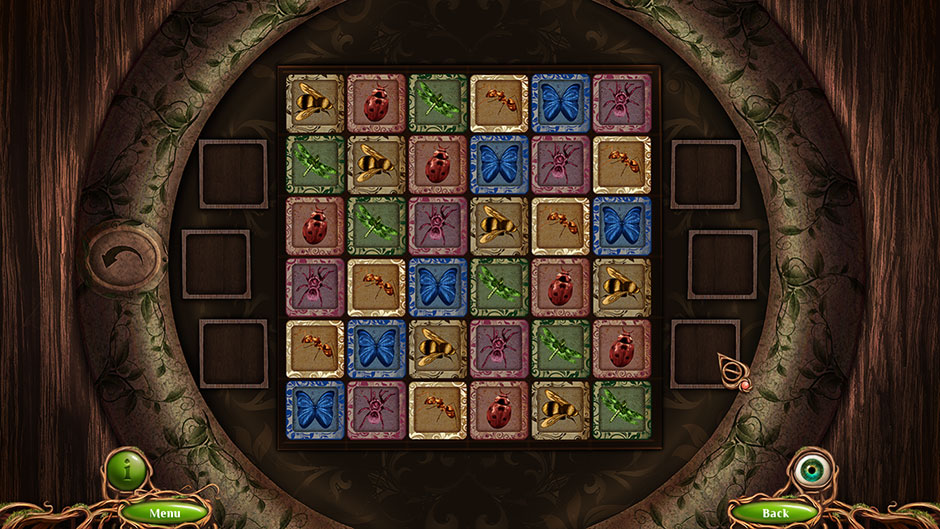
The Last Dream Tile Pattern Puzzle Solution
- Once the puzzle is completed, the door will open. Collect the Gloves and the Bowl inside to add them to your inventory.
- Leave the Windmill Interior.
Windmill
- Take a closer look at the barrel and cart in the lower right corner again. Use the Bowl on the liquid inside the barrel to acquire the Bowl of Water, then click on the Barrel itself to add it to your inventory as well.
- Head back down into the Forest.
Forest
- Take a closer look at the frog at the foot of the tree on the left. Use the Gloves to handle the Frog and add it to your inventory. Once collected, click on the Gear it was sitting on to add that to your inventory as well.
- Examine the trap at the base of the tree straight ahead. Use the Frog to eliminate the mosquitos, then use the Rope to trigger the device. Click on the Trap with Rope to add it to your inventory.
- Examine the hole in the tree straight ahead to enter a puzzle. Connect all the flowers with vines so that it could be possible to get from any of the flowers to any other one. You may make more than one connection per flower. A flower must be connected only with the number of vines indicated on the flowers. Vines can only be horizontal or vertical. You are not allowed to cross vines. The completed puzzle solution is shown below:
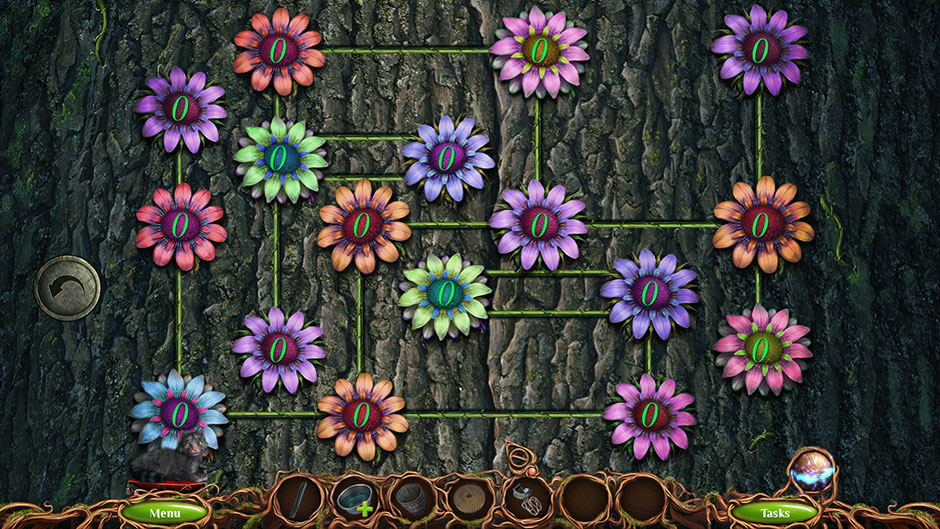
The Last Dream Flower Connector Puzzle Solution
- Once the puzzle is completed, a hollow will open. Collect the Poison inside to add it to your inventory.
- Examine the lily pad on the lower left where the frog was sitting previously. Use the Poison on the water to kill the vines constructing the barrier. However, we’re not done just quite yet. You still need to address the fearsome orange flower blocking your path.
- Return to the Windmill Interior.
Windmill Interior
- Examine the large gears in the center of the mill and use the Gear on the empty slot here.
- Look at the grinding stones on the left and collect the Flour. Combine the Flour with the Bowl of Water in your inventory to obtain the Dough.
- Return to the Forest.
Forest
- Use the Dough on the flower blocking your path.
- Head past the neutralized threat and forward into the next area.
Bridge
- Place the Barrel next to the barrel straight ahead. Place the Plank on top of both.
- Click on the Boards lying on the ground on the path to add them to your inventory.
- If you attempt to cross the bridge, a flash flood will wipe it out. Examine the far bank and use the Trap with Rope to establish a line to the other side.
- Enter the shed on the left, which houses a hidden object area. Find the items shown at the bottom of the screen. Once you’ve constructed the first item:
- Hang the Lantern on the hook to illuminate the room.
- Use the Hand Drill on the steel barrel on the left and click it to reveal the location of the final piece of the Blowlamp.
- Use the Blowlamp on the can of paint on the right to free the last piece of the Winch.
- Use the Winch on the hook next to the lantern to retrieve the final piece of the Circular Saw.
- Use the Circular Saw on the crate on the floor to obtain the Nail Gun for your inventory.
- Back outside, use the Nail Gun to secure the components of the barrels and plank. Place the Boards on top, then use the Nail Gun once more to secure a Raft.
- Proceed across the stream. You will be transported to the next location.
Chapter 6: The Factory
You first met Elizabeth in a dining room while working at a factory. It’s time to revisit the past once more.
Street
- Examine the Rod lying in the street and click on it to add it to your inventory.
- Take a closer look at the road barricade ahead. Click on the Rope coiled over the beam to collect it.
- Examine the fire hydrant on the left. Use the Rope, then the Crowbar on the cap to unfasten it.
- Attempt to enter the factory, but you won’t be able to just yet. Instead, a frozen ice safe will appear in front of you. Use the Cat on the lantern just above it to knock it down, breaking the ice. Click on the Key to add it to your inventory.
- Take a closer look at the factory door and use the Key to open it. Proceed inside.
Factory Floor
- Take a closer look at the device to which the cable is attached on the left. Click on the Hammer to add it to your inventory.
- Examine the box hanging on the wall straight ahead, to the right of the stairs. Click to open it and collect the Extinguisher inside.
- Proceed to the right to enter a hidden object area. Find the components needed to assemble the items shown at the bottom of the screen. Once the first has been assembled:
- Use the Screwdriver on the red power box in the upper right and collect the final piece of the Compressor.
- Use the Compressor on the lever panel straight ahead.
- Use the Manipulator on the mechanical arm on the left to retrieve the last piece of the Press Mold.
- Use the Press Mold on the surface to the far left to create the last piece of the Nitrogen Can.
- Place the Nitrogen Can in the chamber ahead and click the lever to obtain the Liquid Nitrogen for your inventory.
- Head up the stairs to the next area.
Catwalk
- Take a closer look at the grating on the right. After a brief cutscene, you will no longer be able to pass.
- Examine the Chain hanging on the railing on the right and add it to your inventory.
- Head back down onto the Factory Floor.
Factory Floor
- Pick up the Grate (x3) lying on the floor, then take a closer look at the red forklift.
- The Photo 7 of 10 is lying on the floor beneath the forklift’s tire, and the Happy Friend 6 of 7 achievement item, the Cat Tree, is behind the back corner. Use the Chain on the forks to lift the Grate (4) and collect both this and the Gloves beneath. Combine the Gloves and the Liquid Nitrogen to obtain the Nitrogen and Gloves.
- Head back up to the Catwalk.
Catwalk
- Take a closer look at the gaps in the catwalk on the right. Place the Grate (x4) in the gaps.
- Examine the yellow control cabin. Use the Nitrogen and Gloves on the door handle, then use the Hammer to smash it open. Click on the door to open it. The control cabin will allow you to remove the steel debris from the walkway on the left.
- Take a closer look at the door at the far end of the walkway on the left. Use the Extinguisher to cool then handle, then proceed through to the next area.
Dining Room
- Examine the floor beneath the table on the left. Click on the Puzzle Tiles and the Plate to add them to your inventory.
- Use the Plate on the cutout of the waiter to neutralize him. A ceiling panel will fall and the floor will become electrified.
- Exit the factory back out to the Street.
Street
- Take a closer look at the electricity box on the left. Use the Puzzle Tiles on the box to activate a puzzle. Identical cubes disappear on contact. It is necessary to remove them all. You can drag the cubes to move them. Once you’ve completed the puzzle, the hatch will open. Collect the Lever inside.
- Return to the Dining Room.
Dining Room
- Examine the green electricity panel on the right. Place the Lever in its proper location on the right, then click it to switch the electricity off.
- Proceed across the room. You will be transported to the next location.
Chapter 7: Lake Bottom
There was once a lake Elizabeth and her husband found while walking through a prairie. There is a clue out in the water, but you’ll have to dive down to discover what it is.
Boat Wreck
- Click on the Wire Frame at the front of the boat to add it to your inventory.
- Take a closer look at the rocks on the left. Click on the Amulet to collect it.
- Examine the inside of the boat ahead and click on the Life Vest to add it to your inventory. Use the Amulet to open the suitcase, then collect the Fish Food inside.
- Back in the main area, take a closer look at the chest on the right. Use the Fish Food on the vines to have the fish eat them away, then head down to the next area.
Lake Bottom
- Examine the tire on the right. The Photo 8 of 10 is in the upper left corner. Click on this, the Stick, and the Bottle to add them to your inventory.
- Back in the main area, place the Wire Frame and the Stick in the hole on the left. Exit back to the Boat Wreck for now.
Boat Wreck
- Examine the rocks on the left again. Use the Bottle on the rocks to break it, then collect the Broken Bottle to add it to your inventory.
- Take a look inside the boat straight ahead. Use the Broken Bottle to cut the Net and add it to your inventory.
- Head back down to the Lake Bottom.
Lake Bottom
- Use the Broken Bottle on the clam to pry it open and collect the Pearl inside.
- Place the Net over the trap on the left and return to the Boat Wreck.
Boat Wreck
- Examine the chest on the right and use the Pearl to trigger a puzzle. In less than seven moves, move the pearls so that they form a circle. Each pearl should touch at least two other pearls. The solution is shown below.
-

The Last Dream Pearl Arrangement Puzzle Solution
Once the puzzle is completed, the chest will open. Take a closer look inside and click on the Coin to add it to your inventory.
- Return to the Lake Bottom.
Lake Bottom
- Place the Coin beneath the trap on the left. Once the aggressive fish has been caught, look at the concrete debris on the right. Use the Life Vest to prop it up and collect the bag. After a cutscene, you will be transported to the next area.
Chapter 8: The Town Street
It seems the closer you come to Elizabeth, the more intent the barrier becomes on keeping you away. Navigate the town streets and find a way to proceed.
Street
- If you attempt to proceed forward through the door, a ravine will open up in the ground.
- Take a closer look at the bicycle propped up against the wall. Click on the Bicycle Headlamp to add it to your inventory.
- Examine the dumpster on the left. Pick up the Stone and the Bubblegum.
- Enter the Alley on the right.
Alley
- Take a closer look at the forklift on the right. Click on the Screwdriver on top of the hood to add it to your inventory. Collect the left Headlamp as well.
- Examine the door on the right and use the Stone to break the glass and gain entry.
Art Studio
- Click on the green curtain to draw it back, then take a closer look at the canister. Use the Screwdriver to remove the Wheel and add it to your inventory.
- Take a closer look at the table. Click on the Solvent and the Paint to collect them, then use the Solvent to clean the painting device still lying on the table. Use the Bubblegum to repair the hole, then fill it with Paint. The completed Paint Sprayer will be added to your inventory.
- Return to the Street.
Street
- Take a closer look at the crevice in front of the door. Use the Paint Sprayer to reveal the path, then click on the Electronic Car Key on the other side to collect it.
- Examine the door to enter a puzzle. Arrange the numbers so that the sum of the numbers on each line is 24. Once finished, enter through the door to access a hidden object area.
- Find the items needed to assemble the objects shown at the bottom of the screen. Once you’ve assembled the first object:
- Place the Drum in front of the bunny drummer to find the last piece of the Till Printout.
- Insert the Till Printout into the register on the left to acquire the final piece of the Dispenser.
- Use the Dispenser on the top of the swirling tube to gain access to the last component of the Soldier.
- Place the Soldier on the shelf with the others to reveal the location of the last piece of the Pump.
- Use the Pump on the deflated fish balloon on the left to reveal the Pipette and add it to your inventory.
- Return to the Alley.
Alley
- Use the Electronic Car Key on the car, then open the car door. Click on the orange switch inside to pop the trunk.
- Examine the car trunk and click to open it. Collect the Tripod and the Car Jack inside to add them to your inventory.
- Enter the Art Studio.
Art Studio
- Take a closer look at the spill on the floor. Use the Pipette to obtain the Pipette with Oil.
- Return to the Street.
Street
- Examine the dumpster on the left. Use the Car Jack to prop it up, then place the Wheel on the dumpster. Use the Pipette with Oil to loosen it.
- Click on the dumpster to roll it across the street, then follow it into the Alley.
Alley
- Take a closer look at the ground between the car and the dumpster. Click on the Wheel to add it to your inventory again.
- Enter the Art Studio.
Art Studio
- Examine the canister straight ahead. Put the Wheel on the Gas Cylinder, then click on it to add it to your inventory. An important tip: Don’t forget to collect the Baseball Bat from the box that was behind the cylinder before you go.
- Go back out to the Alley.
Alley
- Head up the ladder on the left to the next area.
Balcony
- Take a closer look at the shelf on the right. The Photo 9 of 10 is behind the purple and maroon containers on the lower right. Collect the Flashlight, the Wire, and the Car Key from this area as well.
- Go back down to the Alley.
Alley
- Enter the car again. Use the Car Key to open the glovebox and collect the Wrench inside.
- Head left to the Street.
Street
- Examine the bike propped up against the wall again. Use the Wrench to remove the Bicycle Handlebar and add it to your inventory.
- Head back up to the Balcony.
Balcony
- Attempt to use the Bicycle Handlebar on the powerlines. The barrier will attempt to stop you, causing you to drop it.
- Place the Tripod on the balcony. Then, in the close-up, attach the Wire, then the Bicycle Headlamp, the Headlamp, and the Flashlight. The fog barrier blocking your path will be cleared.
- Head back down to the Street.
Street
- Look at the cobblestones in front of the barrier and pick up the Bicycle Handlebar you dropped.
- Return to the Balcony.
Balcony
- Use the Bicycle Handlebar on the powerlines to jump over the barrier to the next area.
Pharmacy Entrance
- Place the Gas Cylinder in the street, then use the Baseball Bat on it. The front window will shatter, providing you with a path into the next chapter’s location.
Chapter 9: The Dream
Revelations are starting to dawn on our dazed protagonist. One final challenge awaits. One final barrier stands between him and reuniting with Elizabeth.
Gallery
- Examine the area beneath the painting of the car wreck. Click on the Wood Splinters to add them to your inventory.
- Examine the area beneath the painting of the snowscape. Click on the Burlap to add it to your inventory.
- Enter through the painting of the car wreck.
Car Wreck
- Collect the Piece of Pipe lying in the street on the right. Combine the Burlap with the Piece of Pipe in your inventory to obtain the Torch.
- Go back to the Gallery.
Gallery
- Enter through the painting of the fire on the right.
House Fire
- Click anywhere here, and flaming embers will fall from the ceiling, barring your path further in. Use the Torch on the embers to light it, obtaining the Burning Torch.
- Examine the shelf on the far right. Click on the Bird Food to add it to your inventory.
- Use the Cat on the mirror while still in the close-up to remove it, revealing a puzzle. You can’t do anything just yet, so we’ll return here later.
- Exit to the Gallery.
Gallery
- Enter the painting of the Snowscape on the left.
Snowscape
- Click anywhere and watch as the ice cracks.
- Take a closer look at the small structure on the right. Place the Bird Food inside, then collect the Puzzle Parts the pigeon leaves behind.
- Examine the pile of snow at your feet. Place the Wood Splinters on the bank, then light them with the Burning Torch. Collect the Pin in the water to add it to your inventory.
- Return to the Car Wreck.
Car Wreck
- Examine the trunk of the car. Use the Pin to pry it open, then collect the Fishing Rod Part and the Axe Handle within to add them to your inventory.
- Return to the House Fire.
House Fire
- Take a closer look at the inactive puzzle on the right behind the mirror. Use the Puzzle Parts to trigger a puzzle. Starting with the framed button at the bottom, track the correct path through the grid, following the pattern on the left. The solution is shown below.
-
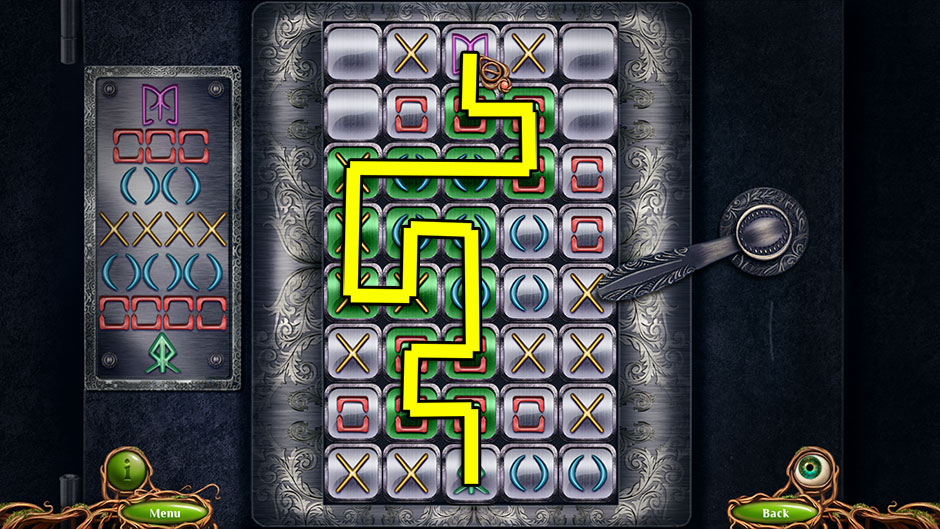
The Last Dream Navigation Puzzle Solution
Upon completing the puzzle, the compartment will open. Click on the Hook to add it to your inventory. Combine the Hook with the Fishing Rod Part in your inventory to obtain the Fishing Rod.
- Go back to the Snowscape.
Snowscape
- Use the Fishing Rod to retrieve the Lifebuoy Figure from the sheet of floating ice.
- Exit to the Gallery.
Gallery
- Examine the area beneath the snowscape painting. Place the Lifebuoy Figure in the slot.
- Take a closer look at the gravestone that appears. Click on the Axe Head lying on top of it to collect it. Combine the Axe Head with the Axe Handle to obtain the Axe.
- Return to the Snowscape.
Snowscape
- Take a closer look at the boat on the right. Use the Axe to break open the box, then click on the Bucket inside to add it to your inventory. The Happy Friend 7 of 7 achievement item, the Scratching Post can be found behind the broken box.
- Examine the fire on the bank. Use the Bucket on the water to obtain the Bucket of Water.
- Return to the House Fire.
House Fire
- Use the Bucket of Water to extinguish the flames.
- Take a closer look at the plaid blanket hanging near the ceiling. Click to remove it from the cage, then open the door and collect the Parrot Figure inside.
- Head up the stairs to access a hidden object area. Find all the components of the items shown at the bottom of the screen. Once you’ve assembled the first item:
- Use the Sprayer with Poison against the bugs over the bookcase.
- Use the Chandelier on the wall straight ahead to get a piece of the Statuette.
- Use the Projector on the shelf on the right to find the last piece of the Violin.
- Use the Violin on the mirror to obtain the last piece of the Statuette.
- Use the Statuette on the safe on the left to acquire the Tin Snippers.
- Exit back out to the Gallery.
Gallery
- Examine the cutout beneath the painting on the right. Place the Parrot Figure inside of it.
- Examine the second portion of the gravestone that appears, then proceed through the painting to the Car Wreck.
Car Wreck
- Take a closer look at the car and use the Tin Snippers to open the door. The final Photo 10 of 10 is tucked away beneath the driver’s seat.
- Click on the driver. Once he’s lying in the road, take a closer look and collect the Car Figure from him.
- Exit to the Gallery.
Gallery
- Take a closer look at the area beneath the painting of the car wreck and place the Car Figure in the picture slot.
- Examine the name that appears on the gravestone.
Congratulations! You’ve completed The Last Dream! You may now access the Extra Game Play via the Extras portion of the Main Menu.
Bonus Chapter: Elizabeth’s Dream
Turns out you weren’t the only one caught in a nightmare. Elizabeth herself experiences a vivid dream, which she’s convinced is key to keeping her husband with her. The final chapter of our The Last Dream Walkthrough will guide you through this extra game play available in The Last Dream Platinum Edition.
Frozen Fountain
- Take a closer look at the pile of snow beneath the tree on the left. Click on it to obtain the Snowball.
- Head left to the next area.
Park Bench
- Use the Snowball to knock down the icicles above the bench, then look at the ground beneath it. Click on the Shovel and the Bucket, then open the jacket and collect the Key inside.
- Return to the Frozen Fountain.
Frozen Fountain
- Examine the crate up ahead. Click on the lid to open it, then use the Bucket on the contents to obtain the Bucket of Sand.
- Look at the snow pile on the left again. Use the Shovel to dig out the snow, then remove the revealed lid.
- Head back to the Park Bench.
Park Bench
- Use the Bucket of Sand to access the cave on the right. Collect the Track and the Valve inside.
- Go back to the Frozen Fountain.
Frozen Fountain
- Examine the dug-out well toward the left. Use the Valve on the pump to trigger a puzzle.
- Swapping two at a time, turn all the lamps green by placing the pipes in the right positions. Only the same-colored pipes can be placed together. When a pipe with the correct color is attached to a lamp, it will turn pale blue. The solution is shown below.
-
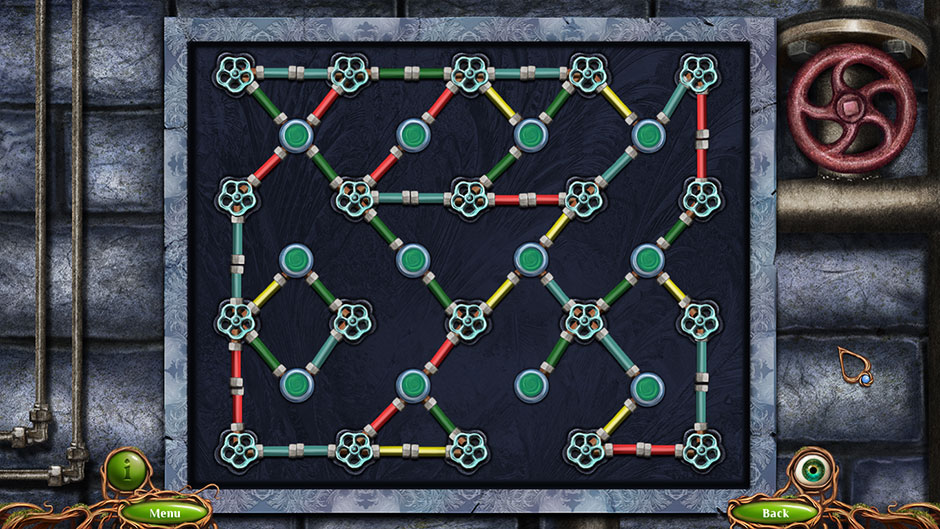
The Last Dream Valve Puzzle Solution
Once the puzzle is finished, place the Bucket beneath the pump and click to fill the Bucket of Water.
- Back in the main view of the area, pour the Bucket of Water over the steps straight ahead. Use the Shovel to dislodge the box and cause it to slide down the ice ramp, crushing the obstacle below.
- Proceed down and forward to the next area.
Snowman
- Click to open the curtain on the right and enter to enter a hidden object area. Find all the objects shown at the bottom of the screen to assemble their completed forms. Once you’ve assembled the first item:
- Use the Generator in the frame on the right.
- Connect the Hairdryer to the plug attached to the Generator to find the last piece of the Perforator.
- Use the Perforator on the stones toward the right to find the second to last piece of the Argon Welder.
- Use the Bucket on the Excavator to find the last piece of the Argon Welder.
- Use the Argon Welder on the blue box on the left to obtain the Sled Part for your inventory.
- Back in the main area, take a closer look at the door on the left. Use the Key to open it.
- Collect the Icepick off the right wall inside and place the Track on the snow blower.
- Return to the Frozen Fountain.
Frozen Fountain
- Examine the frozen fountain on the right. Use the Ice Pick on the ice here to obtain the Lever.
- Head back down to the Snowman.
Snowman
- Take a look inside the garage on the left again and use the Lever on the control panel toward the upper left. The snow blower will leave the garage, demolishing the angry snowman.
- Back inside the garage, click on the Part of the Sled on the floor to add it to your inventory. Combine the Sled Part with the Part of the Sled to obtain the completed Sled. Use the Sled to slide down to the next area.
Willow Tree
- Use the Cat on the area in front of the tree.
- Take a closer look at the tree and collect My Husband’s Ring. You will be transported to the next area.
Train Platform
- Take a closer look at the luggage cart straight ahead. Click on the Duct Tape lying on the tracks in front of it to add it to your inventory.
- Head down to the next area.
Station Entrance
- Examine the flowers toward the lower right. Click on the Lighter and the Watering Can to add them to your inventory.
- Take a closer look at the Post stand on the left. Collect the Cassette and the Rag.
- Examine the waste basket to the left of the flowers, a small ways ahead in the background. Collect the Empty Bottle and the Stone.
- Go back to the Train Platform.
Train Platform
- Examine the luggage cart again. Use the Empty Bottle on it to acquire the Bottle with Petrol. Combine the Bottle of Petrol with the Rag to obtain the Molotov Cocktail. Further combine the Molotov Cocktail with the Lighter to obtain the Primed Molotov.
- Place the Watering Can on the cart to obtain the Watering Can with Petrol.
- Go back down to the Station Entrance.
Station Entrance
- Use the Primed Molotov on the webs to clear them, then enter the Station.
Station
- Take a closer look at the suspended red vending machine. Use the Stone to break the glass, then click on the Meat inside to add it to your inventory.
- Return to the Train Platform.
Train Platform
- Give the Meat to the dog beneath the water tower, then take a closer look at the suitcase left behind. Click on the suitcase in the close-up to enter a puzzle.
- Move the coins into the slots of the corresponding color. Click on a coin to move it into the next empty slot, or you may select coins to swap them or “jump”. The puzzle solution is shown below.
-
The Last Dream Suitcase Coin Lock Puzzle Solution
Once you’ve completed the puzzle, the suitcase will open. Collect the Dynamite, the Card, and the Flashlight within.
- Use the Cat to dig up the sand on the left side of the close-up. Collect the Cassette Player revealed. Combine the Cassette Player with the Cassette in your inventory to obtain the Player with Cassette.
- Head back to the Station.
Station
- Examine the floor. Use the Card to open the hatch, then collect the Code inside.
- Head back out to the Station Entrance.
Station Entrance
- Take a closer look at the ATM to the left of the station doors. Use the Card on the machine, followed by the Code when prompted. Click on the new Code that appears to add it to your inventory.
- Enter the Station again.
Station
- Examine the lockers on the left. Use the Code on the locker to trigger a puzzle. Working out the solution based on the formula provided with the code, input the correct code. The code is “562”.
-
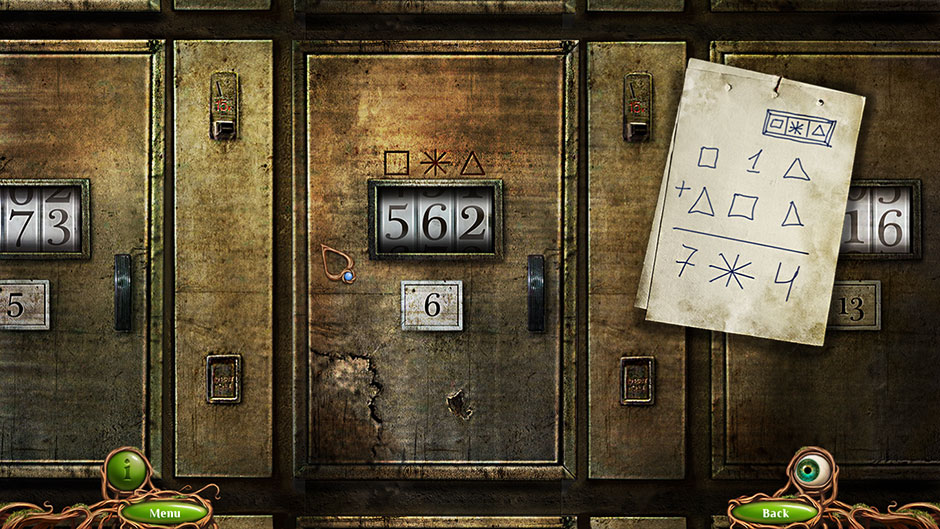
The Last Dream Locker Code
Once the code has been input, the locker will open. Collect the Key hanging inside to add it to your inventory.
- Examine the door straight ahead. Use the Key on the lock to open it and proceed forward into the next area.
Metro Platform
- The area is completely dark. Tip: Use the Flashlight to illuminate the area. You will notice a power box on the left. Click to open it and have a look inside.
- Use the Duct Tape on the pipe at the top of the wire panel close-up, then use the Watering Can with Petrol on the hole to the left. A puzzle will be triggered.
- Following the wires, turn on all the light bulbs in the correct order. The solution is shown below.
-
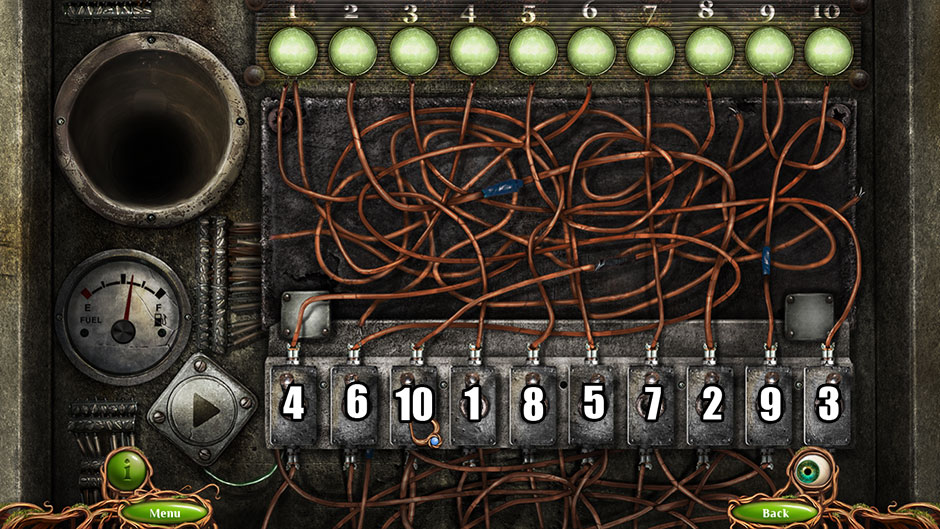
The Last Dream Wire Panel Puzzle Switch Order
Once you’ve completed the puzzle, the lights will switch back on. Take a closer look at the base of the support column on the right and click on the Gas Cylinder to add it to your inventory.
- Examine the ticket booth at the far end of the platform. Hook the Player with Cassette up to the device on the left. The loudspeakers will blare, shaking loose an item. Take a closer look at the base of the support column again and click on the Lock Pick to add it to your inventory.
- Make your way back to the Train Platform.
Train Platform
- Examine the tracks straight ahead. Use the Lock Pick to open the hatch and collect the Gas Welder Gear inside. Combine the Gas Welder Gear with the Gas Cylinder to obtain the Gas Welder.
- Return to the Metro Platform.
Metro Platform
- Examine the subway train on the far end of the tracks. Use the Gas Welder to remove the chains barring the door, then enter the train to enter a hidden object scene.
- Find the items shown at the bottom of the screen in order to assemble new items needed to complete the area. Once you’ve assembled the first item:
- Place the Plane in the middle of the desk on the left to open a drawer, revealing the last piece of the Hammer.
- Use the Hammer on the cabinet on the right to knock it over, stopping the inpouring of water. You will now be able to find the remaining components of the Remote Control.
- Use the Remote Control on the helicopter in the glass case on the right. Collect the last piece of the Saw inside.
- Use the Saw on the frame corner glued to the wall on the right to get the final piece of the Frame.
- Use the Frame on the indentation on the back wall to obtain the Detonator for your inventory.
- Combine the Detonator with the Dynamite to acquire the Bomb.
- Return to the Train Platform.
Train Platform
- Examine the base of the water tower again. Place the Bomb into the hole the cat dug in the sand.
- Back on the platform, when the train arrives, take a closer look at the door. Use My Husband’s Ring to open it.
- Board the train.
Congratulations! You’ve completed our The Last Dream Walkthrough! For more great tips and tricks, visit our blog!
- Delicious – Emily’s Hopes and Fears Walkthrough
- Big City Adventure – Shanghai Walkthrough
- Building the Great Wall of China 2 Walkthrough
The Last Dream Platinum Edition Walkthrough is meant as a guide and does not contain cheats, hacks, or serials.